Changing your Coolant on a pre-2000 BMWF650.
by Kristian #562 & Flash
#412 15/10/01
Please read the Disclaimer before attempting any work in this FAQ.
Updated 15 August, 2004 by Nate #1379
For the GS Coolant
Change FAQ GS
Changing the Coolant
Recommended
Coolant Interval: Every 2 Years.
Changing coolant at 600m service.
This is a quote from the "Chilton Motorcycle Handbook":
"One of the common misunderstandings about cooling systems
is that the coolant can be ignored. You know, I can see some in
the tank, so it must be fine. Well, WRONG! Coolant MUST BE
CHANGED REGULARLY. It is not sufficient to just have the system
full. As coolant ages, it loses its ability to resist boiling and
conduct heat. But, more importantly, it also loses it anti-corrosion
properties, and this will allow the build up of scale and residue
in the cooling system. this build up will reduce the cooling
system's ability to do its job and could eventually render the
system useless. To prevent this oxidation of the aluminium
cooling passages you should replace your engine coolant AT LEAST
once every 2 years." from Spakur.
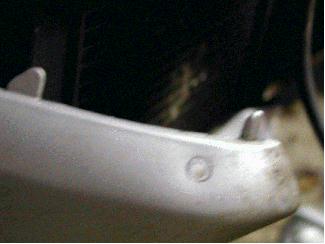
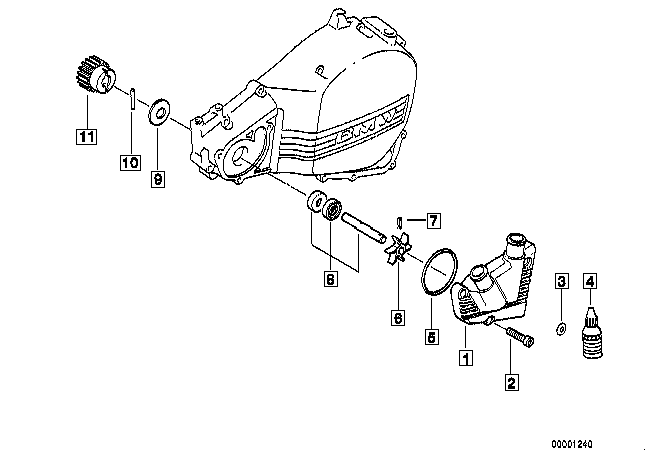
Reference Diagram: See the Water Pump Diagram. The item marked ‘2” is the Coolant Drain
Screw. Here is a photo of the Drain Screw Location (Lower of the three Screws).
Introduction:
This job is
just plain easier if you remove the fuel tank. See the Gas Tank Removal Replacement FAQ. It only takes 10 or 15 minutes to remove
the tank. (This task also lines up with other service items such
as checking valve adjustment, re-torqueing engine fasteners and
cleaning the fuel tap and tank etc.) An inmate did it without
removing the tank (See Below, but even he doesn’t recommend
it). If you choose not to remove the Tank, make sure you unscrew
the Radiator Cap to allow the Coolant to escape without having to
fight against a vacuum. Also Undo the Reservoir Tank Cap. You can
JUST undo the Radiator cap by reaching under the front fairing,
beneath the headlight. It’s on the RHS of the bike,
but it is a bit difficult to do up again.
Tools:
- Allen Keys (In your toolkit).
10mm Socket or Ring Spanner (For Tank). Ring Spanner for
Reservoir Tank Mounting Bolts (Optional).
Parts/Consumables:
- Any automotive non-silicate,
non-nitrite antifreeze mixed 50:50 with water is fine,
and lots cheaper than BMW or Honda Juice (Recommendation
by Flash). The mixed quantity should be a total of 1.2
liter (1.27 quart), where 0.2 liter is for the Burp Tank.
- Crush Washer.
- Loctite 243.
Time :
Method:
Warning.! Do this
with the Bike COLD. At normal running temperature, Coolant is HOT.!
- Remove the Seat and the LHS
Fairing.
- Remove
the Tank. See the Gas Tank Removal Replacement FAQ for a detailed description if you’ve
never done it.
- The
Radiator will now be exposed. Remove the Radiator Cap
& Clean it and the Cap Seat. This will allow you to
drain the coolant without fighting against a vacuum.
- Remove
the Reservoir Tank Cap also.
- On the
attached Diagram remove Bolt (2), the lowest of the three
bolts that hold on the Water Pump Cover. It has a copper
crush washer attached to it. Have a bucket ready to
collect the coolant. Put the bike onto its side-stand to
get out all the coolant.
- I
flushed out the radiator with a hose, running water
through it for a while, but not under too high
pressure. Clean the Reservoir Tank too.
- Replace
the Bolt (2) and if possible use a new Crush Washer, they’re
Cheap, but you can re-use the old one. Torque to Spec. (10Nm).
Use Loctite 243.
- Fill
the Radiator (1.0 liter) & Reservoir (0.2 liter) with
NEW Coolant. If you didn't take the tank off you can
fill the Radiator via. the Burp Tank (Reservoir),
provided the Radiator Cap is Undone. Note: You
have to fill the radiator SLOWLY to avoid trapping air,
and give the air that does get trapped time to escape.
You can help this along a bit by repeatedly squeezing the
rubber hoses that go into the water pump impeller-cover
area. See also Bleed Notes & Troubleshooting below.
- Replace the Radiator Cap.!
Replace the Reservoir Cap.!
- Replace
the Tank but NOT the Side Cover. It’s easier to
check the Coolant Level with it off.
- Run the
Engine and Check the Reservoir Level. Refill if necessary.
- Replace
the Side Cover.
Bleed Notes & Troubleshooting:
- If the radiator cap is
installed correctly, the only way coolant backflows from
the burp tank into the radiator is when the radiator
forms a vacuum due to cooling. The radiator cap is much
more complicated than most people imagine, with two
seals, a pressure valve, and a check valve. If the rad
cap is removed, coolant may flow by gravity, but there
may still be bubbles in the system. Only by heating the
engine up, and cooling it with the cap installed to seal
it, are you likely to get that last .1 liter into the
burp tank. I always measure when refilling anything,
sometimes it tells you when you've done something wrong.
HsN
- After a couple times running
up to temp, it'll bleed out into the overflow tank and
set up the appropriate vacuum to the system. Only
problems I've ever seen is air trapping in the heater
core (analogous to a separate radiator). So, my procedure
is pour slowly into the radiator till full, let it bubble
up a bit, refill if necessary, fill the overflow tank to
the full line, put on the caps and run the motor looking
for leaks. If none, I'm done and check the level after
each run for a couple days. Nate
- Have you run the bike to full
operation temp and let it cool completely? Only when it
cools completely will you get enough vacuum in the system
to suck from the reservoir. If you got a liter in there,
ride it. Watch the temp light, and if it doesn't come on,
ride it a few more times, then check the reservoir again.
I've never even measured my coolant exactly. I mix 50/50
in an empty 1.5L water bottle, and then poor in whatever
will fit. Close the cap, and fill the reservoir. Check
again after a few rides. I've yet to "bleed" my
system. Mark #403
That’s it.
If you do not use Non-Silicate Coolant you MAY end up doing the water
pump replacement sooner
than you should. Not proven, but the GS Water Pump has failed
too, it's not just a Classic problem.
From
an inmate who didn’t remove his Tank:
Changed my
coolant and all brake pads this weekend (1997F) and found out the
following:
Coolant -
- You can fill the system
entirely the first time by jacking the bike up to rest on
the rear tire and by also bending the hose from the top
of radiator to the thermostat down to allow coolant from
the radiator to fill up the top of the motor. You can
also massage the bubbles out of this hose. I rode for a
very hot 50 miles and did not have to add a drop to the
reservoir.
- I drained the system while on
the Centerstand and carefully tipped the bike over to get
everything out of the system. I did this multiple times.
- You can reuse the sealing
washer on the drain bolt. Just torque to spec. A low
range torque wrench helps here. I did use Loctite.
- When you disconnect and clean
the remote reservoir (optional), it is a fine time to
remove the helmet lock if you don’t or can’t
use it.
- This job is just plain
easier if you remove the fuel tank. It takes two minutes
to remove the tank after you get the bodywork off. This
task also lines up with other service items such as
checking valve adjustment, re-torqueing engine fasteners
and cleaning the fuel tap and tank etc.
Back Friendly Coolant Change Procedure
By Nate #1379 23/04/04
Please read the Disclaimer before attempting
any work in this FAQ.
Overview:
This is a method for changing coolant which can be
used by individuals with back issues. Rather than having to
remove the fuel tank, which is cumbersome and can be heavy if not
emptied, this method involves removing the front fairing which is
much lighter and can be removed and reinstalled with out any
bending over.
Tools and parts needed:
1. Allen wrenches (Correct sizes in tool kit)
2. Bucket
3. Coolant (1.1 liters)
4. Thread locker
5. Crush washer for drain bolt (not required, but handy)
6. 4 rubber wellnuts (not required, but handy to have just in
case)
7. Small funnel
Procedure
1. Remove the seat and right side cover.
2. Remove the burp tank cap. Some people can remove
the cap without removing the right side cover (I can), however,
for those who can’t the right side cover is easily removed (2
allen head bolts and a plastic post in a rubber gasket hold it on)
3. Remove windscreen. On the ST, there are 4 allen
head bolts which hold on the windscreen and black screen, 2 on
each side.
4. Remove the 2 allen head bolts on each side
holding the lower engine trim piece to the front fairing (it is
silver on an ST and black on the standard F).
5. On the standard F model, there may be another
allen head bolt holding the fairing onto the lower radiator
bracket (not on the ST)
6. Carefully disengage the tabs on the lower engine
trim pieces from the front fairing (figure 1)
7. Disconnect the headlight plug (3 prong type) by
gently rocking it slightly side to side as you push it off the
blades of the headlight.
8. Pull out the parking light on the lower right
hand side of the head light lens (left side if you are facing the
headlight)
9. Disconnect the turn indicators at their plugs (figure
2) Turning the handlebars from side to side can help give extra
room to reach the plugs.
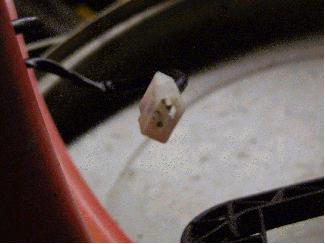 Figure 2.
10. Remove the 4 allen head bolts on each side which
hold the tank cover to the front fairing.
11. Remove the final 2 larger allen bolts from the
upper part of the front fairing where they bolt to the gauge
bracket (figure 3)
 Figure 3.
12. Carefully slide the fairing off of the tank
cover. Be careful, there are tabs on the front fairing which fit
into the tank cover. Set the fairing in a safe place where it
cannot fall and won’t get stepped on, run over etc.
13. The radiator is now exposed. From here, the
procedure is exactly the same as if you removed the gas tank.
14. Remove the radiator cap. It requires pushing
down and turning counterclockwise simultaneously.
15. Remove the coolant drain plug on the water pump
cover (figure 4)

16. Drain and flush. (Note: at first, the coolant
will shoot out about 12 inches from the drain so place your
bucket carefully). Flush until no sediment comes out of the drain
hole (if you do this regularly, there may be no sediment)
17. Apply locktite to the drain bolt and replace the
drain bolt with new washer (you can usually reuse the old washer,
but it is good to have a new one on hand in case the old one
leaks) Tighten down to spec (10 Nm).
18. Slowly fill the radiator. I find a smallish
funnel with flexible hose works well to fill. If you pour slowly,
you will have less chance of trapping air. Fill right up to the
cap.
19. Carefully replace the radiator cap. Remember it
takes pushing down and twisting clockwise to lock it in place.
20. Fill the burp tank to the full line and replace
the cap.
21. Check for leaks.
22. Start bike and check for leaks again.
23. Slide front fairing back into place, carefully
relocating the tabs from the tank cover into their slots in the
front fairing.
24. Carefully relocate the lower engine trim tabs in
their slots in the front fairing.
25. Reinstall the larger bolts in the upper part of
the front fairing (figure 3)
26. Carefully reinstall the bolts on each side of
the tank cover and lower engine trim (and lower radiator cover if
applicable.)
27. Plug in the headlight
28. Reinstall the parking light
29. Reconnect the turn indicators
30. Reinstall the black windscreen and clear
windscreen (if applicable). If the wellnuts are really old, they
may not hold. In this case, you need to replace them (that’s
why it’s good to have some spares on hand).
31. Test all lights.
32. Replace the right side cover (if removed) and
the seat.
33. Go for a ride to the local convenience store and
buy beer and pretzels
34. When you get home, check the coolant level. Top
up if necessary.
35. Go inside, turn on recorded motorcycle races
from Speed Channel
36. Drink beer and eat pretzels
So
what Coolant Should I use ?:
Well as Flash says “Any automotive non-silicate,
non-nitrite antifreeze mixed 50:50 with water is fine, and lots
cheaper than BMW or Honda Juice”.
"You don't HAVE to use distilled water in a
cooling system like you do in a battery. However, some will argue
that you should. (Most folks are blissfully unaware that anal-retentive
IS hyphenated.)"--Flash #412 (a few years later)
"Just for what it's worth (anal-retentive is
probably correct, though).
Tap water conducts electricity (it is just bursting with ionic
species of calcium, magnesium and chlorine, for example). Water
quality varies dramatically. But if there are any significant
ions present, you can generate bi-metallic corrosion (see
previous threads - note that there is undoubtedly aluminum and
steel, possibly copper in contact with the coolant). Distilled
water is a poor conductor (ions removed), as is the stuff in the
antifreeze. So bi-metallic corrosion is minimized (weaker
electrolyte). Most antifreeze will have additives in it to
prevent/forestall/diminish the corrosion. If you flush the
coolant at the recommended intervals (even with tap water), you
are unlikely to have issues (YMMV, depending on antifreeze and
water quality).
Do I still have a gallon of distilled water around for batteries
and such? Sure, so why not use it (I still have a few empty quart
bottles of Specto pre-mixed coolant that I refill with BMW
coolant as I dilute it down to operating strength). Would I use
tap water in a pinch? Sure. (Clean coolant is better than dirty
coolant is better than NO coolant?) "--Marty #436
However the BMW Coolant I have is NOT
Silicate Free, only Nitrite Free. So look on the Bottle you are
buying. They say Honda Coolant is Silicate Free. I don’t
know this for a fact. If anyone CAN confirm it, Great, please
send an email to the Webmaster.
- There's
another one available at most bike shops in Sydney, its
Silkolene Pro Cool from the UK. Says that its Silicate
free. You'll need two of the 1 litre (the only size)
bottles it comes in. Thanks to Andrew #870, Sydney,
Australia
- It
seems that most of the live extended coolants are s+n
free. Others are Ford's Dex-cool, some Synlube and as
mentioned earlier Prestone. Don't know if these are
available down under. I got the coolant as planned from
Caltex (petrol/gas supplier). A$ 9.95. It is E-friendly:-amine,
phosphate, nitrite and silicate free. Prestone is
actually sold by Repco in numerous shops in NSW. Try www.synlube.com/prod05.htm to get some info about Synlube
Silicate free coolant. Thanks again: Oliver in Oz.
- I bought my coolant at a Pep
Boys auto parts store. The advanced coolants state
explicitly they are silicate & nitrite free. They
come in undiluted form, so I'm not paying Honda for water
and I got twice as much for my $$$. Richard convinced me
to get off my keister and actually re-read the label on
my "Red Stuff." I've been using Peak Extended
Life. The label reads, in part: "Protects all
cooling system metals, including aluminum, against
corrosion. Silicate-Free, Phosphate-Free, Nitrite-Free,
Borate-Free. Meets the automotive performance
requirements of ASTM D-3306. Ingredients: Ethylene Glycol
(107-21-1), Diethylene Glycol (111-46-6), Water (7732-18-5),
Sodium Benzoate (532-32-1)". Andy #618. (Apparently
the "Red Stuff" is also Toyota's Coolant.)
- I just happened to have a
bottle laying around of this stuff too. Exclusive Honda
formula with unique non-abrasive corrosion inhibitor.
Premixed (50/50) with purified, de-ionized water.
Prevents Hi-RPM foaming and cavitation corrosion. Extends
life to mechanical water pump seals. Pro Honda HP Coolant
is a uniquely formulated, ethylene glycol based product
engineered by Honda R & D to give maximum service
life to all Honda cooling systems. For convenience, it
has been blended to factory specs (50/50) with purified,
de-ionized water. Andy #618.
- This was posted to a KLR
message board I frequent:
- Two recent restoration
projects undertaken here at Trail Rider have introduced
us to an emerging phenomena with early water cooled dirt
bikes. That is, long term corrosion problems associated
with integral clutch cover/water pump housing side covers.
Many of these early water pumps were delivered with
magnesium side covers. Magnesium, it turns out, is highly
reactive to the corrosive effects of ordinary coolant and
galvanic coupling, the result being serious pitting and
eventual compromise of the water pump housing. Can you
say "sacrificial anode"? Fortunately, this
problem is less prevalent with newer sleds for couple of
reasons. Obviously age has a great deal to do with
things, allowing time for the affects of corrosion to
manifest themselves. Also significant, newer alloys used
in the manufacture of late model engine side covers are
more resistant to the corrosive affects of coolant and
offer less of a galvanic couple. Finally, newer low
silicate coolants formulas, especially the non-silicate (red
colored) coolants sold as OEM Honda and Toyota and some
aftermarket brands, are less of a catalyst to corrosion
for aluminum, magnesium and their alloys.
- Many people think that all
cooling system antifreeze products are the same, except
some are methanol based and some are glycol based. Not so!
In newer automotive applications, silicates are needed to
protect aluminum engine parts and radiators from
corrosion, and are used in virtually all antifreeze
mixtures in varying forms and amounts.
- Eventually, silicates are
supposed to drop out of the coolant mix, and as long as
they do so at a controlled rate, they work quite well.
However, over time, the "soup" of chemicals,
impurities, and corrosion by-products in a cooling system
can start to behave in ways difficult to analyze or
predict. When silicates begin to drop out too rapidly,
they build up and form a gel.
- A number of things can start
this process: high silicate levels from incorrect
antifreeze concentrations or improper use of coolant
additives, impurities in very hard water, and severe
engine temperature swings.
- The main effects of the
formation of this silicate gel are clogging of radiator
and heater cores, and engine overheating. Silicate gel
build-up greatly reduces heat transfer from the engine
castings to the coolant. When the gel coats the
temperature sender, engine overheating can take place
without notice. Silicate gel also carriers abrasive
particles to the water pump, where it wears away pump
seals causing leakage and failure.
- Unfortunately, there are few
effective methods for cleaning the gel from an already-clogged
system. Radiators must be removed and sent out for a
thorough cleaning. The engine must be flushed with a
caustic solution. The gel is not water soluble, so
flushing with water alone will not work.
- One additional point, the
orange antifreezes such as "Dexcool" are
specifically formulated for aluminum components. Since
the KLR-650 has an aluminum engine and radiator, the
orange antifreeze would be preferred over the green
antifreeze. Harl#380
- From what I read, I can't see
any reason not to use Prestone Extended Life. By the way,
I think the dealership has always used the OEM stuff,
which as we know is nitrate, but NOT silicate free. David
#476
- I use Prestone Extended Life.
It costs about 1/10 of what BMW coolant costs. Flash #412
- I just put in Prestone
Extended Life. It says silicate- and phosphate-free on
the front, and it lists the ingredients on the back and
does not list nitrates or silicates. MasterITRIT #1231
- BMW coolant isn't that pricey.
My dealer sells it for $13 a gallon (about twice what the
green stuff costs at the auto store). Mixed 50% means
this gives you 2 gallons of coolant, or about 6 coolant
changes (if I recall correctly). Richard #230
- There are non-toxic coolants.
They work just as well and are priced in level with
regular ones. If you have to drain the bike in a bad
place, you can do so without feeling as bad. I started
using non-toxic coolants for the sake of my cats, as they
will drink anywhere but from their bowl, and I had a
leaking old car at the time. Coolants are by tradition
toxic, and many of them have a pleasant sweet taste as
well :( RakaD
- I was looking for nitrate and
silicate-free coolant and I found this information at a
Texaco site:
"Texaco Extended Life Coolant/Anti-Freeze Nitrite
Free meets both ASTM D 3306 for automotive service and
ASTM D 4985 for heavy duty diesel service. These nitrate-,
nitrite-, borate-, phosphate-, silicate-, and amine-free
formulations use Texaco’s patented carboxylate
technology to provide maximum protection of the six basic
metal alloys found in most heat transfer systems. Since
the coolant contains no phosphates or silicates, hard
water deposits in the cooling system are reduced. Water
pump seal wear is reduced as a result of fewer abrasive
dissolved solids in Texaco Extended Life Coolant System
which results in improved water pump life. The patented
carboxylate technology in Texaco Extended Life Prediluted
50/50 Coolant/Anti-Freeze Nitrite Free has been shown to
remain above 80% of their original concentration after
400,000 miles of on-road use in heavy duty diesels
without the addition of supplemental coolant additives."
The site also provides instructions for swapping over
from other types of coolant (e.g., flushing methods). Wal-Mart
carries Texaco Extended Life Coolant here in Georgia, but
any Texaco-operated gas station/convenience store or
truck stop may also carry it. I bit the bullet
today and changed the coolant in the ST. FAQ info very
useful (can't imagine how to do it without removing the
gas tank). Drained system, flushed system with tap water
(our local stuff has very little hardness), flushed with
distilled, and then refilled with 50/50 mix of distilled
water and Texaco Extended Life Coolant (5 yr/ 150,000
mile). It runs ~ $6/gallon. I had called Shell/Texaco
technical service centre and asked if they knew of any
reason this product and its carboxylate corrosion
inhibitor should not be used in a BMW cycle. They knew of
none and also confirmed that it is nitrate- and silicate-free.
I'll make a post if anything bad happens before 2008 or
the odometer hits 165,000. I may be the first to discover
that carboxylates eat rubber hoses. teddco
- I have been using the BMW
auto coolant, but the Texaco looks like a good choice.
Just be sure to dilute it (if required) using DISTILLED
water. Not sure if I would go more than 2 years on any
coolant in a motorcycle. (See the manual for warranty
requirements.) You'll have to replace the coolant when
the water pump eventually fails anyway. Marty #436
- I have been using the auto
BMW coolant (mixed 50% with distilled water) for the past
6 years and 30,000 miles with no failures or problems
with water pump or anything else. My radiator shows no
evidence of internal corrosion. Honda motorcycle coolant
(which comes already mixed) is another good choice, as at
one time Honda had a lot of coolant pump problems on
their Goldwings and blamed it on the coolant, so they
started selling their own. Richard #230
Engine
Ice
FWIW my experience with Engine Ice
was with my Honda Hawk race bike. I read all the claims and
thought it might have better heat properties than using just
water (which is what's required in racing - most coolants would
make the track slippery if you dumped any).
In a couple of words - it's crap. The race bike ran 20 degrees
hotter with engine ice than with plain water or water with water
wetter. --MarkF
WaterWetter?
- Any of you guys with systems
nearing the edge consider trying "WaterWetter"
from Red Line? They sell it in my local Murray's auto
parts store, and I've not heard any BAD things about it (may
be snake oil, for all I know, though). Supposedly
designed for use in racing machines using straight water
(due to the hazard of dropping slippery antifreeze on the
track), it can also be used in normal antifreeze. The
label I read said it could be used as well in a
traditional antifreeze/water mix. Marty #436-Chicago-97 F650F
- Only thing about WaterWetter
is that you would have to drain the system and refill it
with antifreeze as water with WaterWetter in it will
freeze causing tons of damage. I know a bunch of guys who
race, and they change out after the season. MasterITRIT
- I've used a mix of
WaterWetter and tap water in a turbo 5-series BMW, a
supercharged Jeep, a 320is with a Korman built race
motor, a stock EX500 and my R1 as required to run at
Thunder Hill raceway. No problems with any of them, and
the turbo car actually ran noticeably cooler at the track
(she used to heat up a LOT running flat out all day at
Stapleton in Denver, something about there not being any
air up there). I did have to pull it out in the winter to
keep things from freezing though. Moving back to CA
solved that little problem. kelly1005
- I hit the WaterWetter link
and did a quick scan. It aroused my engineering
skepticism, since it did not mention specific active
ingredients and corrosion-inhibitor chemicals. I'd like
to know what's in the stuff and if it is compatible with
the type of coolant I might mix with it before using it
in a cooling system. The Material Safety Data Sheets (MSDS)
for it or its ingredients may be posted on the web. If
both the Texaco and Water Wetter experiments go south on
us, maybe we can get a group discount on radiators and
water pumps. teddco
- Beware, WaterWetter is NOT
antifreeze... Red Line WaterWetter does not significantly
reduce the freezing point of water. If the vehicle will
see freezing temperatures, an antifreeze must be used.
Flash #412
- WaterWetter is used in
motorcycle racing because it provides some benefit for a
bike's cooling system and is apparently relatively non-toxic
and not slippery, should the bike crash on the racetrack.
It is mixed with straight water and I do not believe that
it is what you want to use for long-term street-riding
coolant. I suspect that it will not provide as much high
and low temperature boil-over/freezing protection and
will not keep coolant systems from corroding, the way
commercial coolants will. I would not use it for street
riding. Richard #230
Some Very Interesting Coolant Information:
- Everything you EVER wanted to know about the
effects of Coolant on Cooling Systems. Here is a site
that has everything that you ever wanted to know (and
more) about coolant. It goes into great length about
coolant chemistry and also compares the green stuff with
the red stuff. It talks about the different types of
radiators and how to make your cooling system last as
long as possible. Very interesting and will make you a
bench-racing coolant authority. (Thanks to Richard #230)
- From Honda
- Honda Coolant MR2 Site
- Seal Life
- Waterless Coolant
- WaterWetter
Can you please confirm whether or not
this product has NO SILICATES as Silicates have been blamed for
failure of the Water Pump on the BMW F650 (including mine). If it
does have Silicates, what percentage and how does this compare
with other Brands. I
would very much appreciate a prompt response as I intend to redo
the Coolant this weekend.
MOTOREX (No affiliation) have confirmed this:
MOTOREX ANTIFREEZE PROTECT G30 is silikatesfree.
I wish you a pleasant motorbike season.
Arnold Zuppiger
Leiter Kundendienst
BUCHER AG LANGENTHAL
Telefon +41(0)62 919 76 91 Homepage http://www.motorex.com
An: "'arnold.zuppiger@motorex.com'"
<arnold.zuppiger@motorex.com>
What the Burp Tank is FOR
by Flash #412
The whole POINT of the burp tank (Coolant Reservoir Tank)
is to have the cooling system purged of air, for two reasons...
reduced oxidation and increased efficiency. ALL burp tanks will
have the hose to/from the radiator feeding (somehow) into the
bottom and an overflow out the top.
- When your cooling system is refilled,
odds are you got some air trapped in there. Air expands a
WHOLE LOT more than water when headed above 212F = 100C.
This builds pressure inside the cooling system. The
radiator cap lets the pressure out at 1.2 bar. The
pressure goes out the hose just below the cap and into
the bottom of the burp tank. This air goes right out the
hole in the cap at the top of the burp tank.
- When the system cools, pressure
reduces, so much in fact that a vacuum is created. The
pressure differential across the burp tank forces the
liquid in the burp tank back down the hose and into the
radiator. A couple or three heat cycles later and your
system is totally purged of air. No need to mess with the
radiator cap but you MUST keep an eye on the burp tank
level.
- When the system is totally purged, the
coolant STILL expands and contracts some, causing
different burp tank levels between cold and hot.
- If you check it hot, there will be
more than if you check it cold. If you check it cold, to
the min line is FINE. But if you check it hot, that MIGHT
be too low when it cools off.
My Bike Gently Weeps - Other Sources of
Coolant Loss
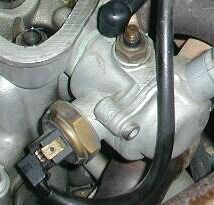
1. Thermostat Housing
by Karl #1012
- I changed the oil this weekend and
noticed a few drops of coolant on the engine. I
immediately assumed that I had a case of the weeping
water pump shaft. I checked out the appropriate FAQ and
to my surprise, the water pump shaft is at the bottom
left of the engine, and my drips of coolant were coming
from the top right. After finding the appropriate drawing
I now know that this is, of course, the thermostat
housing. (Hey, I thought that maybe the water pump ran
off the cam shaft or something.) I don't see anything
about thermostat housings leaking in the FAQ. I'm getting
the smallest bead of blue coolant just between the thermostat housing and the cover.
- Hi friends, this afternoon I noticed a
few drops of blue coolant on the engine. I cleaned the
thermostat housing very well and this evening I went out
for 100 kilometres. GU@RDIAN.
- I noticed some blue droplets and
staining on the right side of the bike's engine, which
look suspiciously like partially dried BMW coolant. I
don't think they were there when I washed the bike prior
to putting it away for the winter. Starts at
approximately the height of the slits in the outer spark
plug cap (stock) which has a greenish-blue cast to it,
runs down the engine from about where the temperature
switch is (starting at the same level as the spark plug
cap), and a few drops blown back as far as the bottom-front
corner of the seat pan. The last two rides were at speed
in cold weather (+/- freezing), with no indication of
overheating. Got out the wrenches (and calibrated wrist)
Found the nuts on the two temperature sensors and the
bolts on thermostat cover just a tad loose...tightened
them both up a bit more. The puke-tank was a touch low,
halfway between low and full. Warmed the bike up, off for
a short ride, no trace of a leak. Marty #436
The recommended fix:
Replace the Seal between the thermostat cover and the housing.
You may not need to drain the coolant, as the thermostat
is fairly high, with respect to the Coolant Reservoir/Burp Tank
and the Top of the radiator/head.
Marty writes:
I used Hylomar sealant
on the new gasket (non-permanent, in case I DO have to take it
off again to replace the head gasket).
So far, this
is not a common occurrence.
2. Defective Radiator or Radiator Cap
by Kristian #562
This has not been a common reported problem on the Classic, but
see the GS FAQ for the number of defective radiators on early bikes. You can still get hole in your
radiator if you get stone chip in it, ride off-road a lot, the
neighbours cat sticks a pencil through it, or it's getting old
and you power-wash it. You may want to consider a Radiator Guard. Refer
the GS Aftermarket Frame Accessories FAQ or the Classic Aftermarket Engine Protection FAQ for Radiator Guard Options.
3. Overflow or Burp Tank Rubber Hose-line
by Werner #547
Ottawa
Crossing from Norway into Russia near Murmansk is like entering
another world, the Nether World. Everything looks run down, the
road, the houses, and the people. No wonder that the bike wanted
to sympathize with this environment. At every stop there were a
few drops of green liquid falling from the bottom of the radiator.
"Chyort," three times (the Russian word for "shit").
Broken radiator? But why green, since I remember putting in
orange stuff. Irish terrorists? In the evening I took off the gas
tank to have a look. Relief! The little hose connecting to the
auxiliary tank (overflow or burp tank) had sprung a leak right
next to the stud under the filling cap. Cutting off one inch and
reconnecting fixed the problem. So, next time you have your tank
off, check that little hose, or replace it. Better then than when
you're in the boonies.
Reattaching or Replacing Radiator Hoses
- At a stoplight I noticed I
was practically gushing coolant. Turns out one of the
thick black hoses had wiggled loose and was almost off.
Should be an easy fix, but I'm having some trouble
getting it back on. There's a circular clip that attaches
to itself with a curved clip that pops over a raised nub
on the other side. With the hose off I can connect the
two pieces but can't get the hose over the metal tubing.
With the clip off I can get the hose in place, but am
having a h*ll of a time reattaching the clip.... Of
course the end of the hose that came off is the one right
behind the clutch cable...the hardest one to get to. Stu
- Same thing happened to me,
and I've read other accounts here, too. I was lucky...happened
just as I pulled in the driveway. I used a regular hose
clamp. Mark #403
- Take the OEM clamp that let
go and throw the *** in the garbage. Get a regular hose
clamp that fits (preferably a "Norma" clamp
from a BMW dealer or other with NO slits cut in the strap).
Put the clamp on the hose, put the hose on the engine,
tighten. And while you're at it, save a trip and get
enough hose clamps to replace the rest of the *** OEM
clamps, before they let go. If anyone's interested, a few
years ago when I was restoring a 912, I discovered Au-ve-co. They are a huge wholesale-only
manufacturer of every clip, screw, and weird piece of
vehicular hardware you can't find at a normal hardware
store. And they supposedly STOCK 15,000 parts! If you
contact your local distributor and convince him to sell
you at <10 pricing, you can get a box of the same
groovy high-tech hardware that goes on a REAL BMW for
less than the cost of one hose clamp at Pep Boys. Quantity varies by size; hose clamps come
2-10 to a box. I don't have access to the bike right now
but if I remember correctly, one box would probably do
the entire job. I would post the part number, but the
site is now password protected. Any distributor will give
you a catalogue though. David #476
- One of my radiator hoses is
weeping and I was thinking to change them. Does anybody
have idea of an alternative (aka CHEAP) source for the
parts? Any idea/experience with the transparent ones? http://alba.buyol.com/Item/WCH%2D00076.htm The $99 is NOT a minor issue right
now. These look exactly like the ones in the picture: http://www.wocoengineering.com/index.htm I think one of the hoses on the DS
[Bombardier DS 650 ed.] is longer than we need. IF the
hoses are flexible (the ones from Alba Action Sports seem
to be flexible and not pre-formed), do you think it is
possible to use the same hose for all 3 applications, i.e.
a hose 22 cm long, inner diam. 19 mm and outer diam. 25-26
mm? Having the 3 hoses of the same exact size should
bring down the price if they are custom made AND you can
carry a single spare instead of a whole set. Also, the
colour of the coolant I use (orange) matches the colour
of the bike :) Giovanni
- Those things are just WAY too
cool. I would start by tightening all your hose clamps
though. Chances are one is just loose. David #476
- Replace all the stock (crap)
hose clamps with "worm" type radiator clamps.
Should be very cheap to do. I think you can probably do
this without even removing the hoses (may be easier,
though), and should solve your leak. Replacing the
radiator fluid is a good thing to do (at least every 2
years). I think this is also possible without replacing
the hoses. Unless that $100 is burning a hole in your
pocket, hoses are usually good for at least 6 years.
Marty #436
- I changed my hoses last week
after discovering that one of them was worn out at one of
the ends. I changed all, since I was at it. Later I
discovered that they weren't bad, so I guess they could
have functioned a few more years... Here is the info you
need. The second hose (listed below) is a bit different
from the others, since it has a wider diameter at the
ends (~20-25mm of the hose) comparing to the rest of the
hose. All hoses are twisted differently, so it is a bit
hard to measure the length, so give or take some.
1995 Classic
Left side radiator to waterpump:
length: ~22 cm
inner diameter: 19mm
outer diameter: 25-26mm
Left side water pump to engine:
length: ~20 cm
inner diameter at the ends: 19mm
outer diameter at the ends: 25-26mm
inner diameter in the middle: ?
inner diameter in the middle: 23mm
Right side radiator to engine:
length: ~21 cm
inner diameter: 19mm
outer diameter: 25-26mm
The reason for one of them to have a slightly smaller
diameter in the middle than the others is because it
wouldn't fit otherwise. The hose is just barely in
contact with the engine side. However if they are
flexible (the OEM is not very flexible), I don't see any
reason why it wouldn't be OK to bend it a bit. Spakur #1117
- Those hoses are cool. They
would also make going through tech at the races really
easy (not having to go through the hassle of opening the
rad to show it’s straight water with a dash of
WaterWetter). Me likey!! Gar #673
What Temperature does the Coolant Idiot
Light come on at?
Classic
115 degrees which
converts to 244 F
GS/Dakar:
 118C/245 F.
Feedback:
- I don't see in the F650/F650ST shop
manual any comparable page. But, with that said, it
doesn't mean its not there (though I doubt it) and more
importantly I offer this for my 1997 F650 (I'm open to
correction here): Thermostat opens at 72-75C (162-167F)
and is fully open at 87C (189F). This from my manual.
Fan comes on at 95C (203F) and turns off at 90C (194F).
This from the Thermoswitch on my bike. Warning light
comes on at 115C (239F) for my Thermoswitch at least.
Chris #782
What is the Radiator Cap Release Pressure
Classic
Todd #389
& Alberta Deryl
- Most thermostats operate and
are calibrated by temperature, not pressure. The old
thermostat should be stamped for it's rating, in degrees
Celsius. The (Classic) Service Manual says: Thermostat
Opens at 72-75 degrees C (162-167F), an opening gap of 7.5mm
at 87C. (The Thermostat is stamped 75C and should thus
open at that Temperature.)
- The only pressure rating
mentioned in the specs is: Cooling system test pressure 1
bar (14.23psi), however this is not the Radiator Cap.
- The Radiator cap with "1.2",
which is 1.2 atmospheres (bar) and equates to about 17.4
psi.
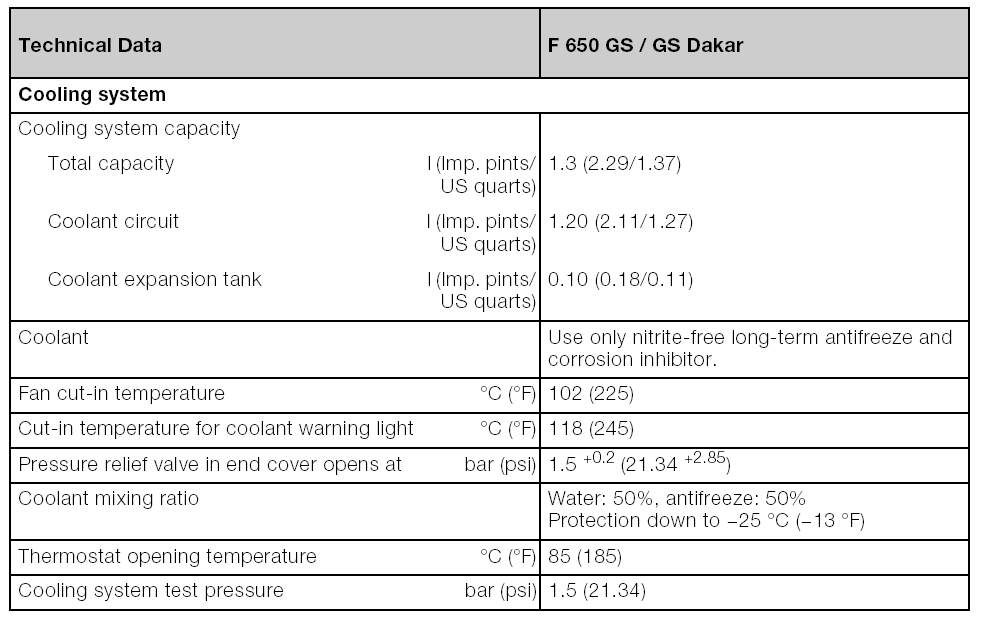
GS/GS Dakar
Radiator Cap Comparisons GS vs. Classic
- So does anyone know if the Classic and
GS models use the same cap? I have a slightly used but un-abused
cap from an 01 Dakar laying here on the desk beside me.
My radiator was replaced under warranty and a new cap
came with it. Let's compare them. Looking at the top of
the cap you have an ear on each side. On the left is the
number TW63. I suspect that's a p/n for whoever makes the
cap for BMW. On the right ear it has1,50. Probably
indicating a 1.5 bar pressure rating. At the bottom of
the cap are the numbers 17.11-1 464 983. Turning it over
and looking at the guts side of it the sealing ring is 1and
1/8 inch diameter. Any of this match up?
- It sounds like they are not the same.
My Classic, has "1.2" ( for 1.2 atmospheres)
stamped in the top. The search continues.
If you're looking for a Replacement
Radiator Cap:
These guys make
Radiator Caps:
This one looks small and is 1.2 bars
Radiator
Manufacturers.
General Comments on Cooling System Maintenance
- I have seen it before on bikes that
have not had their overflow tanks cleaned in a few years.
You need to pull that tank off every year and clean it or
it will develop that black gunk. I think it is a reaction
between the plastic tank material and the coolant. Don't
worry about it. If it gets really bad and you can't clean
it with some sort of caustic chemical, then just buy a
new tank and start all over.
- I've taken an indelible magic marker
and highlighted the fluid level marks on the coolant tank
. . . . I can see the fluid easily enough, I just
couldn't read the lines. Now I can. (Muriel#582)
- Pffffff, fill it and forget it. I can
fill my burp tank to the top line everyday and it'll spit
it all out and when the bike is cool, there's just a lil'
smidgen of coolant at the very bottom of the burp tank.
I've learned that if I see any coolant in there at all
it's fine. And I too can not see it unless I take the
side panel off. (Shank)
- Just had the radiator replaced for a
serious leak near the top right mounting point. Kristian#1175
- I had a Classic 99-00 and now a 2002GS
and I noted that the GS radiator/cooling system is more
efficient. In the classic the start of the radiator fan
is more often. In highway speeds the air cool down the
bike, fan won't go on. One friend had a leak in a classic
long time ago and he ride like 15 miles in the highway to
ne next gas station to fill it again. Temperature never
went on. Only in a very low speed just arriving to fill
up water just to go home. No extra damage to the bike.
Radiator was replaced. That's why radiator grills are
very important. Specially off road. Front wheel without a
low fender throws up lot of small rocks. Or when you ride
behind somebody. Radiator grills are one of the best
investments in aftermarket products. (Guz)
Riding with NO coolant! What have I done?
- During a little off-roading
excursion, I busted the radiator on my '02 GS. Not a
little hole, mind you, but a big fat gap where the
plastic end-cap separated from the metal finned part. No
just filling it back up, or patching the hole. The
radiator was done and wouldn't hold a drop of fluid. No
possible way to get home besides ride the thing. So, for
the thirty mile trip home it was ride two miles (temp
light would come on), shut off the bike, let cool for 10
minutes, and then repeat (coasting down the hills with
engine off as much as possible). Could I have done
significant damage to the engine, water pump, fan, etc.
by riding it with basically no cooling system? The engine
didn't seem to get overly hot and I didn't notice
anything out of the ordinary. It was running same as
usual on the trip home. I just didn't want to push it
with the temp light on so I took it easy. Sometimes the
light would come on and it would take me a minute or two
to find a safe place to pull over. Mike
- The water-pump impeller will
be corked, along with the sealing rings. The shaft MAY be
scored too. Jack
- Not sure how the temp-sending
unit is set up, but if there were no fluid for the temp-sending
unit to sit in, was it reading accurately (or is it a
surface mount thermal probe?)? Way too hot an engine can
cause torched valves and warped/leaky head gaskets (check
your compression). The water pump is likely shot...you
may want to postpone the oil change until a bit AFTER you
get the fluid issue dealt with (in case the impeller
seals leak and you end up with "mocha" oil). If
you don't change it, probably a good idea to keep spare
bits handy. Marty #436
Aftermarket
Oil Cooler?
FWIW, Chrysalis Racing apparently used a
Goodridge oil cooler on their modified Rotax-powered bike in 1999.
http://www.chrysalisracing.co.uk/f_bike.htm
Feedback:
- I have an oil temp gauge on
my 1997 bike and in my opinion, the F650 runs cooler than
most air-cooled bikes that I have owned. At the same
speeds and air temperatures, it runs about 10 to 20
degrees cooler than my 1978 Yamaha SR500 did, as an
example. In my opinion, the bike does not need an oil
cooler. Perhaps your coolant system needs some service.
Richard #230, Pacifica, CA
- Oil coolers are not normally
used to cool the engine as a whole. They are not
effective that way. Their use is to keep oil temps down
in an application where the oil will become so hot it
cannot lubricate effectively. Oil coolers are less used
with modern oils since they lubricate well at much higher
temperatures. Johnny #862
 118C/245 F.
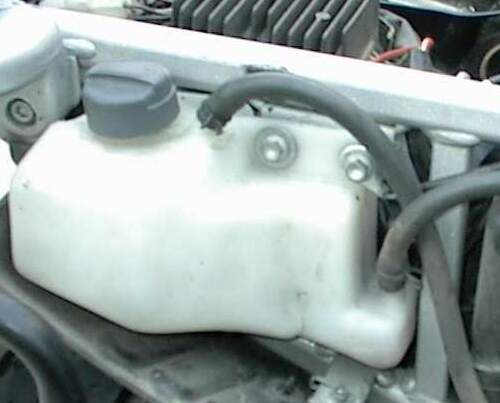