HEAD GASKET FAQ
written, compiled & edited by Kristian #562
Please
read the Disclaimer before attempting any
work in this FAQ.
Refer also the Oil Leaks FAQ & the Other Sources of Coolant Loss
by Kristian #562
This FAQ is not intended to be comprehensive, because not that many of you will take off your Head and Replace the Gasket by yourself. What I have done is try and include the “Gotchas that the Manual doesn’t tell you about. Please buy the Manual, not that it’s great, it’s not, but it sure is better than nothing.
Just want to see the Photos.?
So why do you want to change it.?
If it's coolant that's weeping, I'd pull the cover off that thermostat housing and be DAMNED sure that it isn't the thermostat-housing-to-head-gasket that is leaking. That would be a cheap and easy gasket to replace. And if it were leaking on the bottom, would LOOK like a head leak. If that didn't fix it, I'd pull the cams out and retorque it one bolt at a time, loosening and then re-tightening. Just re-torque Bolts 13-16 (See Diagram for sequence) and it will fix your problem if it isn't anything in the other FAQs about Oil Leaks or Other Sources of Coolant Loss
You should also check your Exhaust Gaskets (See the Exhaust Gasket FAQ), as some of the Spooge coming out through a leaky Exhaust Gasket may lead you to incorrectly believe (oil) it is coming from the Head Gasket.
Otherwise here's a how-to for changing the Head Gasket. I had bought a new Head
Gasket anyway, I was fairly certain it was that that was weeping, so I replaced
it.
You will need:
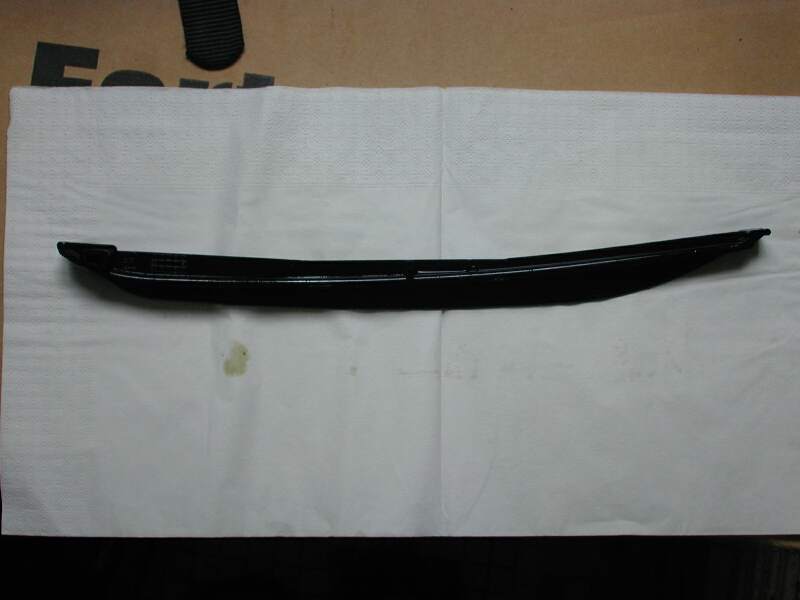
Head Gasket - about US$27 (that’s the photo of the old one).
Exhaust Gaskets - Highly recommended replacement at the same time. See
also:
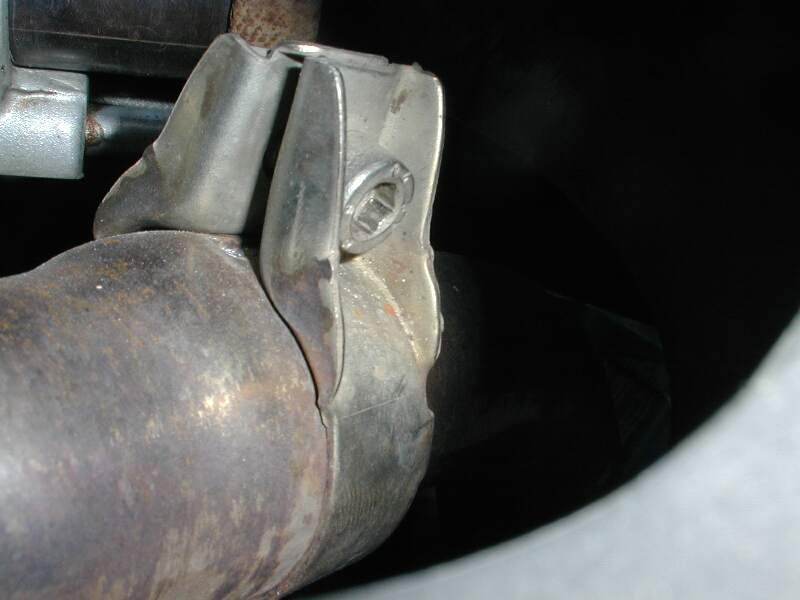
Exhaust Gaskets,
Exhaust Gasket Close-up
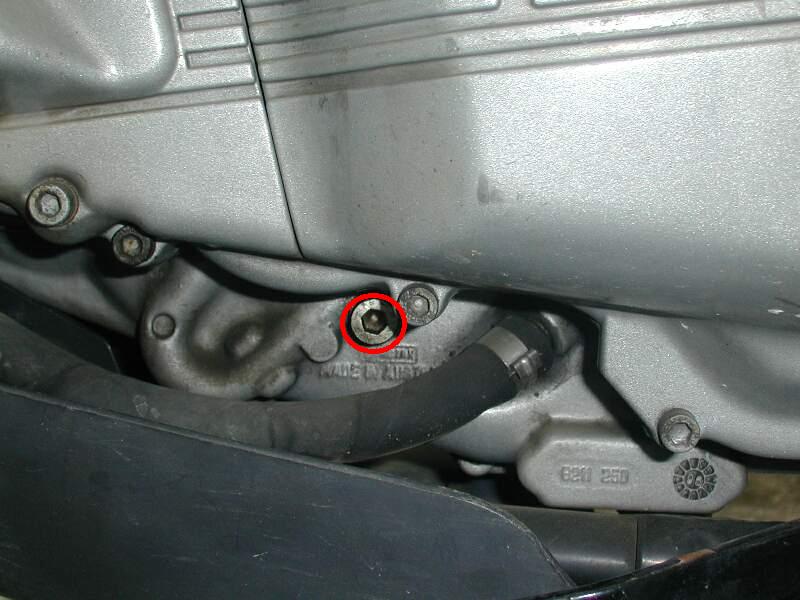
O-Ring for Starter Motor - Highly recommended replacement at the same time
Check Studs and
Nuts on your exhaust manifold. If very rusty, replace.
I highly
recommend replacing all 4# M8 Exhaust Collar Bolts (3 external, 1 internal).
they are alloy and for various reasons I
broke one in the head torquing it up. It was probably my fault, (copaslip
on fingers) but I'll never know for sure. Todd has read somewhere about
pre-96's having a problem with soft alloys for these bolts. Mine's a '96 so
who knows? For peace of mind I bought 4 new bolts. The Nuts and Studs inside
the engine are steel and not a problem.
Valve Shims. What? Well if you're going to go in there and take off the
cams, you may as well check and replace your Valve shims at the same time.
New Coolant.
See the
Coolant Change FAQ for type so you can drag out the inevitable water pump
failure fix.
Lots of Cloths.
You don’t need to do an Oil Change, but it’s a good time to make it coincide with one. You will lose just a little Oil in the Head, maybe 50ml or so.
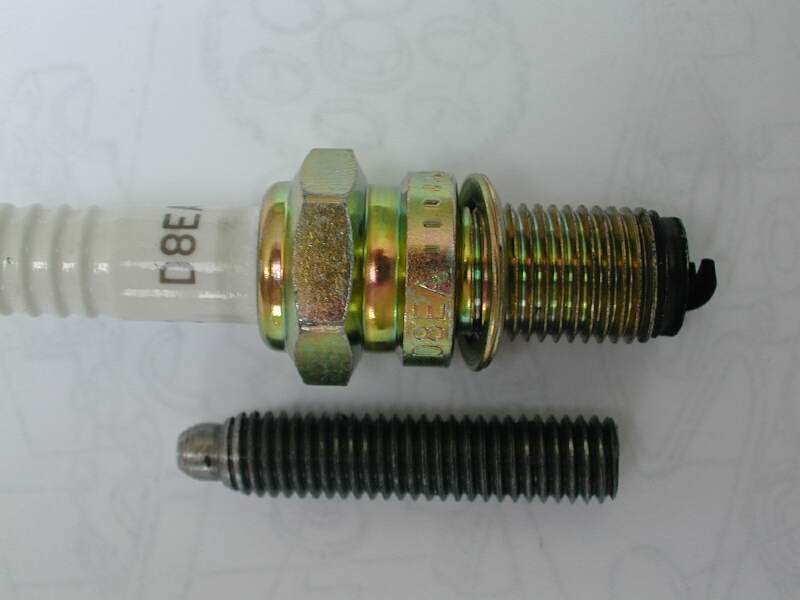
The Top Dead Centre Bolt, so you can Lock the Piston at TDC and you don’t put your timing out when you put the Cams back.
BMW Part # 11 12 2 343 031 Head Gasket
Tools:
The Manual. Don’t Try this without the Manual
Torque Wrenches, Ranges between 10 and
50. See the
Torque Table for actual values.
Sockets for use with Torque Wrench -
8mm, 10mm, 13mm, 15mm, 20mm
Ring Spanners don't need if you have
sockets 8mm, 10mm, 13mm, 15mm, 20mm.
Allen Keys - in BMW Toolkit, Allen
Sockets.
Rags, to stuff down the Timing Chain Well, so you don’t lose anything down there when you take your head off.
Why - For Obvious Reasons :-)
See
Gas Tank Removal-Replacement FAQ
Why.? Because otherwise when you get the
head off coolant will dribble into all your oil cavities, including the main
sump. NOT a good idea. These fluids should remain separate. The oil remains in
the sump and gets thrown up to the valves by the oil pump. The Water stays in
the whole cooling system, including what's up there in the head. Might also want
to empty and clean your coolant reservoir tank at the same time.
Note: The crossover pipe is separate to
the Exhaust Pipe if you have a Staintune Pipe. Otherwise it comes off as one
unit.
Why? - 2 Reasons.
It is possible to get the exhaust
headers off without removing the radiator, but removing the radiator is not
difficult. However unless you
remove the radiator, you won't be able to get a socket and torque wrench onto
the Header Nuts when you replace the headers unless you have a special torque
wrench, which I have never seen, which fixes onto a ring spanner :-). It'll also
give you great access to the Front Collar Bolt. I found the best access to the
Front Collar Bolt was from the LHS of the bike.
Radiator removal involves the following:
ALWAYS TAKE GREAT CARE WITH THE RADIATOR FINS. They are very soft and very sensitive.
Remove
Electrical Connection to Spade Plug on top of Water Temperature Sensor.
Remove the
Small Overflow Hose connection just beneath the Radiator Cap.
Remove the Large Radiator Hose Connection at the Bottom LHS of the Bike, where it attaches to the Water Pump. You will probably NOT be able to re-use the clip, so get yourself a good supply of large and small Hose-Pipe clips for future re-installation.
Unplug the White connection Block to the FAN. The FAN can remain MOUNTED to the Radiator.
Cut the plastic Tie Holding the three cables to the Fan. (Make sure you have a new one for remounting)
Undo the
Plastic Radiator Lower Protection Piece (under and in front of the radiator)
Undo the 2 x
8mm Bolts on top of the radiator.
Lift the
radiator UP and forwards, there are two little spigots seating into the
L-Shaped Radiator supporting plate, which it just comes out of.
Remove the
Supporting L-Shaped Plate (2 Bolts)
Where.? (Just above the
Oil Filter Housing).
WHY.? Because otherwise you can't get a
spanner in there to do up the rear M8x45 Collar Bolt and certainly not a Torque
wrench. Again a ring spanner will undo it. But you won't be able to do up with a
Socket & Torque wrench.
F. Remove the
Starter Motor.
Why. ?It Makes it MUCH easier to
access the Front M8x45 Collar Bolt. Again, with a ring spanner UNDOING all
these bolts is easy. Now fast forward to Torquing them up with a socket. Have a
good look at your Torque wrench and the length of your socket. Ask yourself, can
I get in there without removing this. ? It's easy to do. Simply undo
Two M5 Allen key Bolts on the LHS of the Engine, Holding the LH End of the
Starter motor to the Clutch Cover. Grab the end of the Starter Motor and gently
wiggle it straight put of the LHS of the bike. It just pulls out. Get a new
O-Ring and replace the old, while you're in there, so when you put it back
you'll feel great. Make sure you clean it and the Seat up before putting it
back. While you've got it out you can check the splines for wear too.
G. Remove the Carbs.
Why? Well, because the head is attached
to the intake manifold. How? Well you can either undo the 4# inlet manifold
bolts to the head or you can simply remove the carbs and when you take the head
off the rubber intake manifold will be attached to it. You choose the easiest. I
removed the carbs. How? Out the top, like Flash Recommends.
H. Remove the Valve Cover.
8# M8 Bolts.
You CAN leave the Valve cover attached to the Breather Pipe if you want, put a cloth around it and tie a piece of string through a couple of the boltholes, hoist it up and over your handlebars and tie it firmly in place, out of your way.
Don't twist the Breather Pipe Hose, if it's an older pipe and more brittle it may break.
The CAMS and Valves will be exposed.
Put the Piston at Top Dead Centre and Lock the Crank with the Crank Bolt. See the Valve Check & Shim Change FAQ for Details of how to do this, the procedure is exactly the same.
AT THIS STAGE
CHECK YOUR VALVE CLEARANCES.! The bike MUST be
cold, even after 4 hours I got a 0.01mm difference when compared to leaving it
overnight and checking it again. You can then use this opportunity to redo your
Valve Shims, after you put the head back on. You don't really want to take the
cams off twice do you.?
Undo the Cam Chain Tensioner Bolt
Remove the Cam Chain Tensioner Cylinder that the Bolt Pushes onto.
Take out the Front Plastic Guide
Tie a String onto your Cam Chain and tie it up to the Handlebars, so the Chain doesn’t drop down the Well when you take off the Cam Carrier.
Stuff a RAG down the Cam Chain Well so you do not drop anything down the Well.
You should ZIP-TIE your cams to the Timing Chain or MARK them clearly with a Non-erasable Marker, Chain versus Tooth Location, so you can realign them when you put the Cams Back on.
ALSO MARK which cam is Front and which is Rear.
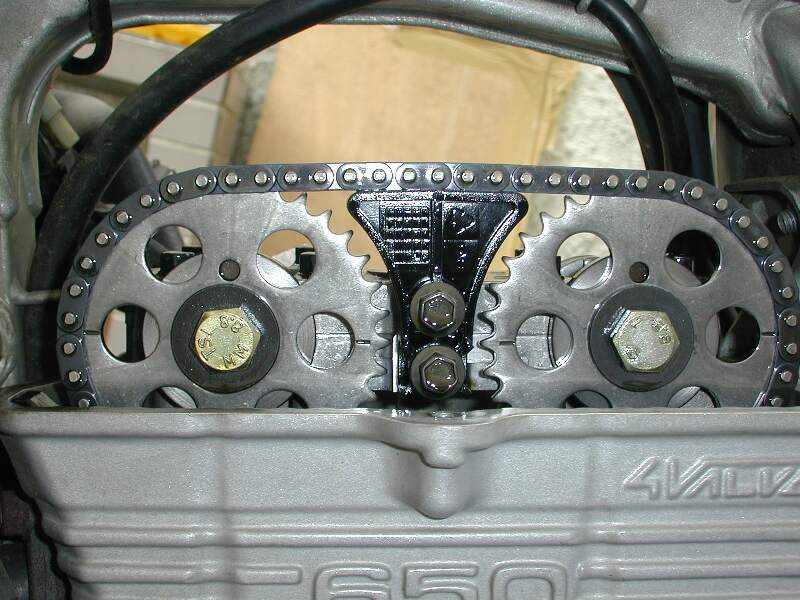
Undo the two M10 Bolts on the Plastic T-Bone between the drive gears which hold the Cam Carrier Sandwich Together.
Then Undo the 8# Allen Bolts holding the Cam Carrier on.
You can then lift off the upper part of the Cam Sandwich.
Ease the Cams with Cam Gears attached (you do NOT need to remove the Cam Gears from the Cam Shafts) off the lower part of the Cam Carrier, and the Chain off teh Cam Wheels and Remove them. The Cam Lobes should not be scratched or bumped or dropped, so protect them now.
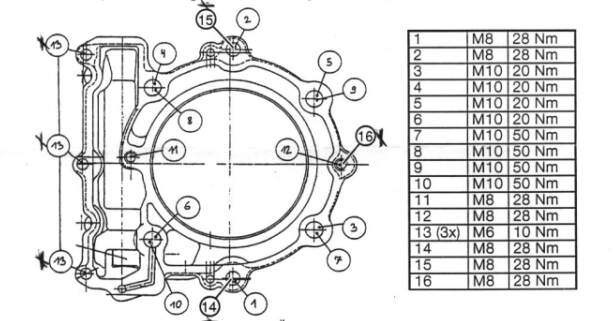
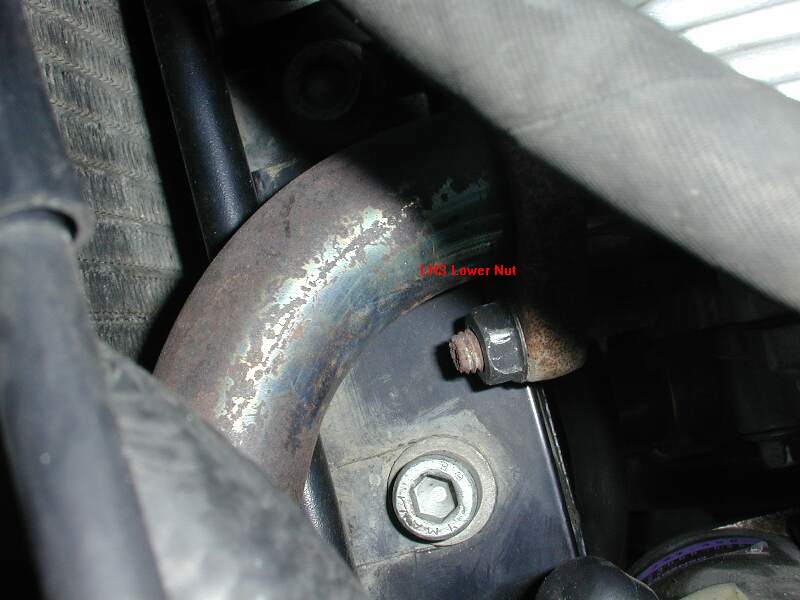
There are 3#M6 Allen Bolts on the LHS, 4#M8 Collar Bolts at N/E/S/W, where N is the Front of the bike, and 4 No. 15mm Nuts on 10mm Rods at NE/SE/SW/NW as shown here on this Diagram, with the Torque Table and Sequence.
Undo the Allen Bolts and Collar Bolts. Then Undo the Main Head Nuts.
The Manual Says to take off the intake Manifold but I found you can easily leave it on and get the Head Off anyway. But check it for cracks anyway, I had replaced mine earlier.!
Raise the Cylinder Head off the Engine as HIGH as you can, wiggling a bit and perhaps even tapping gently with a rubber hammer as the Old HG gets really stuck. Stick a Wooden or Plastic Block under it.
Using TWO Pairs of Vice Grips inserted in the Gap you just made (You may now need to move those blocks around a bit) unscrew the M10 threaded Bolts. Why TWO. Because if you use ONE and it doesn't have enough grip, you will just scratch a nice set of teeth marks in the Bolt when it slips.
When all are loosened as far as you can go, (undo by hand if possible), take out the blocks and let the Head back down again. You should now be able to extract the Bolts out the Top of the head.
The Head is now Free. Remove from the side of the bike. If I remember correctly mine came out the LHS.
Like I said in the beginning, this FAQ is not meant to be comprehensive, so I am going to take the easy way out here and say "Re-install in reverse order". (Hey the Manual says the same!)
I will however point out a few things (which the manual does not do.)
Take good care your Gasket Surfaces are CLEAN before you even THINK of replacing the Gasket. Use clean Blocks to prop up the Head when you replace the Threaded Rods.
Take REALLY GOOD care of the Gasket up until when you reinstall it.
Try and get the OIL out of the wells the Threaded Rods go into. Why.? Because when you screw them back in there, as I believe they are wells (blind, closed ended) and not holes, the Oil tends to stop you from screwing them in.
The Gasket Goes on first, then put the Head ON, Insert the Threaded Rods from the Top, Lift up the Cylinder, replace your blocks and get the Vice Gips onto the Threaded Rods.
The Threaded Rods (Stud Bolts) have a Torque of 10Nm. No way to measure that with a pair of Vice Grips, but suffice to say "it ain't much", so don't go cranking away at them.
Up until Final Tightening of the Rods, either screw them in by hand or use gentle grip on a pair of pliers. You don't want any Steel Shavings floating around the Head.
Replace the Exhaust Gaskets in the Head while the Head is OFF the bike. And do replace them, they are not that expensive and it's peace-of-mind maintenance.
The Manual Notes: If Slight Leakage occurs loosen 13-16 and retighten in correct order. Mine DID leak and I did retighten ALL of the Head Nuts and Bolts. Overkill maybe, but now it is as Tight as a Drum. It is a PITA to do 14-16 because access to them is restricted.
It is always good practice to drive a short while, to heat the Gasket up and Re-torque it.
I wrote it above and I'll write it again here. I highly recommend replacing all 4# M8 Exhaust Collar Bolts (3 external, 1 internal). They are alloy and for various reasons I broke one in the head torquing it up. It was probably my fault, (copaslip on fingers) but I'll never know for sure. Todd has read somewhere about pre-96's having a problem with soft alloys for these bolts. Mine's a '96 so who knows? For peace of mind I bought 4 new bolts. The Nuts and Studs inside the engine are steel and not a problem.
Torque all the Cylinder Bolts in the correct sequence to the Correct Torques. Do NOT overtorque.
Re-install the Oil-Pressure Plug, Re-Install the Exhaust Pipes, then Reassemble your Radiator, Re-install the Starter Motor (Don't Forget the New O-Ring), then Replace the Cams Valve Check & Shim Change FAQ (Check Clearances), then Install & Torque the Cam Chain Tensioner BEFORE the Carbs, Valve Cover, Gas Tank.
Reinstall Coolant and Oil IF you Drained it.
DON'T FORGET TO REMOVE THE TOP DEAD CENTRE BOLT FROM UNDER THE LHS ENGINE COVER.
That's it. Go ride Ride and if it leaks, re-torque the Head Nuts/Bolts. Don't be tempted to over-torque them .Might want to recheck them anyway. Good Luck.!
If you do it and have something to add PLEASE do send something to the FAQMaster.
Starter Motor Removed to access Front Collar Bolt - String to Stop Cam Chain
Falling into well
Temporary Valve Cover Location - Breather Pipe still attached
Camshaft Carrier prior to removal showing correct Lobe orientation,
Time. You can do it in a Day at a Pinch, or easily over a weekend.
A very BIG Thanks to Todd & Tom for their advice & commiserations when I busted the Collar Bolt. Well at least Todd commiserated, Tom just made wisecracks.. :-)
Q. Do you HAVE to buy a new head gasket if you take
the head off?
A. I reused EVERYTHING. TWICE, now. No leaks.
Of course at $48 for a head gasket, you might have some right to expect quality. Flash
#412.
I'd like to hope the leak is a relatively minor thing, as long as you don't run out of coolant. One thing to be careful of tho - if you are losing a fair amount of coolant - if the leak is leaking fluid, upon cooling and subsequent contraction, it's likely also allowing air to be pulled into the cooling system. This means that you might be sucking air into the system instead of drawing coolant from the burp tank/overflow tank. So in extreme circumstances, the burp tank might still be full, despite low coolant level in the pressurized part of the system. Not a problem when you are talking about droplets, and are keeping a close eye on the radiator level every few weeks, seriously a problem if you think you are losing a tablespoon of coolant each time you run the bike, and not sucking more back in from the burp tank every time the bike cools down. Seemingly more of a problem (with trapped air bubbles) with the newer GS/FI head design. Same thing can happen when the water pump seals go bad also - coolant level is dropping in the radiator, but not in the burp tank. HsN
I'd certainly try
re-torquing before getting carried away with replacement. Depending on the
results from that, the results (loose bolts) might be obvious. Assuming no
coolant leaks large enough to cause damage (head warp) due to overheating,
assuming there have been regular anticorrosive antifreeze renewals (so the head
has not corroded the gasket to tissue), I'd go for the head re-torque without
hesitation if I were able to ride it a while to keep an eye on things, like
coolant level and oil contamination, for a week or so. If I were going round the
world next week, I'd go for the new gasket. If the bike has badly overheated and
the head has warped, it's all another story....mostly bad. ESPECIALLY with the
head re-torque bulletin, I'd suspect that (all other possibilities aside) the
re-torquing will do fine - just make sure to use a decent torque wrench. If it
leaks and you are checking the bike often for a couple weeks, you'll know that
same day, and what are you out but for an oil change? If, after
retorquing it lasts 2 weeks of heating and cooling cycles, I'd wager it will
last at least another 2 years. I'm all for taking things apart no more than
necessary. If a new gasket eventually gets installed, be sure to save the old
gasket for future reference (like to compare to see if a Pegaso or Bombardier
gasket will fit) or for things like Flash's experiment for valve piston
clearance. Invaluable when a new gasket costs $50! HsN
Next.
Why you should save your old
Head Gasket
Flash 412 (CO)
If anyone has a used head gasket laying around, I sure
could use it. "Why?" you ask.
I bought a motor and some stuff. Since I didn't NEED the motor when I bought it,
I traded a fellow inmate with a fried top end the low mileage good top end off
my motor for the low mileage warped top end from his motor, plus some ca$h.
Then, I took the warped bits to my local bike engine guru shop (used to be a
BSA/Norton dealer) to see if the parts were salvageable. The cylinder really
isn't salvageable without spending silly money for a new liner. The head merely
had to be fly cut remove the warp. He had to take off 0.010" to clean it up.
That MIGHT be a lot. The only way to know for sure is to "clay" the motor to
check for piston to valve clearance.
To clay the motor, you remount the piston and the cylinder. But before you put
the head on, you take some (plasticine) modelling clay and lay a couple of
strips on top of the piston where the valves are going to be. Put a dab of oil
on top so that the clay continues to stick to the piston and not the valves. Put
the thing back together, torque it down and run the crank through a couple or
four revolutions. Disassemble, take a razor blade and section the divots in the
clay and measure.
BMW gets TOO DAMNED MUCH MONEY for a new head gasket to piss one away for a five
minute test. I didn't know I was going to need to clay the motor when I threw
away the gasket that came out when I took the thing apart.
I asked the local dealer and they indicated that it might be quite a while
before I get a used one from them. So... if you would like to recycle your used
head gasket and help me out, I'd be happy to reimburse for the postage. Lemme
know and I'll give you a mailing address. I'll be sure to post the results of
the piston to valve clearance measurements, too. I only need one used gasket.
BTW... if the piston to valve clearance IS "too small," then the piston gets
relieved a bit. Ten thousandths isn't a big deal for valve cut-outs in a piston.