Classic Oil/Filter Change FAQ
compiled by Kristian #562
Edited and Updated by Winter
Please read the Disclaimer
before attempting any work in this FAQ.
28 December 2005
Please also check the other following FAQs:
Introduction
Changing the oil in an F650 is something that most of us Chain Gang
members can do ourselves. It saves a bit of money and gives us flexibility
that sometimes dealers don't have, particularly during the riding season.
I'm going to get up on my soapbox a bit before we get started:
- Change your oil more often than every 6000 miles (10000 kilometres).
Even with modern oil and metallurgy, I feel this service interval
is just too long. The action of the transmission wears out oil
very quickly. I change oil every 2000 miles and the filter every
other oil change. Maybe I'm just sphincter challenged about it,
but... In one study Mobil One Synthetic oil lost 15% of its
viscosity after being used for 1500 miles in a motorcycle. In a
car it lost only 5% of its viscosity in 3500 miles.
- Get good oil. Motorcycle oils do have some additives that aren't
found in car oils which may not adequately protect your motorcycle
engine. BMW AG strongly suggest switching to a synthetic type oil
after 6 to 10 thousand miles or over 10,000 kilometres.
- If you haven't gone 6000km's in a year, change your oil anyway.
Why? NOx (Nitrous Oxide) from blow-by residing in the oil combines
with water to form nitric acid which eventually overwhelms the
additives included to neutralize such nastiness. The nitric acid
then begins to etch your various bearing surfaces, which will wear
quite a bit more rapidly than they will in an engine with
regular oil changes. Basically... fresh oil is cheap insurance.
Flash 412 (CO). The oil could treat the cam shafts, gears and
bearings harshly by etching various steel parts in the engine.
Richard #230: 1997 Funduro.
- It is advised that while your bike is under warranty that you use
an oil specified for use by BMW. For more Oil info see the
OIL FAQ.
Section 1: Classic Oil / Filter Change
by Harl #380, edited by Kristian #562
Tools and Parts
Things you'll have to have:
- 17 mm wrench of some sort (NOT included in your toolkit).
If you use a Socket, I
suggest you get one which hasn't got a Bevel at the leading edge, or grind a
normal bevelled socket down 1mm or so such that the Hex is flush with the
bottom of the Socket. (Alternatively track down the nearest Snap-on truck and
get a six-point flank drive socket. These have a relief in the corners of the
hex so that they rest on the FLATS of the bolt head, not on the corners. They
will absolutely remove any hex head fastener, no matter how rounded the
corners are. Will probably cost $20, but cheaper than ruining the plug. You
may be able to order from www.snapon.com,
but would have to pay S&H. Chuck#1124
- 10 mm wrench of some sort (in your tool kit)
- 5 mm Allen (hex) wrench (in your tool kit)
- 4 mm Allen (hex) wrench (in your tool kit)
- Torque wrench (not strictly necessary, unless you want
to tighten things to exact BMW spec, requires socket wrenches)
- Pan to catch the old oil (it should hold at least three
quarts but be short enough to fit under the bike)
- Rags/paper towels
Things that are nice to have:
- Inexpensive latex gloves (paint or hardware stores
usually have them) to keep the old oil off your hands
- Blanket or tarp to lay on
- Stool to sit on
- Funnel for putting oil in the frame
- The
Al Jesse "Thingy" to keep oil from getting on the front the of the engine
and front tire. From
www.jesseluggage.com.
- Or you can make your own:
Frame Tank Oil Drain Funnel.
AND
- A filter service kit OR Universal filter kit (see boxes)
- 3 quarts of oil (2 aren't quite enough...) See your
owners manual for viscosity requirements.
| Filter Service Kit (11 00 2 317 015) |
|---|
|
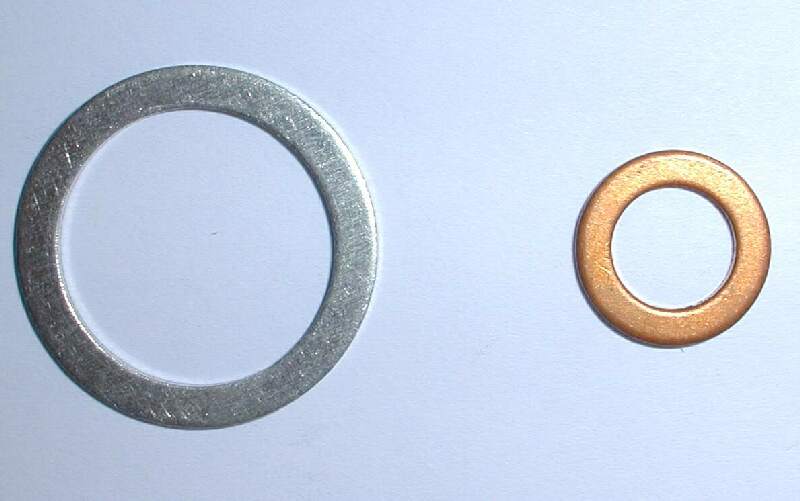
Service Kit 11 00 2 317 015 contains the Oil Filter, O-ring for Filter, both
Crush Washers,
and O-ring for the
Dipstick. Note that the Classic and GS Oil Filters and Filter Cover
O-rings are IDENTICAL however the GS Sump Plug Crush Washer is Copper
and the Classic's is Aluminium.
- Oil filter 11 41 2 343 452
- O-ring for the filter cover 11 42 2 343 247
- Sump plug
crush washer (usually good for a couple of changes)
11 31 2 343 091
- Frame plug crush washer (usually good for a couple of changes)
46 51 2 345 500
|
| Universal Filter Kit |
|---|
|
When ordering an Oil Change Filter Kit, you may get a
"Universal Filter Kit" that will work for several bike
models, which is why the part numbers don't match the ones above and the
reason for the extra washers/gaskets.
- The kit number is # 11 11 7 658 311
- The Aluminum Gasket A8x11.5 is # 9963041
- The O-ring 59.52x2.62-N-NBR70 is # 7654013
- The Oil Filter Inlay is # 2343118
Then there are 3 copper washers, one of which I know is for the
drain plug-the other two must be for other models. I have no idea
which # is for the bigger Drain plug gasket, there are no sizes
indicated on the part list.
- Copper gasket # 2343010
- Copper gasket # 7652949
- Copper gasket # 2343240
(Thanks to Runaway #1259)
|
Oil Change for an F650 (Classic)
-
Read through the procedure to familiarize yourself with
what you're doing. Some steps have descriptive text that may include
explaining a "gotcha," like oil squirting out of places under pressure, etc.
-
Ride the bike for about 10 minutes.
This gets the oil warm and suspends all the engine's grime and crud (swarf as
our Brit comrades call it) in the oil.
-
Put your bike on the
Centerstand and turn the front
wheel to full lock, left or right.
Note: Be careful when working around the exhaust pipe! It'll be hot for a few
minutes. The oil will be hot and stay hot longer.
-
Remove the dipstick from the frame.
This equalizes the pressure in the oil system. It won't squirt out of the
frame onto the floor and your tire or dribble out because the system is under
vacuum.
-
Remove the skidplate.
There are four Allen head bolts, two on the front and two underneath, one
angled off vertical.
-
Place your drain pan under the plug in the frame
reservoir.
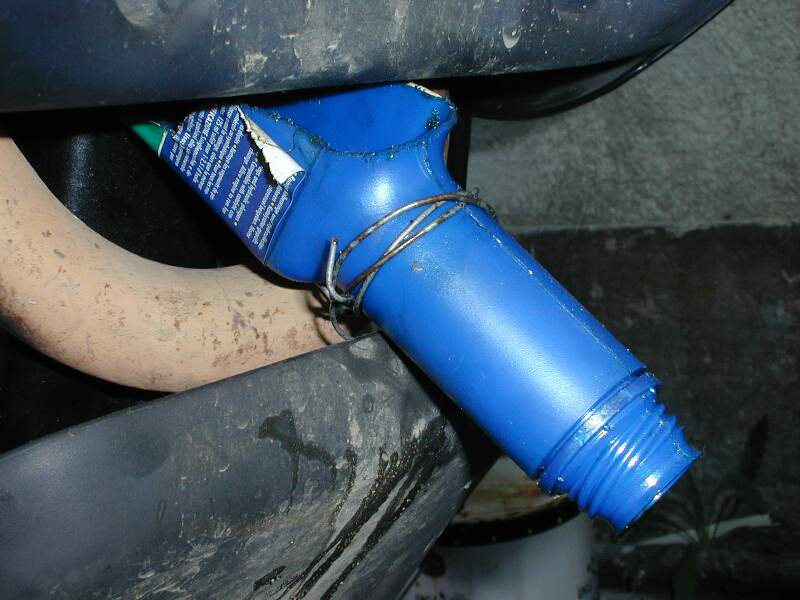
You may want to fashion some sort device
Frame Tank Oil Drain
Funnel out of wire or tape to hold a funnel
under the opening to direct the oil into your drain pan. Or hold a can close
to the drain. This is where the
Al Jesse "Thingy" can save you some clean up mess. Here's a
Picture of it: Jesse
F650 Oil-drain Gizmo. Looks pretty simple to make your own.
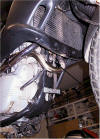
-
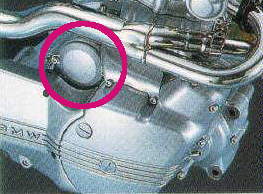
Remove
the plug from the frame reservoir.
This plug is located below the radiator and above the exhaust bend. See the
photo and exhaust pipe warning above.
-
Allow the oil to drain into your pan.
-
Replace the plug in the frame, using a new crush washer
if needed.
-
Torque to 10 NM.
-
Wipe the oil off the exhaust pipe.
Not absolutely necessary, but it smokes a lot when burned and gunks up the
pipe.
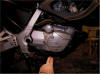
-
Put your drain pan under the sump.
-
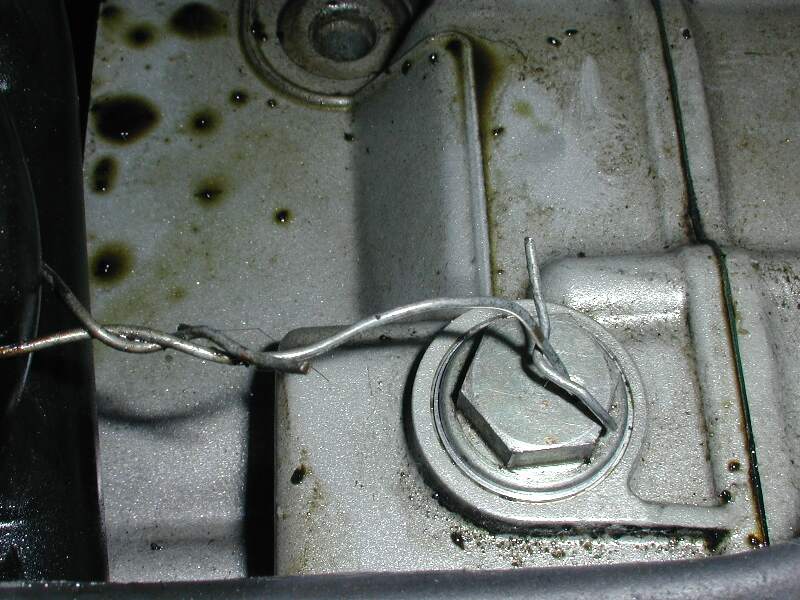
Remove
the sump plug from the engine.
(Note this one has a tie-wire, yours may not).
-
Wipe off any metal bits from the magnet on the plug.
There shouldn't be a lot of bits and they should all be pretty small. If you
have big chunks or lots of them you might want to show your dealer.
-
Check engine casing for broken or loose threads (See
step 25 for more info)
-
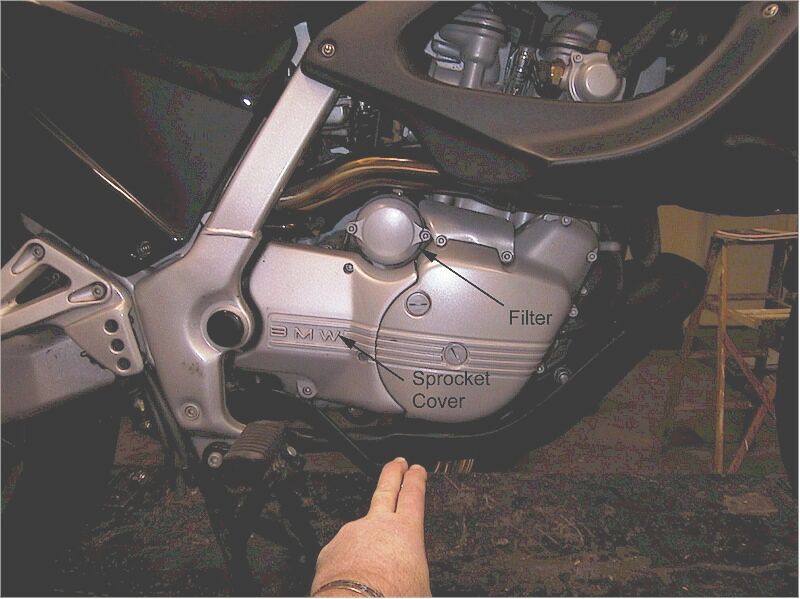
Remove
the sprocket cover (C/S
Sprocket Cover) while the engine is draining.
You'll need to push on the brake lever to get the lower bolt out.
Tip: You can use one of the smaller Allen wrenches to prop the right
footpeg up so that you can get to the (lower) C/S cover bolt by just pressing
down on the rear brake pedal. There is a hole visible when you lift the peg up
and the wrench fits in it. Chris in Santa Cruz, CA
-
Remove the
oil filter cover.
Make sure that your drain pan is shifted enough toward the right so that it
will catch the oil that runs out from the filter cavity.
-
Pull the filter out.
-
Put the new filter in the cavity with the filter opening
toward the motor.
-
Replace the cover.
Use the new O-ring, wetted with a dab of oil.
-
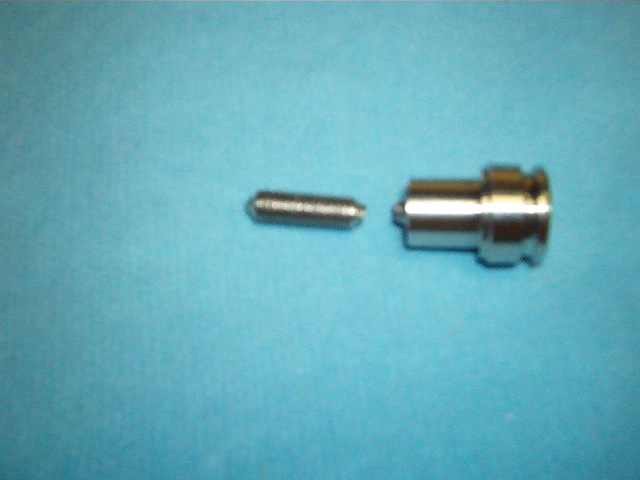
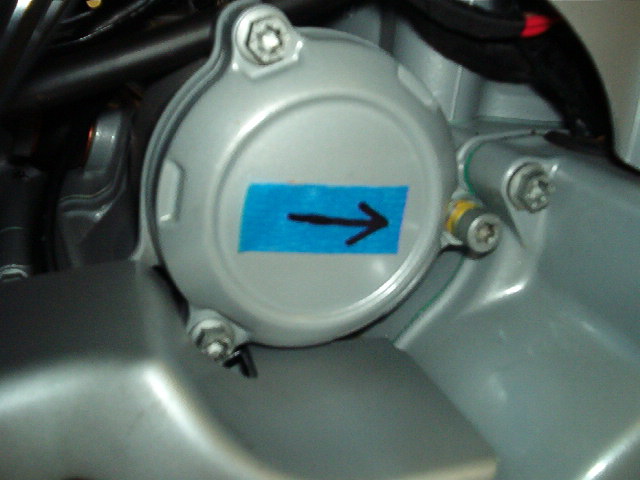
Torque the cover bolts to 10 Nm.
If for some reason you have an '05 or later GS and yo are looking at this FAQ,
NOTE! The '05 and maybe
later GS has ONE extra bolt. It is one of the connectors for Jump-Starting the
bike. Do NOT Torque this bolt to 10Nm! If you do, it will break, like this
one!


-
Wipe up all oil that ran out of the filter cavity onto
the motor.
-
Replace the sprocket cover.
It's plastic, so just tighten the bolts until snug.
-
Replace the sump plug, using a new
sump plug crush washer if
needed. If you go easy on the Torque, the Crush Washers should last a couple
of Oil Changes.
-
The factory torque spec for the plug is 40 NM.
HOWEVER, this amount of torque has been known
to strip the drain hole, so some folks advise just tightening the plug until
the washer starts to crush. You pays your money... There is a Sump Repair Kit
(11 11 2 343 436) from BMW that runs about $150 USD to fix this problem, but
the best thing is to avoid it happening in the first place. PLEASE Check
The Sump Plug FAQ for more information. Either Snug Tighten it and
Tie-wire it or add some RTV Silicone, or go to a maximum of 25Nm.
-
Replace the skidplate.
It's plastic, so just tighten the bolts until snug.
-
Slowly pour about a quart and a half of oil into the
frame. Any more and it'll run out on the floor...
-
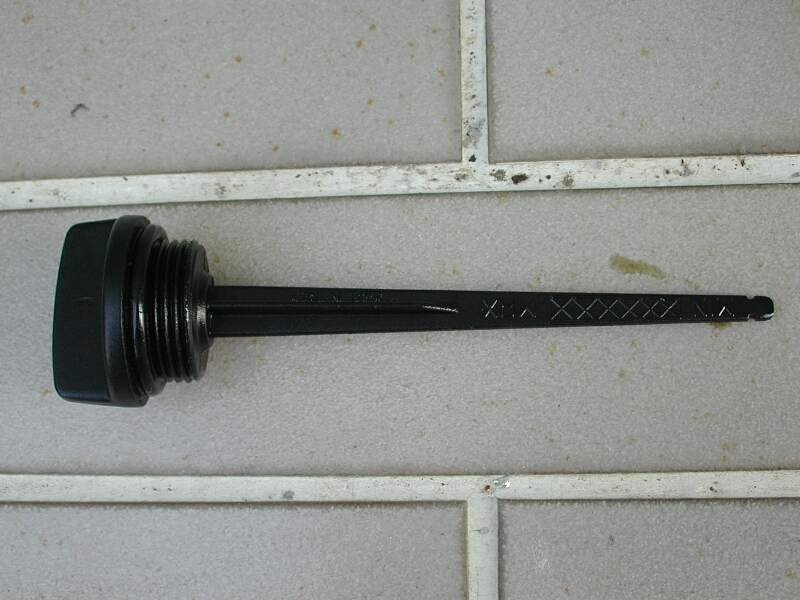
Replace the
dipstick. Note: Some
people who buy the Service Kit get an O-ring left over they don't know what to
do with. It's to replace the O-Ring on the Dipstick.!
-
Start the motor and run it for a minute or so, then shut
it off.
Make sure you have adequate ventilation. The oil pressure light will stay on
for several seconds until the system primes itself.
-
Check for leaks on the plugs and filter cover.
-
Add the half quart of oil.
-
Start the motor and run it for a minute or so, then shut
it off.
-
Check the oil level per the instructions in your owner's
manual and add until it's at the proper level.
Now all you have to do is clean up and you can go for a
ride. FWIW, some oil change companies recycle used oil or check with your local
auto parts stores.
Section 2: Misc Questions and Problems
How do I check the Oil Level in the Classic F
By Flash #412, October �01
Note: The newer F650GS dual sparks (2004-onwards) also use a dipstick
to check the oil level. If you have an older single spark GS, check the GS Oil Change FAQ
Call me a dip-stick, but...
- Ride the bike until it is GOOD and hot.
- Park it on the centre stand, after
riding it sedately for a mile or so.
- Let it idle for a minute.
- Turn off the ignition.
- Check your watch.
- Unscrew and remove dipstick.
- Clean the dipstick.
- Check your watch. When it has been ONE minute:
- Stick the dipstick in the hole. Do NOT screw it in.
- Withdraw and read oil level.
Someone noted the the advice given in this FAQ section is different
from the BMW handbook. This FAQ states that oil should be just right when
the dipstick is pushed in but not screwed in, the handbook says screwed
in. Basically as long as (a) you do NOT overfill it and (b) there is a
reading between mix & max, you're OK. ed
Feedback:
- While checking the oil seems so elementary... I recently got
drastically different results apparently depending on engine temp. Before
a recent trip I checked it 4 times and kept getting a read of overfull (no
I did not screw in the dipstick)... after removing several basters full it
consistently read at the Max... even re-warmed the engine to double check.
Then ~1,000 up the road I check it at a gas stop and it is barely on the
stick. While the verdict is still out... I am pretty confident it is not
losing or using an appreciable amount. Seems like I just got a false
overfull reading. paul #813 Prescott AZ
- The hotter it is, the higher it goes. I have given up worrying
about the ups and downs of the oil in the Classic frame tank. Richard
#230, Pacifica, CA.
Frame Oil-Drain Bolt Issues
Frame Oil-Drain Bolt Torque Spec
If you find the Frame Drain Bolt leaks oil after an Oil Change, don't be afraid
to tighten it down onto the crush washer a little bit more. 10 Nm is the spec
for 6mm steel bolts in aluminum, like ALL of the case bolts for instance.
The frame is steel, the bolt is 8mm. NFW is the standard torque for an M8 bolt
in steel (to a depth over twice it's diameter) 10 Nm. The bolt is about an INCH
long. Try tightening it in 2Nm increments, up to say a maximum of 20Nm.
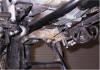
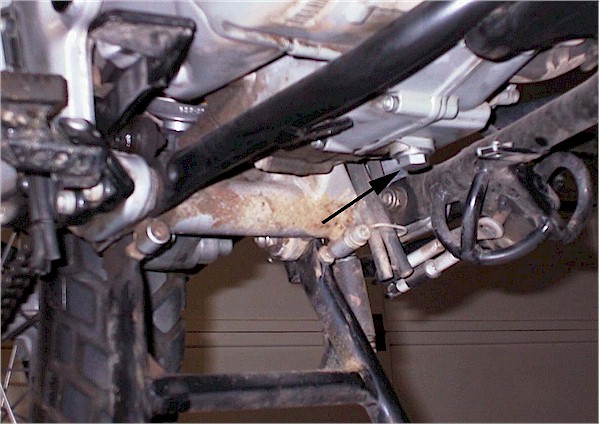
NOTE: The manual also notes you should clean the Frame-Tank
Filter, which is located
here. Note that MOST people have never found anything in this filter and as
it is tricky to access (Not impossible but easier with the
Tank Off ), you might consider
leaving it until the 6000 or 12,000 mile services. A lot of people do!
How to Loosen the Frame Oil Filter Bolt and is it really Necessary
The manual also notes you should clean the Frame-Tank
Filter, which is located
here. Note that MOST people have never found anything in this filter and as
it is tricky to access (Not impossible but easier with the
Tank Off ), so you might consider
leaving it until the 6000 or 12,000 mile services. A lot of people do!
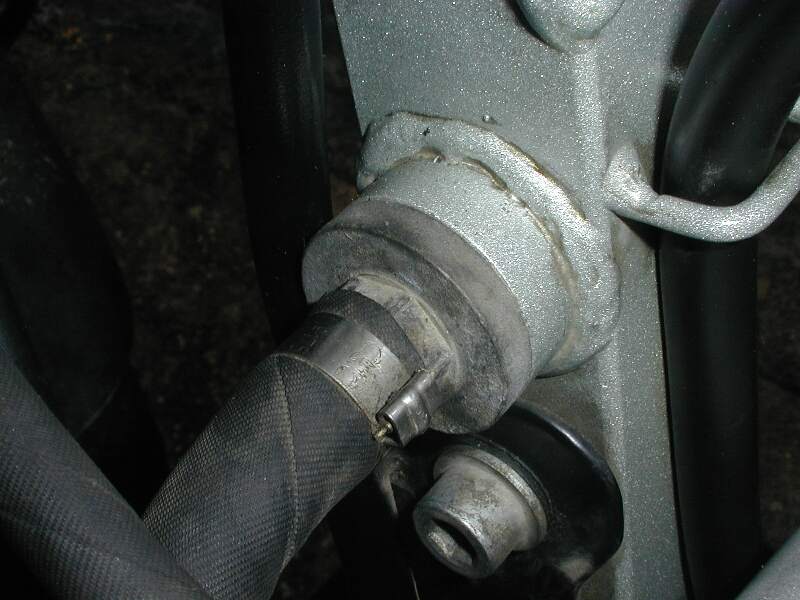
-
You have to remove the hose, and undo the Nut, to which is
attached a Filter, located INSIDE the Frame. Use a Good 6 point
17mm Socket. Don't be
lazy and try to use a Wrench or Spanner on the Nut without taking off the Hose.
You'll just round off the corners of the Nut. That NUT can be easily rounded off
and can be VERY hard to remove after that! It is HIGHLY recommended you use a
Socket with NO Bevel Edge at the Front i.e. the 6 points of the socket starts
immediately at the end of the socket, not after a Bevel front lip, which reduces
the purchase on the Nut by the Bevel Depth. Just grind a socket flat.
-
When you undo the BMW clip to take the hose off, you will
probably not be able to get it back on again (the clip), so have a new hose pipe
clip ready.
-
The Torque Value is Unknown. Anyone with a Manual Please
advise, ed? As long as the surfaces are true and clean the O-ring will do its
job and it won't leak. The concern with tightness is only that it won't come
loose.
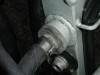
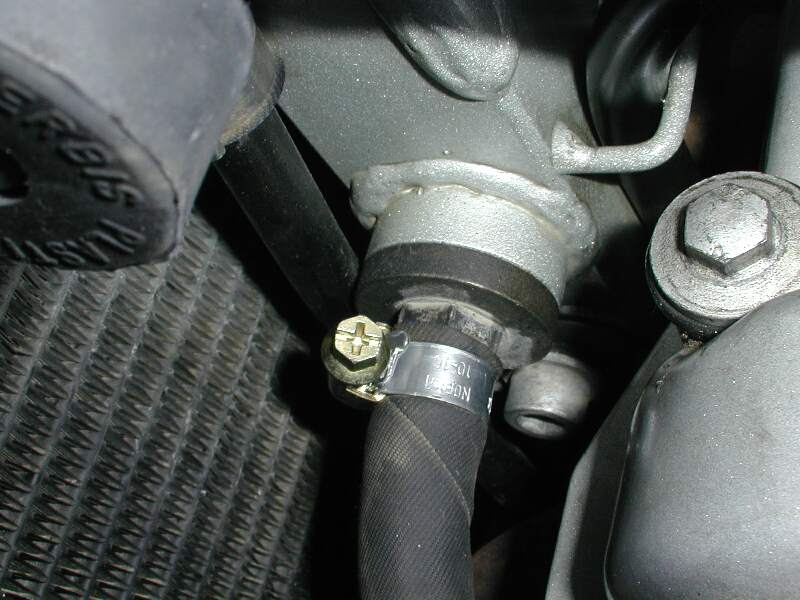
-
Here it is back in place with a
new Hose-Clip. See the
Hose-Pipe Clamp FAQ for more info on Hose-Clips.
Feedback on whether it is really needed:
-
Oil Screen in Tank: I have had mine out 4 or 5 times and
find it useless each time. Steve #417
-
You'll likely never find anything in it, but if you do, that and the contents
of your magnetic drain plug may be your first indicator of problems. It IS the
intake for your high pressure oil pump, so if it ever does clog completely, you
can count on permanent damage. If you think something has ever fallen into the
oil tank - especially those of you who park on the street who have not made the
plug tamper proof - that's where you'll find it. Inspect it every oil change? No
Way! Inspect it never in 3 years and 25,000 miles? Bad idea. Somewhere in
between when you have the tank off and the oil drained - then it's easy. Todd
#389
-
I've checked it 80% of the time when changing oil and have
not found anything worth reporting. tjs
-
The first time you clean the tank screen, get rid of the
cheesy BMW hose clamp, use a 17mm deep socket to remove the screen, clean,
replace. Use a regular hose clamp on the hose and point the screw down at the
ground when tightening. That way, with a long screw driver, you will be able to
remove the hose and filter in the future without having to remove body panels.
mark #403
Problems Loosening Frame Oil Filter Bolt
Typical Problem:
Tonight had the Great Idea ...LOL to clean the Frame Tank Oil Filter .....
the one oil filter that no one ever thinks to clean with compressed air and is
very hard to get to ... but I did take off the oil line to it and now I have a
problem! I took off the oil line after draining the frame oil tank .... No
Problem .... then I took a open end 17mm wrench and tried to go counter
clockwise to loosen the drain plug with the filter at the base of the frame oil
tank and no movement .... then a little heat to the outside with flame .... no
movement ...... now the bolt is striped and vice-grips are no use. What can I do
??? Does this thing go clockwise or counter-clockwise .... Any good tricks to
get this bolt free ? chas1969 '97 F650, Travel and Adventure.
How he solved it
(last resort): After going to a couple hardware stores I found one with a
long sharp chisel ..... and whaalaa the bolt moved with a couple good strikes.
This over, now to order a new bolt/oil filter to replace this damaged sorry
part. I think that it was placed with too much torque and time without loosening
.... and the lack of a good 'bite' with soft metal .... a poor design/quality.
See above for
how you should remove it.
Feedback:
-
Use a 6-point deep
well socket, but it MAY be too late now (maybe you can still hammer it to fit
over).
-
If it is stuck in
place and does not leak, don't worry about it. The screen is only there to catch
big pieces if your engine implodes. Otherwise you will take it off and there
will be nothing to clean, leading to a lot of hassle for nothing. Richard #230
-
I would use a drill
as last resort for the fact that you'll get metal in the oil tank. I would
recommend soaking it with some penetrating oil starting a day or so ahead of
this following procedure. When you soak it with the penetrating oil give it some
taps with the hammer to help it penetrate. CAUTION: Keep in mind the part the
filter plug-hose fitting is screwed into is welded to the frame. I just recently
heard of a BMW mechanic (San Jose BMW) who had a case where the weld on this
part failed (more than likely it was never good) and oil was leaking at this
weld. Upon looking at my �classic� this morning to help come up with a solution
for your problem I discovered the weld on mine is not fully tied-in (a welding
term for a crappy weld) to the female part the filter plug/hose fitting screws
into. It even has the look of a crack around the lower part but this may just be
my imagination after have heard about this issue with the BMW mechanic. I�ll be
looking very closely soon. It would be a real bummer to have this weld fail.
Using a hammer carefully hit the filter plug-hose fitting (I assume you�ll be
getting a new one at this point) strait on with some good sturdy blows. Not so
hard as to damage the part you are screwed into on the frame. This may help to
break the fitting loose. Then using a good sharp chisel (this is a tight spot so
you may need a length that is just rite) you need to try and loosen up the plug
with the chisel hitting in the direction of counterclockwise. Going back to
hitting strait on and then again with the chisel numerous times should do it.
I�ve had success with this many times on rusty nuts including very large sizes.
The other thing is because you already have the hole in the middle you can put
an easyout in the hole and try this BUT metal shavings may go into the tank so
trying to use a magnet with the easyout. I personally like something called a
nipple extractor rather then easyouts. They have very sharp edges (sort of like
a tapered key for a keyway) and work better then the standard spiral easyouts. I
believe they are bought at plumbing supply stores. The correct size is
important. Be patient, use the penetrating oil letting it soak and doing the
tapping thing to help it penetrate. This can pay off big time. Will in CA .
-
One other way to
remove a stubborn bolt is to weld a rod to the head and use it like a
long-handled wrench. SScratch.
Alternative Oil Filters
Cheaper Oil Filters
by Don#301 et al., 28-Nov-01
For those of us that want the original oil filter
without the high price :-) .
Bombardier direct
- There's more Seadoo/Bombardier dealers near me than BMW ones.
- These fit both our Classic engine and the GS/Dakar.
"Bombardier uses the Rotax engine in
their SeaDoo line of personal watercraft also. I've been told that Rotax uses
the same filter in a variety of different engines. If you have a Bombardier /
SeaDoo marine dealer near by, you might want to talk to them. It might help if
took in a new filter for your bike as a sample and asked them to eyeball match
one from what they have in stock for a SeaDoo. Just tell them it is for a
Bombardier/Rotax engine and let them figure it out.
Hint: The first one they should look at is Bombardier Part Number:
711256186" (Harold)
- Simply go to your local motorcycle shop
and order a filter for a 1996-2002 ATK 605. ATK's use Rotax motors which use the
same filter as your BMW and about $4.00 a copy cheaper.
| Gaskets/seals/O-rings replacement |
Oil filter |
265-180 |
$5.00 |
http://www.atkusa.com; from
Pricing.
- Of course you already knew you can get oil filters at the following:
(Mtbiero)
http://www.americandirtbike.com/
http://cycleoutfitter.com/oilfilters.html
http://www.perf-form.com/Default.htm
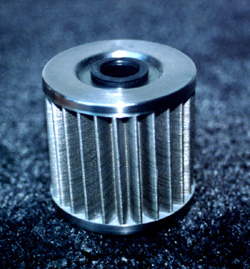
Reusable Oil Filters
David H. Park #711
There is a metallic oil filter from Scott's
Performance. You can see this at:
http://www.scottsperformance.com/indexmain.html under Oil filters - off-road
bikes - BMW.
- One of
the main reasons to use a re-useable filter is that they are capable of trapping
particles much smaller than a standard filter.
Standard
Paper Filters will trap down to about 40-microns. A micron is one thousandth of
a millimeter. That's about .00003937 inches 35 microns is about .00138 inches (
Just over one thousandth of an inch) ADB Oil Filter will not pass any particle
larger than 35 microns, the average human hair is 140 microns thick. High
Performance filters will trap down to 15-20 microns. A really good re-usable
Stainless steel mesh filter will trap down to 5-10 microns.
Also the
oil will flow through the re-usable filter when it is really cold. Often the
paper filter stops most of the really cold oil and the oil has to go through the
bypass valve, until it warms up. Here's a site for Stainless Re-usable filters,
showing about 2X the filtering capability of paper.
These are
not as good as some $100 units available for Cars and Big Trucks.
http://www.americandirtbike.com/k&p.htm.
Let's try
this one again. It's not the Stainless filter that goes into Bypass mode with
cold oil, it's the standard Paper filter. The following is from the Scott Site
"Consistent flow under all conditions: Stainless steel will stand up to the
stress of heat, high pressure and physical handling much better than paper or
brass. This filter maintains consistent flow under all conditions including cold
start ups and or under extreme heat. A one inch square of this micron filter
material will flow 1.9 gallons of 90 weight oil per minute at only 1 psi pump
pressure (70 degrees F). Our typical filter size is 30 sq. in. which equals the
flow of 57 gallons per minute. Standard paper filters do not flow well when the
oil is cold, often causing the bypass valve to open allowing unfiltered oil to
enter your engine. Dick #420
-
I just
changed my oil and inspected my SS filter for the first time as well as cleaned
it after 5000 miles and two stints of 2500 each on oil. Really cool and easy to
clean. The filter traps stuff from the outside in, so when cleaning flush it
with pressure from the inside. I used a citrus degreaser and then forced water
from the inside. I did this twice and then followed it with a quick spray of
brake cleaner again from the inside out to displace the water. Be careful not to
leave anything inside the filter as that stuff will go directly into the engine
I think. I love not having to buy the kit from BMW! Chris in Santa Cruz,
CA
-
Yes we
are happier owners with happier bikes because of the SS kit! davidhpark711
Alternative Parts Sources
Q. Can you buy the crush washers and necessary o-rings
independent of the BMW filter? I have ordered a Scott's filter, but I
presume that one still needs the crush washer and rings.
- Crush washers, O-rings can be bought by
themselves, from BMW dealers. y2kcorvette
- The big o-ring for the cover is part number 11
42 2 343 247. It is a 60 x 2.5 mm o-ring in case you have an industrial
supply place near you that has metric stuff.
The crush ring for the sump drain for the Classic is 18.2 x 24 x 1 mm.
I don't know if it is identical on later bikes. BMW part number 11 31 2 343
091.
The crush ring for the frame drain on the Classic is 8 x 16 x 1.5 mm. I
don't know if it is identical on later bikes. BMW part number 46 51 2 345 500.
But you can probably find something at an ACE Hardware store that will do
at least as good a job for a lot less money where the crush rings are
concerned. Flash 412 (CO)
Feedback:
- I may get spanked by some, but I just reuse
the crush washers. I'm on the fifth or sixth cycle of use with no leaks. You
can buy the O-rings from Scott's. I bought a few of each but have not used
them yet. The cover o-ring and the filter o-ring look just fine after 5000
miles. Chris in Santa Cruz, CA
Other Questions
Is there a Breather for the Oil Tank?
by Todd #389
Sure there's a breather for the oil tank. It's
the small tube welded into the top left side of the frame oil tank, goes down
into the top of the valve cover. The larger tube welded into the left side of
the frame oil tank is the pressurized line that fills the tank. If you
overfill the tank with oil after an oil change, the excess will very slowly
drain down that vent line. I often put all 2.2 liters of my oil fill in the
engine that way, without having to start the engine to fit in the last couple
pints.
Can I do the Oil Change Cold?
Q. Due to circumstances beyond my control, I was not able to complete the
oil change on my 01GS. I got the tank drained. Was just about to drain the
crank case, and that is when I had to stop. My question is, is it going to be
bad to finish the oil change with the engine cold?
-
It will take
longer to drain completely, as the oil is more viscous when cold. As the flow
is slow, it will not carry as much "solids" with it as it leaves. Give it
plenty of time to drain (overnight, at least an hour or two). What other
options are there? Fill it up, then drain it again? Wouldn't hurt, but doubt
you'd really gain much by all that extra work. I'd just finish the job, and do
it "right" the next time (keeping in mind that HOT oil on your drain plug hand
isn't the best choice, either). Marty #436-Chicago-97 F650F
-
HOT is to
DRAIN the Oil, while it's nice and runny. (Lower viscosity). Just don't leave
it so long as to get moisture in there and old oil can be acidic. Kristian#562
HK ex'96F, '00 GS
Service: Empty Tube from Crankcase?
I'm finishing up the 10k service. One item in the manual is "Empty tube from
crankcase," about which I can find nothing on the web, the FAQs, or the message
board. I did find a stoppered tube from the air filter, which had some watery
oil in it. Where is the 'tube from crankcase'?
-
This tube drains
the airbox of any fluid that has collected there. You can find it below and
behind the left foot peg. There are several drains there but the one you are
looking for has a plug in the end. Steve#417(IN,USA).
-
I concur with
Steve. I think the book's technical writer just had a hard night when he wrote
that statement. Richard #230, Pacifica, CA
Swarf/Metal Particles on Sump Plug
How much debris would you normally expect to find on the
sump plug when changing oil? I have just changed the oil on my 4k miles 650gs
and consider the metallic debris unusually high compared to say my CBR600. The
debris is definitely swarf and nothing larger, just the amount surprised me when
compared with other bikes I have owned. I guess that these motors don't need to
be as tightly controlled at the build stage as say a 600cc four that your trying
to get 120bhp from.
-
I would expect lots of swarf on the plug at the first oil
change. Was your oil changed at 600 miles? Is this 4k the first ever or first
after 600? In any case, I would expect the next one to have less crap on the
magnet. Flash #412
GSTimRugbyUK
-
I would have more concern with the SIZE of the chips than
the QUANTITY...especially since you are still wearing in that new motor. BIG
pieces are usually bad news. Marty #436-Chicago-97 F650F
-
I changed my oil at 600 miles, then again at ~1500 miles.
Almost no swarf on the plug at the second change. wicked94pgt, BBG#22 F650CS,
Natick, MA
Oil Filter and Sump Plug Disection and Analysis
Some people like to disect and keep copies of the images of their oil
filter disections and sump plug at each oil change. Why? Because this can
help identify problems with your engine early on. If you have a good
history of previous disections, and there is a sudden or unexpected
increase in the volume of particles, then something may be wrong.
The method is quite simple:
- Once you have removed the filter and plug, take a photo of the
sump plug.
- Do not attack the oil filter right away - more than likely it will
be very hot.
- Take a sharp blade or some sort, and carefully cut along the edges
of the paper filter - they attach to the filter at one start / end point.
- Once you have made a continuous cut all around the sides of the
paper part of the filter, you should be able to start pulling the paper
away. When you find the endpoint, cut the paper off the metal part.
- Now carefully lay the paper out and let it "dry out" for a couple
of days. You might want to put some paper towels under it or something.
- Take a photo of the specs you find on the filter
- Keep notes and a record so you can check when you next change the
oil and filter
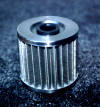
This image of the Oil
Drain Plug Swarf was taken from a GS with 5,000kms (3,000miles) on the
clock.
This image of the Oil
Filter Disection was taken from a GS with 10,000kms (6,000miles) on
the clock. You should be able to see small silvery bits of varying size in
the filter. Towards the center of the image you can see on slightly larger
piece.
Oil Filter Change Costs at BMW?
As at 8th Feb '02
In the next month or two I plan to be doing a bit of travel
in California so I checked to see what cost would be for oil and filter change
for my 99 F650. Some of the prices quoted were rather surprising and some
probably didn't include tax. At any rate I thought it might be of interest to
list the prices I received over the phone. Note the tild ~ means "about"---
which was indicated by the person I talked to. I selected these BMW dealers out
of the BMWMOA Anonymous Book. I use BMW oil.
Brown Motor Works-Pomona $~68
BMW Santa Cruz 83.99
Irv Seaver-Orange ~65
San Jose BMW 68
BMW of San Francisco 95
Fresno BMW 80
Modesto Cycle Specialities 67.34
Calif. BMW Mountain View 133
Riverside-Malcom Smith 70
San Diego-Brattin Motors 88.62
Ventura RPM Cycles 55
Marin BMW 81
Calif. BMW in Mountain View said that this price was what their computer screen
said. Is it because they are in Silicon Valley that their price is so high?? The
long and the short of it is I will remember to change my oil and filter just
before I leave home. Bill No. 391 Las Vegas
How Oil "Flows" Up Into The Oil Tank
Flash #412 & Richard #230
There are two oil pumps in the Rotax 650 engine. One is the normal pressure-feed
pump to the main bearings. The other is called a "scavenging pump." It sucks the
oil from the bottom of the sump through a screen and pushes it up into the oil
tank.
The oil just sits in the oil tank until it is pumped out of the bottom of the
tank and through the engine, gearbox and bearings. When the oil gets pushed out
of the bearings, it flies around the inside of the engine for a while, until
gravity pulls it down to the bottom of the engine and it falls into the sump
(which has a capacity of about a quart). The oil is then pumped out of the sump
by another pump (sort of like a well pump) and squirted back into the top of the
oil tank. As you can see there is no way that overfilling the tank can affect
the lubrication of the engine and this system is also quite resistant to a low
oil level in the tank (compared with a wet sump engine), as everything will work
fine as long as the oil intake line remains covered by oil.
The issue with wet sump motors (unlike the F650) is that the crank dips into the
top of the pool of oil in the sump. It flings this oil around in a "controlled"
fashion. If you overfill the sump, the crank dips too deeply into the pool and
does the same thing your eggbeater does, whips air into the oil. This oil "foam"
has very little lubricity or viscosity. Therefore it is hard for the oil pump to
move the foam AND the foam does very little to actually lubricate the plain
bearings. Very quickly the result is... engine salad.
See also the
Sump Plug
FAQ - Where is the Oil Pickup.
Q: How does the oil in the reservoir normally make its way to
the crankcase? I ask because a novice (like me) would think when the
drain-plug is removed from the crankcase, gravity would take over and
empty the reservoir too! simpco1
A: I guess because we have two oil pumps, the oil can't flow
backwards through the pump and out the drain plug. JC
Can you do an oil change with no filter change?
Yes you can change the oil and not change the filter. Some people like
to do this between each service because they feel the 10,000kms /
6,000miles interval is too long. So every 5,000kms / 3,000miles they
change the oil, but not the filter. There is some evidence to show that
such regular oil changes are not required on the F650. BMW recommends you
change the oil AND filter every 10,000kms / 6,000miles.
- I changed my oil the other day and left the filter in place, since
I last changed it in October and have only put 1500 miles on it since
then. (and it costs $12) When you do that when you drain the oil (even
with a suction pump for the oil tank) you still need very nearly 2.4
quarts to refill the engien. Very little oil is left in the filter
apparently. (ie dont buy two quarts of oil like I did buy three)
echo
To all first time oil changers, it is NOT as hard as it
seems.
For me it was a bit time consuming as I was very careful and
slow throughout the entire process. With the right tools, patience
and an eye for detail, changing your oil can be done effectively
yourself and allow you to get more familiar with your bike.
- Sean Mason
