by Kristian
#562
06/08/02
Please read the Disclaimer before attempting any work in this FAQ.
Last updated 22 Feb 2003 by Spakur
Generic Information such as "What Coolant Should I use", "Coolant Information", "What the Burp Tank is FOR", "Other Sources of Coolant Loss"," Cheap Temperature Sensors",
"Radiator Caps Release Pressure", "Replacement Radiator Caps" are all in the Classic Coolant Change FAQ. This FAQ is ONLY for Changing the Coolant.
For the Cooling Fan FAQ
What are the Symptoms of a failing Coolant Temperature Sensor and where is it?
Solutions, in order of easier to hardest?
It's incredibly difficult to see even with a light as well. Necr0
I wonder if you could add a few drops of some type of colorant to the coolant to make it darker--red food dye or??? Rand #1111
There is a dye that is specific for coolant, however I have
never tried it. This is the direct link to the dye ($2.99):
http://alba.buyol.com/Item/YEL%5FRED%5FBLUE%2DCOLOR.htm Giovanni
Recommended Coolant Interval: Every 2 Years.
Changing coolant at 600m service. This is a quote from the "Chilton Motorcycle Handbook": "One of the common mis-understandings about cooling systems is that the coolant can be ignored. You know, I can see some in the tank, so it must be fine. Well, WRONG! Coolant MUST BE CHANGED REGULARLY. It is not sufficient to just have the system full. As coolant ages, it loses its ability to resist boiling and conduct heat. But, more importantly, it also loses it anti-corrosion properties, and this will allow the build up of scale and residue in the cooling system. this build up will reduce the cooling system's ability to do its job and could eventually render the system useless. To prevent this oxidation of the aluminium cooling passages you should replace your engine coolant AT LEAST once every 2 years." from Spakur.
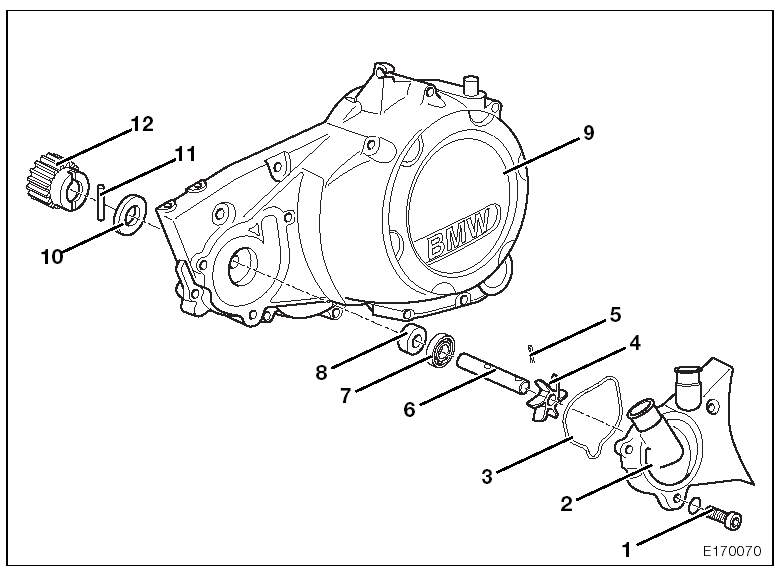
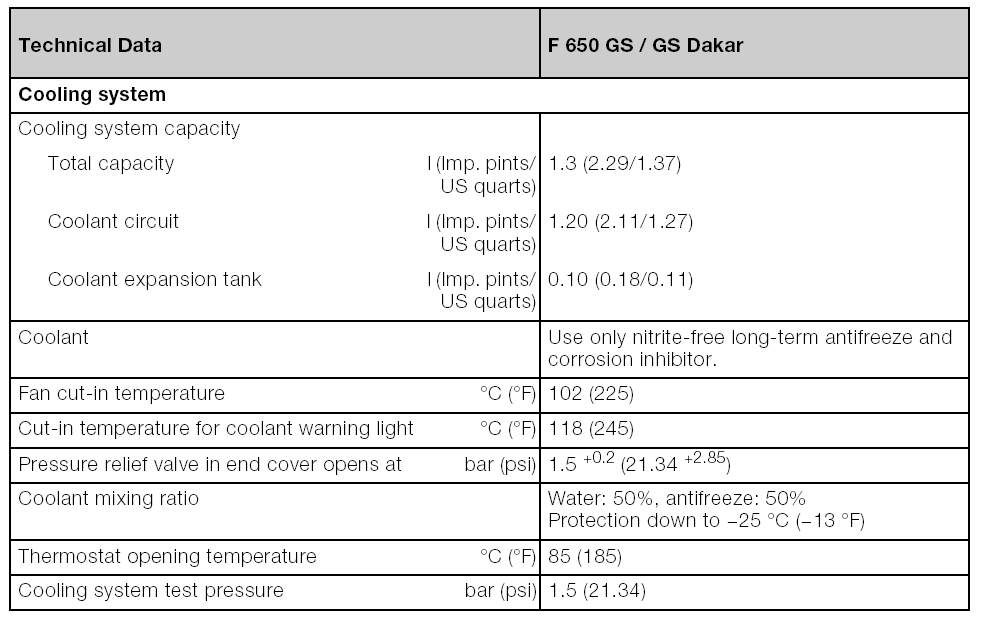
Reference Diagram: See the Water Pump Diagram. The item marked ‘2” is the Coolant Drain Screw. Here is a photo of the Drain Screw Location (Lower of the three screws, marked RED).
Reference Quantities:
Introduction:
This job is just plain easier if you remove the LHS "faux" tank. It only takes 5 minutes to remove the LHS Faux-tank. (This task also lines up with other service items such as checking valve adjustment, re-torqueing engine fasteners, checking the battery and cleaning the fuel tap and tank etc.). The advantage is you can easily access the Burp tank (Coolant Reservoir) for refilling.
You CAN ALSO do it without removing the tank. If you choose not to remove the Tank, make sure you pop off the Reservoir Tank Cap by reaching in under the fairing and prising the rubber cap off. It just pops off. Also unscrew the Radiator Cap to allow the Coolant to escape without having to fight against a vacuum. You can JUST undo the Radiator cap by reaching under the front fairing, beneath the headlight. It’s on the LHS of the bike. For refilling, you will need a funnel or tube that can fit through the "grill" in the fairing.
Tools:
Torx Keys (In your toolkit).
A Torque Wrench, 9 or 10 N.m
Parts/Consumables:
Any automotive non-silicate, non-nitrite
antifreeze mixed 50:50 with water is fine, and lots cheaper than BMW or Honda
Juice (Recommendation by Flash).
Crush Washer for Coolant Drain Screw. A6X10. BMW Part # 11 14 2 343 240.
Loctite 243.
Time :
About 1/2 to
3/4 hr.
Method:
Warning.! Initially install Coolant with the Bike COLD. At normal running temperature, Coolant is HOT.!
Remove
the Seat and the LHS "Faux Tank" Fairing.
The Radiator Cap will now be exposed. Remove the Radiator Cap & Clean it and the Cap Seat. This will allow you to drain the coolant without fighting against a vacuum.
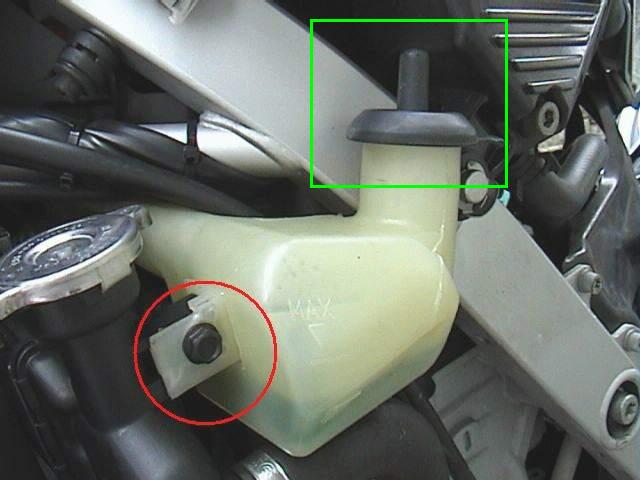
Remove the Reservoir Tank Cap (In the Green Square) also.
On
the attached
Water Pump
Diagram
remove Bolt (1), the lowest of the three bolts that hold
on the Water Pump Cover. It has a copper crush washer attached to it. Have a
bucket ready to collect the coolant. Put the bike onto its side-stand to get out all
the coolant.
I
flushed out the radiator with a hose, running water through it for a while, but
not under too high pressure. Clean the Reservoir Tank too.
Replace
the Bolt (1) and if possible use a new Crush Washer, they’re Cheap, but at a
pinch you can
re-use the old one. Torque to Spec. Use Loctite 243.
Fill
the Radiator & Reservoir with NEW Coolant.
Replace the Radiator Cap.! Replace the Reservoir Cap.!
Run
the Engine and Check the Reservoir Level. Refill if necessary.
Replace the Side Cover Panel.
Bleed Notes & Troubleshooting.

To properly BLEED your system, you can use the Bleed Nipple, which is located here (marked red): If one opens this bleed valve and fills the radiator at the cap opening until a steady stream of coolant runs from the bleed hole and the radiator is full the system is bled. Can't do any better. Easy, quick, and almost fool proof. Then fill your overflow tank as required. (Stuportech).
If the radiator cap is installed correctly, the only way coolant backflows from the burp tank into the radiator is when the radiator forms a vacuum due to cooling. The radiator cap is much more complicated than most people imagine, with two seals, a pressure valve, and a check valve. If the rad cap is removed, coolant may flow by gravity, but there may still be bubbles in the system. Only by heating the engine up, and cooling it with the cap installed to seal it, are you likely to get that last .1 liter into the burp tank. I always measure when refilling anything, sometimes it tells you when you've done something wrong. HsN
After a couple times running up to temp, it'll bleed out into the overflow tank and set up the appropriate vacuum to the system. Only problems I've ever seen is air trapping in the heater core (analogous to a separate radiator). So, my procedure is pour slowly into the radiator till full, let it bubble up a bit, refill if necessary, fill the overflow tank to the full line, put on the caps and run the motor looking for leaks. If none, I'm done and check the level after each run for a couple days. Nate
Have you run the bike to full operation temp and let it cool completely? Only when it cools completely will you get enough vacuum in the system to suck from the reservoir. If you got a liter in there, ride it. Watch the temp light, and if it doesn't come on, ride it a few more times, then check the reservoir again. I've never even measured my coolant exactly. I mix 50/50 in an empty 1.5L water bottle, and then poor in whatever will fit. Close the cap, and fill the reservoir. Check again after a few rides. I've yet to "bleed" my system. Mark #403
That’s it. If you do not use Non-Silicate Coolant you MAY end up doing the water pump replacement sooner than you should. Not proven, but the GS Water Pump has failed too, it's not just a Classic problem.
What are the Symptoms of a failing Coolant Temperature Sensor and where is it?
The Coolant Temperature Sensor is Here:
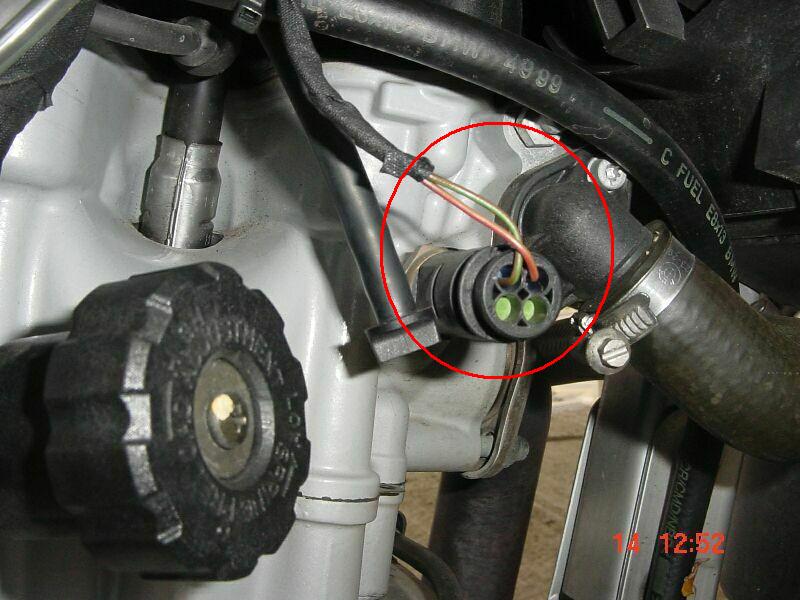
To remove, detach Plug from Sensor, then use a log socket to
undo.
Torque is 15Nm for reinstallation.
Hard Starting When Cold