F650 Fork Maintenance
Original FAQs by Kristian #562, BradG #1002, Scott ID #1244
Please read the Disclaimer before
attempting any work in this FAQ.
Last Updated: 21 July 2006, by Winter #1935
For FAQs related to forks, shocks, maintenance and aftermarket
options:
Introduction
One of the most cost effective upgrades for your F650 is an increase in
fork oil weight. This FAQ has been combined from several other FAQs to
help you deal with everything from busted fork seals to changing the fork
oil.
| Oil volumes (per fork leg) for OEM Springs |
|---|
| Bike |
Oil change (Imp / US pints) |
Refill after disassembly (Imp / US pints)
|
|---|
| Classic F |
600ml (1.056 / 1.268) |
? |
| Classic F (lowered) |
650ml (1.144 / 1.374) |
? |
| GS |
600ml (1.056 / 1.268) |
610ml (1.074 / 1.290) |
| GSL |
610ml (1.074 / 1.290) |
620ml (1.091 / 1.311) |
| Dakar |
550ml (0.968 / 1.163) |
560ml (0.986 / 1.184) |
| Note 1: Some aftermarket springs may require more or
less fork oil. |
| Note 2: This is per leg, so you need
twice as much oil for a complete oil change! |
| Refill oil weight |
|---|
| Stock fork oil weight is 7.5wt. See also
Different Oil
Weights |
| Warning: Don't use a sharp screwdriver! |
|---|
| Rather than using screwdrivers to remove retaining clips and seals
and such, I've found a lot of tool supply places sell surplus medical hand
tools that work great for such jobs. Dental picks and hemostats are a lot
more precise and have a lot less risks of damaging parts than
screwdrivers. Believe me I know. And if possible, make sure your getting
SURPLUS medical tools, not cheap new imitations. Used stuff from Germany
and Sweden is the best, followed by USA. The new cheap stuff from India
and Russia are the worst. They will do the jobs, but the metalurgy is
nowhere near as good. (meaning, in essence, you can lock the jaws on a 4mm
bolt then use them to remove a sliver with a good pair of hemo's. Not so
with a cheap set, the jaws will be bent). dlearl #476 |
Fork Oil Change
Originally the ForkOilChangeFAQ...
edited by Kristian #562, for the GS.
Introduction
The Classic and the Dakar both have a conventional Threaded Fork
Cap. As the thread of this cap is clamped by the Upper Fork Clamps, you
need to undo the Clamp Bolts first, before undoing the Fork Cap. The
GS on the other hand, has a very simple Circlip Arrangement, not a
threaded cap. The Manual says you should undo the Upper Fork Clamps, but I
have yet to determine WHY, because you do not need to undo these to
remove the Fork Cap Plugs on the GS. The GS is very simple to change the
Fork Oil on.
You should change your Fork Oil every 20,000km. Many do it once a year
or at least once every 2 years.
Tools
- Allen Key - BMW Tool Kit (Classic Only)
- 10mm Socket or Ring Spanner for Fork Drain Bolt.
- 17mm Socket or Ring Spanner (Classic Only)
- 18mm Socket or Ring Spanner (Dakar Only)
- Torque Wrench
- Thin Screwdriver and an extra pair of hands (GS Only).
- A Bar with a Rounded end or Screwdriver with Rounded End (GS Only).
- A pair of needle-nosed pliers (GS Only).
- A receptacle to catch the Drained Oil.
Parts
- An appropriate volume of fork oil for each leg. See
table in introduction for your bike.
- 2# Copper Crush washers 6x10 mm. BMW Part # 11 14 2 343 240.
(IMPT: See NOTE below regarding the Parts Number).
- O-Ring for Fork Caps. (optional). The GS Plug also has an O-Ring.
The fork o-ring, is about the same diameter but somewhat thinner than a
standard R23 o-ring. Near as I can tell, it is likely to be about 34 x
2.5 mm.
- Note the DAKAR has a similar arrangement to the Classic,
with Screwed Fork Caps. The GS has a Circlip, and is VERY Simple
to Change.
| Important: Wrong Part Number For Drain Plug Crush Washers |
|---|
| Flash#412 Notes: The BMW parts fiche shows the WRONG fork.
Therefore, you will get the wrong crush washers. What you WANT is copper
washers 6x10 mm, part number 11 14 2 343 240. (These are the same crush
washers as the one used for the
coolant drain
screw when you work on your water pump) Your dealer will try
to give you 31 42 2 312 710 which is 8x13 and WRONG. It will not FIT!
BTW you might think we're mistaken in saying "copper
washers" for the fork drain bolts, and that yours are aluminium.
However the OEM crush washers are copper, they only look aluminium because
of the silver spray paint covering the lower fork tubes. I don't know why
they'd want to use copper in between steel and aluminium, but whatever!
|
| Note: Reusing Copper crush washers |
|---|
Copper crush washers become harder over time, and hence it is
recommended you change these washers each time you perform an appropriate
service. However you can reuse Copper crush washers: In a dark-ish room
(i.e. not bright light), heat the crush washer until it starts to glow a
dull red. You can either dunk the washer in water or let it cool to room
temperature - either cooling method is okay as the heating process is the
important part. This process is called Anealing.
The question is are you such a CBOA you will aneal your crush washers,
or are you going to go out and buy a box full from your local hardware
store for $10?
Caution: Do not use your fingers to hold the Copper, as you are
likely to burn yourself.
|
Method
- Put the bike on the centerstand.
- You will have to deal with the fork spring preload, so support the
bike under the frame with a jack, or from above at the handlebars. Do not
try and support the bike off the plastic bash plate. It is not strong
enough to hold the weight of the bike. The GS/Dakar Metal Plate is
probably OK, IF you put a brick under the right place.
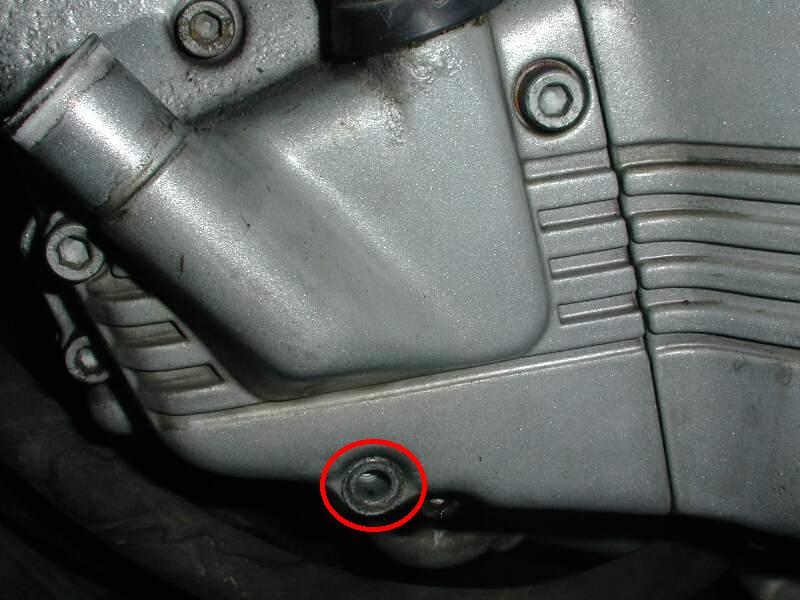
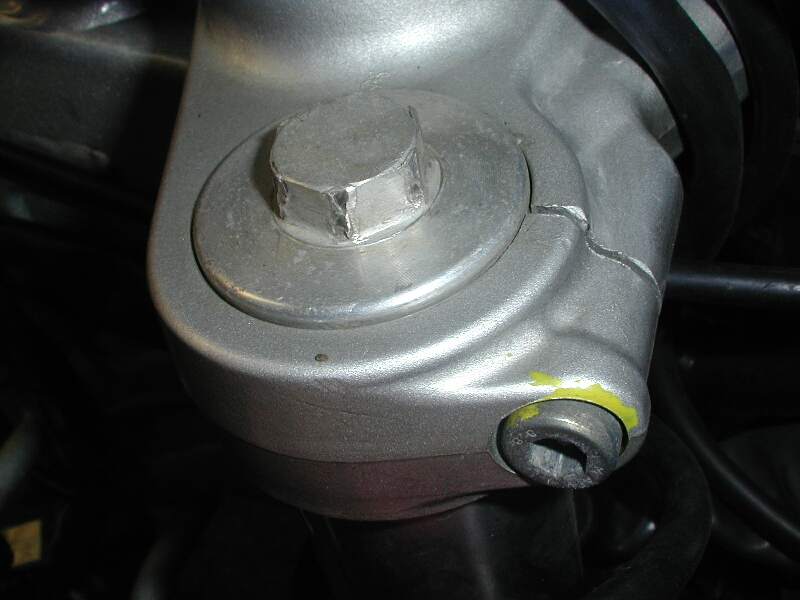
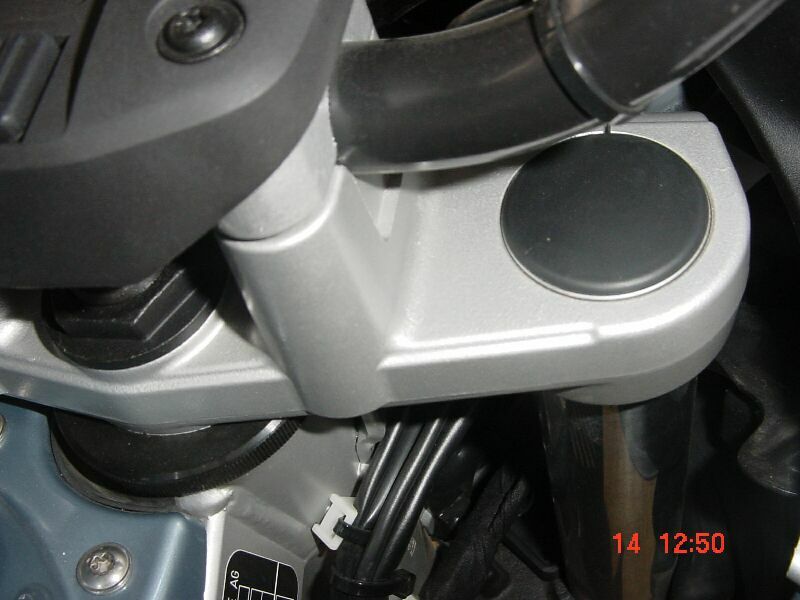
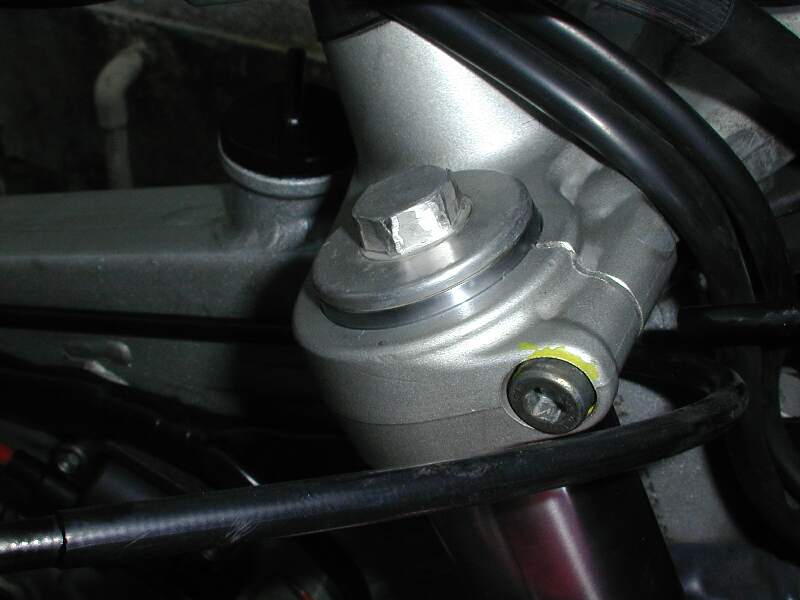
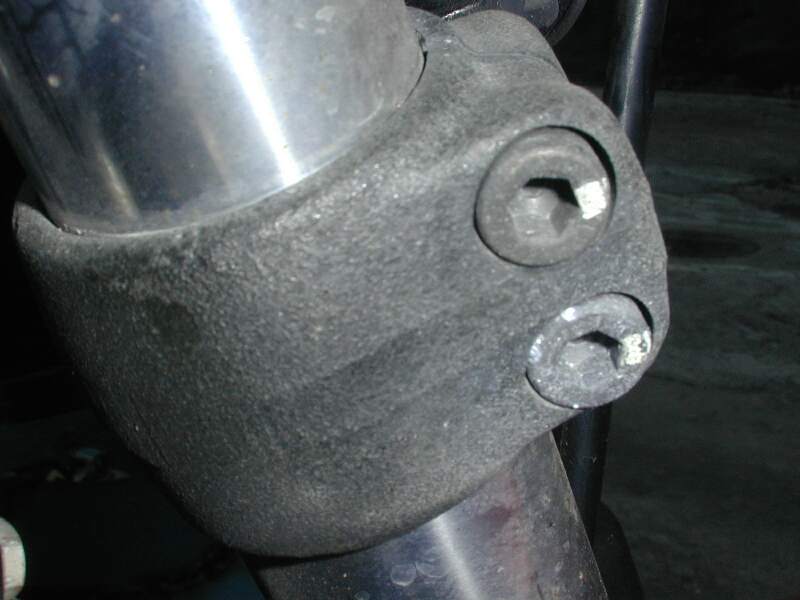
Classics & Dakar: Do one side (i.e. one fork) at a
time, first undoing the upper
fork clamp bolt (marked yellow), then removing first the
cap on top, then the
drain plug on the bottom
of the fork leg. Use a SIX Sided 17mm Socket or Ring Spanner, not a 12
Point one. When removing the cap keep downward pressure on it until
all the threads are undone, then release slowly until the spring
relaxes, otherwise you may ruin the threads or the cap may fly out and
bonk you on the head. You do NOT need to remove the Metal Spacer Tube
underneath the Cap.
| How Much Pressure on the Cap? |
|---|
When you take the load off the front wheel their is not a lot
of pressure. I was able to push the cap down as i turned. Once you loosen
past the o ring you can push it down and see how much pressure there is as
it moves the thread gap. You'll be fine (no need for another set of
hands). Just press down with one hand while undoing with the other.
As a first timer beware: You have extremely fine threads, a steel
tube, and an aluminum cap. More so on the refit, but be extremely careful
with the amount of pressure you put downwards on the cap. It's really easy
to bung those threads up in the aluminum cap.
As for removal, I use a socket on a short ratchet, gently pushing
down on the cap as I turn it, adjusting the pressure to feel the least
resistance. It's most important as you near the end; the strength of the
spring is easy to resist with your hand pressure, but it's also strong
enough to push past one thread on the cap and bung up that all-important
first thread.
Thanks to several contributors
|
If you use a Socket, I suggest you get one which hasn't
got a Bevel at the leading edge, or grind a normal bevelled socket down
one mm or so such that the Hex is flush with the bottom of the Socket.
(Alternatively track down the nearest Snap-on truck and get a six-point
flank drive socket. These have a relief in the corners of the hex so that
they rest on the FLATS of the bolt head, not on the corners. They will
absolutely remove any hex head fastener, no matter how rounded the corners
are. Will probably cost $20, but cheaper than ruining the plug. You may be
able to order from
www.snapon.com, but would have to pay
S&H. Chuck#1124)
IMPORTANT (Classic Only): If the tree clamp holds the
cap and you try and undo the cap BEFORE you under the clamp bolts it you
will Round the Cap Bolt., like one of the previous owners of my bike. Undo
the Clamp, marked yellow in the Photo, FIRST. Kristian #562.
- GS Only: Do one side (i.e. one fork) at a time, first
prise off the black
Plastic Cap with a fingernail (No Screwdriver needed!). Test the plug
with a Thumb first to check the expected resistance. Then using your
rounded rod or screwdriver handle, PUSH the exposed plug down as far as it
will go and hold it down. Using your extra pair of hands, insert a thin
screwdriver behind the spring-wire circlip (at the discontinuity in the
clip) and use a pair of needle-nosed pliers or a screwdriver to lift the
circlip out. GENTLY allow the plug to come up out of the fork until the
spring relaxes, then pull it out slowly. You do NOT need to remove the
Metal Spacer Tube underneath the plug. Then remove the
drain plug
on the bottom of the fork leg.
- Make sure no oil spills on the Brake Disc or Caliper. Clean it off
your wheel and rim. After the oil drains, replace the drain plug bolt,
torquing to just 6Nm and using a new crush washer. IMPORTANT:
(See note below regarding the Crush Washer).
- Slowly pour the measured amount of oil (see
table for oil volumes) to the fork.
- Classics & Dakar: Replace the cap (using a new O-Ring
Seal if necessary). IMPORTANT: Screw it on very VERY carefully by
hand first, making sure it starts correctly. If it just starts to Jam,
undo it and try again. The pitch of the thread is very fine (1mm) and can
easily be ruined by cross-threading it.
- Classics & Dakar: Torque the Cap to 25Nm and then
torque up the Fork Clamp Bolt, also to 25 Nm.
- GS Only: Replace the plug (using a new O-Ring Seal if
necessary). Push it in and again, using your rounded rod or screwdriver
handle, PUSH the exposed plug down as far as it will go and hold it down.
Using your other hand, insert the spring-wire circlip until it clips into
place in the groove. Try and align the clip so the discontinuity is at the
front, this stops (a little) water sitting in the discontinuity). SLOWLY
release the plug and when you are sure the Circlip will hold it, remove
the rounded rod or screwdriver handle. Replace the Black Plastic Cap.
- Repeat with the other Fork Leg.
- Make sure you tighten all Fork Clamp Bolts Classic/Ensure Circlip
is Properly Seated and the Fork Caps are secure BEFORE taking out the
support.
Important: Fork Leg Cap Upstand
- RAG#014 Notes:The first time I changed the fork oil, I
found the caps flush with the
triple tree. The tree clamp may hold the cap also as the dealers now
set the cap 3mm above the tree. Of course this is of no concern for
motorbikes with lowering kits. To do this (ONE LEG at a time) you must
ALSO under the 2 lower clamp bolts as well as the Upper One and move the
entire fork up until you get a
3mm Upstand
from the top surface of the triple tree.
Lowering the Front Forks
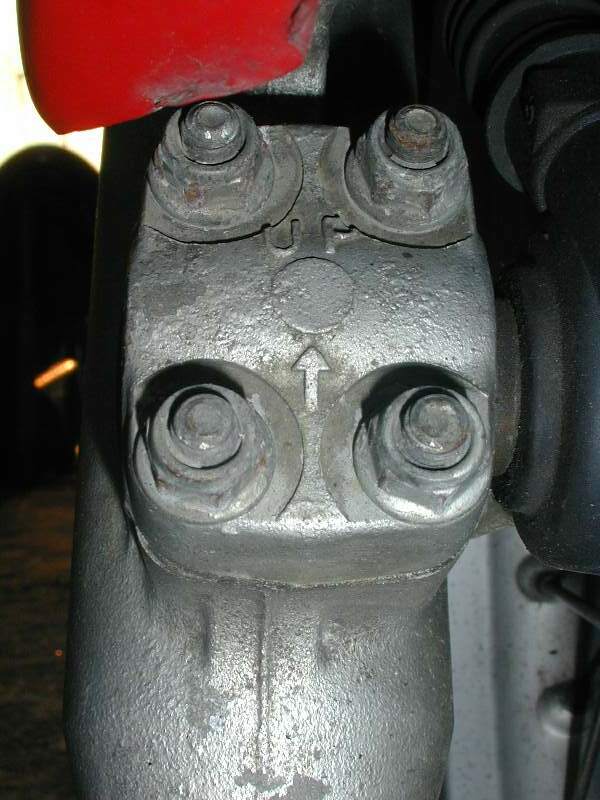
- Flash#412 Notes: If you want to lower your bike some, take
a good hard look at where the fork tubes go through the upper and lower
steering head. You probably should put a jack under the bike with a bit of
wood or cardboard protecting the bottom of the bike. The parts drawing is
Fork Drain Parts Dwg. Note that there are THREE screws numbered 3 on
each side. Loosen all six of these screws several turns. Let off the jack
some. If the bike doesn't drop down, raising the tubes in the steering
head, you may need to GENTLY apply the tip of a screwdriver to the splits
in the castings of the triple tree. Lowering your bike will quicken your
steering somewhat and change the handling, so do not attempt this unless
you know what you are doing.
Mixing Different Oils To Change Weights
- 7.5W is too light unless you weight about 80 pounds. It makes for
a really "cushy" ride rather than one that handles better. If
you prefer the freeway to twisties, use 7.5W. If you prefer twisties, use
at least 10W. Flash 412
- BMW says 7.5wt Fork oil, but many folks prefer 10 wt. (I like 10
wt.) You can mix equal parts of 5wt and 10wt to get 7.5 wt.
- Doubt many would notice the difference between 8 or 9 wt oil in
the budget F650 forks. Especially as the viscosity thins due to shearing
over time anyway. The biggest issue (IMHO) with mix and match is the
compatibility of the fluids and additives. Mixing a oil based on
Polyalkyleneglycol (PAG, synthetic) with either a polyalphaolefin (PAO,
synthetic) or standard dino oil is very incompatible (PAO, esters and dino
are compatible). But you'll likely not find this composition info on the
label (perhaps on a material safety data sheet (MSDS)). If you must go
this route, suggest mixing a bit outside of the bike in a clear container
so as to observe for incompatibility BEFORE putting it in the bike. The
oil additives could also be incompatible with each other. Viscosities are
not linear functions (closer to, but not quite logarithmic). For
viscosities as close as 7.5 and 10, the difference is probably not worth
breaking out the scientific calculator. Marty #436-Chicago-97
F650F.
What about using ATF Fluid? What is its (ATF) weight?
by Rand #1111
The following is a message posted to the "TransAlp" list
which I also read. I am not an engineer and leave it to others to
consider. It seems that Anton (from the TA List) has spent a little time
checking out his information and it might be good to include in the Fork
FAQ.
ATF Fork Oil
Hmmm... A very interesting question. I searched the web and found the
following:
Viscosity requirements for automatic transmission fluids vary with the
application. Transmission fluids vary with the application. Transmission
fluids in automotive applications are usually multi-viscosity, ranging
from SAE 0W-20 to 10W-30, and include viscosity index improvers to allow
adequate low-temperature performance. Powershift transmission fluids, on
the other hand, are often single grade fluids.
Example:
Esso ATF DEXRON-III / MERCON is available in one grade. Compared to
SAE 5W-20 engine oils and SAE 75W-80W gear oils, it has about the same
high temperature viscosity with approximately a 5C fluidity advantage in
the low temperature operating range.
Some additional explanation about the difference between the motor oil
and the gear oil viscosity grading systems:
Viscosity is the most important property of a gear lubricant. As with
motor oil, the Society of Automotive Engineers (SAE) developed a viscosity
grading system for gear lubricants. The SAE system lists requirements for
both single and multi-grade lubricants, but does not differentiate between
EP and non-EP fluids. Typical SAE gear lubricant grades include SAE 80,
90, 140, 75W, 80W, 75W-90 and 85W-140. Although the grade numbers are
larger than those associated with motor oils, gear lubricants are not
necessarily heavier. The two separate grading systems are used to
minimize confusion between motor oil and gear lubes.
ATF Feedback
- It would be interesting to know how the fork seals hold up to ATF.
Used to be you would run ATF in car powersteering units. Most company's
have special fluid now for powersteering because the ATF eat the seals and
caused lots of leakage. The F650 G/S already has a fork seal leakage
problem. Anyone running ATF in the forks for a long period of time without
fork seal leakage??? Steve 1130 Or
- ATF weight appears to be around 0W20 equivalent to automotive oil
scale, although you probably have no concern for the "W" value,
as it is determined at -20 - -40F. When compared to typical "fork
oil" viscosities, it appears to be around 10 (at least Mobil 1 ATF).
But keep in mind that typical automotive oils have a viscosity index in
the low 100s, ATFs are closer to 200, while good fork oils can range from
150 to 400. Not to mention the presence/absence of a zinc antiwear
additive, antifoam, rust and oxidation inhibitors or other differences?
And the type of shear that goes on in a transmission is a lot different
than in a fork. Seriously, do you think most oil companies WANT to carry
18 different varieties of hydraulic fluid, when one (or just using ATF)
would suffice? Not to say that it wouldn't work (for a while), but then
again, canola oil from your grocer's shelf might work, too. YMMV!!!
Marty #436-Chicago-97 F650F
- I am sure technology has progressed somewhat but ATF is what is
specified in the Honda shop manual for use as fork oil in my CX 500. When
I change the fork oil on that bike in the spring I will see what it looks
like (the bike was stored all season in a friends basement as I didn't
have enough time to ride both the CS and the F). I know that the bike
handled well and fork seals did not leak for the full year that I rode
with the ATF in the fork units. Fork oil on it's own is not expensive but
bike fluids--brake, coolant, oil, chain lube--starts to add up and when
you have a couple of bikes and like to change the fluids regularly it is
nice to know if there are substitutions that can be safely made. Same as
cross referenced air filters, oil filters, bulbs etc... Rand #1111
WTF! Different Fork Oil Colour in Each Leg?
Typical Query: I've changed yesterday (for the first time since
I've got the bike from the previous owner) the telescopic fork oil. Right
fork had brownish oil, while the left fork had some greyish oil. The two
fluids didn't mix in the pan and they appear to be different. Their
quantity was around 600ml x 2, so basically correct. Any thoughts? It
seems so unlikely that they used two different fluids, one for each
fork?
Answer: Various manufacturers use different colors to denote
different weights. The last time I changed my fork oil in my F650, I used
red Honda 10 weight in one fork and green Spectro 10 weight in the other
fork. I was just cleaning out my stock of fork oil. As long as both oils
are the same weight and you do not mix them, I am not concerned about who
makes the oil. All brand name fork oils are just fine. I always liked Kal
Gard fork oil, but it is very black, having MoS2 suspended in the oil and
looks dirty when first installed, so most dealers don't carry it. Now
that you have replaced the oil with new, don't worry, be happy. Richard
#230
- I have changed the oil in hundreds of forks and it is not
uncommon for the oil to look completely different from the 2 legs.
Steve#417(in,us)
Thanks to El Hombre Sin Nombre, Rag#14, Flash #412, Todd #389.
What do I do if I spill fork oil on the brake?
I'm doing my 12K service and changing my fork oil. Of course I would
spill fork oil on the bottom part of my brake disc. So I'm gonna go get a
can of brake cleaner and spray it good. Is that all there is to it?
Citizen
- That's what brake cleaner is FOR. Go to the auto parts place and
get a can. You don't need to remove any parts. Just hose down the pads and
the disk from both sides as you spin the wheel. Apply the brakes from time
to time and hose again. Flash #412
If you don't do a good job of cleaning your brake discs with
contact cleaner like Emperor Flash has wisely recommended, you could glaze
your disc somewhat. If that happens, you WILL notice a decrease in
stopping power. Take the wheel off and use some 600 grit wet and dry
sandpaper to clean the disc. I would strongly recommend against rubbing
perpindicular to the direction of rotation. IOW, you should only rub in
the direction of rotation. Should take the glaze off pretty well.
Worked well for me and I've been putting my brakes to the test
since I squirted fork oil all over my disk like a ripe dumb-a**. I ahd
contact cleaner but failed to see that I got some on top of the pads and
so glazed my disk a bit. BOL and, as always, proceed with caution.
NC
Fork Seal Change
Changing The Fork Seal - Short Version (GS)
by Adamx #1001, 29/11/01
The quick procedure is:
The fork seal kit is BMW part # 31 42 2 312 836. This is the Kit for
ONE Seal and ONE Dust Cover. You need TWO seals and TWO dust covers.
- Put bike on centre stand & jack bike up so front wheel is just
off ground.
- Remove the brake calliper and ABS sensor if you have it.
- Undo the clamp bolt and axle, slide it out (don't drop the spacer
in the dirt), roll out the wheel.
- Undo fork clamps & brace.
- Slide out leg.
- Prise off dust seal and remove the spring clip.
- Prise out the seal. Gentle application of brute force. There's no
BMW tool to take 'em out, there is one to put 'em in. Basically, rip it
out without scratching the stanchion.
- If you don't use the BMW kit, NGK 88-4 41-80 BR20031 is its
number. Clean leg, insert seal - use BMW tool to fit. 31 3 620 CE 91 is
the tool #. Or you could try using a bit of wood.
- Reverse outta there.
Note 1: (24/02/02): As the procedure is almost exactly the same
for the GS as for the Classic, particularly once they off the bike.
Note 2: The newer GS fork seals have what look like a spring
around the outside of the seal. They are supposed to last longer. Brad,
#1002
Changing The Fork Seal - Long Version
Original Classic FAQ by: Spakur, David#476 &
Mal#1011, Photos by Mal#1011.
Additional comments by Pat#1214
edited by Kristian #562
Written from memory and with some help from repair handbooks.
See the
Front Wheel Removal FAQ and the
Steering Head Bearing
Replacement FAQ for for additional information.
For Q & A on Leaking Fork Seals, Dinged Fork Tubes etc, see the
Fork Seal
FAQ GS Dakar
General
It is Important to change BOTH of the Fork Seals as soon as you notice
that one is leaking, the other will probably soon break. Why?
Because the fork oil will probably drip on to the Brake Disc making the
Brakes deteriorate (It happened to me after 45.000 KM).
How do you see if the Fork is leaking? Push the forks down a
couple of times (use the Front Brake) and look if there is any oil on the
Upper Slider - there shouldn't be any. If the Oil has been dripping onto
the Brake Disc you'll also have to clean the Brake Disc and the Brake
Linings.
How do I clean the Brakes? Do this with some solution (for
removing oil) and if that doesn't help use a metal file or some Sandpaper
on the brake Linings (not the Brake Disc!) to remove the outer layer
(remember that the linings are made of "soft" material that will "suck in"
the oil. In the worst case - buy new Brake Linings. This is what I did.
Refer the Brake Pad FAQ.
Tools
The tools you require as follows (note: while some other bikes
require a special tool to hold the damper rod while you undo the bolts in
the bottom of each fork leg, the F650 does not need any other tools
other than what is mentioned in this FAQ.
- Allen Keys (in your toolkit or better still off a 1/2" or 1/4" drive
to attach your Torque wrench to).
- An 10mm Socket or Ring Spanner.
- An 17mm Socket or Ring Spanner.
- Torque Wrench.
- Circlip Pliers (not absolutely required).
- A Vice.
- A Propane Torch or Blow Torch for heating the Fork - if the old
Seal is hard to remove.
- A special Fork Tool for inserting the new Fork Seal. I managed
without one, but it took a while longer (next time I'll get one).
- Drifts, Hammers (metal/rubber).
Parts
| BMW Part Number(s) |
Item |
|---|
| 2 x 11 14 2 343 240.
| Copper Crush Washers 6x10 mm for Fork Oil Drain. (IMPT: See
the warning in the Parts for a Fork Oil Change
for further info). You MAY be able to re-use the old ones, at a pinch, but
they're cheap.
|
| 2 x 31 42 2 345 383
| O-Ring for Fork Caps. These you can buy generic. Take them
to a General Bearing & Seal ring shop and ask for a replacement Oil
Sealing O-Ring. You MAY be able to re-use the old ones, at a pinch, but
they're cheap.
|
| 2 x 31 42 2 312 838
| Fork Seals
|
| 2 x 31 42 7 681 274
| New-style GS fork dust seal - the one with the spring around it
|
| 2 x 31 42 2 312 710
| Crush Washers. You MAY be able to re-use the old ones, at a
pinch, but they're cheap.
|
| Note: Honda Part Numbers |
|---|
The roads ? of Labrador, NFLD, etc did in one of my fork seals
so I checked out the FAQ's and printed the good and proper advice and ordered
replacement seals plus a new supply of fork oil. One week later, the day
before I should depart for the Jailbreak, still no seals. And I really
wanted to ride the F650, although I have several other options. Believing
FLASH, as all do, I know that BMW does not mine the ore from which it
makes crankshafts, does not make its own seals and bearings, etc. So, I
went to the multi far eastern bike dealership and asked for a seal set for
my Showa fork. I get H*nda part number 51490-MN8-305 and it is the
exact duplicate of the seal and dust cover that I have removed. All a few
miles from my house instead of 270 miles like to "my" dealer. 'Hope this
may help someone. Regards, Ike647 '97 F650
BMW FORK SEAL KIT FOR A GS: # 31 42 2 312 836
H*nda EQUIVALENT: # 51490-MN8-305 (USD$22 for both seal and dust cap)
NothingClever #1441
- The exact seal dimentions are: 54 x 41 x 11mm. Writing includes...
NOK ... 88-4 ... 41-80 ... BR20031 ... 29 ... Flash 412 (C)
- The fork seals we found here were made by K&S in San Diego. They
don't list the F650Gs on teh package, but they are the correct size.
Twofingers #1717
|
Tightening Torques
| GS / Dakar Torque Values
|
|---|
| Clamps on fork stanchion
| 21Nm
|
| Sliding tube to bridge
| 25Nm
|
| Axle
| 40Nm
|
| Axle lock bolt
| 20Nm
|
| Callipers
| 40Nm
|
Procedure
Removing the Forks and Springs
- The procedure is quite simple and requires few tools. The BMW
manual suggests removing the entire front of the bike to do this, but I
knew my Steering Head
Bearings were good, so I thought that
Removing the Gas Tank,
Fairing and Triple Tree was
just needless work. If you have any doubts about yours, you may as well
take it all apart and replace the bearings. Access to the Fork Clamps is a
little easier when the Tank (with side fairings) is removed, so you might
just want to remove that. If you choose to remove the front fairing,
don't forget to loosen the 2 cables to the turn lights and the cable to
the headlight. Just squeeze your hand in behind the front fairing when
doing this.
- First thing is to lift the bike. I bought a motorcycle jack that
worked dandy. Available at Costco for $100, it's something I've wanted for
quite some time, and this was the perfect rationalization to buy it. It
took a couple of tries to get just the right lift, until I found a two by
four under the skid plate and the two center stand mounts lifted the bike
perfectly straight. I used tie downs to the rear rack and jack and it was
extremely stable, allowing me to move the bike around to deal with the
limited space I had to work on it, which would have been a problem with
the front end removed. That said, I'm sure you could do the jo on the
center stand if you wanted. Do not try and support the bike off the
plastic bash plate. It is not strong enough to hold the weight of the
bike. Take it off if you have to.
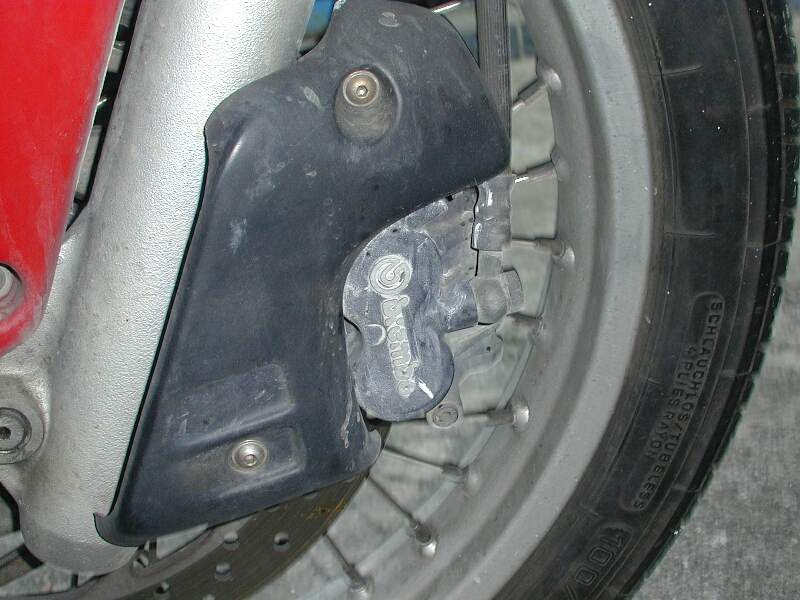
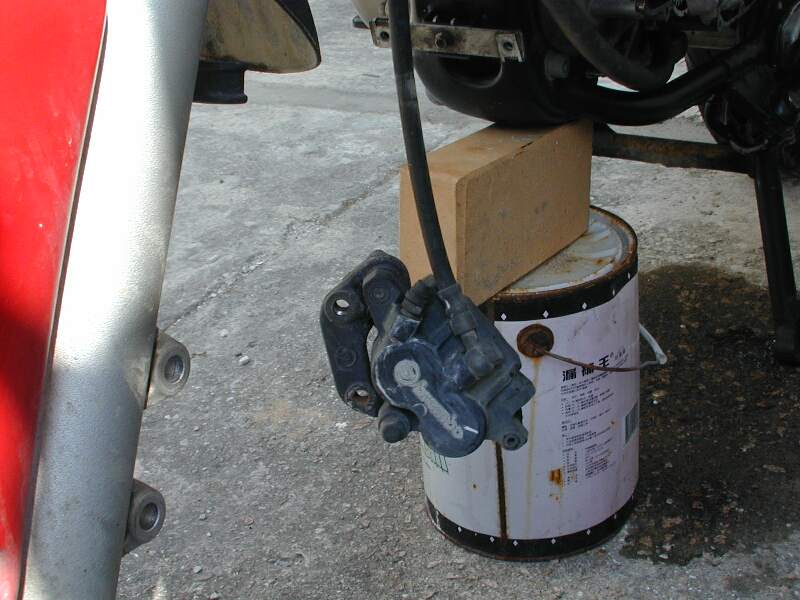
- Then remove the
plastic
from the front wheel; the fender and the caliper cover. Then the
caliper itself. I made a hook from a clothes hanger bent in the shape of a
"C" and
hung the caliper from the plastic radiator surround. This keeps it
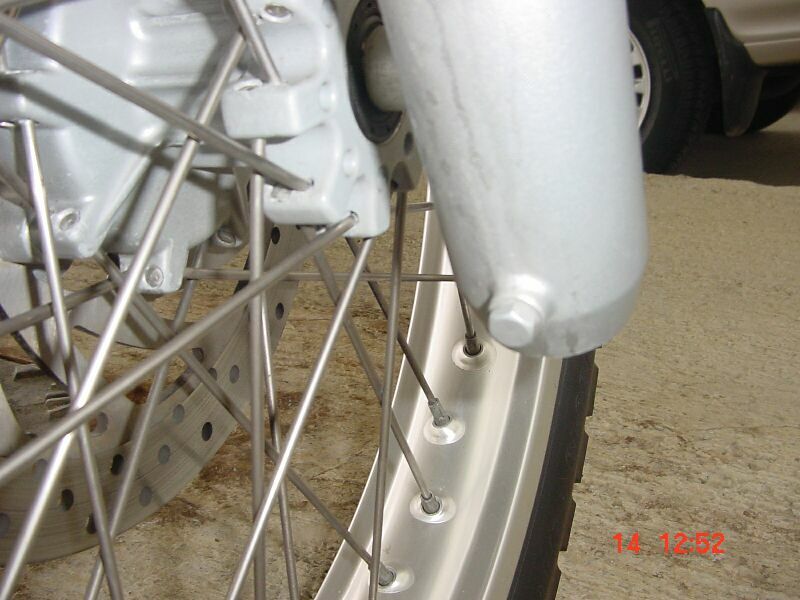
out of your, as well as harms, way. Next was the front tire. Loosen the
four bolts on the
axle keeper (no need to remove them) and unscrew the axle with the 12
mm Allen wrench Then I removed the fork brace/fender support.
- At this point you have the bike suspended in the air with
everything removed from the forks, which are now ready to be removed
themselves. As stated previously, the manual says the fairing and gas
tank (as well as the handlebars on an ST) should be removed, but I found
this unnecessary. By simply moving the forks left and right, I was able to
get my ratchet in to undo the bolts.
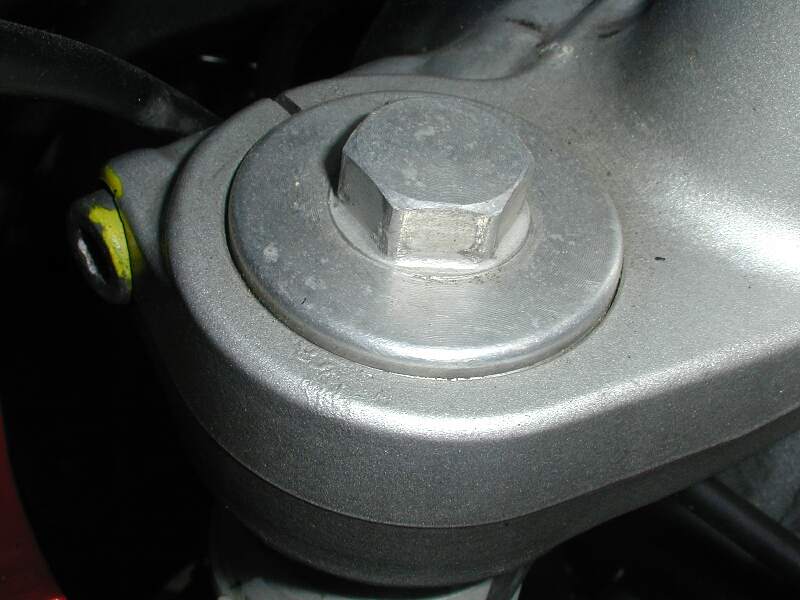
- First I loosened the
top bolt on each triple clamp, (marked yellow) then I undid the fork
cap, taking care to keep the spring pre-load from shooting the cap across
the room. You don't need to worry to much about this as there is hardly
any pre-load on the stock forks. A word of caution here. The fork caps
(17mm) are aluminum with extremely fine threads. The forks are
steel, with a spring pushing up on the cap. In order to keep from damaging
the threads, especially the last two or three, it's important to keep
downward pressure on the cap as it's unscrewed. I found a closed end
wrench worked best for this, keeping downward pressure on the cap with my
finger while I re-set the wrench. Remember, you should be able to loosen
and tighten this cap by hand once the torque is broken. If it won't,
there's a good chance it's cross-threaded, so be careful. Doing it by hand
also gives you good feedback on the amount of downward pressure you using.
- Once the caps are out, you can remove the spacer, washer, and
spring from the fork. Then it's time to drain the forks. Get a container
ready and open the 10mm
bolt on the back of each fork. The first little bit comes out at a
good rate so be careful. (I found a supply of oil absorbent close at hand
was invaluable for this entire job, BTW). Let it drip for a while, it will
save you cleaning up a mess later on as quite a bit is still in there when
it stops flowing. At this point, put the axle back in to keep the forks
from turning and undo the
bolts in the bottom
of each fork leg, which hold the damping rods in place. When undoing
only half a turn will do as long as it's broken loose. Leave them is
place, just finger tight for now. Now take the axle back out and remove
the forks by undoing the two Allen head bolts on the
lower triple
clamp and carefully sliding the forks out the bottom.
- You can now take each fork into the workshop.
Disassembling the forks
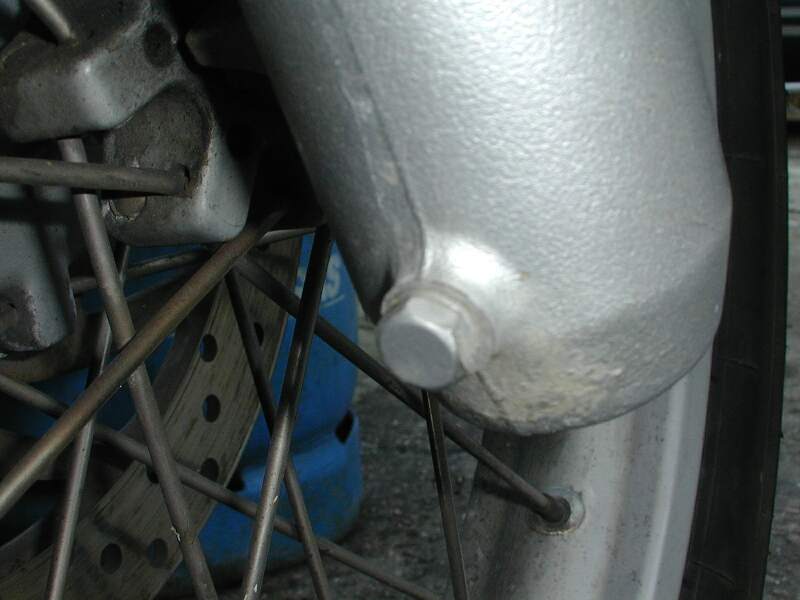
- Taking them apart allows you to clean them, inspect the bushings
and replace the seals. This is accomplished by removing the bolts from the
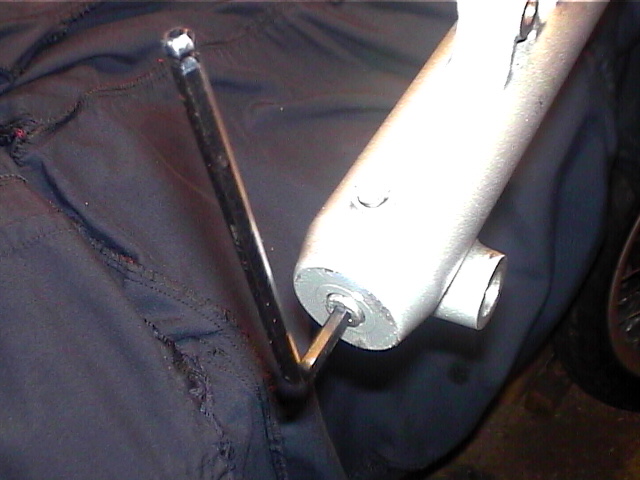
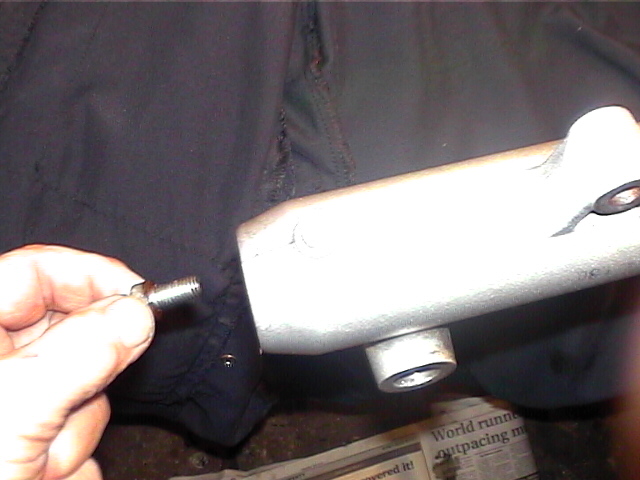
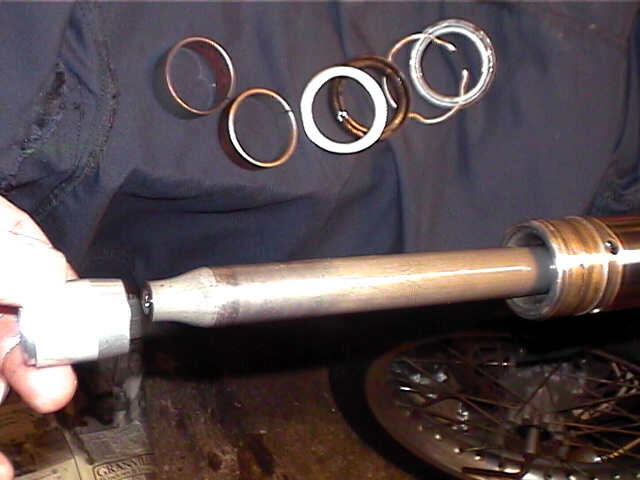
bottom of the forks and turning them upside down. (Undo completely the
Screw Holding the
Slider at the base of the Lower Fork leg. Here it is
removed)
The damping rod and top spring should fall out. Then carefully place the
lower part of the fork (outer tube) in a vice, and using the upper part
(inner tube) as a slide hammer, pull the seal out. In the very bottom of
the fork is a cup which goes between the damping rod and the outer tube
which is very important. If you elect not to completely disassemble your
forks, it is necessary to get this cup in correctly on reassembly. At this
point I would lay out all the parts and compare them with an
exploded picture of the
forks from the manual or parts book, so that you know you have everything
and you know where everything goes. This mental picture will help you
later on, when putting it all back together.
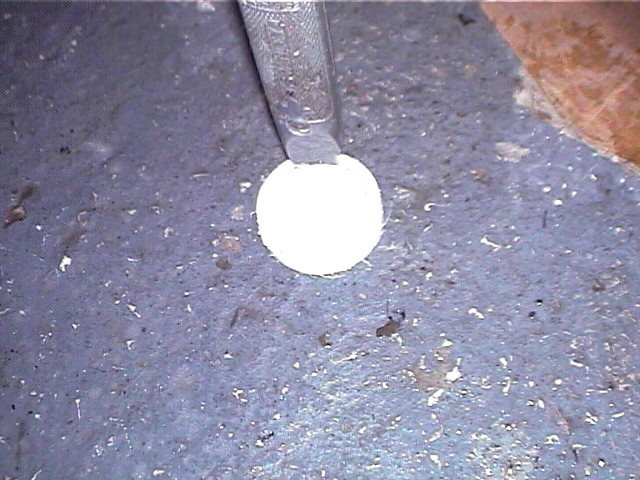
- Dismantle the Outer Forks by starting with the "Dust
Seal", using something thin to lift it up, and be careful not to
damage it. Underneath is a circlip/snap-ring that you'll have to remove
with your circlip pliers. (Note: veggie_deluxe found there was no
need for circlip pliers - you can use a small flat screwdriver instead).
| Mal 's Approach |
|---|
|
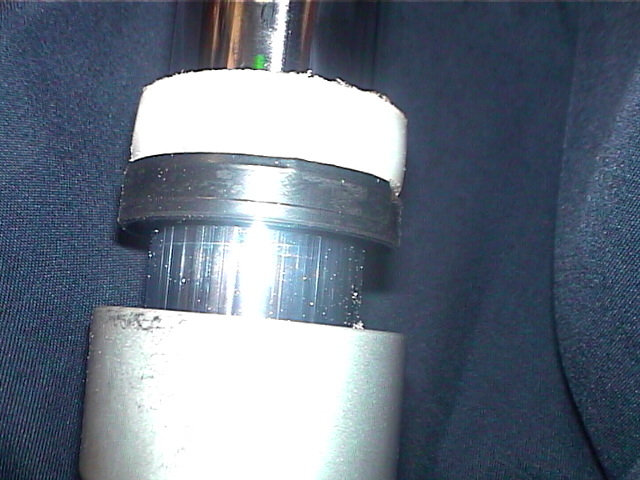
You have to pull off the slider by the slide hammer method i.e. Because
the stanchion bearing/bush is a larger outside diameter than the bore of
the slider bearing bush they won't just "pull" apart. The
idea is to warm the alloy slider so as to release the bush when
the two bushes bang together. The
stanchion
bush stays in place and the slider bush comes out along with
the ring and seal. Mine didn't work like that. The bush stayed
part way in the slider.
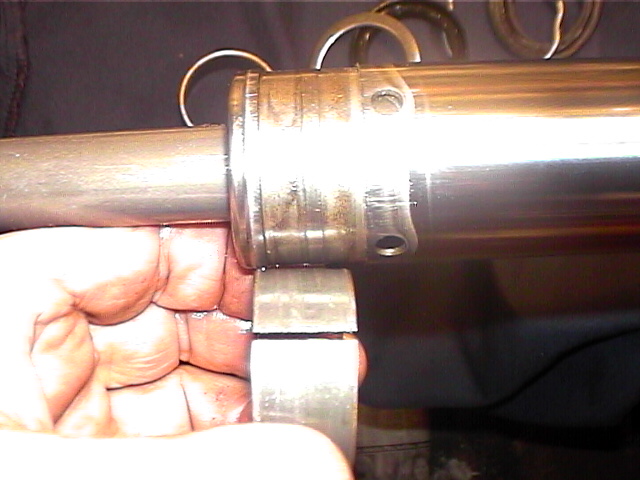
This picture
shows the fix. With the stanchion bush removed I used the groove it sits
in as an extractor for the slider bush. Let the slider hang at an angle so
the groove hooks up behind the stuck bush. A couple of light blows with
the rubber hammer and it was out. I hadn't warmed it enough
beforehand.
|
| Spakur 's Approach |
|---|
|
Now is the time to remove the Fork Seal, this is done with the so called
slide-hammer technique. When I did it, it was really stuck, so mount it
in a vice (use some soft material like rubber or a thick rag between the
fork and the vice so you don't damage the fork) and start using the
slide-hammer method, which means push the Fork all the way in and then
pull it out as fast/hard as you can (try first to be gentle - but if that
doesn't work don't be afraid to use all your strength). If it still is
stuck use a blowtorch or something else to heat the outside off the Fork.
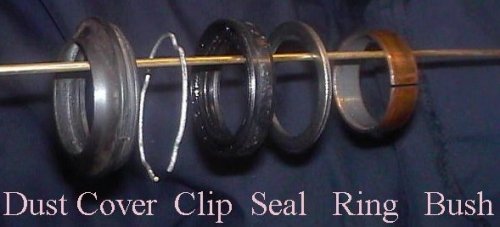
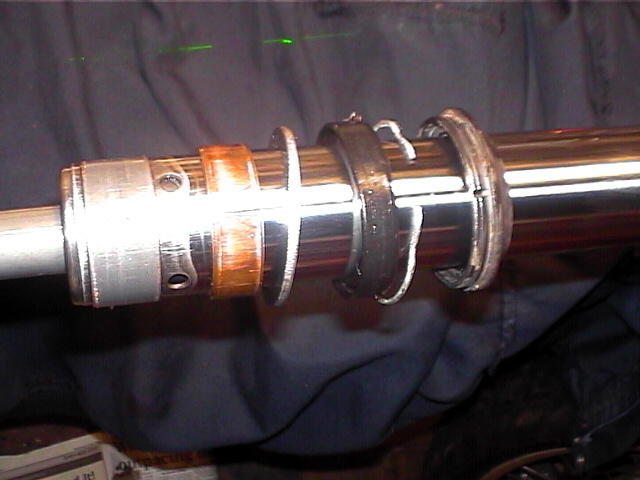
When you've got the Seal out the rest should follow. Again remember in
which order the parts were
in. See also this picture
of the order. Here is the
Lower Fork with Seal
Removed.
|
- Check the fork Slider is straight! Here's
a bent one off a
damaged bike.
- Clean the Forks and check the slider for scratches damages
(places were oil could leak out).
- Take some time for a religious cleaning of all the parts. For the
chrome fork tubes carb cleaner and a well worn ScotchBrite pad work well.
Interior of the outer tube I used carb cleaner and a Heavy Duty paper
towel, but a cotton cloth would work well too.
Reassembling the Forks
- Now it's time to re-assemble. Place the damper rod cup into the
(immaculately clean) outer tube, the spring over the (equally immaculately
clean) damper tube and drop the pair down the (immacul... you get the
idea) inner tube.
- Then the inner tube goes into the outer tube and with the
damper rod fixing
bolt on the end of an Allen wrench (T-Handles work the best) fiddle
about until you get the threads started and tighten it down. Don't worry
about the torque at this point but remember it's only 25Nm so don't make
it too tight! Apparently the Classic Manual says 20Nm, if someone can
confirm please?
- Next open your brand new fork oil bottle (You might consider
changing to 10wt from 7.5wt at this stage) and put a little on the top
bushing as well as splash a little bit down the outer tube. (Oh yeah,
don't forget to replace the
drain plug first, DOH!).
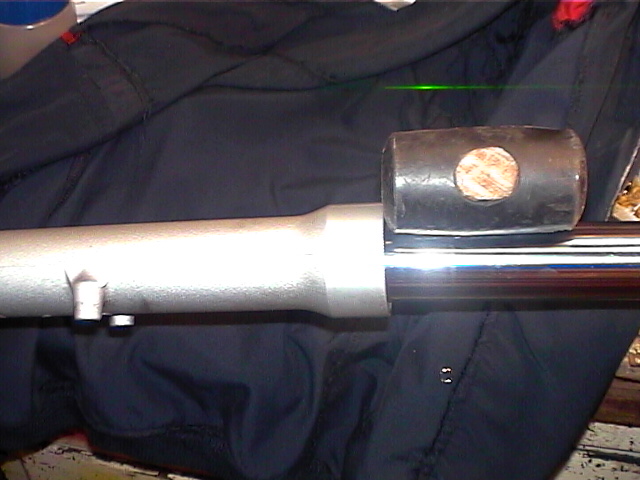
- Squeeze the bushing lightly and get it started down the outer
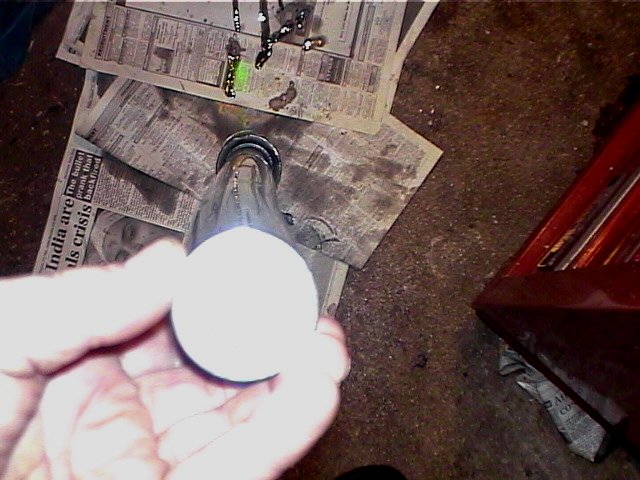
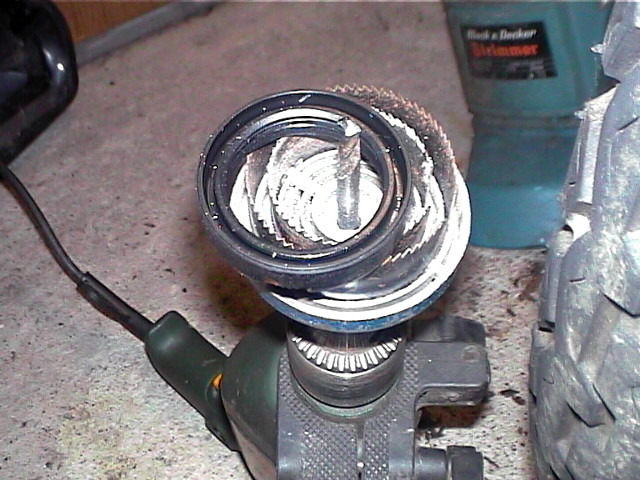
tube. Now it's time for a Special Tool. You can get one at any M/C
shop for $40-$50 or do what I did, get 1 1/2" PVC pipe coupler and grind
the center stop out of the ID. This fits over the 41 mm inner tube
perfectly. Then simply tap gently with a hammer until the bush is in. For
the last little bit put the washer into the tube as well. When the washer
has bottomed out you know the bushing is in as far as it will go.
(Note: Tempo #1908 states "The suggestion to use a PVC coupler to set
the bushing is brilliant. But it's a 1.25" coupler, not 1.5". A 1.5"
coupler does not fit in the slider. Fortunately I caught this while I was
at the hardware store. I still bought one of each just to verify.") -
Ed note: Can someone please confirm the appropriate size?.
- Next lube up the INSIDE of the seal with good ole #10. If you get
any on the outside wipe it off and slide it down over the inner tube. Make
sure the writing on the seal is up and you can see the spring. (another
DOH!) Then place the Fork Seal Tool* on top of the seal and tap
down gently again until the seal bottoms against the washer.
- Fit the seal retaining circlip/snap ring into it's groove using
the circlip pliers.
- Next lube up the dust cover and press it down firmly over the top
of the seal/seal retaining clip.
Mal's approach to make a Drift
(Fork Seal Tool) to drive the Seal in
|
|---|
|
|
| Spakur Notes (Reassembling the Outer Fork) |
|---|
- Insert the pieces you removed after the Seal and then put the
Seal in.
Here is the insertion order on the Stanchion.
- Don't forget the
Damping Guide on the end of
the Damper Rod.
- When inserting the Seal the Professionals use some kind of
special tool for this, the tool fits around the fork slider, because they
don't want to damage the Fork slider or the Fork Seal.
- I managed without one, using different hammers/drifts, but be
careful not to scratch the Slider or damage the new Seal.
- I had to use a lot of force to get it all the way in so that the
circlip could be fit in its place/hole. The Seal should be fitted evenly!
|
| Mark #403's Approach |
|---|
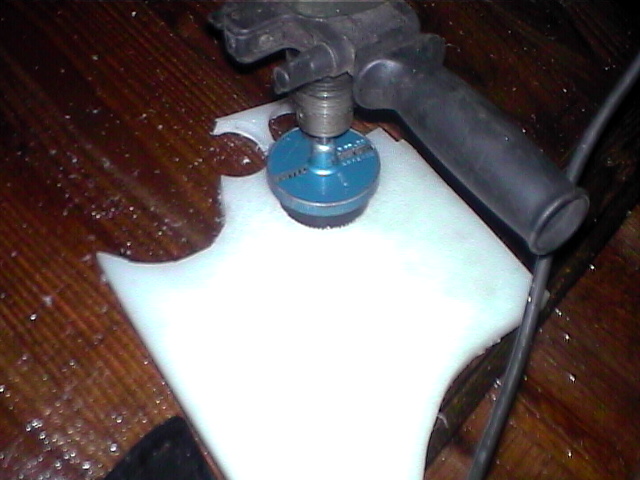
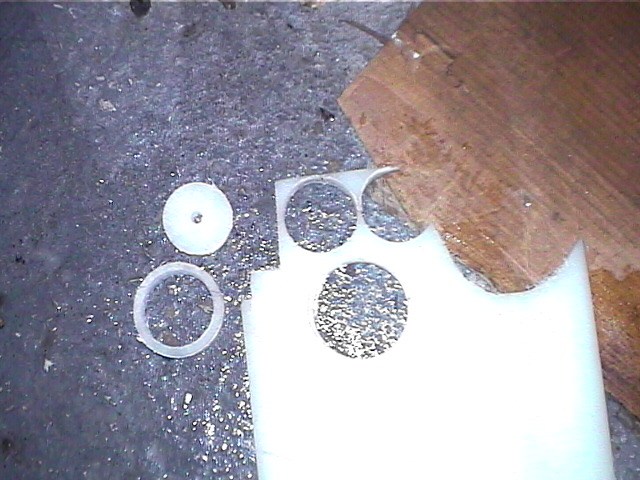
- I took a 12" long piece of 1.5 inch white (sched 40) pvc
pipe, cut it down the length of it, carefully (so as not to burn it)
heated it with a propane torch to get it softer, and stretch it open
along the cut to fit the 41mm fork tubes. Cold water "locked in"
the new diameter.
- This is now my fork seal driver. worked perfectly and cost about
$1. not sure if 2 inch pipe would have worked without modification. I
didn't have any on-hand.
- You can also buy a fork seal driver. once you get the forks off
and take them apart, it's pretty easy to see how to replace the seals.
However, if you have a leaking seal, you MAY ALSO have a damaged fork
tube causing the leak.
|
- You might consider changing the Oil on the bike, but ensure it
still on the Jack/Prop. Don't forget to change (and oil) the Top Cap
O-ring (if you bought one).
- Torque up the
bolts in the bottom
of each fork leg. With regards to these bolts: Always loosen
first and tighten last. That's because the damper assembly/tube it screws
into needs the pressure of the main /long spring pressing on it to prevent
it turning. When undoing only half a turn will do as long as it's broken
loose. The same applies when tightening it. Nip it up to the correct
torque when the top cap is screwed down. That means of course the top cap
has then got to be removed again for the oil to go in. This can
be done before the leg is fitted to the bike.
- Change the Oil. See the Fork Oil
Section for details of Oil Volumes. Once the oil level is set, it's
ready to button up. i.e. Replace the Top Cap.
- Reassemble the Forks on the bike. Don't mix up left and right!
the forks should stick up 3mm above the Fork Bridge. A note here. Unless
you have a lowered bike, when you disassembled your forks the top of the
cap was even with top of the top triple clamp. This spec has been changed.
The top of the INNER TUBE should protrude 3mm above the top of the triple
clamp. 3mm Upstand.
At this point I just tightened the two Allen bolts on the lower triple
clamp, just enough to keep the fork in place and torque the fork cap and
the damping rod keeper bolt. Next I put the fork brace on, then the wheel.
Torqued the axle bolt, leaving the pinch bolts just finger tight. Then the
top fork pinch bolts, getting the bike off its stand or jack and, I sat on
it and compressed the forks several times. This lines up the forks and
axle. Then I torqued the lower fork bolts and the
axle pinch
bolts, then undid and re-torqued the top fork bolts.
- Reassemble the Mudguard and the
Wheel.
- It is also a good idea to check your
Steering Head Bearing
Play after reinstalling the forks, if you have the Tank off anyway.
- Now all that is left is to replace the caliper, caliper cover and
the fender. And ride.
- Don't forget to squeeze the brake handle a few times after
re-installing the wheel to ensure your brakes "take up"!
Time
Spakur: "I think I spent about 10-12 hours working on it, but this
was my first mechanical Motorcycle job - done a lot since then - so with
the right tools and some experience I'd say about 6 hours to finish
it.". Good Luck!
Feedback
- The slider bush on the 'non-leaking side' was a complete bitch to
take off. When the slide hammer method was used the stanchion jammed at
the top. When they eventually parted company both bushes were worn for
half their depth so they rode up on each other and caused the sticking.
The damper cup took a bit of abuse in this process. The leaking side came
off in two hits. There was a grey/black coating on the bushes their
'rubbing sides'. It looked for all the world like Teflon. I cleaned them
but not too rigorously in case it was some frictionless coating given the
application. Pat#1214
Fork Stanchion Maintenance to Prevent Seals Leaking
Thanks to Marty #436
- Q. Do I need to replace the o-ring in the fork caps each time I
remove the caps?
A: Some prefer to be cautious and replace it each time. The part
is not expensive. However, if you don't happen to have new ones on hand or
you are doing some tuning and repeatedly removing them they can be
reused. Just take care when handling the caps, especially during
refitting. The BMW part number of these is 31 42 2 345 383. If you need to
buy them at a hardware store take your with you to compare. They are
about 2mm X 37mm O.D.
Lots of people ask about how to remove the caps in the first place. This
depends on which model you have. The Classics commonly have a cap that is
treaded and screws in and out. The new GS models have two designs. The
Dakar's have a threaded cap but the standard GS (not sure about the CS
yet) has a cap retained by an internal circlip. The circlip is accessed by
prying up the black plastic cap where you will see a wire clip around the
inside of the tube. Use a pick or small blade screw driver to work it out.
BEWARE the cap is being pushed up by the springs. You will have to press
down on the cap to remove the clip and it will pop out when you relieve
the pressure. Putting the bike on a stand is a good idea and doing one
side at a time makes it easier.
- Q: I've found a ding in the fork and the seal on that side is
leaking. Can this be repaired? I have dinged fork Stanchions. How can I
make them last as long as possible before I have to replace the
seals?
A: Maybe. Depends on how deep the damage goes. Some members have
had success smoothing out the damage enough to solve the problem. A new
seal is needed of course as it is already damaged. The objective is
smoothing the ding is to remove any sharp edge and make the defect large
enough that the seal wiper can drop into the smoothed area to achieve a
seal. The scale of this repair is very small though. Removing too much of
the fork tube surface will expose the base and weaken the tube. A large
ding may not be repairable in which case you will need a new fork tube
(there are companies that recondition fork tubes too). The smoothing can
be done with very fine emery cloth or a knife polishing
stone. Use a small, flat, knife-sharpening stone to grind down the
positive without hurting any more of the surrounding area than necessary.
The negative (crater) will probably leak a bit of fluid (likely
negligible). Be sure you get off ALL the rough edges (run a ladies pair of
nylons over it, they'll snag on the slightest edge). And PLEASE go out and
buy the fork gaiters we've been recommending for AGES (they should have
been standard equipment).
You can check your work using a pair of nylon stockings (ladies type of
course). If they snag you need to keep polishing. The repair work should
be done around the tube not vertically to give the seal the best chance
to work. You may still have a small weep but if this is not covered under
warranty it could buy you some time. Then prevent more dings by adding
fork boots (aka gaiters).
See the modifications section below for ideas. If you just suspect a flaw
in the fork tube but can't find it here are a couple of tricks:
Coat the tube with a thin film of grease. Compress the forks fully. If
there is a nick you should see an area where the grease was not wiped
clean.
Use the nylon stocking approach mentioned above to feel for the nick.
- Q. I'm on a trip and the fork seals are leaking, help?
A: The question is how bad. Most seal failures only allow small
amounts of oil by and onto your forks. A small amount of oil goes a long
way and can look worse than it is. A completely blown seal will be a
problem though. The things to look out for are odd handling caused by
the change in dampening, binding if a lot of the oil is gone, the oil
getting onto the tire and or the brake disc rotor and pads. A small weep
is nothing to panic over and the leaking oil can be kept in check by using
a rag to wide down the residue when ever you stop. One member uses a sock
tied around the fork to absorb the oil. Be extra careful with a leaking
left seal as it has a better chance of letting oil run onto the brake
(your brakes will fail to work with oil on them!).
GS Fork Seals Leaking
by Adamx #1001, November '01
When BMW replaced a first seal for me, the technical explained that
there had been a faulty batch worldwide, but the design had been changed
to a double lipped type. The original design was used in several different
models so not it wasn't just a F650GS problem. Now it appears there may be
a second duff batch or maybe a manufacturing fault in the GS legs?
To PREVENT it happening, see the
Aftermarket Fork FAQ
Please send us your stories, info, BMW reactions. It's obviously a
problem worldwide. Postings below:
- I'm now looking at TWO new fork seals for my canary (yellow GS =
tweety bird).... having had one replaced 2 weeks ago, now both appear to
be going u/s. is this the new s&s? any others having this
problem...(Alex#871 I saw you!) Adamx 1001
- Yep,
apparently I've got the same problem. My GS is about 10 months old, has about
2500 miles on it mostly over hilly twisty roads. Noticed oil residue on the
right fork on the last ride. Left fork is clean. I am headed back to the dealer
for warranty repair along with failed computer, new software/injector upgrade,
and recalled rear brake. Seems like a lot of problems for a new BMW. Stan #770
- Same
thing. Fork seal blew and the local shop replaced both of them just to make
sure. David
- Me too,
2001 Dakar seal on right fork replaced in the first month, it is leaking again
now 8 months and 21000km later. My dealer has ordered a new fork tube as it is
pitted and is tearing the seal. Should be another few weeks before it is here.
As a comparison, my wife's 97F650 with 46000km has not needed seals replaced.
Adrian#668
- I'm on my
third one, under warranty - right hand side. Dealer claims it's 'cause
Phoenix is really hot... Art#884
- My front
fork leaked after 7000 km, but I ride a lot on gravel roads. After this, I
installed rubber boots from BMW 100 GS 1988 model part # 31 42 1 458 220. They
fit well, even it the total length doesn't cover all of the chrome tube.
Unfortunately, the cross brace must be modified to allow you to install hose
clamp. The clamps will guarantee, that boot stay on, regardless of riding
terrain. Jerzy.
- My Dakar
was built in 4/01, and bought 1 year ago. It stalls when downshifting
occasionally, and surges badly between 3500 & 4200 RPM's. Now with 1700 miles
the right front fork seal leaks very badly (started at 700 miles). I am taking
it into my local BMW shop soon, they say there's no guarantee that the BMW
warranty will cover the one fork seal w/1700 miles on it (a wearable item) but
they will try? AMC Nut.
- Fork
Seals for 2001 F-650 GS I have the same bike. 2,800 miles left seal blew.
However our local dealer is crap. The closest one 200 miles (Denver) I bought a
seal and dust cover from them, had the local dirt bike shop replace it for
$60.00 Cheaper than driving for me. Good Luck Patrick. Colorado Guy.
- Hi Everyone! I would appreciate feedback on the following situation. I have an
F-650 GS with 8300 miles. Oil is starting to seep out of the fork seals on to
the bars very faintly, very slightly-barely noticeable. I took the bike to the
to the BMW dealership today and they told me that this is a common problem with
the 650-the fork seals and that they have to be replaced approximately 8000 mi.
or sooner. Has anyone experienced this with your F-650's. If this is true, is
there any way around it? Thanks and RIDE SAFE. Jim.
- I have an
'01 GS and mine went out at less than 3,000 miles - replaced under warranty. I
try to keep the forks clean until I get around to installing fork gators. In my
case, I do most of my riding where there are lots of bugs and I think it is
hardened bug guts stuck to my forks that destroyed the seals. I have not taken
my '01 GS off road, I wash it regularly including cleaning bugs and such off the
forks, and my seals went out at about 2,500 miles. I bought fork protectors but
haven't installed them yet. I am waiting for the next seal failure, then will
have the dealer install the protectors at the same time they replace the seals.
When I clean bugs off the forks, sometimes they are really stuck and have formed
quite hard little lumps. I don't see how any rubber seals could stand up to
that. Fork protectors should have come as standard equipment - maybe they will
some day if BMW has to keep paying for so many seal replacements. Stan #770.
- I'm on my
third pair of fork seals with only 8000 mi on my 2001 GSA. Anybody else seem to
go through these things. I do some dirt riding, but not wheelies like the dealer
is accusing me of. Also, where can I find Sebring exhaust in the US. I tried to
fit a Remus on my bike but it wouldn't fit with the factory side bags. Thanks.
Michael (Haven't posted in a while) #883.
- Lots of people have
had seals replaced and that includes me. No problem since I put the boots on.
BradG#1002
- My dealer now accepts
that there was a faulty batch of seals. The seals he used as replacements did
not have the ring you describe and started leaking straight away. Do you know
whether the seals with the ring have a different part number to the seals
without the ring? The boots (which I don't have) are to protect the forks. As I
understand it these faulty seals leak regardless of whether the forks are pitted
or not? I'm a bit worried that if I fit fork boots I will not be able to see
whether the seals are leaking or not. Andrew C (UK)
- "As I understand it
these faulty seals leak regardless of whether the forks are pitted or not? I'm a
bit worried that if I fit fork boots I will not be able to see whether the seals
are leaking or not" Yes, that's correct. Mine were replaced (twice) as well. I'm
not sure if I have the ones with the ring but I'm hesitant to put on boots for
the same reasons. If you get boots that are wide enough (i.e., not the MSR), you
could just loosen them at the top and slide them down to see if there's a leak.
(Or you could just check if your steering feels loose...) its_xls 2001 F650 GSA
-- San Jose, CA.
- Or you could use
Triumph plastic fork stone guards, which sell for about $15 and do not require
removing the fork to install. Richard #230
Removing and Installing Forks
Problems Removing Forks
jesse has gone through the process of many little problems
disassembling the forks... the following questions are based on several
threads covering many problems. Note: For details on the procedure to
remove and install the forks, see the
Fork Seal Change - Procedure.
My Front Axle Will Not Come Out
Loosen the axle clamps first. The axle may also be bent.
I can not get the forks to separate (upper "chrome" slider to separate
from lower 'tube')
- Did you undo the damper rod bolt in the bottom of each fork leg?
That bolt and the circlip are all that hold the bottom part of the slider
to the top part. Robin #790
- Yep (and thanks for the instant reply!) I've 'loosened' that bolt
on each fork:
- on one fork it is still difficult to turn, and won't come out
- on the other fork it is easy to turn, and won't come out
That bolt should come right out, right? jesse
- That bolt should come right out. I can't at the moment think of
what keeps the damper rod itself (which the bolt connects to) from
rotating along with the bolt. Are you sure that the upper fork leg isn't
rotating as you are attempting to loosen the bolt? It's possible that the
one that's difficult to turn is just spinning the damper rod inside the
fork. Heck, that's possible on the one that's easy to turn, too. Robin
#790
- If you have the bolts out... I shoved the tube in the slider as
far as it would go and then quickly and forcibly yanked on the tube with
one hand while holding the slider in the other to get them out. This took
several attempts. At the time I thought this can't be right, I'm going to
break something but I guess it takes that kind of force. Didn't need a
vise and heat won't help unless your cold. Maybe since yours are bent so
much you can't get a good running start yanking on them? patobravo
#1754
- Alright - finally got the bolts out and the forks apart.
The slider and were not spinning, but the damper rod was spinning inside.
I had to put the fork WAY into compression in order to get enough friction
in there to let the bolt come out. Thanks! jesse
Tricks to remove the bottom screw of the fork body?
What's the trick to get the bottom screw out of the fork body?
I got it to break loose, but now it just spins and won't come all the way
out. grofmon #1857
- Just shove something down in there to keep it from spinning while
you undo the bolt. Tempo #1908
- Yeah, I figured it out. I used a broom handle... grofmon
#1857
- Another trick is to use an air-driven impact wrench to pull that
bolt out. The inertia of the fork internals will hold them in place enough
to get the bolt out. Just don't use the impact wrench to tighten it up!
Bryan, #179
Fork Problems (Q&A)
Why does the F650 NOT have inverted forks?
If all goes well, I should be test ridinga F650 Dakar this Thursday,
and placing order subsequently. Beinga dirtbiker, I keep looking at that
spindly little set of forks and wondering why on earth you wouldn't put a
set of inverted forks on a 400 pound bike. Especially after looking at the
brochure with pictures of a guy actually jumping the beast. I have no
plans of airing it out, but I'd feel better dropping $9k if it had say
48mm inverts. HomeMadeSin
- Why, indeed... The powers-that-be at BMW are not about what's
right or good for the customer, they're about what makes money. If you can
sell all the $9000 dollar motorcycles you currently make, with low rent
damper rod forks, why would they upgrade? Harl #380
Why are Inverted Forks Better?
Flash #412, 07-Oct-01
- When the bigger tube is the longer tube, the fork is stiffer.
Stiffer means that it flexes less. If it flexes less, you have a
better sense of control and in fact DO have better control.
- There is also something called the sprung to un-sprung weight
ratio (sometimes just called un-sprung weight ratio). This refers to the
weight of the vehicle mechanically located below the suspension to the
weight of the vehicle mechanically located on top of the suspension.
- Considering the engineering extreme will help you understand why
this is important:
- If your bike and you weighed 1000 pounds and your wheels,
fork lowers and swing-arms weighed nothing, when you hit either a dip or
a bump in the road, the attitude of the bike would not change. The ride
would be super-smooth. Conversely, if your wheels and stuff weighed 1000
pounds and you and your bike weighed 200 pounds, every dip or bump in the
road would throw you up or down with the wheels, no matter how great the
suspension.
- Inverted forks put the heavier bits in the sprung
category, which improves suspension action compared to the identical
parts installed conventionally. The lighter the bike, the more noticeable
this effect.
- And that is why inverted forks are better.
Are the GS and Dakar Forks The Same?
- The Dakar and GS use the same fork lowers; the tubes/sliders are
therefore the same diameter, but on the Dakar they are longer, and they
use a threaded cap versus the clip on the GS. djw #1736
- After measuring my (damaged) sliders they appear to be the same
length as the GS slider patobravo has. Do you happen to know what the
lengths are? Dealer confirmed it's a different PN and different (~$30)
cost. Other differences, like the threaded vs. clip cap, are important
too. jesse
Just to clarify what we're talking about...What you've pictured
the fiche calls a "stanchion" (or we've called it a tube). The "slider"
(what I called the fork lowers) is the part that holds the axle. The
sliders are identical for the GS and the Dakar. The tubes/stanchions are
different for the GS and Dakar. So I'm confused if patobravo has a GS
stanchion that is the same length as yours; it must have come from a
Dakar.
P.S. After further consideration, since I have never had GS and
Dakar fork tubes side by side, they might be the same length. Different
pipes, spacers and springs might enable the tubes to extend further from
the sliders on the Dakar, giving the additional travel and the appearance
(from the outside) that the Dakar tubes are longer. djw #1736
- It is the same length/diameter as the stanchions I had on my
Dakar. The only difference, I can tell, is the 'cap'. The dakar has a
threaded cap, the GS fork has a 'pop-in' cap (I think). jesse
Are the F650 93-94 and Strada -98 forks the same?
Yes. See the Parts Fiches (thanks to
Flash #412 and Fede
What can I do about bent or twisted forks?
As a summary, a driver in the small town of Abancay, Peru crashed into
our bikes parked on the side of the street (two F650GS/Dakar 2002). The
handlebar and the top of the fork are perfectly aligned. The top of the
fork and the wheel, however, are no longer at a 90 degrees angle. The fork
is twisted by what seems to be a 2 or 3 degrees angle.
pierresas
- Loosen the top and bottom pinch bolts slightly as well as the
axle. Stand in front of the bike with your legs on either side of the
wheel and YANK it back straight, then tighten everthing back up. It MIGHT
be the nothing is actually damaged, just misaligned in the clamps.
Sometimes it looks like the FORKS are bent and it is really just
handlebars misaligned. You might try loosening the bars and yanking them
back straight, too. Flash #412
- Often bent parts can be straightened by the
Frame Man in
Sacramento, CA. Flash #412
- I dunno about the fool infected bikes. But a set of CBR600F2 forks
will slip right into the clamps of a Funduro. Flash #412
How much does it cost to replace the fork?
- With new parts? Probably $1600 or more for each bike. With used...
maybe $200 apiece. I had two fork tubes and the top and bottom clamp
straightened for $150, shipping included by the Frame Man. Flash
#412
How do I know if my forks have been modified?
I've checked the FAQs a few times and am wondering if my forks were
modified by the previous owner. Here is the situation: The front wheel
hops on relatively smooth road surfaces. It does this constantly, at any
speed. The tires are balanced. Over large bumps the fork compresses and
absorbs the shock. Small bumps, nada. todd911
- I would try the 10 wt. oil in the forks first off. If it's still
to jumpy, go to the stock 7.5 wt. So far everything is relatively cheap.
You would have to diassemble the fork to find out if any mods have been
done to it. Have you tried contacting the previous owner? My bike's ex has
been very helpful in that regard. Jetdoc, #1546
- FWIW, The first thing I do when I get a new bike, or get one of
mine out of storage, is change ALL the fluids. That way, I have a known
starting point. Oil, Coolant, Trans fluid (if it's separate) Fork oil,
brake fluid. I don't care if the seller swears he just changed it, I
change it again. Then I KNOW what's in there and how long it's been there.
I think some digging would yield the length of the stock springs and
spacer. If you can't find it anywhere, I could check my stock stuff at
storage if you'd like. If you open your forks up and there's a piece of
PVC pipe in there, they've been modified. David, #476
GS Catastrophic Fork Failure?
I own a F650 GS that I received new in June of 2000. After about 5,000
miles, I experienced a catastrophic failure of the castings on both side
of the front forks. I sustained major injuries. BMW has admitted to
knowing of 3 nearly identical failures before they redesigned the forks,
adding more material. They decided not to notify owners. I'm wondering if
any Chain Gang members know of similar failures. Gertarg '00
F650GS
- I forgot to mention that as both sides of the forks snapped, the
front wheel departed the bike leaving the bike and me doing 3 flips as the
forks dug into the dirt. By the way the front wheel is in almost perfect
condition. I didn't hit anything. Gertarg
- That is the first instance of that happening that I have ever
heard. Trevor #999
- Back in '02 I purchased some parts from a guy of the internet...I
think it was of of IBMWR, can't remember...they were new spares he had for
a long tour down south. He was injured really bad for a few months when
his front end came apart, but I can't remember if he said the forks or the
wheel itself. I talked to him through e-mail and on the phone and I'm
trying to find the records of what I purchased and then to narrow it down.
He did say that he was involved with some sort of legal action with BMW at
the time due to his situation not being the first, although his story was
the only one I'd heard of until now. I wonder if he's the same guy?
beem_dubya #1328
Fork Seals Stuck?
In the middle of replacing the fork seals, per the FAQ. Now at the
point where I guess I am going to have to use HEAT. I think I read Mal to
say "warm the slider." and Spakur says "heat the outside of the Fork."
Which is it, and where exactly on the fork or slider should the heat be
applied? davidbwatkins #651
- DBW, I did this job a few weeks ago and did not have to use heat.
My advice is to try brute force first. I clamped the fork in a heavy bench
vice and grabbed the other end (movable) and jerked it like I was trying
to tear it up. 'Had to do this more than 2-3 times before it released and
came out. If you use heat you will still have to jerk it out, I believe.
Heat the heavy portion of the fork, on the outside, around where the seal
is located, on the inside. Watch out for the residual oil and remaining
parts. Have fun! Ike647
Fork Seals Not Covered Under Warranty?
The other day, I noted that my Beemer was leaking from the left fork. I
logged on here, found out it was common, but since it is an '02, figured I
would call the dealer in Denver. I was told that fork seals are not
covered under their warranty. I asked why. He said, basically, that it
happened so frequently that they chose to exclude them from their
coverage. I thought I was hearing things! tannlege
Dave you ought to do what we do here in the UK. Don't take your
dealer's answer as the final answer. Ask your dealer for a contact email
address or phone number for your BMW Customer Services dept. When you
contact them, remember they are humans just like me and you, and so don't
get irate. Just put your point of view and request that they give an
instruction to the dealer to do the warranty work. Get their name, let
them know how great your bike is and make friends with them for future
reference.
It's often as simple as that. I've spoken to all my contacts
in the UK BMW Customer Services dept and I now occasionally act as an
intermediary to setlle warranty claims and/or excessive service charges.
There must be someone on the USA section of the Chain Gang who has
contacts with your BMW Services folk by now. Is it BMWNA you guys deal
with? Let your Dealer know (in a *nice* way) that you intend to take the
matter to a higher authority. Trevor, #999
- Dave, I agree with Trevor on this one. Don't take that dealer's
answer as the gospel. I personally know of one guy who got his damaged
fork seals replaced under warranty. I would try another dealer. After
getting them repaired under warranty, I would consider using fork boots.
Especially if you do much offroad. Seacuke #1214
- Thanks to everyone for your input. Ian and crew up in Northern
Colorado (Loveland) took care of me (although I am surprised that they
didn't change both seals...the left one was leaking but how far behind can
the right one be?) To answer your questions, it was Foothills that gave me
the runaround, and even though it is 50 more miles each way for me to go
to Loveland, I will go there (although I am going to contact the owner at
Foothills). tannlege
Fork Seals Continually Leaking?
I have been fighting a long running problem with 1 fork seal on my GS.
I have been getting about 5000km before it starts to leak, change the seal
and the process starts all over again. So, I decided to replace the
stanchion(sp?) BMW shreaded my wallet to the tune of A$303 and it came
with the sliding bush fitted (thought that would have been an extra!)
I decided to also replace the seal in the other side at the same time.
In the process I also decided to try a new fork oil which also shreaded my
wallet! Like A$39 for 2 litres. Its Silkolene VI-300 Pro RSF 10 weight,
looks purple in colour. is a fortified synthetic oil. This oil appears to
have better damping than the ordinary 10 weight I was prev using. I also
reused my extra washer spacers to add more pressure to the fork springs
than standard, making the bike sit up a little more at the front and give
me a little extra travel without bottoming, in bad terrain. An 11pm test
ride showed a nice firm, well damped front end with no leaks.......so
far! jack
- I had a similar problem with one of Nancy's bikes. Kept changing
the damn seal and it would start to leak in about 1000 miles. I thought
I'd examined the fork tube well, but finally found a little tiny blemish,
likely a little rock impact. Carefully polished it out with an Arkansas
stone and Voila... No leaks. Interesting comments on the oil. I'll be
curious how well it lasts. And at least you have a spare tube now. Harl
#380
Does fork oil get old?
I know that old brake fluid in an opened container absorbs moisture and
is best discarded. But what about fork oil? I have a half-bottle of fork
oil. It was opened, then closed about 1.5 years ago. Use it or toss it?
Raymo, #1173
- Not if it is in a closed (not factory-sealed) container. It is
"work" that makes fork oil "old." If it was left in an open container, it
may have dust and bugs and other crap in it. Bottle with a cap on, I
wouldn't worry about. I'd use it. I have, many times. Flash 412
(CO)
I must admit I kinda wish the line "Loosen the axle
clamp"
had been in large, bold font in the FAQ.
It woulda made axle removal MUCH easier.
I just thought it was so
difficult because maybe it was bent... jesse