Fuel Supply FAQs
compiled & edited by Kristian #562
Please read the Disclaimer before attempting any work in this FAQ.
For Aftermarket Tanks refer the Aftermarket Fuel Tank FAQ Classic or Aftermarket Fuel Tank FAQ GS
For Mileage Feedback refer the Poor Mileage FAQ
For Carb Issues refer the Carb Misc FAQ
Replacing the Fuel Hose: See the Carb Misc FAQ
GAS TANK REMOVAL & REPLACEMENT
by Kristian #562
01/11/01
Removing the Tank
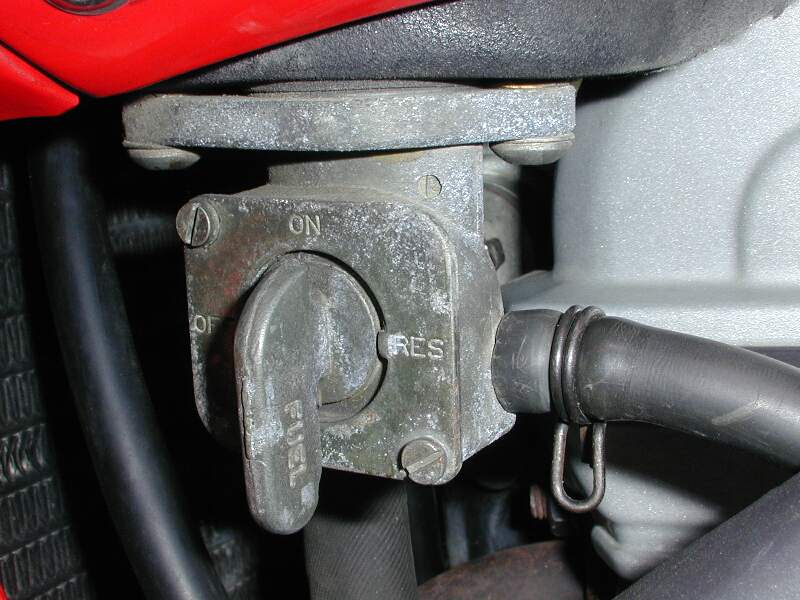
To do this you should first turn OFF the
GAS petcock. Also remove the SEAT. Preferably done with an almost empty Gas
Tank.
Then:
Remove
the fuel line at the
Petcock. Use a pair of Pliers to slide the Spring Clip
back down the line, then use a screwdriver to prise off the line. Some excess
fuel will drain out of the carbs, but it’s not excessive, so don’t fret and
don’t SMOKE.!
On the LHS of the bike Just left of the Carbs there is a small Breather Pipe coming down between the Skin of the Gas Tank and the Tank, joined together just beside the carbs with two smaller spring clips. Use small pliers to loosen one then pull the hoses apart. NOTE: On the USA model bikes there are actually TWO vent lines between the tank and tank cover that must be disconnected, one on each side.
Undo the Large Bolt Just at the rear of the Tank. It’s a 10mm. Use an Open-Ended or Ring Spanner or Socket.
Undo
the Small Allen Key Bolts Each Side of the Tank that holding the tank to the
front fairing. You can also remove the bolts holding the side fairings to the
tank, but PERSONALLY I leave these Grey Coloured parts of the side fairing
attached & remove the lot. If you do it this way there are:
Classics up to and including: '96:
- 4# Small Allen
Bolts each side on Tank itself (8# Total Small on Tank),
- 1# Small Allen Bolt each side attaching Gray Fairing piece to Tank
(2# Total Small Tank/Fairing)
- 1# Large Allen Bolt each Side (2# Total Large Tank/Frame).
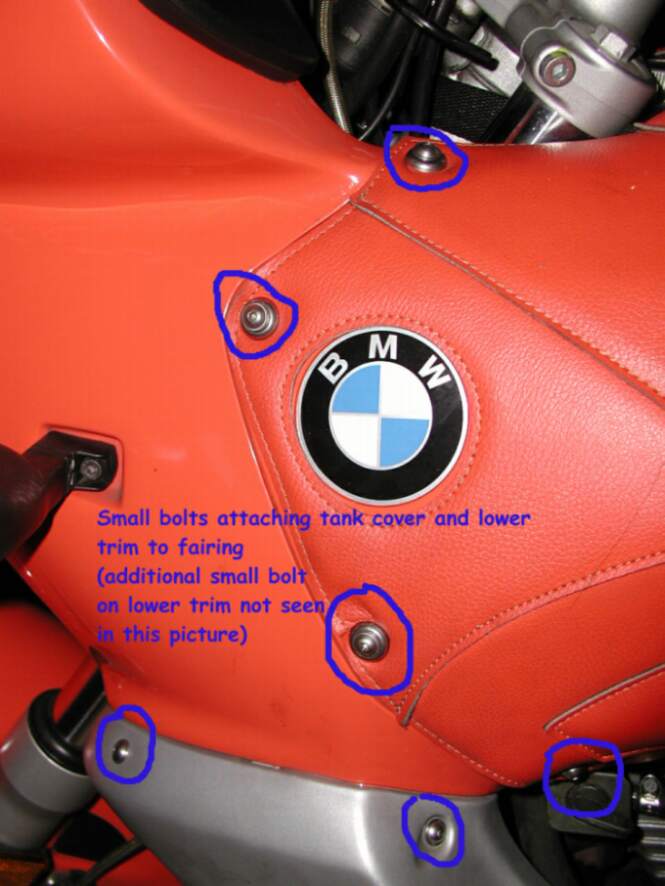
Classics from: '97 on: '96:
- 4# Small Allen
Bolts each side on Tank itself (8# Total Small on Tank)
- 2# Small Allen Bolt each side attaching Gray Fairing piece to Tank (4# Total
Small Tank/Fairing)
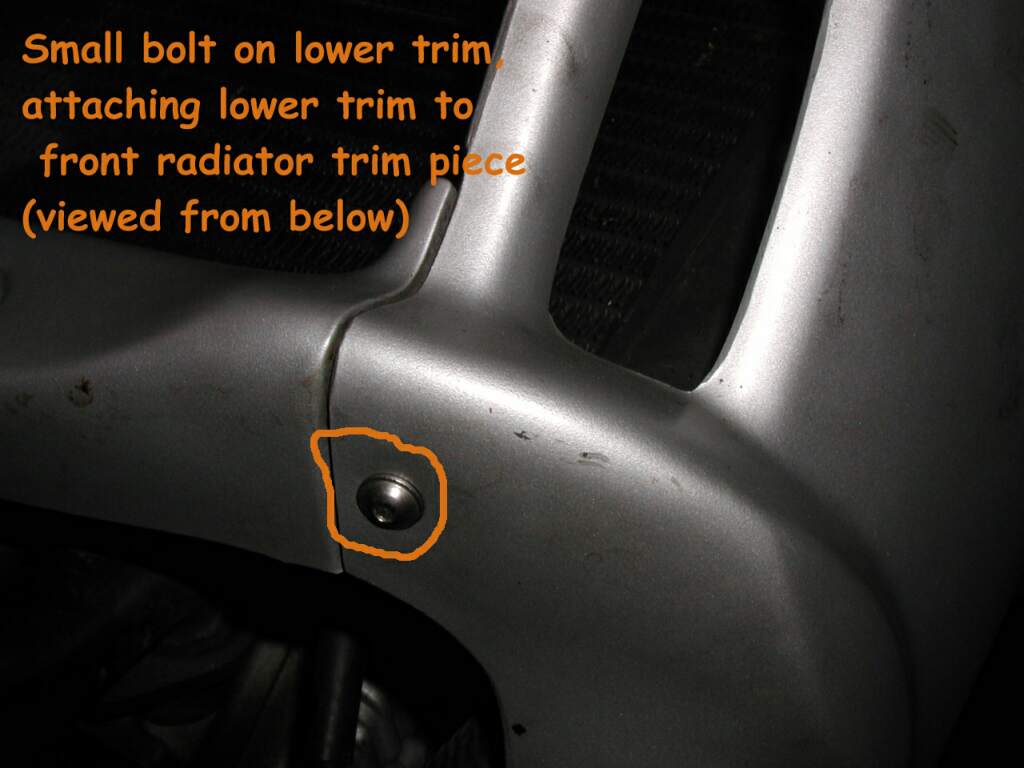
- 1# Small Allen Bolt each side attaching Gray Fairing piece to Radiator Fairing (2# Total
Small Gray Fairing/Radiator Fairing)
- 1# Large Allen Bolt Each Side (2# Total Large Tank/Frame).
If the clips turn, just stick your hand behind the tank fairing & Hold them.
These Photos are for '97on, Many Thanks to Nate for the Heads-up.
OK That’s all the Bolts. Now if you LEFT
the grey fairing bits below the Tank attached, GENTLY disengage them from the
FRONT fairing of the bike, by pulling from the bottom and bending upwards.
Grey Side Fairing Removal Location
('96 Classic Shown).
Do not try to lift off the Tank at this stage. Note that the “Skin” of the Tank
remains attached to the Tank. i.e. on My Bike the Red skin on the Black Tank.
Do not try & prise them apart.!
OK now that the side units are free, you can lift off the tank. Do this by gently pulling the whole thing back about 5-10mm, then back and upward OFF the Frame. Tank Lifting. Have a Saw-Horse ready or better still a railing with a cloth over it and place the Entire Tank over that. Temp Tank Storage. Lift with one hand under the rear of the Tank and one down from the top into one of the fork wells. Tank Lifting Up.
They are flat Tabs on the Classic, no locking devices. The
Tabs on the Tank just push in/pull out, the ones on the grey side pieces/tank,
you have to slightly bend the grey pieces out at the bottom, to disengage
the tab, which has a small kink in it.
With the Tank off it is a good time to Consider a Petcock
Filter Clean and free up your Petcock.
Tank Replacement:
Holding
the tank with one hand under the rear of the Tank and one down from the top
into one of the fork wells recesses, Feed the tank onto the front round rubber
Mounts. Feed it on by lifting the rear
of the Tank pushing forward, then gently lowering the rear. Do NOT push it all the way at this
stage. Leave a couple of inches from
the from fairing.
Now
go around the front of the bike and check all three of the plastic locating
Tabs on each side line up with the holes in the front fairing.
Check
the Breather
Pipe on the LHS of the Tanks hasn’t jammed under the Tank. Major PITA to remove it again just because of
that.
Go
round the back again and push it forward until all the Tabs slide into
place. If you left the lower Gray
fairing bits attached to the tank lift them out a bit so they go past the front
fairing.
Push
the rear off the tank as far forward as you can, place and tighten by hand then
torque the Tank retaining Bolt.
Do up
all your Allen Key Bolts (NOT TOO TIGHT, some Blue Loctite these closed, but I remove
my tank quite a lot)
Reconnect
the Breather pipe & Clamps
Reconnect the Fuel Line and Clamps, Turn on the petcock.
Sticky or Hard-to-turn Petcock Problem
by Omnikron
Well for me, my fuel petcock was almost impossible to turn! So I took it outside on a day when I knew I wouldn't be riding the bike (cause I just knew I was gonna get gas all over the place) and unfortunately, I had a full tank.
Please do this OUTSIDE, in a well-ventilated area and do NOT smoke. Keep the Tank and any spilt gas away from Naked Flame, sparks and children.
So #1 recommendation is to have a near-empty or empty tank. If it's not been "driven" to empty, you can simply undo the fuel line from the petcock (Pull the clip back after squeezing with a pair of pliers), drain the GAS into an approved container, and refill it back into the Bike after cleaning, if your Tank is still a bit full.
If you have the Tank OFF the bike, e.g. for a Valve Check, Carb Clean, laying it down on its side on a wad of cloths with the petcock side UP will also allow you to remove it, even with some gas in the Tank.
Switching the Petcock to OFF won't help you.!
Remove the two screws holding the metal casing that surrounds the petcock and slowly and gently remove the cover and the copper-looking washer. NOTE!!: The metal on the bolts and petcock housing is very soft and the threads can ruin easily.
Now you are looking at the petcock from the cross-view and you can turn it back and forth and watch it work, but be careful, because the force of the gas pushing against it will most likely push out the petcock and will spray gas all over the place. Its what happened to me, but I just stuck my petcock back in where it came out of and it held. After that, I sprayed silicon around the edges and all over it. I put it back together and it works wonderfully now. Its SO much easier to turn. I'm not sure if it was the silicon or just the speed of the gas exiting the hole that perhaps cleaned it out but whatever it was, it works a WHOLE lot better now.
You can get Silicone Spray from most auto shops.
There is nothing to it. Just put the washer back on, and if it gives you some trouble trying to get everything to go back properly, just be patient and make sure the washer fits in the groove before you tighten those screws down.
You may need to repeat this at your 10,000kms Service Intervals.
If you happen to strip your petcock screws undoing them,
the petcock for the Aprilia Pegaso appears identical to the Funduro
classic's, with one major plus; it has a big plastic handle instead of the
lame-o lever we've got. Costs about a buck more for the pleasure. NormJ #473.
Hard-to-turn Petcock Experiences
I'm having a problem with the petcock - fuel flows even when shut off. I know that there is a rebuild kit for it. Anybody else have this problem? If so, were you able to fix it with a rebuild kit, or did you have to replace the petcock? Any ideas about the cost of the kit VS a new petcock? I checked the FAQ's, but couldn't find much about the petcock. Tom in Tallahassee
Is it just me or do any of the rest of youse guys and gals
have problems with the fuel petcock? I mean, mine is so difficult to turn with
my big hairy sweaty arthritic hands. And going from "on" to "reserve" is
brutally painful. My fuel petcock is so difficult to move that I'm actually
considering paying the $23 for a new one that my dealer doesn't have in stock.
Either that or I'm gonna perform some surgery and attach a huge honkin' piece
of metal (rustified to my specifications) to make it easier to turn that dang
thang.
Yes, I made many sacrifices to the gods of lube and sprayed it profusely with
a plethora of spray-on slippery stuff. Nothing has worked. I replaced all the
rubber bits inside, the lil' face plate screws are as loose as they can be
without it leaking and still it's difficult. I just wanna know if there are
any other Chain Gang Geezers out there with this same problem and if so, what
did you do to fix it or did you just decide to live with it, did you replace
it with a billet unobtanium/carbon fibre one from Slow-By-Sarducci or did you
just stuff a big hose in there and the hell with a reserve or what. I'm
getting desperate here, my left hand hurts and not for the usual obvious
reasons. Shank NYC USA
Take it apart. Remove and grease the o-rings. Reassemble in reverse order. Gotta do that every now and again. Consider doing it as part of the 6k interval circus. It sure helps if the tank is empty OR you remove it as the sidestand is on the left and you have to lean the bike to the right to make the gas go away. I find that doing it while I have the tank off for something else is easiest. But others have reported that it IS possible without removing the tank. Flash #412 (CO)
So has anybody had a fuel petcock that is REALLY hard to
turn? Mine must really need cleaning or something special. Do I have to take
it apart to make it easy to turn? I looked in my BMW manual and couldn't find
anything nor could I find anything on this site! I basically have to stop the
bike at the side of the road and take my glove off to turn it, because I need
such a tight grip.
Omnikron.
Try using one of those hand-exerciser things. Just kidding ;) I have the same trouble, not quite as bad. I have taken mine apart, and found that there's nothing you can do (I think). Very minimalist inside, no opportunities to adjust the tension. An o-ring and a spring washer. You can't lubricate it (gasoline, right?). When you put it back together with the screws appropriately tightened, it goes to it's natural state of tension. Bummer. Then again, there might be a narrow sliver around the spring washer where a little grease could go. Anyway, it's easy to open and put back together, so have a look. Aleksander.
Try silicone spray. It doesn't rot rubber, and it's largely petrol repellent. Pete
Managed to strip the threads on the small petcock screw (the one nearest the "on" setting) whilst taking it apart to free it up (it was very sticky and hard to turn to reserve). It looks like there is not enough of the very soft metal to go to a wider screw, but perhaps enough to tap another 1/8" or 3/16" deeper on the same hole. I just went to home depot and bought 2 #6 x 1/2" self-drilling hex heads. Bored right through the soft metal and seated everything well. Not leaking yet. NormJ #473.
Ruined my petcock. I've put in a longer screw, can't recall how much longer, and used a tiny lock washer so I would be less tempted to over tighten. I plan to re-tap the holes with a coarser thread, if I ever get around to it. Very, very soft material; if I ever have to replace it, I will definitely not get the BMW OEM part. Aleksander in Dubai 98ST.
You probably could go with a longer screw, some sort of self tapping one would probably work. The good news is, if it doesn't, a new petcock is only about $27.00, I just replaced mine because it wouldn't shut off. Just to warn you, I found out that the hex screws holding the petcock to the tank are made out of some incredibly soft piece of sh** metal that my hex key basically destroyed removing it. Be prepared to go to the hardware store or the dealer for replacements. Tom in Tallahassee.
My fuel petcock is unreasonably stiff. Almost impossible
actually. Not that it matters because even when I switch to reserve the bike
surges, stalls and dies. Once pulled over the engine restarts like nothing
ever happened. Does this happen to anyone else? Thomas Stewart 97 f650st
orange.
by NormJ #473
Petcock Removal and Tank Screen Cleaning FAQ.
If you have never removed and cleaned your petcock and in-tank screens, you
should. And as I discovered when doing my own 24k maintenance, none of the 3
previous dealer 6k services had actually done the work. When I removed the
petcock to clean the screens, there was an amazing array of plastic shavings,
sand and unidentifiable particles collected on the reserve screen. My guess is
that the plastic shavings are remnants from the manufacturing process, and
sand and other junk blew/fell into the tank during fueling.

This really should be done with the tank removed for the reasons explained in step 5 below. See the Tank Removal FAQ for details. Also, you should wear rubber/vinyl gloves to prevent neurological damage from the gasoline.
Drain as much fuel from the tank as you can by turning the petcock to reserve and tilting over a suitable container, such as your oil collection pan. You should theoretically NOT be able to completely empty the tank; there is a slight sump wherein water can settle and thus not enter the reserve tube.
Turn the tank on its right side and carefully remove the 2 hex head bolts securing the petcock; it takes a 4mm wrench. I strongly suggest using your high-quality T-handle and taking your time. The metal on the bolts and petcock housing is soft and threads can ruin easily.
Gently remove the petcock by pulling straight out; this would be down if the tank were on the bike.
Gently place the petcock on a cloth. Then, work the tank around to slosh out the remaining gas into your collection pan. You are likely to see more gas than you expected (1/15th or 1/10th of a Litre), plus maybe some water and more particles than you thought you'd see.
Gently clean the gunk from the tubes, screens and the joint where the tubes join the body of the petcock. A soft toothbrush, a little gas, and med-high pressure air are great tools. The long tube appears to be removable by simply pulling it free, but it is not necessary for cleaning it well.
If you are having trouble with the lever being sticky or stubborn, CAREFULLY remove the two small screws holding the plate and lever in place. BEWARE - the petcock body is very soft. Several inmates have ruined their petcocks by stripping the metal when disassembling or screwing the plate back on. Clean and reassemble as per the Sticky Petcock FAQ.
Gently reinsert the petcock into the tank and re-secure the bolts; be careful, you're screwing them into plastic. Be Gentle. At this stage you're wondering, should I use a Sealant? Mine and quite a few others didn't leak, the gasket was just fine, but I guess in case it dribbles, a sealant is one cure, although a new gasket might be a better solution. If you use a sealant, then find one one NOT affected by Petroleum.
If you have not yet installed an inline fuel filter between the petcock and the carbs, I highly suggest you do it now. I found several particles in my filter that I cannot understand how got past the petcock screens.
So can I clean it without removing the TANK?
Classic F650
by Johnny #862
Maybe I'm the last one here to figure this out, but the fuel screens can be cleaned (or the petcock replaced, in my case) without pulling the fuel tank as instructed by the factory manual. It takes a bit of fidgeting with the Allen wrench, but it can be done. I didn't take the time to do it, but best would be to weld about a foot of steel rod to the 4mm Allen wrench needed so you could get at the two securing screws from below the bodywork. As it was I loosened the panel under the fairing at the front two 3mm screws and that provided room needed to get the wrench in there. The screens were perfectly clean at 9k miles but there was quite a collection of black plastic shreds at the base of the screens which were likely left overs from machining the tank. Pretty harmless sitting there.
Ah, sorry, yes, it's a '98 classic. I should have mentioned too that I was impulsive enough to take this on with a full tank. Holidays now so I felt I have the time to do this. I used a manual gas pump from Griot's to remove several gallons and then pulled the gas line off the petcock and replaced it with a short piece of tubing to drain the rest (on reserve, of course). I can't tell that there was anything wrong with the original valve, but I was definitely able to ride for miles with it closed occasionally. I might have massaged the old valve and got it to work. I did take it apart and could find nothing obviously wrong, but neither could I explain why at times I could run for miles with the thing off. The replacement, "Made in Italy" is only about $20 so I just replaced it. This one is much stiffer to turn!
Feedback:
Coincidentally I just came up from the basement where I pulled the petcock apart and put it back together. I didn't pull it off the tank, just disassembled, cleaned, lubed (a touch of white grease on the spring washer and "o" ring) and re assembled. Operates much smoother now. As for "able to ride for miles with it closed occasionally", I have found the bike will go about 3/4 mile on dead closed. Rand #1111
Close the
Fuel Tap?
Q. In the BMW owners manual, it says to "ALWAYS CLOSE the fuel tap when the
engine is switched off"...I've never heard that... I've only thought to turn
the fuel tap off when I'm storing it long term.
Yes. Keeps it loose. Chris in Santa Cruz, CA #782
If either carb's float needle fails to seat, possible to drain fuel tank into cylinders (or floor, see "puking petrol" syndrome), at least on some bikes. Cranking on cylinders full of fuel can damage engine (bent conn. rods). While not likely, just easier to turn off the tap. Marty #436-Chicago-97.
And if you park inside near a fridge, water pump, or heater, you might save your house from burning down if the carbs leak. Todd #389.
I've been riding bikes for 37 years and never turn the gas off unless I am gone for a few days or more. Never had anything happen. But, as mentioned above, it will probably not hurt to do it occasionally so the valve doesn't get stuck. Colorado Bob.
Pet Cocks revisited. I always turn off the petcock when parking the bike. Don't want the weight of the fuel on my float pins wearing out the rubber nipples (that's nipples, not niggles). Also, the petcock is getting easier to turn but then that may be because it's warm out. Very warm. Shank.
Aftermarket Fuel Filter FAQ
by Steve Johnson, F6501, updated by Kristian #562
In-line Fuel Filter
 This filter is similar to Prime Line #7-02357 and available at O'Reilly Auto Parts.
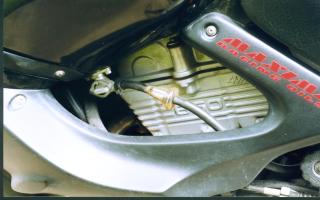
One very necessary item that every bike should have is an external fuel filter. A see-thru type is the best. The rider can see what kind of garbage is collected before it gets to the carb. Easy to install and cheap, it is the best insurance around. Shut off the gas, cut a short section out of the line, and install the filter. Be sure to check for correct flow direction, usually indicated by an arrow on the fuel filter. See photo.
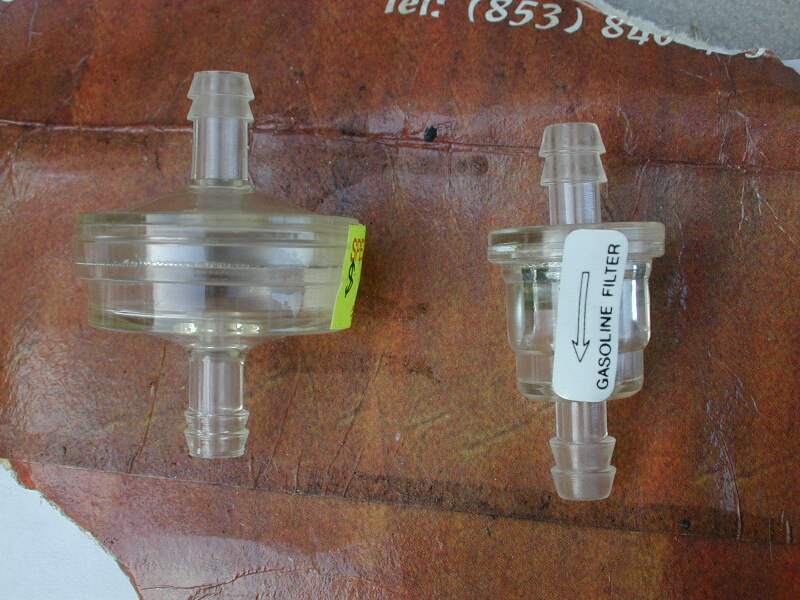
Here's a close up of a couple of Aftermarket
Fuel Filters.
Note the following when buying/installing a fuel filter.
There is already an inline fuel filter in the T-Piece connector between the Carbs. Refer the Carb Cleaning FAQ for Details of where it's at.
A LOT of people of have had problems with vapour lock when using the larger see-through filters, but no problems since switching to the tiny ones. The theory is "the smaller quantity of fuel in there produces less vapour and cycles through fast enough not to cause a problem. Smaller within reason....I have heard of tiny ones supplying insufficient fuel flow as they start to get plugged up (a good reason to get a spare one to carry in the saddlebag). If you get 40 miles per US gallon at 80 mph, you are flowing 2.0 US gallons per hour, which is 126 cm^3/minute. You could check your fuel filter's performance by sticking a filter on a piece of fuel line, attaching it to the petcock of a nearly empty tank, catching the flow in a 12 ounce cup and timing the exercise 'til the cup is full. 12 fluid ounces is 354 cm^3, so it should take 354/126 354 cm^3/(cm^3/minute) = about two minutes to fill the cup if your burn rate is 40 mpg. MORE time is Bad. Less time is GOOD. (Because your filter should be able to handle the flow that the Engine needs) Great, a new field event... Petcock Races. Flash 412 (CO).
There are of course people who have two very large in-line filters on the bike and have never had a vapour lock problem. YMMV.
You want to make sure that the final placement of the filter allows you to see it and keeps it away from the heat of the motor. Start long and trim the hose down until it looks right.
Don't install the inline filter until you have completely put the bike back together including the new fuel line and all body work. You want to make sure that the final placement of the filter allows you to see it and keeps it away from the heat of the motor. Start long and trim the hose down until it looks right. Chris #782
Also check the DIRECTION of the inline filter........there should be an arrow showing the correct way of the fuel flow ... it should be pointed toward the carbs (grin)...I remember a thread or a FAQ that talked about inline filters etc... I use one of the those little Karcoma inline filters I got from bing when I was rebuilding the carbs for my other bike...it works great....I am sure that there are others out there as well. Nick #1085
Q. I installed an aftermarket filter on my '97F. It's a glass one with replaceable element from Pep Boys ($10). I notice that it doesn't usually fill up with fuel. Sometimes it does, but more often it just has a little in the bottom and you can see it trickle in the top as the bike is running. That's my first question - why doesn't it fill up, located under the tank as it is? About 400 miles into my Saturday ride this weekend, I hit reserve. Pulled off to go to a gas station about ten miles later. Waiting at the stop light, the bike dies and it won't restart. I push it off to the side, pop the gas cap and shake the bike around to see if I can hear any fuel in there. I do hear some sloshing, then the filter starts filling up. Then, of course, the bike started. What was going on?
Throw away the glass thing for two reasons. GLASS on a dirt bike is not a good idea. And, as you have found out, the BIG thing will vapor lock. Buy a $1 throwaway item in any dirtbike shop. Flash #412 (CO)
and as flash has so eloquently told me before... purge the air from the line... I used a small plastic Karcoma that would never quite fill all the way up...purged the air from the line...voila ... works like a charm... for an 'letricul 'ngeneer he does make some good suggestions... Nick #1085 Glenwood NJ 07418.
You know I have been thinking about this one and I remember back when the F650 classic first arrived at the dealership , we uncreated it , did the PDI and the darn thing would not start. Happened on most of them and I have seen this happen when they sit for a while. I am a bit surprised I haven't read more of this problem with the classics. Problem is the gas doesn't flow on its own. It is like a pump that loses prime. You sometimes have to prime them pump. I coined the phrase the you need to give it a blow job. You do this by disconnecting the fuel line from the tank and blow the gas into the float bowls. Taste bad works good. I don't know if this will fix your problem but it has worked many times for me on classics that have fuel, spark and compression that still won't start. Good Luck F650GS Dakar, Oregon. Steve 1130.
I went to pick up my bike from the shop yesterday (not a BMW dealer) after a major service, and the bike started up okay. It ran 1-2 minutes, I put it in gear, and it stalled. It would just about catch, then stall - 2-3 times. I couldn't see any gas in the fuel filter. We added gas to the tank - still no gas showing in the fuel filter. The shop had the tank off, cleaned the screen, lubed the petcock, etc. Any ideas as to why gas apparently isn't getting through? The bike is a '97 Funduro w/48,000 miles, stock. Answer! The shop evidently took the in-line filter off and put it back on after reinstalling the tank, etc. There was an air pocket in the hose that had to work out. The bike started right up not long after I left. I guess the lesson is "patience". Plus realize it may take longer to start. It did take longer to start than when you switch to reserve. Yeah, the in-line filter was on backwards for a year - the shop discovered it and turned it around. I guess it worked fine as far as gas flow went, but wasn't filtering anything . . . . details :-( Muriel #582
Split the problem in two. Unhook the fuel line at the petcock. Put a container under the petcock. Turn on the petcock...does gasoline come out (at a decent flow rate)? If not, the problem is with the tank/petcock/filter screen/vent. If so, the problem lies with the in-line fuel filter (OEM and/or aftermarket), fuel line or carbs/floats/needles. To venture a wild guess (this assumes that the bike was stored with carbs full of gas, and hadn't run since last year)...I have had the float needles "stuck" into the off position by varnish as the volatile portion of the fuel evaporates. A few good raps with the end of a screwdriver handle can sometimes dislodge them and get things flowing again (YMMV, wield that screwdriver with caution, carbs have been known to crack). This also assumes that the problem is fuel related. Marty #436-Chicago-97 F650F.
Last summer while riding on a rough dirt road at slow speed in high gear the engine died because of fuel starvation (2000 F Classic with Acerbis tank). The fuel line was empty; the tank half full. I disconnected the line at the pet cock, filled it from the tank (to let air out), reconnected the line, and the bike started again immediately. Five minutes later, same thing, and so on. I opened the filler cap, suspecting vacuum because of a faulty cap. No improvement. I used a long spare fuel hose to make a bypass outside of the fairing to eliminate high heat from engine near auxiliary fuel filter. Some improvement, but no total cure. Next day no problem. I put short hose back, inside fairing. No problem for a few days. A week later, riding slowly in stop-and-go traffic in city, the same problem. It always seems to happen when tank is half full (or half empty). I suspect vapor lock because of high heat beside auxiliary fuel filter. Werner #547, '00 F650 Classic, '91 R100 GSPD, Canada.
What about Clamps to re-attach the Hoses?
I did exactly what Gim did with the spring clamps. If your filter has the proper size ends (nipples), you don't need much of a hose clamp, and the screw type hose clamps for such small tubing can put excessive stress on the plastic nipple - I have seen several such plastic nipples crack from over tightening (be careful with clamps on the radiator nipples!) . So I did what Gim wants to do: Clamp11,9 BMW part #16 11 2 345 077 Actually I stopped in to a Stihl garden tools dealer, as they use similar (metric) clamps in small gasoline motors like weedwackers. You can also sometimes find such clamps in packets in assorted automotive hardware displays, or sometimes in the small drawers of specialty parts in hardware stores. Todd #389.
http://www.aboveboardelectronics.com/heyco/Page5-12.htm Gim. Giovanni.
Gas Tank Lock
Q. Does anyone know of an alternative to the BMW for a new lock cylinder?
The key broke off in the lock for the gas cap. Drilling the lock through worked well enough to remove the cast piece for the cap. Further filling and hammering with a nail set removed the the remaining bits of the lock. The most frustrating thing has been the dealer. When asked about price for a new cylinder they quoted me $280 Canadian. After regaining my composure I said all I needed was the lock cylinder and that couldn't be the right price. In fact that is price of the cast piece that bolts to the tank. They then looked further and a found a price of $130 for a lock and key. But I must give them my key code. There must be another source for such a small piece. I seem to remember others inmates mentioning European car repair shops a possible source. Does any one have specifics on this? That is, a car model that uses the same lock or better yet an actual part number. Adrian#668, 97 Funduro, 01 Dakar.
A. Nope. Not yet. Sorry.
Removing the Gas Tank Restriction for easier filling.
(NOTE!: Appears to ONLY apply to US Models and WILL VOID your WARRANTY)
Filling a "classic"....from a gas can or at a station is not pleasant. The small hole keeps you from seeing how much you put in and at the station the spring thing that surrounds the hose nozzle (at least here in NJ) doesn't fit into the larger opening ; just scratches whatever it contacts. A while back someone mentioned that they cut off the small hole with a hacksaw thereby eliminating most of the unpleasant part of filling up. It enables you to see better and the spring thing can be held back so no contact is made with the tank. I'm sure doing this is easy, but I thought many of us would like to as well and any additional comments and/or suggestions would be appreciated. It's really a good idea and the thought of not struggling each time I fill up makes this surgery a "must".
I did the same with the F650, except as the filler funnel bit is all one piece of plastic, used a hacksaw to remove that unwanted section (be sure to leave the part that the gas cap gasket seals against, and be sure not to contaminate the tank with plastic "sawdust"). Resulting filler hole is now larger in diameter and easier to fill while still being able to watch the level. It's been over 18 months since I did this mod... I remember the six bolts (only half of which have to be removed, if you know which ones are which). The single one that you talked about was a pain to remove, and even more so to replace (the spring loaded cap keeps interfering). If I remember correctly, you may also have to remove the "decorative tank cover" (the painted shell that covers the stock gas tank) to remove the funnel bit. I also remember a gasket that was finicky to get lined up just so to realign all the parts (under the funnel?). I know the funnel bit IS removable, because I distinctly remember hacking away on it while sitting on my front porch (I touched up the "rough cut" edges with a file). There is a little "vent tube" and/or hole cast into the funnel, don't mess these up. This was on a 97 Classic, maybe the design changed? Absolutely keep the funnel away from the gas tank while cutting. I'd also wonder what this particular BMW part costs if it should NEED to be replaced (EPA regs or something?). Guess this particular mod was is the brain cells I torched rallying this summer. As always, proceed at your own judgement and risk, YMMV. Marty 436.
Where does the "Fuel Cap Drain" Drain to?
Q. I have a 98 classic, and I seem to remember when I first got it if I spilled some gas when I was fueling into the little black channel around where the nozzle goes that it would disappear. This is no longer happening. I went to fill up the other day after a heavy rain and I opened the cap to see all this liquid running from that channel into the gas tank. This is not a good thing as it was water but the bike has run ok since anyway just don't want to make a habit of it. My question is is there supposed to be a drain for this channel and if so where does it go? What do I need to do to check to see if this is clogged? If anyone has some pictures that would be great.
The well the filler cap fits into drains thru a small hole in the LEFT side, thru the left side tank tubing. The right side tubing is the internal tank vent that goes thru the check valve in the filler cap. There is a detailed schematic (drawing) of the vent/drain tubes in the FAQ's under reversed vacuum tubes routing or the Canisterectomy. (Diagram at the bottom). Be careful when opening the filler cap when it's wet out - the cap tends to collect a teaspoon of water between the top of the gasket and the filler cap body, which drips into the tank completely un-noticed when you open the cap. Todd #389.
Pull the tank and follow the hoses find the right one and give 'er a big blow OR find where ya pinched the tube last time the tank was off. Mike.
That's why there are drain screws at the bottoms of the float bowls, to let out the water that migrates down there. Flash #412 (CO).
by Flash 412 (CO)
Q. I assume I have to take it apart to clean it? Are small pieces and
springs or something going to come flying out? Fairly recently somebody on the
site said the check valves in the cap can get plugged up. In the FAQ it says "If
the canister is gone, then the hole in the vent cap may be clogged with dirt" or
some words to that effect.
A. The gas tank vents via a hose, not through the cap. Revisit the
Canisterectomy FAQ.
The cap lets pressure past the seal between the cap and the inside of the inner
tank to the area between the cap and the outside of the inner tank. You are not
looking for a hole that goes THROUGH the cap to the outside air. You're looking
for the action of the spring-loaded portion of the cap that contacts the inner
tank in order to "vent" properly. The spring loaded thing need withdraw only
slightly to allow it to "burp" to the enclosed area where the hose hole resides.
(I'm not even sure that there is anything to clean or SEE associated with gas
tank venting.)
Years ago mc gas caps had a literal hole through them, a vent hole to the air,
that became clogged. This hole was generally under the cap, outside the
perimeter of the sealing surface of the tank. Sometimes it was even on top, in
the middle of the gas cap. It ain't like that no more.
Actually, the interior of the cap is much more complex than most would
realize, with a couple flap type check valves. Take it apart some winter just
for fun.
Feedback:
Acerbis tanks excepted...(mine vents through the keyhole in the lock). Marty #436-Chicago-97 F650F
How
"suddenly" should the effects of running low on gas kick in?
Q. Last week, I was riding downhill on a curvy dirt road when my engine
sputtered once or twice and then very quickly shutdown. So fast in fact that
my rear wheel locked up and sent me high-side before I could engage the
clutch. Sure enough, when I dusted myself off and picked the bike back up, it
was at about 150 miles and wouldn't start back up until I turned the fuel tap
to reserve. This is my first carburetted bike in a while, but I still tend to
think I should have a little more warning before running out of fuel. Any
advice would be great.
A. Sudden (engine) death.
On flat roads I normally get a good amount of sputtering for 30-45 seconds (guesstimate) before it dies completely. On a fairly long steep uphill section of Rte. 2 in western Mass. I once had no warning whatsoever- it just died suddenly in a corner. I attributed that to the fact that the petcock is at the front of the tank, and going uphill would drain the fuel to the back of the tank, away from the petcock. I would think that going downhill would have the opposite effect, but what do I know. James #523 CT USA '99
My 97ST with 53,000 miles will sometime give warning and sometimes die right out. At 150 miles I start watching my see through gas filter. I have noticed under higher speeds the warning is less than at lower speeds. Scott#264.
Remember that when you're going downhill even with the throttle totally closed against the stop, some fuel is still going into the cylinder, so it's quite likely if it was a long downhill that the float bowl would have been *sucked* completely dry. If as you say the wheel locked up, then it seem you were in a lowish gear using *engine braking* which would leave you with no fuel in the float bowl, once you tried to open the throttle, hence the lock up. Trevor #999, Bristol, UK, 01GS.
While riding along, turn off your petcock to find out how it "dies." Flash #412 (CO).
That's typical, you do get SOME warning, a slight loss of power and change in engine tone, about 30-60 seconds. I've had the same happen to me in the middle lane of a three lane freeway. All I can suggest is watch that mileage :). Pete.
Not a common Breakage Item!
BRACKET 46 51 2 345 258. Marty #436-Chicago-97 F650F
Cracked Fuel Tank Support Bracket - 1996 BMW F650.
I took my fuel tank off the other day and noticed that the metal bracket that
bolts to the frame and supports the rear of the fuel tank (a bolt passes
through the tank and a bit of rubber and into the support plate in question)
had cracked around the right frame mounting bolt hole. I have the 27 litre
tank. Does anyone know the BMW part number for this bracket/plate ? Anyone had
this problem, I wonder if the extra weight of the 27 litre tank is a factor ?
(I was replacing the carb o-rings and hence needed to remove the bracket to
get the carbs out.) Thanks, car0tene - 1996 BMW F650 - AUSTRALIA
Q. Filler
cap leakage? Is it possible to get water into the fuel tank from my filler
cap, even if locked when for example I wash the bike or under some heavy rain?
A. Yes. It is also possible to get water in the tank from condensation
AND from filling up while the truck is delivering gas to the station. Flash
Removing the COLOURED SKIN off the Tank?
by Flash #412
Q. Is is possible to remove the plastic body panels off of the fuel tank
without removing the fuel tank? In the fuel tank removal section of the FAQ, is
says that you aren't supposed to pry them apart, but does that mean that it is
an unnecessary step, or that it cannot be done? My intention was to remove the
plastic so as to modify (paint) it... I was hoping it would just pop off with
minimal hassle. Robert in Texas #959 -- Black '97 Classic.
A. You can pull the color part off the tank without removing the tank. Take all the screws out between the cover and the fairing. Take all the screws out between the cover and
the engine
covers. Take the rear bolt out. Removing the CAP is a bit tricky. You need to be
especially careful not to over tighten anything when you reinstall it.
Feedback
Leaving the plastic on the tank is just a short cut. I believe that the BMW method of removing the tank calls for removing the entire plastic fairing and then removing the tank. Richard #230
You will STILL need to remove all those fairing bolts/panels, and likely the BIG mounting bolt at the rear of the tank in order to slide it rearward enough to get the tabs out from underneath the fairing. You'll still have to unscrew all those screws holding on the gas cap assembly to remove the beauty cover. You might save having to disconnect the fuel line (and cannister and vent line, if still applicable). If it's a matter of having a FULL gas tank, perhaps it might make sense to drain it through the petcock into a large (or several small) gas can(s) first. You could conceivably leave it resting on the bike but just slid rearward a coupla inches (but very precarious, especially if unattended with no gas cap!). If you have no need/intention to remove the beauty shell that covers the tank from the tank, just remove the tank/shell as a unit. (This assumes you're trying to get the tank out of the way to fill the radiator or something). Just be sure to "block up" and support the removed tank so the weight of the tank isn't resting on the petcock! Marty #436-Chicago-97 F650F
Problem: The problem
is, it doesn't seem like my bike has a reserve. At about 180 miles (classic F) I
run out of gas. Switching to reserve doesn't help. What does help is leaning the
bike over to get that last little bit out of the right side of the tank. Could
my "reserve" inlet be leaking into the "on" inlet? Any help you can offer will
greatly improve my marriage (otherwise known as, my wife is getting sick of
standing around in the middle of nowhere while I go off looking for some dirt
bikers with extra gas). '97 F650, #1291.
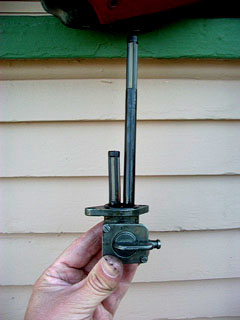
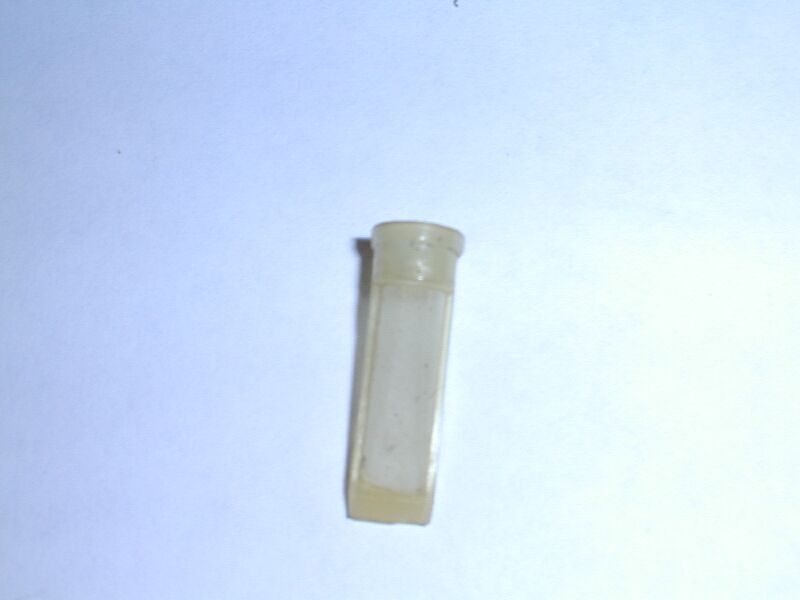
Solution: Run it out of gas. Lean it over to the right. Remove the
petcock. Look at the petcock and see if there are two tubes of different lengths
on it. If not... fish the missing tube(s) out of the tank and shove it/them back
in the hole(s). The LONGER tube is for the ON position. The shorter (or no) tube
is for the reserve position. You can figure out which is which by blowing
through the tube(s). Flash #412
If you are losing gas, check the PUKING PETROL FAQ.
Feedback:
Check you aren't mistaking Reserve for the Main Tank. Easily done, and you basically run the WHOLE tank dry then switch to what you THINK is reserve and it's the main, so of course there's no Gas there either!
Also check that the tubes seat properly and are not warped to the point that fuel can still pass where they join the petcock.