
Miscellaneous Carb Questions FAQ
compiled & edited by Kristian #562
Please read the Disclaimer
before attempting any work in this FAQ.
If you are looking for performance-related carb information See the Rejetting Spreadsheet accessed via. this link Performance Mods Section
Straight to the
Carb Clean FAQ
For Aftermarket Fuel Filter Q's
and the OEM
In-line Fuel
Filter.
For Petcock Q's.
For Idle Q's
For Canister Q's
Carb Primer
by Flash #412
Please read the Disclaimer before attempting any work in this FAQ.
October '01
This is a carb primer for those with little or no understanding of this device.
If you're carburettor literate, move on. If you're carburettor ignorant, you
might like this... "Carburettor is NOT Latin for 'don't mess with it.'"
Fuel and air need to be mixed in the proper proportions in order for your engine
to run. The device that atomises the fuel is your carburettor (unless your motor
is fuel injected). Due to the relationship between the volume of a sphere and
it's surface area (spherical surface area is about 12.6 r^2 while spherical
volume is about 4.2 r^3), smaller drops ignite better by a factor of three times
the difference in the radii. Producing these small drops at idle as well as wide
open (WFO) requires more than one method of atomisation. Hence, your carb has
three distinct fuel circuits. The simplified view has one single air circuit.
If you look at a carb, you'll see that it is a fancy, glorified pipe through
which air passes. When you twist the throttle, a slide raises in the carb
throat. This may or may not happen with the engine NOT running due to
differences in design. But anyway, this slide controls the amount of air allowed
to go into the intake manifold. The intake manifold is whatever is between the
carb and the hole in the head containing the intake valve(s).
The float chamber is an area inside your carb filled with gasoline, whose
level is more or less carefully controlled. There is a float in there, sorta
like in the back of your toilet. You access the float by removing the float
bowl. The float is either solid or filled with air. In any case, it floats in
gasoline and is made of material impermeable to that solvent. When the fuel
level rises, so does the float. At a certain level, the float pushes a conically
shaped round thing (float needle) into a conically shaped hole (seat) and shuts
off the flow of gas. This "needle and seat" is the valve that controls gas flow
into the bowl. Float level is important and so is a good seal here. If the level
is too low, the carb won't get as much gas as it should (lean). Too high and it
can run rich or leak.
The idle circuit is made by drilling some holes from the float bowl to the area
on the *motor* side of the throttle slide. There is ambient air pressure on the
air-filter side of the carb. There is vacuum on the motor side. This vacuum is
used to draw fuel through this little hole, the diameter of which is normally
controlled by an orifice, or pilot jet, installed in that hole. More vacuum at
wider throttle opening draws more fuel. This is from idle, through off-idle to
about 1/8 throttle. Normally idle SPEED is set by a screw that opens the slide a
little more or a little less. Idle MIX is set by a screw that sticks a pointy
tip into the little fuel passage (or a similar air passage used to draw the
fuel).
At about 1/8 throttle, the effect of the next circuit swamps out the effects
of the idle circuit. There is a bigger hole that goes straight up from the float
chamber into the bottom of the carb throat. This hole has two precision
fittings, one at either end, both removable. The one at the bowl end is the main
jet. More on that later. The one at the top is the needle jet. Hanging off the
bottom of the slide is the jet needle. The jet needle is a tapered needle that
moves in and out of the needle jet. Normally, both the needle jet and jet needle
can be changed. Needle jets have different size holes in them. Jet needles have
different lengths and tapers. Usually, they are suspended from the slide in a
manner that allows one to change how far they hang down, by moving a clip to a
different notch. You can imagine a tapered needle withdrawing from a hole... the
further out it is, the more surface area of the hole is available to flow fuel.
This circuit works up to about 3/4 throttle, when the jet needle is completely
withdrawn from the needle jet. At that point, the limiting factor becomes the
main jet.
The main jet is used at wide full open (WFO) throttle. How much fuel does the
engine NEED when it is breathing as fast as it can? That is *THE* limiting
factor for your motor for any given combination of exhaust system, Airbox/filter
setup, temperature, altitude or barometric pressure.
Tuners tune first to get the bike to start and run (idle circuit), then make
power on the mains, THEN be "streetable" between idle and WFO. *HOW* to go about
tuning is a different subject, maybe for a different day. Many whole books have
been written on the subject.
PULLING THE CARBS
by Flash #412
October '01
For more details about removing the Gas Tank see the Gas Tank Removal FAQ.
Feedback:
PUKING PETROL
by Flash #412
October '01
Last night I stopped and filled up 0.8 miles from home. I was careful not to overfill. NO gas escaped into the "well" below the metal cap. I parked the bike in the garage. At about 4AM my wife woke me up because she smelled gas. There was a large puddle below my bike. I put a coffee can under the hose and mopped up the puddle. Thinking to improve the situation, I put the bike on the centerstand. When I did, another table spoon or more poured out. In the morning, there was almost an INCH of gas in the coffee can. I pulled the bike outside and parked it on the centerstand while I drank my coffee. When I went to leave, a half hour later, there was about a two foot diameter wet spot on the concrete under the bike. It was hard as hell to start. I stalled it at the bottom of the driveway. I happened to look back and see a trail of drips from the big wet to where I was. I rode it about eight miles and stopped just to check things out. No more drip.
I've smelled gas in the garage every night this week, even when parked with more than 100 miles on the tank. The temps lately have not been extreme. I think there was not such a great differential between the temp of gas in an underground tank and the temp last night. If anything, the air was cooler.
So what causes it.....Pukin' Petrol (The Answer!)
After putting it all back together, it started right up like it's supposed to, full choke & zero throttle. I rode around the block. When I got back, I put it on the sidestand and a few drops of gas came out one of the hoses on the opposite side from where it HAD been leaking. Being an optimist, I put a coffee can under there, turned the petcock off and left it overnight. All was well this morning.
BTW, I also installed the fuel filter while I was at it. There are four carb screws, which I replaced with Allen's. They are 5M0.8 x 12. But if you try to use ones that are too long, they won't go in the front holes, only the rear ones. See the Carb Cleaning FAQ for details and pictures of the Carbs.
Q. What are the Symptoms:
My bike, a '95 F, came to a halt as if I had run out of fuel, I will add that I hadn't. Anyway the bike came to a stop and I found the pipe running from out of the top of the carb was pumping petrol out and onto the engine. It will turn over with no problem but doesn't want to know about catching. I know this isn't a huge amount of info but until Monday when I'm off I can't give you any more. Any ideas as too what could have gone wrong. The bike has 70K on it and normally runs well with no major problems other than a bit of oil in the airbox.
It MUST be a float or FUEL VALVE problem. The fuel is gravity fed from the gas tank to the carbs. The carbs is design to work with a certain "height" of fuel inside. If this level is a bit too height it is like running with the choke on, and if it is far too high it will overflow by the small pipe(s). The device to keep this level right is called a float and resides in the float chamber at the bottom of carbs. It works like the device that you might find in your toilet bowl. When it drops a bit it opens a valve to let more fuel in and when the fuel raises it it will close the valve. If the valve gets stuck partly open (by some small impurity in the fuel) or the float does not rise due to it being punctured or stuck, the fuel level will rise until it overflows. Haakon#626 (Norway,12-1999- F650GS)
Read the FAQ on how to get the carbs out. Take them out. Take the float bowl off. Remove the floats. Spray some carb cleaner through where the fuel normally goes IN to knock out any impurities. You should probably change the little fuel filter in the "T" while you have them out. If you don't have an inline filter installed between the petcock and the T, you'd be advised to add one. Flash 412 (CO)
Q. Can (not should) you still drive with "Puking Petrol" syndrome.
by A
Watson
12/12/01
Floats serve 2 purposes: First, they keep the carb bowl from overflowing by floating up against the float valve and shutting off the (gravity feed) flow of fuel. Second, properly adjusted, they maintain the fuel level in the bowl at the right height. This is important because the height of the fuel in the bowl determines how much fuel gets sucked up through the main jet for a given RPM, which in turn has a direct affect (along with needle size and adjustment) on the air-fuel mixture that reaches the cylinder.
All the wisdom I've heard is that floats, which are made of plastic (they appear to resemble extruded - closed cell - styrofoam), can over time absorb fuel and become less buoyant. (The way older ones and some newer ones may be made of copper, but that's another story.) Floats that are less buoyant will allow the fuel level in the bowl to become too high before they shut off the flow, even if they are properly adjusted. This in turn will permit more fuel to be sucked up, which will enrich the air/fuel mixture, which will affect fuel economy.
Floats are cheap and relatively easy to replace. As someone said, it makes sense to replace them now and then. 13 years seems a long time to me.
The post about weighing the floats was very interesting and this should permit a very precise determination of their condition/buoyancy. However, a visual examination can also help. If they're heavily stained, porous-looking or just plain cruddy, change 'em.
See also:
Q. Which way is the Choke on?
A. The Choke is on when the Lever is BACK toward you. It often goes off by
itself, rotating AWAY from you (when you are sitting one the bike).
Q. How long should I leave the Choke On?
A. Do not leave it on TOO LONG. You will
foul your plugs, carbon your cylinder and head and and stuff up your fuel
economy. Most folks can switch it off after half a mile to a mile, depending on
the weather.
Same as Wamer. I use the choke only to start it when it's completely cold. Turn it off immediately and drive away. Mason #631 - 97ST in PA.
I am curious how long people run before they turn the choke completely off. Even on a 80 degree day I am still at 1/2 choke when I get to work, any less and it stalls. I have a 15 minute commute much of which I do at 80. I have also noticed very poor fuel mileage ~33 mpg. I am wondering if maybe my thermostat is stuck open. Any way to test this without taking it out of the bike and putting it in a pan of hot water? I am going to go through the poor mileage faq and take off the lowering kit since I got my other bike running. I am going to check the plugs and gap et all. my impression is that something is wrong. Don Don - Rochester
As soon as I get to a road where I can run for more than two blocks without a stoplight, I turn it off, less than a mile. Yes, I have to turn it on when the temperature is in the 80's if the motor is stone cold. Flash #412 (CO).
It also only takes me a couple blocks before I can turn the choke off. Robert #959 in TX - '97 F650.
I need the choke to start easily even when hot, but it goes off within 1 mile and then the bike idles normally. With the oil at 40 centigrade plus the choke goes on half the engine fires (with no throttle) and the choke goes straight off. With cold oil on a normal UK day (10-15 centigrade) half choke for 1 mile. On a cold winter day (minus 2-3) I need full choke to start, then half for 1-2 miles. With a warm engine and choke on after the engine fires, you get the trick where the engine stalls as soon as the throttle is opened. I am guessing that the passage in the carb is a bit on the big size and the rest of the carb setup might be critical. Having the choke part on when the carb was set might give the result Don describes. A plug chop test after a longish run would seem to be the order of the day to see if the choke is set to start even when the lever is set to off. Andy Leeds UK #982.
I fire it up and ride off immediately. It will not idle correctly without choke _ever_ if I do not ride it. But if I ride off and kill choke ASAP, it will idle fine within moments (say, at the next stop light). kinda weird, but that's how it works. NormJ #473 Seattle.
The phenomenon you see is that the lever actually operates an enrichener, not a choke, which is why I do not use the terms open and closed as most people get confused. Your problem is likely that your idle is adjusted incorrectly. And it's too low. Before you do ANY other adjustments, get the bike fully warmed up to regular running temperature with a good ride with reasonably fresh gasoline. Then adjust the idle to 1400 rpm (real easy to do, takes 10 seconds). Run it a while and confirm that (when fully hot) your idle is stable around 1400 rpm. Yes, it's a bit fast, but that's the way it was designed. Now you can see how your cold idle and "choke" works the next time you ride. Do NOT adjust the idle cold while operating the choke lever. Vary the choke lever instead. This will likely solve your idle problem if nothing else is wrong with the engine. Todd #389.
The choke changes the air-to-fuel ratio by either supplying more fuel than normal or limit, choke (hence the name) the air-supply. Your bike will consume more fuel on choke, sometimes it will also run badly on low revs and probably pollute more. Not having to remember the choke is one of the nice things about fuel injection. I know of a guy that misunderstood the choke on his veteran bike and was starting without it and when the engine got warm he applied full choke. He did this for several years... :-). Pelle, Sweden, '02 GSDA.
The choke is not a choke (air restriction) its an enricher jet control (more fuel), hence it runs the engine rich (carbons up plugs etc.) and uses more fuel. If you run the cold starting device for long enough, the plugs will foul, the carbs will maybe overflow and the engine will flood and stall at idle. If you don't have a temp gauge you should maybe get one, the screw in type tells you when to close the choke. Imagine setting up the bike with the choke on full. You get the idle at 1100 rpm by moving the idle screw in or out so the air and fuel match up and burn. You then move the choke to the normal run position, the engine will stall. However, run until the engine is hot and then move the choke lever. The engine is so hot, it'll burn pretty much anything, lean, rich whatever at least for a time and with the right throttle setting. However, the plugs will show what the mixture was like. I've had this on the dreaded Ural. The Ural choke opens an additional fuel jet. With the crappy sponge cake seals the Russians use, the choke is always letting some fuel in. You set up the carbs like this and get idle and some sort of balance. You actually close up the main chamber a bit to allow for the extra fuel that's sneaking in via the choke. On a Ural, the seals then leak gunk into the carb by reacting with the petrol and give a proper seal and/or block the start jet. The engine runs lean and hot. You then retune and all is well until the main jets block and you hit them with carb cleaner. The choke jet seal de-gunks and its sooty plugs time again. At this point you sell the bike and buy one with FI if you have any sense! The F carb doesn't have this exact problem because the rubber bits are petrol proof, but I am wondering if something similar is possible. I guess you've already checked the choke cable for tightness? Andy Leeds UK #982
(Less air in mixture than usual). This results in the engine running a little hotter, which is never a great thing. I normally ride to the second stop street with my choke on about 2/3 (Classic). By this stage the engine is warm enough to tick over smoothly by itself. I do, however, frequently check my choke, turn signal and low beam switches while I ride (just a habit really). Bernard.
Make sure the choke is off (check at the carb, not the bar lever).......are you sure your choke goes completely off? With the "choke" circuit on these carbs, it usually runs really bad with a partially-on choke. I've seen the choke cable get hung up halfway, which leads to no running/stalling/no idle with choke seemingly "off" but will run fine but horribly rich with it full-on. Never leave mine ('99 Classic) on choke for more than a few minutes, if it's above 10'C (50'F), all I need is the choke to start, after starting, it'll run fine with no choke (totally stock 'cept for silly K&N). Shank NYC USA.
Turned up the idle and this seemed to fix the problem. The whole bike seems to run a bit better but it is probably just my imagination. Don.
Apart from theoretical problems, has anyone noticed actual ill effects on the classic F650 from either driving with the choke partially open for miles (forgetting to shut if off promptly) or not closing the fuel petcock after riding? I'm not guilty of the second, but I am the first now and then. Think there's enough extra fuel on the cylinder walls to effect ring lubrication? Johnny #862.
Don't know about theoretical, but gas mileage is a little worse when you ride with the choke on, but not much. that I know from experience. have never noticed any other problems (never fouled a spark plug). I think it's a throttle advance, not an actual "choke" (i.e. air restriction). I never shut off the fuel except when transporting the bike on a trailer. Haven't noticed any ill effects from that either. mark #403
The small amount of extra fuel, when the throttle is open, is not likely to cause a ring oiling problem. However it might shorten the life of the spark plugs and the catalytic converter (if you still have the stock muffler), through fouling, over a long period of time. Richard #230, Pacifica, CA
My bike peed gasoline all over the garage floor cuz the petcock was left on and there were some tired o-rings in the carbs. Since then, I prefer to avoid the fire hazard and turn it off. This isn't common. But I am not the only one it happened to. See "Pukin' Petrol" in the FAQ. Flash #412 (CO).
The fuel enrichment circuit of Mikuni carbs starts to work only when the cable is pulled about half way. And I think that if you whack the throttle open it basically defeats the vacuum that the enrichment circuit relies upon, so I don't think riding with a partially open "choke" would result in any damage, if it were open further, the bike would just run poor, lots of smoke and over the long term, catcon damage, maybe. Shank NYC USA.
THIS is how much mpgs can drop with choke on. Ok, it's not a choke but fuel enrichment device wouldn't fit in the subject line. Over the last 3 fills, I go 150-155 miles before getting fuel starvation symptoms (which calculated out to 50-55 mpg at the fill ups). During this last tankful, I left the fuel enrichment device (aka choke) on for about 10 miles on one trip. My mileage to reserve dropped to 125 miles (I don't know yet the gas mileage on this fill up--I had to go to reserve to get home)--however, it looks like about a drop to around 40 mpg. This is a 97 F650 ST with 26K on it. So, if your mileage is down, make sure it's not just due to leaving the FED (choke) on too long. Nate 97 F650ST, Maryland.
Choke
Stuck?
If it is idling high, just Check the Cables. BOTH Choke Cable and Throttle cables.
If you don't normally use the choke fully when the weather is warmer, I suspect that the cable isn't running freely and it's not going back all the way to the closed position. In that situation I would lubricate the choke cable with a very light oil and if you can just keep opening and closing it to work the oil along the length of the cable. When the lever is closed is the end piece on the cable sat nicely in its socket or is there a pit of play there? If there is a bit of play or you can see a small bit of the inner cable then it just needs that lubricant to get it working again. Trevor 999 UK 01 GS
Generally, the F650 (Classic) can cope with MOST Altitude changes, with no changes to the Carbs. Any Changes should normally only constitute MINOR adjustments to the idle mix screws.
The F650 CV carb provides crisp throttle response and lessens jetting sensitivity to temperature and altitude changes.
All constant velocity (CV) carburettors are designed to compensate for changes in altitude and barometric pressure. From http://www.floheadworks.com/Products/keihin_carburetors.htm
The FI should have no problem at all, as it has lots of sensors and copes better with Altitude/Air temperature.
What does constant velocity mean.? When you open the throttle the engine draws more air through the carb. A large quantity of air must move faster being drawn through the same diameter Venturi than a smaller quantity of air does. In a non-CV carb the air would be speeding up and slowing down in the Venturi depending on the demand of the engine. In a constant velocity carb the Venturi automatically gets smaller when the engine isn't drawing much air and gets larger when the engine draws more air, this keeps the velocity (speed) of the air close to the same at all throttle openings and provides a more consistent metering of fuel in the Venturi. It is "supposed" to give better fuel economy, cleaner emissions and adjust itself to altitude changes. Most tuners dislike constant velocity carbs and use round or flat slide carbs in which the slide is raised directly by the throttle cable instead of indirectly by airflow as in a CV carb. From: http://www.sonic.net/~blaineh/xs11carb.html
Going from Low to High
Altitude:
Possible Symptoms:
You may experience rich running, stalling, hard starting and irregular idling at slow engine rpms at high altitude. The bike will also run rich at full throttle, because too much fuel will flow through the main jet. So do I need to adjust it:?
Yes & No. The carb vacuum diaphragm will adjust the mixture for you when running on the throttle.
(CV carbs tend to be self-compensating at high altitudes, the flat slide carb does not.) From http://www.chuckhawks.com/super_glide_sport.htm
If you were moving to altitude, you might consider the following: (Try ONE at a time, depending on the Altitude).
Screw in the idle air screws and/or
Lower the needle position and/or
Possibly, reduce the size of the main jet. Refer http://www.nightrider.com/biketech/main_jet_correction.htm for Jet Multiplication Factors for Temperature/Altitude.
For a trip over a BIG MOUNTAIN, just keep your hand on the throttle, in case the bike starts to die at idle.
FI systems have an advantage here, as they do a pretty good job at adjusting the mixture for changes of altitude.
Less air means less power and a richer mixture. A K-bike gets better mileage above 4,000 feet because the injection system switches to a leaner program to compensate for the altitude. The vacuum carbs can adjust to an extent, but not anywhere near as well.
Going from High to Low
Altitude:
Possible Symptoms:
You may experience popping on throttle slowdowns. i.e. popping/minor backfiring during compression braking/deceleration. BUT check your carbs are adjusted correctly, not worn and also check the Backfiring FAQ, Exhaust Gasket Replacement FAQ and Strange Noises FAQ. So do I need to adjust it?
The idle mixture screws are not self-compensating, as they (as well as the throttle-cutaway) are not affected by the constant-vacuum feature of the carbs. They need to be manually adjusted.
In the Manual there are no instructions related to re-jetting or adjusting the high speed mixture, only adjustments are for idle mixture and idle speed.
Most people have no difficulty changing altitude.
Feedback:
The elevation of Phoenix is 1112 feet. Yep- 10k is a pretty big gain. Pack light over the passes- I think the loss of power will be very noticeable but it won't stop you- it IS a motorcycle. Going down a tooth on the front sprocket is an option but it harms your gas mileage and maximum potential cruising speed. I say don't change anything and tough it out. Stick in the lower gears up the hills and prepare for a significant drop in gas mileage. Aurora, CO. chppdlvvr
It is a common misconception that a trip to the mountains requires that you to rejet the carburettors. There will be a slight loss of power, nothing more. The time you spend at 11,000 feet will probably be about an hour. What you really need to do is make sure the engine is tuned up and running properly before leaving. A climb to altitude will expose any flaws in the engine, and when people have trouble with their vehicles on a trip to the mountains, that's why they have trouble. So forget about rejetting the engine. F650GS Dakar, Camden, New Jersey. echo
A clean air filter is pretty important if you're not going to rejet for altitude. If you're only going to be at altitude for a few days, you probably shouldn't worry about rejetting. If you are comfortable removing your carbs, going one size smaller on the main jet is a good idea. BMW dealers will be useless when it comes to supplying alternate jets. But the jets are the same as run of the mill Japanese-bike Mikuni carbs (Mikuni BST B316 CV carbs, to be exact), available wherever Japanese bikes or parts are sold. According to the FAQ, your stock mains should be 132.5. I believe the next smaller size in that numbering scheme is 130. If you plan to change main jets, get two, one for each carb. See Performance Mods Flash 412 (CO)
In the good old days, in order to lean out the mixture for a few hours of high altitude operation, we would remove the air filter and pull any removable baffling out of the muffler(s) when the bike started to slow down. With CV carbs, you will likely not have a problem, except that your idle may be "lumpy" and slow. If things get too bad, you may want to turn your idle-mixture screws in a turn. Just remember to turn them back out to 3.5-4 turns out, when you get below 5000 feet. Richard #230
I would (and did) do nothing.. you will lose some power but hey its not a race anyway. Lance, #1303, '01 F650GS, '96 G650ST. y_kiwi
I live at 1400 feet. I have had two different experiences in Colorado and Utah at elevation: 1998 Triumph Sprint. Three Keihin Carbs. Factory stock (probably a little lean). Ran SMOOTH and perfect all the way to over 12,100 feet on the road to Fall River Pass. Noticeable loss in power over 9,000 feet. Smooth and comfortable at 12,000 feet, but way down on power. Really a non issue. I was loaded for a solo 10-day trip and had a blast. Didn't use sixth gear much...1996 Moto Guzzi Sport 1100. Two Del Ortos with accelerator pumps. Aftermarket exhaust and jetting mods (probably runs a little rich). Ran like shite at anything over 6,000 feet. Had to keep it at 5000rpm or more the whole friggin' way from Colorado Springs to Park City (the long way). Had it rejetted and dyno'd at Salt Lake City with some improvement. Ran good up to 9,000/10,000 after that, but still coughed and spit and was problem child. Although it ran poorly at lower rpm and slower speeds, it wasn't enough to make me want to cut-short my 2,000 mile trip. I'd say don't change anything, worst case, you'll run a little rough and get poor fuel mileage. It'll be a blast. I'm taking my new DAKAR to Colorado next week. I'm hoping Fall River Pass is open so I can see how this fancy fuel injection works at 12,000+ feet ! guzzimike
I have ridden my 01 GS two up around the same areas you are talking about and was fine. Sure there was power loss but like it was said before, it is not a race. Besides power loss means slower speeds = more time to take in the amazing scenery! Have fun and ride safe. facito, 2001 F650GSA, Las Vegas, Nevada.
Do I need to Synchronise the Carbs
Randy#748
Synchronization is possible with anything more than one carb. Two, as in F650's case can be synched and may not be noticeable to rider, other than less HP. I am assuming a bit here, because the 650 carbs may have no adjustment ability (I've not looked), individually, but my experience with other bikes has always been that the individual carbs can be adjusted separately. Usually a screw on the actuating bar, for each carb. Factory set, these are rarely off, but possible. Most Japanese bikes with multiple carbs have single cable, bar actuating all four as unit and they are synch'd as a regular service item. Single cylinder has no input here, except acting as a single, the input to rider will be less obvious in rough running vs. less HP. The domes on F650 carbs do have access ports. Two 33mm throats feed the 650 and less than two equally opened butterflies, will mean less HP. I imagine the settings are very close to perfect from factory. Comparison; My R100 only has two 32mm carbs! The 650 has 4mm more feeding power than the 1000cc bike! A lot going through a 650 and thus the 48HP it delivers and the somewhat equal mpg to the R100. The R100/7 delivers 58-60HP, as I recall, but with one more cylinder and very close to same carb size (total). The 650 breathes better with 4 valves, which creates more power, where the old boxer has two valves per hole. Anyhow, the 650 rams a lot through one cylinder, with two 33's behind the intake and I imagine without water cooling, high tech metallurgy, etc. the engine would burn up. One fun bike!
This is to share a possible fix for your pre-fuel injection F if the idle suddenly or unexpectedly refuses to drop down to normal.
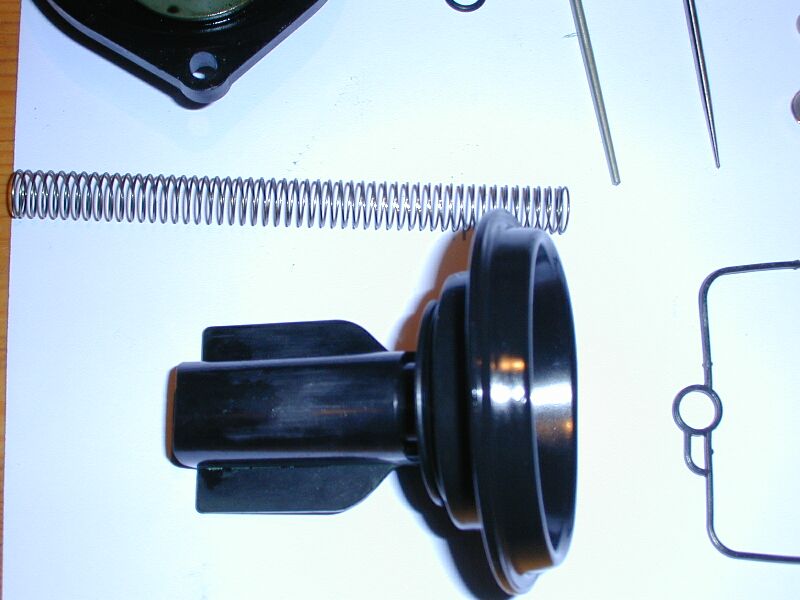
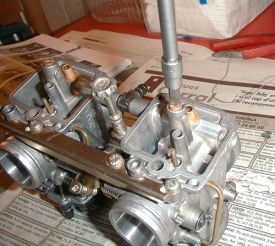
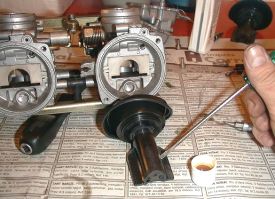
Tonight I took the tank off my '99 F650 to see what was causing the throttle to hang up. What I found was that one of the electrical wire connectors located near the left carb had worked its way down to where it was rubbing against the throttle cable and had snagged the spring-loaded linkage at the carb body. I moved the connector back and away from the carb, and all was well...until I decided to check the diaphragms that control the needles in the carbs.
I took the top off the right carb first, and checked things out. The rubber diaphragm was just fine, and everything looked in order. Then I tried to refit the diaphragm and its top cover back in place. No go. After an hour of failed attempts, I finally smeared a little engine oil on the edge of the diaphragm, thinking that may help it slip into place. It did, and I was finally able to close everything up.
What is the Effect of Dropping the Needles.
Flash #412
December ‘01
Effect of Dropping the Needles: Flash vs. Matthew
Flash:
CV carbs (sometimes called Constant Velocity or sometimes called Constant Vacuum) use the pressure differential between the two sides of a diaphragm to raise the slide. The needle is attached to the slide. By removing the snorkle, you lower the "effort" required by the motor side to raise the slide. You have effectively "raised" the outside air pressure by removing the snorkle. In other words, for a given manifold vacuum, the slide now rises higher than it did before you removed the snorkle. This means that the needle is allowing more fuel in for the same throttle-plate opening than it was before. To counteract this effect, you need to drop the needle, physically, one notch. You do this by putting the clip in the next higher notch, physically.
Matthew:
CV carbs
operate of the velocity of the air passing through them. Removing the snorkel or
opening up an airbox will slow the speed the slide raises. It will have no
effect on the distance the slide rises.
Can anyone
enlighten us on Practical Observation vs. the Theory.? (ed)
While I'm not even close to being a guru, I'll take a crack at answering your question. The vent holes bleed off vacuum that operates the needle slides. Ok, you probably figured that out already. So why change the hole diameter? To change the ratio of vacuum to slide position. You've had your carbs apart, so you have seen the slide return springs and know that the slides carry the needles as they move.
With that in mind, the chamber & diaphragm at the top of the slides gets a supply of intake vacuum, fed through the little hole at the lip of the cover. The vacuum pulls the slides up, exposing more of the needle. That vacuum is pulling against the return spring, and also being bled off by the vent hole at the other end of the chamber.
If that makes sense so far, then you'll realize that there are three ways to alter the needle position vs. engine load (vacuum):
1.) Change the diameter of the vent hole. A larger will bleed the vacuum off quicker, smaller will bleed the vac off slower.
2.) Change the rate the return spring. A heavier spring will have the same effect as a larger vent hole.
3.) Change the position and shape of the needle.
You can use any combination you wish, provided it produces the results that you (or should I say, the engine) wants.
I've seen it done all three ways by different shops and kits. I know one successful race shop that prefers to use the stock needles (straight taper) and slides. He only changes spring rates and jet sizes. Others, Dyno-Jet kits included, use custom needles (stepped taper/adjustable position) and larger vent holes in combination with stock spring rates. And some just alter the needle shape while leaving the vent and springs alone.
The results are all that matter. (btw, this is usually a mid-range adjustment. Low range is still governed primarily by the pilot jets & float height, and top end by the jet size.)
Refer the Canisterectomy FAQ, Idle Mix Screws FAQ, Poor Mileage FAQ, Carb Clean FAQ.
The following responses are for PRIMARILY from people with Stock setup. If you know or suspect you have a Jet Kit, please also refer the Performance Modifications FAQ.
I figured out what the problem was. On the air filter side at the bottom of the Venturi there are two orifices a small one and slightly larger one. The smaller one was clogged big time used carb cleaner and a piece of stiff wire and finally got it cleared. Took about 20 min. Put them back together and the bike runs like a charm. Thanks again for all your help and everyone here. JAMES.
Oh yes I was talking about the float mount. The left one slides over and seats on a brass tube and the end of the float mount has a restrictor. The tube I am referring to is connected to the choke the left float o-ring side slides over this tube. I noted that the left float has a restrictor built into it therefore there is a different float assembly for left and right carbs. I am not too familiar with carbs dealt mostly with FI. On the right carb there is a drilling with a hole for a tube but compressed air will not flow through it I am assuming it is a blind and not used. I wonder why there is a restrictor on the left float and not on the right unless the float assemblies were switched at some point I am baffled at this point the only reason I got into this mess was because Dyno jet sold me a jet kit that does not work on the 1998 F650. I continuously fouled plugs and called and they told me this kit was not for the 1998. So I went back to stock. And could not adjust the right carb. Bottomed out or 5 turns out no difference. So then I decided to look at float height. This is when I discovered these differences. Again thanks to all. JAMES.
The parts in my kit are stock needles (5 clip settings #5E94), stock main jets (132.5), Dyno stage II jets (138) a set of springs (anyone know how to tell stock springs from DynoJet springs - Refer the Jet Kit FAQ). Two black rubber plugs (Idle Mix Screw covers). Two small/tiny needle jet washers. So this is my plan. Buy a "packing kit/o-rings, pull carbs, change main jets to stock (132.5), change to stock needles four slots down from the top (anyone think I should use a washer on each clip ?), switch to stock springs (again not sure how to tell the difference), check/replace all rubber and double check diaphragm. Set the idle mixture screw to stock setting 3.5 turns out from lightly seated. Double check floats and float heights. Now for the big question, When my lovely wife and I purchased her 97' F650 (which has the jet kit) I was really impressed with the 5000 rpm and up power and throttle response. Shortly after that I bought a 99' F650 without a jet kit but with a 15 tooth sprocket. Her bike has a noticeable amount of power above 5 grand rpm's. It also lurches and bucks in lower RPM's (she is also a noob, but member #A6501188) Is that the trade off = power for drivability ? If that is the case then back to stock and the jet kit can gather dust. Is the factory pro kit any better or is it a lot of playing around and compromise between power vs. drivability ? Both of our bikes have the snorkel yet should we pull those ? XtreemLEE.
Morgan Seim has a solution for the G's carb crappiness. Not for the F650 but interesting all the same.
“This letter is the culmination of many hours of trouble and tinkering with Ellen's 1100G's carbs. Riding my new 1200 Bandit back to back with her 1100G really highlighted the gross carb troubles her bike had with the original carbs. You may have read my earlier "fixes" on the Worship page, little did I know how wrong I actually was. My "fixes" were more of a band-aid that made the bike run better, but didn't cure the root cause. A letter sent in to the November 2000 issue of Cycle World magazine's Service section by Sasha Shapiro of New Paltz, New York, describing the exact symptoms I had experienced prompted me to finally get hot on the problem. I must note that Cycle World's response was way off target! ( I will be sending them a letter regarding the true cause of her troubles. I contacted her, and she eventually replaced her carbs, curing the bike.) I finally got fed up enough to do some serious research, and I found a letter on the Web from a guy in England that said he had noted emulsion tube wear on his 1200 Bandit, and after replacing them, it cured his low speed mixture problem. I reasoned that with 56K on our bike, we must have this problem as well. I rushed out and bought new needles, emulsion tubes, and slides, confident that I had solved the problem at last. Wrong! The bike ran no differently, which prompted me to completely tear down the carbs for some direct inspection of my own. After getting the carbs apart and taking some careful measurements, I finally found the true problem, which is the plastic pieces that the slide mates with. This piece eventually develops an uneven mating surface with the slide, which leads to needle and emulsion tube wear, and inaccurate air and fuel metering at idle and low speeds. I also noted that the problem can cause sticking of the slide if the wear is severe enough, since the wear results in such a misalignment of the needle and the emulsion tube that the side load on the slide from intake vacuum binds the needle in the emulsion tube. The original needles I removed from Ellen's bike had two steps worn into them, causing the slides to not fully lower as well. I had always thought the Bandit carbs would work on the 1100G, so I called American Suzuki, and one of their reps said he had both a Bandit and an 1100G, and had put Bandit carbs on the 1100G. He said I needed the Bandit intake boots, and I had to use pod type air filters. It turns out he was incorrect, it's a direct bolt-on. The used carbs I put on Ellen's bike supposedly had about 4K on them, and they looked like that was accurate mileage. There is always the unconscious expectation when you work on your bike that it will run better since you have just expended so much effort, and I think this can sometimes create false expectations. Before putting the used carbs on her bike, I opened up the mixture screws a bit, and raised the needles about .040". After getting her bike all buttoned up, I
anxiously started it, and it idled perfectly. I was so relieved I was nearly beside myself with disbelief. Of course, when buying anything used, you are at the mercy of the guy at the junkyard, who usually has a different perspective. To him, if the donor bike was in good shape, it must be low mileage, but fortunately, these carbs actually were. I suspect the wear problem with the plastic pieces starts to affect carburetion around the 15-20K point. I think not everybody notices how bad their bike has begun to run, since it is a very gradual degradation, and some people are not as particular about their vehicles as I am. Here's the arrangement with the carbs and why I haven't had any luck getting
the parts I need. Suzuki buys the carbs from Mikuni Japan, and in order to get the part that wears out, you have to buy the entire carb body for approximately $350, and of course you need four of them. Dealer reps told me to contact Mikuni, so I did, and it turns out that Mikuni Japan is separate from Mikuni America, and Mikuni America said they couldn't help me. So far, Suzuki of North America, Mikuni America, and all the dealers I have talked to have said they can't help me. Their stance is that the part is available, you just have to spend $1500 for four carb bodies, that's all.
No, I haven't contacted Mikuni of Japan, and at this point I don't expect a different answer from them either. Since the supply of good used carbs is finite, I have developed an inexpensive way to correct the worn plastic pieces by re-facing it with brass, and at this writing, I will have the first prototypes installed in a bike in about two weeks. It is a rather labour intensive undertaking, but it sure beats $1500 for some plastic pieces that should cost $10 each. So far, I have found about seven different types of bikes that use carbs with this same configuration, mainly big Suzuki’s and the fix is applicable to all of them as well .(Pretty much any bike with 36-38mm Mikuni's.) Please post this ASAP, I welcome correspondence from other Worshippers. Happy Trails, Morgan."
Carb
Alternatives (Complete)
by Mtbiero (Cugino Pegaso)
I found a pair of 39mm Keihins here: http://www.rotax.net/BMW_F650.htm for $760:
and more cheaply here:
http://www.pro-flo.com/proflo_keihin_fcr_carb_kits.htm#BMW for $625
However I think dual 39's is best for all out racers, and feel the dual 36mm
Mikunis offered here:
http://www.team-pami.de/ENGLISCH/index.htm for 448 euros ($392) would work
best.
Since the F650 and Pegaso share
dual Mikuni BST33's, I think the F650 carbs would work on my Pegaso.
Info I got from Team Pami:
The Mikuni flat slides have both 36mm diameter - both open together, the carbs have an acceleration pump.
The stock cable doesn't fit - you have to make a cable(!!).
Yes the stock choke cable fits and works!
Minimum 2-3hp more and the throttle response you can't compare - this all with stock cams. Gottfried - Team Pami
PAMI Performance Kits
by Mtbiero (Cugino Pegaso)
I don't have the entire kit (won't work with my Pegaso) but I do have a set of
team Pami 36mm Mikuni radial slide race carbs for a F650 on my Pegaso. Just the
carbs alone gave me a very noticeable power boost, more top end, and allows me
to cruise the bike at the 2000 to 3000 rpm range without any lurchiness...
When I first put them in, I used my stock airbox, when I finally removed it and
went to Uni filters, the bike really woke up. Right now I'm still trying to get
the idle right, I messed up, I assumed the idle mix screws should have been at 2
turns out nominally. finally got a tuning manual from mikuni.com, that says
unlike every other carb Mikuni makes, the RS idle mix screws range is 1/8 to 1/2
turns MAX! Been wrongly going to leaner idle jets to compensate, and causing
other issues. I'm back on track and expect to have them idling perfect after
about one or two more iterations. The nice thing about removing the airbox is I
can have the carb out and on the bench in 6 minutes as opposed to 1 hour before!
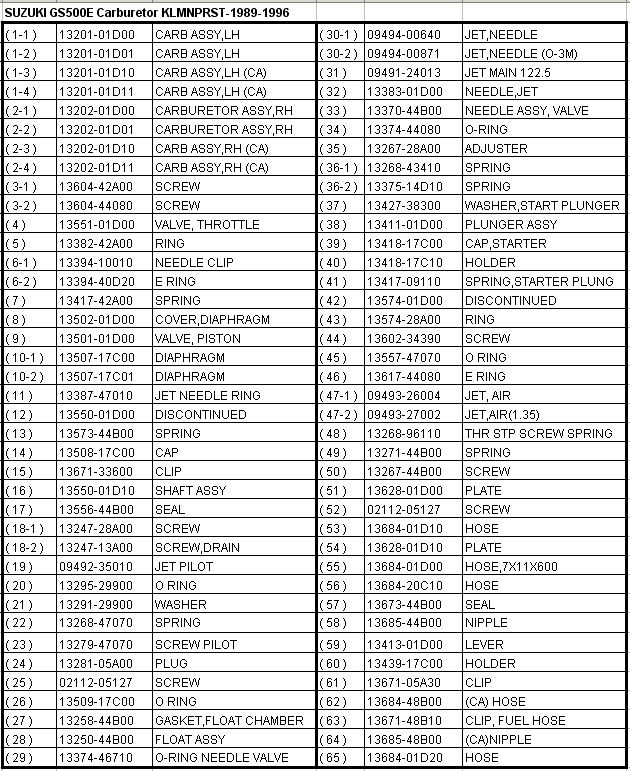
OEM Parts List:
OEM Carb is a Dual Mikuni BST33-B316 CV carb
For the diaphragm try one from a Suzuki GS500, part number 13507-17c01. I don't know if the other parts are the same or not. Charlie #070 from Pennsylvania.
Some parts are exactly the same parts as a Suzuki GS500E. Note the GS500E uses Mikuni BST33 x 2 Carbs.
The Suzuki '98 DR350SE uses a MIKUNI Carburettor BST33 (BST33SS CA. Model) Single.
The Suzuki DR350 EU model 1994 uses Mikuni Type BST33SS but US Model 1990 Mikuni uses TM33SS.
The Suzuki DR750S and 800S Specs also show a MIKUNI BST33, twin.
The Suzuki 1996 GSX600FT also show a MIKUNI BST33, four.
The Suzuki GSF 400 Bandit has MIKUNI BST33, four.
These are from a Suzuki GS500E
For GS500E
1989~1996
1997~2000
The Aprilia Pegaso (Sister of the Funduro), also uses the same Mikuni BST33 Carb as the Funduro.
Notes:
Note there MAY be a Yamaha that also uses a Mikuni BST33-B316 carb? Might be worth some odd digging to see.
Note the 1994 Triumph Daytona 1200 has Mikunis BST 36mm CV carbs but the 36m is the horizontal opening size and Diaphragms MAY be the same as the F650.
You CAN get some Carb parts from Sudco, at www.sudco.com, but they do not list our carb. I got my Pilot Jets from them.
Ron Wood offers dual 39mm flatslides for the F650 for $760, you can get them at www.pro-flo.com for $625. mtiberio.
Dave #365 (Thank you Dave !) got this precious Gem:
Dear Sir,
We checked your question. Your F650's BST33-B316 original slide springs
are the following compatible part No's. Please order Yamaha or Suzuki your local
dealers.
It is faster than delivery when you order to BMW or Rotax (engine maker).
Yours faithfully,
Mikuni Corp.
International Dept
How do I get Water in the Float Bowls?
Q. How did I get water into my
float bowls?
I emptied the fuel tank, I replaced the green gasket under the filler cap but
somehow I still get water into my float bowls. Also, I don't have a cannister.
Are there any other ''suspicious" passages for water? The problem arises only in
wet weather (under rain) and cold. Then, the bike drops its idle and stalls or
surges as if it runs out of gas.
This is a common problem on the classic F. The water goes in through the air filter. You can empty the water of the carbs by unscrewing for a few seconds (2 or 3 are generally enough) the two screws located below the carbs, in horizontal position, taking care you have the gasoline pass key in the off position. Then the water, first, and gasoline, after the water, go out. You can see the width of the water flow line is a bit wider than the width of the gasoline flow line. Better if you put some rag or paper below the carbs, avoiding the gasoline spreading. Fede
You might also make sure you keep the gas tank full. When it is less than full, condensation forms in the tank in cold weather (and probably also in wet weather). If you don't have cold weather where you are then Fede's answer applies more. Find a way to keep water out of the airbox. Colorado Bob.
If the Gas Filler Cap Leaks, it gets first into the Gas Tank, then into the Carbs
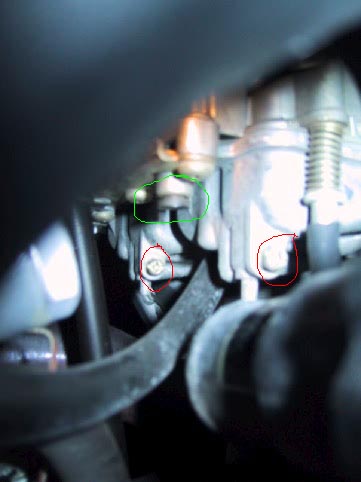
Q. How can I drain water from my float bowls?
The
Screws Circled RED are the Float Bowl Drain Screws, for emptying Crud/Water out
of the Carbs. The screws circled Green are explained here:
Idle Mix Screw.
Fuel Line
Replacement
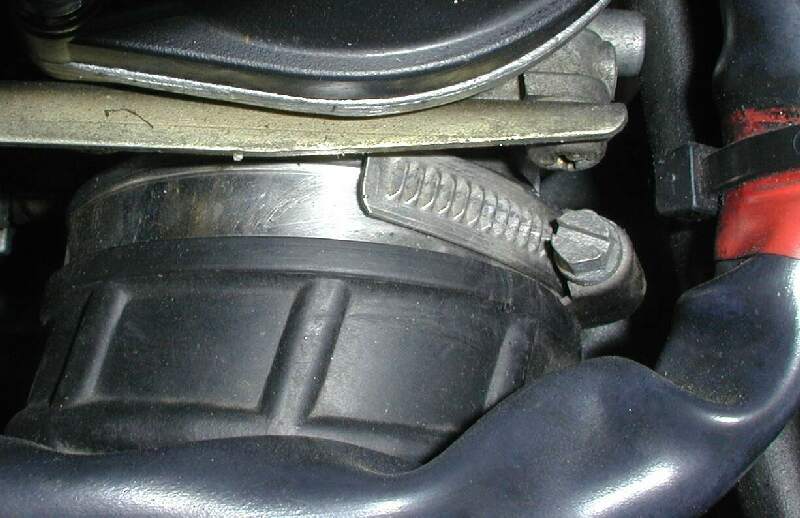
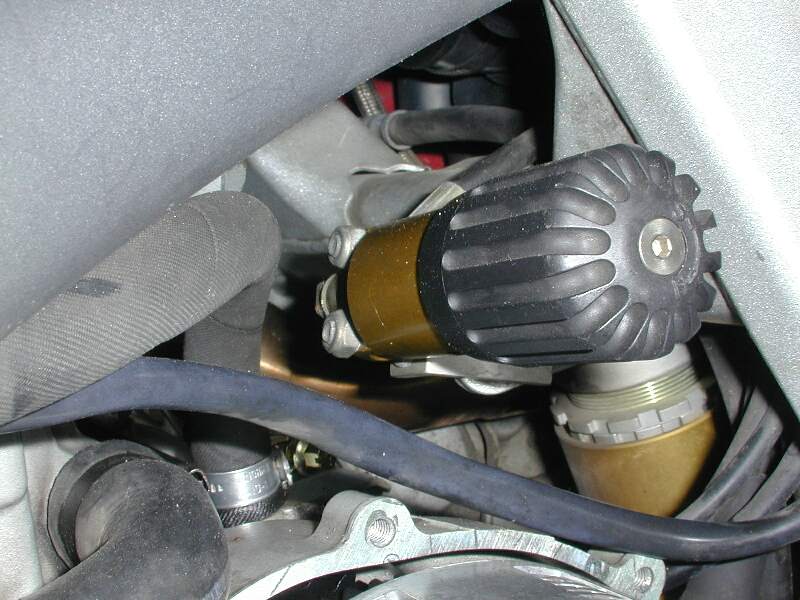
by Chris in Santa Cruz, CA
It is possible to replace the fuel line without removing the carbs. You must have long fingers. You remove the rear shock preload adjuster (this ones an Ohlins, but the location is the same), grease the hose a little, and do without the clamp. I will take the carbs out at some later date to reinstall the clamp. Meanwhile I will inspect the connection for a while. I used 6mm Gates PVC fuel line.
This MAY allow you to remove the OEM In-line Fuel Filter.
Maybe. If anyone can confirm this, great. The inline fuel filter
is in
the brown T-Piece connector between the Carbs. Refer the
Carb Cleaning FAQ for more Details.
Fuel Lines:
Believe it or not, the BEST fuel line is BMW fuel line, from the dealer. It is rubber, covered with cloth weave. Some dealers sell it by the meter, some by the yard. Some can make the conversion, some cannot. The hose that came on the bike ... was Italian. Flash #412
I had nothing but problems with the fabric covered line. I don't know exactly what ate it up but it just started cracking and leaking. The hose that came on the bike was not the fabric covered line but a single walled line with no internal reinforcement. This stuff just got really hard and inflexible. The Gates line is double walled with a woven fabric reinforcement sandwiched in it. Beefy. Chris in Santa Cruz, CA
You can usually buy "clear" fuel line (sometimes in designer colors or black) at the nearest Jap bike dealer. 6mm is closest to US equivalent 1/4", although 5/16" is also available. I had some of the old BMW cloth covered stuff in stock, it works fine (so far). Marty #436-Chicago-97 F650F
-W(98)-X(99)-Y(00).jpg)