Compiled by Kristian #562.
Pictures by Kristian #562.
Please read the Disclaimer before
attempting any work in this FAQ.
Alternative Gasket Sources?
Note. This might sound really dumb, but do please wait for the bike to cool completely before replacing any Gaskets.!
There are actually a total of FOUR Exhaust Gaskets on the Stock Exhaust Pipe, (Only three for a Staintune) however the most common ones that fail are the two at the Engine/Header pipe connection.
They are:
If the leak is right at the exhaust header, where it connects to the engine, the leak could cause valve damage over a period of time, if it is anywhere else further down the exhaust system, it will just make noise.
By Shank, Flash #412
December ‘01
What to check First: Before you go replacing the Gasket, try first tightening the nuts that clamp the Exhaust Headers to the Engine Ports. The location of these nuts is shown below. Replacing the gaskets should give you far less flatulence (wish I could say the same for me), will be quieter and may give you more power. Check also you actually have the nuts, as sometimes they can come off.
Symptoms of a Failed Exhaust Gasket:
As you increase revs you may get popping and perhaps in a
darkened garage or at night a blue flame shooting out of a pipe on the front of
the engine around the exhaust pipes. The flame if any will come from around the
clamp. It may not have been assembled correctly at the Factory, or it might just
have got tired.
NOTE:
1. It can also make it LOOK like a weeping head gasket, because of the spooge that comes out, so don’t go replacing your head Gasket Until you’re sure.!
2. Also, this junction is right below the temp sensor that turns on the fan. The hot air blowing out of there Can heat up the thermostat and fan sensor, turning the fan on prematurely. And when the fan comes on, it will blow the hot exhaust gasses on your leg.
3. My 98 F650 appears to display defective behavior. The symptoms are as fallows: an unusual, gargle sound after downshifting (after clutch release), rapid acceleration or rapid deceleration, the sound appears to originate and/or surface in the exhaust. I have also noticed a slight decrease in overall power performance. Jacek.
Refer also the
Backfiring FAQ and the
Strange Noises FAQ for
more Symptoms of a Failed Exhaust Gasket.
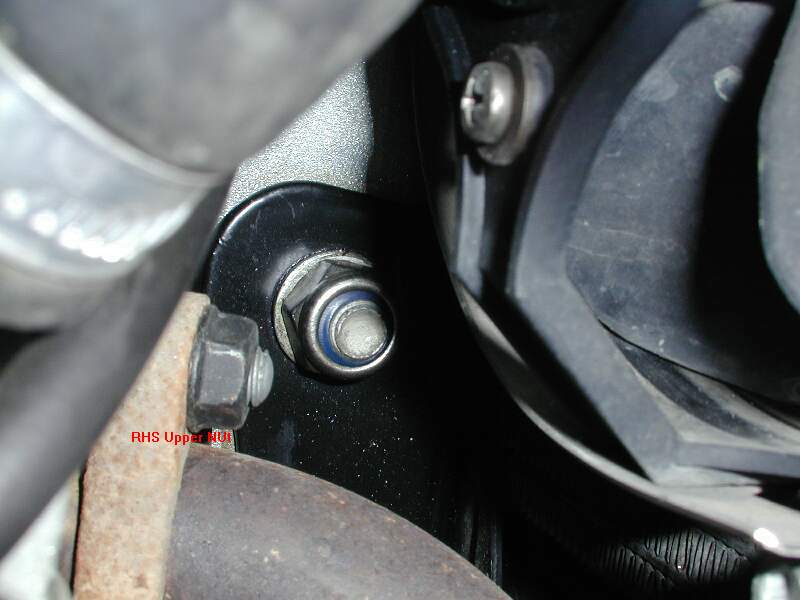
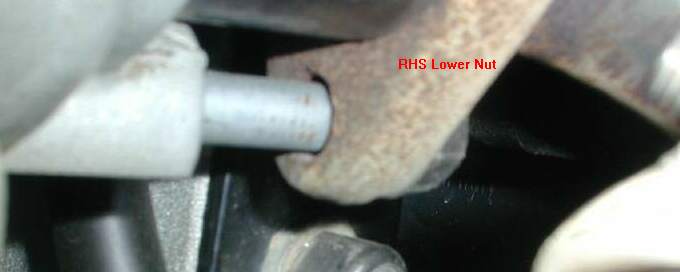
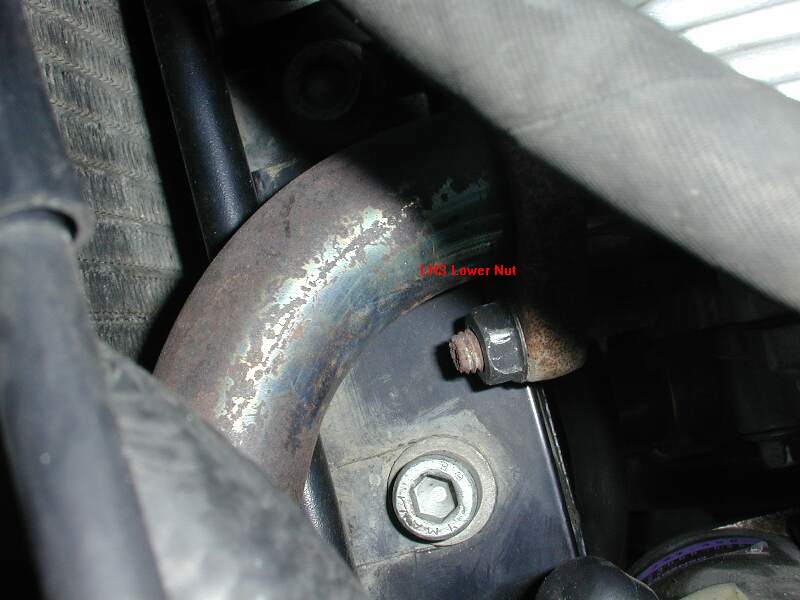
VERY often you can fix the problem by simply tightening the Exhaust Header/Cylinder Clamp Nuts. Do not overtighten! The nuts are as soft as cheese. Here is the RHS Upper One, RHS Lower one, LHS Lower One. You can also try tightening the Exhaust/Collector Clamp. If you need to replace the studs, refer What about those Rusty Exhaust Nuts below.
You can check these with a bit of smoke (like from a cigarette) in a still area, wafting around the joints. Headers also crack and split sometimes. Watch for the smoke being blown away by leaking exhaust gases.
or:
Take an old, tired dollar bill (which is very flexible) and wave it around in the vicinity of ALL of the Exhaust Joints to check for leaks.
Is there a Temporary Fix so I don’t wake up the Neighbours coming Home.?
Stuff the offending hole with aluminium foil and lo, the whole thing will be quieter, fart less (wish I could do the same) and the fan won’t come on as often.
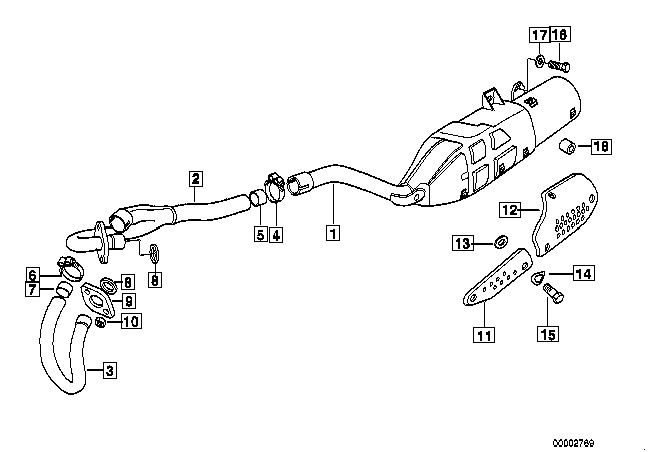
Lex = Left Exhaust
Rex = Right Exhaust
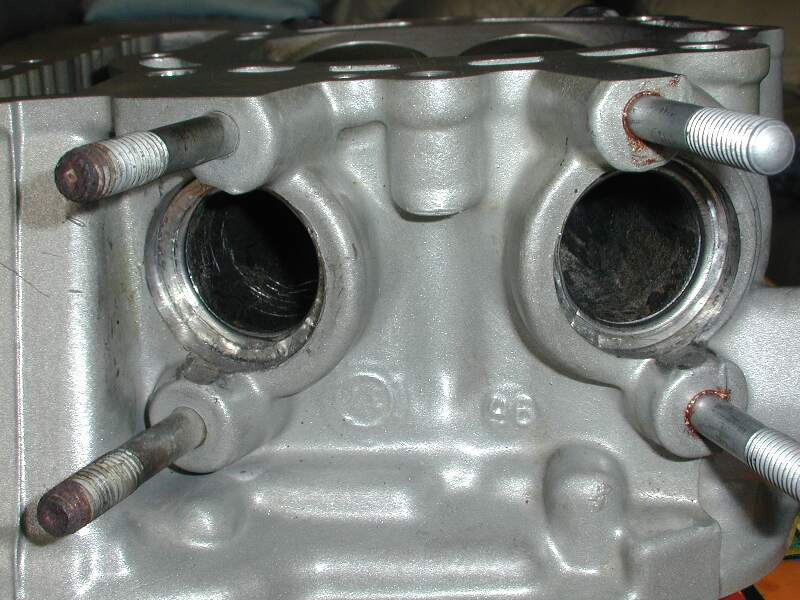
#8 = Exhaust Gaskets at the Head. This has been reported as a corrugated sleeve that fails under the clamp. The Replacement gasket is no longer corrugated.
#5 = Gasket between Tail pipe and Mid-pipe
#7 = Gasket between Lex head pipe and mid-pipe
The numbers will make sense if you have le partsfiche a l'i'clair.
(That’s the Parts gif, for Details refer Documentation). (or Shh, don't tell BMW. Exhaust gif)
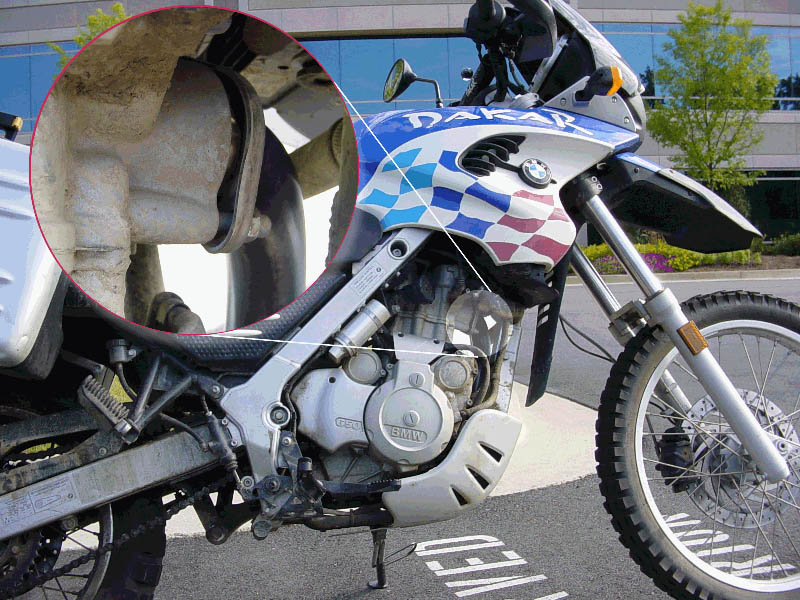
Note: You can get sockets on Rex. You CANNOT get sockets on Lex.
Remove the LEFT sidecover.
Remove the black plastic panels that cover both sides of the motor.
Remove both screws from the FRONT of the belly pan and just loosen the rear ones a turn or three. The belly pan just needs to drop down a couple or three inches in the front to make your life a little easier.
Loosen the Allen screw on the clamp that holds the u-pipe into the collector.
Loosen the Allen screw on the clamp that holds the collector to the muffler.
Get a 13mm box end wrench. A socket won't work. An open end won't work. Get a BOX end wrench. An open end will round off the corners of the cream cheese material used to make the fasteners. The stock stud nuts are made of cream cheese and extraordinarily cheesy. You may want to replace them with some Japanese exhaust nuts that you have lying around. Perhaps slather everything with Aunti Sieze (she didn't mind). (That’s Anti-Sieze to non-native English Speakers)
You NEED a box end wrench. That is the one that is NOT in the Official BMW (POS) Tool Kit.
Loosen all four 13mm nuts at the header clamps until you can remove the nuts with your fingers.
When removing the Lex pipe, I suggest removing the frame bolt just below it to make it easier.
If a stud wants to come out of the head give it some Vice-Grippian persuasion to make it stay in the head.
It is much easier if the radiator has been removed and if you have four arms.
Remove them, and then remove the clamps that hold the headers in.
Pull the headers out.
There is some wiggling that needs to be done to get the headers out at the same time you're removing the u-pipe.
You might need to pull the collector out of the muffler at the same time. Make sure you hold your mouth just so.
Replace your vaporized gasket. Pull out or lever out the Old Gaskets with a Screwdriver.
The Exhaust Gaskets are slightly larger than the opening and very soft metal, so it is difficult to get it in there, so some persuasion with a screwdriver and hammer may be necessary, and of course, the radiator is in the way. Getting the Gaskets in place and not mangling it can be very difficult.
Gasp.! I'm
sure there is no gasket there.!
There is. Stick your finger in the port. Feel for the EDGE of the gasket
as your draw your finger out. You might need to feel in several places (3
o'clock, 6, 9 and 12 for instance). If you go ahead and put a new Gasket in on
top of your old one i.e. TWO gaskets in, your exhaust system is more liable to
leak and won't fit exactly right. Besides that, the nuts won't run down as
far.
The gasket where the U-pipe joins the collector is just asbestos (or some sort
of impregnated carbon) as is the gasket where the collector joins the muffler.
With NO metal, these can disappear gradually. The gaskets where the pipes
enter the heads have METAL in them. They cannot disappear. When I first took
my header pipes off, I thought those gaskets were missing, too. Keep looking.
Gasp#2. I
think I was given the wrong-sized Exhaust Header Gaskets
Sound Familiar? Does the F650 have different size gaskets to go between
the exhaust pipes and head? (I'm thinking of certain models of BMW Airheads
that had different sized exhaust pipes) Reason I am asking is that I was
installing new ones to replace the old ones (OK at 25K miles) while the
muffler was off...and the new ones were 1-2 mm too big in diameter to fit into
the bores in the head. As they are soft "crushable" material, I "made them
fit", but as they are calling for snow this week (and likely the season's
first de-icing salt), I probably won't know until next spring if they actually
seal or not. Marty #436.
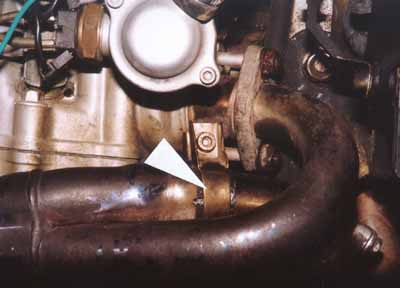
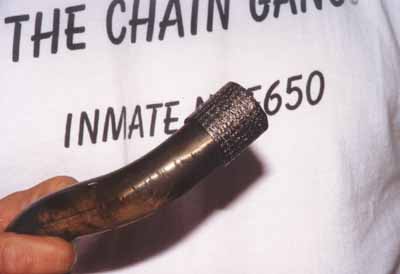
Actually I had the same problem. Kristian #562. I MADE them fit, which is why
in this
close-up of one of them, it looks all squashed. Don't know WHY BMW
do that. But it looks like it's normal. You might have more luck with a set of
Gaskets from Aprilia (The Pegaso Gaskets will fit the Classic).
If you need to replace the studs, refer What about those Rusty Exhaust Nuts below, otherwise.
Reassemble:
In reverse order.
It REALLY helps to have someone over on
the left side, feeding the left pipe into the head while you're dealing with the
other three joints all at once on the right side.
Tighten it all up. Torques are
in the Torque Table.
Fire it up.
Test again as above.
Notes: Justin843, Flash #412.
There is no way to get socket wrench or torque wrench on the main exhaust pipe nuts without removing the radiator. The tool to use is a 13mm box end wrench. You won't have to mess with the radiator and it works quite well.
Get the collector pipe flare pieces to open up to accept the new gasket is not easy with all the other hardware getting in the way. You have to pull the pipe flares open with a pair of pliers, but getting a bead on it is tough. I just pulled the lowest one open as much as possible because there were no obstructions. Another method is to stick a long screwdriver in the slot between the "ears," angled from the inside of the hole, as close to the open end as you can get it and then smack it with a hammer.
If your think your main exhaust gaskets have disappeared... you will swear on your mother's grave you have no exhaust gaskets. They are there, really.
Collector gasket = $11 clams. They wear out quickly They wear out quickly WHEN THEY START TO GO. But if the clamp is tight, that isn't a problem. This is NOT a normal wear item.
Exhaust gasket= $1.50 - that's a BMW shock! They are durable. I think you can probably get the same gasket at lots of other motorcycle stores for half as much. But I do not KNOW this.
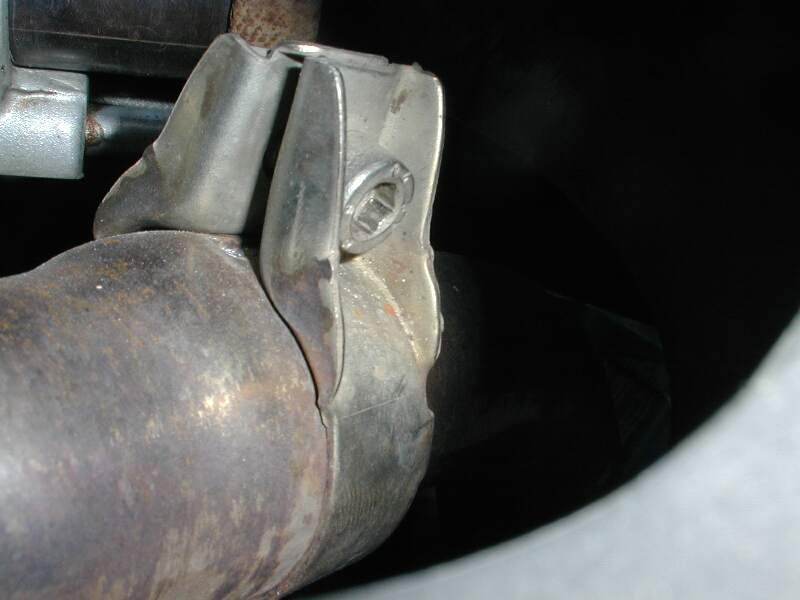
Gasket Replacement at the Collector/Header Pipe Junction
My exhaust collector/header pipe gasket (end of the U tube) went (99F650, 26,000km) and was leaking gas.
I am not happy about the lifespan of this piece which is way too short, and I am especially unhappy about BMW’s explanation that it was destroyed by an excess of heat! I thought this piece would be designed for this.
The Symptoms were:
Increased backfiring
A Loss of power
A Louder Exhaust Note
The BMW part number is 18 11 2345 037, cost: 10$.
The gasket is asymmetric, and the rolled edge should be inserted facing backward i.e. toward the rear of the bike.
The new gasket looks like a section of tube made by rolling up a piece of metallic paper, with one section slightly biased.
The Gasket Dimensions are:
External diameter: 35 mm
Internal diameter: 30mm
Thickness: 2.5 mm
Length: 20 mm
Removal of the old Gasket is fairly easy:
Take off both side fairing panels (the long pieces)
Unbolt the Gasket Connection (Allen Key)
Unbolt the U pipe at the Head (These 13mm nuts come undone pretty easily),
The interior of the exhaust was dark, leaving a thin black powder on the finger
Remove the remaining parts of the old gasket.
Insert the New Gasket
You may need to use pliers to widen a bit of the end of the external exhaust pipe, which is factory notched, because the clamp narrows it and the new gasket may not fit in.
Put the U pipe in place and re-fasten the two nuts at the Head.
Torque the collector bolt.
As advised by the mechanic, I left about 2 mm from maximum tightening of the clamp.
Start the engine and check for leaks, as per the procedure for the Gaskets at the Cylinder Head.
Some sort of vapour may come out from the collector but not under any pressure, and possibly some WD40 burning, if you used that to loosen your nuts/bolts.
Some pulses of air may come out from the new gasket.
Tighten the clamp a little bit if this happens.
Check the air-tightness over the next few days. The new gasket is supposed to heat and shrink a bit so retighten if necessary.
The whole thing is quite easy
and takes less than an hour, you just need two Allen keys from the bike
tool-set, pliers and a 13mm wrench.
The bike now sounds
fine, power is back and there is no backfiring.
Mechanic’s advice:
Do not tighten the gasket fully straight
off. Ride about 150 km, (the gasket will shrink a bit), then do a final tighten.
The
clamp is specially designed so that it can’t be tightened to less than a certain
minimum diameter.
Take it off and head to an auto supply shop to look for a suitable-ish temporary replacement? When we blew an exhaust gasket on our off-road buggy in the middle of Baja we went to a shop in Geurro Negro and got the closest match we could find...worked long enough to finish our trip and save our hearing and the valve. Cold air being sucked onto a hot exhaust valve is bad. One trick you might use (we did) is to use a pair of shears to cut away sections at the bolt hole locations so you can simply slip the gasket between the manifold and header without having to take the header completely off. then clamp it down. not the best solution, but as I said, it worked...when you don't have a lot of options, you make do. Mark #403
What about the GS Exhaust Gasket?
Unlike the Classic, the GS has only ONE, Large Exhaust Gasket. At the present time there is no procedure to follow for its replacement, but is likely to be very similar to the Classic.
Meanwhile here is some feedback:
I found out the exhaust manifold on my F650GS was loose,
caused by two loose exhaust pipe nuts. I tried to fasten the nuts but decided to
take everything off to see if the gasket was all right.
The gasket is/are the two thin metal parts right? Now the strange part: I
measured the stud length with the nuts fastened and found out the space is to
big to tighten the manifold. The end of the studs were damaged by the (cap) nuts
because they were turned on the studs to far. The studs are not loose. I have
driven the bike 6000mls now, never had any trouble. Recently the dealer
installed a Remus exhaust and 1000mls later this. Does anyone have any
experience with this? Maarten
What about those Rusty Exhaust Nuts/Studs?
by Flash et al.
Q. I have a F650ST and I am concerned at the state of the exhaust studs
that hold the exhaust to the cylinder head. They are looking a bit corroded. I
am concerned that if I need to remove the exhaust in the future I might have
some difficulty. Any advice on how to get around this problem would be
appreciated. Skidmark.
A. Replace the studs now. Use ant-seize.
Q. Can you please advise how to remove the studs.
A. Pull whatever it is you need to pull to have access to the area. (See
above). Remove the nuts. A clamp plate will pull out of the way. Shoot a
little Liquid Wrench® around the base of the studs and follow the instructions
on the container. Use Vise Grips® to twist the studs out. If you need to pull
the headers to do the job, so be it. The absolute worst case is that you will
break one (or more) off in the head and need to drill it to remove it. There is
no point in using any Loc-Tite® on reassembly because of the temperature where
the studs live. To screw in the new studs, put two exhaust nuts on one stud and
jamb them together using two spanners. Then put the wrench on the outboard nut
to "drive" the stud home in the head. Yes, hi-temp anti-seize on the threads
where the nuts go, just before you install the nuts.
Preventative Maintenance:
1) Soak with WD-40
2) Remove one at a time. Clean with wire brush. Glop on anti-seize. Retorque.
Unless they look like the corrosion is more than surface, I wouldn't try to
remove them unless they come out while trying to take the nut off. If one
breaks, then what could have been a clean-up and re-lube job becomes a
nightmare.
Alternative Gasket
Sources?
Ring Gaskets
by Flash
You might have more luck with a set of Gaskets from Aprilia. (The Aprilia Pegaso Gaskets will fit the Classic).
by Steve F650001
I was in Eastern Oklahoma when things started getting loud. As I neared Queen Wilhemina State Park the loud got louder, and when I backed off the throttle the engine backfired. That may sound cool when you are 17 years old and driving your dad's vehicle, but not when you are the owner who has to pay for repairs. The gasket, a cylindrical woven "sleeve" that fits on the end of the left side exhaust pipe just before it enters the "Y," had disappeared, leaving quite a gap for exhaust gases. The closer a leak of that type is to the exhaust port the greater the chances for a burned valve. The connection is about 12 inches from the exhaust port.
![]()
At first I thought it to be the ring gasket, which fits inside the port and several Inmates helped by calling dealerships in their hometowns. We planned to contact another Inmate who would be coming to the rally and could pick up the part and bring it to the rally. Meanwhile I drove to Mena looking for replacement parts. Closer inspection showed that the ring gasket was not the problem it was the exhaust pipe gasket. [See photo]. I raced back and forth across town in desperate haste. Finally, I tried the Yamaha shop. With the short section of exhaust I my hand, the wonderful woman behind the counter came to my rescue. The $20 part was just what I needed. Yamaha #4DN-14714-01; also indicated 863066.