REAR Wheel Bearings and
Idler
Arm/Swing Arm/Tension Lever Bearing Replacement FAQ
compiled, written &
edited by Kristian #562
updates edited
14/3/03 & 23/05/03 by PDuffy#1210
Many Thanks to Richard #424 for some of the detailed Photos.
Many Thanks to Haakon #626 for the detailed Bearing Information
Please read the Disclaimer before attempting any work in this FAQ.
See the
new
Shocks Maintenance FAQ section on suspension linkage for idler arm /
suspension linkage related maintenance.
From a Boxer
Site: Wheel Bearings are probably the most neglected part of any motorcycle,
and on the older, twin-shock Boxers the near-side bearing in the rear wheel can
totally fail with little warning. Its seal becomes worn by exposure to grit,
allowing road grit and water to contaminate the grease. The off-side bearing is
well protected within the hub, and like the front wheel bearings, gives little
trouble. Always remove the inner races of your bearings every year or so,
washing out all the old grease, and re-packing before replacement with new
seals. If you ride throughout the winter, re-grease the near-side rear bearing
in Autumn and Spring. Remember - new seals are cheaper
than bearings! The front wheel bearings of the later Monolever Boxers
and K-Series models give little trouble, even after extreme use.
Rear Wheel Bearing Replacement
by Kristian #562
15/10/01
While I was waiting for the parts for my Water Pump, I think
I turned into a Bearing and Seal fiend. I think replacing Seals
& Bearings is almost more satisfying than a new pipe and
slippers, sorry I mean pipe and jets, which is why I'm writing a
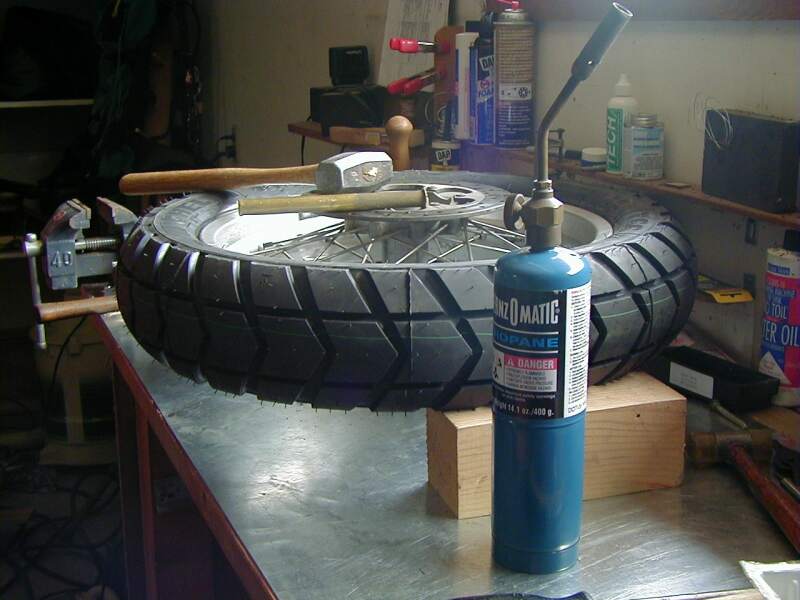
few things up here. A blowtorch/propane torch is very much the
answer for bearings. And a Refrigerator. Replacing the Wheel
Bearings really makes me feel good about my bike, especially
those crunchy Russian (Yep, Stamped made in Russia) Rear wheel
bearings.
General:
- You shouldn't need to replace
any Bearings at all unless they are worn and crunchy or
obviously broken, like a number of my Idler Arm (free)
Needle Bearings were. See Feeling for Worn Bearings for a description. What you SHOULD
do is regularly Grease them with a good High Temp Bearing
Grease. (You cannot Grease sealed Wheel Bearings btw...)
- Some seals, of the same size,
like the ones that came out of the idler arm, have a
steel rim and rubber centre, while others are all rubber,
I really don't know what the difference is in terms of
application, however the bearing man assured me it was
fine and showed me the numbers were the same, which of
course they were.
- Especially to knock IN the
new bearings without damaging them you MUST have a drift
just slightly smaller (so it doesn't Jam in the hole) the
size of the outer rim of the bearings, otherwise you will
damage the cover plate between the inner and outer race
of the bearing. I used sockets that were just the right
size, but another good alternative is a thick walled pipe
the right size.
- Put the NEW bearings in the
Freezer well before you start and don't take them out
until the LAST possible moment. Keep them on water/ice if
you need them by you.
Flash's abridged version of this FAQ.
Heat up the HUB with a propane torch until it is hot enough to
make spit sizzle. Take a big screwdriver and knock the spacer
between the bearings sideways slightly. This will push the
bearing out slightly AND it will allow the spacer to be pushed
further aside. Then you can hit the inner race of the bearing
with the screwdriver. Use a BIG hammer. Have the new bearings
COLD and ready to install. You want to knock out what is there
and then drop the new ones in while the hub is hot. Do NOT hit
the new bearings on their inner races or shields, ONLY the outer
races.
Part Numbers:
- The Classic Bearing and Seals
numbers are all on Flash's F650 Maintenance Log, but here they are again for good
measure:
- Rear Wheel: 2 bearings, 1
Seal, #'s 6203-2RS & 30x40x7 Respectively. BMW Part #
36 31 2 345 335, 36 31 2 345 337 Respectively.
- Rear Sprocket Carrier: 1
Bearing, 1 Seal, #'s 6204-2RS & 30x47x7 Respectively.
BMW Part # 27 71 2 345 338, 27 71 2 345 341.
- Note: The GS/Dakar
Sprocket Carrier has TWO 6204-2RS Bearings. The SKF
Part # OEM in my GS, is 6204-2RS1/C3. The GS
Sprocket Carrier Seal is 30x40x7 NOT 30x47x7.
- The "/C3"
designation is rather important as the bearing is a
"shrink" fit in the carrier. The C3 tell us the
bearing has a bigger internal bearing clearance than
normal. That is used so that when the carrier cools down
it clamps onto the bearing a bit and thus eliminates any
"looseness". If you fit a standard clearance
bearing in the carrier it will be a bit "tight"
internally. Thanks to Haakon #626.
- The Rear Wheel Bearings
are still: 2 bearings, 1 Seal, #'s 6203-2RS & 30x40x7
Respectively.
- The GS Sprocket Carrier
has a Washer AND an Internal Circlip (Snap Ring SR B-47)
between the Sprocket Carrier Bearings. Make Sure you HAVE
that Circlip.!
- Without it (The Sprocket
Carrier Circlip) the GS Sprocket Carrier will move, like
this.
- FYI the Classic Wheel Bearings are
nominal sizes 17x40x12 and the Classic Sprocket Carrier
Bearing as 20x47x14.
- Some Members have OEM as KOYO
6203RS JAPAN, some Bulgarian, mine were Russian. Jean
#636 gets his parts from A&W Bearings at www.awbearings.com.
- RS or LS= 1 contact seal, RS2
or LS2= 2 contact seals (one each side), RZ or LS= 1
shield. A contact seal is a sort of rubber/plastic
sealing that is a lot more "watertight" than a
shield. Many Thanks to Haakon #626.
- Refer both Part Number Bearing Schedule and Detailed Bearing Information &
Resources for
further information.
Tools:
- A good strong pair of
Internal Circlip Pliers
- A screwdriver to remove the
old seals
- A BFH (Flash's alarming
description of a Big F#*&$in' (Large) Hammer) and a Long Drift
- Some Heat. Really DO NOT try
to remove the old bearings/replace the new ones without a
Blowtorch
or you might even consider heating the hub in the Oven (Don't tell the wife).
My Blowtorch cost about $20 and runs on $4 camping
gas canisters which last at least 9 bearings, so far.
- A Fridge with a Freezer. Stick your NEW
bearings in there. The heat differential between cold bearings (Contract due
to cold) and the heated (Blowtorch or oven) Bearing seat, will allow them to
go in easily and snug in there.
- Grease for the Axle, preferably BMW#10 or
Similar.
Terminology:
When referring to two similar items:
"Outside" means closest to the
Outside of the Bike.
"Inside" means closest to the
Bike Centreline.
Method:
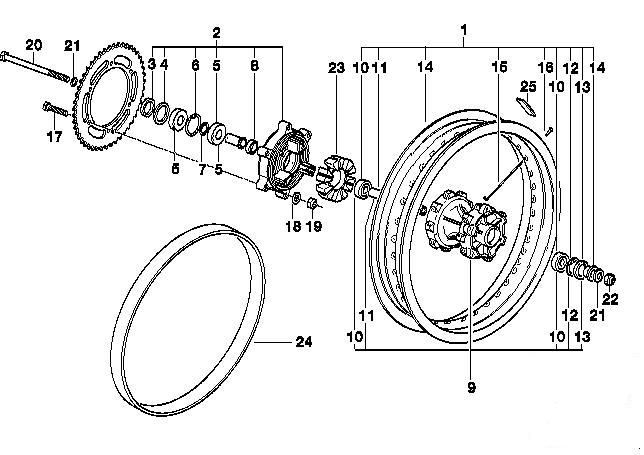
Rear Wheel Bearings:
Classic Sprocket
Carrier:
Replacing the Seal and Bearing in
the Sprocket Carrier is easy and I'd recommend it first if you're
not experienced in bearing replacement, because it's easy and
satisfying. Instant Gratification, or almost.
Removal:
- After Removing the Rear Wheel, take off the Sprocket Carrier
(Parts #2-#8, it just pulls out from the rest of the
wheel), to expose a series of black wedges (Part #8),
called the "Cush Drive". You can just
peel out these wedges to save them getting fried if you
apply heat.
- Remove the flanged
"Outside Spacer", Part #3 from the Sprocket
Carrier. Mine just fell out, but Mark #403 and James #523
note that this Spacer CAN take a bit of levering out with
a screwdriver as it is wedged in the Bearing, or you can
use a puller to remove it. Don't lose the spacer. Perhaps
put it in the Freezer, so it is easier to re-insert it.
- Lever out the Seal (Part #4)
with a screwdriver (I'm Assuming you will replace it, so
you don't need to worry about damaging it). Use a Blunt
Screwdriver (not a Sharp one you will damage the Metal
Surface the Seal Mates with).
- There is an INTERNAL Circlip
(Part #5) under that seal. Remove.
- Now heat the HUB around the
seal. The old bearing will scorch a bit and a bit of
grease might even come out. Use a hot blue flame, not a
yellow one, and get used to getting your direction right
for the other bearings later. Try not to heat the bearing
itself. You might scorch some dust and a bit of paint in
the hub too if it's already started peeling like mine had
(BEFORE the Blowtorch). Actually amazed how resilient the
paint was on the stuff that hadn't already peeled
though).
- Place the Sprocket Carrier
(which is fairly robust, if it was more delicate like
e.g. the clutch carrier, I'd advise placing it on a piece
of wood), on something solid, with a hole in it which
should be bigger than the one the bearing fits in. There
is ANOTHER flanged spacer (Part #7) between the bearing
and the INSIDE edge of the Sprocket Carrier, which you
will have to hammer against to get the bearing out. The
bearing will come out the sprocket (Circlip) side of the
Sprocket Carrier. Using a Socket the same dia. as
the Inside Spacer (Part #7), place the Socket against the
Spacer and give the Socket a good couple of smacks from
the BACK (i.e. the Inside) of the sprocket carrier using
a hammer, but try not to hammer the spacer directly with
the hammer, as you may damage or knurl the edges of the
Inside Spacer. Wear thick leather or Cotton Gloves a the
metal is HOT and stays that way a LONG time.
Or put an old BOLT through the back (inside) of the
Carrier and hit the head of the bolt. ONLY use a bolt for
removal of the bearing.! The Bolt should have a Shaft the
size of the AXLE and a Head smaller than the hole the
inside spacer sits in.
Replacement:
- Find a socket JUST slightly
smaller than the OUTER RACE of the Bearing.
- Now heat the Sprocket Carrier
Hub AGAIN, until it's nice and HOT and get your little
helper to bring your ICE-COLD bearing, Just the one that
goes in the Sprocket carrier. They can bring an ICE-COLD
Beer after you get it in.
- Drop in your inside Spacer First (If you
FORGET this you will need to take the bearing out again.!
- Take off the heat, place the
Sprocket carrier on a Piece of Wood, Drop the new bearing
into position, MAKE SURE it's about level, then place
your correct sized socket/pipe drift over the outer race
and give it a couple of whacks until you hear a ringing
sound of it coming up against the bottom flange. Do
NOT hammer against the INNER RACE.!
Mark #403 noted: "The sprocket carrier bearing
was the hardest to install because I didn't have anything
to drive it in. That would be a huge socket. So, I ground
down the outside of the old bearing by holding it in the
centre with gloves on and touching the outside ring to a
grinder. As the grinder did it's thing, it also turned
the outside of the bearing keeping the whole thing
perfectly round. I used this modified old bearing and a
30mm socket on top of that to drive in the new bearing.
worked OK." If it goes in skew, straighten it up
ASAP, BUT DO NOT REAPPLY the heat or You will invariably
ruin the Grease in the Bearing and the rubber cover if it
has one.
- Whack Harder when it looks
like it's going in straight and is 2/3rds in as it is
less likely to Skew at this stage. ALLOW to cool do NOT
place under water to cool. Do NOT put in the Rubber Seal
until the Sprocket carrier is cool.
- When Cool, Replace the
Circlip (Snap Ring), then before insertion, thoroughly
pack the inside of the seal with grease and with a piece
of wood flat over the top of the seal, tap it into place.
MOST of my seals I pushed in by hand and finished off
with straight edge piece of timber. They are that easy.
- Place the Outside Spacer in
the Bearing, through the outer seal and tap it gently
into place.Sometimes this needs a little encouragement to
get it back in. If you have to hit it with a hammer to
get it in please ensure that you put something behind the
bearing so that you are not transferring the force across
the ball race and possibly damaging it. A spark plug
socket may be long enough to serve this 'anvil' type
task.
That's it for the Classic Sprocket
Carrier.
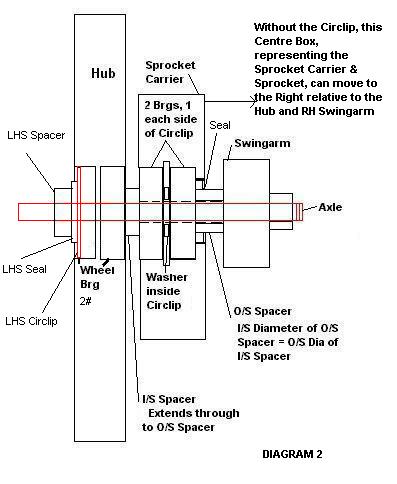
The GS Sprocket Carrier is a little different.
Here is a Better Picture. GS Sprocket Carrier.
As you can see it has TWO
Bearings, either side of a Circlip, and the Spacing Washer is now
BETWEEN the Bearings. This presents a problem in removal, because
you can't just remove the Circlip and Whack out the Bearing and
unlike the Classic, the Bearings come out the INSIDE of the
Sprocket Carrier, not the Outside.
- After Removing the Rear Wheel, take off the Sprocket Carrier
(Parts #2-#8, it just pulls out from the rest of the
wheel), to expose a series of 3 pairs of black wedges
(Part #23), called the "Cush Drive". You can
just pull out these wedges to save them getting
fried if you apply heat.
- Remove the "Outside
Spacer", Part #3 from the Sprocket Carrier. It fits
over the Shaft of the INSIDE SPACER, Part # 8 and the
Unnumbered bit to the left of it. Don't lose the spacer.
- Lever out the Seal (Part #4)
with a screwdriver (I'm Assuming you will replace it, so
you don't need to worry about damaging it). Use a Blunt
Screwdriver (not a Sharp one you will damage the Metal
Surface the Seal Mates with).
- Remove the "Inside
Spacer", Part # 8 and the Unnumbered bit to the left
of it, by tapping gently with a Rubber Hammer or a
against a bit of Hard wood. Tap against it from the from
the outside of the Sprocket Carrier and pull it through
from the Inside. Don't lose the spacer.
- Now, placing the Sprocket
Carrier inside Face Down, observed there is a Washer
between the Bearings (Part #7), which you have to lever
across a little way with a blunt drift or Screwdriver, to
expose the lip of the Inner Race of the INNER Bearing.
The Inner Bearing MUST BE REMOVED FIRST and unlike the
classic it comes out the INSIDE. (There is no other way).
Just push against the washer with a screwdriver. Don't
hammer it if it jammed between the Bearings, you'll ruin
it, unless of course you bought a Spare. In extreme
cases, if it will just not budge, Heat the Sprocket
Carrier around the INSIDE Bearing and use a Slide Hammer
(Get someone to hold the SC Down) to try and dislodge the
Inner bearing just enough to free the washer. Or after
heating try gently whacking against the outer bearing to
see if you can slightly separate the two.
- Once you have established you
can move the washer across OK, find a good drift which
you know will fit against the lip of the exposed inner
race of the Inner Bearing.
- Now heat the INSIDE of the
HUB around the INNER BEARING. The old bearings may scorch
a bit and a bit of grease might even come out. Use a hot
blue flame, not a yellow one, and get used to getting
your direction right for the other bearings later. Try
not to heat the bearing itself. You might scorch some
dust and a bit of paint in the hub too if it's already
started peeling like mine had (BEFORE the Blowtorch).
Actually amazed how resilient the paint was on the stuff
that hadn't already peeled though). Use Leather Gloves to
Handle.!
- Now, place the Sprocket
Carrier INSIDE BEARING DOWN. I'd advise placing it on a
piece of wood), on something solid, with a hole in it
which should be bigger than the one the bearing fits in.
Using the Drift from the OUTSIDE of the S.C. with the
Drift against the Bearing Lip, give the INSIDE Bearing a
good couple of smacks. DO NOT hammer against the OUTSIDE
BEARING as you may damage the Circlip or Circlip Slot.
Wear thick leather or Cotton Gloves a the metal is HOT
and stays that way a LONG time.
- Once the inner bearing is
out, an INTERNAL Circlip (Part #6) will be exposed.
Remove. The OUTSIDE BEARING will be exposed.
- If you were quick to remove
the Inside Bearing and Circlip, you will not need to
reapply heat. Otherwise, reapply Heat to the S.C. again,
concentrating around the Outside Bearing. Again place the
S.C. INSIDE BEARING DOWN.
- Using a hammer and a socket
the Dia. of the INNER RACE hammer the Outside Bearing Out
in the Same Direction the Inside Bearing Came out. i.e.
Toward the inside of the S.C., FROM the Outside of the
S.C.
Replacement:
- Find a socket JUST slightly
smaller than the OUTER RACE of the Bearing.
- Now heat the Sprocket Carrier
Hub AGAIN, until it's nice and HOT and get your little
helper to bring your First ICE-COLD .... Bearing, one of
the two that go in the Sprocket carrier. They can bring
an ICE-COLD Beer after you get the job done.
- Take off the heat, place the
Sprocket Carrier on a Piece of Wood Outside Face Down,
Drop the new bearing into position, MAKE SURE it's about
level, then place your correct sized socket/pipe (or whatever fits the Bearing Outer Race AND down
the Hole), over the
Bearing Outer Rim and give it a couple of whacks until
you hear a ringing sound of it coming up against the
bottom flange. If it goes in skew, straighten it up ASAP
or remove it and try again BUT DO NOT REAPPLY the heat or
You will invariably ruin the Grease in the Bearing and
the rubber cover if it has one.
- Do NOT hammer against the
INNER RACE.!
- Whack Harder when it looks
like it's going in straight and is 2/3rds in as it is
less likely to Skew at this stage. ALLOW to cool do NOT
place under water to cool. That's ONE BEARING.
- Replace the Circlip (Snap
Ring) and place the Spacer Washer in position inside the
Circlip. DO NOT FORGET THESE TWO ITEMS.! Refer the GS Sprocket Carrier FAQ.
- Repeat a-e for the second
(INNER) Bearing except don't hammer the inner bearing
Hard up against the Washer. Just Snug, so the washer can
JUST move between the Bearings, is OK.
- Do NOT put in the Rubber Seal
until the Sprocket carrier is cool. Thoroughly pack the
inside of the Seal with grease and with a piece of wood
flat over the top of the seal, tap it into place. MOST of
my seals I pushed in by hand and finished off with
straight edge piece of timber. They are that easy.
- Place the Inside Spacer
through the Bearings from the inside of the S.C.
- THEN, put the outside spacer
over the top of the shaft of the Inside Spacer. Ensure
the Outside face of the Outer Spacer goes snugly through
the outer seal.
The GS/Dakar Sprocket Carrier bearing is 6204-2RS1/
C3. The "/C3" designation is rather important as the
bearing is a "shrink" fit in the carrier. The C3 tell
us the bearing has a bigger internal bearing clearance than
normal. That is used so that when the carrier cools down it
clamps onto the bearing a bit and thus eliminates any
"looseness". If you fit a standard clearance bearing in
the carrier it will be a bit "tight" internally. from
Haakon #626.
That's it for the GS Sprocket
Carrier.
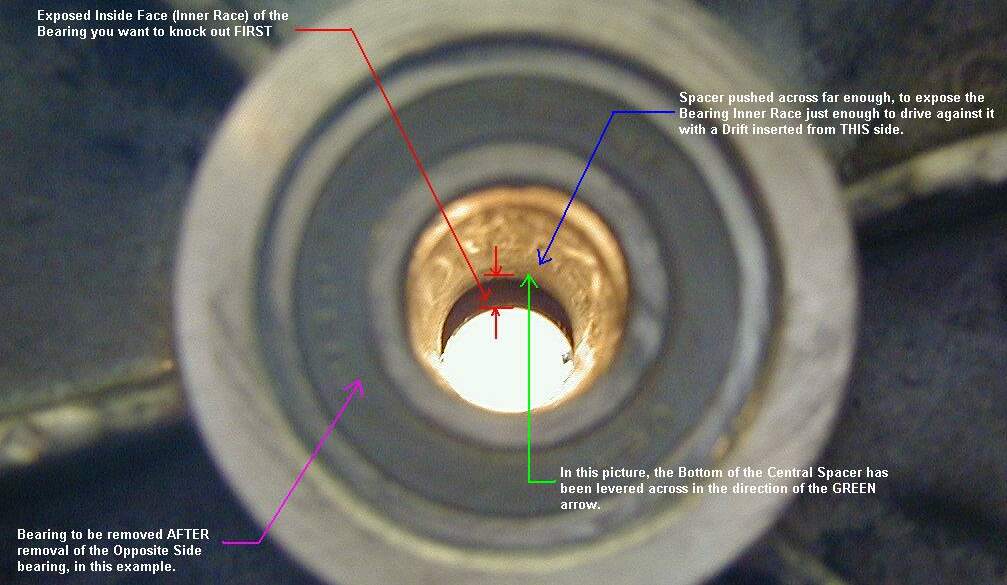
Rear Wheel Bearings: Wheel
The problem with both of the Wheel
Bearings is that there is a Long Tubular Spacer between the bearings. Because this spacer is the
same internal diameter as the bearing the teeth of a conventional
slide hammer cannot get any purchase on the underside of the
bearing. I didn't have any other tools and the thought about
using the Hilti-Bolt hadn't yet occurred to me (See the Clutch
Cover Removal FAQ for
details - useful for BLIND Bearings, where there is not a
through-hole.). So this is what I did:
Removal:
- Now the sprocket carrier Side
Wheel bearing has NO Seals and NO Circlips, So you don't
have to worry about taking them out. However the brake
rotor side has a Seal and a Circlip. Gently Lever
out the seal with a Blunt Screwdriver (not a Sharp one
you will Damage the Metal Surface the Seal Mates with)
and remove the Circlip.
- On ONE END of the spacer
(discussed above) there is a (centralizing) washer, which
stops the spacer dropping into the hub. Of course you
could go and buy BMW Special Tool "XYZ" but
it's expensive and I need both my arms and legs. So you
need to find the end of the spacer that moves across MOST
(beneath the Bearing) and heat the Hub Casing around the
Bearing on THIS side for removal. (Do not heat it yet).
It is not shown in the manual. One of the wheel bearings
will be easier to gain purchase on than the other, due to
the centre spacer between them having a locating washer
pressed onto its outer surface (between outside of spacer
and inside of wheel hub, but closer to one end than the
other). What you need to do is to determine
WHICH end of the Spacer moves across the most and
remove this Bearing first.
Mark #403 notes: "When pushing the spacers (both
front and rear hubs) to the side, if the spacer doesn't
seem to move much, turn the wheel over and try the other
side. The centering washer is of course at one end of the spacer, except you don't know which end.
Once I found the end that would move, it was very easy to
get purchase on the bearing with a long drift. Two
good whacks and the bearing was out."
- Some people have a devil of a
time getting the spacer moved over enough to get a drift
to catch on the old bearing. Of course the end WITH the
Washer on it will not move across. Also, if the Bearings
are hard up against the Spacer, (which when you put them
back they should NOT be), even the free end of the Spacer
is hard to move across enough to get any purchase
on the Bearing with a Drift, because both ends are
trapped by the Bearing Races. (Not sure if BMW installs
the spacers all facing the same direction).
My trick, because you're going to
Trash the old Bearing anyway, is to either:
(a) - After an initial heating, (or you CAN
do it cold) hammer the Centre (one or Two Whacks
on a Correctly Sized Socket) of one Bearing (on any side)
to move the opposite end bearing away from the Spacer just
enough to free the Spacer just enough to slide across
i.e. it LOOSENS the Spacer between the bearings just
enough so you can move it across (and you can only move
it across at the end without the washer around it.!).
or:
(b) - After an initial heating (or you CAN
TRY to do it cold) try and use a Puller to get some
purchase on one of the bearings, to move it out just far
enough to get the Spacer loose as (a) above.
(You will have to do a
secondary heating to actually remove the bearings after
this.).
- Once you have determined the
end of the Spacer that WILL move across, the Bearing
closest to this end of the Spacer is the one you
should remove FIRST. Call it Bearing 1. Inserting
a drift (about 8" long) through the Hub, from
the OPPOSITE side to Bearing 1, push sideways on
the drift, trying to push the spacer off-centre enough
for the drift to be able to whack on the inner race of
what is now the far bearing (Bearing 1). (Do
NOT use a sharp screwdriver to push the spacer across or
you will score the inside of the spacer).
- When you have determined you
can push the Spacer across with the Drift in a couple of
different directions, heat the Hub around Bearing 1.
Be VERY careful NOT to heat the spokes. They are very
thin and will glow red in a short time. Perhaps a short
section of steel pipe placed over the hub is a good idea
to protect the spokes.
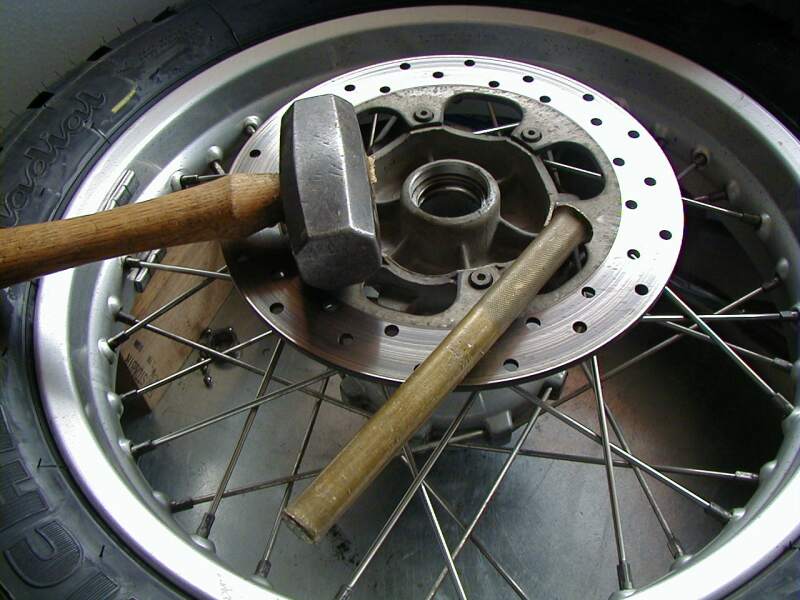
- Place the Wheel over a Piece
of timber with a Hole in it. (Place the wheel bearing you
want to knock out, down). Now with the Drift pushing the
spacer across and the Tip of the Drift on the
inside Race of the Bearing (Bearing 1) hammer the
end of the drift. Note that considerably less than half
of the Bearing Race will be exposed and it is tricky to
hit. Two or three Good Solid Whacks will do it. If it is
difficult, try pushing the Spacer across in another spot
and hit the race of the Bearing again, say across a
Diameter.
- With this bearing out, remove
the spacer, heat the Other Bearing, Bearing 2
(make sure the Circlips are OUT) and drive out with a
drift through the Hub.Pat #1210 notes: I
couldn't get this spacer out in the manner mentioned here
(ie BEFORE bearing No. 2 is removed) so I placed a
suitably sized socket on the bearing 1 side of the spacer
and a couple of hits had the bearing out.
- Note also that driving sealed
bearings (in or out) with the drift on or near the inner
race, when the bearing SEAT is on the outer race, will
stuff the bearing. So always tap in the NEW wheel bearing
on the Outer Race. Knocking Bearings OUT on the inner
race is not so important as you're not going to use those
bearings again anyway, right.!. Same goes for hitting the
outer race when the inner race goes onto a shaft, like
the Steering Head bearings. OK, that's the removal.
Replacement:
- Putting them back is easier,
BUT be careful, the HUB is narrower in the middle than
the outsides and the washer around the spacer won't fit
past it. So (a) Do not forget the spacer and (b) put the
spacer in the right way around, i.e. The End WITHOUT the
Washer to the First bearing installed.
- Having frozen your bearings
in the freezer, Heat the Hub again, good and hot, (Spit
Sizzles aka Flash) and have the bearings close at hand in
ice water or in a Freezer in your Garage. They warm very
quickly.
- Installation is the SAME as
for the Sprocket carrier above BUT two things to watch
out for. The first is the Bearing with the Circlip must
be driven as far as you can see the Circlip slot exposed.
The second is Do NOT Drive the second bearing in too far
that it JAMS the spacer hard up against the first
(installed) bearing. It must be just a little slack. So
it makes sense to put in the bearing WITH the Circlip
FIRST.
- The 30mm socket used on the
countershaft nut is absolutely perfect for driving in the four wheel bearings, but not the sprocket carrier
bearing. Thanks to Mark #403.
- ALLOW to cool, Install the
Circlip, Pack the seals with grease, press them in by
hand and straighten with a FLAT piece of Timber. Remount
your wheel, et Voila.
Grease your Axle: If
the bearings fail and the Axle doesn’t have enough grease,
the wheel bearing inner race(s) can weld themselves to the axle.
This is an expensive example of why it is a good idea to grease
the axle with a good wheel bearing grease before re-installing it
(delays the "welding" process of Axle to Bearings if
your wheel bearings fail !).
For Reinstalling the
Wheel refer the Rear Wheel Removal FAQ.
Experiences:
by Marty #436
Here are some Photos of completely wrecked Bearings i.e.. No
Balls, just BALL DUST. Thanks to Marty #436.
Photos courtesy of Greg Olsen of Alaska who graciously came to my
aid in the repair adventure.
97F650 Classic - rear
wheel bearing failed catastrophically at 13,000 miles just north
of Anchorage, on the way back from a trip to the Arctic Circle. I
was refused warranty work by Anchorage BMW dealer, as bearings
are a "normal wear item". I've been told that the
"service interval" (i.e. remove & replace) is
25,000 miles. Local dealer and BMWNA gave me the royal run
around, never resolved (ask me if I'll bother to buy a BMW new
enough to have a warranty again). Have had the bike since 7200
miles, my mileage had been (at that point) approximately 15%
graded gravel road, the rest pavement (almost all street now).
Based on the condition of the bike, I suspect that the previous
owner's miles were mostly pavement as well. Pictures of:
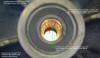
 Failed F650 Bearing. The metal outer part is all
that remains of the seal; the outer spacer (3 o'clock position)
is grooved at seal area. The inner race (5 o'clock) is missing
the balls and cage (silver dust inside wheel hub). Outer race is
still in the wheel, and notice that the inner spacer end is
chewed up a bit.
Failed F650 Bearing. The metal outer part is all
that remains of the seal; the outer spacer (3 o'clock position)
is grooved at seal area. The inner race (5 o'clock) is missing
the balls and cage (silver dust inside wheel hub). Outer race is
still in the wheel, and notice that the inner spacer end is
chewed up a bit.
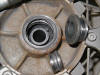
 Bearing Dust. This is the material that poured out
of the wheel when we dumped it out. Note the lack of indication
of any lubricant. When the inner spacer was pulled out, some egg
shaped balls fell out as well. Both bearings and the seal were
replaced (other parts were not available). I will be redoing the
whole job complete with new parts when I remove that wheel for a
new tire/chain/sprocket (soon). Will use standard
industrial/automotive bearings (# is in FAQ) and seal, ask for
the "top of the line" bearing (forget the name), it's
like US$2.00 more/bearing (price was less than $20/bearing, if I
remember correctly).
Bearing Dust. This is the material that poured out
of the wheel when we dumped it out. Note the lack of indication
of any lubricant. When the inner spacer was pulled out, some egg
shaped balls fell out as well. Both bearings and the seal were
replaced (other parts were not available). I will be redoing the
whole job complete with new parts when I remove that wheel for a
new tire/chain/sprocket (soon). Will use standard
industrial/automotive bearings (# is in FAQ) and seal, ask for
the "top of the line" bearing (forget the name), it's
like US$2.00 more/bearing (price was less than $20/bearing, if I
remember correctly).
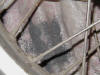
 Munched Rear Wheel Spacer
Back to bearings.
Replaced the chain carrier bearing at 21k as it was
"crunchy". Possibly related to stresses from the wheel
bearing failure? Again, I replaced the bearing and seal with
"top of the line" industrial/automotive bearings.
Replaced the front wheel bearings at 21K. Preventative
maintenance, still seemed OK. Top line industrial/automotive
bearings and seal.
Replaced the steering head bearings at 21K. Seriously notched,
especially noticeable at highway speed behind semis. Replaced
with the hi-performance ones listed in the FAQ (from local
bearing house). Top and bottom seals had to be ordered from BMW.
Used extremely high temperature waterproof grease, we'll see how
long it lasts (stuff they use on steel mill/paper mill
conveyors). This is definitely NOT advised as a project for a
beginner to start with.
My observations are that these F650 bearings can be expected to
wear much quicker. After all, they all lack serious environmental
protection...the wheel hubs and sprocket carrier only have seals
on one side, and the seals on the steering head are not that
great, either. With more water and dust ingress comes more wear.
My plans are to carry a spare set of bearings and seals for the
wheels and carrier. The work can be done in LOTS of places, IF
you have the parts (otherwise, a day or more wait?). Steering
head bearings tend to go slowly and is a much bigger job, so no
point in carrying them (except round the world trips?).
Finally, while the rear wheel/chain/sprocket, etc were apart,
thought it was a good time to replace the damaged parts I had to
re-use when the rear wheel bearing turned to "dust"
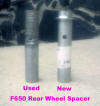
(you really liked those pics) in Alaska. I also took a picture of
the "used" center spacer vs. the new one. Worked out OK
because the ends were still square and the length correct. The
walls are a little thin in places, though. Best I can figure is
that the bearing cage failed, and the balls escaped to the inside
(between spacer and hub) and never "escaped", just spun
around inside, getting egg shaped, and grinding away the outer
part of the spacer and the inner part of the wheel hub
(fortunately, inboard of the bearing race seat and circlip
groove). Couldn't take a decent picture of the inside of the hub,
but looks like there is still plenty of meat there, although the
inside surface resembles the used spacer. Guess that additional
"support" on the inside of the wheel hub is why I
didn't notice a SERIOUS problem with it (and the molybdenum
disulfide grease on the axle didn't hurt, either).
FEELING
WHEEL BEARINGS
by Flash #412
Additional comments by Kristian#562
October '01
- With the wheel off the
ground, grab the tire with hands opposite each other. If
the axle is pointing at your navel, push one hand away
and pull the other toward you, then reverse the motion.
If you feel play, the bearings are shot.
- Or, with the wheel off the
bike, stick your finger in the axle hole and rotate. If
you feel anything "crunchy," the bearings are
shot. Do both sides of the wheel and also the sprocket
carrier.
- Replacement bearings cost
about US$5 each at any bearing supply house. These
are standard industrial supply parts. Why pay a
dealer 5X the price for the same (or even lesser quality)
parts? The part numbers are listed in the F650 Maintenance Log.
- Note: When you're feeling bearings in
the hubs, try and do it after the Central Spacer has been slightly loosened.
While I would STRONGLY advocate replacing them all simultaneously, if you
are looking for which one has worn the most, the reason for loosening the
Central Spacer is that if the Spacer is tight between the bearings, and you
turn one bearing this in turn (via. the spacer) turns the opposite side
bearing, and it can feel as though the bearings are really crunchy, when in
fact they are not as bad as you first thought. Try it.
Bearing Failure
Feedback
Refer also Survey
Section for early feedback
-
97 classic 39,000 miles rear
wheel bearing failed; one ball split it two. Generic
sealed bearing was $4.95; BMW owner from Anonymous book
fixed it :-) Symptoms: Acted like I had a soft front
tire. Muriel #582.
-
Q. Amount of play in
swingarm? - 96 Classic F. Following a tyre change, I
noticed that there is about 1cm of free play (uo-down) in
the swingarm when the bike is on the centre stand. Does
anyone know if this is normal?
A. Not more than 1-2mm.
-
Work DONE:
68,000 kms
Typical Usage:
70% Road
30% Off Road (including some beach riding)
Swingarm :
LHS = Fine,
RHS one fine, the other rusted and the bush was also
rusted. - Replaced both in here
Replaced RHS and packed both sides with grease.
Connecting strut (one with 3 sets of bearings):
Connection to suspension = Mush, the sleeve had lots of
wear from the rusted bearings - Replaced
Other 2 sets of bearings ok, will check them again in 20K
kms
Tension struts:
Both mush - Replaced
Used 18mm socket and vice to extract bearings and found a
6mm bolt with some nuts on it made an excellent large
Allen key.
J@mes #848 -- '97 F650 - Classical & Red (66k kms and
counting-- '85 XT400 - aka "Patty the Cow"
-
Just
finished changing the Sprocket Carrier Hub Bearing on my 97 ST, which was
found to be failing during a tire change at 15K miles. The FAQ info was of
great help. Found the SKF bearing ($9) and seal ($4) in stock at Applied
Industrial Technology, 1719 Marvin Griffin Rd, Augusta GA, 30906-3809,
706-798-4335. The OEM bearing had very little "crunch," but a look at the
surface of the carrier hub facing the wheel hub told a different story. The
carrier hub had a 90 degree wear mark from contact with the wheel hub as it
wobbled on its bearing. Very poor design. In preparation to press in the
bearing, I removed sprocket, degreased the hub, and cooked it at 250 degrees
for about 15 minutes in the oven, while the bearing was in the freezer.
Compared to a torch, the oven makes for even heating and maintains paint on
hub. (It may anger your wife.) I used a floor jack, some 2x4 pieces, a 30mm
socket, and the bottom of my pickup's step bumper to press the bearing. BTW,
the bearing and both bushings popped out of the hub when struck with a 1.25
x 6" brass drift and hammer. Also be careful prying the seal out of the hub.
I chipped the hub's lip levering a screwdriver against it, and had to break
out the JB Weld for just a cosmetic repair. Makes one wonder about the
structural qualities of this casting. I plan to inspect wheel bearings at
20K miles. They are OK now, but probably have similar low OEM quality and
life expectancy. 97 F650ST, teddco
-
Well
I did the brakes and check the bearings on my bike. Everything is fine
except for the rear left side wheel bearing it is "crunchy" and doesn't turn
smoothly. Now if I am going to be in there should I change all three
bearings? Also any idea why one went bad and the others seem ok? I read the
faq thoroughly and I read the part about the spacer being tight and causing
them to feel crunchy but wouldn't that be both? Just curious. MasterITRIT
#F650-1231 -- '98 F650 Classic
-
"If I
am going to be in there should I change all three bearings?" I would. At the
very least, change BOTH wheel bearings. You can't very well change one
without significant risk of damaging the other. Flash#412
-
"Also
any idea why one went bad and the others seem ok? "The one that died first
was either packed with the least grease or else got the most direct blast at
a spraywash, or both. Do NOT buy the bearings at a BMW dealership. Buy them
at a BEARING house or INDUSTRIAL SUPPLY house (found in the Yellow Pages).
Flash#412
-
I
know one person who got SKF as an OEM replacement from BMW. My GS OEM F & R
Wheel Bearings were all SKF. Forget what they LOOK like, do they roll
evenly... ;-) Kristian#562
-
My
bike has front, rear, and sprocket SKF bearings from the factory. 25K miles,
and not a hint of trouble. Is it true that the SKF bearing are longer
lasting than other brands. Raymo #1173, Chicago, 2001 F650GSA Raymo
-
I was doing a weekend ride with my cousin, and halfway through the trip the front wheel on his Road King began to grind. It occurred to me it could just as easily have been me . . .
As I approach my 24k checkup, I just realized I never "inspected" the wheel bearings at 12k miles. I quickly skimmed through the FAQ's, and didn't see right away the answer to this question: At 24k miles, am I likely to need new bearings (i.e., instead of "inspecting", should I just replace them?). -Scott ID, #1244
-
Darned if I know about all these new (since 1918) machines. I have replaced a lot of wheel bearings on trailers and cars but only changed one on a motorcycle. What I do is stick, or as we say down South, poke my fingers inside of the inner race while the wheel is off having the tires changed. Then I spin the wheel some , or rotate my finger in the bearing. If it feels rough or seems to "catch" at spots, I consider it needs replacing. Seems to work for me. -Ike
-
I've replaced a rear wheel bearing at the sprocket carrier, and a front wheel bearing that I detected play in. Don't have my maintenance records in front of me, but I believe that both were in the area of 30-40K. I do some off-road, though possibly not as much as you do, Scott. Yes, you can color me jealous! Anyway, Ike's method of inspection is sound. -Robin#790,'01 Dakar
-
My rear wheel bearing went south at 13K miles (note, this is a "normal wear item, not covered by warranty"). I am going to assume the GS is similar to the Classic, and as such, the bearings cannot be lubed without removing the bearings (thus trashing them) - although some picky person might claim that the outer seal, and the bearing's contact seal can be removed to grease the bearing. So no, can't lube them - and you will need new seals if you decide to replace them. At 24K, I would replace them and consider it preventative maintenance - others will disagree. That said, I was able to ride mine at least 70 miles (not wise) while they were destroying themselves (and I was trying to figure out the cause of a "rain groove" feeling, with no rain grooves). So it also depends on how worried you might be about being stranded on the road. Ike's version of how to check them is the best there is (suggest pushing "in" on the inner races when doing this to simulate the axle torque loading). As always, YMMV. - Marty #436, '97 Classic
-
2 on Ike's method for checking. I just hook a finger tip in the inner race on each side and spin the wheel and feel for any notching or grinding as it slows to a stop.
To test the sprocket carrier, same thing in the horizontal position with just one finger stuck into the bearing from underneath.
I replaced the sprocket carrier bearing on my '99 at about 13K miles because it felt like it was dragging. As I reassembled it I came to the realization that it was probably the extra drag of that tubular spacer that rides in the outer seal on the carrier. -mark1305
Miscellaneous Items & Q's
Rear Wheel Spacer:
Just rebuilt my 1994 model, and have just found out
I am
short of a rear wheel spacer ( Disc Side) anybody out there give me the
dimensions so I can get one made up?
-
A:
It would probably be cheaper and maybe even faster to order the part from a
dealer but FWIW the rear wheel spacer ID for the CLASSIC F650 is 17 mm. The
thing has three different ODs. The OD of the lip inside the seal is 31 mm.
That lip is just over 1 mm thick. The lip toward the swingarm is 36 mm OD
and about 4 mm thick. The "body" OD is about 29.75 mm . This surface is the
most important surface since it is where the lip of the seal contacts the
spacer. I measured it several times and it is not quite 30 mm in diameter.
Though I suppose 30 mm would do just fine as seal lips stretch a bit.
Overall thickness of the entire spacer is 14.15 mm. When I said, "The lip
toward the disk is 36 mm OD and about 4 mm thick." I MEANT the lip toward
the swingarm. The disk is attached to the wheel, just like the seal. The
material is steel, not aluminum. Flash#412
Bearing Grease:
What should I use?
-
I use
BMW #10. I like that stuff. I find the swing arm a pain to replace. the
plastic washers on the outside want to get lost. I stick them on with some
grease, then slide the s.a in place. usually takes a couple tries dropping
one of the washers. then I get smart and MOVE all the hoses in the way that
knock the washers off...then it goes on easier. I've always done it without
the linkage in place. I think it's probably easier to get the s.a. in place
without the linkage, than get the linkage in place without the pivot... at
about 18K, I replaced all the seals on the linkage and the foam seals on the
pivot. everything was actually still in good shape, but I got a wild
hair.... I'd also had some battery acid drip down the side and eat away the
left side foam seal on the swing arm pivot, so i guess not EVERYTHING was in
good shape. but all the metal/rubber seals were good. personally, I prefer
not to remove the swing arm if I don't have to, although it does come off
once in a while for various reasons. on the chain, I use a rivet tool. Mark
#403.
-
When
I re-lubed my suspension bearings I used BMW #10 grease. If I did not know
about and have a tube of that grease, I too would have used moly wheel
bearing grease. I guess the only concern would be what did BMW use at the
factory and would your new grease adversely react to their grease. I don't
have an answer to that question, all I know is that the #10 grease seems to
be working. Richard #230
