 Parts and Tools (Ignore Lag Bolt/Slide Hammer)
F650 Classic Front Wheel Bearing Replacement
by Marty #436
Please read the Disclaimer before attempting any work in this FAQ.
March '02.
Edited by Pat #1210 23/05/03
Warning:
This is what worked for me. Attempt to duplicate it at your own risk, using your own judgement of your abilities. A failed front wheel bearing can result in property and bike damage, personal injury or death. If you doubt your abilities, you are strongly advised to consult a professional mechanic for repairs. Here is a gif of the layout: Front Wheel Bearings. If you are looking for the Rear Wheel Bearing FAQ go here.
General Info:
Be advised that the F650 front wheel bearings as specified by BMW have 2 rubber contact seals (one on each side) and are pre-lubricated from the factory. The bearings are non-serviceable, they will be damaged by removing them from the wheel (at least following this procedure), and must be replaced. Typical service life is around 20,000 miles? (varying wildly depending on service).
From a Boxer Site: Wheel Bearings are probably the
most neglected part of any motorcycle, and on the older, twin-shock Boxers the
near-side bearing in the rear wheel can totally fail with little warning. Its
seal becomes worn by exposure to grit, allowing road grit and water to
contaminate the grease. The off-side bearing is well protected within the hub,
and like the front wheel bearings, gives little trouble. Always remove the inner
races of your bearings every year or so, washing out all the old grease, and
re-packing before replacement with new seals. If you ride throughout the winter,
re-grease the near-side rear bearing in Autumn and Spring. Remember - new seals
are cheaper than bearings! The front wheel bearings of the later Monolever
Boxers and K-Series models give little trouble, even after extreme use.
Time:
I would guess that BMW book time is less than two hours (probably half that). That assumes that the proper tools are at hand with knowledge of the task. The new bearings will take longer than that to get cold enough, and time spent chasing down the proper supplies can vary. Once you are "ready to roll", I can't see this job taking more than an afternoon under normal circumstances.
Tools:
Mandatory:
Jack or equivalent
Refrigerator/freezer (or equivalent)
Spanner/wrench (preferably closed end) or socket: 10 mm
Allen wrench (Preferably a socket-type): 8 mm
Hammer
Drift
Wood scraps
Bearing driver (30 mm socket or equivalent - 30 mm socket needed to do steering head bearings eventually anyway)
Heat source (electric or propane torch)
Screwdriver (or seal puller)
Optional Tools (can be done without in a pinch, but at greater risk):
Bike support (bike tie down)
Heat Resistant Gloves
Safety Glasses
Torque Wrench (probably should be mandatory)
10 mm socket (to fit torque wrench)
Paper towels/clean rags
Beverage and tunes of choice
Parts:
Mandatory:
Classic Only
The Bearing and Seals numbers are all on Flash's F650 Maintenance Log, but here they are again for good measure:
2# BALL BEARING BMW Part # 36 31 2 345 335 (Standard industrial bearing number is 6203-2RS)
1# GASKET RING BMW Part # 62 11 2 346 459 (Standard industrial seal, size is 40x50x4, 40x50x5 will also do, just). (I got the spare out of my saddlebag, still sealed in the OEM BMW bag, with a label with the correct part number. It is also a 40x50x4 seal. Marty #436).
The part I've got from BMW (Part#62 11 2 346 459) are 40x50x4 and cost $1.05 a piece. The part I've got from A & W Bearings (WRONG SIZE 40x50x7, ordered in a rush, just in case.) cost $4.30 EACH! gim.
Both these are available at any Bearing House. Some Members have OEM as KOYO 6203RS JAPAN, some Bulgarian.
Note: RS or LS= 1 contact seal, RS2 or LS2= 2 contact seals (one each side), RZ or LS= 1 shield. A contact seal is a sort of rubber/plastic sealing that is a lot more "watertight" than a shield. Many Thanks to Haakon #626 for this information.
Refer both Part Number Bearing Schedule and Detailed Bearing Information & Resources for further information.
GS/Dakar only
Optional:
Classic
1# SPACER SLEEVE BMW Part # 36 31 2 345 468 Center Spacer
1# SPACER SLEEVE BMW Part # 36 31 2 345 350 Brake Disk Side
1# THRUST WASHER BMW Part # 62 12 2 345 467 Odometer drive
Both:
Wheel bearing grease (preferably hi-temp synthetic disc brake grease w/moly)
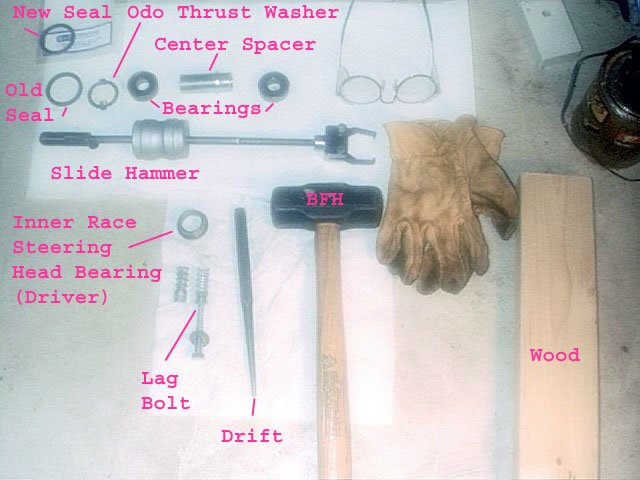
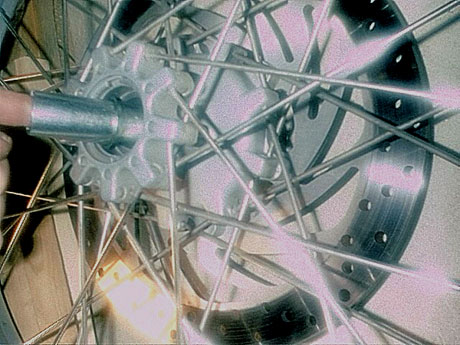
Parts and Tools (Ignore Lag Bolt/Slide Hammer)
Note: You will see in the
picture above my faulty American interpretation of something Kristian called a
Hilti-Bolt. I substituted a lead wall anchor with a lag screw and slide hammer,
with disappointing results. Still not sure what a Hilti-Bolt is, but I'm fairly
sure it's NOT a lead wall anchor!! However, it did serve to remove the bearing
just enough to make the center spacer easier to push to the side to allow use of
a drift.
Simply put, a
Hilti-Bolt is a bolt (or thread+nut) in an expansion shell. When you put the
shell in a (normally blind) recess and do up the bolt (or nut) the shell expands
and grips on the walls of the recess. You can then either use a hammer to knock
against the bolt (or nut) to extract what was in the recess. Note this is NOT
the normal use for a Hilti-Bolt. I used it on the very small blind bearings on
the inside of the LHS Engine cover, for the Clutch Shaft Bearings, because I
didn't have a small enough bearing puller. Refer the part of the
Clutch Removal FAQ on the removal of
these bearings for details. Just use the method outlined below !.ed.
Procedure:
Removing the Worn Bearings:
Put your bearings in a freezer, and allow time for them to reach maximum coldness. (Note: the bearings come "pre-lubed" and sealed -both sides- from the manufacturer. Probably wise to check this by turning the bearing by hand to confirm that grease is actually in there. I found that the seals can be CAREFULLY pried off and replaced - using a jeweller's screwdriver. I pried out one seal from each bearing, cleaned out the original lube, re-greased with high quality, high temp (disk brake), moly fortified auto wheel bearing grease, replaced the seal, and installed the bearings with the "removed/replaced" seal facing the inside of the wheel hub - in case it leaked (0 test miles to date). Actually, this bearing is also available (industrial supply) with only one seal, at extra price (go figure), not exactly sure why you need a seal on the inner side anyway.)
Support the bike securely on the centerstand. An optional spotter wouldn't be a bad idea, if available. Tying the centerstand off to something (NOT the exhaust pipe, in case you forget) toward the front of the bike is a good idea, to keep it from accidentally "retracting" if the bike should get bumped forward.
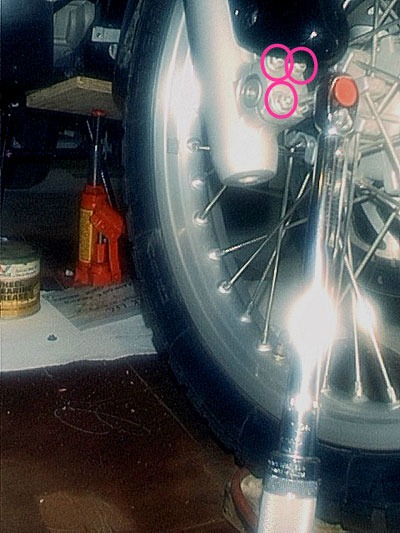
Loosen the four axle retaining nuts (lower right fork, not necessary to remove them completely), using 10 mm wrench. This can be done without removing the fender lower, if you're careful. (Which is the opposite of tightening these bolts, see the reinstallation photo way below)
Pry the black plastic cap off the end of the axle (right side) using a fingernail to expose the recessed 8mm Allen socket in the end of the axle (right side). On some bikes, this cap may be missing and the recess packed with mud that needs to be removed. Using the 8 mm Allen wrench, loosen (unscrew) the axle just enough to break it loose.
Use the jack (cushion with wood block) to lift the front wheel of the bike slightly off of the ground (too high will make it difficult to remove/replace the front wheel). Support the bike securely in this position. I like to use a bike tie down strap looped over a rafter in the garage and hooked under the center of the handlebars (between the clamps). You don't ever want to have to pick up a bike that fallen over and has a wheel or two missing (don't ask). See Feedback on Jacking Points.
Take a good look at where the spacer is located between the left side of the wheel and the left fork leg. Also take a good look at how the odometer drive and cable is positioned relative to the fork leg and wheel, especially the stop that keeps it from rotating with the wheel. Place a clean rag or paper towel under the oil pan area. Unscrew the axle the rest of the way. At this point you can pull it out through the right fork leg (the wheel will drop slightly to the ground, and the left side spacer will probably drop out and try to hide, so be watching for it). You may need to lift the wheel slightly to pull the axle out easily. Put the axle down on the paper towel, pointing in the correct orientation. (I try to position parts relative to each other as I remove them to save confusion later). Add the spacer to the paper towel collection (remove it from the wheel if it is still "greased in place"). At this point, you should be able to manoeuvre the wheel about enough to remove the odometer drive from the wheel (it pulls straight out). If not, you can wiggle the wheel from side to side to push the brake pads/pistons into the calipers a bit (but don't bend the disk!), and try again. Optionally, remove the brake caliper and suspend/support it by a coat hanger. Pay attention to the proper location of the odometer drive and cable, and be careful with the brake disk (it is bent easily and expensive to replace). At this point, the wheel can be removed (rolled out the front). Refer the Brake Maintenance FAQ if you make any mistake with the Brakes.
You should now assess the likelihood that someone (friend, neighbour's kid or your own) will use your front brake lever (not a good thing) while the wheel is off. Either tape a wooden block under the lever so it can't be squeezed, or put a shim of some type between the front brake pads (I like a bunch of the wood shims used for levelling doors and windows during installation).
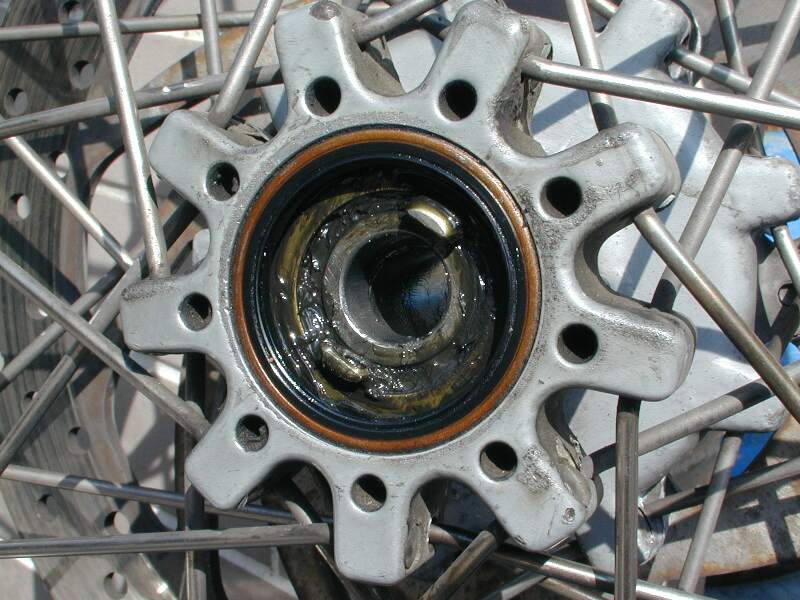
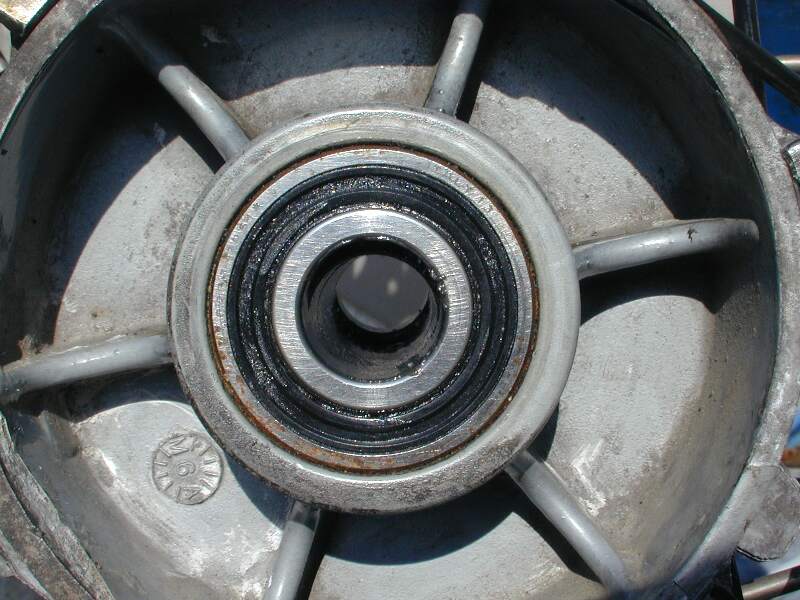
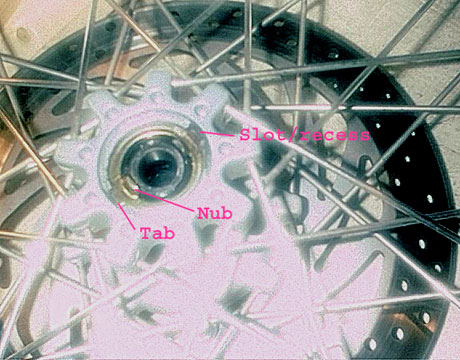
Carry the wheel off to a comfortable work location. Preferably away from flammable liquids, vapors and combustible materials! You will need a couple of wood scraps to protect the wheel hub and brake disk while working. Use the gloves and safety glasses to protect yourself (have a fire extinguisher nearby if you're seriously challenged!) Remove the skinny seal from the odometer side of the wheel. You can probably do this with your fingers, but use the screwdriver/seal puller to pry it out if needed (Be careful not to scratch the inside of the wheel hub). At this point, the brass odometer "thrust washer" can be lifted out of the grease. Note the orientation of the two nubs that engage the odometer drive, and the tabs that drop into the recesses of the wheel hub (see installation picture below). Wipe away as much of the old grease as you can using a rag/paper towel (unless you want to enjoy the smell of burning grease later).
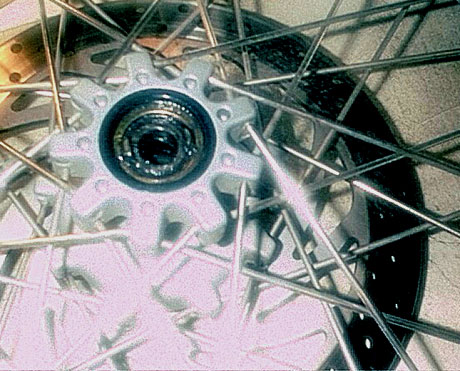
Obtain a drift (the one I used was
about 8" long with a 3/16" flat tip). One of the wheel bearings will be
easier to gain purchase on than the other, as the center spacer between them
has a locating spacer pressed onto its outer surface (between outside of
spacer and inside of wheel hub, but closer to one end than the other). What
you need to do is to slide the drift into the wheel until it just reaches the
far end of the center spacer. Then push sideways on the drift, trying to push
the spacer off-center enough for the drift to be able to whack on the inner
race of the far bearing. Try this from both sides of the wheel to determine
which bearing should/could be removed first…order is not important, do the
easier one first. (Not sure if BMW installs the spacers all facing the same
direction, for mine, the odo drive side was easiest).
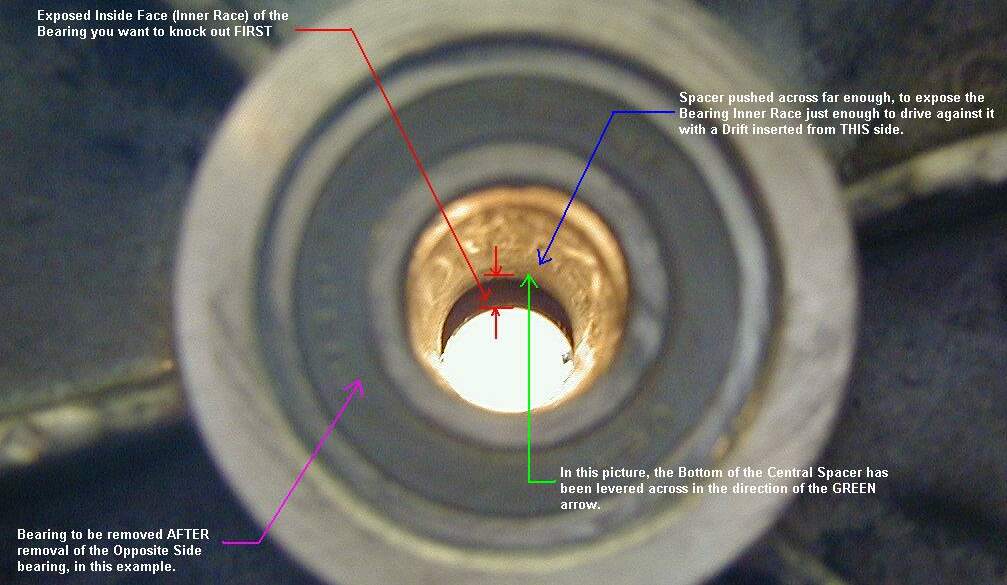 Photo from Richard #424
Prepare two blocks of wood to support the wheel or hub so the bearing will be free to come out between them. On the odo side, you can support on the hub. On the brake side, I supported on the wheel (DO NOT support on the brake disk, it WILL get bent and have to be replaced). On afterthought, supporting on the wheel probably stresses the spokes, but didn't see many other options.
Put on your heat resistant gloves and safety glasses, gather up your wood, hammer and drift, and start heating the outer area of the hub on the side where you want to remove the first bearing (some use a propane torch, I prefer an electric heating gun, A.K.A. paint stripper, as the heat is less and more diffuse). The hub must be heated evenly to the point where water (or sweat or spit) "sizzles" when dropped on it. Apply the heat evenly around the outside of the hub, trying to not heat the bearing any more than necessary, and trying to avoid heating (and weakening) the spokes (these can be partly protected with aluminum foil).
The Spacer Centralising Washer is smaller than the Rear Hub. The HUB is also smaller so CARE with the heat on the spokes. You can try removing the Bearing without heat first if you wish, but it is MUCH easier with heat, however you MUST protect the spokes.
Quickly flip the wheel over onto the prepared wood blocks, insert the drift into the wheel, pry the spacer to the side, and whack the far inner race with the drift and hammer (do not hammer on the center spacer, as this may deform it, and most dealers don't stock it). Reposition the drift 120 degrees, and whack again. Repeat at 120 degree intervals until the bearing is driven squarely out the far side. If the bearing is or becomes difficult to drive, perhaps the hub is not hot enough. (Good chance to practice here on heating and driving force; on the re-installation you will want the new bearing to go in without any "reheating" that would melt the bearing's contact seal). When the bearing pops out, so will the center spacer. Note the orientation so you can install it correctly (but I don't think direction really matters).
Heat the opposite side of the hub, following the procedure above, and drive the remaining bearing out.
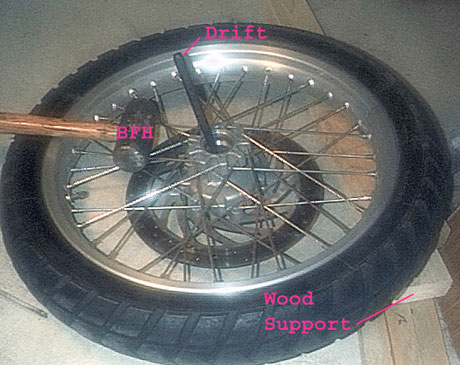
 Driving out the
Odo Side Wheel Bearing
Driving out the
Odo Side Wheel Bearing
Installing the New Bearings:
Clean the hub interior of grease, dirt, corrosion, etc. I like to thoroughly coat the inside of the hub with a thin layer of the moly grease (aids in future removal or if a bearing should "seize").
A helper to fetch the bearings from the 'fridge (one at a time, as needed) is helpful here. Heat the hub up again (I did the brake side first). When you are satisfied that it is hot enough, instruct your helper to fetch the bearing while you continue heating. Support the wheel properly, position the frozen bearing squarely, and drive it into the hub until it bottoms using a 30mm socket (the inner race of a steering head bearing works as well, if you should destroy a lower one while replacing it at some point) and a BFH (Big F***ing Hammer). The sound will go from "ting, ting, ting" to "thunk" when it bottoms. Be sure to only drive on the outer race of the new bearing or it will be damaged!!

 Driving Brake Side Wheel Bearing
At this point, grease the center spacer thoroughly, and position in wheel hub (probably better to heat the wheel hub for the second bearing before putting in the spacer, but DON'T FORGET!!!).
 Center Spacer Installation
Heat the opposite side of the wheel hub in preparation for bearing installation. Again, position the wheel on wood blocks, protecting the brake disk. When the wheel hub is hot enough, have your assistant fetch the frozen bearing, and drive it home as before (again, be sure the center spacer is in place FIRST).
 Odometer Side Wheel Bearing Driven Home
At this point, it is probably best to let the wheel hub and bearings cool off a bit. While waiting, you can clean up the odometer thrust washer of grease and corrosion, and give it a thin coat of grease. Put a little grease on the outside of the odo side bearing and into the recess that the odo washer tabs go into. Install the odo drive washer (nubs out), and turn it to hold it in place. Pack some more grease on the outside of the odo washer, the inside recess of the odo seal (especially be sure the sealing lip is greased), and also the outer edge (to aid installation/removal). Press the seal in place (after the hub is cool enough not to melt it!), flush with the wheel hub. Pack the space between the seal and washer with grease. Also put a layer of grease over the brake side bearing/contact seal. The wheel is ready for installation on the bike.
 Odometer Drive "Thrust Washer" Installation
 Odometer Drive Seal Installed (w/grease)
Cleaning Up and Reinstalling the Wheel:
Clean the axle, and put a thin coat of moly grease on it. Replace it on the paper towel for now. Clean the left side wheel spacer and replace on paper towel. Clean the surfaces (especially sealing surface) of the odometer drive. A thin coat of fresh grease on the sealing surface is good.
Optional…before you stick the wheel in there, inspect the front brake pads for wear.
Position the wheel between the forks with the brake disk between the brake pads (remove the wood shims). Install the odometer drive unit into the wheel seal, being very careful to align the thrust washer "nubs" with the matching recesses in the odo drive. Position the odo cable and odo drive locating tab in the proper orientation. Insert the axle through the right fork leg, odo drive, and partially into the wheel. Install the left wheel spacer between the wheel and left fork leg, and push the axle through the spacer and into the left fork leg. You may need to lift the wheel slightly to get things to line up. Start screwing the axle into the left fork leg by hand to be certain you aren't cross-threading it. Double check the alignment of all the parts (especially odo drive).
Torque the axle properly (80 N.m/59 ft-lbs) using the 8mm Allen socket and torque wrench. Install the plastic cap in the Allen recess in the end of the axle.
 Torque the Front Axle
Remove any remaining "aids". (Wood blocks under brake lever, support straps, tie downs, jack, reinstall brake caliper if removed, etc.) This is a good time to wipe down both sides of the brake rotor with a brake cleaner dampened rag to remove any greasy fingerprints. Also, use your finger to wipe away any large globs of grease that smooshed out as the axle was tightened.
Remove the bike from the centerstand, straddle it, and using the front brake, "bounce" the front forks up and down hard several times (to seat/center the axle). Replace the bike on the centerstand, and tighten the 4 axle "clamping screws" to 12 N.m/9 ft-lbs. Be careful torqueing the little clamp nuts on the wheel shaft. They look a bit fragile. Do the UPPER pair of nuts up first, then the lower ones. A slight GAP at the bottom is NORMAL.!
Note: for the "ultimate" in fork alignment, loosen the fork bridge/fender bolts and lower triple clamp bolts while the axle clamping bolts are still loose. Bounce the front end, and tighten the axle clamp bolts. Bounce the front end again, then tighten the fender bridge bolts. Bounce the front end again, then tighten the lower triple clamp bolts. Loosen the upper triple clamp bolts, bounce the front end again, then tighten the upper triple clamp bolts.
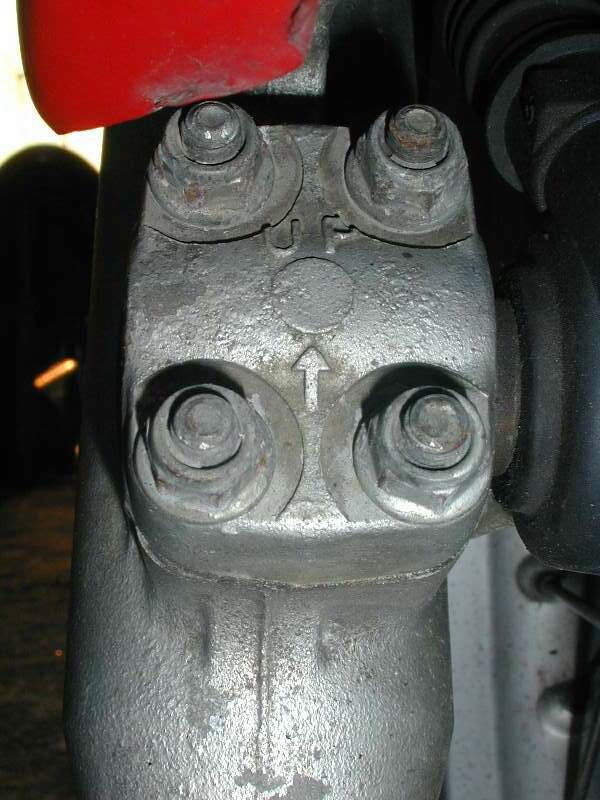 Torque axle "clamping screws"
Spin the front wheel by hand (gently at first), listening & feeling for problems. If none are detected, put on protective clothing and go for a short test ride. Feel the hub for extreme warmth (some heat is normal) to indicate a problem. If everything checks out, you are done (for about 20,000 miles).
For more information on Replacing the Front Wheel see the Front Wheel Replacement FAQ. (Thanks to Kristian for the original version, and also to Mark#403, James#523, Haakon#626, edited by Kristian #562
Doing the front bearings today/tomorrow so I was reviewing the FAQ. I have the bike up on a board on the centerstand and can get the wheel about 1 inch off the ground. Does it need to be any higher to get the wheel out? The FAQs mention jacking up the bike, where does one put the jack on a F650 classic? Is the plastic bash plate sturdy enough or do most people take that off and put the jack against the framing?
1 inch is perfect. lt enough for removing the wheels and using a jack in front of the centerstand will be just fine. If you have the original plastic bashplate, you should perhaps remove it first, before using the jack. Spakur #1117 Icelander in Malmö, Sweden 1995 Classic Red F650 with 60.000+ KM
I just stick a small piece of plywood or about a six inch piece of 1 x 4 under the belly pan before applying the jack. Anything wide enough to catch both frame rails is all you need. To get the tire off, you don't even need it an inch off the ground. What I used to do in France (to take off the front tire) was get two pieces of cardboard. I put one on the ground under the bike and slid my helmet under the bike with my foot while attempting to balance the other piece on top of the helmet while pushing down on the rear of my bike. This is a HUGE Pita by yourself, but trivial with a helper. You BARELY need to see daylight between the tire and the ground to get the wheel off. Flash 412 (CO)