by Kristian #562:
Please read
the Disclaimer before attempting any work in this FAQ.
23/11/01
Is there anything else I should check on my Brake System while I’m at it ?
If you are looking for information on how to CHANGE your Brake Pads, see the Brake Pad FAQ
For Other Brake Questions see the:
Brake Light FAQ
Brake Questions Misc FAQ - Includes General Maintenance, Problem Solving and Aftermarket Parts
DISCLAIMER: My Father told me a long, long time ago, if you are buying a used vehicle, there's two things you need to make REALLY sure of; Brakes & Tyres. Changing the Brake Fluid is a simple job, but nevertheless should not be done someone who is not that confident with their mechanical abilities. I'd say that very little mechanical experience is OK if you are mechanically inclined. Having "No Brakes" is not much fun and is just plain dangerous. ed
Take great care with brake fluid. It will rot pretty
much anything known to man, especially organic stuff like eyeballs and skin.
Keep it off the paint and if you spill any wash it off with gallons of cold
water. Think acid and you'll be safe enough. Andy #982
Why should I bleed my
brakes ?:
Well there are several reasons:
New Brake fluid is fairly incompressible. So when you squeeze your brake,
the force in the piston at the Lever goes to the piston at the calliper with the
fewest losses. Over time however, a couple of things happen. One is that air can
get into the system, either by absorption directly into the brake fluid or more
commonly by absorption of water, which contains air.
Air is much more compressible than Brake Fluid. Think in terms of childhood
games with a needle-less syringe filled with water. If you put your finger over
the end and squeeze the plunger, it doesn’t move at all, or not so you’d notice.
With air in the syringe rather than water you can compress it a fair bit. Same
happens when air gets absorbed into your brake fluid. It’s what makes your
brakes feel mushy or squishy.
The second thing that happens is that the brake fluid can absorb water. This water very often gets into the system as a result of condensation due to heat, from when the brakes or hoses get hot. Water can have dissolved oxygen in it, which when hot expands into small air-bubbles. Enough of these can also make the fluid more compressible. The water, if left in the system, can cause corrosion of the Cylinder, which is what eventually ruins your seals. When you bleed your brakes and the old fluid is brown, part of that is the corrosion.
Water in the fluid will boil and change state from compressible gas to incompressible fluid during the brake application, the change in volume causing a change in brake force. Old brake fluid can cause a failure that is fast and dramatic. i.e. if they get hot from constant use down a hill, you can have a situation where you will have NO BRAKES. So change the fluid regularly.
Basically, if you ever do anything that results in fluid coming out anywhere except the filler, you need to think about bleeding. The F classics are very easy to bleed. I don't know about the ABS bikes, they might take longer. If you take the lever off the master cylinder there is no need to bleed.
How often should I bleed my brakes ?
Dot. 4 Brake fluid (or any new brake fluid) comes in many colors but is clear of debris or dark opaque color. If the brake fluid in your sight glass on the Handlebar becomes a darkish brown, it's time to change your brake fluid. Good brake fluid is clear as a rule. Bad fluid can be clear, but tends to be cloudy. If it is clear the only way to test it is to measure the boiling point. This is not recommended at home, it is easier just to replace it at the set intervals.! If there’s two things you want to be absolutely sure of on your bike it's Tyres and Brakes. (and the Chain Master Clip, but that would be 3 things). Otherwise the BMW Manual recommends every two years. Many people do it annually, especially if they winterise their bikes.
Brake fluid can turn very dark in color very rapidly and there is no reason to assume this was not done. Brake fluid turns dark quicker the more the brake is used and the more moisture it is around. The rear brake on these is right out in the open and you must use a lot of rear brake. I have seen this rear brake fluid look like coffee in way less than 6k miles on my bike and others. StuporXtech #1130 01 Dakar Or
Brake fluid can turn nasty in a few thousand miles (especially the front), which is why it's on the annual service checklist. If it didn't get horrible, why would we tell you to change it? :-) Todd #389
How should I bleed my brakes ?
Bleeding your brakes involves replacing the old contaminated fluid with new fluid. Assuming you have the stock bleed nipples:
Note Well:
Parts/Consumables:
Notes on Brake Fluid:
Tools:
Safety
Spilt brake fluid should be washed off using a low pressure stream of fresh water. If you get in on your hands, you want to run them under a cold tap for at least 10 minutes. Don't use soap until you've washed and dried them, the soap can contain Chlorine type stuff. Brake fluid in a cut stings like mad, so you need to try and get water in the hole to wash it out. Latex medical gloves give reasonable splash protection. I'd recommend use of safety glasses.
Getting to Work:
If you are replacing your Brake Pads at the SAME time, (see the Brake Pad Replacement FAQ) note that the NEW pads are thicker than the old ones, and hence push the Piston in the Brake Calliper back a bit. Thus, once installed the Brake Fluid Level in the reservoir will be HIGHER than with the old pads. SO do the Brake Pad Replacement First and then the Brake Bleeding. If your Brake Reservoir was full BEFORE you replace the pads then, try and remove some fluid with a Turkey Baster or something first, otherwise when you squeeze back the piston in the Calliper to get your new pads IN you will cause the reservoir to OVERFLOW.
Rear Brake:
1.) Remove the Seat and Remove the Right Hand Side Panel (Two Allen Bolts)
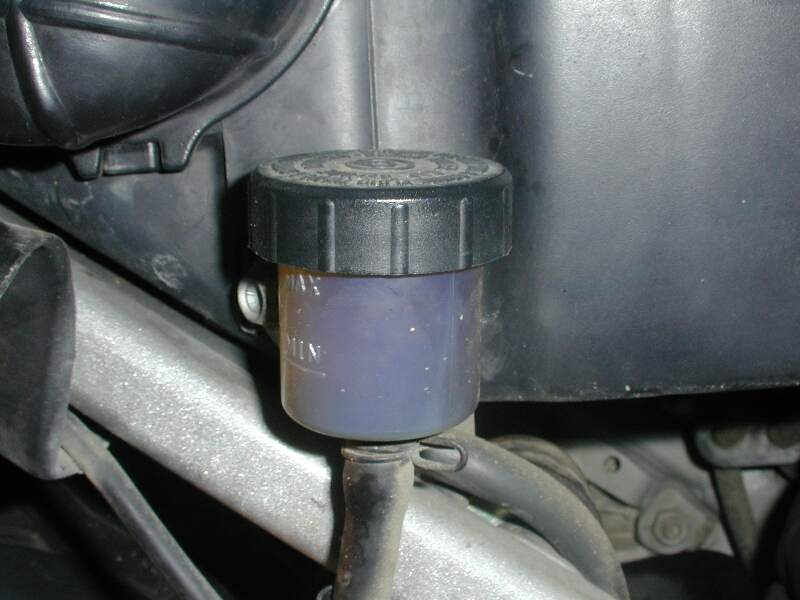
2.) Under the Coolant Reservoir Tank is the Rear Brake Reservoir. (The one in that picture is too full).
3.) Before you start. Make sure your reservoir and reservoir cap is clean. If you get dirt into the lines its like letting air in, because, dirt is also compressible. Remove the Reservoir Cap and have your New Brake Fluid Bottle handy.
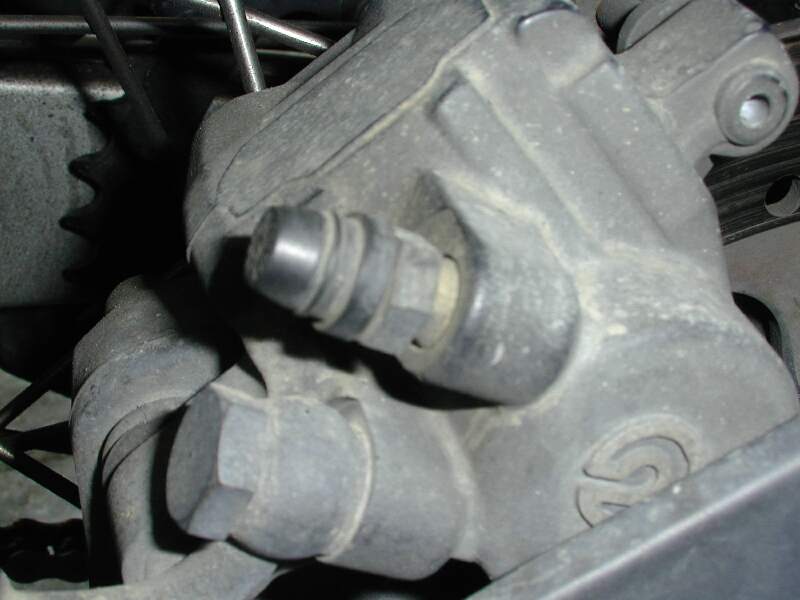
4.) Locate the Rear Brake Bleed Nipple. Remove the Rubber Dust Cap.
5.) Now put your ring spanner over the Nipple FIRST, then attach the Plastic Hose, pushing it firmly over the nipple. Put the other end of the hose in the Jar.
6.) Get your helper ready at the brake pedal.
7.) Now just cracking open the nut, simultaneously get your helper to SLOWLY depress the Brake Pedal, and ask them to tell you how far down it's going as they do it.
8.) When it's almost all the way down, Nip the Brake Nipple closed. Do this before your helper lets the Brake Pedal come up, otherwise you will suck not only the old fluid, but also air, back into the system. Nip means just tighten till it seats, then gibe it a very small amount more.
9.) Repeat this exercise #7-#8, until the Brake fluid level is on minimum, but do NOT let it get empty, or you will introduce Air into the System.
10.) Top up the Reservoir and repeat the Brake Depress/Nipple Nut Open/Close (#7-#8) sequence.
11.) Keep repeating the reservoir fill exercise until the Fluid that comes out of the hose looks like the clear fluid that you are putting in. It should be only 2 or 3 reservoir fills.
12.) When it runs clear, Torque the Brake Nipple closed, clean the Nipple, put on the rubber dust cap. Do NOT over-tighten the bleed nut. It is steel and the alloy in the Calliper much softer. I stripped one on my car 15 years ago and it was an expensive lesson.
13.) Top up the Reservoir to Max., replace the Reservoir Cap and Replace the Side Panel.
Front Brake:
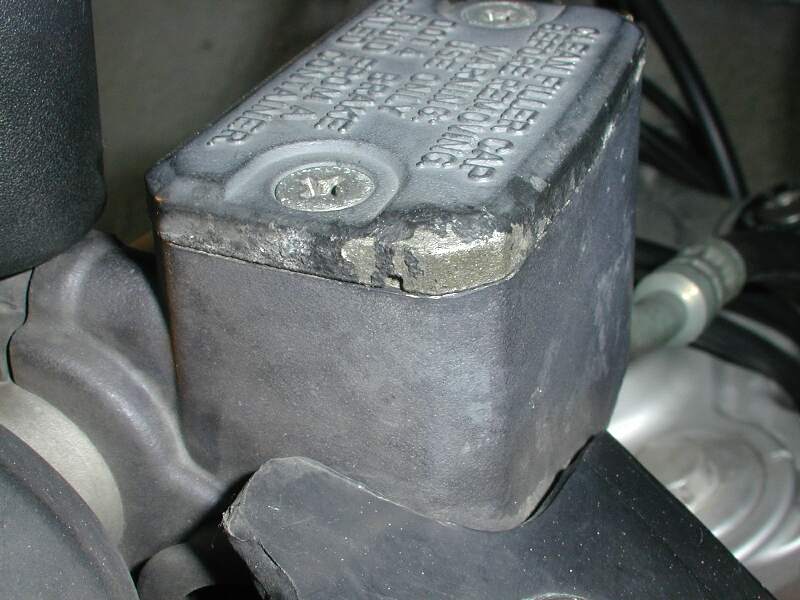
1.) The Front Brake Reservoir is on the Handlebar, next to the Throttle.
2.) Before you start. Make sure your reservoir and reservoir cap is clean. If you get dirt into the lines its like letting air in, because, dirt is also compressible. Remove the Reservoir Cap and have your New Brake Fluid Bottle handy.
3.) Undo the Screws on the Reservoir Cover and remove the cover. Inside is a Black Rubber Diaphragm with a Triangular bit hanging down underneath it. Remove this from the Reservoir.
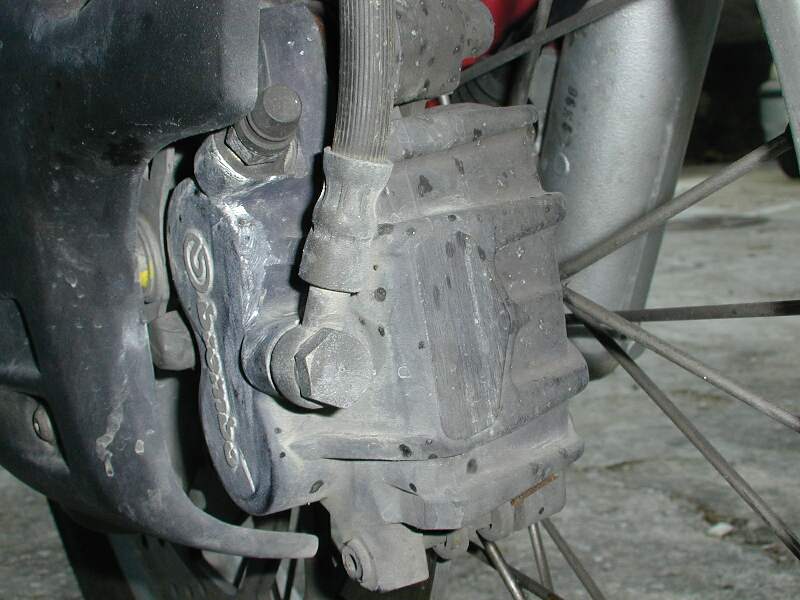
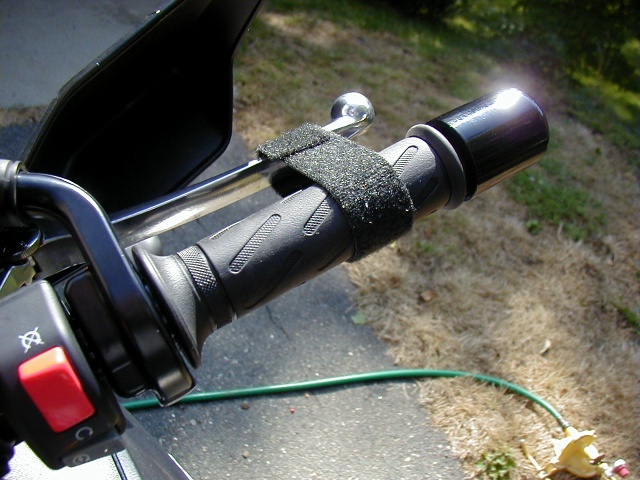
4.) Locate the Front Brake Bleed Nipple. (top of Photo). Remove the Rubber Dust Cap.
5.) Now put your ring spanner over the Nipple FIRST, then attach the Plastic Hose, pushing it firmly over the nipple. Put the other end of the hose in the Jar.
6.) Get your helper ready at the brake pedal.
7.) Now just cracking open the nut, simultaneously get your helper to SLOWLY squeeze the Brake Lever, and ask them to tell you how much it is to almost fully pulled in.
8.) When it's almost all the way in, Nip the Brake Nipple closed. Do this before your helper lets the Brake Lever out, otherwise you will suck not only the old fluid, but also air, back into the system.
9.) Repeat this exercise #7-#8, until the Brake fluid level is on minimum, but do NOT let it get empty, or you will introduce Air into the System.
10.) Top up the Reservoir and repeat the Brake Depress/Nipple Nut Open/Close (#7-#8) sequence.
11.) Keep repeating the reservoir fill exercise until the Fluid that comes out of the hose looks like the clear fluid that you are putting in. It should be only 2 or 3 reservoir fills.
12.) When it runs clear, Torque the Bake Nipple closed, Clean the Nipple, put on the rubber cap. Do NOT over-tighten the bleed nut. It is steel and the alloy in the Calliper much softer. I stripped one on my car 15 years ago and it was an expensive lesson.
13.) Top up the Reservoir to Max., replace the Reservoir Cap Screw up the Two Screws. They do NOT need to be Mega-Tight. You will either strip the screws or the worse the Reservoir.
Wipe all surfaces clean. Test you have Working Brakes before you ride off.
If you have replaced your Brake Lines or done some work
which resulted in Brake the reservoir emptying you might have to flush quite a
few reservoirs-full of brake fluid through the system and pump the lever a bit
to actually make the brake actuate at all. It might FEEL like nothing's
happening for a while, i.e. like there is absolutely no resistance, but persist
with the Bleed Nipple open and do NOT let the reservoir go empty.
Note: Bleeding Brakes FAQ Clarifications:
When you open the Bleeder Nipple (or Speedbleeder) and squeeze the brake lever/pedal to force fluid out, you do NOT need to have the cover and diaphragm on the master cylinder. i.e. you do not need to put the master cylinder cover back on before applying pressure as it is not a Pressurized Chamber. However, please SQUEEZE SLOWLY or the plunger will squirt brake fluid all over your PAINT!
To bleed brakes I loop some clear hose up and over the mudguard and down into a bottle. This way you don't have to tighten the nipple up as there is always fluid in the hose and air can't get in. You might use a bit more fluid but I never use an opened bottle at a later date anyway. Rick, 01 F650GS, Qld-Australia.
Yes, there are several Aftermarket Solutions:
A Speedbleeder is simply a replacement bleed nipple with a non-return valve in it. This basically allow you to open up the nipple, and either vacuum pump or squeeze the old brake fluid though the system, without having to nip the bleed nipple closed after every Brake Pedal Depression or Squeeze of the Brake Lever respectively.
Installation. When you install them you can simply replace the stock bleed nipple with the Speedbleeder nipple. Do NOT over torque when fitting, it will shear off in your calliper and then you're in trouble. If you're not confident get a PROPER mechanic to do it. You do not want to dice with your brakes.
If you're installing a new SS brake line simultaneously with the Speedbleeders, install your new SS-line and do the initial line-fill using the stock bleed nipple. After you've got fluid in the line, THEN install the Speedbleeder for the final purge. This goes only for the first time because you have no reason to empty the system afterwards.
The package the Speed Bleeders came in gives the part number as SB1010S. The thread pitch of the bleeder is M10x1.0. You can order them on-line at www.speedbleeder.com.
This device allows you to SUCK the old fluid out and the new fluid through, rather than having to PUSH it through with the pedal or the lever. It saves you having to have someone else squeeze the pedal or lever. It can be used in conjunction with the Speedbleeders to make the job simple and easy without having to contort yourself between the Nipple and the Handlebars or Brake Pedal.
See Web Bike World Article on Vacuum Pumps.
Vacuum and pressure bleeders aren't all they are cracked up to be. A certain UK 4x4 manufacturer got into a fair bit of trouble about 4 years ago with these things because they were only bleeding the part of the system they had flow in while the bleed unit was on. The only way to be certain you've got all the air out (with ABS in particular, which needs the Motronic to be operated) is to bleed, use the system then bleed again. Bleeding by hand does this as you go along so its only one job albeit a longer one. Andy Leeds UK #982
Today I started doing part of my 12,000 mile service and since my friend seemed so sure about the rear brake fluid had not been change I decided to start with that. After doing a little research on various methods of flushing and bleeding I decided on the reverse bleed method because its seems easier to make those bubbles go up than down. After hooking up the pump to the bleed screw and getting my new fluid ready I used a bulb type thingy to suck the old fluid out of the rear brake reservoir. Next I loosened the bleed screw and applied some new brake fluid under pressure. As the reservoir filled I noticed it was of about the same color that was in there before. I repeated the steps of sucking out the reservoir and adding new through the bleed fitting. This time the fluid that came up from the system was almost black. Really nasty. I repeated the process 4 times and the 5th time I was happy with real clear fluid. Wamer #1021 CA
Personally, I'd never do a reverse bleed for an annual service, since it's hard to get all the crud out. Usually the contents of the caliper looks worse than in the reservoir and I'd rather the crud not flow back thru my $$ master cylinder. I cannot imagine why you would choose that particular method, but to each his own. Todd #389
What if it is till Spongy AFTER Bleeding?
Loosen the bleed screw. Pull the lever to the bar and TIE it there. Tighten the bleed screw. Park the bike with the master cylinder as high as possible. Leave it over night. Problem solved. Flash 412 (CO).
Feedback
Parking Brake and Quick Brake Bleeder. I keep a strip of double-sided Velcro wrapped around my handlebars. When, for some reason, I don't want the front wheel to move, I move it to the brake lever. But it's more than just a parking brake. On the VX, the front brakes would periodically get mushy. I'm not sure why. I used to do a full bleed every time, and after a while I just learned to live with mushy brakes. But then someone told me this trick: if you squeeze the lever for a long time (like overnight), and then release it, you may get a "free bleed" without having to open anything up. The theory is that there may be a small bubble of air trapped just below the fluid pump. When you brake, it gets forced down the line a bit, and returns to where it was when you release. But if you squeeze and hold, it will slowly drift back up to the top. Then, when you finally release, it will get pulled back through the valve into the reservoir. Seemed to work for me.
Yesterday I changed the pads and fluid on my '94 Classic F with the sticking master cylinder plunger. It solved one problem but now I have a couple more. I must have got some air in the system as they are a bit spongy now. I will bleed them again hopefully to sort that out. The new pads though are binding on the discs. I have re-loosened the bolts and axle and tightened them up again but to no avail. Also when I was bleeding the brakes (old fluid the colour of a premium brand dark ale-not good) the plunger stuck every time when I was pumping the system. I had to give it a couple of taps to get it free. It doesn't stick now when in use, but I have a suspicion that the air in the system may be putting sufficient back pressure to keep it free (also causing pads to bind). Any suggestions? Pat #1210 - Dublin, Ireland
Gettin' the air out. Hint: When pumping the brake, don't pump it all the way to the handlebar, go v e r y s l o w. Don't pump fast, go nice and slow. Other tricks: close the bleed valve, pump up lots of pressure, hold lever tight, open bleed valve and watch the bubbles jet out of there. Flash method: Open bleed valve, pull lever all the way to the handlebar, tie lever to the handle bar, close bleed valve. Get a good night's rest, untie lever from handlebar, pump up the pressure to see if all air bubbles are gone. Another hint: While the bleed valve is open and fluid is slowly coming out, do your best drummer imitation on the brake line, a good R&B beat should do it, it knocks the lil' bubbles off the brake line wall. Tapping the caliper and M/C helps, too. Brakes bleed best when the caliper pistons are all the way into their bores. New pads sometimes feel spongy when the pads are not bedded into the disc. Bed them in real good with the Flash New Brake Pad Bed Method (tm) (should be in the FAQ) and then see if they feel spongy. If you can do the water pump repair (something I AM NOT looking forward to), you can rebuild your Master Cylinder. In fact, I'm willing to trade an M/C rebuild on your bike for a water pump R&R on my bike if you want. Shank
Yes:
How to check it: The way to check for the whole calliper thing is: Put the bike on the centre stand. Somehow apply weight to the back wheel, easiest way is to have someone sit on the luggage rack, and spin the front tire once it's off the ground. If you have an off centre disk, it will bind at some point and if you listen to the brake you will hear the disk drag more at one point than the rest. (It's normal for the disk to drag a little, but a good spin should keep the wheel turning for 10-20 revolution at least). (From Unknown contributor).
Q. I look in my Sight Glass (on the Front Master Cylinder and it appears empty?) What's with that?
A. It's Probably just OVER Full, so you can't see it, but check for leaks anyway
Feedback:
I took my '03 GSA out for a spin early last evening, because the sun FINALLY popped out...and when I put her back in the garage I went over some of the components (which I do before and after every ride).....I noticed that the front brake fluid level seems to be lower than the spy-glass (in other words, I can't see any fluid...I swear I stayed there with a flash light for like an hour checking every angle......I had to do some hard breaking due to some SUV's who forgot that stop means stop...could that have anything to do with the level dropping? I've only had the bike for three weeks and it only has 220 miles on it...I'll be really surprised if the brakes are screwed (or will I)......by the way, the front brakes work great (but now I don't want to ride the bike with this looming, should I just top off the fluid? Omniconn - Georgia
I would just top it off and check if there are any leaks. Pull in the lever and check if there is any signs of brake fluid at the top or bottom of the brake cable. Remember that brake fluid damages paintwork and plastics if it gets in touch with it. It only takes half a minute or so to get your mirror holder to look like a zebra (That's what mine looks like...). If the level is way down in the tank I'd also air it, but if the brakes feels great you're probably fine. You could of course also check the brake pads for wear, but since you haven't used the bike so much that shouldn't be a problem. When the brake pads wears the fluid level sinks. Regards, Spakur #1117, Icelander in Malmö, Sweden, 1995 Classic Red F650 with 65.000+ KM
When new, DOT4 brake fluid is nearly clear. Don't want to imply you can't tell the difference but can you actually see fluid sloshing around when you wiggle the bars? Either it was that way when you bought it, you wore out your pads way faster than expected or you have a leak if the level is really that low. If it was full to start with it had to go somewhere. As Spakur says, check for leaks and wear, then, if all looks good top it off with DOT4 fluid and monitor it. If you're not comfortable doing it yourself then you might want to talk to your dealer's service department. What Spakur means when he says "air it" is to bleed the brake line of any air that might have gotten in. Personally, if I was near my dealer with a new bike I would make it their problem to bleed the system. Brad, N. CA., 2001 F650GS - Inmate #1002
My guess is that the brake fluid reservoir is overfull, rather than empty. Wrap the reservoir in rag (to stop any drips) and whip the top off. I bet its full! EssexDakar, Mike, London, UK -- '02 Dakar -- '98 DR350
I'm with Essex. Probably filled above the window, or just new/clear/hard-to-see. Marty #436-Chicago-97 F650F
Just so that we can have some closure on this, it was filled to the brim...thanks again for the pointer! '03 F650GS, Georgia.
When the Brake discs measure <4.5mm or are warped or BADLY scored. Measure SEVERAL places around the disc.
Feedback:
Well, Flash, asked me how I thought I warped my rear rotor. After receiving my replacement BRAKING rotor in only 5 days from Dennis Kirk (as the Galfer was 8 weeks delivery), I think I see the reason for my rotor warp, as well as now appreciating the beauty of a floating rotor (which I now wish I had instead of the model I ordered). My first impression in taking off the old rotor and checking the new rotor for fit is that the machined mating surfaces of the HUB itself are slightly warped. That possibly means that the hub is slightly warped. I've never broken a spoke but I've had to tighten a few, not unexpected for all the offroad I do, and all of the spokes still seem to twang similarly, but there's not a lot of meat in that part of the hub - it's an intricate casting, but thin. Something to keep in mind as you play around down there, or a possible reason to search out a floating (rear) rotor next time around. Nothing that 3 minutes in a large machine shop wouldn't fix. HsN.
The "real" brake limit is the limit of the stroke on the pistons or when the thin disk gets thin and warps. Both failures can be dangerous. BMW's service limit is reasonable and when you get to it its time to look for new disks. BMW work on the basis that at the limit you won't make the next service, but that can be 1 mile up the road or 5999. It depends on how you ride. Andy Leeds (UK) #982
Having a classic F650/95/53000km. Checked front and rear disc brake thickness. About 4mm. Oliver in Oz.
I've just had mine renewed - 4,5mm front, 4,2mm back - cost 132.50 and 125.00 euros (US$) original BMW. The old ones had just over 20.000 miles but looked pretty groovy if you see what I mean. I let the dealer change them - about 1/2 hour but I didn't fancy rounding the hex screws. Chris #1068
Brake replacement - classic F. I can't say it's a fact, but it sure SEEMS like all my rotor wear happened in the first 12K miles that I was using stock pads. In the 12K since, using Galfer greens (twice), it seems the rotor has stopped wearing. Guess I'll take a measurement when I install the EBC Kevlar pads sitting on the shelf. Mark#403.
Next.
Self-Bleeding Brakes ?
Q. My front brake was getting a little less crisp than I like it, so I
was preparing to bleed the system. Like y'do. Before I started, I squeezed the
brake hard, to see if I could bring the lever in to reach the handlebar, which I
couldn't. but the squishy sensation has gone. ok, ok, I am aware that you can
'pump up' a brake system by repeated presses but this was just ONE HARD PULL on
the lever, with the ignition and therefore the ABS on. Why has the brake stayed
crisp and sharp for a week now without having to repeat the hard press?
Adamx#1001. Any ideas?
A. Moisture/water in brake fluid + some inspired riding? Haakon #626
1. What Haakon said.
2. a small bubble that finally floated up past the piston into the
reservoir.
3. a small piece of rust or crud stuck in the piston seal/cup.
4. an early indication that your bore is rusted, or
5. your piston seal/cup is worn and close to failure. Especially likely if
your master cylinder is older, and you bleed the brakes by over pumping the
lever instead of pressure or vacuum bleeding. Todd #389.
When should I
replace the Master Cylinder Boots?
by Raymo #1173 Chicago '01GS
The service manual indicates that the front & rear master
cylinder primary sealing boots should be replaced every 24K miles for ABS bikes.
Rear Brake Free Play Adjustment?
Q. Can you adjust the rear brake pedal freeplay? I have to
push the pedal over an inch before the brakes start engaging. It seems that the
plunger is on a threaded rod with a nut, but I can't figger out how to adjust it
so that there's less play.
A. Loosen the locknut. Turn the rod. It will go in/out depending on which
way you turn it. Get it where you want it and then tighten the locknut. Flash
#412