The Brake Pad FAQ
compiled & edited
by Kristian #562
Please read the Disclaimer before attempting any work in this FAQ.
If you are looking for information on how to
BLEED your Brakes, see the Brake Maintenance
FAQ
For Other Brake Questions see the:
Brake Light FAQ
Brake Questions Misc FAQ
The ABS FAQ
Brake Pad Replacement FAQ:
by Kristian #562
15/10/01
DISCLAIMER: My Father told me a long, long time ago, if you are buying a used vehicle, there's two things you need to make REALLY sure of; Brakes & Tyres. Changing the Brake Pads is a simple job, but nevertheless should not be done someone who is not that confident with their mechanical abilities. I'd say that very little mechanical experience is OK if you are mechanically inclined. Having no Brakes is not much fun and is just plain dangerous.
See also the Brake Maintenance FAQ.
It's also a good time to bleed the brakes, i.e. change the brake fluid, which absorbs air with time and becomes a more compressible fluid, with the resultant that your Brakes get spongy. Bleeding Brakes is left to another FAQ at this Stage.
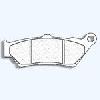
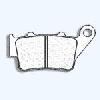
Note 1: You CANNOT swap pads from front to
rear on either model. The OEM pads have a chamfered corner (angled) that you can
see with a flashlight. If there is no chamfer left the pads need to be replaced.
BradG
Note 2:
Most
brake pads have some type of wear indicator: Typically an angled cut on a corner
of the pad material, or a groove of a certain depth. When it reaches that it's
time to change. Don't let them go down less than 1mm.
Note 3: Yes, the GS and
the Classic Brake Pads are the SAME.
-
See the Maintenance Log on Flash's F650 FAQ
Maintenance
Log for the Type of Brake Pads available for the F650. The EBC & Galfer Pads are recommended, the Ferodo Squeak, in my experience. I've had both EBC & Ferodo.
Here are some more details on the Galfer pads, from Shank:
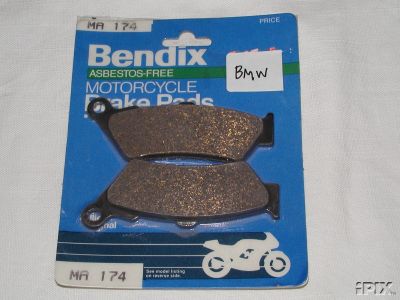
Bendix (out of
production)
The part # is (WAS): MA174. Impossible to find as they don't make
them any more! Apparently they are
SBS Pads.
From: "Jones,
Peter EXPORT" <Peter.Jones@Honeywell.com>
To: "'faq A f650.com'"
Subject: FW:
Date: Wed, 20 Nov 2002 19:06:44 -0700
Sorry but Bendix Australia do not make any pads to suit motor cycles and
have not since the late 1970s.
Regards, Peter.
----- Original Message -----
Yes, we do sell Bendix brake pads. We do not stock the
MA174 or any other compound of the 174 style. Have your dealer contact Parts
Unlimited for SBS brand pads.
BMW Replacement Pads
This weekend I installed a replacement set of genuine BMW
replacement front brake pads on my 1997 Funduro. The entire job only took 30
minutes and I discovered that you receive several extra parts in the pad kit
for the additional $15 that you pay over the cost of after-market pads. In
addition to the pads, I received the retaining pin, the J-clip to hold it in
place, the upper pad spring and another plate (that I had never noticed
before) that fits vertically in front of the pads. These look like parts
that are worth replacing occasionally, as they tend to get rusty and gorpy
after a few years of use in the calipers. So far, my renovated brakes are
working great. While I was at it, I also changed the brake fluid, just for
fun. Richard #230, Pacifica, CA
BMW Part #'s:
- 34 11 2 345 445 Front brake pad kit (inc hardware)
- 34 21 2 345 449 Rear brake pad kit (inc hardware)
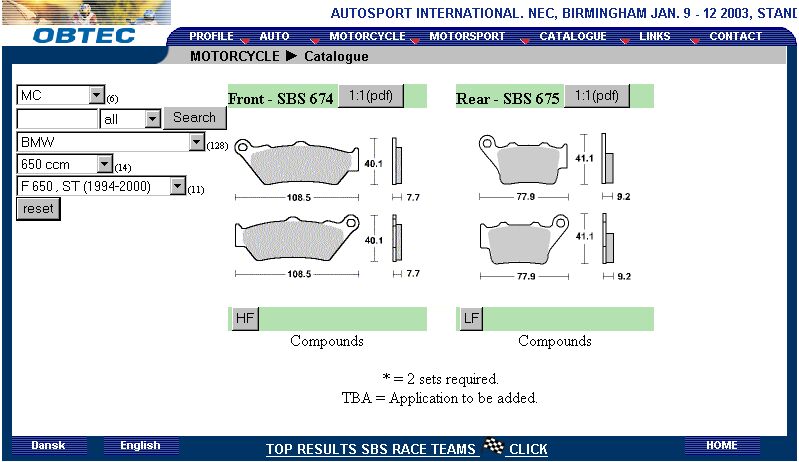
Carbon Lorraine
The site has a a
Catalogue for you to choose which bike and which usage. (AV=AVANT=Front
in French); (AR=ARRIERE=Rear in
French)
For the Classic they list:
Front: Model #2396. Choose A3 or S1
Rear: Model #2353
Choose RX or S2
|
Reference : 2396 |
|
|
108,5 x 40,1 x 7,7 mm |
|
|
Reference : 2353 |
|
|
78 x 41,3 x 9 mm |
|
For the GS/Dakar they only list the A3 and the RX
EBC
Kevlar Front FA209, EBC (Black?) Rear FA213 . I
measured a new set of EBC pads I bought for a 97ST. Each front pad has 5/32"
(4 mm) of material. Each rear has 1/4" (7 mm). The bottom of the wear
indicator slot is about 1.5 mm. Teddco
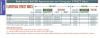
Ferodo FDB2006 Front, FDD2005 Rear.
(But they are hard and I think they squeak). FDB2006ST
(ST=Sintered, but Sintered Pads CAN eat Rotors!)
Refer Opinions on Pads below.
Galfer Part Numbers are: FD172 for the front. FD165 for the rear.
Available pad compound numbers are: Kevlar 1532 for the Greens, Carbon &
Kevlar 1434 for the Blues, Semi-Metallic Carbon 1054 for the Blacks.
Some people use green in front, blue in rear, although some members say the
Greens wear fast. Note that one downside to aftermarket pads is they don't
come with the additional hardware (clips/pins), although you can normally
re-use the OEM ones. Check them well however.!
You may also see these numbers on the Galfer Pad Box: (Thanks to HsN
for all these numbers)
Galfer Green (Kevlar) front 172G1532
Galfer Blue Rear 165G1434
Galfer Black Rear 165G1054
I went to the source (
www.galferusa.com ). order a set of FD172 G-1532 pads. they are the
Galfer greens for the front, from '93-present. FD172 is the style, G-1532 is
the compound. These are the "green" Kevlar, organic compound that have
excellent stick, no fade and are easy on the rotors, unlike the sintered H
or GG pads. There are part number differences for the rear beginning in '01,
and I have no idea why. for your bike the number is FD186, but the person I
spoke to said CalBMW should call them about availability of different
compounds. So if you really want Galfers for the rear, have them call
Galfer. I think most people go with Galfer blacks in the rear, which I
believe they have. Personally, I've been running the same stock rear pads
for 25K miles, and they are at about 75%. I don't want anything grippier on
the rears than what I've already got, nor something that wears faster. I was
getting about 6-8K miles out of my Galfer fronts. Galfer is online at
www.galferusa.com. Mark #403.
SBS
 Numbers are Front SBS674, Rear SBS675 for Classic, GS, Dakar
and Scarver.
Numbers are Front SBS674, Rear SBS675 for Classic, GS, Dakar
and Scarver.
-
So far this FAQ deals only with the Short, Fast & Simple Way of changing your pads.
If you have low miles and do little dirt, no problem. Otherwise I would recommend taking off the Rear Wheel/Front Wheel and giving yourself a bit of room,
but this is not necessary if you know what you doing and are careful
or need to replace your pads in a hurry. So long as you know that:
-
Taking off the wheels also allow you to clean (Compressed Air is Good) all the Brake Pad Dust from around the pads. It allows you to check the state of the springs which sit behind the edge of the Brake Pad.
-
Taking off the wheels also allow you to clean around the outside of the Brake Piston Dust because when you push it back in (to fit in the new Pads with more MEAT on them) you may push some of the dirt stuck on the Piston into the Sealing Rings around the Piston, causing Brake Leaks. These sealing rings seal the Piston and the Casing so when you apply the Brakes, Fluid doesn't escape.
It will also allow you to take out the anti-squeal spring and bend it so
that it holds the pads more firmly. This is the little spring BEHIND the
squared-off end of the Pad, so you will need to remove your wheel and disc
to access it.
-
Taking off the wheels
will also allow, if you got OEM Pads, to replace the Spring that
comes with the OEM pads or taking it out and giving the existing one a
little bend. Aftermarket Pads don't come with the spring.
For Rear Wheel Removal & Replacement, see the
Rear Wheel Removal FAQ.
For Front Wheel Removal & Replacement, see the
Front Wheel Removal FAQ. You do NOT
need to remove the Brake Caliper. If you do remove the caliper WATCH THE THREADS
of the two bolts. Make sure they are PRISTINE before you replacement or you
will Jam them in the caliper and wreck the threads when removing them to see
what the problem is. A good reason NOT to remove the Caliper too often.
-
When your brake pads wear the little Piston that Pushes them out move more toward the Brake Disc, resulting in a drop of your Brake
Fluid level as the displacement of the Piston is replaced by the Fluid. IF you have been filling up your Brake Fluid reservoirs to the maximum, when you push the Pistons BACK to get the old Pads out and the new ones in, the reservoir can overflow. So step one is to check your reservoir level and if it is Full, then get a Turkey Baster and remove some fluid, say back to the minimum. This is mostly applicable to the
Rear Brake Reservoir as the front one is more tightly sealed. Remember that Brake Fluid is caustic and will strip your Paint, so try not to spill any. You will need to remove the RHS body panel to get to the Reservoir.
-
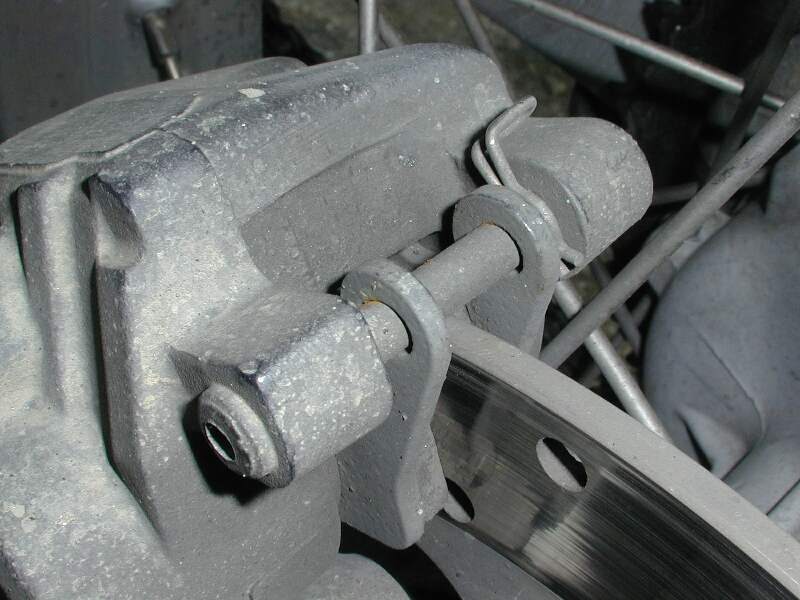
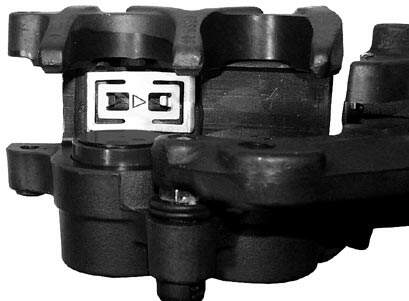
Rear Brake: After you have emptied your reservoir a little, remove the
Stainless Safety
Split Pin (The pin with a 90 degree bend, top of picture) with a pair of needle-nose pliers: This pin is at the end of the
Steel
Retaining Pin holding the upper end of the Brake Pads.
-
After you pulled out the Safety pin, Drive out the
Retaining Pin, using a Small Drift, through the small
hole. Drive it from the outside TOWARD the Hub. There is a small expansion shell retainer at the end of the Pin closest the Hub, so it IS DIFFICULT to get it started. A couple of good whacks are required.
-
The Pads are now free. Grab the upper end of the Pad farthest from the Hub (Outside Pad) and pull it firmly and slowly away from the hub, perpendicular to the hub. Do NOT try to remove it at this stage, what you are trying to do here is push the Piston back into its mounting. This is when the reservoir level fills up. When you feel it is back as far as you can go and the pad is loose against the Disc, remove the outside Pad, by lifting it up just a little and moving the whole thing toward the Disc. You can then Pull it out beside the Disc.
-
BE CAREFUL YOU DO NOT LOOSEN/DISLODGE THE SPRING STEEL CLIPS.!
-
If
you do dislodge the spring, the Manual says Make sure the spring is
correctly seated and installed right way around:
engraved
arrow must point in forward direction of travel.
-
Wiggle the Brake Assembly so that the other (inside pad) Pad has more room and remove this Pad in the same way. NOTE the direction the Pads came out. The new Pads go back the same way.
-
That's the removal completed. At this stage you can give the Disc Brake a
bit of a clean. Compressed Air if you have it or a brush and some water if
not. You can also try to clean the piston a bit, but you MUST be VERY
careful it doesn't pop out of the Disk Brake Housing. To do this very
gently squeeze the brake handle or Pedal until the Brake piston is JUST
far enough out that you can see the clean shiny silver-coloured piston. Give
the rest of the piston, from the silver part to the end closest the pad a
good clean. I would recommend only cleaning the piston AFTER you have
cleaned the rest of the Brake Housing, to avoid contaminating the piston, or
you will be looking at putting in new brake seals soon too.! You will need
to PUSH the piston back as far as it will after cleaning, as indicated in
(8) above or you will not get the new Pads in. Check
the Pistons are CLEAN. What often happens is that as
the pads wear the pistons extend further and further out of the caliper
until you change the pads. Then with new pads you push 'em back in again.
But if you didn't clean the piston's at all, all that gunge ends up going
back into the seal and can cause the piston's to "stick" somewhat, which
often causes
Binding Brakes.
-
Pad
Replacement. Some people put Copaslip (A Copper Dry Grease) on the BACK of the New Brake Pads to stop Brake Squeal before replacement. If you do this DO NOT get any on the Pad. i.e. the material that touches the Disc.
-
Slip the new Pads into place, first the inside one, sliding it down close to the Disc, then moving it toward the hub into position so that the tab at the end fits snugly into the disk assembly. Make sure the springs were not dislodged. Note that before the retaining Pin goes in
the Pads fall down a little. Wiggle the Brake assembly across away from the hub and install the outside Pad, again sliding it down close to the disc and then pushing it into position so that the tab at the end fits snugly into the disk assembly. If you cannot get the second pad in you probably didn't push the piston across far enough.
Alternatively, Chris in Santa Cruz, CA #782 writes: The key to the spring is
to place the pads in first, put the furthest away pin in next to hold the
pads, then slide the spring underneath the first pin and while pressing the
other end of the spring down slide the second pin in.
-
Put anti-seize on the pins! See
Brake Pad Pin Removal Problems.
-
Lift the Tabs at the upper end of the Disks up and slide in the retaining Pin, from the Hub outward, making sure the expansion-shell end of the pin is closest the Hub. DRIVE, with a few good whacks, the pin into position. Install the Spring Split Pin. Give your Foot Brake a couple of good pumps until it engages. It will take a couple, at first it feels like NO
Brakes. Check your reservoir level and top up if necessary. Top up with DOT 4
Brake Fluid.
-
For the Front Brakes, you will need to remove the Plastic Cover First, it's just a couple of Allen Screws, then the procedure is exactly the same as the rear Brake. I don't think it's necessary to empty some of the Front Brake Reservoir (RHS of the Handlebar just next to the Throttle), however if you cannot get the Piston pushed Back Far Enough, you may need to empty it a little first. Undo the Two Screws, take off the Lid, CAREFULLY Pull OUT the
Rubber Diaphragm and get to work with the Baster. Use some cloths to stop Brake
Fluid Dripping onto your paint.
-
Lastly: IMPORTANT. The brakes will NOT engage immediately. You must give them a good couple of Grabs (Front) or Pumps (Rear) to bring them to a point where they are useable again. So if you live on a hill, don't go scooting off down the road without doing this first, please. I'd like to see the Chain Gang Membership to increase, not decrease :-)
Notes: Fork Oil or Brake Fluid on Brake Disk/Pads
Q. Will it eventually burn off? Do I need a
special cleaner for the pads?
-
You
can buy liquid brake parts cleaner at an auto supply store. When this
happens to me, it will usually burn off after a couple of stops. Try washing
your bike and brake disc. Spin the wheel with some of the soap on it and
flush with a weak stream of water. Immediately go for a ride and stop
several times to dry the brakes out. Richard #230
-
Easy,
Just by a container of brake cleaner. Spray is any where you can. It will
dry instantly and you will have no problems at all. Dutch Polisher.
General
Feedback on Brake Pad Replacement:
-
Brake
replacement - classic F. I put anti-seize on the pins and just pry the
piston back into the caliper with a piece of wood between the piston and the
disc. Do this slowly and remove fluid as it accumulates in the reservoirs if
you need to. I would probably go ahead and bleed the brakes if I had not
done it in at least a year. You can use a drift punch or flatten the end of
a 16P nail to drive out the pins. I always pre lube tight pieces with WD40
numerous times before the actual time I do the work. A good shop would
remove the wheels, clean the calipers with brake cleaner as well as clean
and grease the sliding bits. I just checked that there was easy movement. A
good shop might also take the glaze off the discs with some very fine
abrasive paper. Anyway, just my thoughts on it. Oh yeah, and the clips that
lock the pins in have a specific orientation that will keep the bent bit
from rubbing on the disc after the pads wear down. The key to the spring is
to place the pads in first, put the furthest away pin in next to hold the
pads, then slide the spring underneath the first pin and while pressing the
other end of the spring down slide the second pin in. Chris in Santa Cruz,
CA #782
-
The
biggest hassle for me is getting the spring back into the upper portion of
the caliper and the pads in place and keeping everything together when
fitting the new pads and caliper over the disc. The pads always seem to want
to fall out as I am re-installing the caliper. Richard #230, Pacifica, CA
Brake Pad Pin Removal Problems?
by Andy Leeds UK #982
With the first MOT (annual inspection starting when 3 years
old) coming up, I decided to change the front pads. What an absolute pig of a
job. Getting the caliper off and pushing the pistons back is easy enough. Take
car mind, the fluid goes back into the reservoir with some pressure and will
spray over the paintwork if you don't lay a rag over the reservoir. The BMW
manual says to drive the pin out with the caliper on the bike (having pulled the
pin out), but this proved impossible. Removing the caliper showed the problem.
The pin is untreated steel with a monkey metal bush at the head end, the caliper
is aluminium. As grease is an alien concept to BMW, both the tapered end of the
pin and the bushed end had seized solid. No amount of hammering or even a 3
tonne press at work would shift it, although I did manage to compress a tool
steel press pin by about 2mm (don't tell the workshop manager!).
The solution was as follows, but requires a bit more equipment than most people
will have. First of all you saw the middle section out of the pin so you can get
the pads out. Next you use a 4mm drill and a pillar drill to drill out the
tapered section of the pin. This is where you need to be very careful. The
tapered end of the pin tends to push the drill into the caliper, that cuts like
butter. That's why your DIY hand drill is not such a good idea. Once you have a
hole, you can drive out this section of the pin with a hammer and drift. The
bottom is just as bad. You need to drill with 4mm from the top (you need a long
4mm drill and a length of steel tube as a support), then use the hole as a start
for a 6mm drill from the other end. The good news is that once you have the
caliper cleaned up, the pins are available from Motorworks and its is the same
pin front and rear.
As a preventative measure I would suggest that people consider removing the pin
before it seizes and dabbing a bit of copper grease on the ends that meet the
caliper. This should not cause a problem as the pin is retained by the head and
its clip, and can be done with the caliper on the bike. The design (if not the
parts) are the same on the FI bikes as on the classics and I bet BMW haven't
started greasing things. A bit of grease now may save a lot of drilling and
brake bleeding later.
Cost of prevention: 10 minutes and £0.01
Cost of fix (drilling): 4 hours, 2 trips to Motorworks (60 miles) , £1 for a pin
and £3.75 for brake fluid
Cost of fix ( if you slip with hand drill): £85 for second hand caliper in
Motorworks catalogue.
Points worth noting are:
- My retaining pin was seized and had to drilled out. That's UK salted roads for
you, But I think the pin has missed a surface treatment too. Motorworks were
able to supply a pin, but I bet BMW would only sell you a new caliper. When you
push the pistons back the fluid really sprays out (much worse than any other
vehicle I've worked on), so lay a rag over the reservoir or lay the cover back
on as a spray shield. A bottle of DOT 4 is useful if you loose any fluid. The
system is pretty easy to bleed, so if its easier, you could take the caliper off
the banjo bolt. The BMW idea of not taking the caliper off until after you drive
the pin out only works if the last person put copper grease on the pin. The pin
is not in the Brembo caliper repair kit BTW, this is a seal kit only.
- Looking at the colour of what drilled out and the inside of
the bits of pin that finally pushed out (red/brown), both the tapered end of
the pin and the bush were corroded in place. I would however bet that the pin
was on the big side to start with to get that sort of interference fit just by
corrosion. Given that the new pin only needed a light tap to line up, if
anything was oversize it was the old pin. Thinking about it, perhaps the pin
had missed a surface treatment too as the head end is very rusty too. Similar
truck pins are treated then ground to size.
- The copper grease should not melt out just by friction heat
and if it does it will fall away from the pads rubbing surface. Lithium type
grease would do the job too but would pick up more crud and is harder to apply
in reasonable quantities.
What
Life can I expect out of Brake Pads?
How long is a Piece of String ? As always, this is a very subjective thing, and
differs depending on Brake Pad Compound, Driving Styles and Conditions. So as
always with this TYPE of questions, here are some experiences:
-
I put
10,000 miles on my front stock brake pads and they were hardly worn when I
changed them with Braking blue pads. Those pads wore out in 12,000 miles. The
rear stock pads only went 15,000 miles. It is not the thickness of the pads that
matters, but their compound.
-
I just
replaced the front & rear w/EBC Kevlar, which I use on all my bikes, at 17,000
miles. I still had some pad left, although much thinner than new. I felt that
the braking action had deteriorated over the last couple thousand miles, so went
with new pads. It's my belief that braking action is lost as the pads wear thin
due to the effects of heat over time. I could be over analyzing this, but it
seems that with thinner pads, the ability for heat to transfer through the
backing and into the calliper is increased, ability to dissipate decreased as
the heat continues to build in the calliper, brake fade increased, which is the
feeling I have experienced when pads get thin. Besides, the job is SO easy, and
at a minimum, you could remove the pads, clean and lightly lube the calliper
contact points and pad pins, remove any dust build-up from around the piston
boots, and sand the pads with some course non-metallic sandpaper.
-
Don't
forget the face mask and ventilation if you want to sand the glaze of your
existing pads.
-
I have
also noticed that as the pads wear to half thickness they seem to loose bite. I
never wear them all the way down anyway.
-
Pad
performance is affected by heat building up in the pad material. The reason
though is usually not that the pad is affected by heat in the thin material.
Rather, the thin material allows more heat to transfer through to the backing
plates, into the calliper and that in turn overheats the brake fluid. Severe
cases result in boiled fluid, air in the lines and a complete loss of braking.
The pads only have a bevelled corner to show wear., nothing metal. I got 12k out
of my stock pads before I was sick and tired of the squealing. they had plenty
of material left. I got 6K out of my next set (Galfer green pads), but when I
changed them, I realized there was a good amount of material left there too. the
Galfer green pads are SO much better than stock. I'm on my second set. but I
have a set of EBC Kevlar waiting on the shelf. they're cheaper and more easily
found than the Galfers, so I thought I'd try them.
-
My stock
rear pads look hardly used at all after 21K miles.
-
I put 10,000 miles on my front stock brake pads
and they were hardly worn when I changed them with Braking blue pads. Those pads
wore out in 12,000 miles. The rear stock pads only went 15,000 miles. It is not
the thickness of the pads that matters, but their compound. Richard #230
-
I just replaced the front & rear w/EBC Kevlar, which I use on all my bikes, at
17,000 miles. I still had some pad left, although much thinner than new. I felt
that the braking action had deteriorated over the last couple thousand miles, so
went with new pads. It's my belief that braking action is lost as the pads wear
thin due to the effects of heat over time. I could be over analyzing this, but
it seems that with thinner pads, the ability for heat to transfer through the
backing and into the calliper is increased, ability to dissipate decreased as
the heat continues to build in the calliper, brake fade increased, which is the
feeling I have experienced when pads get thin. Besides, the job is SO easy, and
at a minimum, you could remove the pads, clean and lightly lube the calliper
contact points and pad pins, remove any dust build-up from around the piston
boots, and sand the pads with some course non-metallic sandpaper. Gary in Ohio
-
Don't forget the face mask and ventilation if you want to sand the glaze of
your existing pads. Simon (in Ireland)
-
Gary, I think that you are right. I have also noticed that as the pads wear to
half thickness they seem to loose bite. I never wear them all the way down
anyway. Steve#417
-
Yes, pad performance is affected by heat building up in the pad material. The
reason though is usually not that the pad is affected by heat in the thin
material. Rather, the thin material allows more heat to transfer through to the
backing plates, into the calliper and that in turn overheats the brake fluid.
Severe cases result in boiled fluid, air in the lines and a complete loss of
braking. I've done it any number of times in that over-priced racing car that
Flash doesn't like :). One last question for those that have had the pads off,
do the pads have the little metal projection like found on cars to rub (and
squeal) against the rotor when the pad is at minimum thickness? I don't do much
sport riding on the bike (sorry, car nut) so I use it for daily commuting.
Maximum brake performance isn't really much of an issue for me. The pads only have a bevelled corner to show wear., nothing metal. I got 12k
out of my stock pads before I was sick and tired of the squealing. they had
plenty of material left. I got 6K out of my next set (Galfer green pads), but
when I changed them, I realized there was a good amount of material left there
too. the Galfer green pads are SO much better than stock. I'm on my second set.
but I have a set of EBC Kevlar waiting on the shelf. they're cheaper and more
easily found than the Galfers, so I thought I'd try them. my stock rear pads
look hardly used at all after 21K miles. Mark #403
-
I've been using the Galfer greens in the front
for about 10K miles (on my second set). I found them to wear very fast, although
pads are a snap to swap, so no big deal. personally, I find the stock rears to
be more than adequate, and after 22K miles, I'm still on my first set. I have a
set of EBC Kevlar pads I will use up front next (cheaper than the Galfers), but
so far, I haven't found a need to go with a different brand in the rear. the
Galfers seemed like they are more cheaply made in that the edges crumble,
while it doesn't look like the EBCs do that. one downside to aftermarket pads is
they don't come with the additional hardware (clips/pins). I guess one reason to
go with a different brand in the rear would be to spare your rotor Mark #403
-
As far as I'm concerned, brake pads are like
Flash's girlfriends; cheap and easily replaced. If my Galfer Greens last only
six thousand miles, I'm fine with it. The blues are good for the rear brake
because they have a lower coefficient of friction than the greens. I like Galfer
pads because they DON'T have a lot of initial bite and have SUPERIOR fade
resistance. In fact, the coefficient of friction for the greens INCREASES with
heat. I also find that they skate a lot less when wet (like when riding in the
rain). I think they give me a much more sensitive feel. And I'm a VERY sensitive
guy. And all of us sensitive guys like a lot of sensitive feel for our sensitive
brakes. With Galfer pads, it's like braking with nothing on. This is how I treat
my brakes; I put new pads in and fill up the master cylinder, when the I can see
the fluid getting low in the M/C, it's time to replace the brake pads. Usually
this happens once a year. I'm finding that the rear brake eats brake pads
quicker than the front and rightfully so, more swept area in the rear (oh come
on, I'm leaving this out there for all sorts of jokes). Shank
-
I've been very happy
with the Galfer green pads. excellent stopping power, no real noticeable fade,
no noise, but only last 6-8K miles. my next set, waiting to be installed, will
be the EBC Kevlar. I think they are probably much easier to find. Are you using
your rear brake too much? My disks are the opposite measurements, and I'm still
on my stock rear brake pads after 24K miles (and they have plenty more). in
normal commute riding, i don't use the rear brake most of the time, only under
hard braking or "spirited" backroad riding. Mark #403.
-
I usually change my
pads out at 2 mm. I have found that the after-market pads that I have tried seem
to wear very fast and don't work any better than the stock BMW pads. I replaced
my blue Braking pads with the stock BMW ones (at about $10 more per set) and
they seem to be working well and wearing about half as quickly.
-
Although Richard
doesn't find any difference in braking between stock and aftermarket, YOU might.
Richard, by his own admission, is not the most aggressive rider. however, if you
ride hard and are on the brakes a lot, you will notice a difference between the
stock pads and a set of Kevlar pads or Galfer "green" pads. the stock pads will
get very hot and the friction coefficient is reduced more quickly than the
aftermarket pads...this becomes "brake fade". they also wear your rotor more
quickly (I think they are semi-metallic). the aftermarket pads will not fade on
you anywhere NEAR the way the stock pads will. however, they WILL wear MUCH
faster. personally, I'd rather have consistent stopping and spare my expensive
rotor...just my preference. Now, if you are only getting 3K miles out of
your stock pads, you've got a problem. I'm very hard on my front brakes and I
got about 12K out of them, with some to spare. My Galfer greens are toast in 6K.
Is your caliper retracting properly? Have you checked how freely your wheel
spins when off the ground? (See the
Brake Maintenance
FAQ) My rear stock pads have over 27K miles on them and look almost new.
Mark #403, '99 F650, Bay Area, California.
-
Next.
Brake
Squeal FAQ:
by
Kristian #562, Flash #412
27/10/01
Q. I’ve just
changed my brake pads. Why do they Squeal. It’s really annoying.!
Brake squeal is caused by the pads vibrating
against the caliper/piston (vibration=noise=squeal).
Otherwise:
1.
Solution 1:
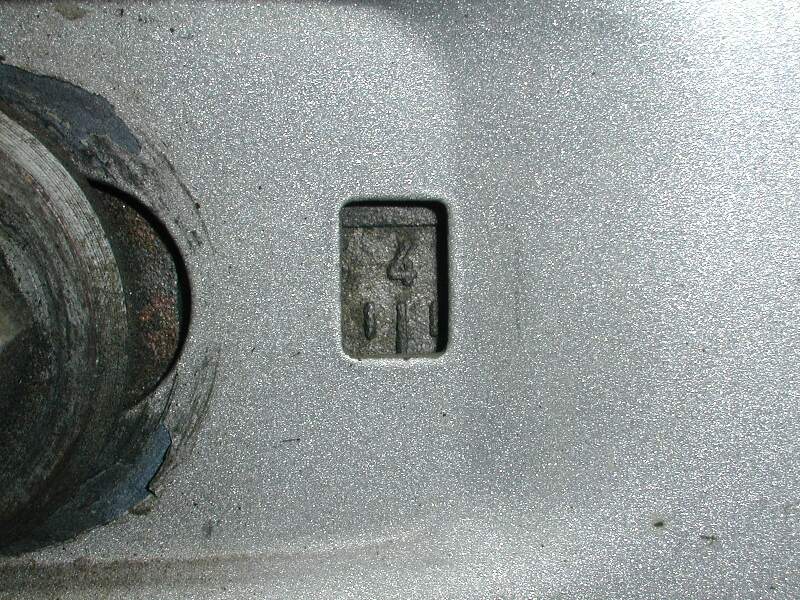
Rear Wheel Only. Check your wheel alignment. i.e. for the rear pads, check the
numbers in the little tabs on the side of the Swingarm. They must be the
same on both sides of the Wheel. It is easy, if you took your tyre off to say
change the pads to get the wheel out of alignment even IF the marks read the
same. The reason is that you MUST PUSH the wheel forward to the end of the
adjustment travel (and keep it there) when reinstalling the tyre, otherwise
the marks can “float” around inside the swing arm and give you incorrect
readings. Don’t forget to DO UP those
adjustment bolts AFTER you have torqued the rear wheel Nut, so you don’t
lose the End-Plates
and Bolts, they can work their way loose.! You won’t lose the rear wheel, don’t worry, just the
Bolts/Endplates,
if they somehow undo ALL the way. You do not need to take the tyre off to change
the pads btw, see the FAQ above for details. There is no such adjustment on the
front wheel. See the
Rear Wheel Removal FAQ for more
information.
2.
Solution 2:
Check your “Floating
Disc Brake Unit” CAN actually “float” on the Brake Disc. i.e. the Disc Brake
Unit, sits on the Wheel Axle Shaft AND is NOT jammed up against the Swingarm
somehow a this could also put it out of alignment with respect to the Disc. You
should be able to wobble it a lit bit. For the REAR brake, on the inside of the
LHS Swingarm there is a little nib welded in place which stops the whole Disc
Unit from rotating. Make sure this little Nib is IN the SLOT in the Disc Unit.
Another thing to check is that the calliper pins are
free. Our brakes are what's called floating calliper which means the calliper
floats on a mount which keeps it centred on the disk as the pads wear. This way
the brakes require no adjustments throughout the life of the pads. If the
calliper begins to bind on the pins or (as in my case) the wheel or fork is put
incorrectly the calliper applies uneven pressure to the pads, lessening the
brakes' effectiveness. All that's required is to loosen all the stuff on the
bottom of the fork a little bit, as if removing the wheel. Sit on the bike and
pump the fork up and down a time or two, then re-torque everything. To my
long winded post above I would like to add: The way to check for the whole
calliper thing is:
-
Put the bike on the centre stand.
-
Somehow apply weight to the back wheel, easiest way
is to have someone sit on the luggage rack, and spin the front tire once it's
off the ground.
-
If you have an off center disk, it will bind and one
point and if you listen to the brake you will hear the disk drag more at one
point than the rest.
-
(It's normal for the disk to drag a little, but a
good spin should keep the wheel turning for 10-20 revolution at least).
3.
Solution
3:
Take out the anti-squeal spring and bend it so that
it holds the pads more firmly. This is the little spring BEHIND the
squared-off end of the Pad, so you will need to remove your wheel and disc to
access it. Bend the spring/seat until it is tight on the pads. You will see what
I mean if you look at it. There is also one on the top of the calliper which can
be bent downwards slightly.
4.
Solution
4:
Sand the surface of the Pads (the Pad
Compound) lightly with sand paper, on a flat surface. This will remove the
Glaze that builds up over time. You may need to do these several times over
the life of the Pad. Some riders believe it comes from using the Brake too
Lightly. This has not been confirmed.
5.
Solution
5:
Put “Copaslip”, a sort of copper based “dry” grease on the BACK of the brake
pads (Just where they contact the Pad Holders). When you do this make very sure
you DO NOT get ANY of the grease on the pad compound. Or you will have
NO BRAKES at all.! “Dave # 093 wrote: Get yourself some brake specific
grease--high temp grease made especially for brakes. Get a small container
because it will last for the rest of your life. Apply a thin layer of this stuff
to BACK of the brake plates--where they touch the callipers, not where they touch
the disk and the squeak will be gone.”.
Or use a small amount of High Temperature silicone on the BACK of the
pads.
6.
Solution
6:
This one normally ALWAYS fixes the problem. Change See Flash’s Maintenance Log
Maintenance Log for the Type of Brake Pads available for the F650. The EBC &
Galfer Pads are recommended, the Ferodo ones Squeak, badly, in my experience.
I've had both EBC & Ferodo. I believe the Ferodo ones are made in Italy and
hence, as the F was originally made in Italy at the Aprilia Factory, MAY be the
OEM ones you get when you order replacements from BMW. The EBC & Galfer Pads use
a softer compound, hence may not last quite as long, but they grip well and I
like to have good brakes over anything else, bar tyres. you can actually SEE the
harder specks in the Ferodo pads too.
7.
Solution
7:
For the short term, try some
Brakkleen. But in the long run, it probably won't fix your problem
Thanks to Dave#
093 for the tip on “Brake Grease.”
and Rick #815
Feedback:
-
Decided to experiment in removing the horrible
squawking noise from my rear brake. Removed the pads and cleaned them by placing
them face down on some 320 grit wet and dry paper, using a sheet of glass as
backing (nice and flat) keeping the paper nice and wet, I managed to scuff off
the glazed material from the pads, washed them off, dried and refitted. Road
test revealed no more noise and the braking is good......see how long it lasts
before I get the noise back again. Well......it did not work :-( I have the
squawk back again. Next move is remove pads and make 2 hacksaw cuts into the pad
material, similar to the front pads, but at
a slight angle across the pad itself. Like Todd said, will clean the rotor this
time around. Jack F650GS Australia
-
To complete your process, while the brake pads are
removed I take a cotton rag, wet it with brake cleaner, and wipe the rotor while
spinning it to clean off the grease. I do this several times with fresh brake
cleaner and rag surfaces - that way I know that the rotor is clean when it first
meets the new pad surface you prepared. Most of the time when you have problems
with brake noise due to contamination of the rotor/pads, it all starts with a
greasy handprint during a tire change or wheel adjustment. Todd #389
-
Rear brake squeal was driving me nuts. I believe
there's a solution short of replacing otherwise okay pads. So far, so good. I
bought a can of this spray called Brakekleen. I dropped the rear wheel so that I
would have good access to most of the pad surfaces. With the wheel dropped, you
can spray into the inside of the pads, as well as the gap between the outside of
the pads and the thingamajig that squeezes them. First short bursts to blow out
the dust, then I saturated all of it. Have a rag to catch the run-off. I Rode
all afternoon in traffic without any squeal. Job took about ten minutes. It was
chain lube time anyway. It's baaaaaack, but I'm not complaining. The Brakekleen
spray did stop the horrific rear brake squealing for about 900 miles. Not bad
for such little expense and trouble. Pads still good, so still no need to
replace them. About 50 of those miles was some hard braking and corning on a
go-cart track where I was talking the MSF's advanced rider course. Roy 1095
-
Brake squeal is caused by the pads vibrating against
the caliper/piston (vibration=noise=squeal). Take the pads out, lube the back of
the pads with BMW#10 or axle grease or Vaseline or anti-seize or anything else
that's gooey and will stay in place. I've been doing this for years on a
plethora of bikes (Hondas, Suzukis, BMWs, Moto Guzzis) and it works. Give it a
try. Shank NYC USA
-
I tried the Brakekleen and got about 300 squeal free
miles for the trouble. Next step I pull the pads and try the high temp grease
trick. IMHO the Brakekleen treatment is a bit messy and the stuff is bad for
plastic finishes. I think it was intended for use in cleaning parts NOT on a
vehicle. Cover everything plastic in sight if you decide to use the spray. Next
stop, new pads. BradG 1002, N, CA '01GS.
-
The brake cleaners as specified, will not eat the
brake seals, IMO. Just don't use carb cleaners, electric motor cleaners, etc on
brake parts. It may be harmful and cause bad reactions with brake fluid. Maybe!
Use "rubber gloves" from one who did this a ton, in earlier years and did
NOT....Skin may be fairly resistant to a lot of things, but not all.
Randy748/Calif.
-
I'll confirm what Mark403 says about the
Galfer Green pads. I put Blue on the rear and eliminated my brake squeal too.
BradG.
-
Yes, I thought the same thing. Had the problem start
at 3500Km. One day I was looking at a brochure and in the fine print, pads are
covered till 7500Km. Finally fixed at 15000Km. Now all my HD biker friends can
stop riding me. Rick #815 BC Can.
-
My '01 GS-A developed a significant rear squeal when
I was out on a hundred mile ride. It was there again after only a few easy stops
on my next ride. I used some brake cleaner which helped for a short while but,
came back the next day. I'd like to avoid having the bike tied up at the dealer
if at all possible. Logan's Ride 2001 F650GSA Chicago, IL.
-
When it sometimes happens to me, I find a place well
away from folks, stick the bike in first gear and ride along with plenty of
throttle and with the rear brake on (and off) hard till the squealing noise goes
away. After a short while it disappears, (till the next time). I just put it
down to glazing of the pads. Trevor 999 UK 01 GS
-
My tip. Enjoy it. I have the same noise at times.
Comes and goes. No reason to it. I use lots of rear brakes on my Dakar. It tends
to hold the nose up. Over the last couple years there has been lots written
about this on the board so you are not a lone ranger. Fact is Disc brakes have
been noisy at times since the invention of them. As long as the pads are good.
Enjoy. F650GS Dakar, Oregon. Steve 1130 Or
-
When we got our 02 650GSA last May, it developed the
rear brake squeal at about 150 miles on the bike. I figured it had glazed over
from all the washing and cleaning it got from sitting on the showroom floor
along with a little dust from the dirt road we live on. If I applied the rear
brake to the point that it was getting quite warm, the squealing would go away
for about 20 miles. I took it buy the dealer at about 500 miles on the bike and
pointed out that it was getting to the point that when it would squeal (howling
now) you would actually lose a little breaking action and I was afraid of
developing a wear pattern in the disc that could cause future pads to developed
a squeal again. They said that they could schedule me in about 3 weeks to look
at it. I couldn't believe that they would not even try to do a quick sand job on
the pads or anything else since I would have considered it to be kind of a
"Safety Issue". They didn't even want to take the bike out to see how bad it
was. Even though I don't use the rear brakes much, it concerned me because we
sold our Honda XR650L for the BMW 650 so that my wife could ride it also. I'd
like her to have all the braking power available of the bike if she should need
it. Anyway, I was a little ticked so on my way out of the dealership, I bought a
set of EBC Pads and in less than 2 minutes had them in and haven't had a squeal
since. The bikes got over 4k miles now. A couple of weeks ago we picked up a
2002 650GSAL for my wife (because she liked the 650 GS so much I couldn't get it
away from her and when she found out BMW made a lowered one, I new we'd end up
with two 650's) and so far no squealing brakes. If it starts, I'm just going to
put in new pads right off. It's worth the dollars not to mess with the dealer if
they want to drag it out. It's over a 100 mile round trip for me to go to the
dealer plus they can seldom do the work at the time you bring it in so that you
don't have to drop it off for a couple of days. Maybe your dealer would be the
type to toss you some new pads and say go for it.
BBach, 02 650GSA, Brian #1324
-
My squealing started when I changed my pads half a
year ago (at 60.000KM). I used the same brand as before (SBS). The squealing is
almost gone now after 5000KM of use. Regards, Spakur #1117, Icelander.
Opinions on Pad Types
-
I have recently install a set of
Ferodo Road Sinter brake pads on my 01 Dakar. Part # FDB2006ST. Wow what an
improvement. This thing really stops now. I have no ABS and one has to be
careful. You can lock the front wheel with little effort. I know I have read
on board of Dakar guys saying they can't use front ABS. The wheel doesn't
lock. It does now. It is great to have a little more braking power available.
www.braketech.com is the place to find
them. Steve 1130 Or
-
Sintered pads, especially HH,
will eat your rotors like candy. may want to take some measurements with
caliper now, and keep a close eye. of course, Ferodo says they are kind to
your rotors....what are they supposed to say? I've been using the Galfer green
pads which are not metal sintered (Kevlar/organic pad) and are much kinder to
the rotor, no fade, and easy two finger lock-up. Pads are cheaper than rotors.
-
I also put new EBC pads on the
rear, and discovered the same thing you describe: the rear brake now slows the
bike down, sorta. But will only lock up if I really stomp on the brake pedal
while using the front brake hard. Then the rear tire becomes unloaded enough
to slide. At first I didn't like this, but the more I live with it the better
it feels. Almost like the poor man's ABS! Bob#550 (Olympia WA)
-
I've been very happy with the
Galfer green pads. excellent stopping power, no real noticeable fade, no
noise, but only last 6-8K miles. my next set, waiting to be installed, will be
the EBC Kevlar. I think they are probably much easier to find. Are you using
your rear brake too much? My disks are the opposite measurements, and I'm
still on my stock rear brake pads after 24K miles (and they have plenty more).
in normal commute riding, i don't use the rear brake most of the time, only
under hard braking or "spirited" back road riding. Mark #403
-
Try some Galfer pads - makes a
world of difference on most bikes, and as Jinx recommended, make sure the
brakes are properly bled and aligned. Lauren
-
I think the Ferodo pads are
dreadful. They are hard as hell, squeal, and have bits of copper in them.
Kristian #562.
-
I am not sure how thick new pads
are, but I believe the minimum recommended thickness for old pads is about 1
mm. I usually change my pads out at 2 mm. I have found that the after-market
pads that I have tried seem to wear very fast and don't work any better than
the stock BMW pads. I replaced my blue Braking pads with the stock BMW ones
(at about $10 more per set) and they seem to be working well and wearing about
half as quickly. Richard #230
-
I also replaced my rear brake
pads along with the chain (I like this, chain and brake pads wore out at the
same time, must be that Bavarian engineering). I replaced the stock pads with
EBC pads that came with the bike when I got the bike. I like the EBC pads, no
matter how hard I stomp on the rear brake, the tire won't lock up. Which is
just perfect. Oh yeah, one more comment on the front sprocket shaft and
whether or not you O-ring, circlip or whatever. I think this is classic
Italian manufacturing (even though the engine was supposedly manufactured in
Austria); whatever you have on your bike is what they had at the moment. In
other words, Your Shaft May Vary. Shank NYC USA.
-
Although Richard doesn't find any
difference in braking between stock and aftermarket, YOU might. Richard, by
his own admission, is not the most aggressive rider. however, if you ride hard
and are on the brakes a lot, you will notice a difference between the stock
pads and a set of Kevlar pads or Galfer "green" pads. the stock pads will get
very hot and the friction coefficient is reduced more quickly than the
aftermarket pads...this becomes "brake fade". they also wear your rotor more
quickly (I think they are semi-metallic). the aftermarket pads will not fade
on you anywhere NEAR the way the stock pads will. however, they WILL wear MUCH
faster. Personally, I'd rather have consistent stopping and spare my expensive
rotor...just my preference. Mark #403.
-
I bought Galfer pads at World
Superbike a couple of weekends ago for US$29 for the front (green) and US$18
for the rear (black). According to the receipt, I got 'em from:
Giocar America, 57 W. Mc. Farlane Av. Ventura, CA 93001, Ph. 805-653-5012 |
Tech support 800-685-6633 (I also picked up some Ferodo rears from someone
else for $12 on closeout.) Flash #412.
-
Next.
 Numbers are Front SBS674, Rear SBS675 for Classic, GS, Dakar
and Scarver.
Numbers are Front SBS674, Rear SBS675 for Classic, GS, Dakar
and Scarver.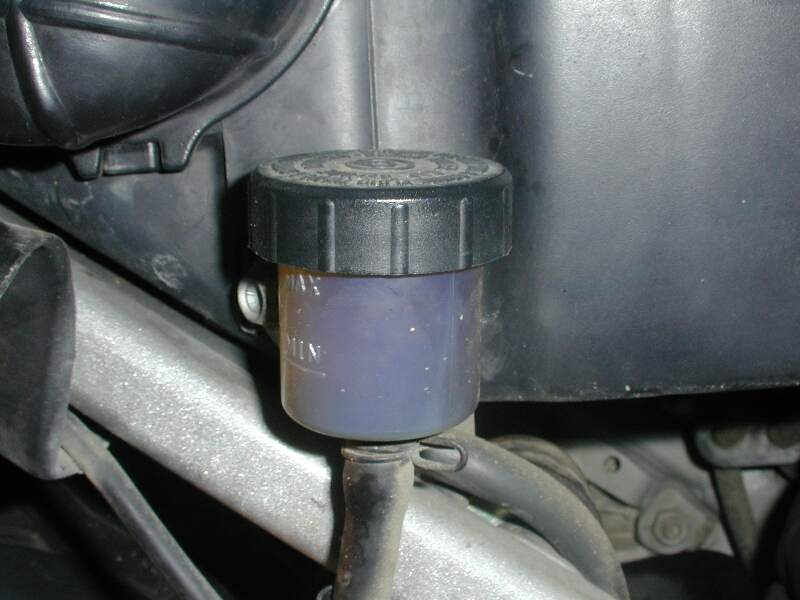