This FAQ has been written as a precursor to removing the Rear Wheel for repairing Flat Tyres, Changing your Chain, Lubing your Swing-arm bearings and any other work for which you have to remove the wheel.
You might think “why would someone write a FAQ about that, it’s so darn simple and obvious”. Well it is, if you’ve done it 100 times, but even if you haven’t maybe you’re doing something unsafe or something that’s bad for your back. If you are looking for the Chain Replacement FAQ follow the link.
Rear Wheel Removal & Replacement
Preparation:
Put the back on the Centre Stand. If it doesn’t have a Centre Stand, like the GS Dakar, prop it up on an Orange Crate or Suspend it from the ceiling of your garage, JUST off the Floor.
If you are in the garage place a 3/4 inch thick piece of wood on the floor to roll the wheel onto when re-installing it. This will make the task of aligning the axle, brakes, etc. MUCH easier.
If you are going to undo your c/s Sprocket for Chain Removal, put the bike in First Gear. This locks the countershaft (small front) sprocket and stops the wheel from turning. Otherwise leave it in Neutral, it is easier to slid the Chain off the Rear Sprocket.
Undoing the Axle:
Undo the Main Axle Bolt, by undoing the NUT from the Axle (RHS), not the Bolt from the Nut.
The Nut is bigger and there is more purchase, and less energy lost in torsion through the Axle Shaft.
Initially the NUT will undo without the Axle rotating, but very quickly you will need to HOLD the Head of the Axle on the LHS, while you undo the NUT on the RHS. You’ll save your back if you initially just concentrate on the NUT.
Try to keep your back straight when you undo the NUT, until it’s free to turn easily. You wouldn’t believe how many people put their back out undoing Axle Nuts or Bolts.
When the Axle starts to turn WITH the Nut try and find a position where you can keep your back straight, HOLD the Head of the Axle on the LHS AND Undo the Axle NUT on the LHS.
If you are just taking it off for a Tyre replacement or some other maintenance where you will NOT be adjusting your chain, take a note of the Setting the Current Chain Adjustor is on. If you replacing your chain these settings will change, so you can skip this step.
Loosen the Allen Keys which control the Chain Sag Adjustors.
Pull out the Axle. The Wheel will drop and tends to jam if you don’t have anything under it so remember the Plank.!
You don't have to do anything to the front sprocket to get the rear wheel off.
Removing the Wheel:
The hardest part is pulling the wheel out. The chain and brake calliper get in the way and sometimes it seems like you need an extra pair of hands to get the job done. One person can do it, using your feet as the extra pair of hands, but it is not easy.
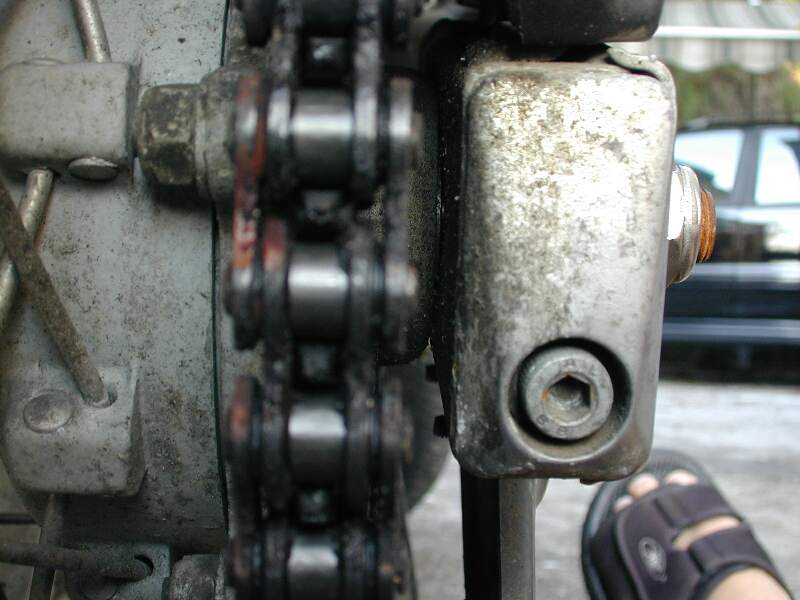
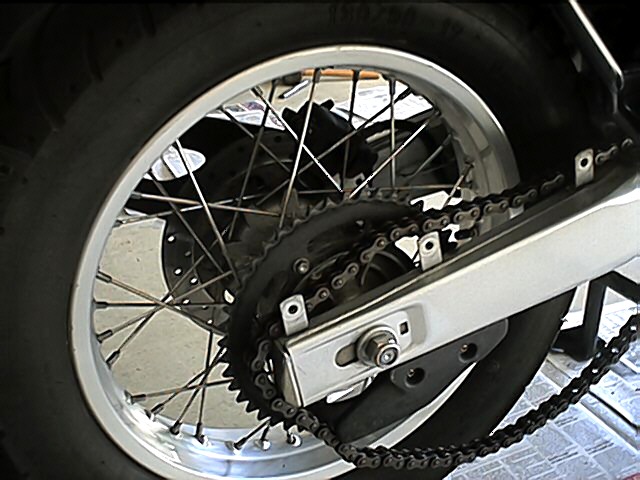
With the Chain Sag Adjustors (Both of Them) wound a long way out, which allows the wheel to move forward, you can now push the wheel forward and pull the links off of the rear sprocket (to the RIGHT of the Sprocket). It's messy so wear Cotton throwaway Gloves.! If you wound the Chain Adjustors out, try and do BOTH the same number of turns out, so when you reinstall it you will be pretty close to Straight when you wind them back in the same number of turns.
Careful with the brake disk (Rotor)
With the Chain off the Sprocket, but holding the upper run of the Chain in your right hand, wheel the Rear Wheel Back toward you, i.e. backwards. You may need to hold the brake calliper up AND the Chain up a bit so the wheel can pass both these items by without snagging.
Do NOT step on the rear brake pedal while the wheel is off. Nothing really wrong with the pads coming off if you press on the brake pedal by mistake but you don't want the extra work to put them back.Stepping on the pedal will push the brake Piston Out closing the little Gap between the Brake Pads and making it very difficult to get the Brake Rotor Disc back in again. (If you have time, you can take the opportunity to change your pads but that's another half hour job).
Put the wheel against a wall or with the disc rotor on top not to scratch it.
Q. When I changed my chain, I tried to take it off the rear sprocket pushing the wheel all the way forward but it didn't give me enough slack to do it so I had to cut it. Is there a trick to do so ?
A. You certainly DO NOT need to cut or remove your chain to get the wheel off. you can just push it aside. otherwise, you'd have to replace your chain every time you put on new rubber.! If you're using a 110 link chain and stock sprockets, there SHOULD ALWAYS be enough slack.
Reinstalling the Wheel
Grease the Axle: If the bearings fail and the Axle doesn’t have enough grease, the wheel bearing inner race(s) can weld themselves to the axle. This is an expensive example of why it is a good idea to grease the axle with a good wheel bearing grease before re-installing it (delays the welding process if your wheel bearings fail).
Make sure the Chain Adjustors are Slack. Make sure the chain is OVER the Lower Roller and UNDER the Upper Roller.
This is a good time to put a little grease inside the Wheel, where the Axle Slides in, and on the Sprocket Carrier. The Wheel Bearings are sealed BUT should they fail and lock up, you will be running on the Axle alone, so a little Grease doesn't hurt. Don't get any on the Brake Pads.
Make sure the Brake Calliper is lined up in (a) Its Retaining slot on the Swingarm AND (b) At the Axle.
Make sure the Brake Pads are in position, not skew and the Gap is big enough for the Rotor.
START to reinsert the wheel into position, but at the same time, lift the chain up with your Right Hand, so that the UPPER run of the Chain is above the Axle Position and the LOWER run of the Chain is below the Axle.
As you push (ROLL) the wheel forward, make sure the Rotor lines up with the Slot between the Brake Pads.
Push it ALL the way forward until it stops, sliding the Rotor between the Brake Pads and lifting the Chain over the Sprocket. (If you slackened the Chain Adjustors enough you should be able to get it far enough forward).
With the Chain now on, line up the Wheel with the Swingarm holes and slide in the Axle, Put the Nut on but DO NOT TIGHTEN it, leave it just Snug. You can push the slides with the Axle Holes in by hand to line them up if need be.
Remove the Wooden Plank and roll the wheel back & forward a bit to check the chain is free and ready for adjustment.
This is a subject open to much debate and interpretation. The chain slack doesn't really change very much until the shock starts to bottom out (the limits of the geometry), like with a really heavy rider, heavier than say 100 kilos. The manual says 20-30mm on the centerstand (also mentions the same on the sidestand). Comes out the same either way, but on the centerstand your wheel is easier to spin, and the (loosened) axle is held flat, not off to one side, and the wheel is centered and balanced. It is OK to check chain tension on the sidestand, but I can't imagine trying to do adjustments on the sidestand. Bad idea unless you have to.
The chain tension can be adjusted with the bike on either the side or centre stands. Owner's manual says check with side stand, Service manual says use centre stand. Do NOT have someone sit on the bike when the chain is adjusted.
If the chain is properly tensioned before you remove the wheel, just make alignment marks on the swingarm with a scribe, tape or marker and realign them after you mount the wheel.
Do up the Chain Adjustors, to CLOSE to the marks you had before (if you wind them back IN the same number of turns for each Adjustor) when you reinstall it you will be pretty close to Straight, although the Tension may not yet be correct.
PUSH the wheel forward to make sure the Axle is at the END of the Adjustor Travel and the Adjustor End Blocks are Hard up against the end of the Swingarm. They have a propensity to want to loosen backwards.
Check BOTH the Chain Adjustment Marks on the Sides of the Swingarm are the same.
Now Check the Chain Slack at the Centre of the Chain. Use the bottom of the swingarm to measure from, but note the measurement is NOT 20-30mm to the Swingarm, it is 20-30mm SLACK, i.e. The amount you can push it up by, from its normal hanging down position.
Repeat Steps 3-6 until the slack is correct.
Measure the final chain slack by having the bike at NO LOAD. The sticker on the swingarm says the slack should be 20-30 mm. Too slack is definitely better than too tight, so go for more like 25-30mm, heading toward 30mm with decent hand tension. Spinning the wheel while checking first find the tightest point to go for :i.e. the (-) 30mm. Note that despite snugging the axle to the point where it will barely move (one way) when pulled by the adjusters (they do NOT push), when you are done adjusting to (-) 30mm, after you fully torque the axle nuts, you will usually find chain slack a bit closer to 25mm.
Note the index alignment marks for the adjusters might not SEEM like they are in alignment with the swingarm adjustment holes, but because of construction methods (marking the alignment marks AFTER welding the swingarm) are probably in excellent alignment with the swingarm pivot geometry, which is what counts.
Some more detailed explanation of the Adjustment Screw Procedure:
What happens if the Adjustment Screws are undone all the way is that the Wheel goes all the way to the front of the slot in the swingarm and the Adjustor Travel is longer than from the end of the swingarm to the end of the slot.
So, just start adjusting the adjustors, each by the same amount (# of turns), screwing them IN to pull the wheel back. The adjusters will pull it BACK, taking slack out of the chain. Make SURE you check chain tension at several spots through a complete rotation of the chain because it will have tighter spots and looser spots. You want it correct at the tightest place. If you get the wheel too far back, you can back off the adjusters and KICK the wheel forward. Do not kick the bike off the stand. That would be a bad thing.
Obviously the axle NUT is NOT tight at this stage. When you CHECK the adjustment marks, keep the wheel PUSHED forward against the adjustment sliders, making sure the axle comes up against the Adjustment Stops on BOTH sides of the swingarm.
When you have it right THEN tighten the main axle NUT KEEPING the wheel pushed forward against those stops, as it has a tendency to move by itself.
Perhaps you can get a helper to push it forward for you as you do the adjustments.
Adjusting the screws Clockwise pulls the Axle (Wheel) back and TIGHTENS the CHAIN.
NEVER work on the adjustment screws with the Axle tightened.
Thanks to Hombre Sin Nombre, Flash #412.
Adjusting the Chain Tension- Alternative
by Mark #403
October '01
The best way to measure chain slack is not the easiest, and is virtually never recommended. put the bike on the center stand and compress the rear suspension until there is a straight line from the axle bolt, down the swing arm, through the swing arm pivot to the counter sprocket. this is the tightest that the chain will ever be. at this point, you want just a little bit of up/down (slack) in the chain. most important is that at this point, the chain is not very tight.