Carburettor Cleaning FAQ
by Kristian #562
Please read the
Disclaimer before attempting any work in this FAQ.
Looking for the OEM
Inline Filter ? or the
Aftermarket Fuel Filter?
Please Note that this FAQ only deals with the resetting of your Carb to the
STOCK configuration. Re-Jetting, Needle Changes and Modifying Float Heights are
covered to some extent in the
Exhaust-Rejetting
Spreadsheet. Have a look there if this is the kind of information you need.
Nor is this a treatise on how a Carb Works. There are lots of references about
that on the Web. I will try and add some links I think are worthwhile
references, at a later date, as I come across them. Perhaps you might like to
suggest some too. Dynojet has pretty good simple one here:
Dynojet’s Carb Theory. I need to refine some
parts of the pictures and circle some specific parts of the photos, and I need
a few additional pictures. Write to me and tell me what you think would make it
better.
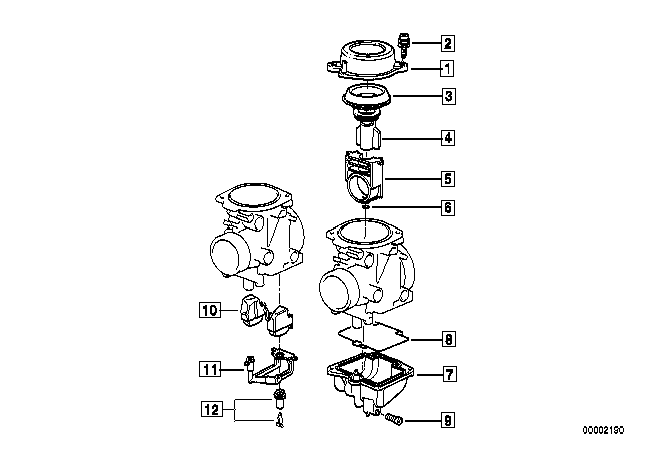
Carb Nomenclature:
Note that Slide is also often called Slide Piston (or Piston) or Slide Barrel.
The Slide Carrier is often just referred to as the Carrier.
A.
-
If you've read the
Hard Starting FAQ and the
Poor Mileage FAQs and nothing helps.
-
When the bike has been
standing a long time and it sputters and stalls and pops and wheezes (but try
some carb cleaner in a tankful of gas first! ) and you’re worried (or you know)
the rubber O-Rings have deteriorated.
-
When the bike falls
victim to the
Pukin’ Petrol Syndrome
and you have to take it out anyway for that reason.
-
When the bike “bogs
down” at anything above just past idle,
a sign of a Split Diaphragm and you KNOW it’s not your
Voltage Rectifier or
Plugs or Plug-Caps.
-
When you are getting
Poor Gas Mileage.
-
When you are
Rejetting (Warning, Rejetting is a long
slow process and you may NEVER be satisfied with the results).
-
When your bike seems to Surge or Stumble (even if it is NOT an
F650GS) and you KNOW it’s not your
Chain/Sprockets
or a dirty
Air Filter.
General FAQ’s about the F650 Carbs
Q. At what mileage can I expect to get a
reduction in mileage due to
worn Carb parts?
A. This is an extremely difficult question to answer, it depends on
whether you ride in dirt, road or at cruise revs or high revs. Some inmates
have noted a decrease in Gas Mileage around the 20,000 miles mark.
Q. So what gas mileage should I expect to get?
A. Again this is an extremely difficult question to answer, it depends on
whether you ride in dirt, road or at cruise revs or high revs. Some inmates get
45-50, some 50-55, some 55-60. If you get less than 45-50 with a stock bike,
normal around town riding on the road, and you have a high mileage bike, it’s
probably time to check the Carbs. Same goes if you get less than about 50-55 on
the open road. Refer the Poor Mileage FAQ for
more details/feedback.
Q.
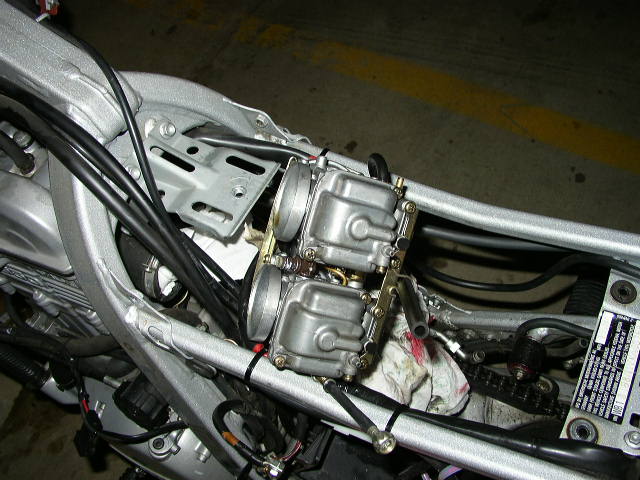
Who makes the F650 Carb?
A. Mikuni. They are 2 x 36mm
Mikuni BST B316 CV (Constant Velocity) Carburettors. There are two on the F650,
side by side.
Q. Is there
another bike with the same carb. from which I can scavenge cheap Bike
Parts.
A. Yes, the Aprilia Pegaso, a
5-Valve Aprilia version of the bike, made in the same factory in Italy. It’s
not identical though. You can also get SOME parts from the Suzuki GS500E Carb,
which is very similar. Refer Alternative Carbs & Carb Parts for details.
Q. Is there
another supplier
that supplies parts?
A. If it’s just Main and Pilot
Jets you are after you can probably get them from your local Bike Shop. Ask for
Mikuni Jets and show them your old ones, as there are several different head
Styles. I know
you can get them from to Sudco-Mikuni in the U.S. however Sudco do NOT supply
the needles. They say they were a special run for BMW and I’ve found the only
supplier to be BMW or a BMW Agent. However Dave #365 (Thank you Dave !) got this
precious Gem:
Dear Sir,
We checked your question. Your F650's BST33-B316 original slide springs
are the following compatible part No's. Please order Yamaha or Suzuki your local
dealers.
It is faster than delivery when you order to BMW or Rotax (engine maker).
- Suzuki genuine part no. 13417-12D00
- Yamaha genuine part no. 3LN-14933-00
Yours faithfully,
Mikuni Corp.
International Dept
See also Alternative Carbs & Carb Parts for details.
Q. Do I need to “Balance”
(Synchronise) the
Carbs.
A. You have probably read
somewhere about needing to “balance” the Carbs. This really applies to
multi-cylinder engines where individual Carbs feed individual Cylinders. You do
NOT need to “Balance” the carbs on the F650 if you set the “Settings” (Needle,
Float/Jet Size/Mix Screw) the same, for
each Carb. It’s a single cylinder engine. For more information refer
The Carb Misc FAQ.
Q. What are the
STOCK
Carb Settings?
A. The Stock Carb Settings are:
- 1996 Onward Models:
- Main Fuel Jets #132.5
- Pilot Jets #41.3 (Idle Air Jets)
- Needles 5E94, 4th Clip from Top (Blunt End)
- Carb Venturi (Emulsion Tube) 584□□-2. The first "□" stands for a rectangle
with a small square inside, the second "□" stands for a small rectangle.
Thanks
to Marty #436)
- Float Height 14.6mm from the Gasket Surface
- Idle Mix Screws backed out 3.5 turns from LIGHTLY seated (all the way in).
- The Stock "Organ
Pipe's are sealed so
if yours are open someone has probably re-jetted your bike.
1993-1995 Models:
Thanks to Spakur & Fede
- Main Fuel Jets #140
- Main Air Jet 0.6
- Pilot Jets #41.3 (Idle Fuel Jets)
- Idle Air Jet 1.5
- Needles 5E94, 4th Clip from Top (Blunt End)
- Carb Venturi 584#0-2
- Float Height 14.6mm from the Gasket Surface.
- Idle Mix Screws backed out 3.5 turns from LIGHTLY seated (all the way in).
- The Stock "Organ
Pipe's are open so if
yours are plugged someone has probably re-jetted your bike. Here's a picture of
a 1995 with the holes ALREADY open, from the factory:
Factory
Airbox.
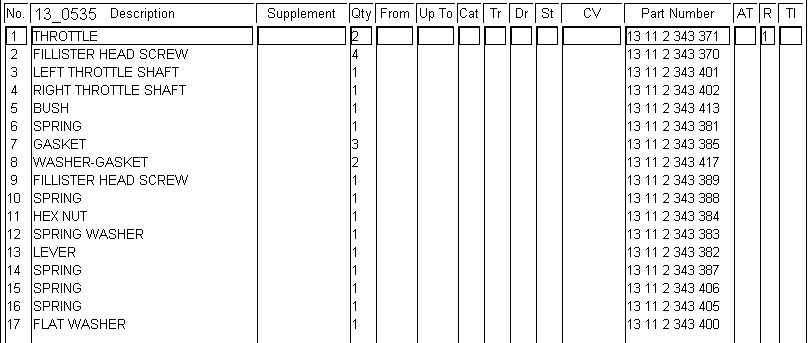
Q. What are the Carb Parts Numbers?
A. Steve#417 supplied these: (Thanks Steve)
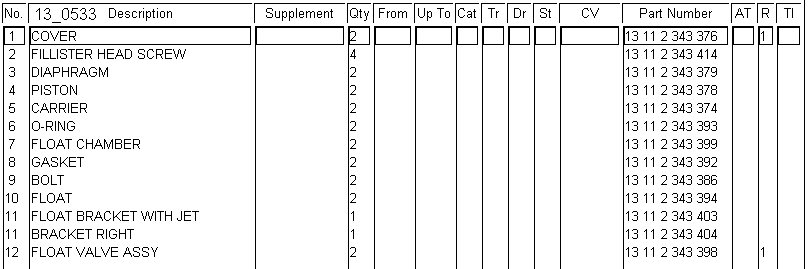
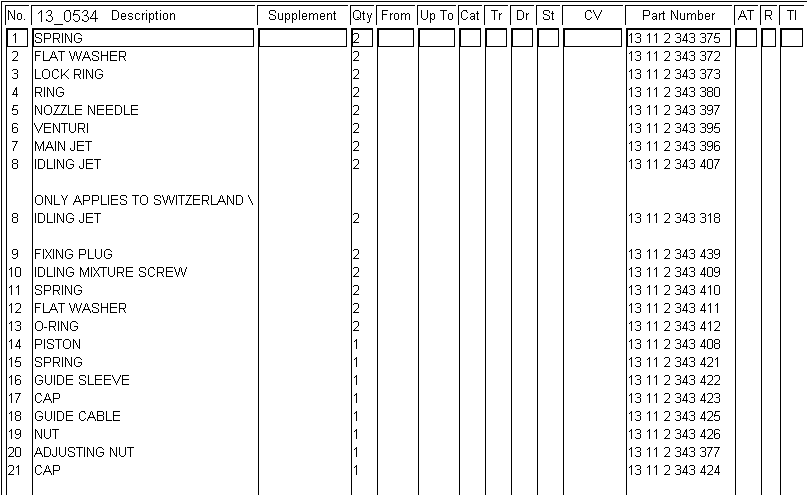
- 13112343398 Valve Assembly
13112343379 Diaphragm
13112343397 Needle
13112343395 Venturi Jet
13112343318 Idle Jet
13112343412 O-ring (idle mixture)
13112343404 Bracket Float (with O-ring)
Here is the OEM Parts List:
Refer also the
Carb Alternatives
Q. Are there any
Websites to tell me how to tune my Carb?
A. Well the best thing you can do if you have a Stock Setup or even
Stock Carb with an aftermarket exhaust is to Check for and Replace all the worn
parts discussed above and set the Carburettor Floats/Idle Screw/Clip Location
to the specified Stock Settings. Otherwise:
-
Factory’s is pretty good:
Factory Pro's CV Tuning FAQ.
Their approach is to tune the Carburettor from the Main Jet size and work DOWN
through the Needle Clip Setting, Float Bowl Height, (SOMETIMES Pilot jet) and
then the Idle Mixture Screw.
-
Sudco have a Manual, called the Sudco-Mikuni Manual
which I cannot give you because it is copyrighted, however they work UP from
the Idle Mixture Screw , Pilot Jet, Needle Clip Settings, Float Bowl Height to
the Main Jet size and claim that each of the Carburettor Circuits are additive.
See Sudco Carbs
1 &
Sudco Carbs 2.
-
Dynojet gives you the Needle and the Main Jets and says
THESE are the settings, if it doesn’t work , try the needle one clip either way,
then adjust the Float Bowl Height. Do NOT change the Pilot Jet.
-
These last three you SHOULD only need if you rejet,
which can be a REAL Trial. (PITA)
-
There is also a good list at the
Bottom of the Page.
Q. What Parts of the Carb get worn?
A. Pretty much all the moving parts or parts against which moving parts
work, like any mechanical device. However there are some parts which don’t move
that deteriorate with age, some to a greater extent than others. The parts that
most often wear or deteriorate are the
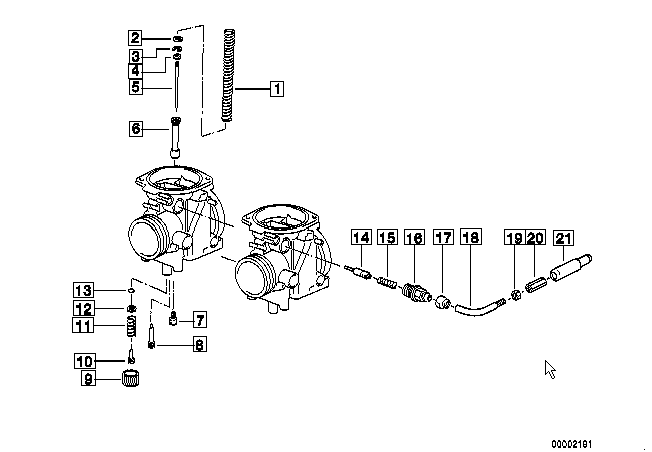
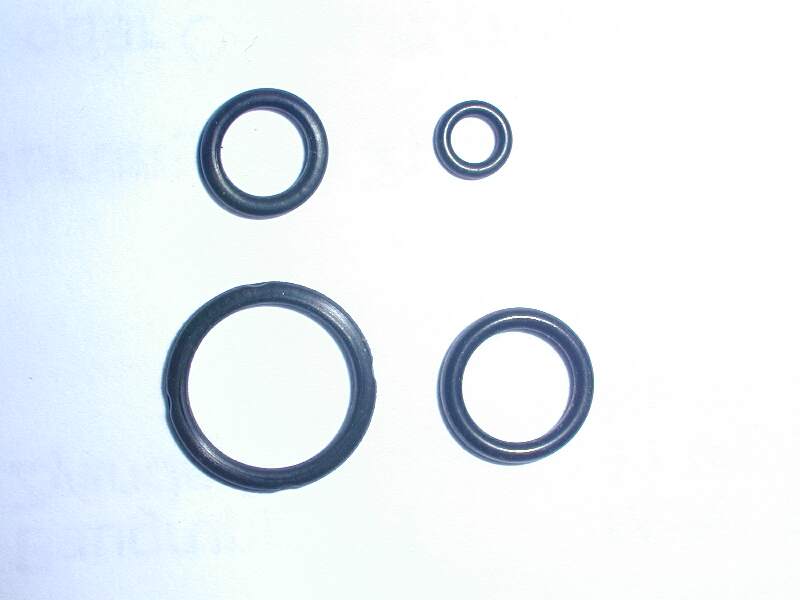
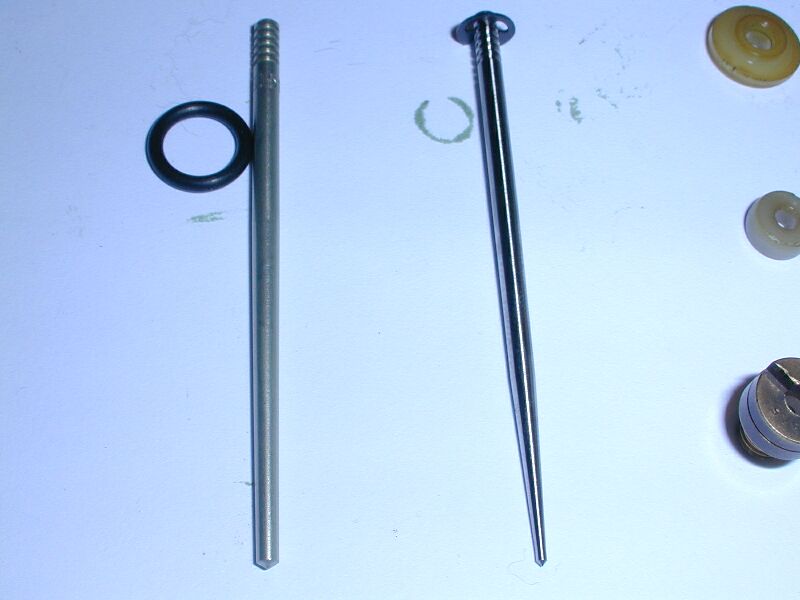
Carb-O-Rings, Needles (shown are
the Stock (L) vs. Dynojet (R) needles),
Diaphragm Rubbers
(shown on top of the Slide),
Slide
Carrier
(Grey Plastic Block) and the
Slide
(Black barrel with two Side Fins). The jets (Main Jet, Pilot Jet) do not
really wear, except for the so-called
Carb Venturis or
“Needle Jets”, due to the action of the needle vibrating within in it. Here's a
link to an
Oblong
Venturi Jet, on Factory Pro's Website, to give you some idea of the wear
that can occur in the needle jet. It is this wear, along with the corresponding
rubbing/scratching of the needle. See
Worn Needles, also on
Factory’s Site. However if the gas is dirty the Main or Pilot Jets can also get
blocked (fairly common) and the hole CAN wear bigger, although this is not that
common. The
Float Valve Tips
and or
Springs can
also wear, but take a bit longer than other parts.
AND.... Don't forget to check the
rubber intake manifold
for cracks as well as the rubber Air-intake boot.!
One thing you might also want to watch out for. If you've been using Coolant
with Silicates in it, (which you should NOT as it will destroy your water
pump), you might accidentally spill some into the intake snorkel when you fill
your coolant and the fine Silicates that may pass through the
Air Filter will quickly wear
your Carb Venturis and Needles.
The sizes of the
Four
Replaceable O-Rings, (4 in EACH Carb i.e. Total 8) available from any
bearing shop are, Smallest to Largest:
-
Idle-Mix Screw O-ring: 1 x 2.5 (or 1 x 3). I
found that the 1 x 3mm O-ring was the closest fit for the idle mix screw (vs.
the 2.5 in the FAQ). Actually, the 1 x 2.5 is closer on the ID, and the 1 x 3 is
exact for the OD. Marty #436) . Idle-Mix Screw O-ring: 1 x 2.5 (BMW Part # 13 11
234 3 412)
-
Float Frame O-ring: 1.5 x 5
-
Float Valve Seat O-ring: 1.5 x 7
-
Slide O-ring: 1.5 x 10
-
Where the first number is the O-Ring thickness and
the second is the internal diameter, both in mm.
-
Buy at least two of each, but get even more, say 4
of each, as they are really cheap and you might even break or lose one putting
them back.
-
Seriously Consider buying Allen Screws (or Socket
Head Cap Screws - SHCS) for the Float Bowls (and also possibly for the Diaphragm
Cover Cap Screws, though not as likely to be stripped).
-
You MIGHT strip one of those float bowl screws
trying to get it out. e.g. Simon in Ireland notes: I found the float bowl screws
difficult to budge - solution = get an impact driver!
Q.
What about alternative Sources for the
O-Rings?
A.
-
Either but generic as noted above or try a Suzuki
Dealer for the "O" rings. Viton 5.7X1.3 Part # 8-4602 fits the tiny 1X2.5mm one
for the float bowl assembly.
-
The 1.5X5mm one is #13374-35C00 from Suzuki. That
seals the float seat. These two should cure your "drips".
-
Now beware. These stupid "o" rings can cost $2-4
each. That's silly but much better than the parts with "O" rings from BMW. I
think the seat, needle and "O" ring alone for one side is about $32 plus tax and
jar of Vaseline. Then you have to buy a complete new float assembly and that's
more ridiculous.
-
Don't break your float bowl gaskets. They are $37
each from BMW. Don't know what they are if you run then down from some Jap
dealer. (Mal)
A1.
Complete
Carb Removal
-
DON’T SMOKE.
-
Remove the Seat.
-
Remove the Tank See the
Gas Tank Removal-Replacement
FAQ.
-
Remove the Seating Plate at the Rear of the Tank, held in
Place by two 10mm Bolts.
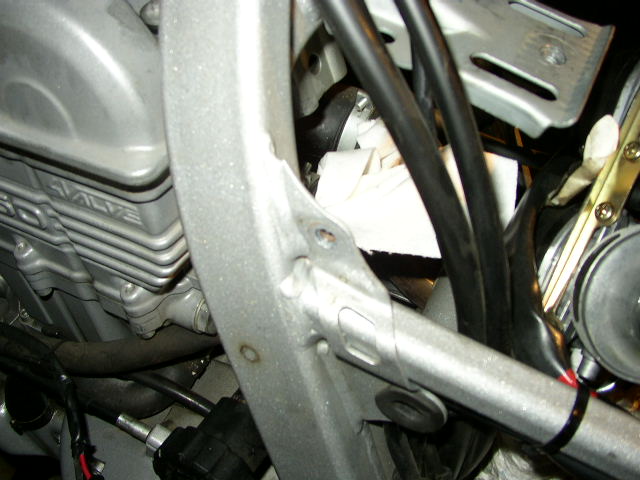
-
Undo the 2 Hose-Pipe Clips on the
Air Intake Side (Rear of
Carb) and the 2 on the Cylinder Head Side (Front of Carb) and Remove the
Carbs.
-
For
Carb
Removal, see Flash’s FAQ. This is a bit hard on the rubbers and you
might think you’re doing some serious damage, but if you do it right and don’t
use a sharp screwdriver, it’s fine. The alternative is to remove the
exhaust pipe and take out the Airbox, which is VERY time consuming and a
Royal PITA.
When you do it, in addition to Flash’s great comments I’d recommend
pushing each of the Clamps back away from the Carb as you can and also to
wear thick cotton gloves for your hands as the Metal edges, specially the
Airbox Side are a bit Sharp. Lift the Air-Intake Side up first and get
them past the thinner and more pliable Air-intake rubbers, by pushing the
rubbers down past the Carb, while simultaneously pulling the Carbs up and
out.
-
Unlatch the Throttle Cable. To do this first twist the throttle (at
the Carb) against the spring, then with the cable now slack pull the
little steel bend out of the socket in the side of the Carb. With the wire
now slack, but still attached to the throttle at the Carb, just rotate the
cable in its holder at the throttle-mounting until the cylindrical head and
the wire come free.
-
Unscrew the Plastic 12mm Nut to the
Choke Cable and pull
it out gently. You can only use an open ended spanner. Do NOT turn it the
wrong way and screw it up tight now (or later) it’s just a PLASTIC Nut and
will Break.!
Give the Choke Cable Barrel a bit of clean with some “Jif” or some other
polishing fluid. If you want to lubricate the choke cable, this is a good
time to do it. Recommendations for lubricating cables run from (a). It’s
not required because it’s ion a plastic Sheath (I subscribe to this
notion, especially for Choke Cable) to (b) Tape a SMALL STRONG plastic bag
of cable lubricant around the cable then hang it up higher than your
handlebars, leaving it overnight.
-
The Carb is now free for you to work with in a nice warm
comfortable and CLEAN environment, all of which are highly recommended.
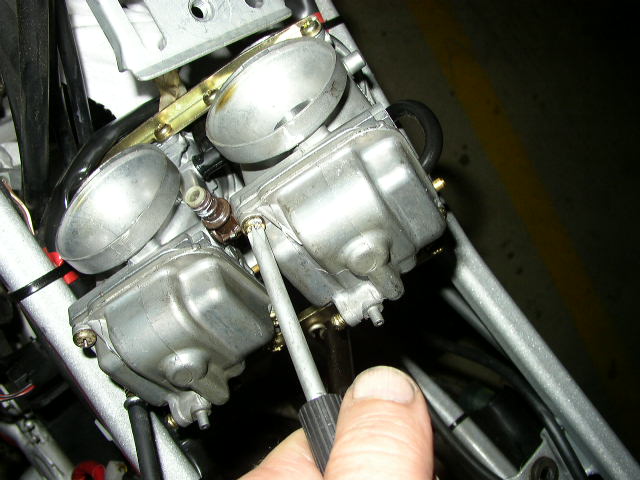
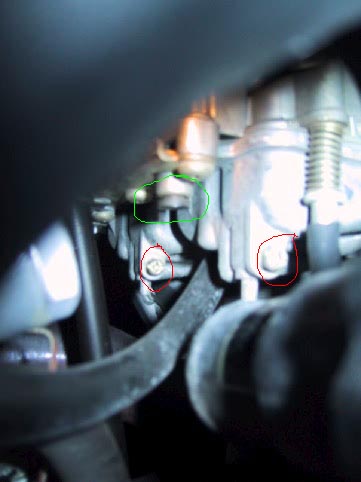
-
Bear in mind the Carb Bowls are still full of GAS, so undo
the
Float Bowl Screws
(Circled Red) a few turns and rotate the Carbs around until all the GAS
you can get out of it comes out. DON’T SMOKE.
A2.
Removal of the Diaphragm Cap only (on the Bike):
-
DON’T
SMOKE.
-
Remove
the Seat.
-
Remove
the Tank See the
Gas Tank
Removal-Replacement FAQ.
-
Remove
the Seating Plate at the Rear of the Tank, held in Place by two 10mm Bolts.
-
You now have access to the
Diaphragm Caps, which after removal allow you to check and replace: The
Diaphragm, Slides (But NOT the Slide Carriers), The Needles, Springs, Needle
E-Clips, Needle Spacer and Washer. This also allows you to change the E-Clip
position or add a small thin washer, for an equivalent ½ E-clip position
change, all without removing the carb from the Bike. Great for fine-tuning
Rejetting. Not so good if it’s snowing outside and your bike lives outside.
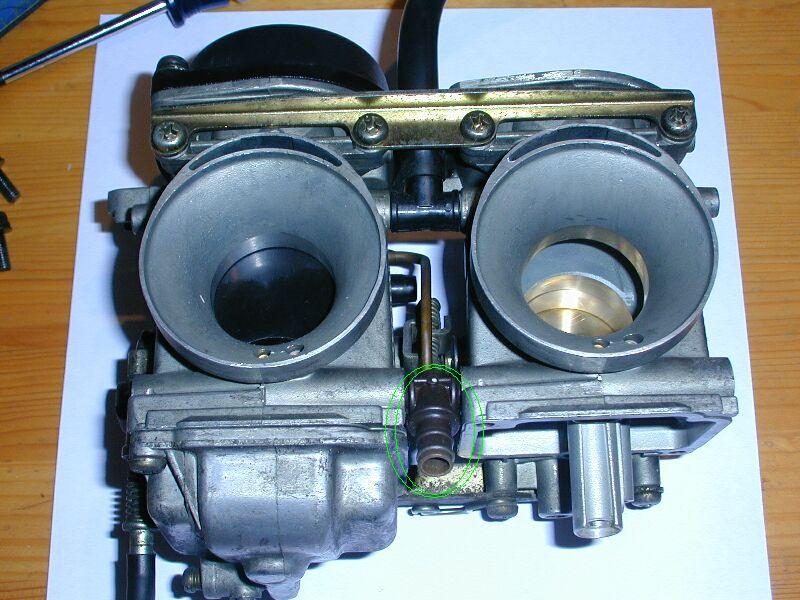
Q. Should I run the carbs dry by turning off the
petcock and running the engine until it dies, before I remove the tank? Or, when
you remove the tank and drain the fuel hose going from the petcock to the carbs,
do the carbs drain too? If not, is there a reason this is not mentioned in the
FAQs? (Perhaps work on the carburettors is easier/better with their "bellies
full")?
A. No. You don't need to run the carbs dry. After you turn off the
Petcock, if you are REALLY paranoid, you CAN empty the bowls using the drain
screws if you really want to. (The Drain Screws are here
Float Bowl
Drain Screws
(Circled Red). Wind them out a few turns, either on the bike beforehand (or
after you get the Carb's out and rotate the Carbs around until all the GAS
you can get out of it comes out). DON’T SMOKE.
Enough of the Preamble, How do I actually Clean & Replace Carb Parts.
-
Tools:
-
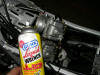
You should get hold of a can of Carb Cleaner (any Motorbike
Shop should have one, or simply use Petrol) and a few small brushes, with
soft (non-metallic) bristles that are not affected by Solvents e.g. Carb
Cleaner, Petrol.). Do NOT use wire brushes or bristles from wire brushes
to clean the jets, you will damage them.
-
You need a Large Thick and Fairly wide Flat-Blade
Screwdriver (for removing the Main Jets).
-
You need a Small thin Flat-Blade screwdriver (for removing
the Pilot Jets).
-
You need a Medium-Sized fairly Blunt Phillips Screwdriver
(for removing the Float Bowl and Diaphragm Cover Screws).
-
The Tools should be fairly new, should NOT be worn and must
FIT properly or you will damage the Screws or the Jets, especially the
soft Metal of the Jets.
-
If you want to measure the Float Bowl Height which is very
tricky but important nevertheless, a pair of callipers is recommended as
a minimum. Factory Pro make a Float Bowl Height Measuring Tool, which in
my opinion is not very well made and not worth the money, but is useful.
If you can make one yourself, go for it.
-
Rags, Fire Extinguisher in case you have an accident.
-
Patience. But don’t open it up and then leave it lying
around for weeks, the O-Rings and Gaskets can become dry and brittle and
you might lose some of your parts or forget where they go. But you may
use the pictures here as a mnemonic if you wish.
J.
Q. How do I undo those Float Bowl Screws!
A. This is a good place to discuss the 2 Screws holding on each Float Bowl.
-
The
Phillips head screws holding the bowls were INCREDIBLY difficult to remove on
my 97. I ended up borrowing a friends cordless impact driver to remove them.
Use anti-seize on the threads when reassembling or at least a little grease.
Chris in Santa Cruz, CA #782
-
Better
yet, replace them with Allen's (aka Socket Head Cap Screws = SHCS). Flash #412
(CO).
On
with the Cleaning.
-
Outside of Carb Body. First off
give the outside of the Carb a good clean with your brush and Petrol,
including the springs and all the nooks and crannies. Clean it and rub it
dry with a Rag. Not only will it look good when you put it back, it will
stop getting dirt everywhere inside the Carb and it will stop it being
a slippery sucker when you work on it.
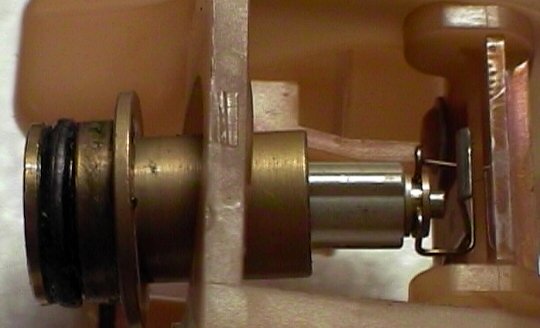
-
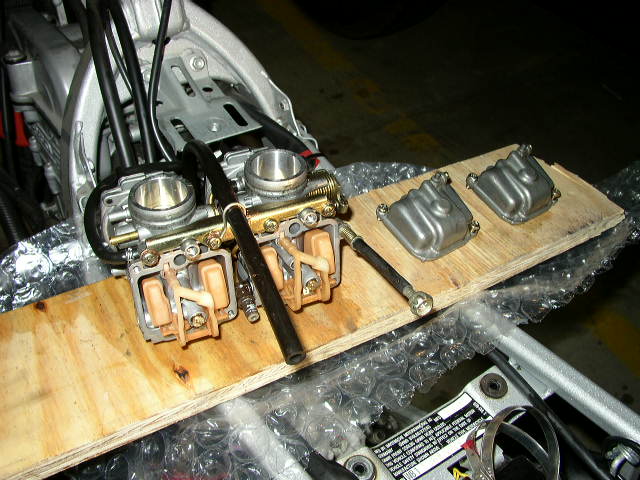
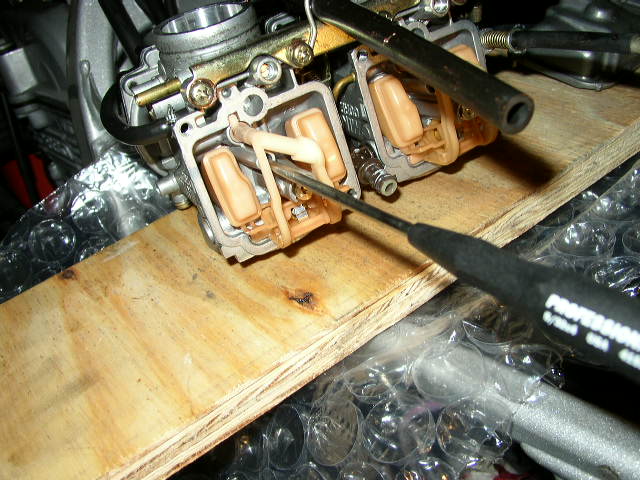
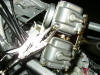
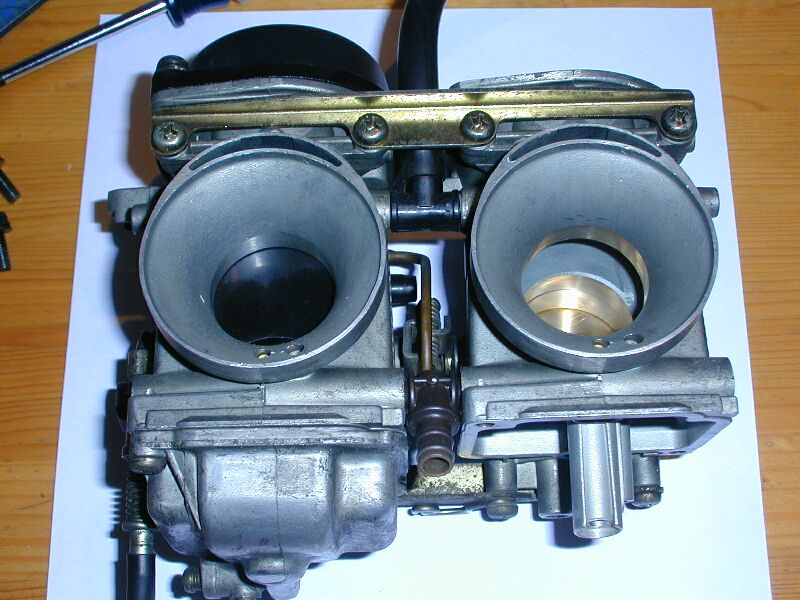
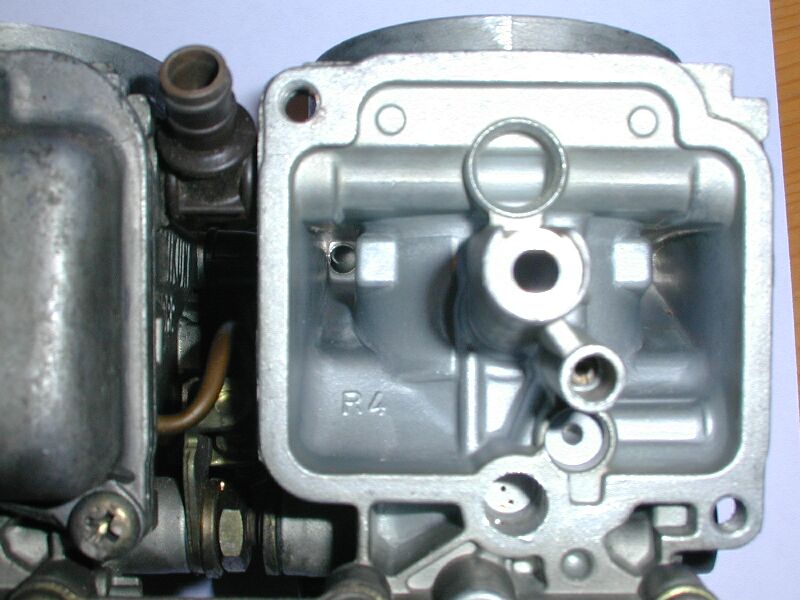
Orientation. For
purposes of orientation, in this picture,
Intake Side, the Black
Dome at the TOP Left is the Diaphragm Cap, held in place by two Philips
Screws. One of the Float Bowls, the Jets, the Float Frame, the Slides,
Slide Carrier and the Diaphragm Caps have already been removed in this picture
(RHS). You can see the back of the Slide through the left Carb, and
you can see through the right Carb because the Slide has been
removed. I recommend you work on ONE Carb at a time, clean it thoroughly,
adjust and replace what you need to and then button it back up again. This
way you won’t damage any parts in the adjoining Carb, nor will you lose
any.
-
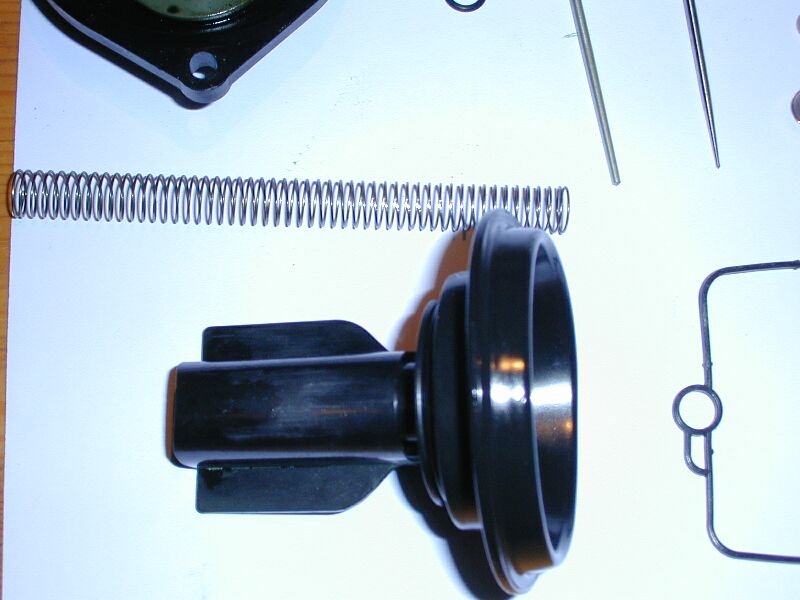
Access TOP: When you
take the Diaphragm Cap off you have access to the Slide Springs, the Diaphragm, the Needles (Complete
with E-Clips and Spacers) the Slides and also (but ONLY when you
have unscrewed the MAIN JET INSIDE THE FLOAT BOWL), the Slide Carrier, Slide O-Ring and the Carb
Venturi. All these parts come out the TOP of the Carb. The sealing gasket
for the Diaphragm Cap is also the Diaphragm itself.
-
Access BOTTOM: The Silver
Bowl at the bottom left of the
Intake Side picture is
the Float Bowl also held in place by two Philips Screws. Once removed you have
access to the Float Frame, Floats, Float Frame O-ring, Float Valve, Float
Valve Seat, Float Valve Seat O-Ring, Float Bowl Gasket,. Main Jet and the
Pilot Jet. As mentioned above, you will NOT be able to disassemble the
Slide Carrier (out the Top) nor gain access to the Venturi, without first removing
the Main Jet.
-
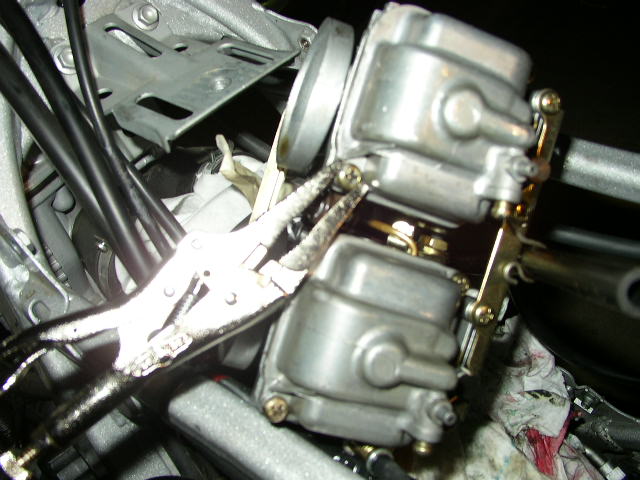
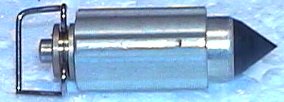
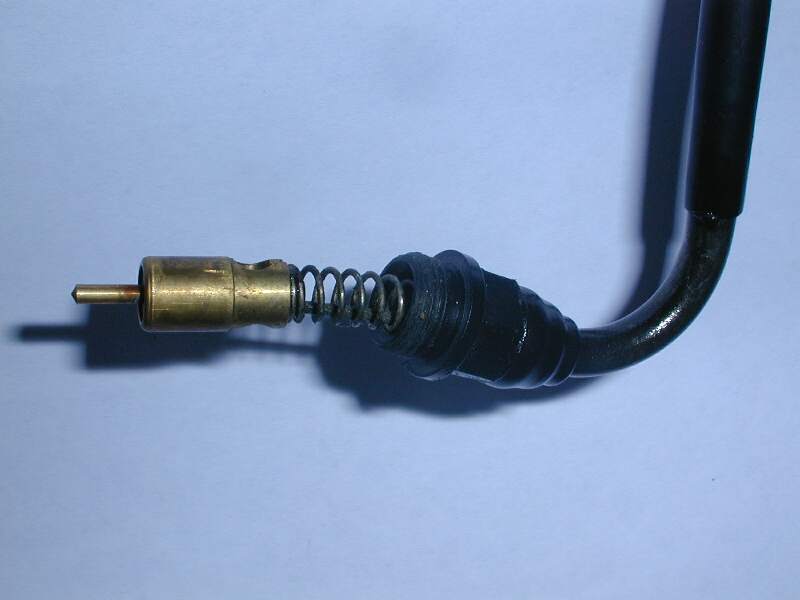
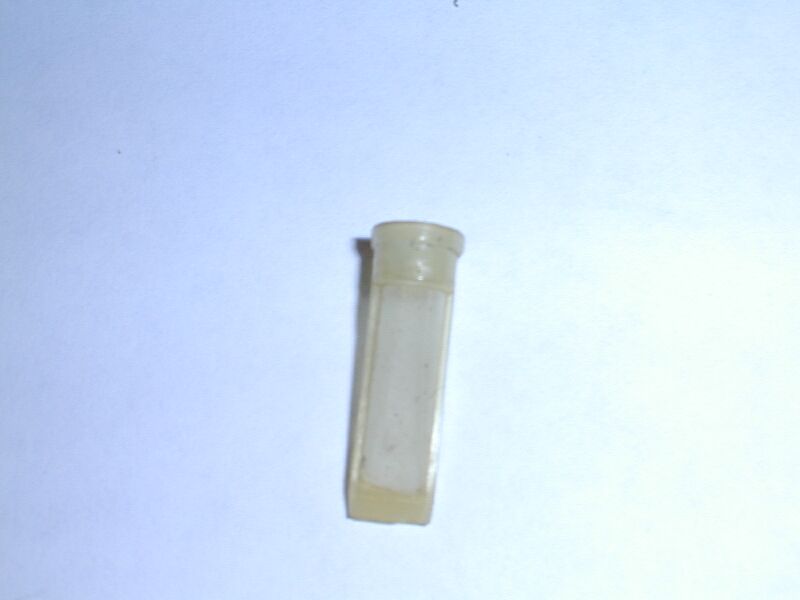
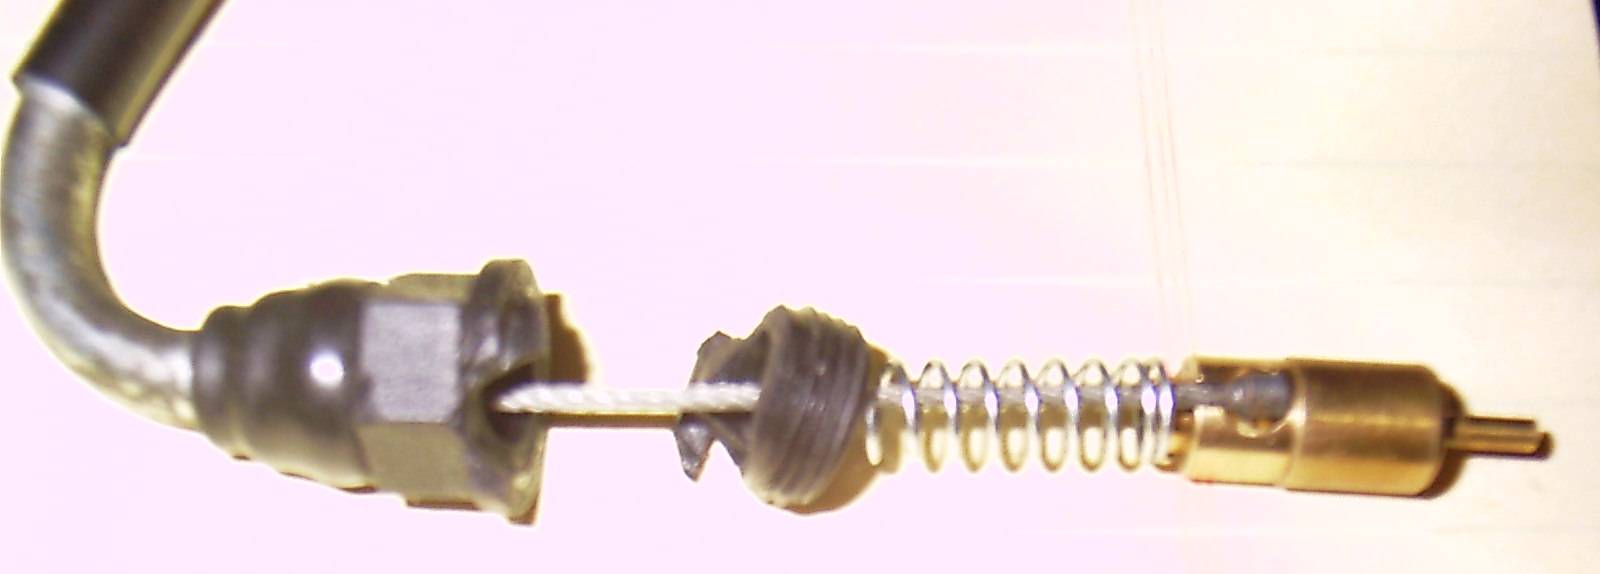
Inline Filter. When you
pull the Carbs out the Fuel Line to the Petcock come with it. So it
doesn’t get in the way while you are Cleaning the rest of your Carbs, undo
the spring clip to where the Fuel Line meets the Carbs, in between the Two
Carbs. When you pull off the Fuel Line (Do it gently the T-Piece is only
Plastic) there is a brown
T-Piece which holds the
In-line
Fuel Filter. Gently pull out this filter by hand and clean it with a
little petrol, blowing on the outside to dislodge any particles on the
INSIDE. Then put it back in again so it doesn’t get lost or squashed. When
you reinsert it try and line it up so that each of the two flat sides
faces the direction of each Carb Bowl. This way when goes go in it goes
directly into the filter and out through the netting fabric to each carb.
-
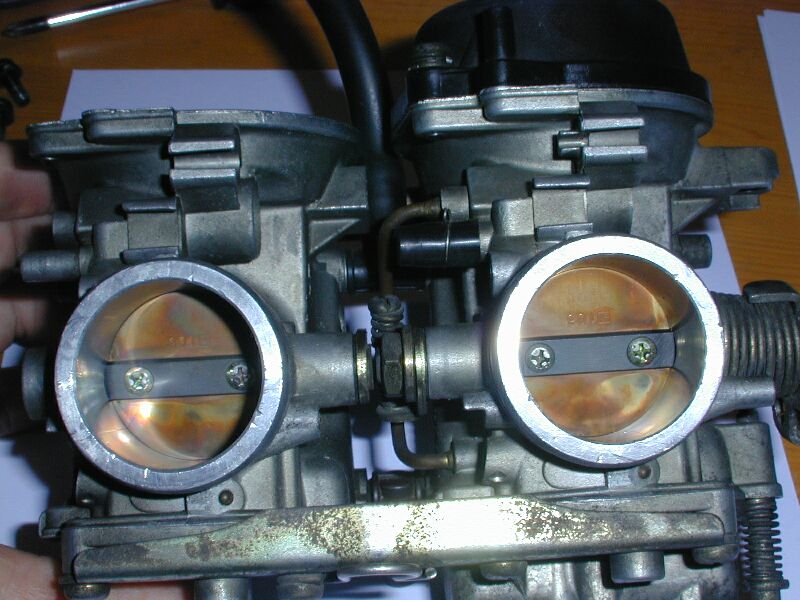
Butterfly Valves. When you first get the
carb out you will see this, on one side: This is the
Engine
Side of the Carb. The two Brass circular Discs are the Butterfly
Valves, which rotate about a Central Pivot and open when you open your
throttle. The more you open your throttle, the more and (faster) air
passes through and creates a vacuum, sucking up the Petrol from the Float
Bowl, through the Carb Venturis. These parts hardly ever need removal or
replacement and should be left alone, unless they are obviously
“sticking”. i.e. when you manually turn the throttle against the return
spring, you can feel they “Jam” for a moment before they open. If there is
any dirt stuck in the pivot, give it a bit of a squirt with carb cleaner
and clean it with a brush.
-
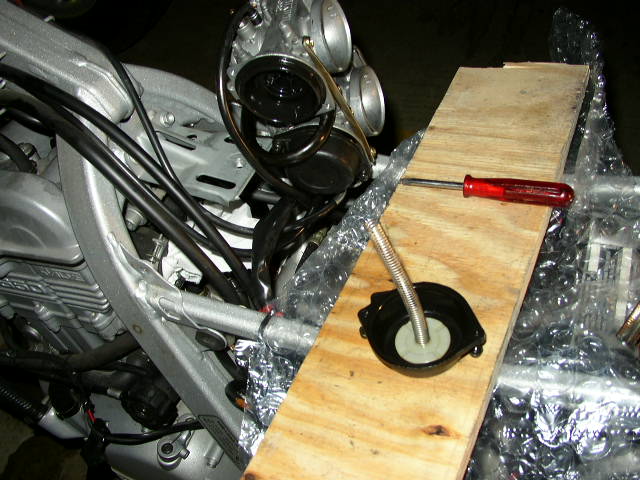
Inspecting the Carb Needles. Take the Carbs and stand them up in your work bench, Float
Bowls down. Try to let the Idle Adjustment screw hang over one edge of the
bench so you don’t bend it. On one of the Carb Diaphragm Caps, undo the
two Philips head screws and remove the
Diaphragm Cap. They
can be pretty tight, so use some good downward pressure so you don’t
mangle the screws. You may even need to gently tap the end of the
screwdriver or get to work with a bit of WD-40. I recommend once you’ve
undone one of the two screws, to hold the cap down with your thumb while
you undo the other, otherwise the
slide springs will try and push the Cap up and skew it, making it more
difficult to undo the other screw. Lift the Cap off and gently extract the
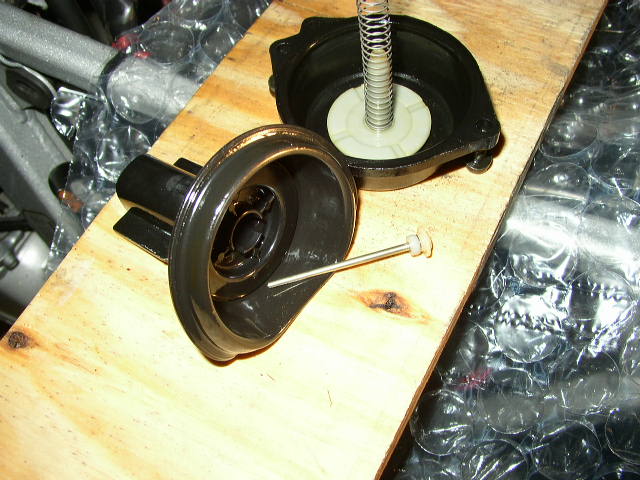
Spring, putting both to one side. You do not generally ever need to
replace the springs. Now gently pinching the Black Rubber Diaphragm with
thumb & forefinger, and working your way around the edge lift it up
off the Carb Seat, out of the little Groove in which it’s in.. Then, using
two hands, again thumb and forefinger, extract the Diaphragm vertically
upwards. It will come out with the Black Plastic Slide attached and
the Needle hanging out the bottom. When it’s free, grab the Plastic Slide
and tip it over, pouring the Plastic Washer, Needle with E-Clip and
Lower White Spacer all into your hand. The needle/E-Clips/Lower Spacer (Upper
Left of Picture) should all come out as one unit, the upper washer
separately. If you don’t know whether your bike needles have been altered,
they should stamped 5E94 and the clip should be in the 4th
groove from the TOP (Blunt End) of the Needle. The Stock Needles are
on the Left of this
Needle Picture,
Dynojet Needles on the Right. Check the needle for wear, score marks or an
easily rotating e-clip in accordance with Factory’s
Worn Needles guide.
If all is O.K. Put them all in a little box for safekeeping.
-
Inspecting the Rubber Diaphragm. NOTE:
Do NOT spray the
Rubber
Diaphragm or indeed any Rubber Parts you wish to re-use with strong
solvent. Some Carb Cleaners contain strong Solvents. Use a gentle soap
like Dishwashing Liquid. After you’ve cleaned it, (you can leave it
attached to the barrel), with your thumb holding the bottom lip of the
Diaphragm, hold the Rubber of the Diaphragm up to strong light and stretch
it by pulling upwards. It can take a fair amount of pulling. Work your way
around the full circle of the rubber. If there are any splits or holes you
should be able to see these fairly quickly and the Diaphragms should be
replaced.
-
Inspecting the Slides.
If the Air Filter lets any gunk through or somehow dirt gets
trapped in the Carb, the Carb Barrels can wear at the front (curved) face
and at the Wings on the side, which results in their becoming scored, so
check for scoring on these surfaces. They are fairly robust, (mine are
actually quite scored but still function adequately), so you don’t need to
replace them for a bit of scoring. Don’t forget there’s fair amount of Air
Pressure against the back of the Slide, even if it doesn’t go up
and down that fast. (It’s rate of rise and fall is controlled by a mixture
of the Airflow through the Butterfly valve, the spring stiffness, the size
of the little hole off-centre in the base oft the Slide and to some
extent the friction caused by wear at the wing and front faces. There is
no external mechanical Control on the Slide). That’s all you can
inspect that comes out of the top for now. You won’t be able to get the
Slide Carrier or the Carb Venturis out until after you’ve extracted the Main Jet.
-
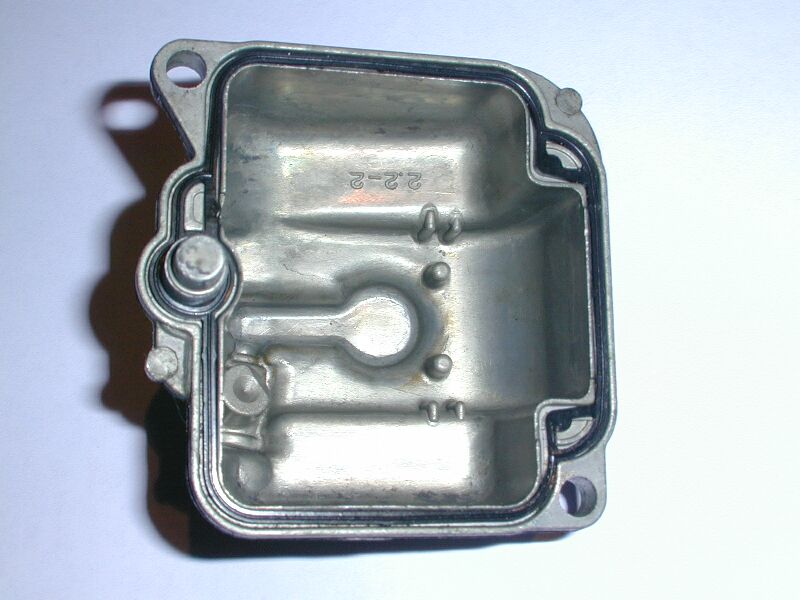
Inspecting the Float Bowls. At
this point I’d recommend just gently screwing the Diaphragm Cap BACK on,
but without any of the other bits you just took out. The reason is so when
you turn the Carbs over and stand them on the Diaphragm Caps to remove try
and remove the Float Bowl Screws, you have a stable end on which they can
stand. The Float Bowl Screws are Very Tight and again you run the risk of
mangling the screws. Again, you may even need to gently tap the end of the
screwdriver or get to work with a bit of WD-40. In despair you can use a
pair of Vice-grips and get some new Screws later. Don’t try heat except as
a last resort (EXTREME FIRE HAZARD) and make DAMN sure the Bowls are DRY.!
Many people have actually replaced these Phillips screws with Allen Screws
and I’d recommend it if you intend to take your Carb apart often, for
re-jetting or whatever. When you get the Bowls off they look like this on
the inside:
Float Bowl.
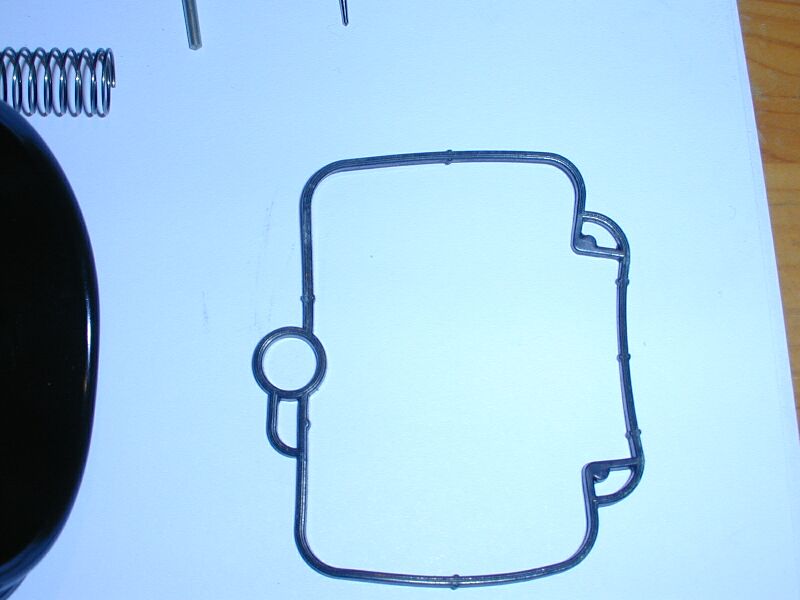
Not much to do there, but give it a little cleaning and inspect the
Gasket for cracks. Again,
don’t use Harsh Solvents on the Rubber Gasket.
-
Inspecting the Main Jets.
What
you should see now is something like this, except in the middle of this
picture
Main Jet Removed
there is an aluminium stalk with a
hole in it where I’ve already removed the Main Jet. The Main Jet screws
through the hole in the Aluminium Stalk which pokes up through the Float
Frame. The Main Jet looks like this,
Stock vs. DJ Jets, to
the bottom left is the Stock Jet, to the right is my Dynojet Jet. Using
the Large Screwdriver (Make sure it is good and WIDE so it just fits in
the groove), undo the Main Jet and remove it. It should be stamped “132.5”
if it is the stock jet. Check there is nothing blocked in the hole and if
so use a stiff PLASTIC rod or Bristle, NOT a wire Brush Stalk, to dislodge
the blockage. Put this aside.
-
Inspecting and replacing the Float Frame O-Rings.
When you
look down on the
Float
Frame, close to the idle mix screw location (Top of picture) you will
see a plastic Stalk about 5mm in diameter which connects the Float Frame
to the Carb Body. Grasp this stalk as low down as your fingers will allow
and wiggling it a little bit pull it gently vertically upwards. It is
quite tight until the O-ring comes out of the hole. When you pull it out
you will also pull out the Float Valve, which hangs off a Metal Tang by a
thin wire. The location of the Metal Tang it hangs off is marked up in
this picture:
Metal Tang.
It’s O.K. for the Float Valve to fall off the Tang (and it probably will),
when you remove the frame and I don’t think it makes too much difference
which way around the wire goes because it’s centralised over the Float
Valve, though you can make a note of it before you pull out the Float
Frame if you wish. WATCH out the Float Valve doesn’t drop down the
drain.!! If it didn’t fall off, tip the frame to one side and take it off
and put it aside. When you get the Frame out you will see something like
this:
Float Frame. The
Float Valve is still hanging off the Tang in this picture. The O-ring will
look this:
Float
Frame O-Ring. This is the first of the two culprits of Flash’s
Pukin’ Petrol Syndrome. You can easily replace
this O-ring. Get a blunt needle and gently prise it off, then roll on a
new one. (Size given above). The Carb Body minus the Float Frame and Main
Jet looks like this.
Float Frame Hole
Location. The marked hole is the Float Frame Connection location.
Shake the Floats gently to see if they have any petrol in them, if they do
then they are leaking and need to be replaced. Some Web-Sites reckon if
the Floats are discoloured they should be replaced, but I think they can
be discoloured and work just fine.
-
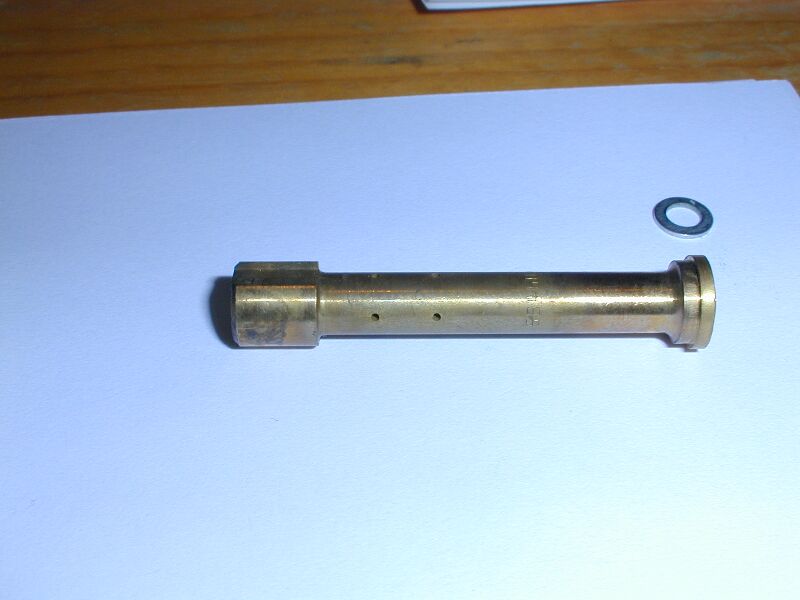
Inspecting and replacing the Float Valve Seat O-Ring. With the Float Frame removed, you will see the Float Valve
Seat, which is where the Float Valve (that you just pulled out with the
Frame) sits into. It is a
Dark Brown Brass Cylinder.
In the same way you just took out the Float Frame, Grab the cylinder and
wiggle it out. At the bottom you will see the O-Ring, which can also be
replaced.
(Size
given above).
This is the second of the two
possible culprits of Flash’s
Pukin’
Petrol Syndrome.
-
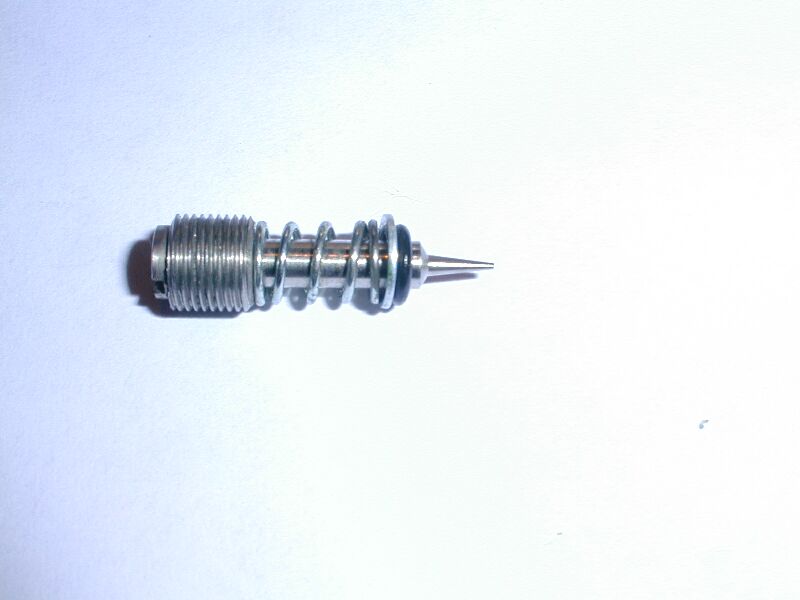
Inspecting the Float Valve.
The
Float Valve itself is tipped with a
Rubber Pointy End which does the sealing into the
Float Valve Seat.
Inspect the tip to make sure it is not worn with a severe groove or the
tip broken. At the TOP of the float valve, under the wire (which is bent
into a loop) is a
small piston. Underneath this piston is a VERY fine
spring, which gets compressed when the Fuel Level push the Floats Up.
Check, by tapping very, very gently, that this
spring can be compressed
and doesn’t “stick”. This piston and spring is discussed in more detail
below, for checking the Float Heights, once you replace the frame.
"One member said he fixed a problem by replacing the little cutoff valves AND
the seats, for the Float Valve, as they weren't shutting properly, which means
that even with the floats at the right height, he was getting too much gas."
-
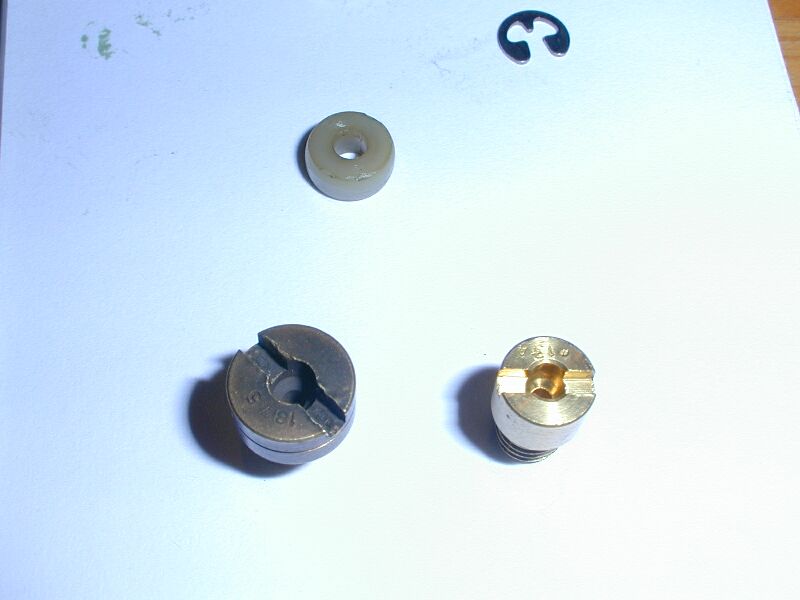
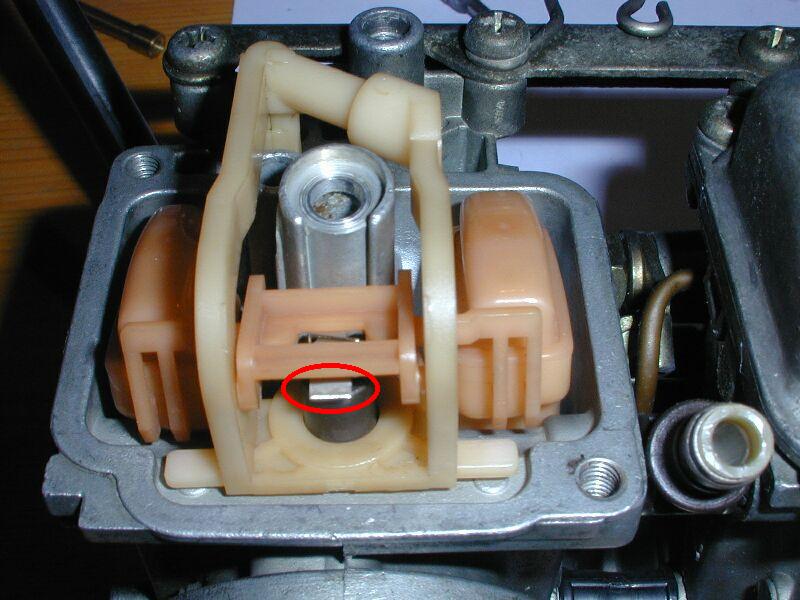
Removing and inspecting the Pilot Jet.
With the Float Frame removed and the Float Valve Seat
removed, all that is left to take out and clean is the
Pilot Jet
which is the small brass screw in the well just visible in the photo.
(needs RED Circle!). Unscrew this with your small thin screwdriver, taking
extreme care with the soft brass. You can easily ruin Screwdriver Slot.
Tip the Carb over and let it drop out into your hand. It has holes in the
sides as well the end and should be stamped “41.3” if it is the
Stock Pilot Jet.. Check you can blow though it and all the holes are
clear. Again use a plastic brush bristle to clear any obstructions, but
not one from a Wire Brush. That’s all the things inside the Carb Bowl that
need tending to. Now’s a good time to put it back in its little hole. One
less thing to lose.! Screw it in until it seats then a little more. Just
“FIRMLY”. Use the correct-size screwdriver or you will ruin the slot and
burrs from a poor Screwdriver mangling pieces of the slot, could jam in
the holes you just cleaned.
-
Removing and Inspecting the Idle Mix Screw:
While it can be done with the Carb Bowl done up, it is
a VERY good idea to check the
Idle Mix Screw with the
Carb Bowl off and everything out. The reason is this. As you can see the 3rd
(and finest, hence easily broken) replaceable O-Ring is located on the Mixture
Screw. If it wears out or there has been too much vigorous screwing of the
Idle-Mix Screw in and out (sounds horrendous doesn’t it) bits of the
broken O-Ring can get stuck in the little hole that allows fuel from the
Carb Bowl, enter directly into the main Carb Venturi (NOT the Venturi JET)
at idle. Unscrew the screw all the way out, check the condition of the spring, the washer and the tip of
the Screw. Replace the O-Ring. (btw the Washer in this picture, between
the Spring and the O-Ring is NOT the original, it is too big, but the old
one was missing at the time I took the Photos). It is hard to find the
correct washer, because it is a very small diameter and not very wide, so
try not to lose them. The order
shown is the order it gets installed. You can screw these back in now.
Screw them down until they are LIGHTLY seated. Do NOT screw them up real
hard, you will damage the fine tip. Then back them out 3.5 turns, with a
screwdriver. This is the STOCK setting.
-
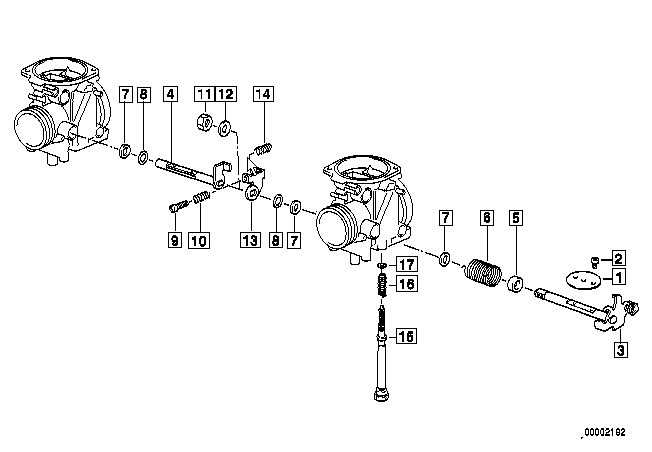
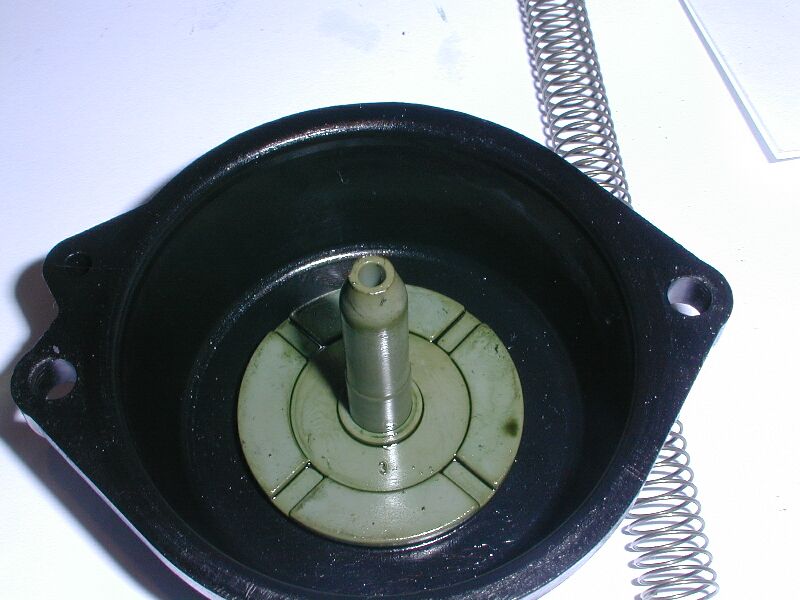
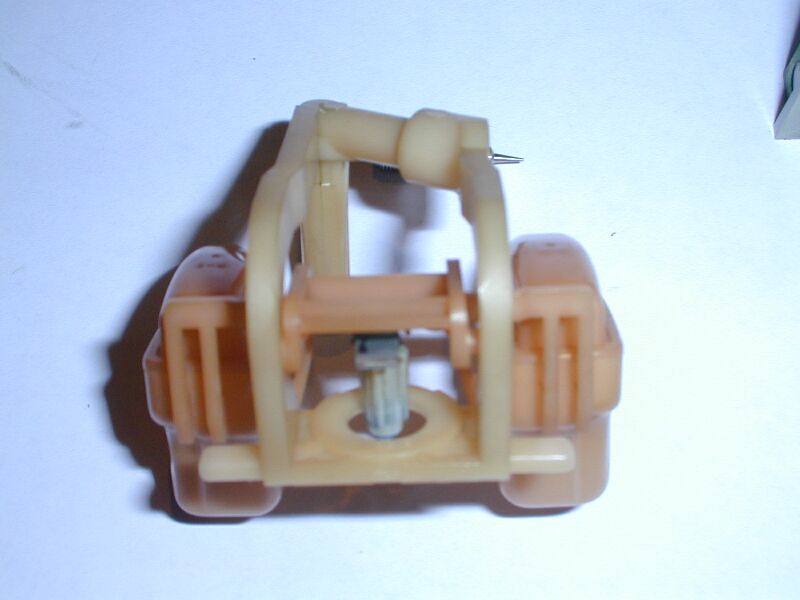
Removing and Inspecting the Slide Carriers and Carb Venturis. With the innards of the Carb Bowl out, there’s nothing to
break if you turn it over, so turn it back upright and undo the Diaphragm
Cover again. Now that the Main Jet, which actually Screws into the bottom
of the
Carb Venturi Jet,
is out, you can remove the Slide Carrier and the Venturi. Assuming your Diaphragm,
Slide Barrel and Needles have already been removed, do this by grabbing
the Grey Plastic Frame (Slide Carrier) and simply pulling it upward, out the Top of Carb.
Don’t worry about the 4 Plastic Tabs at the sides they just pull up. If
you don’t pull it out too vigorously, they will be just fine. When
you pull it up, the Carb Venturi comes with it, because there is a Flange
at the top of the Venturi, which sits in the bottom of the Slide Carrier. It
should look like this:
Slide
Carrier, Venturi
attached. You can just push the Carb Venturi toward the top of the
Slide Carrier to remove it. Underneath the Slide
Carrier
is an O-Ring, which gets
compressed when you do up the main jet which pulls the Carb Venturi Down
and hence the
Slide Carrier O-Ring, onto the Carb Body. At the bottom of the Slide
Carrier
you will see
the O-Ring, which can be replaced.
(Size given above). Now check the Carb Venturi.
The main hole, down the middle is large enough that it should never get
blocked. However, on the sides, as you can see in the picture, are a
number of small holes. Clean these in the same way as the other Jets, with
a small NON-Metallic bristle.
-
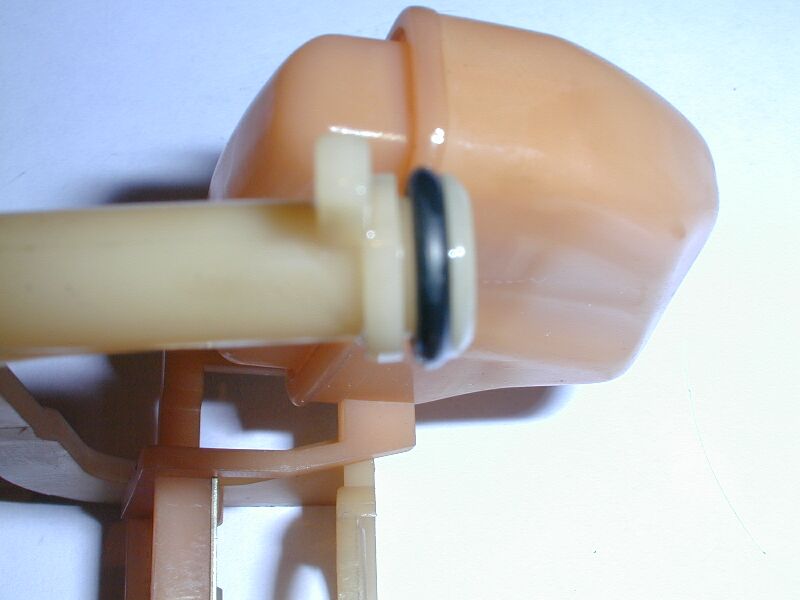
Replacing the Slide
Carrier
and Carb Venturis.
Note that the Carb
Venturi has a Flat Surface on one side, at the bottom. This flat surface
sits against a Pin in the Carb Body, which you can see if you look down
the well that the Venturi came out of. This surface sits against the pin
so that the Venturi doesn’t keep turning when you screw up the Main Jet.
Once you’ve cleaned the Venturi Jet and have replaced the O-Ring, put the
Venturi Jet back into the Slide Carrier and press it into the small wall, so the
flange seats.
Note also, for Slide Carrier
replacement, that the curved part of the Slide Carrier
is
at the FRONT or Engine Side of the Carb. Then turn the Venturi so that the
flat surface lines up with the Pin. Smear the O-ring with a little oil and
press the whole Slide Carrier/Venturi
combo back into position, so that the 4 Tabs are all the way down. If the
Venturi pin pops-up when you press the Slide Carrier
in
you haven’t lined it up properly, so have a look at the pin/flat side
arrangement again. It should stay down OK until you get the Main Jet in
position.
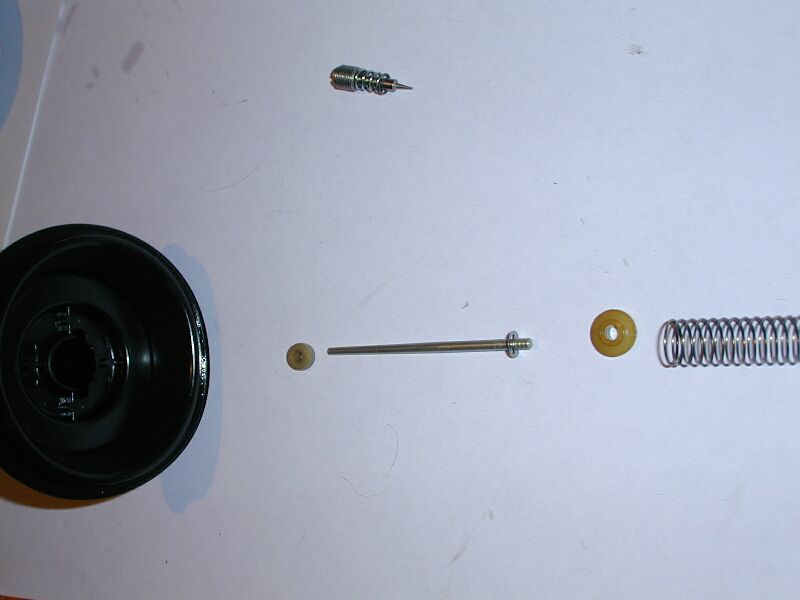
-
Replacing the Needles, Springs and Diaphragm :Now’s a good time to put back the Slide + Diaphragm,
Needle, Spring and Diaphragm Cap in that order. See
Needle Parts Install
Sequence. Before you start smear a little oil on the Diaphragm Seat
and on the Sealing Ring of the Diaphragm, where the Diaphragm Cap seals it
to the Carb Body. I find it easier to install the Needle (With E-Clip and
Spacer Below it, on the Needle), the Upper Washer IN the Slide Barrel, keep the
whole shebang in place with the spring and feed the lot into the Slide Carrier. If
the needle comes up a bit pull the Slide Barrel out a bit and try again,
keeping it as vertical as possible so that the Needle can drop into the
Venturi. Thread the Spring onto the little green “Spring Guide” under the
Diaphragm Cap. Press
the Diaphragm into the Groove on the Carb Body and make sure it (more or
less) stays in. It might try to pop out, but don’t worry when you put the
Cap on it will slip into the groove, so to speak. So put the Cap on and
slide it around a little bit on the rubber, just to make sure the rubber
is down in that groove and you haven’t pinched it somewhere. Do up one
bolt, just seated, then the other. Then Tighten both, nice and firmly,
because they vibrate a bit, although damped by the intake rubbers, but not
so tight you kill the head of the Screws. Now you can turn the Carb over
to stand on the Diaphragm Caps and work on the Floats.
For Problems reseating the Diaphragms see
Diaphragm Trouble below.
-
Replacing the Main Jet.
This
Part’s easy. You will see the needle where the main jet goes, so Screw the
Main Jet into the hole by hand, making sure the Needle stays Central to
the Jet. When it is fully in, Tighten it up firmly with your LARGE WIDE
Screwdriver. Do NOT over-tighten, it’s soft Brass. Just Firmly, i.e. so it
seats and then a little more. Remember you will initially be compressing
the new O-Ring you just put on the Slide Carrier.
-
Replacing the Valve Seat.
Again
fairly simple, just push it back in place, but put a little oil on the
O-Ring first so you don’t ruin the Dry Rubber against the Metal Sides.
-
Replacing the Float Frame.
Replacing
the Frame is fairly simple. First, smear the O-Ring with a little oil.
Then, feed the wire loop of the Float Valve over the Metal Tang and
position the frame over the Carb Body, with the Float Valve positioned
over the Float Valve Seat and the Rubber O-Ring on the Plastic Frame Stalk
over it’s hole. Push it into position. The Float Valve likes to fall off
the Tang during this procedure, so either tip the Carb Body and hence the
frame so it stays on, or use bit of bluetack to temporarily hold it in
place. Here's a picture, with all three parts not yet in the Carb
Body, (on it's side) of the
Float Valve in the Float
Valve Seat and attached to the Tang on the Float Frame.
-
Checking the Float Height.
Checking the float height is like a mixture between Art, Black Magic,
Science, Witchcraft and Acupuncture. i.e. It’s a really, really hard measurement to make. Even
more so without the right tools. Factory’s Site gives a fairly good
description
of the measurement plus they sell a Special Tool, also shown on that
site. Like I said earlier the tool is a neat idea, but the workmanship,
for the money, is terrible. Read their instructions first, then read on
here. What they do NOT mention, at least on that page, is that the Float Bowl
clamps the frame down and holds it in position (You might have wondered
how it worked flopping around in there) to the Carb Body. It does this by
clamping the two little plastic tabs that can be seen on the side of the
Frame, in the front of this
picture.
Float Tab On.
You WILL need to hold these two down also (firmly), while making the measurement.
Use a Bulldog clip, a Wife, a Girlfriend, a Son, a Dog, whatever. It must
be clamped down to make the measurement. Make sure the Stalk with the
O-Ring is also firmly in place. Now what you need to do is tilt the carbs
so the floats swing out far enough that they do NOT compress the Float
Valve at all, not even that little piston at the top I talked about
earlier. Then slowly and gently, rotate the carb body back until the Float
JUST touches, but DOES NOT compress that little piston on the Float Valve.
Try it a couple of times until you get the “feel” of it. So now, holding
the Carb in this rather awkward position, with your Special Tool or your
ruler or your custom-made gizmo if you made one, measure from the Carb
Gasket Surface (i.e. where the Float Bowl Gasket makes contact with
the Carb Main Body) to the TOP of the HIGHEST Float. With the Tool SET at
the correct measurement, the tool should just graze the top of the
float. If it clears it by miles, your FUEL LEVELS at which the Fuel
gets cut off will be too high and may be the reason for the rich
sooty residue on your Spark Plugs. (Remember you
are measuring the FLOATS upside-down, don’t get confused between FLOAT
HEIGHTS and FUEL LEVELS. The HIGHER the Float Height i.e. what you
measure, the LOWER the FUEL LEVEL at
Fuel cut off!). To RAISE
the Float Heights (Raise the Fuel LEVEL) you need to bend the
little Metal Tang, shown in this Picture
Float Tab On DOWN. Do this by hand, using one finger, a small amount
at a time. Conversely if the first measurement you make forces the Float
Down, it is too high i.e. the Fuel gets cut off too quickly (Lean) and you
will need to need the Metal Tang UP. Remember small movements, when
bending the Tang. Repeat until the measurement is right. Keep the beers on
ice until after this procedure, you need steady hands.
Notes:
-
1. Flash notes the manual says to put the seam in the
float parallel to the joint where the bowl meets the carb (Gasket
Surface). For him, that was WRONG. The float level was too low (once the carbs
were back right side up). It wouldn't sustain a speed over 80 mph. (The
manual doesn't actually say that ed.).
-
2.
Float Height. I discussed this with Flash at the time. Setting the float
parallel to the Gasket surface is a rough measurement. From what I
understand it's what he interpreted as the approximately correct setting from
the Maint. Manual. I tried to pin him down, but he said he adjusted it
following that approach and when it didn't allow him top speed he took them
out again and bent the tang "a little". When I asked what height he says "I
dunno", I bent it "a little". Anyway, there is a correct measurement and a
correct WAY of measuring it. If you're like me, not too comfy with "a little",
you measure it the right way. I put mine at 14.6. Several times. It worked
FINE. At the end of the day, what Flash did was right, because he bent it just
enough to get fuel delivery all the way across the board, without flooding at
low rpms when the demand was not too high and with no overflow of gas because
it could never shut off, when switched off. It's a TRICKY measurement, as you
seem to know from other bikes. Marty #426 did note he went back to stock
height, his floats WERE going too HIGH to shut off => his must have been about
12 too I guess. THAT makes sense, if the tang spring weakens due to float
pressure, or the Plastic cage wobbles about. Don't forget when you measure it
to HOLD THE PLASTIC TAB on the CAGE down, so it's firmly fixed. If you replace
the O-rings on the cage, seat it properly first before re-measure. No cats
were harmed while rebuilding my carbs ;-)
-
3.
My Description vs. Factory Website Description of the Float Bowl Measurement
This FAQ Says:
"Now what you need to do is tilt the carbs so the floats swing out far
enough that they do NOT compress the Float Valve at all, not even that little
piston at the top I talked about earlier. Then slowly and gently, rotate the
carb body back until the Float JUST touches, but DOES NOT compress that little
piston on the Float Valve."
Factory says
1. Tilt the carbs so that the floats just flop over towards and into the carb
body.
2. Tilt
just enough to touch and close the float the float valve, but...
3. Do
NOT compress the float valve spring when measuring.
4. With
the metal adjustment tang on the float just touching, but not compressing the
float valve spring, place the Setting Gauge over the highest part of the
float. If there is a gasket or o-ring stuck to the carb body, remove it while
measuring.
The Factory Website and the FAQ actually say exactly the same thing, however
they do not clarify how sensitive that little piston is. I found it easier
(with the floats already flopped over toward the carb body) to tilt the floats
away from that little piston, then tilt the carb so they go back into the body
until the tang just touches that little piston. Performance could
be saying drop them into the body (compressing the piston) then tilt the body
so they come out SUCH THAT the piston is not compressed. However I believe by
saying "... floats just flop over..." they are saying the same as this
FAQ.
NO the valve is not open during the
measure it is STILL closed. It ONLY opens when that little wire on the tang
pulls the whole valve up. As long as the tang is not pulling up on the valve
it is closed, under it's own weight (gravity...). What you have to remember is
that valve is up the other way, normally, so what the little piston does,
because it is spring loaded, is work against the valve pushing it up to close
off the supply to the bowl.
-
Replacing the Float Bowl.
Smear a little oil on the Gasket, making sure it
is seated properly in its groove, then replace the Bowl and do up the Float
Bowl Screws. Allen-Head screws are a good replacement.
-
Repeat from “Inspecting the Carb Needles” down, for the Second Carburettor.
Diaphragm Trouble
Diaphragms don't go back into place after lifting
off the Black Covers?
I lifted the diaphragm covers today in order to check the diaphragms and needles
out, as I've been getting rather few mpg. I have no idea when the insides of the
carbs were changed out the last time, but I guess it's probably been done since
the bike's got more than 62,000 kms on it. The needles looked brand new to my
(untrained) eyes though. So did the diaphragms, and thorough checking revealed
no rips or punctures of any size or kind. HOWEVER, I did get a bit puzzled over
the fact that my diaphragms are way too large to fit in the circular
indentations they're supposed to settle in before you screw the covers back on.
(They were indeed pinched under the covers by whoever screwed them back on
previously). I've checked the FAQs, but I only found this (from the carb
cleaning faq):
"Press the Diaphragm into the Groove on the Carb Body and make sure it (more
or less) stays in. It might try to pop out, but don’t worry when you put the Cap
on it will slip into the groove, so to speak. So put the Cap on and slide it
around a little bit on the rubber, just to make sure the rubber is down in that
groove and you haven’t pinched it somewhere. "
My problem is that it is positively impossible to get the entire edge of the
diaphragm into said groove. My diaphragms are at least a couple of millimeters
too large (across) to fit, and after 45 minutes of trying to get the edge to
seat in the groove all the way around, I gave up. I had to screw the covers back
on, pinching both diaphragms in the process. Looking from above, either
diaphragm would protrude from under its cover for maybe a fifth of the total
circumference.. this can't be good. Has anyone else experienced this problem?
Could it be that whoever replaced the diaphragms before me got the wrong size?
In your experience, is the diaphragm exactly, or at least almost exactly, the
same diameter as the groove it's supposed to sit in? I mean, this was NOT a case
of the rubber "trying to pop out".. I can't see how anyone could have managed to
get the entire edge down there, let alone keeping it down while reaching for the
cover. Last question: could this be (part of) the reason why my mpg is low? I'm
imagining that pinched diaphragm edges could be fairly equivalent to rips in the
rubber. No, there was nothing sprayed on them. Also, they were already pinched
before I even started unscrewing the covers, so the previous attempt to get it
right apparently failed, too.
I called the dealer today. It appears to be a
well-known issue with older diaphragms, they simply grow larger with age, due to
contact with gas fumes. The mechanic I spoke to thought my diaphragms are the
original ones, which would make them almost nine years old. (They are
approximately three millimeters too large, across.) He also said getting older
diaphragms back in the slot is a major PITA. They wanted $18 per diaphragm (must
have remembered the price of some other part), so I called the local Suzuki shop
for a quote of the GS500 diaphragms... which were priced at almost $40. So I
ordered them from a BMW car dealership instead, saving $2 compared to the bike
shop.. guess I'll use my savings and buy a snow cone or something :) Emil '94
F650 -- Malmö, Sweden.
-
Sound
too big to me. I had the Tank off and the Diaphragms out on my Classic over 20
times to swap needle positions while rejetting. I wrote the above description
and it was exactly like that. It didn't fit EXACTLY, but a little oil, lightly
pressing down with the plastic cover and rotating, it popped back in just
fine. Sounds like something amiss there. They may have installed the
diaphragms off a different carb. The Suzuki GS500E ones may fit though, if you
need a new set. What you could do, if you want to check, is to take them out,
flip the rubbers over and dab the oily lip onto a piece of paper (or just take
the whole thing) to the dealer and ask to see a replacement if they have one
in stock to measure it. Do the same at the Suzuki Dealer (See FAQ for Suzi
Part No's) and ask both the price. k.
-
If you
happened to be spraying carb cleaner (or equivalent) and it got on them, they
can swell up larger (at least the ones on my Airhead did). Let the solvent air
out of them for a day or two, they may shrink back (if they're not already
trashed by the forced installation). If not, I agree that they sound too big.
Marty #436-Chicago-97 F650F
-
Secondly as someone else complained, once I came to refit the diaphragms they
wouldn't go - at least 3mm too big. Don't worry they will still fit. The
secret is lots of fine (sewing-machine) lubricating oil. If you lube the grove
on the carb body and the lip of the diaphragm. Working with both hands from a
point on the circumference feed the diaphragm lip into the grove. Then moving
your hands in opposite directions around the circle keep feeding the lip and
press each section lightly back towards your original starting point. The idea
is you are compressing the rubber lip to a smaller circumference. The oil will
help the already seated material slide in the groove. Once I did this my
impossibly large diaphragms went back on without any problem. The oil helps
hold them in place whilst you reach for the cover as well. Hope it doesn't rot
the rubber! Simon in Ireland.
Q. How Do I Replace the Carbs.
A. With Difficulty, Patience, Cotton
Gloves and Vaseline.
Putting them back can almost feel more gruesome
than taking them out. You think your ruining something, but the rubbers are
pretty hardy and with a bit of patience you’ll get there. I suggest you use
some of the lubricants Flash mentions on his removal procedure or coat the
inside of the rubbers (Both Airbox and Engine Side) with Vaseline. Reconnect the
Choke Cable BEFORE you start pushing the Carbs in (You can do it afterward but it’s
very hard to get to the plastic nut.)
Again, please, do NOT over-tighten
the Nut. It’s just Plastic! The Throttle cable can be reconnected after
you get the Carbs back in, but you can do it now to save yourself the trouble. Affix
the Wire-Head to the Throttle-Plate then twist the throttle Plate (or pull the
wire) until there is enough slack to get the bend back into it’s mounting. Work
the Carbs down into the cavity, again pulling back the softer Airbox-side
rubbers, to fit the Engine Side first. After you get the Carb ports mounted
into the Engine Intake Manifold Rubbers (They are stiffer and relatively easy),
the Airbox side rubbers will probably still be all squished up. Try and free
the bottom first and get them fitted to the Carb, then with a finger or BLUNT instrument
(e.g. Flash notes a Tyre Iron works well),
working from the sides towards the top, stretch the rubbers over the Airbox
Side Intake Ports. These Ports are not that wide, only about the width of the Steel
Hose-Clamps, so after you get them in place pull the whole assembly
Horizontally BACK toward the Airbox so you know they are as far on as they can
go. THEN do up both sets of clamps, lining the clamp heads up so they are easy
to access with a screwdriver.
Replace the Tank Seating-Plate, making sure the choke and
throttle cables drape OVER the top of it and they are free and not caught anywhere
between the Carb and the Throttle on the Handlebars. Replace the Tank as
indicated in the
Gas Tank
Removal-Replacement FAQ.
That’s it.! Sounds long and arduous, but in
reality it’s not, I just wrote a lot of detail. I can get the tank off, whip the
Carbs out, change the Jets and Needles, put it back and get the Tank back on in
about 45 minutes, during my lunch hour and still have time for a sandwich. But
I’ve done it way too many times. I’m not suggesting you should hurry through it
though, take your time. A job worth doing is worth doing right. It’s a job you
can do in a few hours over the course of a leisurely day.
Any comments on the FAQ, improvements or
suggestions, drop us a line. For all you poor people with F.I., aren’t Carbs
FUN.!
Thanks to Flash and Todd, who always manage
to be both entertaining and informative, to Mark for getting out there and doing it and to Craig, Tom and the
other guys who went and are still going crazy trying to get the jetting right, having
pulled their Carbs for the umpteenth time. Big thanks to Mal for his great
close-ups of the Float Valve.
Note.: I have no affiliation with Factory Pro who are mentioned often in
this FAQ, though they do have some very good tips. They didn’t like it when I started
asking questions about their jet kits without buying it, but hey if you can’t ask
about something they want to sell ! Others have had a good experience with them
and find them helpful.
Cheers & Rgds
Kristian
Is there any way of Setting/Checking
the Float Height with the Carbs ON the bike?
by Richard #230
The Downtime Files of the April issue of Motorcycle
Consumer News has a really great tip for checking float level height without
removing the carbs: Connect a piece of clear tubing to the float bowl drain
tube, bend the tubing up against the outside of the float bowl and turn on the
float bowl drain screws. The gas will rise in the tubing and you can take your
measurement by observing the top of the level of the fuel in the tubing, as it
will rise to the same level that is in the inside of the float bowls. The
Classic has bowl drain taps on the bottom of the float bowls that you can hook
up a plastic tube to. The only problem would be finding clear plastic tubing
that will fit tightly over the drain nozzles. I think you could find this tubing
in a pet fish store. If the tubing was a bit large, you could use wire wrapped
around the tubing and twisted with pliers to compress it over the nozzles so
that the fuel wouldn't leak while you were checking the float level.
The best way to use the tip is to check your float
level when the bike is new, or at least running well. Place the tube on the
float bowl drain and then turn on the bowl drain tap. Wait until the level
stabilizes, then scribe a mark on the bowl for future reference. Then in the
future, if you have a carb problem, you can perform the test again and check it
against the mark. If it is higher than the mark, then you might have a leaking
float or bad float needle valve.
-
You know the original Kawasaki Z-1's had a tap on
the bottom of the float bowls and you used a device just as you described to
check the float level. I don't know where you would tap the float bowls on a
Classic or if you would have small enough hands to connect it but this is a
tried and true method that has been around for a long time. F650GS Dakar,
Oregon. Steve 1130 Or
-
<<My question is, once you can see the fuel level
from the outside of the carbs, how do you know it's the correct level? Is there
a reference mark outside the carb? >> Nope. The only real way to measure it is
from INSIDE, See here:
http://faq.f650.com/FAQs/Carb_Clean.htm
-
Only a few carburettor makers (and then mostly for
racing carbs) give fuel level info. The most common tech info is the height of
the bottom of the float(s) relative to the bottom of the carb body with the carb
upside down. BUT- when the float height is absolute right (upside down),
reassemble the carb and take an accurate measurement of the fuel level, hose
attached. make your own mark(s) on the carb body and then you use that
marking(s) the next time you want to check the float height. Whenever
"something" (being it a piece of machinery, boy/ girlfriend or whatever) works
near perfection, ALWAYS make a note of ALL information you have and can get with
regard to whatever it is. Motorcycles: Fuel level or pressure, ignition timing
or map, valve timing (valve movement relative to degrees of crank rotation),
compression pressure (with info of battery voltage or rpm of engine), and so on.
The more info of the "perfect" machine you have, the easier it is to find any
fault WHEN (it will not be "perfect" forever) you want to restore it to it’s
former state. Haakon#626 (Norway, F650GS)
Carburettor LINKS
Some good resources for Jetting and
Plug Reading Information - Not F650 Specific.
Opinions
(On Carb Cleaning/Particular Parts Replacement).
Some of the comments below might seem
to indicate the 14.6mm measurement is no good. But if it is measured properly, I
believe this measurement is fine. At present there is just not enough feedback
to say either way. So set it stock, measuring it right and if it doesn't work
for you, (runs outta gas at HIGH rpm/flat out speeds), LET US KNOW!
-
The 99 model's carburettor is specified to be set with a .56 inch clearance from
the float bowl face. I used those exact specs and had the bike stall from
insufficient gas in the carb. after a brief time the bowl fills enough for
another short distance. I've set it down about twenty percent lower than this
spec but has anyone else had trouble with performance attributable to setting
the float bowls to this much of a gap from the measuring surface. Unknown
-
I've been working on my bike since the last posting of my problems (carbon
fouled plugs and rough running). Done so far: 1. Lowered the needles, which made
the bike able to run at lower rpm in the same gear and only a little bit of
carbon fouling on the spark plugs. 2. Changed the chain and sprockets, which
made the bike run at a stable speed on a constant throttle position (smooth is
the word). 3. Changed the Spark Plug Caps to OEM 1kOhm (had NGK 5kOhm), this
made the bike run at even lower rpms in the same gear (and perhaps a little bit
smoother). I measured the Resistance before the change to 14kOhm and after to
10kOhm which means that the current is now 40% higher at the spark plug cap. I
took the bike out for a 50 miles spin this afternoon and the bike runs pretty
good now - no rough running, good rpm-range in gears and easier starting. Could
it run even better? - I have no idea since I have no other bike to compare it
to. Problem left: The needles are 1 position lower than they are supposed to and
the bike is still a little rich - not much though. Solution: Next thing up is to
remove the carbs and change the emulsion tube, and while I'm at it I'll change
the main and idle jets (all parts laying on my desk). I'm going to try to
measure the float height also.
If I ain't mistaken mine (Idle mix screws) are set to 3.0 (or somewhere near). I did a major
overhaul of the carbs last spring, which included new Venturis, 135 main jets
and new OEM spark plug caps. Since then the bike is consuming approx. 15% less
fuel and the spark plugs are no longer carbon fouled, actually they look brand
new. 60.000 KM F650 1995 Spakur in Sweden #1117, '95F.
-
I was just reading the carb cleaning FAQ, and perhaps you could add to my
comments at the bottom of the FAQ that my float heights were off by ~1.5mm (too
low) and that after these changes the fuel consumption is now 15-20% lower.
-
Woooohoooo!! 55mpg!! How many miles were on the
bike/carbs when you did your rebuild?. 28.5k miles. What year "classic"?. 1999.
What kind of environment has the bike been stored in when not in use? Outside
but covered, in the mild Seattle climate (i.e., never super hot nor frigid cold)
How often did you or someone ride it? At least weekly, except for last winter
when I put it up for 12 weeks (using proper storage protocols, drain carbs/tank,
etc ...) all kinds of use: city commute, touring, some dirt roads. The
precipitous decline in mpg occurred while on my 13k mile trip this summer. NormJ
#473.
-
Here, so far , is the sequence of events.
March '02 - removed Ron Woods "muffler" replaced with stock. No other mods. Bike
runs rich, but otherwise well.
July '02 - inspected carbs for presence of DynoJet kit. There was one, I dropped
the needle on that kit to see if it would lean out my mixture. It did, but not
enough.
Aug '02 - replaced all DynoJet bits and bobs with stock carb parts. Also
replaced K&N air filter with stock. Too early to tell if fuel economy has
improved (it wasn't all that bad before) but now that I'm back to stock here's
what's happening. Throttle response is better at low RPM (It would tend to bog
if I sat at idle too long and then went to take off - you like at traffic
lights). Plugs aren't fouling any more. I am now going to restrict the airbox so
it's as close as I can get it to stock to see what happens. That's about all
guys. I don't know if there's anything there at this point that merits an
addition or change to the FAQ. I will say that moving the hose clamps as far
back on the rubbers as possible makes all the difference as far as insertion and
removal. And clumping cat litter makes a great absorbant for gasoline spills or
draining the little hoses. Sean #1015 Ottawa Canada.
-
FINALLY rebuilt those carbs (@26K). Surprisingly,
the needles and emulsion tubes looked good (replaced anyway, stashed the old
ones for spares). Both diaphragms had small tears, both idle mix screws were
only 2.25 turns out, and both floats had to go WAY too high to shut off flow
(float needles were well grooved as well). Here's hoping that the changes back
to stock will improve my gas mileage significantly (running 30-35 MPG at last
check, boy did I miss my Acerbis tank...which is ALSO repaired now). Maybe that
17-tooth front sprocket won't feel so tall now! Marty #436.
-
Note to
all who helped me with advice on returning the carbs to stock (Kristian#562;
Todd #389; Richard #230; Shank NYC; Teddco #1192; JAMES) We did it yesterday
(with the exception of Dyno jet springs) and it runs really great now. No flat
spots or roughness in the acceleration curve. We screwed up on the springs,
but we can probably pull the diaphragm cover and switch out springs without
pulling the carbs. Somebody tell me that can be done. Pulling the carbs was
not that hard but certainly not easy. XtreemLEE#1188.
-
Carb
removal experiences. I removed the carbs today, using the "mild force" method
described in the carb cleaning FAQ (i.e. no airbox removal). Everything went
ok, except that I wasted one of the float bowl screws. Had to get a screw
extractor to fix it. d*mn that screw was hard to undo... Anyway - when
reinstalling the carbs, I ran into a problem. It wasn't that hard to get them
into the engine side rubbers, but then I found the airbox side rubbers were
suddenly way too short... there was a 2 mm gap between rubber and port on the
airbox side when the carbs were fully seated in the engine side rubbers.
Apparently, the rubbers had been pushed into the airbox when I struggled with
getting the carbs out. It was NOT easy to pry the rubbers back out of the
airbox. Just a small warning and a note to self to take it a bit more easy
next time. veggie deluxe, Sweden.
-
Yep,
changed both my diaphragms out last fall (both had failed). Bike exhibited the
same drastic drop in gas mileage. Marty #436-Chicago-97 F650F
-
Numerous problems this month (blown fork seals, poor pick up, worn head races)
but all easily resolved with the help of the Technical FAQ's. God Bless You
All.
The poor pick up has been traced to the carb-mounted inline fuel filter but
whilst I had the carbs out I decided to clean them anyway and have the
following snippets to add to the FAQ. Firstly as with many others I found the
float bowl screws difficult to budge - solution = get an impact driver, it
does the job! Secondly as someone else complained, once I came to refit the
diaphragms they wouldn't go - at least 3mm too big. Don't worry they will
still fit. The secret is lots of fine (sewing-machine) lubricating oil. If you
lube the grove on the carb body and the lip of the diaphragm. Working with
both hands from a point on the circumference feed the diaphragm lip into the
grove. Then moving your hands in opposite directions around the circle keep
feeding the lip and press each section lightly back towards your original
starting point. The idea is you are compressing the rubber lip to a smaller
circumference. The oil will help the already seated material slide in the
groove. Once I did this my impossibly large diaphragms went back on without
any problem. The oil helps hold them in place whilst you reach for the cover
as well. Hope it doesn't rot the rubber! Just the new head bearings left to
install. My wife hasn't found the steering stem in the freezer just yet but I
am not sure how I will heat the new bearings in our oven without her noticing!
Simon, '98 F650, Ireland.
-
To make
a long story short, I am moving and all my tools are packed. I have a 2 month
old new to me 1998 f650 with 22k. It started running poorly, died in the
middle of a ride. I dropped it off at the BMW shop and they immediately want
to rejet it as the plugs were fouled. No attempt or offer at idle mixture,
etc. Re-jet was their only offered option. The bike is from the same altitude
as my current town. I admit my ignorance as I have never owned a BMW, and
don't really get this two carb hi/low with the F650. Are those guys trying to
pull a fast on me?. Flash "That sounds like one of two things, you probably
have either ripped carb diaphragms or else bad spark plug caps. Oh... might
you have gotten some bad gasoline? Rejetting it is horseshit. You can check
and/or fix either the diaphragms or plug caps yourself by using the FAQ"
Sante Fe BMW treated us well, clogged idle jet was all it took. Chicken
little '98 F650, Albuquerque
-
Next
Detailed Feedback:
on Carb Reconditioning
Feedback#1
Rejet of the 97 F650 Carb with Tech Tips/Problems/Tools/General Whining
by
Langlois
First: Get your airbox out...see the
F650 Faq, remember to take the muffler
off, much easier with it out of the way. I struggled for a while and could not
get the angle right to pop it out without the pipe removed (the headers stay,
the muffler is removed with the cross-over/connector pipe).
NOTE: You do NOT need to remove the Airbox.
Just pull
the Carbs (ed).
Second: Have a cup of coffee, I am sure you just
spent half an hour dicking with this and you will need your wits about you for
the rest of the job!
Now, see photos:
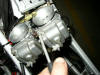
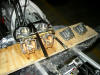
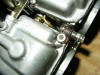
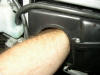
|
Carbs still hanging from
Throttle Cable still attached, there is a little room to mess with the
carbs.
|
Plug the intakes with
paper towel, keep the nuts/bolts/washers/birds from getting in!

|
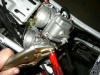
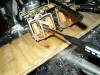
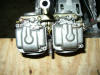
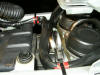
Here is what you see to
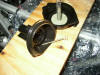
work on the jets, the float bowls.
|
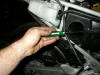
Ideally you will be able
to use a Phillips Screwdriver drop the float bowls...but......sometimes they
are frozen...
|
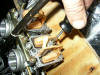
|
Float Bowl Removal for
difficult screws, vice grip on screwdriver......
|
When that does not work,
soak with your favorite penetrating oil.
|
Then latch onto them with
a mini-vice grip and ruin them completely. (see bottom of page for contact
info on nice new stainless ones!)
|
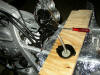
|
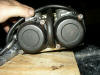
|
Floats off, note bubble
wrap and genuine factory-tool plywood plank.
 |
Skinny screwdriver for
the jets
 |
Stubby one for the others
 |
Diaphragm with slide
spring
 |
Note needle with lock
ring and 2 plastic bushings (4th from the top for those who asked!)
 |
|
Eurosport Jet Kit as sold
by Factory Pro Tuning, these guys are AWESOME, they really helped me out
when I bunged up my float screws and went the extra mile for me to get some
replacements (photos of the jets and screws below).
http://www.factorypro.com/ go
there and spend money.
Nicely packed Jet Kit
w/decent data sheet.
  |
Stainless Carb Screws
from Factory, these guys overnighted me the parts in the afternoon of one
day and they actually got here before 10AM to finish the project. While this
might seem common to you, I have had SOOOOOOO many supposedly "overnighted"
parts show up a week later...
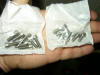
Tasty new SS fasteners,
being the "coal to Newcastle" kinda guy, I ordered 2 sets. 5*16 and 5*12 for
those who need to know!
 |
|
Installing with gobs and
gobs and gobs of Antiseize.
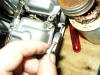
|
Looks purty now! See the
gold anodized bar that holds the carbs together? Be sure to remove those
screws and hit them with antiseize too.
|
This is the flexi-gas
spigot that is a pain in the you-know-what to get a line on when your old,
stiff, factory gas line decides that it wants a new home. Unless you are a
hampster, you cannot get under the carbs easily to put it back on. My fix
was NEW line with a REAL screw type hose clamp (no photos sorry, but get a
close fitting clamp to fit in this spot)
|
Sporty Stainless
Diaphragm screws with liberal smearings of Anti-Seize.
|
|
Why can't I get the
Airbox rubber intakes to fit over the carbs after jiggling it for 20
minutes???
Do this (you did remove
the snorkel right? you did loosen the clamps right? you also lubed the
rubbers right?)
1: Take hand, remove
watch, grab screwdriver/hooktool/whatever.
2: Insert hand, arm and
tool into airbox.
 |
My hand and tool is well
hidden but I am pushing up on the left side carb rubber that is being
problematic with my screwdriver tip...
Below HERE |
|
Finally,
I cannot recommend the guys at
http://www.factorypro.com/ enough, these guys saved my butt. (the SS screws
and jets are nice too!) But, saying that, jets are jets...you can buy them
everywhere (almost) it's the service you need during and after the sale, they
most certainly provided that!
Identifying a Float Valve Problem
See
PUKING PETROL