F650 General Chain and Sprockets FAQ
compiled & edited by Kristian #562
updated 22 Feb 2003 by Spakur#1117
Please read the Disclaimer before
attempting any work in this FAQ.
Last updated: 16 May 2006, by Winter #1935
For other related FAQs:
Introduction
The stock DID 520V on our F650's is a good chain, but fails in a couple
areas. One is that according to DID's website the 520V is rated for an
engine up to 400cc. The second failing of the chain is that it's wear
resistance and tensile strength are nowhere near the standards needed for
our F650's.
Consequently, above 10,000 miles the original stock chains will start
stretching excessively and constantly be out of adjustment. When this
happens it's time to change the chain. If you do this soon enough, you may
not have to change the sprockets. But keep in mind, common good practice
in motorcycle maintenance is to change the sprockets with installation of
a new chain.
Note: Many old links to chain related websites have been removed
from this FAQ simply because they were no longer working and "alternative"
links could not be identified. If you have any website links for this FAQ,
please contact the FAQ master.
| Maintain Your Chain and Sprockets |
|---|
| Your chain (and sprockets) are exposed to all sorts of forces in
all sorts of conditions. Your chain needs to bend around the sprockets,
and over time the wear of metal on metal will change the shape of the
sprockets. With proper care your chain and sprockets will last longer. The
main advice is to ensure you lube your chain on a regular basis (every
tank of fuel is a good time). On a regular basis also inspect the
condition of your sprockets and replace them as required.
|
About Chains
Chain Specifications
You need a 520 type chain for the F650 model bikes. 520 means 5
eighths of an inch between the pins and 2 eighths of an inch (i.e. 1/4")
between the plates. There are some good ideas in the
Chain and Sprockets FAQ on how to
ensure you have the correct chain length. You can also check the
15T and Other Sprockets FAQ for a
table containing the number of links you will need on a bike with
different sized sprockets. However, for a stock 47T/16T sprocket setup (on
all bikes), you will require:
- 110 links on the F650 Classic and ST
- 112 links on the F650 GS and Dakar
- If you make an 18" rear wheel change on the GS you need to
make the chain 114 links instead of the standard BMW 112 links.
This isn't a problem as the chains typically come 120 links then you
shorten them. DHP #711
Most chain manufacturers recommend a maximum engine capacity for their
chains. For the F650 you want a chain rated to at least a 650cc capacity,
or a little bit more.
What Chain Size #'s Mean
by Mark #217, 14-Sep-01
The first two numbers in a chain size are the length and width of the
link in increments of 1/8. So a 520 chain is 5/8 long and 2/8 (1/4) wide.
It only gets a little complicated with say a 525 chain. This chain is 5/8
long and 2.5/8 (two and a half 1/8's) wide----which figures out to
5/16.
Can I use a 525 chain instead of a 520?
- The 525 chain size was developed for high performance motorcycles
and is used on my Yamaha FZ1, which has been tested at 120 HP at the rear
wheel. The "Gear Head" section on page 41 of the December issue
of the AMA magazine talks about going from a 525 chain on a Honda CB600 to
a 520 to save weight. The response was that you would only save 10 ounces
for a hundred-link chain and you would get less service, but that you
could do it. That sounds like to me that you could go the other way and
use a 525 chain to replace the 520 chain on our bikes. I have not tried
this, but I do know that a 525 chain is a whole bunch stronger than a 520
chain. This might be of interest to anyone who is taking a very long trip,
or otherwise is looking for a chain that will last a long time, at about a
12 ounce weight penalty. I believe that the DID 525 X-ring chain does not
cost much more that the DID 520VM chain and is sure to provide longer
service. (Some of us still remember the 630 chain which weighed a ton, but
when used on 750cc bikes would last forever - and that was before O-rings
came around.) Richard #230
- If a 520 is good; is a 525 better? Not sure of the answer, but I
think it is over-kill---sort of like building a shed with 2x10's when
2x4's are ample. My guess is that these engines do not develop enough rear
wheel horse power to benefit from a 525 chain. Steve #1059 in MA
- What measurements? 520 means 5 eighths of an inch between the pins
and 2 eighths of an inch (i.e. 1/4") between the plates. 525 means 5
eighths of an inch between the pins and 2.5 eighths (5/16") between
the plates. You have to use 525 sprockets, which are just slightly
thicker, otherwise the chain will have too much side play. The rear
sprocket will go right on the bike and you won't notice any difference.
The front... your locking washer might not catch. So use lots of LocTite.
Flash 412
Chain Selection - Hints and Tips
- All suggested chains can be reference through the manufacturers
websites. Link to these sites can be located on our Links Page or through
the Suppliers below. There are also other brands and types of chains on
the market. If purchasing one of those make sure the specifications of
those chains resemble the ones above.
- It is strongly advised to purchase an O-ring or X-ring chain due
to ease of maintenance to the chain. They still require cleaning and
lubrication, but not as nearly as much as chains with out the rings.
- The stock chain is continuous link chain that is installed at the
factory before the swing arm is mounted. If you want a continuous
link chain, you'll have to remove the swing arm. However many owners have
had excellent results using master links and clips. Using a chain with a
master link or clip does not require removal of the swing arm for
installation of the new chain. The disadvantage of removing the
swingarm is that it time consuming. The advantages of removing the
swingarm are:
- Removal of stock chain is easier - it does not need to be broken.
- A Common Bench Vice can be used to close the new chain.
- You can now clean areas that were difficult to access
before. This includes Lubricating your
suspension linkage.
- If you are REALLY worried about the Master Clip coming off order a
Rivet Type Link which is Hollow and use the DID tool to rivet the ends for
an endless chain. The Rivet Links are not the default, so order them
specifically if you want them. Not that there's anything wrong with a
Master Clip. See below for comments on Rivets vs.
Clip Master Links.
- You do NOT want a Racing Chain. They are made light to run
very smoothly, but they wear out quickly.
Master Links: Clips or Rivets
This is a perennial discussion. The warnings on the packet always say a
Rivet is better than a Clip. Some like them some don't. Opinions are
below. Whatever you choose:
Note that both are called Master Links, one is a rivet type the
other a clip type. Lots of people talk about master Links when they mean
Master Clips as below.
- Install
the Master Clip with the ROUND END facing in the direction of Travel. See
Master Clip in Place.
Place the clip over both pins and slide back using a pair of pliers or a
Screwdriver, until it sits firmly in the grooves on the pins and the open end
is CLOSED.
- It is
Highly Recommended you RTV Silicone the Master Clip in Place!
- Or, Let
the shop who sells the chain put it together and then remove the swingarm for
installation. No problems at all. Spakur in Sweden #1117
- Do NOT
try to put a 520VM master link in a 520V Chain or Vice-versa. 520VM pins are
bigger (Hence the Greater Strength) and will jam a 520V chain, even if you do
manage to squeeze the pins in. 520V pins will be to small on a 520VM Chain and
wear too quickly. Kristian #562
Master Link type Opinions:
- Master clips take a good deal of patience to install
correctly and are very easily put on wrong. I found mine, with the O ring tech,
to be much harder to get right than previous non O ring chains. Using a
magnifying glass, you can get close up look at grooves to see if the link is in
fact, in place. It may look good, but without aid of mag. glass, I could not
tell. I'm getting old! Mines still working fine with master link. Randy #748
- For me, the choice between buying a hundred dollar
tool to make a hassle-filled endless chain or buy a $2 tube of RTV and using a
clip-type master link was a no-brainer. Ferchrissakes, in 1981 BMW started using
clip links on their CAM chains after 60 years in the business. Clip-type master
links don't BREAK, the CLIP pops off. Use some RTV and that doesn't happen. Tell
me again why you prefer a riveted chain and removing your swingarm? Do you wear
a belt and suspenders and take a hand pump and a CO2 inflator? Oh my GOSH! Your
motor only has ONE cylinder!!! If you get better fuel mileage at 55 mph than at
75, why not drive 25 mph? If you think I am poking fun at you for using rivet
links, you FINALLY woke up. Clip links do not BREAK any more often than rivet
links. But rivet links ARE a HUGE hassle. I had a clip link on my bike in France
and never had any trouble. I lost a clip in the USA, but not the side plate. I
replaced the clip. I lost another one. I was bitching to someone about it and
they asked me if I put RTV on it (like I was an idiot for NOT doing that). So
much for 200,000 miles with of experience on shaft drive bikes. I haven't lost a
clip since. Empirical data, please. Flash #412 (CO).
- Just get the tool or something like a Motion Pro
tool (which I have). Look at each opportunity for new service as a chance to
expand the toolset and learn new skills and you'll have what you need to
properly (and easily) work on your bike in no time. Just get the Motion Pro tool
and do it yourself with master link. Easy, and worth it. DavidHPark, #711
- If you're going to do it OFF the bike, in controlled
conditions, on a bench in your workshop, you can easily do it with an
Engineering (ball-peen) hammer, with the bottom half against an anvil or
something solid. Maybe Practice on the old link you ground off first. Or take up
Spakur's suggestion & get the dealer to do it as you are taking off your
Swingarm right. DID Tool is nice though :-)
personally, I always use a siliconed Master Clip. Kristian#562 HK ex'96F,
'00 GS
- Master link (clip) isn't that bad- If you are not a
rivet link evangelist what's the point? most people here use the master link
(clip), and that can be done using pliers, ViseGrips or any old chain breaker.
The rivet link is a hollow tube, so any attempt to use conventional tools
increases your risk of tearing the pin and compromising the chain. The DID tool
is expensive, but man is it EASY. The hard part is finding rivet links. Not too
many people carry that since the master link (clip) is included with the chain.
Unknown.
- Master link clips are funny items. They like to go
on once, installed by sliding them in place (not by spreading them open) and not
removed. I don't go along with people who remove the link to do maintenance
often and reuse the clip, as eventually they tend to fatigue and break. But some
people remove and reuse the same clip for years without problems. I guess it's
all in the quality of the clip and the method and care of removal and
installation. Thus the tip in the FAQ's on gluing the clip in place with
silicone rubber. The wear is a different problem. Either you didn't grease the
inside pins of the master link before installation, or the chain is too tight.
Are the regular links of the chain also worn.? Todd #389
- Shame I didn't read the warning a month or so ago !
I fitted an EK O-ring chain with the clip instead of the rivet ling believing
thinking that the bike wasn't used very hard and would be able to cope with
relatively low BHP but I was wrong. The chain link broke at 11000miles luckily
it only caused minor damage to the rear sprocket and twisted the chain. This
time I went with a DID chain and used the rivet link. No probs so far.
r1speedyrider
- I fitted a DID VM Gold chain some 8000km ago. It was
purchased non-continuous/non-closed. I used the 520VM master link as per
instructions. I have oiled (chain wax) and cleaned the chain religiously. Also
checked the tension very often to spec. On refitting my rear wheel with a new
tyre I went to unclip the master link to chain to make wheel replacement easier.
Firstly the clip just snapped through the middle with minimum force applied!
Secondly on removing cover plate and link I discovered the link pins were very
worn - thin, distorted and worn especially on one side.
Thirdly on inspection the link holes in either side of the chain were worn
elliptically! One may guess that the chain has been run too tight, unlubed
etc...but I have really been most attentive. So beware...I know many swear by
riveting chains... maybe know why now. Dominic
- Did you install the lube and o-rings when you put
the Master Link together? I have seen techs at motorcycle shops forget or is
that the Master link clip goes together a lot easier with those pesky o-rings
missing... Craig #325.
- I have the same chain, but bought the DID tool and
use the rivet master link. I inspect it every month (about) and have about 5000
miles on it now, everything from highway to mud bogs to air! The link looks
fine. The tool is kind of pricey but it is still cheaper than the dealer and I
don't trust those "clips". Mike #789
- I've only lost one clip, after approx. 11K miles,
but that was enough for me to decide to use rivets. I thought the clip-type
master link was fine. I put 11K miles on my chain without any problems, but last
night, while washing the Redmond grime off my bike, I noticed that I lost my
clip somewhere on the way back from Redmond (yes, it was put on correctly). So,
I jumped online and followed Todd 389's advice. I bought the DID KM500 rivet
tool and some new rivet type master links. I had told myself that if the clips
worked, I'd use them; if they failed, I'd drop the money on the tool. I used a
clip type link and safety wire. the safety wire would disappear every 100-200
miles. that was a pain, so I quit using it since I figured the clip should stay
on if that's what it was designed to do. After about 10K miles, the clip
disappeared. That was a pain. I ordered the DID tool and a few extra rivet
links. That was a pain ($). I installed the rivet link. That was easy. No more
pain. I'd never heard of using glue to hold my chain together when I bought the
tool, or if I had, the idea hadn't stuck in my gourd. I'm not sure what pain
flash is referring to with a rivet link. why would you need to remove your chain
once it's on? I've never had to do that. If I had to do it all over again, I'd
probably buy some RTV and try that out. But I can say that having a riveted link
has yet to cause me any pain. Mark #403
- If you are using Lone Star BMW in Austin I can tell
you that 6 months ago they didn't even own a rivet tool. I used the clip and
silicon like I have for over 30 years with no problem. I even safety wired it on
for a little extra protection. Ron#304.
- Had a DID gold with new sprockets installed (by the
local BMW dealer) on my 98 classic at about 14k last July. Did (no pun intended)
a 1,000 mile run on my week off with new chain. Worked great! Ran another 1,000
the following month. Still great! Ran to the east side of the state with wife on
the back (250mi). Poi-fect!! Later in the afternoon, pulling out of the motel,
two up, when I shifted into 2nd I felt this big CLUNK. I thought I missed a
shift. So I clicked up again and let out the clutch. The motor just revved. So I
coasted to the side of the road to find out that my new chain had flung off. I
walked back on the road about a 150 feet only to find the DID chain with about
2.500 miles on it, in the center of the road missing the master link! If that
chain would have flung off when we were doing 75 mph....... So not only do I
hate chains, I'm damn scared of them!!! Jimmy #598
- On the first gas stop on the way home, I lubed my
chain, and discovered that my master link clip (which had been RTV'ed, by the
way) was missing. I was able to replace the clip with the spare that I keep in
my toolkit. Robin #790
- And the missing master link clip...be sure that you
clean the pins, side plate and clip to remove the waxy/oily protective coating
from the new bits before adding RTV (I wipe several times with a fresh rag damp
with brake cleaner, and allow RTV to cure 24 hrs+ before use). Marty#436
- When I was at the Red River, NM rally, I noticed
that both link clips (don't ask) were missing. Steve gave me two more and by the
time I got home (around 1200 miles) I had lost one. I also noticed that the
plate was in too far and figured I should pop it out against the clip. Thanks
Flash, for confirming that. Barry #425
- Same thing happened to me on my long trip this
summer. I ended up riding 100 miles on it before i got a link. Get very fine
gauge stainless steel wire and use needle nose pliers to wind figure-8s around
the pins. if the side plate is still on, and it is an o-ring chain, the wire
should be good enough for a short-term fix. don't ride off-road or any
unnecessary miles. NormJ #473
DID Chains
| Model
| Link Type
| Max. Displacement *
| Comments
|
|---|
| DID 520V
| O-Ring
| 400cc **
| DID OE Equivalent
|
| DID 520VM
| X-Ring
| 750cc
| Low Friction; Enduro/Off-Road Racing;
DID "Upgrade" from 520V
|
| DID 520ERV3
| X-Ring
| 750cc
| Racing version of the 520VM
with slightly more tensile strength;
Enduro/Off-Road Racing
|
520VL4
520ZVM
| O-Ring
X-Ring
| 750cc
| Ducati 520VL4 851/888 900SS/900SL 900 Monster only.
NOT SUITABLE FOR F650
|
| 520MX
| ?
| 500cc
| NOT SUITABLE FOR F650
|
* The above maximum c.c. displacement is based on original
manufacturers recommended chain size. Consult your owners manual.
** According to http://www.didchain.com/app.htm (no longer
available) and
http://www.accwhse.com/ZDID.HTM.
Note DID's site does show the Chain is O.K. for up to 600cc engines for
ATV's ONLY.
- Despite having exactly the same Pin/Plate Sizes, the 520ZVM has a
Lower weight/100 links AND a Higher Tensile Capacity.
- The 520VM has slightly smaller pin length AND plate thickness, but
the Pin Dia is the same and while the Tensile Capacity is LOWER than the
VL4 it has a much higher Wear Index, close to that of a 520V the OEM Chain
of the F650.
- So looking at this way, while the strength of of the VL4 is
slightly higher than the 520VM you don't need the extra capacity as the
bike is just 650 not 750, the thing wears out more quickly.
Tsubaki Chains
Regina Chains
| Model
| Link Type
| Max. Displacement
| Comments
|
|---|
| Regina 135 ORN6
| O-Ring
| 650cc
| Regina Recommended for Classics and ST
|
| Regina 135 ORS6
| O-Ring
| 650cc
| Slightly higher tensile strength than ORN6
|
| Regina 135 ZRH
| Z-Ring
| 650cc
| Specified as an upgrade for Classics and ST;
Regina Recommended for GS and Dakar
|
| Regina 135 ZRD
| Z-Ring
| 900cc
| Slightly higher tensile strength than ZRH
|
EK Chains
Websites:
| Model
| Link Type
| Max Displacement
| Comments
|
|---|
| EK 520SRX
| Quadra-X Ring
| 750cc / 90hp
| Value-Priced; available in colours
|
| EK 520MVXZ
| Quadra-X Ring
| 750cc / 100hp
| Premium chain; available in colours;
Up to 160 links
|
Other Chain Options
- Discussing chains with Crazy Charles the other day, I had an
epiphany. He buys CHEAP chains from JC Whitney. Buys them three or four at
a time. Buys NON-O-ring chains. Pays about $20 each for them. Says that
they last about 6000 miles with near total neglect. I'm thinking that
three twenty dollar chains cost LOTS less than one EXPENSIVE X-ring chain
that may or may not last as long. I think I may fire off an order for some
JC Whitless 520 110 link heavy duty chains (01ZX1284Y).
http://jcwhitney.com/productnoitem.jhtml?CATID=67602&BQ=mot
Flash #412
- That is exactly the direction I am headed (and have been going)
with any dirt bike or dual sport bike of about 650cc or less. On my
Hayabusa, well it will still get the heavy-duty O-ring chain, but that is
a totally different type of application. Non-O-ring (or X-ring) chains are
easier to install as you don't have to compress the O-ring (on the master
clip), so the clip just snaps in perfectly. My new chain will come from
Krause Racing - a Sidewinder, without O-rings. They advertise in every US
dirt bike type mag. They also have O-ring, but I don't think I want to pay
the extra anymore - especially when the Sidewinders don't stretch much
(they do have some noticeable initial stretch, but are very good for a
long time after that) and I got good life from one on my former DR650. I
do believe the Krause Sidewinder chain to be of a superior quality. They
make the chain in O-ring and non-O-ring (same chain) in 3 qualities,
including Titanium. I wouldn't trust any off-brand or most of the Japanese
makers for non-O-ring - Tsubaki and RK excepted - but would still look for
premium non-O-ring chain. It's still made as the mx/sx racers use
non-O-ring, usually.. Gar #673
- The problem with non-O-Ring chains is that you have to maintain
them carefully and never let them run out of lube. If you do, the chains
will wear very rapidly. The other problem with modern "HD"
chains is that they are not at all heavy-duty. If you read the
manufacturers specs on their chains, you will find that their non-O-Ring
chains are something of their bottom-feeders, when it comes to tensile
strength. They definitely do not use the best materials available when
manufacturing these type of chains - which is not to say that they will
not work just fine, they just may not last all that long under high-speed,
high-power usage. There is certainly nothing wrong with a non-O-ring
chain, especially if it runs in an oil bath. But left un-oiled and
exposed, as on modern chain-driven bikes, a non-O-ring chain will have a
short life - which may end in breakage. The chain manufacturers tend not
to make non-O-ring chains of the same quality as their O-ring chains for
marketing (read profit) reasons and because the non-O-ring chains are
mostly bought by dirt riders and road racers, who regularly clean and
replace their chains - unlike most road riders. Richard #230
Chain Details and Comparison
The following table shows the details of various appropriate chains.
Please note not all appropriate chains are listed here - either because
some details are not available, or it was too time consuming to fill the
details in.
| Model No. |
Pin
Length |
Roller
Dia. |
Plate
Thickness |
Weight |
Tensile
Strength |
Seal
Type |
Wear
Resistance
Index: Std.
Chain = 100 |
Connecting
Link |
|---|
| Inner |
Outer |
kgs/ |
lbs./ |
|---|
| mm |
in |
mm |
mm |
mm |
100 Links |
100 Links |
kN |
lbs. |
Rivet
(ZJ) |
Clip
(FJ) |
|---|
| DID 520V |
20.20 |
.795 |
10.16 |
2.00 |
2.00 |
1.52 |
3.36 |
30.4 |
6,830 |
O |
2,350 |
 |
|
| DID 520VM |
20.20 |
.795 |
10.22 |
2.00 |
2.00 |
1.54 |
3.40 |
35.8 |
8,050 |
X |
3,220 |
|
|
| DID 520ERV3 |
18.60 |
.732 |
10.22 |
2.00 |
2.00 |
1.50 |
3.30 |
38.5 |
8,660 |
X |
3,100 |
|
- |
| Regina 135 ZRH |
20.40
| .803
| 10.23
| 2.00
| 2.00
| 1.64
| 3.60
| 34.8
| 7,822
| Z
| ?
| ?
| ?
|
| EK 520MVXZ |
(Not available at time)
|
About Sprockets
Sprocket Specifications
The stock configuration on all F650 chain driven bikes is a 47 tooth
rear sprocket and a 16 tooth front sprocket. Steel sprockets
will last far longer. For information on sprockets of other sizes, see the
15T and Other Sprockets FAQ. The
BMW 16T front sprocket contains two rubber sides which act as a noise and
vibration dampening system - aftermarket front sprockets will not have
these rubber sides.
What about JUST Changing the Sprocket?
- What are your opinions on changing sprockets without changing the
chain? Is the life of the chain reduced? More chance of slippage? Would
love to reduce RPM's at 65-70 MPH, but still have some life in the links.
Derek
- Generally speaking, and where
mileage is your objective, change them all together and don't use aluminium
sprockets. If you don't change the steel sprockets and chain at the same time,
you will get increased wear on the new part. Gar #673
- Most people would tell you it's
not a good idea. For what it's worth, last time I changed mine I got a steel
front (15t), DID X-Ring chain, and hardened aluminium rear (49t) from Kiernan
Racing Supplies for less money than most places would sell me a chain, if money
is your concern. David #476
- Voice of Experience: Get steel - and change sprockets and chain
all at once. bmwmuriel #582
External/Internal SNAP-RINGS
by Flash #412, October '01
- An external snap ring LOOKS like the one in the pre-1997 shop
manual. I can't recall if it looks like the one in the shop manual I have
or not. You CAN NOT SEE it well enough in the parts manual to tell WHAT it
should be.
- Basically, internal and external snap-rings are both C-shaped with fat
sections near both open ends of the C with a hole in those sections for the
snap-ring pliers. INTERNAL snap rings are very nearly perfectly round on their
OUTSIDE with the swollen bits facing in. They are intended to fit into a
groove in a bore. EXTERNAL snap-rings are very nearly perfectly round on the
INSIDE with the swollen bits facing out. These are designed to fit in a groove
on a SHAFT.
- The output SHAFT on which the sprocket fits is ... a SHAFT (duh).
Therefore it should have an EXTERNAL snap ring. Fitting an internal snap
ring means that the retaining ring only actually touches the shaft in
three places, two ends and the middle of the C. Since the two ends are
quite close together, the ring fits in the groove in essentially two
place. Using an EXTERNAL snap ring (like they should have) would mean that
there is retainer-in-groove for about 350 degrees of the shaft.
- I was horrified when I found that there was an internal snap ring
on my bike in France. I ordered a new snap ring. I was even MORE horrified
to find that it, too was the wrong type. I added snap ring pliers to my
tool kit the moment I got home.
- If someone gets hurt from one of these coming off, BMW *IS* going
to have to pay them a WHOLE lot of money over this. This is criminal
negligence. The entire power output of the motor goes past a WRONGLY
SPECIFIED common retainer. How come it is RIGHT in the picture, yet
installed wrong at the factory and delivered wrong from spare parts
stores? (My very first post to the Chain Gang was over this issue).
- If you want an external snap-ring, measure the shaft outside
diameter and the thickness of the ring you have. Go to any industrial
parts house where you would go to get bearings and seals. Tell them you
want the equivalent snap-ring thickness for an external snap-ring for a
shaft of X-mm diameter, not counting the groove. They should be able to
look it up in the Machinist's Handbook. It is a STANDARD part
(mis-specified by BMW).
- Here is photo
Kristian took of (left to right) - internal (what the (BMW) idiots used),
external (should have been used), and e-clip (what Kristian decided to use)
- Another
tip: you'll notice on any stamped metal piece (like the circlips) there is a
rounded side and sharp side. This is caused by the punch and die during the
stamping process. A visual inspection should indicate which side is which. The
sharp side should be facing out on the countershaft. Looking at Kristian's
photo in the FAQ
(that's a 15T NON-OEM Sprocket by the way), it
obvious the rounded side of the e-clip is up. Once you find the sharp side of
the clip, it should face out, away from the sprocket. This works cause the
sharp edge digs into the groove, keeping the clip from working out, putting
the rounded side out facilitates the clip being forced out by thrust loads. I
learned this from an Aircraft mechanic. It's for real. Thanks to Mtbiero (Cugino
Pegaso).
- If you
have the OEM Clip on there (Left one in that Picture of 3 above), you need a
pair of Circlip Pliers (Pliers with two nibs (little pins) on the end), that
fit into the Circlip holes, so when you squeeze it it expands the clip to a
dia. larger than the shaft, and you can then simply slid it along the shaft
and off. The sprocket simply slides off. (Chain must be off the sprocket first
of course). You can also do it (maybe with a couple of screwdrivers, but spend
s a couple of bucks and buy a GOOD pair of Circlip Pliers. Cheap ones are
terrible, the nibs bend. Note there are TWO kinds, innies and outies. That's
an outy. Innies you can use for your Wheel Bearing circlips.
Classic/Pegaso Circlip observations
by Mtiberio (cugino pegaso)
I know some classics suffer this, but I was shocked as I pulled the
front sprocket on my Pegaso yesterday to try a 15 tooth. this is what I
found.
- The
bike had a wimpy internal snap ring retaining the countershaft sprocket. the
proper snap ring type for this application is an external. the ring showed
hammer marks at the three meagre points of contact it was making with the slot
(more on why the hammer marks are there below). A trip to the H/W store today
will fix this.
- Worse,
is the red rust dust I saw at the shaft/sprocket spline interface. My bike is
a 2000 leftover with less than 2500 miles and 3 months use. I'm glad I found
this in time before the splines on the output shaft got hammered, requiring a
complete teardown. When it goes back together I'll be using a mixture of wheel
bearing grease and moly assembly lube.
- Third.
The original sprocket and the aftermarket sprocket both are offset slightly.
that is the plane that represents the center of the teeth is not down the
middle of the sprocket in a left right sense. As installed, the teeth are
closer to the transmission face than the Circlip face. No problem here, but I
noticed that there were wear marks on the inside (tranny side) of teeth and
none on the outside, indicating that the front sprocket is offset to the left
relative to the rear sprocket and/or that the chain was trying to pull the
sprocket to the right by applying pressure to the left side of the teeth. Of
course given the above mentioned Circlip issue, combined with the thrust loads
from the misaligned sprockets, you can see a problem building. I also noticed
that if you reverse the front sprocket, it would move the plane of the teeth
further out (due to the asymmetry) which would be the proper direction to go
to rectify this. What I don't know is if this will be too much (yes I know
there are ways to "measure" alignment).
- See also the
Chain Sprockets FAQ, What happens if I put the Front Sprocket on the Wrong Way
Around?
General Sprocket Comments
- Both the Classic and the GS/Dakar have a 16T Front and a 47T Rear
Sprocket as STOCK.
- The front sprocket should be the same for all 97-2002 models.
There are Superseded front sprockets part numbers listed for the (Circlip)
93-95 models, and for the 96 model year. Take note that though they have
the same number of teeth, the rear sprockets are listed as separate
applications with different part numbers for the Classic vs. the
GS/Dakar series. Todd #389. (They are the same (DHP#711)).
- Aluminum sprockets for the bike, while lighter, should wear faster
than the BMW ones and that there are all kinds of nice varieties like
different colors or specially coated sprockets. Benefits are lighter
weight as well as self-cleaning properties for riding off-road or in mud.
- I have had the JT 53t rear sprocket on my bike for nearly a year
now, some 7500 miles?- Speedometer not working for the last 6 months. The
fit was perfect and I am most satisfied this far. I used an original BMW
front sprocket, to be sure it fitted properly, and DID 520VM X- ring. The
front sprocket was rather inexpensive. Haakon #626
- I just ordered a 520VM chain and JT sprockets from
Bob's BMW. I was going to order the BMW sprockets, but Bob's recommended the
JT's. The JT's are steel, just as the BMW, but are half the price. Bob's hasn't
sold any BMW sprockets for over a year, and hasn't had a complaint on the JT's.
If you search online for the JT's, you'll see that they seem to be very well
engineered. Brian 1025.
- Something else also
uses the same sprocket, including (but not limited to) the 84-85 KTM600, and
most BUT NOT ALL 97-01 ATK's, also (don't ask, I'm just copying a listing) 97-98
BMW CME, ES, DS600 (maybe those are actually Bombardier?). Wunderlich or Wuedo
also offer aftermarket European sprockets for our Rotax on their sites. I have
no idea where they get them from. Also AFAIK, none of the aftermarket sprockets
have the dampening rubber sides, only the OEM BMW sprocket. It's probably a BMW
thing, but maybe the Aprilia Pegaso has it too. Not sure what sprockets are
available from Aprilia, might be something different. Marty #436
- My chain is going bad, too and I just ordered a new
one. The way you tell, with an O-ring chain, is that it will require adjustment
every couple of hundred miles. Before that, the chain will almost never need
adjustment. When it finally goes, it does so all at once. If you don't replace
the chain when it starts needing regular adjustments, you will ruin your
sprockets and be forced to replace them with the chain. If you replace the chain
early, you should be able to save the cost of buying new sprockets. That is what
I do and I have yet to need a new chain wheel, due to wear of the teeth.
(Richard #230)
- Classic F's have flat sprockets and it does not
matter which side you have facing out (on the rear). I think Krause designs
their sprockets to be reversed for longer wear, as they have some type of
scallop on the side of the sprocket in the valleys between the teeth to help
shed dirt and debris (I think, I could be really wrong). Gar #673
- I noticed that the old sprocket on the rear of the
bike looked symmetrical on both sides...BUT the new OEM rear BMW sprocket on one
side appears flatter than the other....one side seem to slope up more to the top
of the teeth.. Does anyone notice a difference on either side of the new OEM
rear sprocket...? I can re-install mine but it is now with the flatter side
facing out....am I wacky or has anyone else noticed this..? Nick #1085
For opinions on Gearing Changes see the
15Tooth Sprocket FAQ. (Also
contains other gearing Change Opinions).
Aluminium Sprockets
Kiernan Racing Direct Link
Sprocket Specialists
- I've got my rear one from Sprocket Specialist. They don't have
steel ones. I've changed front, rear and chain all at the same time and
after (only ?) 4500 mile (all street, no dirt) I can clearly see some
wearing and aluminum filings on the wheel rim. I plan to flip it during
this week end since the teeth have an asymmetrical shape right now...It
sucks. gim - Giovanni
- Is your
SS sprocket hard anodized? Pretty poor durability if it is. BradG 1002. No, it
is not. Big mistake I guess...I have double checked it this morning and it is
MISSING a dozen of teeth - gim
- Aluminum is for RACING purposes. Won't last on the street.
Specially if ya ride in dirt. mike410
- I wouldn't use them. I have 20K miles on my original cogs and
expect the current set-up to go another 8K or so and then I will replace
all cogs with the original spec and use the 520VM chain again. Chris in
Santa Cruz, CA #782
- I have
the Sprocket Specialist rear sprocket and also noticed the shavings on my chain
during the first 1,000 miles after install. Since then I installed a Scottoiler
and have not noticed the shavings. I still have good shape to the teeth, but
will monitor to see what kind of life I get out of the rear. Andy #618 (MD - '99
F650)
- You will
never get the wear from an aluminum sprocket that you get from steel. Steel is
simply harder. The only purpose for aluminium sprockets is to save un-sprung
weight, thus it is primarily a racing application. My belief is that those that
say Sprocket Specialist sucks were expecting similar or near similar wear as
they got from their factory sprockets. If wear, as you say, is your biggest
concern, no Scottoiler or anything else will extend the life of an aluminium
sprocket to equal that of steel. If you are using
aluminium rear sprockets, you should go through about 2 rears for each chain and
steel front. I have never been disappointed with Sprocket
Specialist, and have used their products in the past (on different bikes) but I
understand that the wear will occur quicker. There are some specially treated
aluminium sprockets that are supposed to last a long time, but I don't know how
good they are. Gar #673- Ky 97F
- Voice of Experience - the hardened aluminium
sprockets SUCK - once you've worn through the coating, it's like butter.
bmwmuriel #582
- Not my experience at all. Changed the OEM at 12K,
17.5K now and aluminium rear shows hardly any wear. (That is unless I'm still
running on the coating.) After totally ignoring and abusing my OEM, I've taken
really good care of the new set, and it seems to be working. Gar points out the
common logic, 2 AL rears per chain and front. If that works for me, I'm thinking
I'll get 20K out of the chain. My thinking is that the softer aluminium rear
will cause less wear to the chain, and the rear sprocket is marginally easier to
replace than the entire set. Are you certain you were adjusting your chain
correctly? I'm sure if a chain on an aluminium sprocket was too tight, it would
eat it in short order. I think I led to the demise of my OEM chain because the
first time I adjusted it, I adjusted it to 25-30mm on the centre stand, not with
me on it like you're supposed to do. David #476
Sprocket Suppliers List
by Hombre sin Nombre, November '01
-
http://www.sprocketspecialists.com.: They make the 15t Sprocket for the F,
to replace the OEM 16t Front Sprocket, which makes the bike
easier to use around
town. They have no steel rear sprockets for the F650, only aluminium, though
hardening is available on request. See
-
http://www.kiernanracing.com/: Selling (cheap!) Sprocket Specialists
sprockets, chains, tires, AND carries the DID KM-500 chain tool
-
http://www.ozemail.com.au/~chaingang: Makes CUSTOM steel rear sprockets
including for the F650 (I have one, real nice, THAT sure was tough to track
down!), any color, any teeth (nice stuff, not cheap), mail-order from OZ.
- Contacting (Paul) at the Chain Gang Oz (the Sprocket maker) was always a PITA.
He didn't answer email, answered the fax number but not the voice number, put
the fax to answer the voice number, etc. Paul is very nice, but we got the
impression it's a real small shop, maybe even a one man shop. Nobody ever came
up with an actual physical location or mailing address, so I have no idea what
time zone it is. He seemed to have plenty of work, no interest in volume or
wholesale business. He would do mail order but his interest in selling to the US
was limited. The sprockets are great, if pricey. We're hoping to find out if
it's still in business and accepting orders, and we're looking to confirm if the
regular phone numbers (below) are still good for long distance orders outside
Oz. Oz toll free: 1800 806 857 Voice:+61 (0) 7 3715 8990 Fax:+61 (0)7 3715 8991
Yes they are still operating as Chaingang Australia. Phone and Fax number are
valid. There are two guys working there and are happy to fax me or yourself
quotes on stuff. All you have to do is specify bike and what you are after. He
is happy to deal either through me or to you direct. Will mail stuff directly
overseas by registered mail. Their names are Chris and Paul. (0)7 means they
work out of Brisbane somewhere. Not really on e-mail yet or internet. They are
working on a new website for the next couple of months as they are not computer
wizards. Fax or Phone is still the best way but you can email to
chaingang84@bigpond.com for orders
but it is best to call and confirm that they have got it. Once up and running
website will be ready for a lot of email communication from then on in.
One Caveat: Although I have SEEN comments in the affirmative, I personally have
no idea of the compatibility and interchangeability of sprockets from Classic to
GS to Dakar. I don't know if Chaingang OZ has a pattern for the GS or Dakar. But
any number of teeth and your choice of 5-6 colors for maybe $75USD (it costs $7
just to send via US Mail) is worth checking out.
http://www.rentalaska.com. Orders and sells the Oz sprockets above, decent
price considering their initial cost, CG Inmate and supporter:
- http://www.onoffroad.com.
-
http://www.jtsprockets.com.
-
http://www.kevinscycleracing.com/chainsprockets.htm. I also see that MAW
(among others) has rear sprockets in 39 through 53 teeth and they're pretty
cheap too. $140 for VM X-ring and two steel sprockets here. Mason #631
- Q: I didn't see anything in the FAQs in the
sprocket section about AFAM. They have the steel, front, 15 tooth sprocket for
the Classic F650 for $19.95; Part # 61301-15. They have carried them for a
couple of years, maybe longer, so somebody must have ordered one. They make them
themselves. Any feedback? (Colorado Bob)
A: AFAM is an European and good quality firm, making motorcycle
chain and sprockets. There is a set of AFAM chain and sprockets on my
F650, from more than 38000 Km. ago... (Fede)
A: I seem to recall that I put an AFAM set on my F650 in France. The
thing about AFAM in Erp is that you get a LIFETIME guaranty on the sprockets. No
kidding. (Flash 412)
-
http://www.rebelgears.com/pages/787898/index.htm
I asked the dealer if the sprockets were the same for both GS and
Funduro. Guess what, they are! DHP #711
Care and Maintenance
Chain Lubrication - That Greasy Dirty Chain
by Steve #001. Opinions by Everybody, updated 8/22/99
Remember to lube the chain, especially after a long ride. Do this
procedure immediately at the end of the ride. There are two basic schools
of thought on chain care. One idea is to keep the chain under constant
lube, as in a Scottoiler. Another is using lubricants like Chain Wax, PJ-1
Blue or Black label, or another marque's lubrication (Honda, Yamaha,
etc).
Other riders feel that cleaning with WD-40 (or equivalent) after each
ride is the answer. NEVER clean the chain with a solvent. Solvents destroy
lubricants. Solvents get beyond the O or X rings and chains die quickly
without lubrication. This is the Voice of Experience speaking!
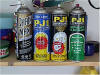
Another easy way to clean the chain is to use PJ-1 Spray and Wash (see
picture). It cuts the grime easily and using rag can to clean the
sprockets, covers, and housings on your chain drive can make it even
easier. Just rinse off those areas with water while your washing your
F650. Once you've cleaned the chain, be sure to relube it with your
preference for lubrication.

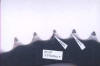
And while your down there lubing that chain, don't forget those chain
rollers (upper and
lower). However those
are not true chain rollers since they do not run on bearings. Keep them
lubed and free rolling otherwise that chain will eat through them rapidly.
Look at the picture on the right for example of well-worn rollers. If you
have a lowering kit, be sure to check the rollers since your suspension is
in a different position.
So what is the Best Chain Lube to use?
by Kristian #562, 25/11/01
Like OIL, everyone has an opinion on The Best Chain Lube. So here are
some of those opinions along with a few observations
- Chain Wax is very popular, because it sticks better and doesn't
fling-off easily. It does make the Chain very Grimy and can trap
sand which will grind your Sprockets away, so clean off the old residue
before applying a new coat.
- Some people use Chain Oil.
- The General Consensus on frequency is about every 500 miles.
- It is recommended to spray whatever you use on the INSIDE of the
Chain so that when you drive along it flings it into the places it's
needed, not off the chain.
- Always spray it on a warm chain, it goes in better.
- Try to Spray the edges of the links where the O or X-Rings are.
The rollers are sealed. You won't get any lubricant through them and
overspray will give you enough for the sprockets anyway.
- Richard #230 has a GREAT tip on Chain Lubrication, to keep your
wheels clean. Place a bit of Cardboard BEHIND the Chain between the Chain
and the wheel and Spray against that. It keeps the stuff off your rims
and tyres.
Chain Lube Opinions
- I transferred much of the maintenance habits I use on my bicycles
to the F650. The main chain on my tandem bicycle undergoes about as much
abuse as you can inflict on a bicycle chain. The secret to longevity of
chains, in my opinion, is regular lubrication and cleaning. Here is what I
think happens with chains and (sorry Richard) cogwheels. The un-lubricated
chain wears down the teeth on the cogwheel effectively increasing the
distance between the gaps in the chain that are needed to properly mate to
the cogwheel. This in turn requires the chain to stretch to accommodate
the new cog teeth spacing. In this case everything needs to be replaced.
On a bicycle if you put a new chain worn cogs the chain literally jumps
teeth. If this doesn't happen with the motorcycle then the new chain will
just stretch to match the cogs. Quickly. The second scenario is the normal
wear scenario whereby the chain stretches naturally even when optimally
maintained. In the case of the bicycle there are cheap measuring devices
that can be used to detect when the chain stretches to the point where it
will start to wear the cog teeth to match it. In this case a new chain may
pre-empt the need for new cogs if caught soon enough. There are two
schools of thought in the bicycle world. One, do your best to maintain the
chain and cogset you have until it just doesn't work anymore or the chain
breaks (bad deal on a motorcycle) and then replace the everything. The
second group feel that the proper attention will preclude the need for
new cogs every time you replace the chain. For the F650 there is one thing
about the cogs that might lead me to choose the let it all wear out school
of thought (within reason of course) and that is the fact that the cog on
the countershaft has a rubber damper integrated in it and I have a feeling
that over time and with many temperature cycles this rubber might loose
some of its damping capabilities. I may be a nut, but I am currently
lubricating the original chain on my bike every 200 miles with Bel Ray
(blue can?) chain lube. I put it on liberally right after my 20 mile
commute while it is warm. I spin the rear tire about ten times to help
work it in and then I grab a rag and wipe off the excess cleaning the
side plates. After sitting overnight I only have to clean a little spray
off the rear wheel after the first ride. I will let you know how this
works.
What happens is the rollers on the chain wear over time, effectively
increasing the distance between contact points on the chain, which then
causes the cogs to wear rapidly. Chain first, cogs second. This is why
cogs can survive several chains, if the chains are replaced before they're
worn enough to damage the cogs.
- PJ1 Black was rated the best, but sling-off was only
average. Followed by Kawasaki K-Kare Foaming, Yamaha Performance and Pro Honda
HP Lube. The three waxes (Castrol, Bardahl, Maxima) rated fairly good at
sling off, but their reduced rolling resistance did not last as long
(indicating shorter lube life or more frequent application required). WD-40
rated best at grit resistance, but not much else. Reprints are available at Ian
Smith Information (Sept. 2001 issue, p. 20-27). Marty #436
WD-40, no way. IMHO WD-40 is NOT a viable substance for chain lubrication. I
use a grunge brush with the stuff that it came with now am switching to Motorex products. They have a great system, a cleaner then a specific
lubrication agent. The best part is that it comes in master/filler size and you
can get a baby bottle to take it on the road with you. This way you can lube
after each off-road ride (every day) or after your ride when you're on the road.
Check them out at
http://www.motorex.com/en/default.html They don't show the chain cleaners on
the web site but Cycle Gear carries them. There is also another
cleaner/lubricant that I saw used at a maintenance demo which seems AWESOME.
This is the Dumonde Tech BHP Chain Oil.
http://www.hgnr.com/Products/Dumonde/DT_main.html or
http://www.hgnr.com/Products/Dumonde/DT_tech_info.htm#BHP_Chain. This is the
only product that I've seen specifically stating that it can increase brake
horsepower because of its properties. I was talking to some racers who's advise
I value and they swear by this stuff so it's making its way into my garage
soon! Davidhpark, #711
- Have another read of the Info page on the
Loobman Chain Oiler website.
They appear to have a very good reason to lubricate the O Rings on the
Chain, which maybe you would not expect to be necessary. Trevor #999
-
As for the rust, my chain is rusty on the side plates, as long as that rust
isn't chewing the o-rings, you are fine. As for the stickiness, about midway
in chain life I wash it with kerosene. Basically I have two tubs of kerosene
about one knuckle deep. I take the rear wheel off, I place the chain in tub#1
and scrub it with a toothbrush, when I've scrubbed the accumulated spooge off
the chain, I then pull the chain off the front sprocket and scrub the sprocket
and clean all the flung spooge and crap off the inside of the front sprocket
cover, I wipe off the rubber chain guide thingy on the swing arm (usually
takes some toothbrush scrubbing), wipe the rollers off and clean off the rear
sprocket and chain guard. Then the second tub of kerosene is for a second
rinse of the chain and a second wash of all related parts to get everything
squeaky clean. Then I put it all back together, adjust slack, start the engine
and while it's on the Centerstand I put it in first gear and fling the
kerosene (paraffin for the limeys) off the chain. Then I liberally spray Chain
Wax all over it and I'm done. A big messy job but I feel that the
build-up of Chain Wax, although very
protective against water and rust, keeps chain-killing grit in there as well.
So a cleaning makes me feel better. The reason I'm saying this is because you
might want to try cleaning the chain.I think that the F, as spunky as it is, doesn't have enough torque to cause
catastrophic failure of the chain, even if it's quite worn. My chain is also
grabby when it's cold. But smoothes out when warm. Shank NYC.
- Moose
Chain Scrubber (you gotta love the name) PJ1 Blue rocks. I tried the wax
recommended in MCN - sucked and also used PJ1 Black - really sucks - way too
much thrown off. I now use a chain cleaner which also doubles as an
application guide for chain lube. You put it on (minus the brushes inside),
hook up a can of chain lube, spin the wheel and push the spray button on the
can. It has two holes in side on top in just the right place and puts the lube
where it needs to be with no splatter in one pass. I have had very minimal
throw off with the blue, just changed the oil, and when I pulled the sprocket
cover it was almost clean after 800 miles and there was nothing on the rim. PS
- The cleaner that comes with it is incredible, but wear gloves and don't let
the tree huggers see you. It has Diethylene glycol monobutyl ether and sodium
trypolyphosphate - kick ass shit. I normally use kerosene, but this shit blew
that away - don't know about residue.
- I use
chain wax (Castrol) and since then, no more problems with the oil leaving the
chain and falling on the wheel. My bike has almost 75.000 Km and the 2nd set
of chain and sprockets is actually working fine, from 37.000 Km ago...I never
have used oil in this set, only chain wax. First set lasted at some more than
38.000 Km, having used oil first and chain wax at last. Ah! I usually lube the
chain every 1.000 Km., or a bit frequently (every 500-600 Km.) if the ride is
off road. Fede
- My
friend lost about a centimetre off his right index finger last month cleaning
his Dakar chain in a campground with the engine running. Good thing it was
here in Japan and not in Russia where he was a couple months ago, or he may
have lost more than just the tip of the finger and a lot of money in hospital
bills. It seems that this is a common type of accident in the rural area of
north Hokkaido he was in at the time. The doctor took one look and new exactly
what to do. An then a farmer came in at about the same time with a similar
injury from an engine or something. Why is it that some people feel the urge
to stick their fingers in moving machinery? Chris in Tokyo
- I've
been using the Honda Pro dry lube since I bought the bike last spring. I give
it a spray once a week. I'm often accused of NOT lubing the chain because it
always looks so dry. And clean. I don't know what the future holds, but at
5,000 miles the chain has never needed adjustment. Or cleaning. Scott, ID
- Riding
in the dirt, I much prefer a light lube (like WD40) that flings off, rather
than a sticky one (Chain Wax) that collects dirt into hard globs. In a sealed
o-ring chain you are not really lubing the internals of the chain, just taking
care of the protective o-rings. I've never understood the chain wax thing on a
sealed chain. Todd #389
- I took
my KTM, with 4500 miles on it, to Seattle for the Alcan 5000. At the Trenton
Rally, I talked to the Amsoil rep, who agreed to give me some oil for sticker
space on the bike. Cool. Free oil. He asked me if there was any other products I
could use. They had some "heavy Duty Metal Protectant" listed in the brochure,
so I asked for some of that. The can said that it could be used for motorcycle
chains. Maybe it just said chains, I cannot remember and the can is in the
garage right now. Anyways, the stuff hardens much more than the chain wax that
I had been using up to that point. The route in the Alcan took us over gravel
every day, including several sections 100-300 miles in length with calcium
carbide, or something like that, on the road. This stuff coats everything, and
sticks there. IT has a very abrasive feel to it. I will be the first to admit
that because of the extreme hours on the bike, and my fatigue after each day,
I only properly cleaned the chain (a 520 VM) twice, and did a 1/2 way decent
job two more times. Each time I used a "Simple Green" like stuff to clean, and
then used the Amsoil Protectant. There were some days when I did not lube the
chain, or clean it, at all. After I got home, I gave the chain a thorough
cleaning. I will also admit that I do something I have heard others on this
board condemn, that is I use engine cleaner (solvent) occasionally to
completely clean chains. I don't leave it on the chain long, just long enough
to soften everything an get the major gunk off. Which leads me to the
conclusion. I thought that I would need to replace the chain when I got home,
with 9000 miles on the chain, much f it "abusive". Nope. It still looks great.
I think any substance that you can use to keep the chain from rusting, that
also has some lubrication properties, will do the trick. The Amsoil stuff
worked great, I think, because it is dries hard, so that less stuff sticks to
it. So far it is the best stuff I have used. I would have never bought this
stuff off of the shelf, as the can makes you think that the manufacturer put "chain
lube" or such on the can as an afterthought, but I am impressed. YMMV, etc..
Chris #1073
- The
conventional wisdom I have always heard is: "don't use WD-40 to clean your
chain because it will dissolve O-rings." However, while reading the September
issue of Motorcyclist Magazine I noticed in their Answers section (p.99) this
article on chain lubes. It reads in part: "...The chain makers all generally
agree you should clean the chain regularly, using kerosene instead of more
aggressive solvents. Although WD-40 does not actually contain kerosene (so its
maker says), it's been proven to be a good solvent that does no apparent harm
to O-rings. Squirt the chain with WD-40 or kerosene right after a ride, wipe
it down and then apply (sparingly) you choice of chain lube." So what is it?
Any chemical engineers out there that can answer the age old question "to
WD-40, or not to WD-40." Mark #797
- Despite
the fact that you will hear tirades against WD40 from people who do not use
it, I have been using it for 35 years, in both spray cans and liquid gallons,
and I can tell you that it does not dissolve o-rings. It's a great cleaner and
light lubricant. If overused, the solvent in the aerosol can de-grease
lubricated parts, but it can be very effective when used sparingly. It's a
great chain cleaner. My OEM 520V chain still had .5mm wear left at 14k miles.
I use it as chain lube, letting it dry overnight. It is not heavy duty, being
good for only 200-300 miles, however it does fling off, attracting less dirt,
and making less build-up than some of the sticky lubes that do not fling. Some
of the chain manufacturers chain sites used to mention it by name as suitable
for o-ring chains. Todd #389
- You
could probably not find a better preservative of 0 rings than WD40. It wont
lubricate the chain and sprockets at all, but I use it to clean everything up
before applying 90 weight oil. Paul
- Bel-Ray
"Super Clean". You have to get it if you don't have it already. I actually
just posted a reply on the gen. disc. board about this but thought it really
should be here. Since I got my bike I have been bummed on the whole chain lube
all over my whole bike thing. I know now that I was using too much in the
beginning too. But, seems like no matter how much you use, it still warms up
and flings off. The "Super Clean" goes on dry and white. I rode to work and
back with it (bout' 100 miles) to try it out and it was still dry and clean. My
bike is now staying 80% cleaner in the rear end and I am stoked. Can't say
enough. It's the little things... (Colbster, CA)
- I've
been using Bel-Ray "Super Clean" for about 10,000 miles now. I bought my bike
with about 3000 miles on it and I'm sure it was the original chain and
sprockets. I see little chain and sprocket wear but it could happen all at
once as I've heard form others here. I try to remember to use it often but I'm
still on the first can though it isgetting low. I found out about clogging the
little tube and learned that the last bit applied should be with the can
upside down to clear the tube. (Will in CA)
- Actually, I didn't write it very well. Hopefully this is better. Their most
recommended chainlube is PJ1 black (that's why I bought it). They took
everything into consideration: lubrication (roll resistance), corrosion
protection, fling-off, price. Bel-Ray superclean was significantly worse in
lubrication, as compared to most others. It was absolutely superior to
anything else in the fling-off results though. I don't care, I'm going with
Bel-Ray superclean from now on. I hate the mess. Otherwise I can't touch
anything back there without getting messy hands. (its_xls)
- I have
tried one bell ray lubricant in my Dakar chain and I did not like it. Chain
just felt...dry. So I went back to more "oily" lubricant (do not remember the
brand right now). If you use more "oily" lubricant, just use piece of cloth to
wipe off excess oil. This way your bike is not so messy. (Marko & Dakar)
- People
who race motorcycles use 90 weight transmission oil on their chains. If you
warm up the chain before putting the oil on it there will be little fling off
IMO. And 90 weight is much easier to clean up than that chain goo. (echo)
- 90 wt
gear oil is also what most motorcycle manufacturers recommend to oil the
chains on their bikes in their owners manuals. Oddly, most of them also sell
spray lube, but don't mention using their own lube in their manuals. (Richard
#230)
- I must
agree with 90wt gearlube. I have 19000 on my stock chain and I haven't had to
adjust my chain in 3000 miles. Makes a mess. Cleans and lubes the chain. Cheap.
Takes time. Makes a mess (Marko, Dallas, TX)
- I have
tested various chain lubes on various things around the "ranchette" and I too
was initially thrilled with the "SuperClean" until over time I saw that stuff
coated with it would rust anyway. Maxima Chain Wax is far superior IMO and its
still pretty clean. I also spray a bead of Bel-Ray 6 in 1 thin film lubricant
on the chain just before riding sometimes when the chain is cold and the last
chain wax application is a little worn out. (DaveJ#888)
- I've
used the Maxima Wax also, for about 2 years. It works great and doesn't make
much of a mess like the black lubes do. (Colorado Bob)
- Yeah, I
started out using the Maxima - recommended by my Dad. To be honest, I liked it
and I think my problem was simply putting too much on. You see, my problem was
that the lube would heat up and fling all over the rear tire/rim and also
fling into the front sprocket cover. It would then build up in the cover and
leak down all over/under the engine, not to mention the mess on the swingarm.
The thing I like about the Super Clean is that when it heats up, it doesn't
fly. I don't get the hot flash when I get off that my bike is leaking oil
anymore. Even though the Maxima is good, when it heats up, it does fly. Anyway,
where I live, it's pretty darn dry (humidity wise) and I'll keep an eye on the
chain as I always do. I'm going to stick with the Super Clean until it wrongs
me... (Colbster, CA)
- I have
been using the wax type chain lube for all the miles I've owned the bike,
nearly 13 thousand miles. A couple of weeks ago I decided it was time for a
new chain because the old one was crappy. Adjusting the chain you had to take
into account the stiff links and this would make other parts of the chain
loose. This made for a noisy chain. I ordered the new chain and sprockets.
While cleaning the bike after our Death Valley trip I decided to try cleaning
the chain and see what would happen. I used nearly a whole can of some bicycle
degreaser and it cleaned up real well. I still had many "stiff links" links
that would not move easily but it appeared clean. I then used 40-weight motor
oil and worked the tightest of the links and put a liberal amount on all of
the chain joints. Yes! This has worked quit well, the chain runs smooth and
with reduced noise. I will no longer use wax lube (I have used this type for
years on my bicycles) on my motorcycle. It's a little messy but, oh well. I
will put off installing the new chain and sprockets for now and see if I can
get a few thousand more out of the existing (16,000 miles now). Will in CA
- I put
on a Scottoiler (shaft guy for the last 13 years, hate oiling the damn chain
so often). I suggest if your sprockets are still OK, you get the new chain on
SOON. Your false economy may cost you a new set of sprockets to go with the
new chain...once the chain starts to go, it generally doesn't take long, and
takes the sprockets along as well. Marty #436
- After a
messy experience with PJ Black, I switched to the much cleaner Honda Spray
lube but ended up questioning how well it really lubes. I gave up on the fancy
junk and started using chainsaw bar oil, which I have plenty of anyway. It
appears to work quite well and the little bit of fling off it causes is easily
wiped off even after it sits for a while. I washed my bike yesterday for the
first time in at least a month (wanted to get the yucky snow-melt stuff off my
bike - whatever it might be) and the rim wiped clean just with regular sudsy
water. Razz
- I
switched two years ago from various spray lubes to 90w gear oil (as the chain
manufactures suggest in their instructions). I have been very satisfied with
the results. Keith #714
- Chain
manufacturers recommend using 90 weight on their chains. Also racers use 90
weight. Those spray-on lubes just make a mess. They get on the side plates but
not on the rollers. It's good to hear others finding out the same thing. By
the way, it's also a good idea every 1000 or so miles to give the chain a good
douching with something like WD-40 before oiling it to get it clean. Also,
it's best to oil a chain when warm from operation, as it will then drip less.
Echo
- I'm
trying to find out what people are using to care for their chains in a moist
environment (Pacific Northwest). I lube my chain religiously with Motul but it
constantly develops rust spots. I've tried PJ-1 (same results) and gear oil,
which is a bloody mess. Should I be looking at chain wax?? lmcdonald
- No need
to worry about rust on the exterior of the links. I assume it is not rusting
on the rollers? Just install a Scottoiler and forget about regular
lubrication. In 14k miles, I have only tightened the chain once. On my Classic
Funduro, the chain was toasted in 10k miles. Steve #1059
- O-ring
chains have sealed-in lubrication. Any type of water-dispersant like WD-40
will keep the chain from rusting and helps keep the o-rings pliable. About the
only difference in what you use is how much of a mess it makes flying off the
chain. SScratch
- My apologies to SScratch and everyone else who
uses WD-40 for chain lube. I've had two chains melt down within 1000 miles of
having WD-40 used on them. WD-40 is a penetrating water dispersant, not a
lubricant. If you spray it on your chain, it will penetrate the o-rings and
dissolve the lubricant on the INSIDE of the seals and fling it all over your
bike. Shortly thereafter, you chain will die a horrible death. I know of
people who use WD-40 sprayed on a rag and wiped on a chain to clean it, but
for lube, especially in the Northwest, you want something with paraffin in it.
Like Boeshield T-9 at a minimum. T-9 is a product developed by Boeing Aircraft
to coat newly machined parts to prevent corrosion prior to assembly. It's much
the same as WD-40 (so I wouldn't spray it on, apply with a cloth) but has a
paraffin coating that remains after the WD stuff evaporates. It's one of the
handiest products around, just not my first choice for chain lube.
http://www.boeshield.com/ I like a
wax, prefer Motul, couldn't keep PJ-1 on my chain. I ride in the desert a lot
and another reason I prefer the Motul is that I can get the dirt crud off the
chain simply with a stream of water from the hose and a soft brush, and a
coating of wax remains. Any other lube I've ever used, I had to clean it all
the way down to bare metal and start over. I use the heavy Motul and it works
great here in the desert! David#476
Inspecting Your Chain and Sprockets
More detailed descriptions can be found below on how to check the chain
and sprockets conditions. However the following is a summary with pictures
of how and where you need to check your chain and sprocket condition.
| Inspection 1: Chain Tension |
|---|
|
On the sidearm of your bike, or in the manual you will find a sticker
indicating how much tension should be in your chain. This will depend on
the bike you have. Grab a ruler or mark a piece of cardboard with the
"range" specified for your bike. Hold that against the swingarm so you
have a fixed point. Now simply push your chain upwards and make sure the
distance it moves is within specifications.
|
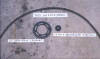
| Inspection 2: Pulling Chain Off Rear Sprocket |
|---|

Try pulling the sprocket toward the rear of the bike. You should see
less than half a tooth. (Note: This picture was taken on an Aprilia Falco.
On the F650 the sprocket is on the other side). This picture shows a chain
that is still okay.
|

This picture shows a worn chain / sprockets. Notice how the chain can
be lifted more than half a tooth off the sprocket? Also notice the chain
does not appear to have been lubed very often. In this case the chain
and/or sprockets need to be replaced. You can find an interesting
chain wear calculations on
this website.
|
| Inspection 3: Stiff Chain Links |
|---|
|
Slowly rotate the rear wheel and closely watch the chain as you go
around. Watch out for stiff links - these will show up as kinks in the
chain. Stiff links will increase the wear on the sprockets.
|
| Inspection 4: Uneven Chain Stretching |
|---|
|
Grab a ruler again, and count off ten or so links on the chain. Measure
that distance and note it down. Now rotate the chain around and measure
another section of ten links, and repeat until you have four or so
"samples" of the chain. If the distance varies too much between these
measurements, you have uneven stretching of the chain.
|
| Inspection 5: Sprocket Condition |
|---|

Finally have a look at the sprockets. This sprocket on the left is a
new BMW 16T sprocket. You can see the teeth are symetrical around
the whole sprocket.
|

This is another new sprocket, a 15T sprocket. Again all the
teeth are symetrical.
|

This is a worn BMW 16T sprocket. You can see hooked teeth. When
you draw two lines relative to the sides of the teeth, you can see clearly
the wear pattern on the sprocket. It is debatable if this sprocket was
worn enough to replace.
|

This is a slightly worn 15T sprocket. Again you can see the
hooked teeth and again the lines show the wear pattern on the sprocket.
Note: This sprocket was installed around the wrong way! The flush side of
the sprocket should be facing the engine. If the sprocket had been
installed correctly the teeth would have worn in the opposite side
more.
|
Checking the Condition of Chain and Sprockets
by Steve Johnson #1
The stock chain for the F650 is a continuous loop 520 o-ring with 110
links. The stock chain has no master link for easy removal. The 520
denotes the width; the 110 denotes the length, and "o-ring" means that
tiny o-rings seal the inner workings of each link from outside moisture
and grit while keeping in a lubricant. All this is important to know when
removing, replacing, cleaning, lubricating, and adjusting the chain. F650
owners should take care to monitor the chain and sprockets. The chain
connects engine power to the rear wheel and tremendous force is exerted on
sprockets and chain. Sprockets and chain wear, and the rider should make
frequent checks on the condition of these items. Exaggerated chain wear is
dangerous.
Sprockets and chains show wear in obvious ways. The driving sprocket
(countershaft sprocket) is the smaller of the two. A protective cover
just above the rider's right footpeg is easily removed with an Allen
wrench. The teeth on a new countershaft sprocket are upright. Think of
each tooth of the sprocket as an isosceles triangle, equal on each side.
Teeth on a worn sprocket will appear leaning to one side; the constant
force of pulling on the chain at 6000 rpm and rapid accelerations does
this.
The rear sprocket is a driven sprocket, meaning that the chain tugs
against the teeth . The countershaft sprocket is a drive sprocket, meaning
that it tugs against the chain. The material used to make rear sprockets
is not as hard as that of the countershaft sprockets and wear is usually
more obvious. Thinking of the teeth as triangles, look for wear on one
side of each tooth. Note this wear in the picture.
A chain that is very worn is obvious. With the bike on the centrestand,
rotate the rear wheel and watch to see if the chain alternately tightens
and loosens. Look also for "kinks" in the chain. If you have adjusted the
chain, test it for wear by grabbing the chain at the very rear of the rear
sprocket. Tug at the chain. A new chain stays against the sprocket; a worn
chain, though properly adjusted, can be pulled away from the sprocket far
enough to see the "valley" between the sprocket teeth. The greater the
wear, the more the chain can be pulled away from the sprocket. If the
screwdriver in the bike's tool kit can be pushed into this space between
chain and "valley" an immediate chain replacement is called for. An
alternate way to test for a worn chain is to remove the chain, stretch it
out on a flat surface, and attempt to bring the ends toward each other to
make a semi-circle. A new chain stays nearly straight; a worn chain will
make an arc of 120 degrees or more. Note the wear of the chain as shown in
the picture.
A badly worn chain is a danger. If a chain "pops" as the bike is
ridden, it means that the chain and sprocket no longer match and the chain
is being forced to jump a tooth. Do not ride the bike under these
conditions.
Although I do not do so, some riders suggest replacing both sprockets
when replacing the chain.
NOTE: as of this date, 3-17-2003, I have nearly 29,000 miles on my
chain - more than that on the sprockets. I expect that 35,000 is possible
with the chain-lubricating system that I have devised. The chain is the
best DID has to offer.
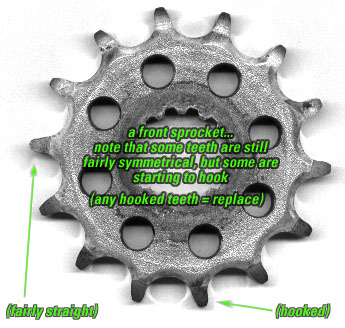
Chain Primer
by Shank, October '01
This is how I see the chain mess:
- If you can't expose half a tooth your chain is fine. I find that
chains (and I'm assuming you have the stock chain) slowly wear and then
BAM, they're toast; they don't hold an adjustment, they are super floppy
and you can expose at least half a tooth (kind of like titties).
- Pull on the chain right at about 3 o'clock on the rear sprocket.
Also make sure to check the chain in more than one place as the chain can
have tight and loose spots.
- Also, examine the rear sprocket teeth, if they aren't even and if
they measure less than 3mm at the shoulder of the tooth, the sprocket is
toast and it will soon toast your chain (if it's not yet toasted).
More on Chain Slack Measurement
In measuring chain slack, is the correct method to:
- Measure the distance from the bottom-most point of travel of the
bottom of the chain to the top-most travel of the top of the chain or
- Pick a point on the chain - top, bottom or middle - and measure
the distance from its lowest point of travel to its highest point of
travel?
By travel I mean pressing the chain down and up, at the appropriate
point on the chain, as in the repair manual and FAQ. Formerly shaft-driven
minds want to know.
- I have
always measured chain adjustment slack by measuring from the bottom of the
lower link at rest, then pushing up hard with my finger at the center of the
chain and measuring to the bottom of the lower link, again. Do not push down on the chain. I have been checking chain
tension for 40 years now and it is not too critical, just make sure that the
chain is not too tight. A little loose is OK, as long as it doesn't flop
around when riding. It is important to get both sides of the axle the same
distance from the swingarm pivot to be sure that the wheel and chain sprockets
are in alignment. Speaking of tight chains, I have bought about 25 new
chain-driven bikes over the years and every one of them was delivered with a
tight chain. Apparently, the people who assemble (or check over) bikes from
the crate feel that chains should be tight to compensate for the initial
stretch during the break-in period. Let me tell you, if the chains were
installed looser (to the correct sag), chains would stretch a lot less during
break-in. The first two things I check when buying a new bike are the tire air
pressures (usually too high - but sometimes too low) and the chain tension
(always too tight) and make the appropriate changes before riding the bike
further. (There is no use telling the shop that they adjusted things wrong, as
all you will get is an argument.) Richard #230
- Another
shaft handicapped rider...I go by #2 (if you err, it's too slack instead of
too tight, slack is better). But the most important point is that the chain
develops "tight" and "loose" spots, so it is imperative to rotate the chain
and find the the 'tightest" spot to do the above adjustment. In my case, the
difference between tight & loose is much more than between #1 and #2. Marty
#436
- In
regard to adjusting the chain - NEVER EVER make it tight. That is much worse
than too loose. WHY? Because if it's tight when the rear suspension is at or
near full extension (static sag: how it is when you adjust the chain), there
is not enough slack when the suspension compresses and the bottom of the chain
gets tighter. This will cause EXCESSIVE wear and can easily cause chain
failure real quick. As Ed Bargy (moto road-racer instructor) says, "Its not a
bow string." He constantly makes riders loosen their chains before he lets 'em
on the track. When you go off road, you will compress the suspension even
more! Ever look at pure dirt bikes and how the chains sag when they sit
unused? You need slack in that chain. Oh, it will also wear out your sprockets
fast if it's too tight, also. Gar #673
Dirt behind the Front sprocket cover
I got some dirt stuck up behind the front sprocket cover. I
assume just taking it off to clean everything out is the easiest thing to do.
Does the Touratech front sprocket cover alleviate this? It looks like it would
help, but does it make a noticeable difference (like 60 bucks worth?) or
should I just stick to taking the original off for cleaning?
I cleaned and lubed the chain yesterday but when I spin the wheel backwards
you can hear sand grinding under the sprocket cover...that can't be good.
Runaway #1259
- I find that lots of sand and chain oil accumulates under the front
portion of the cover. I take it off every thousand miles or so and use an old
screwdriver blade to scrape the gorp out of the cover, then I spray it with
Gunk and use an old toothbrush to clean out the rest of the oil - flushing
with water and wiping with a rag for the final cleaning. It is not the oil and
grease that is the problem, but all of the sand and dirt that it attracts.
Getting this mixture on your chain and sprockets will not help their life
expectancy. (Richard #230)
- Yeah it was pretty gross under there. The grinding sound actually came
from the hmmmmm guide? that the chain runs on. All clean again now but it sure
would be nice to not accumulate that much icky stuff in there. The TT guard
looks like it would work well, I just dunno what drawbacks it has. I think
part of the problem was the PJ Black Chain lube I had tried...I'm sticking to
the Honda Chain lube from now on. It's much less messy. Anybody want a can of
PJ Black? *grin (Runaway #1259)
- The Touratech cover isn't so much of a cover as an open aluminum guard.
It makes checking the Countersprocket and chain easier for wear and fit
without having to take off anything. Also you can spray it down easier because
it's open. Taking it off as well is the same as the stock cover minus one
screw less. (davidhpark711)
- Why not just carve up the stock cover with a Dremel tool? (Flash)
- I've the TT cover fitted. Much easier to keep clean (mud/sand
etc). But oil off the chain sprays up onto the engine. It's noisier too.
Ride safely.......... (Paul W (UK) Dakar)
- I just threw away a full can of that PJ1 crap. "Won't fling off my
a**". If everyone doesn't already know I have found the ultimate chain lube
after much research and t and e. Bel-Ray "Super Clean". It's the bomb. It goes
on almost dry. It looks white. It really wont fling off and you won't have all
the mess that you have been in the sprocket cover. Dirt and gunk won't stick to
this stuff, thus not as much ends up on the cover. Your rear wheel will no
longer get lube all over it, etc. Highly recommended. (Colbster, CA)
- Yup, that's what I
switched to after a few rounds of Black PJ1. I only bought it because it was
the highest recommended in MCN. So yeah, Bel-Ray super-clean is a winner! :)
its_xls.
Chain and Sprocket Life
Refer also Survey Section
for early chain feedback
An article that might prove interesting (although industrial rather
than motorcycle chains). Chains for Drives and Conveyors -
Lube 'Em to last. Marty #436
- It is very easy to replace, should you want to do it yourself. Stock chains
usually last about 10,000 to 13,000 miles, depending on use and care. Buy a 110
link DID 520VM X-ring chain for a replacement. Running your stock chain in its
current condition may damage the sprockets on your bike and if they become
damaged they will also have to be replaced. Expensive if the dealer does it.
Chain and sprocket replacement by your dealer will likely cost around $200.
Unknown
- At 12500 miles, I had to buy new chain and sprockets! Sprockets were not needed,
but original chain was toast. I just ordered the sprockets figuring they would
have to be replaced. Wrong. Mine were still like new with wasted chain. Original
chain sure ain't much! Randy#748
- I usually find that the rear sprocket lasts twice as long as the chain and front
sprocket, in other words only change the REAR sprocket every other chain and
front sprocket change. The front sprocket on my GS was getting hooked after 6000
miles where as the rear sprocket was perfect. Because the front sprocket is
considerable smaller in radius then the rear each tooth has to do more work per
revolution of the rear wheel and hence it will wear out quicker assuming they
are made from a similar material. I found the front sprocket on the GS to be
quite soft. Have a look at yours, if the teeth look hooked then it will need
changing soon. It is easy to do and they are quite cheap. PJ
- I clean my chain with kerosene and a rag every 1000 miles and oil it with an
O-ring spray lube (PJ1 Black Label is a good lube) every 250 miles. Don't expect
the chain to need adjusting after the first 1000 miles. Don't keep it too tight.
When the chain starts needing to be adjusted every week or two, it is time to
replace it. Expect to replace the stock chain around 12,000 miles. Richard #230
- Pierre's c/s sprocket nut did not
want to turn - after breaking the wrench we were using he ran down to Sears and
bought the biggest wrench they sold, which did the trick.
The Motion Pro tool had mixed results. I shattered all the
breaker bits trying to break the chain. I realize now that I didn't set the
guide properly which caused the bits to bend & snap. I found a drill bit which
fit in there & successfully broke the rest of the links.
We riveted my chain & clipped Pierre's. At 13K miles my stock
sprockets were barely worn. The chain, however, was shot.
Andy #618
- Slack, chains and wear. A tight chain has a much greater probability of
suffering a catastrophic failure by breaking. A chain must have some slack at
all positions of the suspension. If it's too tight, the chain takes over for
your rear shock if you bottom out. Not good. So long as the chain is not so
loose that it might hit something or jump off, it's A-ok. Only the top of the
chain loop is under tension, as the front sprocket pulls the chain around. There
is no pushing going on, so the bottom of the loop carries slack almost all of
the time. As there is no tension in the slack part (self-evident), additional
slack causes no wear. When a chain wears (and let's be clear about what wear's,
it's the unseen pins inside the rollers that are most important) the rollers
become loose on the chain and the chain stretches. To my knowledge, the chain
doesn't actually stretch, it's the accumulated wear in the pins which causes the
effective maximum distance between rollers to increase. This extra space causes
the rollers to get out of alignment with the sprocket teeth; rather than fitting
in perfectly between teeth, they whack into the teeth on first contact. This
misalignment causes the sprockets to wear. Therefore, if you change you chain
early, as soon as it begins to show any sign of stretch, your sprockets (like
Richard #230's) will last forever. Good alignment yields almost zero rubbing
between the roller and the sprocket. Poor alignment causes rubbing, which causes
sprocket wear, which accelerates chain wear, and so on. In sum, chain slack does
not cause sprocket wear. Misalignment of the rollers and sprockets caused by
roller pin wear causes sprocket wear. Mason #631
- The chain has the least amount
of slack when the swing arm is in a straight line with the counter shaft and
swing arm pivot. in either direction, compression or rebound, the chain will
have more slack as long as there is no contact with a roller or slider taking up
some of the slack. As the swing arm moves through it's arc in either direction
from the straight line i mentioned, the rear sprocket is actually getting closer
to the counter shaft. Mark #403
- Broken Chain. I think that it was a Regina. It was less than 9 months old with
perhaps 6-9k miles on it. Mostly ridden in the desert and off-road with light
regard to lubrication other than the occasional cleaning and lube job. Sprockets
were stock BMW 47 rear and 15 front (this is aftermarket). It broke just on one
of the links. The chain was rivet linked onto the bike not master linked. The
sprocket hubs were thoroughly thrashed as I've kinda put the bike through it's
paces both with and without luggage off-road. Don't know if this helps the FAQ
as my usage is somewhat abnormal. DHP #711
- My chain and sprockets lasted around 12K miles. Onoffroad.com
sells a chain and sprockets set that lots of chain gangers use, and as of
about 3 weeks ago, the price was about $160. Robin #790
- I've talked to a number of people who have put hardened aluminum
sprockets on bigger bikes than the F650, and none have reported any
problems. As long as you get *hardened* aluminum, not plain aluminum, you
should be fine. Josh #581
- Flash buddy, Tsubaki is expensive because it is a vastly superior chain to ALL
OTHER chains out there. My next chain will be Tsubaki because they don't stretch
(after I use the crappy DID that came with the bike when I bought it). I have
chain induced surging because of the crappy stretched out stock chain on the
bike, at 10K it's toast. Shank NYC
- My DID 520VM X-ring doesn't
stretch. The STOCK was a PoS, I agree. I adjusted this one for the first time
yesterday. It has 11,000 miles on it. If I pay 3x for a Chewbaccy (Tsubaki),
will I get 30,000 before I need to adjust it? BTW, I have had chain surge (on
the stock chain) from not lubing the chain for too long. Also, at the end of
life, when there is a partially frozen link. Flash #412
- Racing Chains - Check if they have o-rings ! (O, X or Z-rings).
I almost bought a ring-less chain at a motocross shop. If the guy hadn't
asked specifically if I was going racing with it, I would have bought it.
He told me the racing chains don't have o-rings because they roll easier
without them. Without O-rings it has a much shorter
life. Thomas849.
- The chain on my '99 finally gave out at 14,500
miles. vfour #265.
- I talked to an old Harley rider over the weekend.
His opinion of why chain rollers split/crack/disappear is that as the sprocket
gap gets wider, the teeth get pointier, and the chain stretches, eventually a
roller ends up getting "speared" on a tooth. Marty #436
- Changed OEM chain at 8k (no sprockets, they looked
OK). Installed DID VM chain, both chain & sprockets were toast at 21K. Of course,
this includes a round trip to the Arctic Circle, much rain an many hundreds of
miles of gravel. Marty #436
- I replaced the OEM chain on my F650GS with a Renthal
R3 at 10,000 miles, did not change sprockets. The Renthal has served me well, it
started to stretch at 15,000 miles. Almost 26,000 on bike, I'm replacing the OEM
sprockets and Renthal this week. Gary#751
- I put one of those x-ring things on my bike after
all the glorification I read about it on this very site. And I don't regret it
one bit, I had over 15 000kms on it (before bike hit car) and I only adjusted it
once at the beginning after the first couple hundred kms. My maintenance of it
is minimal, so far I have only gone through 1 can of $3 CDN = $1 US Castrol
Chain lube. My application technique is to drench the chain every 500kms or so
aiming at the seals, a little messy on the bike but what can I say, I figure
that way the grime is washed away from the seals. It has survived dust storms in
the prairies, 6 hour rides in torrential rain, not to mention the abuse of a
heavy wrist. And as far as I can tell, there is lots of life left in it. so umm,
yeah... either I am lucky with the chain or my method and chain seem to be good
ones... RacerRoo
- As I may have mentioned before, I have never had a
chain break, but my K-bike broke its Paralever's front U-joint and cost me $1200
to repair. That can buy a lot of chains. Ever since O-ring chains have been on
the market I have used the RK brand, because they are the cheapest O-ring chain
that can be found around here. They usually sell for about 60% of the price of a
DID chain in the local motorcycle accessory stores. However, having bought my
first DID chain for my F650, I would say that the DID chain appears to be of
much higher quality than a similar RK chain. And it is prettier, too. Richard
#230
- I replaced my stock chain at 10k with an RK. After
installation I did the first adjustment 3k later. A guy on a Goldwing I met
while out riding one day asked me if it was new. I drip gear oil on the links
and then wipe down every weekend. It is the only thing on the bike I have
cleaned since I bought it. Generally I put about 200-300 miles on a week
commuting and riding. I have been very pleased with the performance of the RK.
Sean-STL
- My Stock Regina chain lasted 14000 miles and then I
changes it though it could have lasted longer. I replaced it with a Tsubaki
omega chain which was toast after 8000 miles and really dangerous when I changed
it at 9000. I have a DID 520VM gold chain now. The Regina chain is supposed to
be junk so I can only conclude that the Tsubaki is worst than junk. Lubed with
Chain wax every 350 miles. The bike is babied - I get at least 15000 miles out
of a set of tires. That's on a Pegaso which is almost the same bike as a classic
F. Tim C
- So I took a chain that LOOKED damned near brand new
off my spare bike. And I took the new "BMW" sprockets that had been installed
with the chain. These things had about 400 miles on them, so I was told. I put
them on my bike in Butte, Montana. I rode about 400 miles. The tension remained
unchanged. I lubed the chain with Chain Wax. I rode 1100 miles home, lubing the
chain every 250 miles or so. I rode the bike to Mena, about another 1000 miles,
lubing it along the way. The adjustment was still fine. I rode to Mtn. Home, AR,
about 300 miles. Then I rode about another 200 miles before I lubed the chain.
It was WAAAY loose, banging - loose. I adjusted it. I lubed it every 200 miles
for the next 800 miles. I feared it would break before I got home. When I got
home, I found that it had about 2.5" of slack around MOST of it, except for one
REALLY tight spot. This DID VM X-ring chain has all of about 3800 miles on it.
Ok, fine. So I took it off and installed a NEW ID VMX chain and Sprocket
Specialist sprockets from Kiernan. While I was messing about with nasty chains,
I laid them in the floor side by side. The old one wasn't really stretched all
that much. But it had ONE horribly frozen link. So frozen in fact, that when I
put it in a vise and hit it with a hammer, it did not budge. I pressed the link
out. I installed a new master link it it's place. I sprayed the chain with
Tri-Flow (banana-smelling Teflon spray). Suddenly, it feels GREAT. My plan is to
reinstall the "fragged" chain on the spare bike when I get it back on the road,
with the matching sprockets. My UBER plan is never to lube my chain again. I was
talking to some long-time dirtbiker friends of mine and they told me that they
NEVER lube an o-ring chain. They hit it with silicon spray every thousand miles
or so and wipe it with a rag, just to clean it up a little and keep the o-rings
supple. One friend with a 650 Honda Hawk said that he got 30k miles off his rear
sprocket by changing the chain and countershaft sprocket at 15k and the whole
shebang at 30k. THIS is the laziest method of chain maintenance I have heard
about. Since there are more opinions than belly buttons on the proper method of
chain maintenance, THIS is what *I* am gonna do this time. I went through
about 6 cans of Chain Wax at $8 a pop on my last chain. I'm gonna see if one (1)
$4 can of silicon spray will make the chain outlast that method. Flash #412
- Flash it sounds like you got a turkey. I usually get
15k from the did520vm before they look worn. I change them at 15k regardless of
shape because they start getting choppy feeling on my bike. Steve#417
- I've heard the same about chain maintenance from a
couple of sources. Apparently over-lubing actually collects and traps dirt that
causes premature o-ring failure. I don't lube like I used to, with no early
failures noted. Harl #380
- In '97 I was associated with the first F650 to run
the IB and all that was done to that chain was to squirt it with WD-40 once a
day. The bike went 11k miles but the chain had a tight spot and probably would
not have lasted much longer. Van Singley, the rider and an AMI instructor at the
time, was going to take the chain apart; he suspected that the affected link had
not been lubed properly on assembly. That's my bet also. I have become very
casual about chain care and you know my '97 has had no bearing problems, no
water pump problems, no battery problems, no valve problems, no loose screw
problems (except on foot peg pad), no spoke problems,,,,NO PROBLEMS at all
including FI. After saying all that I'm going to ride my custom R80ST to Shiloh
and not take a chance with the F650. luv to all, Ike647
- I concur with Ike. It is likely that the link did
not get lubed at the factory. And, of course, lubing an O-ring chain is a waste
of time, if you are trying to get lube into the links. I lube my chains
regularly, but only to keep rust at bay, to keep the O-rings soft and to lube
the front and rear sprockets. If you do not lube the chain, your sprockets will
wear relatively rapidly, especially if the chain gets a bit slack or dirty.
Riding in the rain (to say nothing about riding in the dirt) does a very good
job of washing off any lube on the chain and sprockets, while replacing it with
road grunge. If the chain was fully enclosed and running in oil, you might never
have to replace it. Richard #230
- Having finally figured out how the revised website
works, here is my reply: My 15-tooth front sprocket, purchased from the Sprocket
Specialist, lasted for 47,000 km (about 30,000 miles) thanks to a Scottoiler.
The same goes for the DID chain and the rear sprocket. On an around-the-world
trip I checked the drive train repeatedly, and noticed hooking of the front
sprocket, then wearing off of the hooks. By now the front has only stub-teeth
left, like the one you get at the dentist before he glues on the caps. Time to
change. Rear still O.K.; chain also. Weak link, therefore, front sprocket. Don't
be paranoid about it. Run front down until the chain almost jumps. Then change
the whole thing. (Werner)
- I have almost 21.000 km and still the original
sprockets and chain. I haven't adjusted the chain yet (it might have been
adjusted at my service, but I'm not sure). I have checked the chain and the
slack is within limits. There is also no noticeable wear on the sprockets. Since
about km 9000 I have had a Scottoiler. Before I kept the chain lubricated after
every major ride or 500km. I figure the chain will last at least up to 30.000km,
maybe beyond that. I'll have to wait and see. (Sojourner)
- If you have money to burn, stop reading. But if you
are like most riders, in my case, a retiree with a retired wife, with a travel
addiction, and stingy children, money is a rare commodity, and it is, therefore,
imperative to squeeze the maximum mileage out of chain and sprockets. Why have
some of us barely gotten 10,000 miles out of their sets, while others have
accumulated 30,000 +? For longevity of chain and sprockets, this is what I
suggest:
1) Avoid excessive speed. What is excessive? Richard might say, anything over 60
mph; Flash, anything over 100 mph. I tend to compromise, anything over 80 mph
for this little puddle jumper. The faster you ride, the faster the chain has to
turn around the little front sprocket, and the more oil is begin flung off.
Chain gets hot.Less oil on the chain=faster wear.
2) Avoid quick starts, e.g. wheelies. This is self-explanatory.
3) Avoid applying sudden bursts of power to the drive-train, as, for instance,
in the case of a maladjusted clutch. There should be no jerking when engaging
first gear. Each jerk adds another death blow to your chain.
4) Learn how to shift gears smoothly. There should be no jerking when shifting
up or down. How to become a smooth operator? Learn the technique by practicing
power shifting, i.e. shifting from first to fifth and down to neutral without
applying the clutch, simply by carefully manipulating the throttle. This is a
good technique to master should your clutch cable ever break while out in the
boonies.
5) Regular cleaning and lubricating of the whole set-up. How regular is regular?
You be the judge.
6) Discard your stingy companion and children, and shack up with a rich and
generous significant other. You will have money to burn, and will be able to buy
a new chain and sprockets every 5,000 miles. (Werner)
- I might also add, don't ride a big single.
Four-cylinder bikes are a lot easier on chains. My 1993 Honda CB750, with 60 HP,
still has the original DID chain, after 25,000 miles and it has yet to need an
adjustment. Whereas the same quality chain on my F650 lasted 16,500 miles. I
suspect that the hammering of the single's power output through the chain is
tough on the chain rollers and their internal grease. (Richard #230)
- I just ordered a new chain for my bike, too. The
original chain lasted 12,000 miles. My current DID VM x-ring chain now has gone
an additional 17,500 miles and now needs to be adjusted every 200 miles, so it
is time for replacement. The original sprockets still look like new ones and I
do not plan to change them. (Richard #230)
- Note that not everyone's sprockets last as long as
mine. I occasionally clean my sprockets with WD-40 and then coat their teeth
with MoS2 grease. I rarely ride in heavy rain and stay clear of dirt (the real
destroyer of chains and sprockets). I also oil my chain every 250 miles and coat
the rollers with a heavy duty chain lube. Don't re-use your sprockets without
cleaning and inspecting the teeth to be sure that they are not showing any wear
that has changed the shape of the teeth. If the teeths' shape are not absolutely
symmetrical do not re-use the sprocket. (Richard #230)
- I have used RK chains for years on other bikes.
Their chains are pretty good. They cost a little less than DID and seem to be of
a slightly lower quality to me. When it comes to chains, I would say you get
pretty much what you pay for. Richard #230
- What mileage are CG'ers getting from the DID 520VM
x-ring chain? I'm hoping to get over 10,000 miles on this baby. RodP
-
17,000 for me. The stock chain lasted 12,000 miles. Richard #230
-
15K miles on my last one...but most of that was on a trip to the Arctic Circle
in lots of rain, gravel, etc. Marty #436
-
9K and still in good shape. Brad #1002
-
About 17K miles on my current DID, still in good shape. Using a Scottoiler since
the chain was first installed. Mark #403
-
24,000 miles with the good DID, but when it failed, it failed all over and all
at once.... Lance, #1303
Misc Chain and Sprocket Stuff
Chain Tools
- The DID KM500 chain tool is probably a better choice than the Motion Pro one and
with two of us splitting the cost it worked out to $51 each. We're making this
tool available to other DC Inmates or bikers who'd like to participate in
collective ownership. Makes a one or two time use tool even cheaper. George #384
- No contest
on the tools. The DID is a no-brainer, perfect alignment jig for newbies. For
the money, for a DID chain, I cannot imagine why you'd buy the $90 MP tool,
which is NOT available at the same price ($50) it was a few years ago. You can
lift a photo of the DID tool right off their site, or I can snag it for you. The
motion pro tool advises that on 520s and above, the pins are ground off first,
so I figure it's a good practice, even for the DID tool. As Mark says, it's MUCH
easier to push the pin out if you grind the head of the pin off first. If you
don't have a grinder or Dremel, you could also use a good sharp file almost as
easily. Todd #389.
- The DID
chain tool will push a rivet out, will press a side plate onto the pins, and
will squish the head of a rivet to secure the side plate. You don't need this
tool if you are using clip-type master links. If you DO use clip-types, I
suggest you order a couple extra links for when your clip takes a hike. I would
also recommend you buy new Nylocs for the rear sprocket. Unknown
- You do not HAVE TO cut the chain but, in order to get it off without cutting it
(or separating it in some way*), you will have to go thru a much more difficult
process; that is removing the rear swing arm. A simply way to cut the chain is
with a hand grinder of some sort but be very careful about getting metal
particles in your eyes (wear safety goggles). Some simply grind the ends of the
link pins off and separate the chain in that manner; doesn't always work so well
for me. *Other ways of separating the chain would be cutting with heavy duty
shears or with a flame torch or some sorts or with a chisel. JUST CUT IT. Do you
have a friend who rides 'dirt bikes' who could help you; they have all sorts of
experience in these matters. Regards, and good luck.
- My clip-type connecting link lasted 11K miles. Yesterday, I used my DID chain
tool for the first time to install a rivet-type link. it was very easy. The tool
will drive out old rivets (to break the chain), it will press the plate onto the
rivets, and then it will also set the rivets. Unknown
- You can
simply grind of the end of a rivet or two to remove the chain. You don't need a
chain breaker. People (at least me) buy the DID tool
so they can install a rivet link, instead of a clip type master link. The $25
motion pro tool simply presses the plate onto the pins/rivets (I have one of
these also). I can't tell exactly what you get with the $80 motion pro tool. It
says press fit plates are sold separately ($22). If you are going to be using
DID chains, you might want to consider spending $100 on the DID tool as it comes
with everything you need. I bought 3 links, 1 replacement rivet pin (part of the
tool), and the tool for $150, including shipping from Kiernan racing.
I thought the clip-type master link was fine. I put 11K miles on my chain
without any problems. but last night, while washing the Redmond grime off my
bike, I noticed that I lost my clip somewhere on the way back from Redmond (yes,
it was put on correctly). So, I jumped online and followed todd389's advice. I
bought the DID KM500 rivet tool and some new rivet type master links. I had told
myself that if the clips worked, I'd use them; if they failed, I'd drop the
money on the tool. Mark #403
- Stopped by
a bike shop in rural Kentucky a few months ago to get all this chain equipment
we're talking about here. The guy says I've probably put on 10,000 chains in my
life and I've never used a breaker or compressor. I grind them off with a wheel
or file and compress them using a small socket wrench and a C clamp. I tried it
and it worked great. Simply grind the two pins of the link you want to sever,
small screw driver or chisel to knock off face plate, remove rest of link by
pulling from rear and remove chain. To install new chain, piece ends of chain
together, insert master link from rear, place face plate on front of link,
compress by placing # 6 or 8 socket wrench over pin with C clamp behind master
link and behind socket wrench. Tighten C clamp until seated (pins from rear
sticking through face plate in front), install link spring clip (open end facing
rear) and you're done. Unknown.
- DID Chain breaker Question. I don't have the
patience to grind or scatter fine particles for that matter...I just use a large
bolt cutter El Guru.
- Just get the tool or something like a Motion Pro
tool (which I have). Look at each opportunity for new service as a chance to
expand the toolset and learn new skills and you'll have what you need to
properly (and easily) work on your bike in no time. DavidHPark, #711
- Just riveted my chain an hour ago. My front sprocket
nut never came off-I broke a wrench with a pipe and figured the sprocket didn't
look that bad in reality. I can at least wait until I take it in to a garage
with an impact wrench. The DID chain tool breaks chains pretty well, though I
found the riveting part to be a little inaccurate. One pin has a slight crack in
the rivet. I'll have to order a couple of new ones from on/offroad. It's amazing
how much more responsive the bike is to the throttle when you lose the thrashed
chain. Justin 843
- Motion Pro makes a chain press tool for about $25
that works like a charm. Any cycle shop.
I also endorse using a Dremel tool for this (and many other things!). Bob#550
- Bolt cutters will do the job, but you will need
really big ones. Better just make a run down to the local hardware store and
pick up a hacksaw and a couple of extra blades. They are cheap and you can
probably do that faster than finding your roommate's saw. Richard #230
- The trick with the pins is not to stop at the
outside edge of the master plate, but get your grinder or Dremel to gouge the
pins a whisker (0.5mm) is enough past the plate surface ... Easy... Kristian#562
Removing the Countershaft Nut
by Colorado Bob
If you obtain a wrench like the one in the picture, insert the
6mm key into the alternator, let it push against the brake pedal so nothing
moves when removing the nut.
Switch it to the other side of the brake pedal to install
the nut to the proper torque. This is a very easy one person method.
_small.jpg)
I also use the tool shown from the BMW tool kit to keep the
foot peg out of the way when removing the Sprocket cover. You still have to put
a foot on the brake pedal, but again, it only takes one person who doesn't have
to become a contortionist to perform this function. Just hold the peg up, and
insert the round end of this tool into the hinge underneath.
Alternatives:
- I could not break the C/S nut loose without spinning the rear
wheel. The rear brake did not have enough grip. I solved this by backing the
bike into a concrete curb and using the side stand. The extra friction of the
tire against the curb was what I needed to break it lose. I used an 18 breaker
bar with the 30mm socket. Still, you'll need some muscle to get it loose!
- I just figured I'd mention that one of the reasons you may have had trouble
getting the nut off is that (at least for the Classic F650) the Service Manual
recommends using Loctite 243 (slightly stronger than 242) on the threads. Not
sure if you used it or not. Some people have had trouble with their sprocket nut
loosening (as you already know), and this may account for the difference. I used
243 and have had no loosening after 13k miles, others think it is not required.
Loctite 243 (blue) is what is specified in the Manual for the sprocket locknut.
It's supposedly about twice as strong as 242, and more oil resistant. 242 (also
blue) is much easier to find, but 243 used to be a stock item at NAPA autoparts.
Maybe try professional mechanic parts supply stores. Todd #389
- When first installing the front sprocket make a little mark with nail polish
(not brown, I got pink) on the nut and the shaft. Then check it every week or so
(it takes five minutes to remove the cover and put it back). If the nut is
moving, the marks won't be in line and you have to torque it. Jean #636
- Recently, I noticed upon downshifting and braking
that there was a little 'ripple' at times on the brake pedal... Well, today I
took a GOOD look around and found that the front sprocket counter shaft nut
worked slightly loose....now I am to blame for this as I have had my chain and
sprockets on hand to be changed last fall....never did it...bike has about 14.5K
on it... Nick #1085
Chain-Related Surging
by Muriel #582
About 3 weeks ago I asked for things
to check to cure by 97 F650's hesitating (opposite of surging?) and got some
great replies - use dry gas, use carb cleaner, clean air filter, put in
in-line gas filter. It didn't seem like any of those suggestions helped - at
least much.
That is because the hesitation was my first "early warning
symptom" that my chain had a problem. Today I had a new DID VM X-ring chain and
sprockets put on (along with a new back tire), and . . . no more hesitation
:-) I appreciate all the input I got, but know I know to add one more thing to
the list: have you checked your chain?
A chain with stretched and frozen (or freezing)
links definitely causes those symptoms. When it happened to me I called it
hesitating - the bike was holding back rather than surging forward. Immediate
cure as soon as I got new chain and sprockets.
As a relative newbie and non-wrench, I
wasn't all that familiar with chain symptoms other than check the adjustment
(I wax it frequently) which I had been doing, but evidently not often enough.
Now I know. See the
Chain Replacement FAQ.
- Two
months ago, the tech at our shop did the remap and new nozzles for my FI
because I had a little surging. Over the previous several months, it seemed to
be getting progressively worse from almost no surging at all. He finished some
of the 12,000 mi. service didn't want to try to tackle at home. Told us then
[and we knew at the time] we were going to need to replace my chain and
sprockets early in the riding season because I had been lax in the first few
months of ownership about keeping it lubed. When I took the bike home, the
surging seemed worse than ever. Told the tech, who said I should bring it in
and let him ride it and see where the surging was happening at speed and rpms.
Meanwhile, my chain was getting worse and we knew we needed to replace it. We
had trouble with getting the tension right so I took the bike in to the shop
and after messing with it for about 45 min. the tech found we had some seized
links and he said he really didn't want me riding it home in case it might
break. My bike sat until Friday when he did a chain-and-sprocket-ectomy on a
new bike so I could go on a day trip planned for Tuesday. On the way home from
the shop, the bike didn't surge -- at any speed, at any RPM. The next day,
over about 400 miles of riding, the bike didn't surge -- at any speed or rpm.
Could a really bad chain and messed-up sprockets cause something like surging?
The tech is not sure what to think and wants to do a test ride. I'm just
really curious.
- I had
the same problem some months ago. I was convinced it was something else, but
the constant adjustments I had to make to my chain eventually prompted me to
just replace it - surging gone. For what it's worth, the surging only really
occurred in the first three gears. An easy way to check the chain is to pull
it away from the back of the rear sprocket (to determine the wear between the
links and the sprocket teeth) - and a good solution is to buy a top-notch
replacement! Bernard, S.A.
- As a
chain wears and stretches, it gets longer. And not evenly so that if you
measure 20 links at different places in the chain, you get different
dimensions. Essentially you get shorter and longer (or tighter and looser)
pieces of chain going around your sprockets, driving the wheel at different
speeds. That's also why you can't adjust the chain. Harl #380
- My
Dakar exhibited the exact same symptoms after I discovered I had lost the
bottom chain roller; replaced it and tightened up the chain as it was very
slack. Since I have back in my usual routine of cleaning and lubing the chain
every weekend, the chain induced surge has decreased steadily. Sean STL
- I
changed my chain and sprocket two days ago and I have the same experience as
Muriel...it's more of a hold back. This happened only at around town speeds,
at freeway/highway speeds the bike was happy. Spakur in Sweden #1117, '95F
- Donna's
97 F650 had a condition that felt like surging that a new chain and sprockets
cured, FWIW. It was at 14,000 miles on the chain. Dave J #888.
- I
finally got to ride the bike with the new DID x-ring chain. IT'S EXCELLENT ! I
got rid of 99% of the bike's hesitation feeling (opposite of surging). I don't
know a lot about chains, but I always thought that was the main problem.
Nobody else thought so, including BMW, dirt riders, other bike shops, etc. It
was mentioned on this site and on the FAQs as a possibility, so after checking
everything else out, I thought I would spend the big bucks on a chain, as a
last resort. I was ready to dump this bike off a cliff because it ran so bad.
Now I like it just fine. Bob #1297
Chain Adjuster (Screws)
THIS BIT!
 (This is the one on the Classic. The GS seems to have more
problems than the Classic)
(This is the one on the Classic. The GS seems to have more
problems than the Classic)
Q:
Am I the only one with this problem? I have talked to several other owners as well as 4-5
different BMW dealers, but no one has come across this before... I have had 3
(THREE!) chain adjusters (those little aluminum pieces at the end of the
swingarm) snap off in under 2 months! The first two times it was on the right
hand side (same side as sprockets) and buckled the swingarm in the process.
1st time - 200 kilometres after an Authorized BMW dealer installed new
chain/sprockets/tires. This was the right hand side one that broke. Riding on
dirt roads. 2nd time - 5 days after the first one was replaced it broke again,
leaving me stranded in the Australian outback. I had to hobble along for 400
km to nearest bike shop. Now BMW did not have any more spares (3 week wait) so
they authorized a new one to be manufactured by the local bike shop. This was
the right hand side one again. 3rd time - When I got to Perth (closest dealer
from where it happened 2nd time) I had a full service done (20,000km service)
and new tires fitted. 9 days later, once again on a dirt road in the middle of
nowhere, the left adjuster broke, leaving me with 1,200km of horrible dirt
roads to get to BMW dealer (or any bike dealer for that matter!). This time it
was the left had side one (opposite the chain/sprocket). This time BMW in
Adelaide machined up a new part for me (BMW still did not have the part in
stock!) The bike shop that fixed it the 2nd time thought the chain may have
been too tight, but every time it has happened just after a BMW service! I had
not touched or adjusted the chain since. I now have too wait until I get back
to Sydney for BMW Sydney to see if they will warranty a new swingarm b/c of
the damage caused... Anybody else have any problems? Please help! I carry a
fair bit of luggage, but am still well under the max recommended weight by BMW.
(Johan Rodskog - In Australia, heading for Asia)
- It sounds like a chain tension problem to me. Remember to have
someone check your chain tension when you are sitting on your bike with all
your usual luggage (or at least simulated weight). It's a deliberate weak
point to save the rest of the drive train (like the... um... driveshaft!) when
tension is too high. When you replace it again, check the rubber swingarm
guard for wear too, as these go very rapidly when the chain's too tight. (Bernard
Voges)
- Do you mean the bolt going through the plates closing off the end
of the swingarm broke, or the plates themselves? Twice I've had the bolts
vibrate loose (or at least that's my interpretation). The first time it was
the right bolt, which resulted in a badly bent bolt and buckling of the outer
surface of the swingarm just before it's open end. It appeared the bolt had
loosed to the point it contacted the sprocket, resulting in the damage. The
second time the left bolt simply vibrated out entirely and was lost. Both
times the bolts were torqued to specifications. I'm going to use LocTite on
the bolts, and check them very frequently, from now on. I don't know if this is
the same problem you've had, but when you mentioned the buckling of the
swingarm it sounded similar to the damage I experienced so I thought I would
pass along my experience. Mike #926
- Mike, I had the same problem with the same result. Solved the
problem with fiber locking nuts (the ones with a plastic insert in the crown).
The dealer had these in stock so I don't think they should be too big a
problem to find. They fit right in the same cut-out as the stock non-locking
type nut. (glennbtw)
- On the first two occasions the adjuster plate broke (could be
because the bolt got loose and the plate slipped backwards, then broke after
smashing against the sprocket. The last time it happened the whole plate and
bolt was gone so it sounds like the bolt came loose. (This would also explain
why BMW but lots of ugly black tape around the adjusters, securing them to the
swingarm so they could not fall off!)
Q. I stopped for
breakfast this morning and before getting back on the bike I looked at my
chain. To my surprise I noticed that the end cap on the swing arm had come
loose and was jammed. It appeared that the end cap had rubbed against the
sprocket and had badly bent the screw. It appeared that the end cap could
have gotten jammed against a bolt on the sprocket and caused some real damage.
The screw doesn't do anything except help align the rear axle when adjusting
the chain tension. It has been my experience that the end cap is just hand
tightened because if you try to do more then you may effect the axle position.
Is this correct. This has been one of my frustrations in adjusting the chain
tension. There are a lot of variable to get right with only two hands and four
bolts to tighten is has been trying. What am I doing wrong? How do you tighten
the end cap so that the tension bolt doesn't get loose after torquing the axle?
(davemishalof)
- One of mine made the rounds on the brake disc side. No bent screw,
just made it a bit smaller! It was the one time I neglected to duct tape them
on. David Park once suggested I put duct tape around the end of the swingarm
and I've never had a problem with the duct tape in place so I guess it works.
Kristian has it right but a hard day on some rough roads and they can work
loose. LocTite would keep them from backing off but make it real hard to
readjust the chain without cleaning the LocTite off each time. (BradG)
- Basically, you tighten it AFTER you have done up the Main Axle to
Torque. (After you have set the Tension correctly). Then it DOES NOT affect
the tension, (because the Axle Bolt is tight) and the end cap doesn't come
off. Simple. Read the Rear Wheel Removal FAQ
for more info.
- If all else fails, you need to check them often add duct tape if
you're going to ride off-road.
Slide Rail Screws
by Kristian #562
So you've stripped the
Screw to the Slide Rail//Swingarm Protector! (this is the upper one).
Silly you. You probably thought you'd tighten them up when you replaced
the Chain didn't you?
Well you'll be (sort of) happy to know it's happened to a few people, either
those screws (Lower Screw)
are too soft or the swing arm metal is.
So what to do? Well it's easy. Go down to the hardware store and buy a new
one, that looks like this. New
one.
But how do I get the old one out, it just keeps turning and turning.? Use a
screwdriver underneath the head of the old screw and while prising it up, undo
the screw. It should eventually "bite" and you can screw it out normally the
rest of the way.
Chain Links
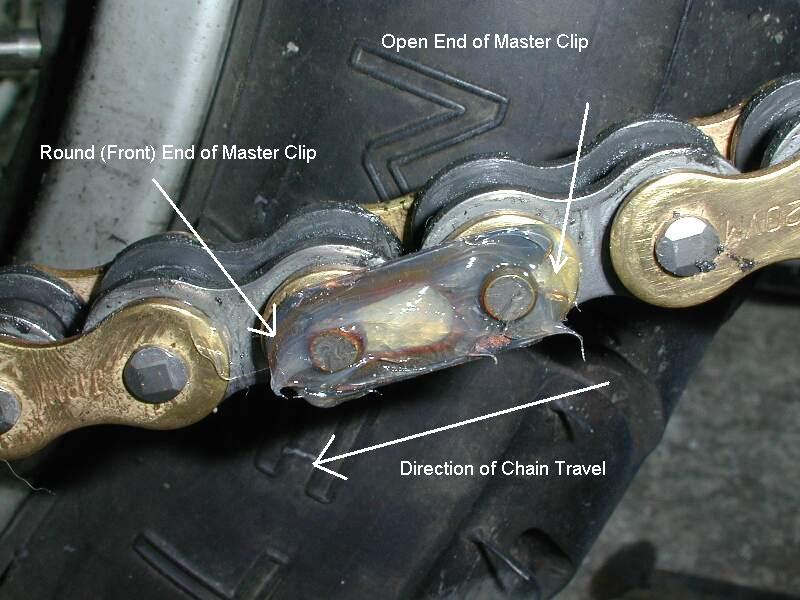

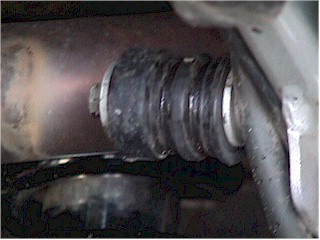


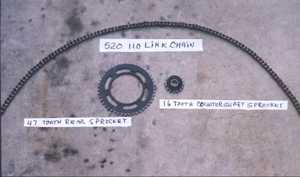

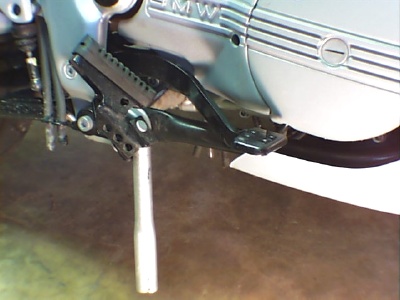
.jpg)
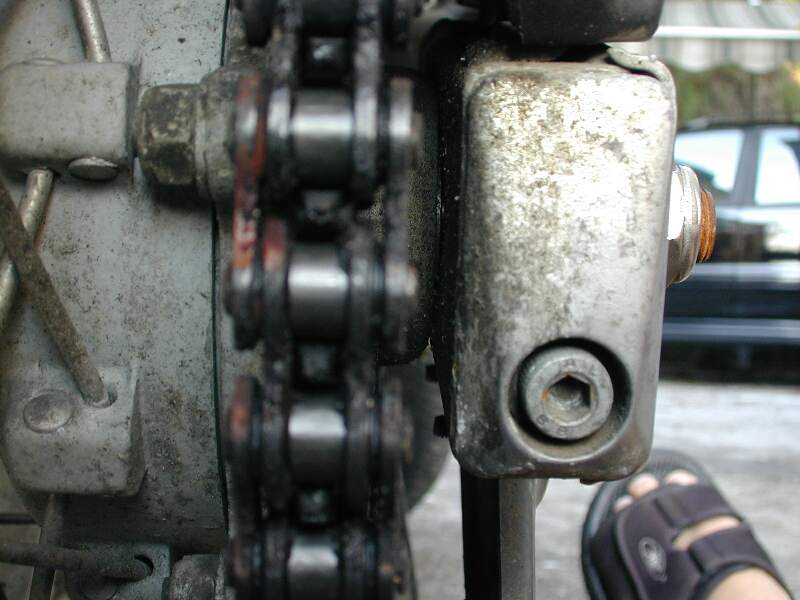 (This is the one on the Classic. The GS seems to have more
problems than the Classic)
(This is the one on the Classic. The GS seems to have more
problems than the Classic)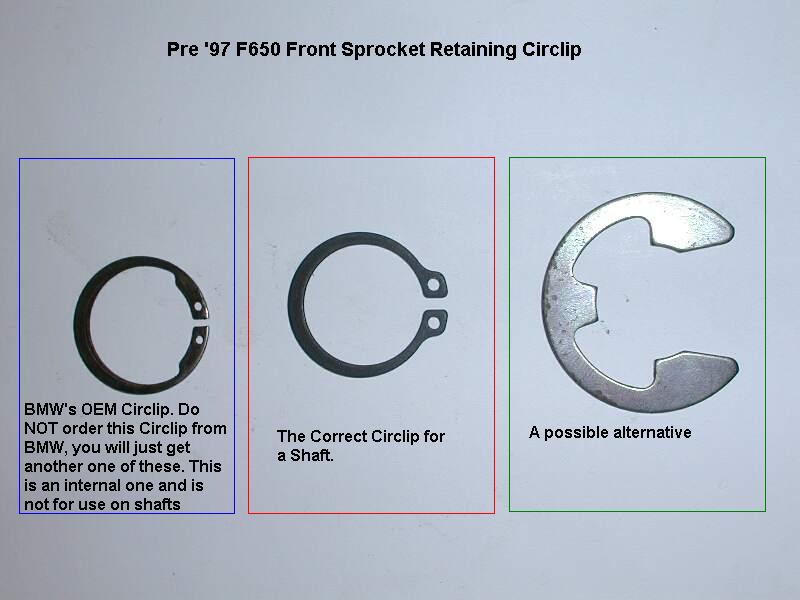
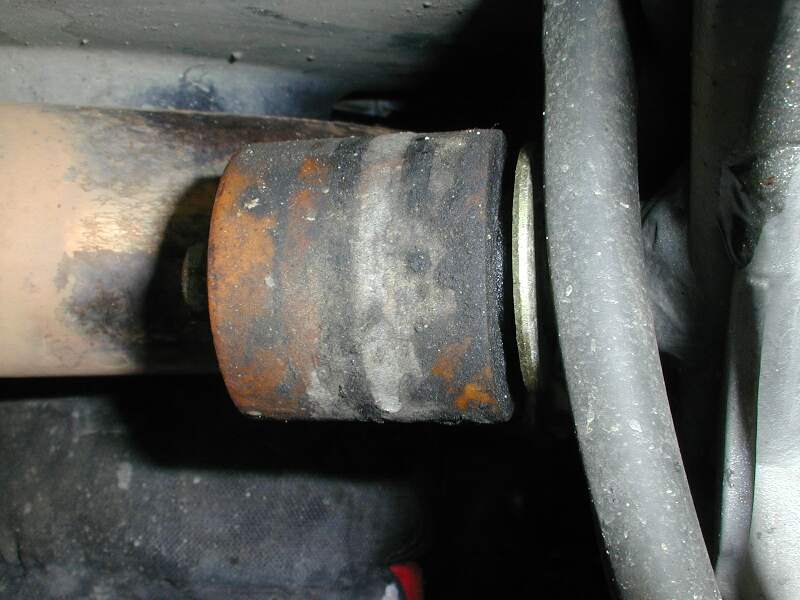
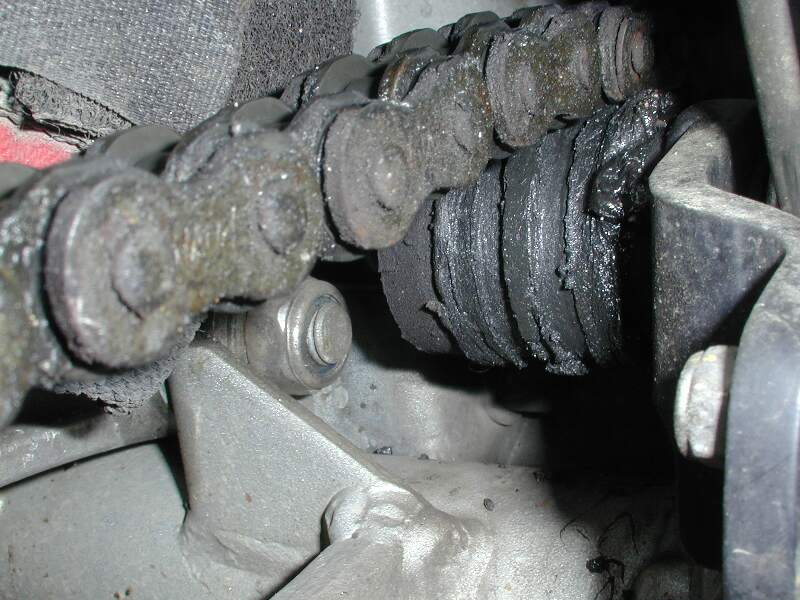
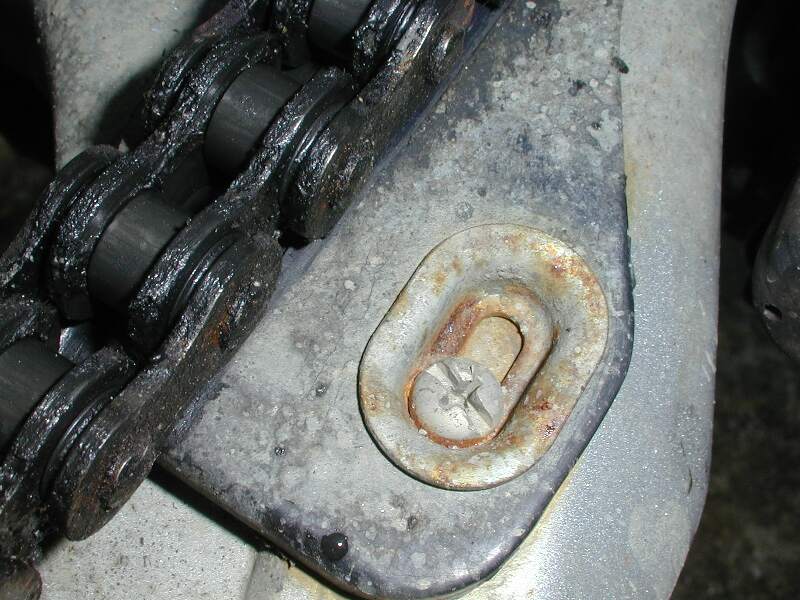
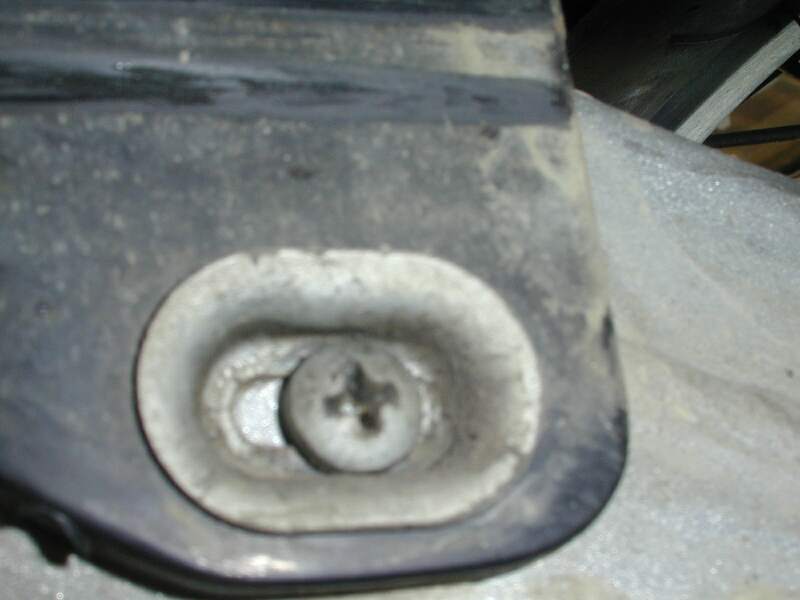