The Aftermarket Luggage FAQ
compiled & edited by Kristian #562
Updated by Nick #1085
Major updates by mspeed #1023; editting by Scott, ID #1244
(See the GS Aftermarket Luggage FAQ for Opinions on Luggage/Sidecases/TopBoxes/racks & TankBags for the GS/Dakar)
Please read the Disclaimer before attempting any work in this FAQ.
For Photos of GS Aftermarket Luggage (TopBoxes/TankBags/SideCases/Racks/TailBags) ON the GS/Dakar click the Link for the GS Gallery. Some of these will of course also fit the Classic.!
Opinions on Aftermarket Luggage (TopBoxes/TankBags/SideCases/Racks/TailBags) for Both Classic &GS/Dakar.
Bagster Tank Cover
by
Flash #412
I would advise getting the bigger ones as
these are rather small. I wish I had the bigger ones so I could put the
backpack I used to bring to work. Now I use one as a briefcase and the other
for oil, tools, etc.

Doug#1206
I have the large bags they stick out wide but are very handy on long trips.


Ted
Mal#1011

Here is a pdf of the
Installation
Instructions. (In German, but the pics are
good.)
And thanks to Nelson Oliveira (a.k.a. Sojourner) here is the English translation.
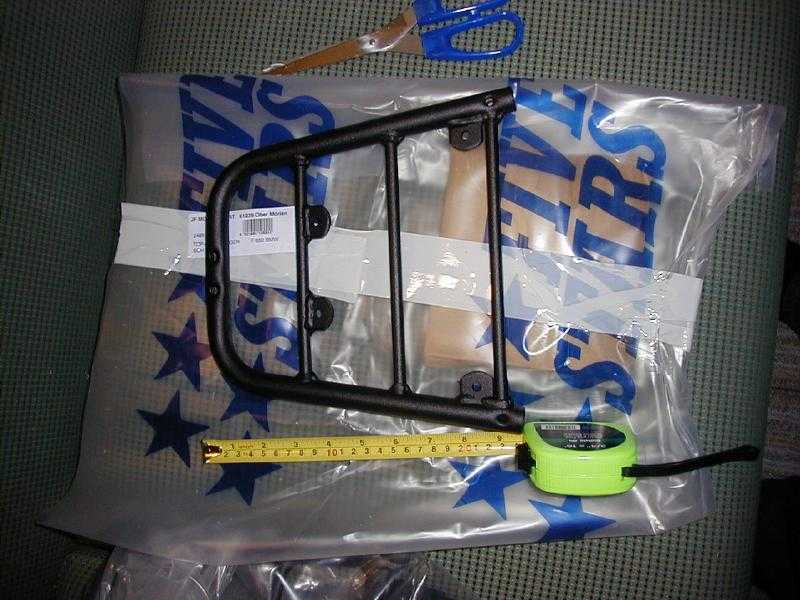
Five Stars Rack & Kappa Luggage
by Omnikron via.
Riderhaus
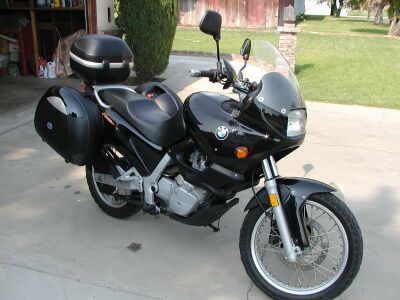
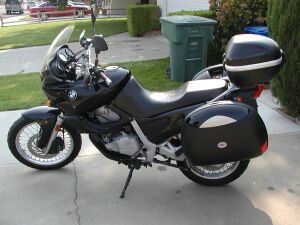

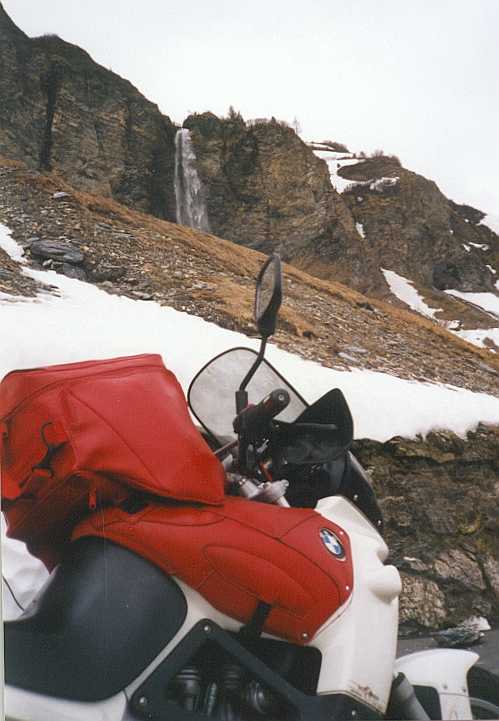
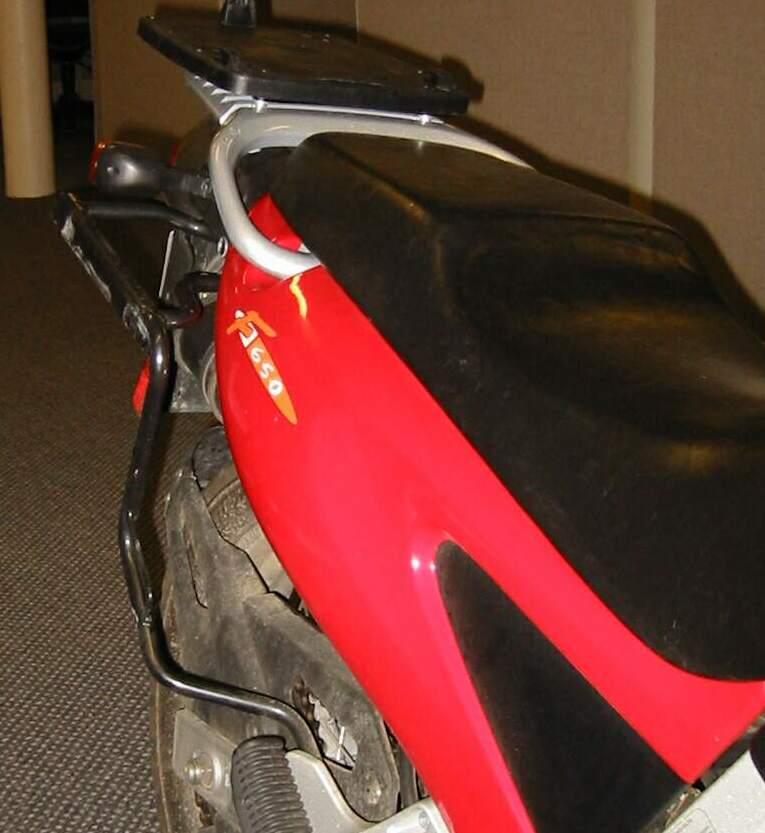
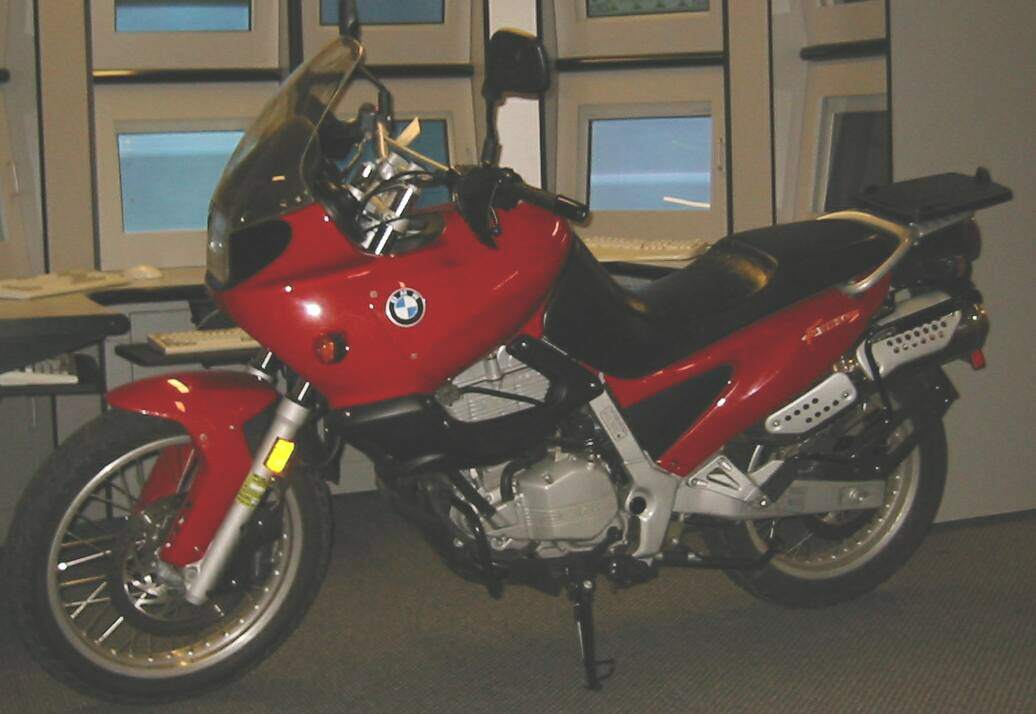
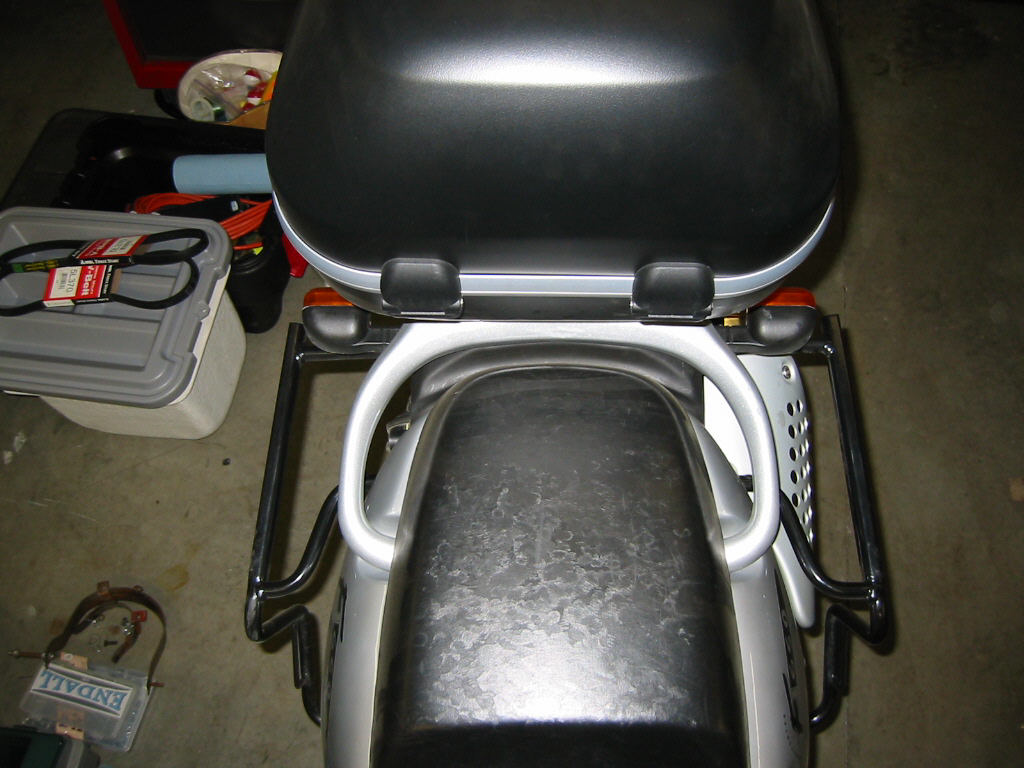
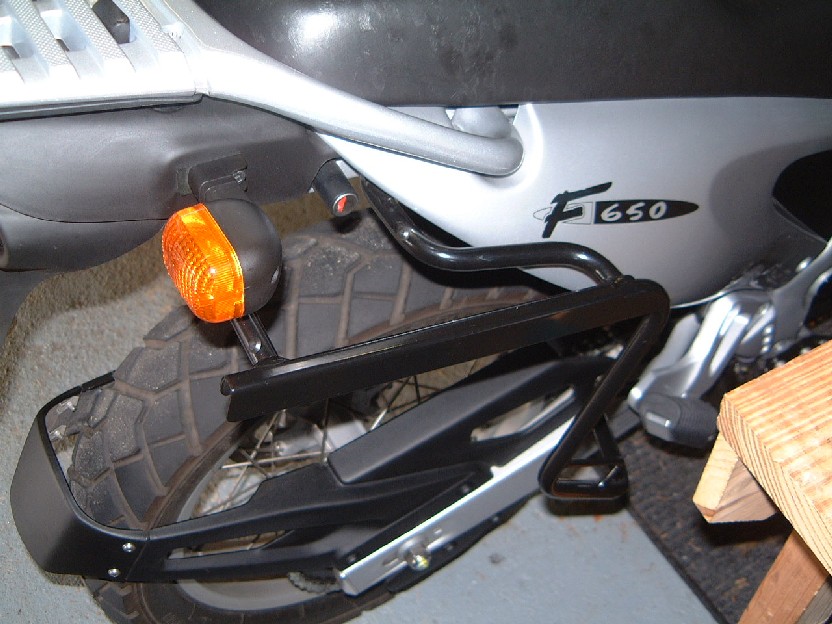
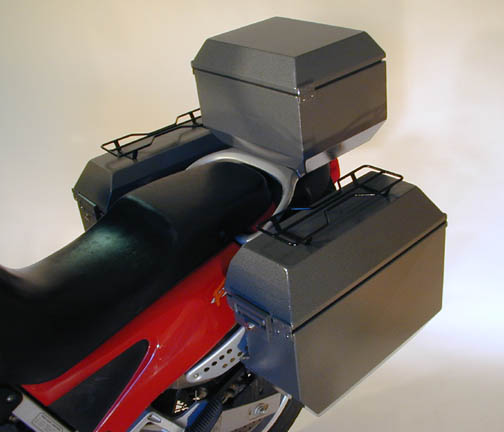
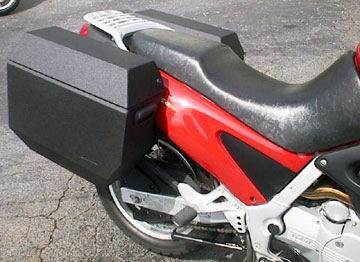
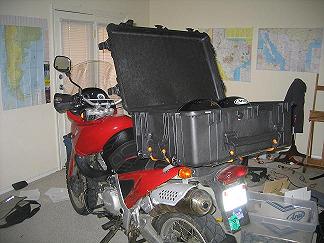
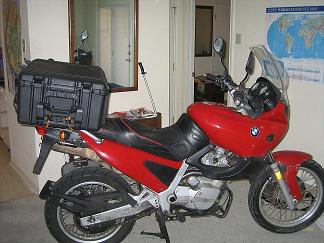
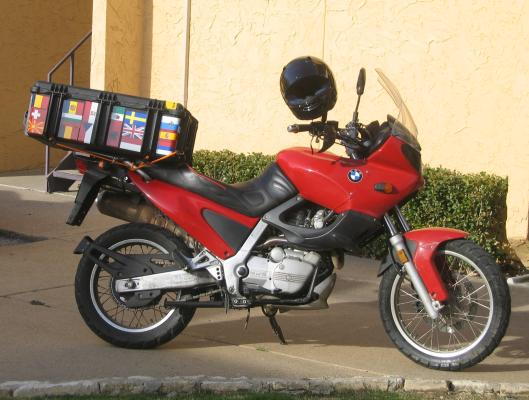
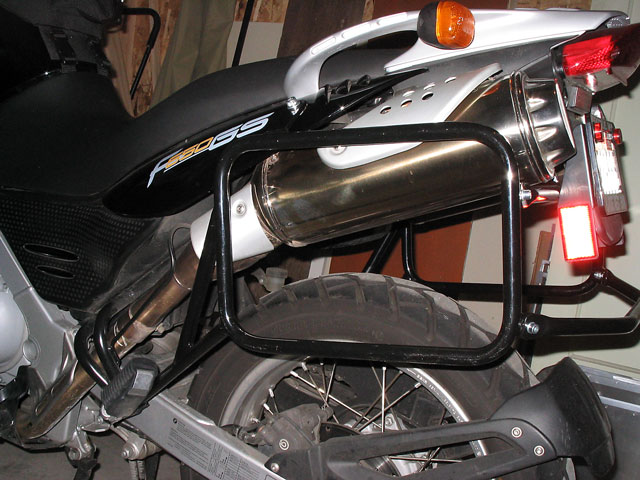
Omnikron's 1997 BMW F650 - Five Star Rack and Kappa K40 Pannier with OEM BMW topcase setup
Omnikron's 1997 BMW F650 - Five Star Rack and Kappa K40 Pannier with OEM BMW topcase setup
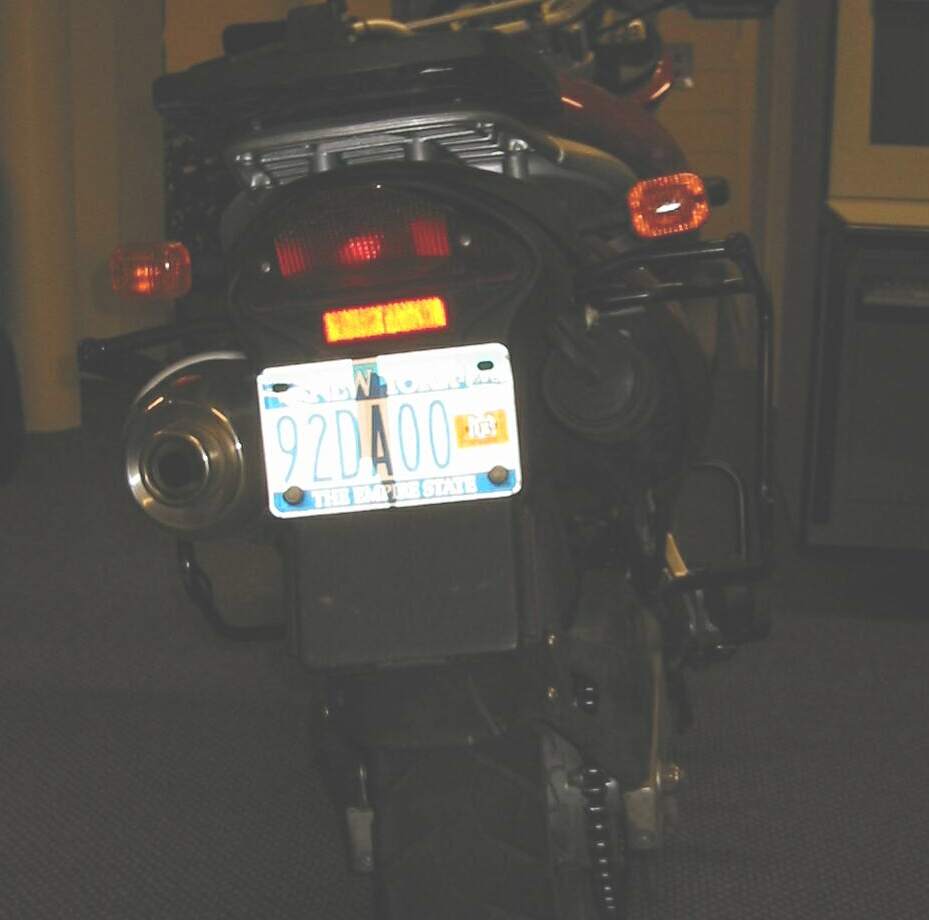
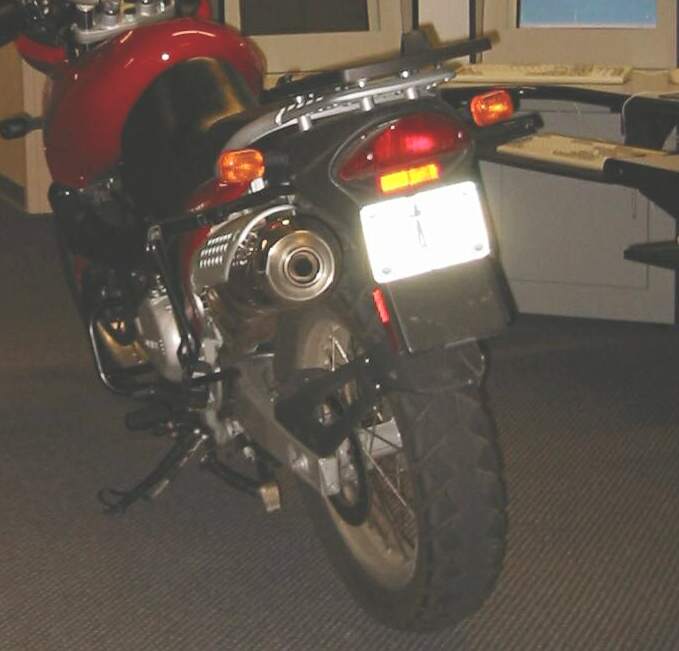
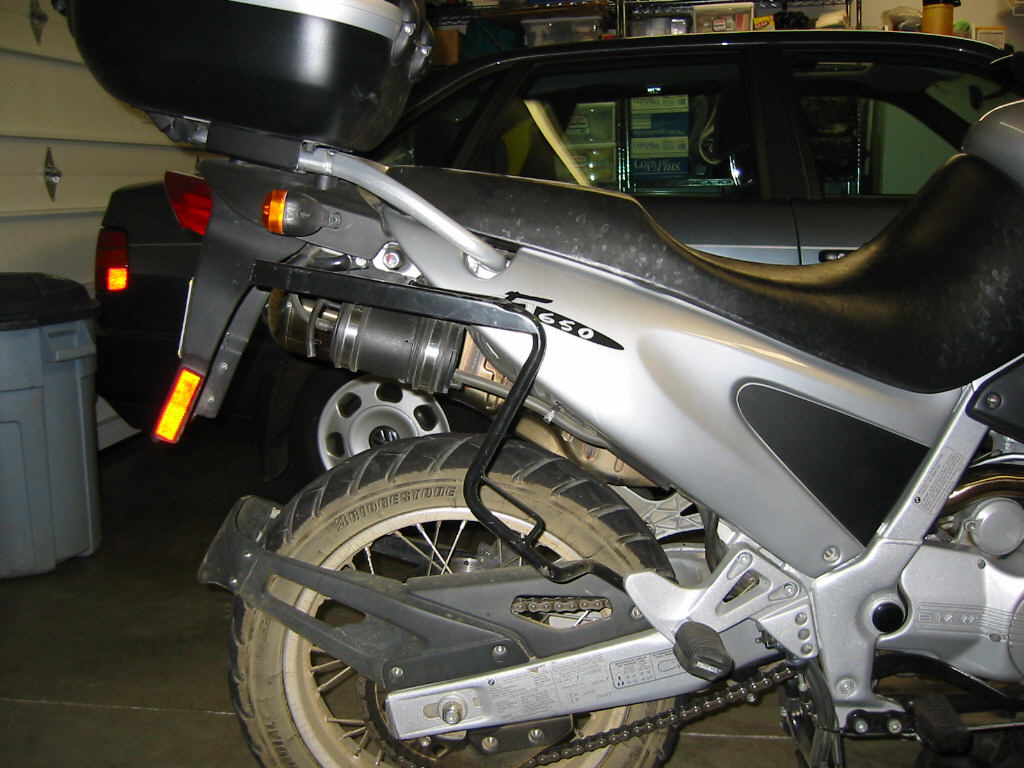
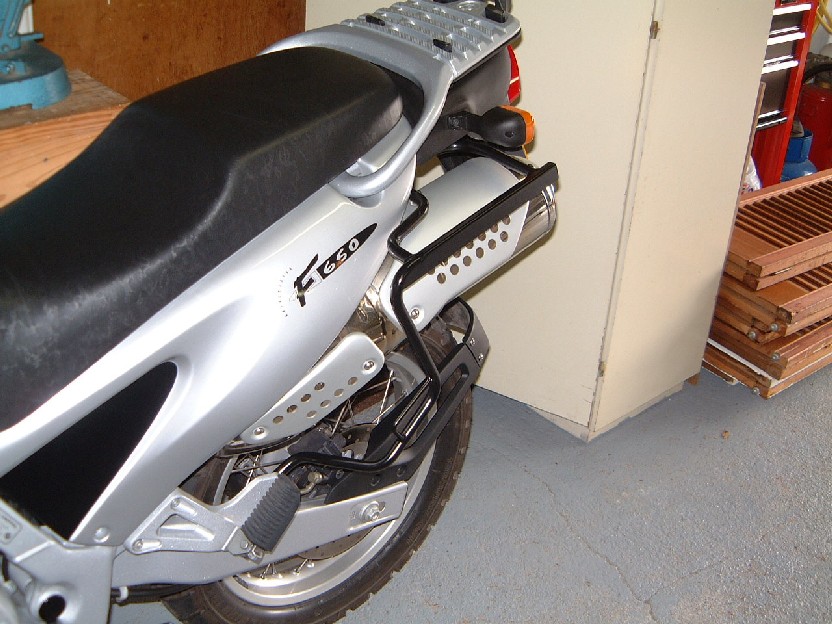
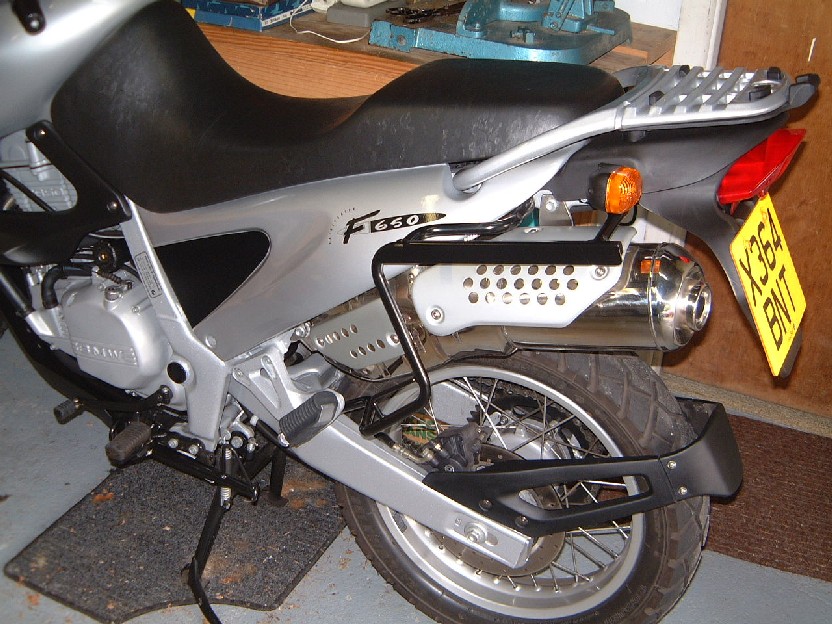
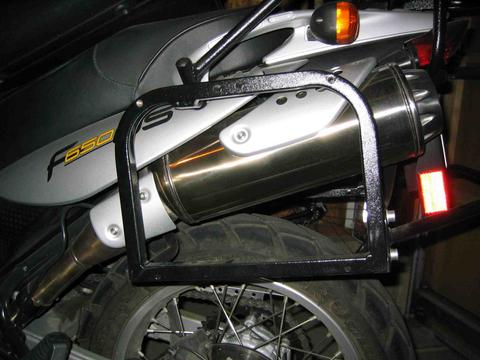
A rear view of Omnikron's 1997 BMW F650 - Five Star Rack and Kappa K40 Pannier with OEM BMW topcase setup. Note the racks maintain a symmetrical appearance even with the high exhaust.
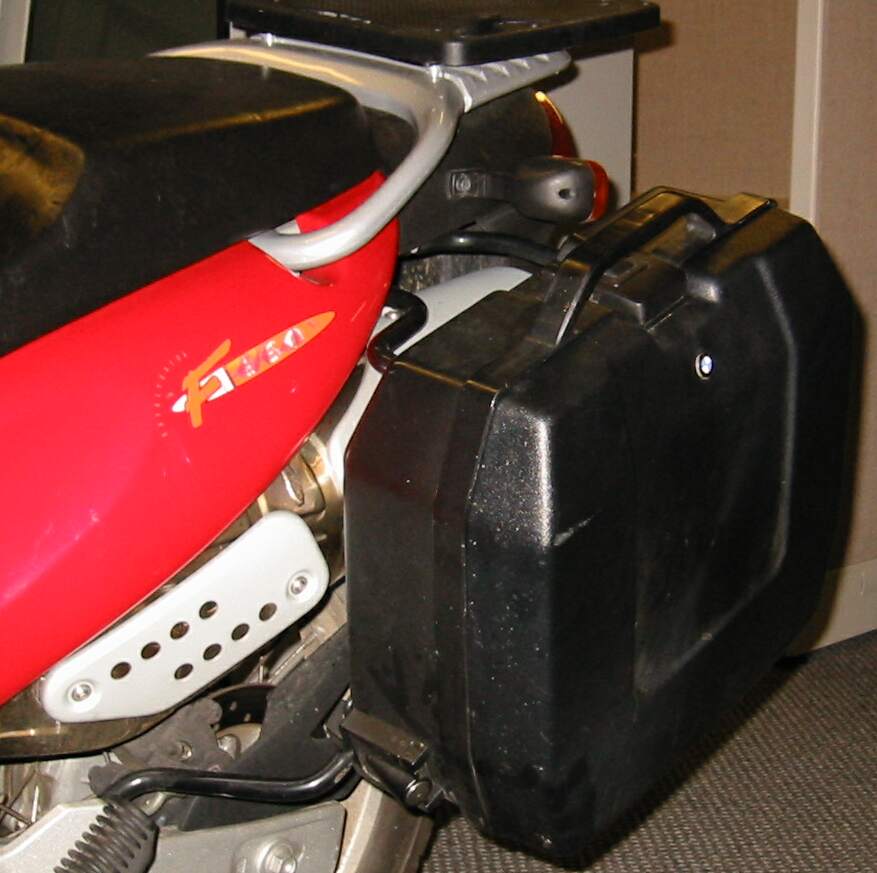
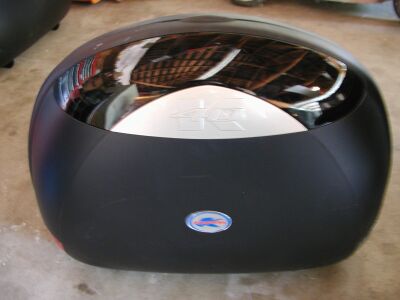
The Kappa K40 sidecase. The gloss black panel is interchangeable with other colored panels to match your motorcycle.
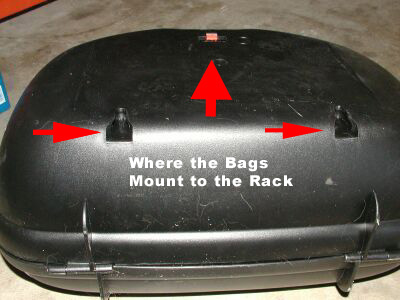
The Kappa's have the three-point mounting system as Givi Monokey cases.
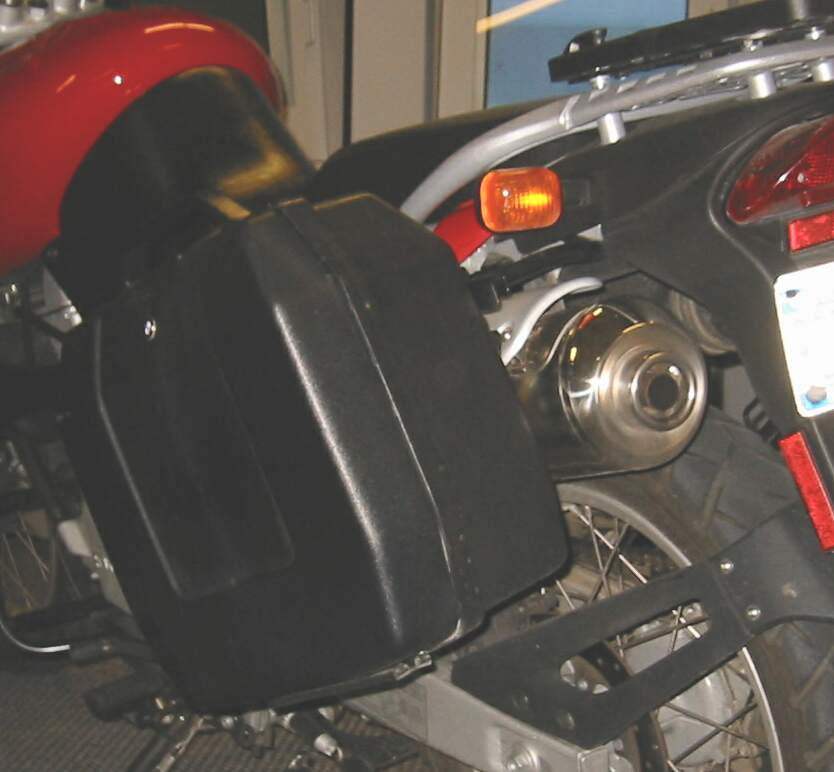
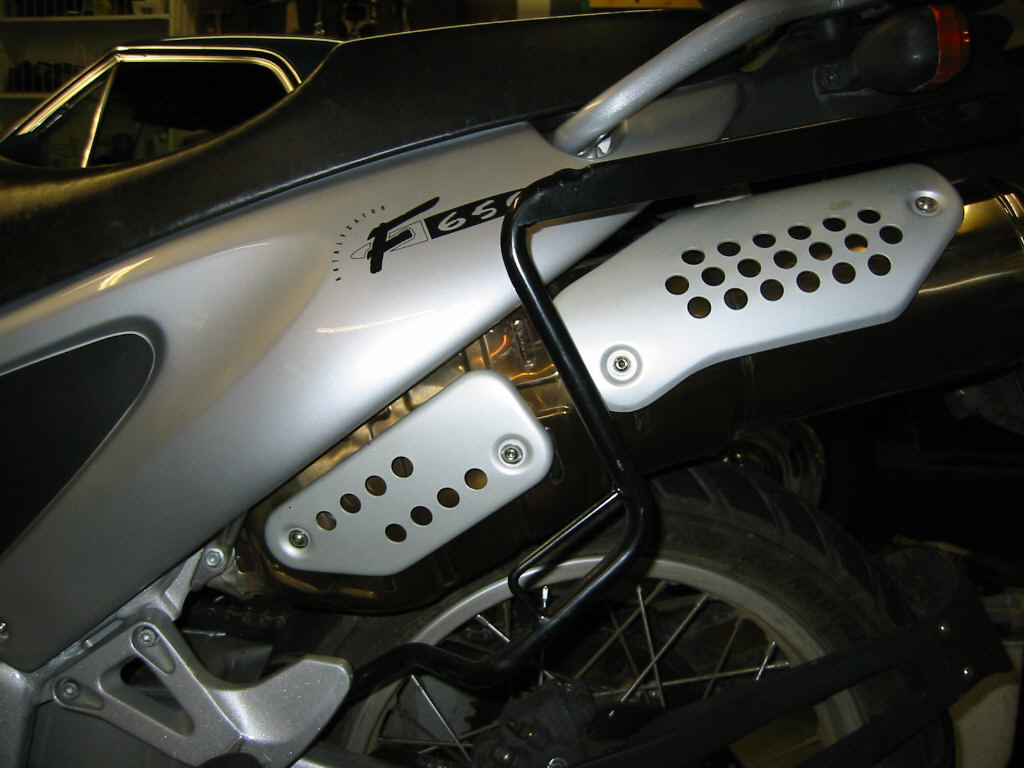
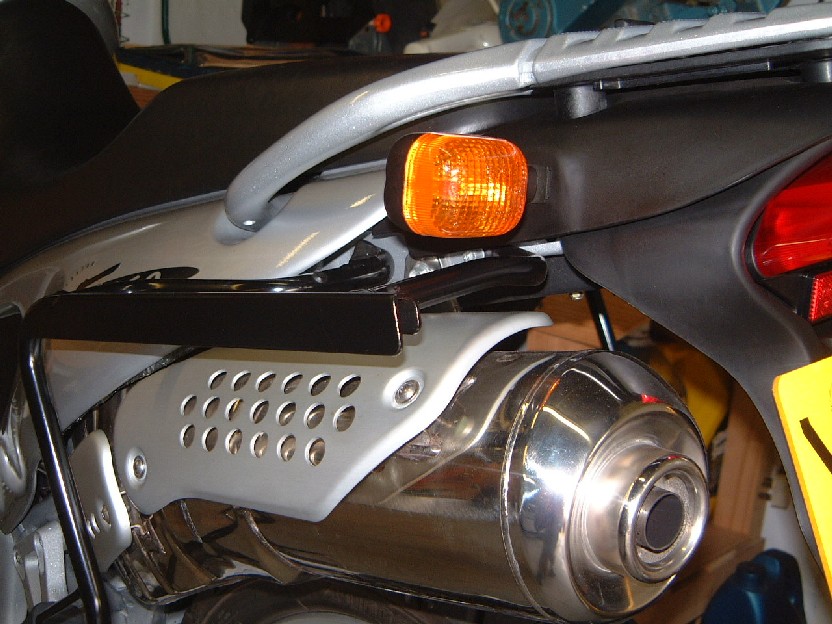
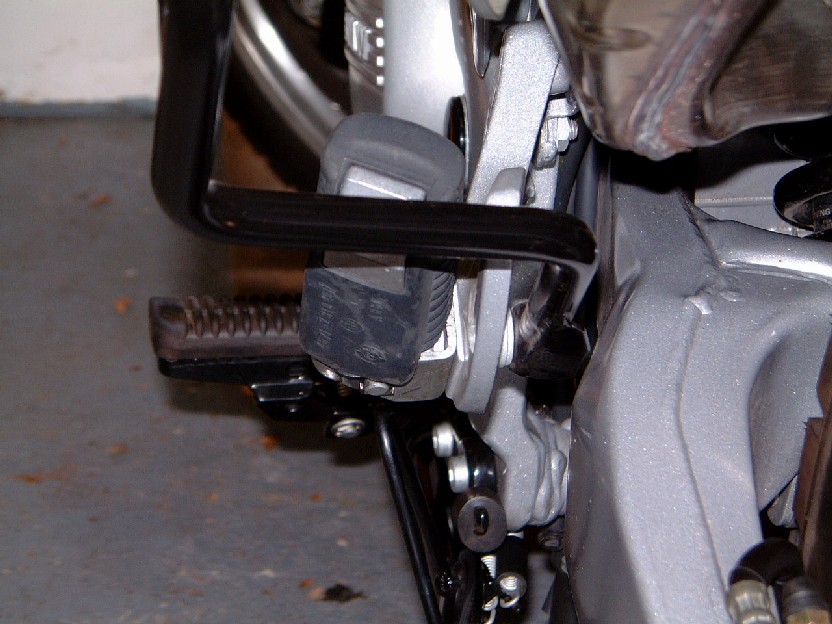
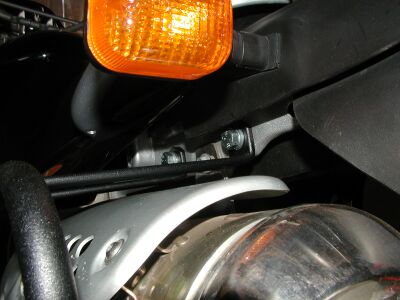
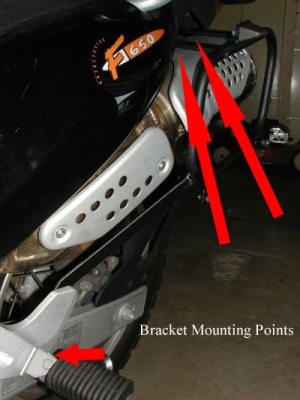
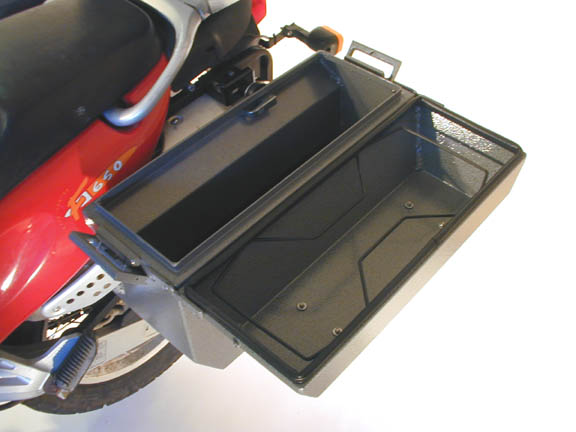
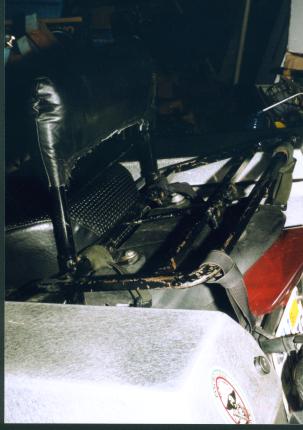
Here is what the completed Mounts look like.
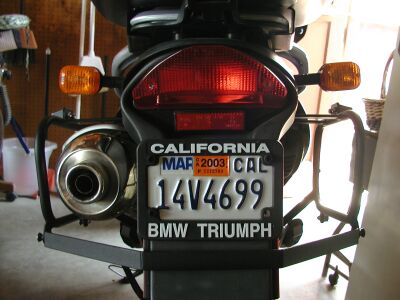
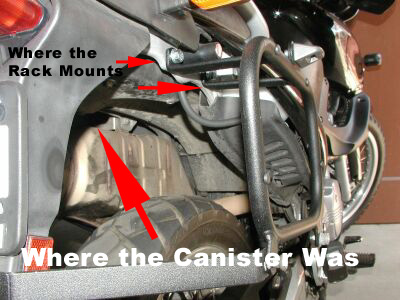
The Right Mount is bolted in next to the seat lock as shown next, where the canister bolted to before.
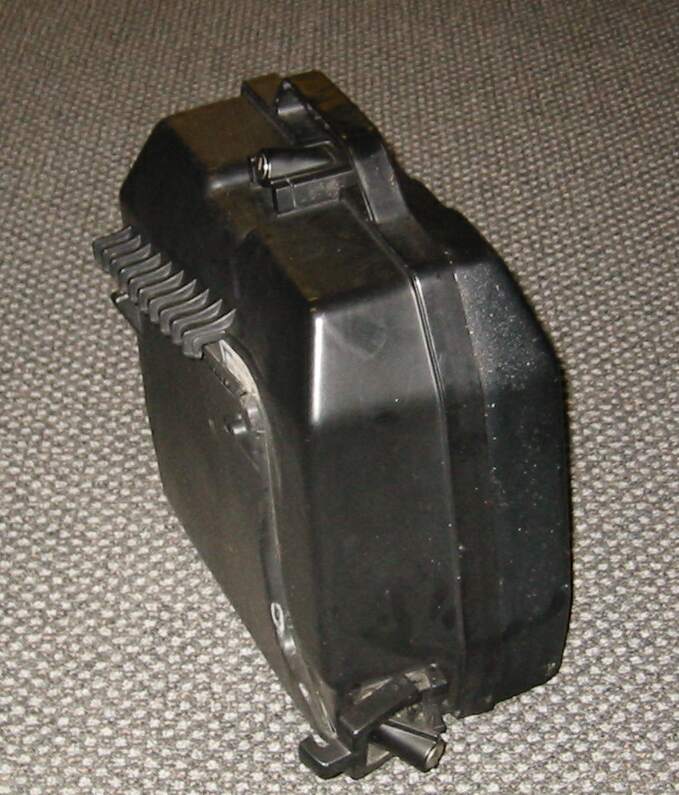
You have to remove the canister to install the side rack. There is a short guide on how to remove the canister with the last image.
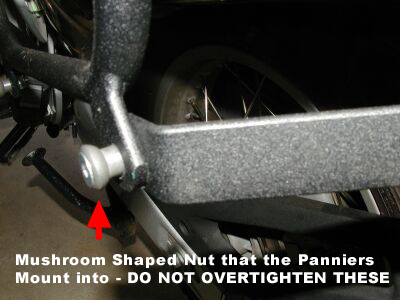
For the Final touches, a word of caution. Do not over tighten the mushroom shaped nut that the bags slide into. They are easy to crack and there are no chances that you'll find one in a store.
If you do happen to break one, use the same screw provided and stack a bunch of washers on it until its the same length as the others and it should work fine.
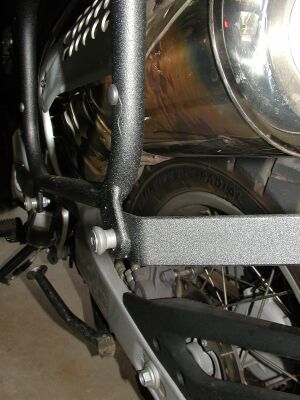
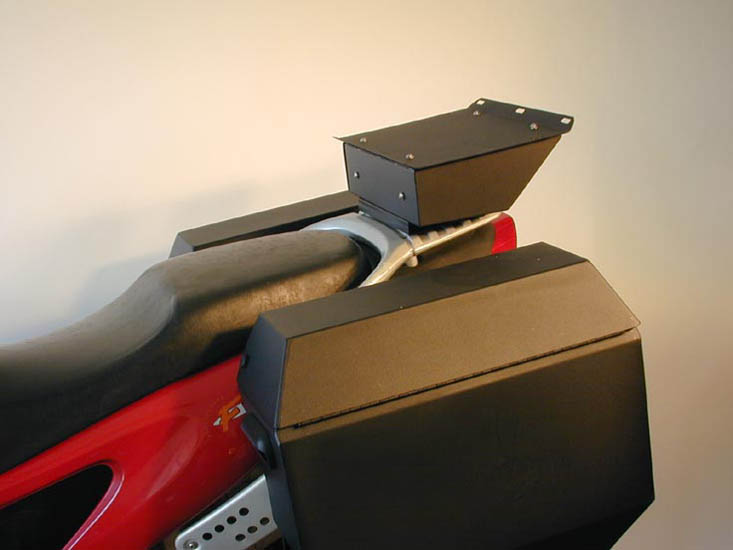
And there is where the left mount bolts, next to the muffler. This side should be a breeze to put together.
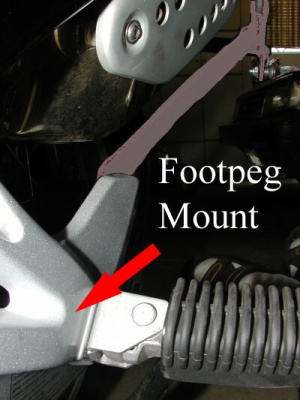
The Mounting points are the same for both sides, here they are shown below. You use a wrench and ratchet for all of these.
And you have to take the nut off that holds the footpeg in place to attach the rack mount, then put it back on and tighten.
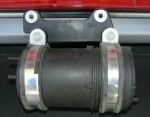
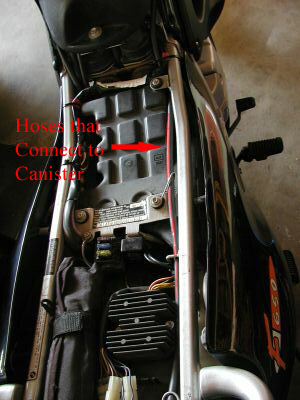
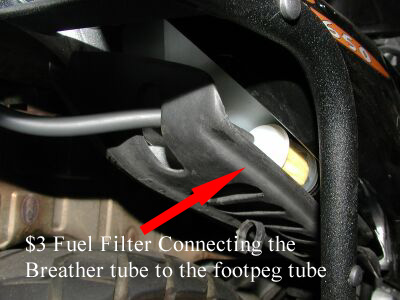
REMOVING THE CANISTER: The hose on the right side of the gas tank under the tank cover that runs all the way back to the canister is the vent hose. This vent hose connects to the interior of the gas tank thru a series of check valves contained inside the filler cap. The other end of this vent hose runs to the charcoal canister at it's center rear fitting. The front (lower) fitting on the canister goes to a drain hose which ends by the right footpeg.
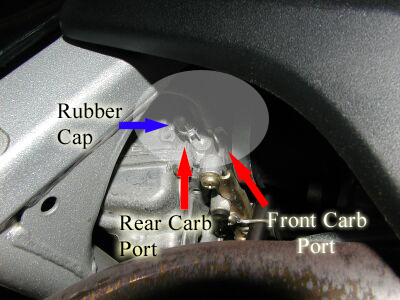
You take the little hose from the carb and plug it or take it off the carb port and plug the (rear) port on the carb. Ya, don't mess with the front carb port.
You take the long hose from the tank to the canister and reroute it to the place where the hose that used to go from the canister to the footpeg went. I used a small cheap gas filter to connect the two hoses together. Because this hose is just a 'breather' hose for the gas tank, chances are it won't suck up any dirt from the ground, but being so close to the ground (footpeg area), I thought it best to add this filter just in case. I would suggest going here for a more detailed textual description of what to do. Which is where I got some of the info on this page.
GIVI Panniers & Topcase
Pair of E360 bags and an E45 Topcase. Flash #412
Jesse Luggage
Jesse's Website


The Jesse bags have two points where you use a small ratchet-type level to lock a conical-shaped metal bit into a receptacle in the rack itself. It would be difficult but not impossible to dislodge one. The locking mechanisms aren't that sturdy and a determined 12-year old could lever up the handles even if locked. If security is that much of a concern, I'd add a hasp-type mechanism and locks. Cheers - Gerry #951 (Phoenix AZ)
More Jesse angles

 i
i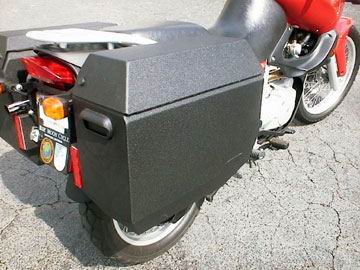
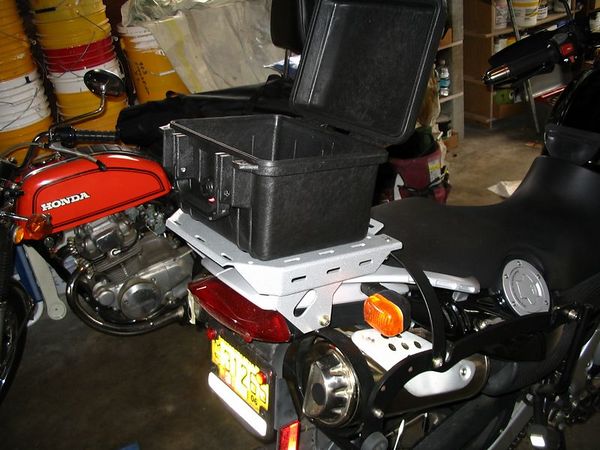
Pelican Cases
Martin 1201
Pelican Top Box Solution
WillK
 For description see
Opinions section below.
For description see
Opinions section below.

Tail Rack too Small?
Steve Johnson #F650001
5/24/99
The stock tail rack is just too small and just too plastic for some owners. Here someone has made a steel rack with a backrest. He plans a new version which will be at the same height and slant as Jesse panniers - thus creating a huge flat area for packing all your gear.
BMW F650GS
Side Cases: Instructions and Installation
Side Case Instruction Booklet – Thanks to
Haakon Aas for scanning:
Pages 1 through 5: pictures and German text. You need these even if you don't
read German because the English text which follows does not have the diagrams.
Page 1,
Page 2,
Page 3,
Page 3a,
Page 4,
Page 5
Pages 6 through 10: English text, without pictures.
Page 6,
Page 7,
Page 8,
Page 9,
Page 10
A small note as to the mounting and "Adjusting the
mushroom-type retainer" in Section 5 of booklet:
When I was about to adjust my "mushroom-type retainer" I just could not do it.
The case fitting piece that goes over the mushroom touched the side panel before
I had the desired tightness. I did not know what to do so I just had a
sloppy-fitted side case. Not properly resting on the bottom rail, but hanging on
the mushroom thingy. After my first small crash I discovered the frame lug (where the mushroom-type
retainer is fitted) was bent upwards. I bent it down by brute force and could
then adjust my case properly. Haakon
Side Case Bracket Installation Booklet – Again,
thanks to Haakon Aas for scanning:
As with the Instruction Booklet above, you need all the pages because the
pictures are with the German text.
Page 1,
Page 2,
Page 3,
Page 4,
Page 5,
Page 6,
Page 7,
Page 8
BestRest F650GS CargoRest: Installation Instructions
Thanks to Wayne #1314, McGuireV10 and zdkayaker
Have a look at both versions. The pictures are easier to follow in the colour version, but the black and white version has the parts list and a helpful addendum.
CargoRest Instructions in colour, CargoRest Instructions in black and white.
For pictures and description of CargoRest installed with a BestRest BackRest see The GS Aftermarket Luggage FAQ.
Jesse Bags for Classic F650: Installation Instructions
Thanks to Marty #435 and with Al Jesse's kind permission, here are the scanned instructions:
Parts List, Page 1, Page 2, Page 3, Page 4,
Pelican Cases as Panniers and Removable Top Box for F650GS
by Greg (CessPool)
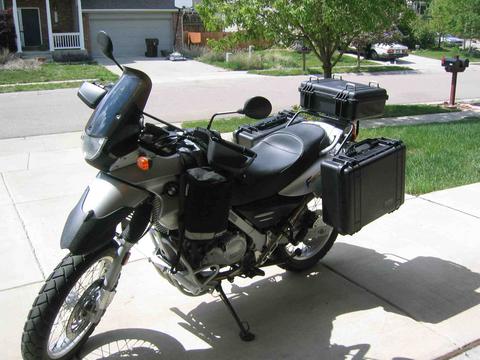 Complete setup.
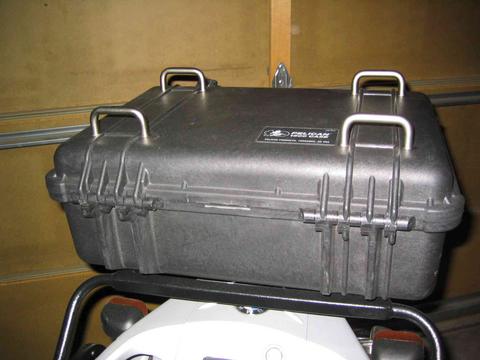
Mounting a Pelican 1500 case as a removable top box
The case was mounted on a Happy Trails tail rack. In case
you aren't familiar with the HT rack, it is build like a brick sh#t house...
err, I mean it's really solid. I got the Pelican case from
All-Pelican-Cases-4-Less.com.
The case looks a lot larger in the pictures than it does in person.
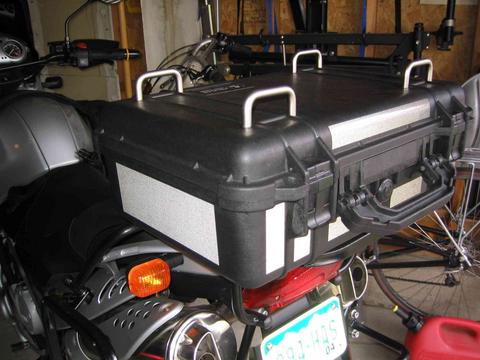 Rear view of box with lid closed.
As you can see from the photos, I've got some reflective adhesive strips on the
box back and sides. I just had some spare stuff laying around and decided to use
the pieces available to make the case more visible at night. Turns out it worked
fine.
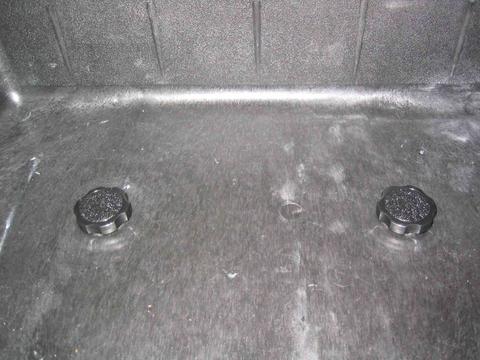 Inside view of case with mounting hardware.
The mounting hardware consists of a couple of metric bolts with press fit knobs
from the local hardware store that match the embedded threaded inserts on the HT
tail rack. There is also a wide washer underneath the knobs between the knob and
case. I really crank these knobs down when the top case is mounted and so far it
hasn't come loose while riding. I like the option of being able to remove the
case when I need to... but come to think of it, I haven't had the need to yet.
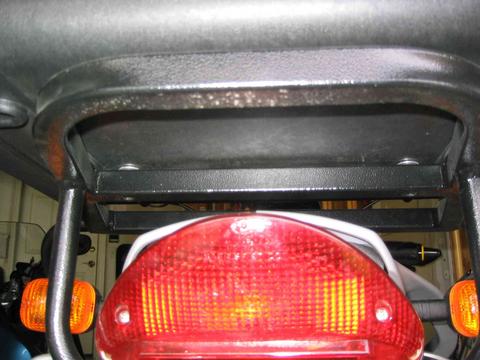 Bottom view of case mounted on rack with small spacing washers.
This picture shows a couple of rubber-backed washers that take up the space
between the rack and the case. The rubber backing on the washers has a two-fold
purpose. It holds the bolts captive in place on the case after removing it and
takes up the small space between the case bottom and the rack. The case has some
small extrusions on the bottom that hold the case up off the rack by about
1/16".
 Right side view of case with lid open.
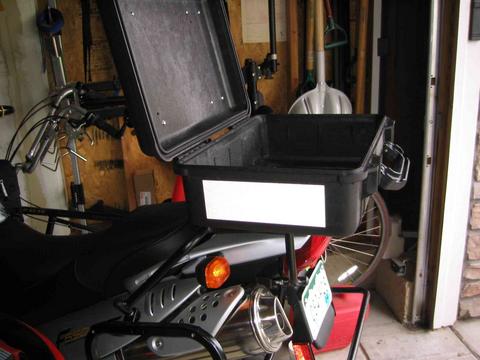 Left side view of case with lid open.
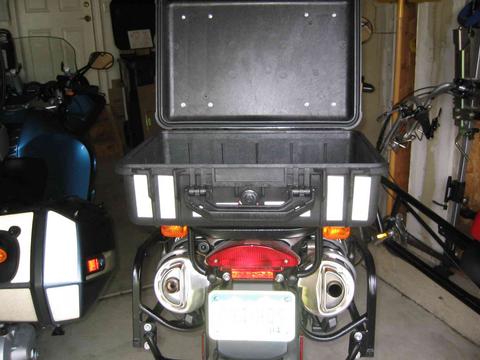 Rear view of case with lid open.
 View from front with case lid closed.
Notice the tie-down loops on the top of the case. I went to the local hardware
store and got the most heavy-duty drawer pulls I could find, and mounted them
with a washer on both the outside and inside of the case. I also used blue
Loctite to hold the screws in place, so they wouldn't loosen while riding.
From Ike #647:
I have used similar cases, and Pelicans, for many years and have two
suggestions.
1: Put some of that reflective tape inside of the lid in case you are stopped at
night with the lid open/up.
2: Stick a piece of wide masking tape inside of the lid so that oil changes, etc.
can be easily recorded on it. I also record on the tape certain telephone
numbers inside of my bags and usually keep a spare key there also.
Mounting Pelican 1550 cases as panniers
I mounted a set of Pelican 1550 cases on my F60GS as a lower-cost alternative to
aluminum panniers. As with the case for the Top Box above, I acquired them from
the online dealer, All-Pelican-Cases-4-Less.com. The cost for the pair of cases
was about $200 and that includes the shipping charges.
 Happy Trail side rack.
The cases are mounted on a
Happy Trails side rack, which is one solid piece of equipment. I also used
the
Happy Trails pannier mounting kit, which consists
of a set of "L" brackets fashioned from some sort of synthetic material, as well
as all the hardware necessary to mount the brackets and a pair of large knurled
knobs which allow the cases to be easily removed from the rack. The width of the
mounted cases is 38" from edge to edge. I tried weighing the cases on my
bathroom scale, but it's one of those digital ones and it failed to trigger.
According to the web site where I ordered the cases, they're about 13-1/2 lbs
each.
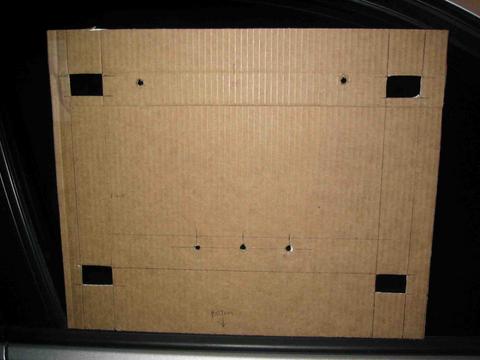 Cardboard template.
 Case with cardboard template.
I constructed a cardboard template to fit the back side of the Pelican case and
used it to locate all of the mounting holes to be drilled on the case.
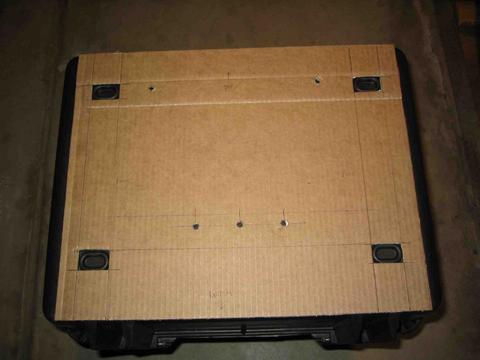
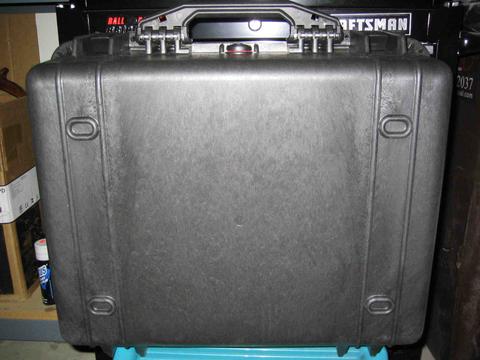 Back side of the Pelican case before modifications.
Note the extrusions which run vertically up & down the
case. When the case is mounted on the rack, these extrusions hold the case away
from the rack and prevent it from sitting flush. Rather than put spacers between
the "L" brackets and the case, I elected to remove the extrusions.
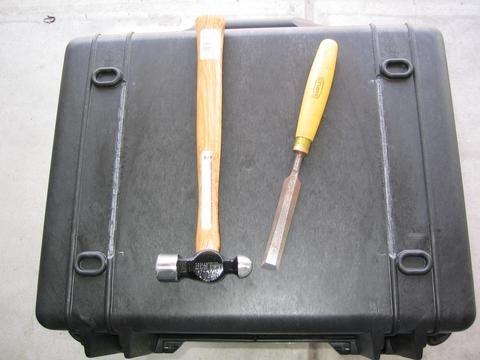 Back side of the case with the extrusions partially removed.
Yeah, I know, I shouldn't use a wood chisel with a ball
peen hammer and I should be ashamed of having such
rusty chisels...
 Case back with the bottom "L" bracket mounted and the extrusion removal
completed.
Case back with the bottom "L" bracket mounted and the extrusion removal
completed.
I used blue Loctite on the bracket mounting screws so they
wouldn't vibrate loose under use.
 Pelican case interior detail when mounted on the bike.
 Rear view from below with cases mounted.
 Rear view from above with cases mounted.
The rear views of the completed installation show how the cases are mounted
flush with the side rack and how wide the setup is while on the bike.
I've got a few more things to do before I'll consider the installation complete.
I'd like to mount some footman loops on the tops of the cases so I can lash
luggage on the top of the racks. I need to put some black reflective tape on the
front, side and rear portions of the cases. This reflective tape is almost
invisible during the day but makes you really stand out at night. Thanks for the
idea from inmate member Ike in Georgia. I'll also be putting an 8x11 sheet of
this reflective stuff on the inside lid of the top case, so that when I'm
stopped by the side of the road with the top case open, I'll even be able to be
seen by the blind... I also need to install a piece of wire or rope connecting
the lid to the case so when the case is opened the lid doesn't immediately fall
to the ground and spill the contents of the case.
So far I like the whole setup of using Pelican cases as panniers. They're
inexpensive, virtually indestructible when you drop the bike, and very dust and
waterproof. On the downside, they're a little heavier (I think) than aluminum
panniers and open from the side rather than the top. I'll be using the h*ll out
of them this summer...
I got the Pelican locks as well and they work great. I was going to get some
locks at our local hardware store but the Pelican locks were cheaper than the
equivalent locks I found locally.
I also considered the 1520 cases but wanted the extra room of the larger cases
for a trip to Alaska. The 1520's would work and look great and provide more
clearance too.
I took out the bike and rode it hard in the Colorado mountains and didn't touch
the bags down once! I did reduce the size of the sidestand though. I also had
the bike up to 100mph on the interstate and didn't notice the bags at all.
Pelican Cases on Moto-Sport Pannier Brackets for F650GS
by cb_abq #1534
I have installed the Moto-Sport pannier mounting brackets and pucks and Pelican
1550's and I must say, I am pleased with the finished appearance. (Pics
in The GS Aftermarket Luggage FAQ.) By the way, the whole set-up was $373, not
bad for ~4000 sq. in.
I noticed that the brackets are wider than the flat area of the bottom of the
case, and originally I was going to stand-off the pucks and bottom bracket by ~¼
in. I saw where CessPool removed the extrusions, and I did not want to modify
the cases in that manner. But then I decided that it was only necessary to shave
off 1" of the extrusion in four places on each case to accommodate the brackets.
This was preferable to cutting billet aluminum to stand off the hardware, which
wouldn't have worked due to the length of the bosses on the pucks anyway. It
also proved to be more difficult than I thought to position the pucks due to my
own competence level and in part to the position of the boss; it is offset at a
45 degree angle with respect to the tab, rather than at 90 or 180 degrees. I am
concerned that the pucks lay on or near the muffler heat shield. (I know, that's
what they're for.) I don't know if the cases will drag. The lowest point is
about 19 or 20 in. off the deck.
One thing that concerns me is that the Moto-Sport brackets sound like they have
some residual material from cutting and welding the supports (rattle, rattle,
rattle) inside the tubes.
Greg #1245 commented: On the Yukon's and other M-S panniers, the pucks are
rotated 45° so that they fit exactly in the corners of the bracket (visualize
having the pucks as far apart as possible and rotating them 45° clockwise and
counter clockwise). This prevents the panniers from moving forward/backward
without relying on really tightening down on the pucks.
cb_abq replied: That makes sense now that I read it. I put them all the way to
the edges, I just didn't turn them into the corners, but I should have. I left
some slop to the inside so I could a) add some rubber strips to the bottom
brackets and b) if I erred the other way they wouldn't go on.
Mounting Pelican Cases
to Givi Saddlebag Loops
by Flash #412
Givi makes some great products. I have a set of E360 saddlebags and an E45 top
box. I’m VERY happy with them. They have one drawback… because of the way the
single lock works, you cannot take them on an airplane. If you lock them, the
TSA will destroy the latch to open them. If you don’t lock them, there is
nothing to hold them closed.
I wanted a set of saddlebags that I could take on an airplane. These bags needed
to latch securely without locks. Yet I needed to be able to lock them to the
bike and lock them closed when they were on the bike. From the variety of
plastic cases out there, I selected Pelican Cases.
Pelican Cases cost significantly less than bags from motorcycle companies and
are significantly sturdier. Pelican Cases come with an unconditional lifetime
warranty, with the exception of sharks, bears and children under five. That’s
what they write. What Pelican will tell you on the phone if you ask, is that
drilling holes in them voids the warranty. I figure that since they cost less
than $100 each, I can buy three before I have bought one bag from BMW. BMW bags
are made of crap plastic and will explode like a firecracker if you drop the
bike on one of them. Pelican Cases are STRONG.
 For a variety of reasons, I picked the 1550. (Click on thumbnails to open large
pictures in new windows.) When mounted as saddlebags, they open from the side.
Since have a tank bag and a top case, I don’t open my bags very often when they
are attached to the bike. So I prefer these. The 1650 has more volume with very
little addition to the dimensions. I think if I was going to do it again, I’d
get the 1650’s. I picked the International Orange color for several reasons.
First, they are EXTREMELY visible. This might keep someone in a car from
broadsiding me. (Probably not.) Second, they are EXTREMELY visible; this makes
them unattractive to thieves. “Did you see a guy go by here with a black
suitcase?” just doesn’t cut it. Finally, I ride a BMW F650, the only BMW
motorcycle with a chain drive. The international club for the F650 is called The
Chain Gang. Members are called “inmates.” And the club’s color is jailhouse
orange. I bought a pair of Pelican 1550 cases and a set of Givi bag loops. I
think the whole mess cost me right at $300 new.
For a variety of reasons, I picked the 1550. (Click on thumbnails to open large
pictures in new windows.) When mounted as saddlebags, they open from the side.
Since have a tank bag and a top case, I don’t open my bags very often when they
are attached to the bike. So I prefer these. The 1650 has more volume with very
little addition to the dimensions. I think if I was going to do it again, I’d
get the 1650’s. I picked the International Orange color for several reasons.
First, they are EXTREMELY visible. This might keep someone in a car from
broadsiding me. (Probably not.) Second, they are EXTREMELY visible; this makes
them unattractive to thieves. “Did you see a guy go by here with a black
suitcase?” just doesn’t cut it. Finally, I ride a BMW F650, the only BMW
motorcycle with a chain drive. The international club for the F650 is called The
Chain Gang. Members are called “inmates.” And the club’s color is jailhouse
orange. I bought a pair of Pelican 1550 cases and a set of Givi bag loops. I
think the whole mess cost me right at $300 new.
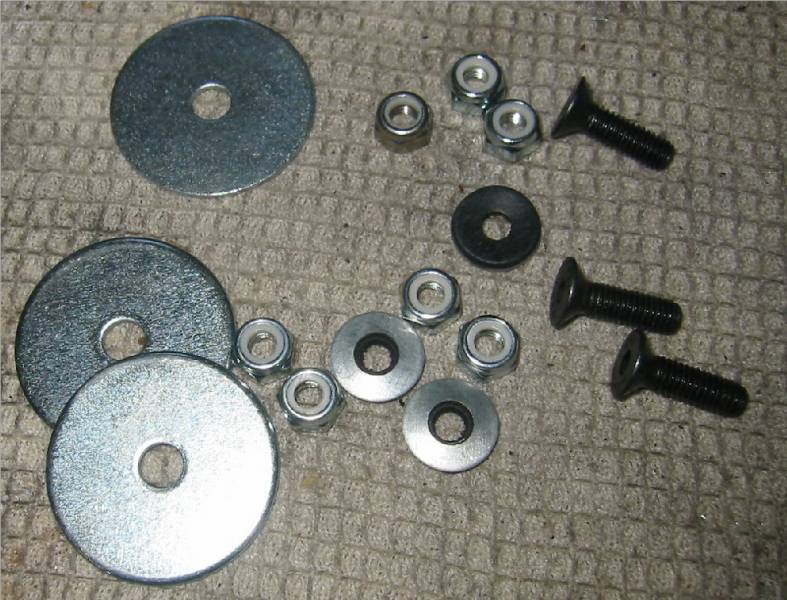
 Then I bought a few eyebolts and some washers. I also got a length of
appropriately-sized C-channel aluminum. I cut the C-channel so that the pieces
would fit in the space between the “tits” that the regular Givi bags use to
attach to the loops. Then I drilled three holes in each piece, straight through
the opposite sides of the “C”. I drilled one set of holes over-size so that I
could get a bit through it to countersink the inside of the opposite holes. My
plan was to use 6 mm flat head cap screws to attach the rails to the bags. On
the inside of the bags, for each bolt, I used a large fender washer followed by
a quarter inch rubber-backed washer, followed by a NyLoc (nylon-insert locking)
nut. This would not only attach the rail to the bag, but prevent any leaking.
Plus, the outer surface of NyLoc nuts is rounded, which theory says will be less
“offensive” to whatever rubs up against it inside the bag as we rattle down the
highway.
Then I bought a few eyebolts and some washers. I also got a length of
appropriately-sized C-channel aluminum. I cut the C-channel so that the pieces
would fit in the space between the “tits” that the regular Givi bags use to
attach to the loops. Then I drilled three holes in each piece, straight through
the opposite sides of the “C”. I drilled one set of holes over-size so that I
could get a bit through it to countersink the inside of the opposite holes. My
plan was to use 6 mm flat head cap screws to attach the rails to the bags. On
the inside of the bags, for each bolt, I used a large fender washer followed by
a quarter inch rubber-backed washer, followed by a NyLoc (nylon-insert locking)
nut. This would not only attach the rail to the bag, but prevent any leaking.
Plus, the outer surface of NyLoc nuts is rounded, which theory says will be less
“offensive” to whatever rubs up against it inside the bag as we rattle down the
highway.
I also bought some short eyebolts. My original idea was to attach two eyebolts
to each bag so that one would be above the top rail of the loop and the other
below the top rail. I figured that a long-shackle padlock would catch both bolts
and secure the bag to the bike.
 After some eyeballing and allowing as how, I realized that I needed to remove
some hardware from the bag loops. Since I didn’t want to lose the hardware, I
just turned it around backwards. When moving the “tits” on the bottom rail to
the other side, I used screws that were longer than the originals. After tapping
the through holes, I re-installed the tits on the other side using longer bolts
with jam nuts.
After some eyeballing and allowing as how, I realized that I needed to remove
some hardware from the bag loops. Since I didn’t want to lose the hardware, I
just turned it around backwards. When moving the “tits” on the bottom rail to
the other side, I used screws that were longer than the originals. After tapping
the through holes, I re-installed the tits on the other side using longer bolts
with jam nuts.
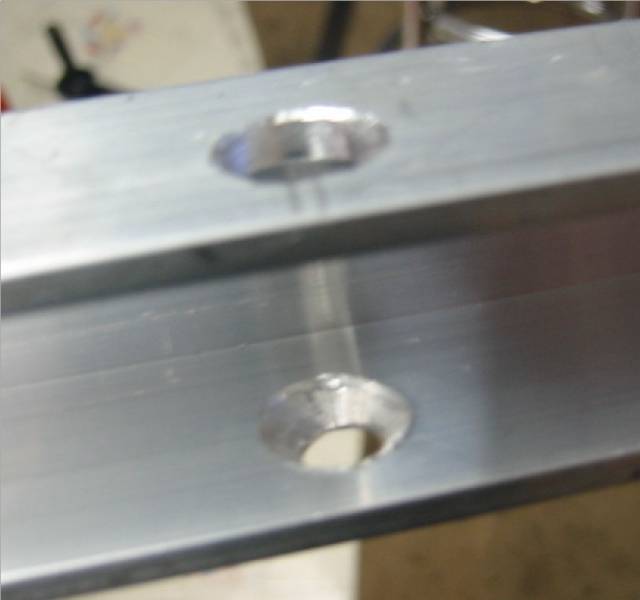
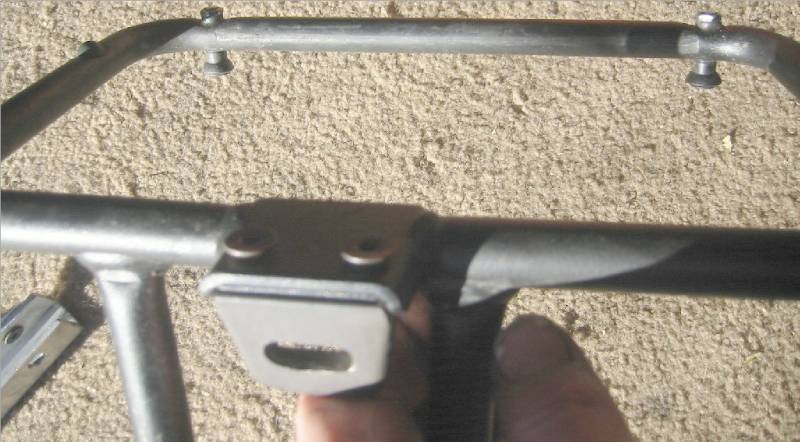
 Similarly, the latch piece required some different bolts. I used flat head cap
screws for their lower profile. But I realized that by milling a slot in each
stock Givi latch piece, I could mount a bag to the bike and lock it with just
one padlock. This involved bending some special rods. My fallback plan, if that
didn’t work out, was to have three locks per bag, one for each latch and one to
secure it to the bike.
Similarly, the latch piece required some different bolts. I used flat head cap
screws for their lower profile. But I realized that by milling a slot in each
stock Givi latch piece, I could mount a bag to the bike and lock it with just
one padlock. This involved bending some special rods. My fallback plan, if that
didn’t work out, was to have three locks per bag, one for each latch and one to
secure it to the bike.
 After getting the loops worked out, it was time to decide how the bags should be
positioned. I held them parallel to the loops and they seemed canted too far
forward. I held them parallel to the ground and they seemed too flat against the
lines of the bike. So in the end, I split the difference. This meant that the
two bags would not be strictly interchangeable. So I put a piece of red
electrical tape on one handle and a piece of black on the other. It’s just as
well. When you are in a hotel and open one bag, if they’re not marked, Murphy
says you’re going to open the wrong one first. I also stuck a return mailing
label on each bag and covered it with clear packing tape, just in case I lost
it.
After getting the loops worked out, it was time to decide how the bags should be
positioned. I held them parallel to the loops and they seemed canted too far
forward. I held them parallel to the ground and they seemed too flat against the
lines of the bike. So in the end, I split the difference. This meant that the
two bags would not be strictly interchangeable. So I put a piece of red
electrical tape on one handle and a piece of black on the other. It’s just as
well. When you are in a hotel and open one bag, if they’re not marked, Murphy
says you’re going to open the wrong one first. I also stuck a return mailing
label on each bag and covered it with clear packing tape, just in case I lost
it.
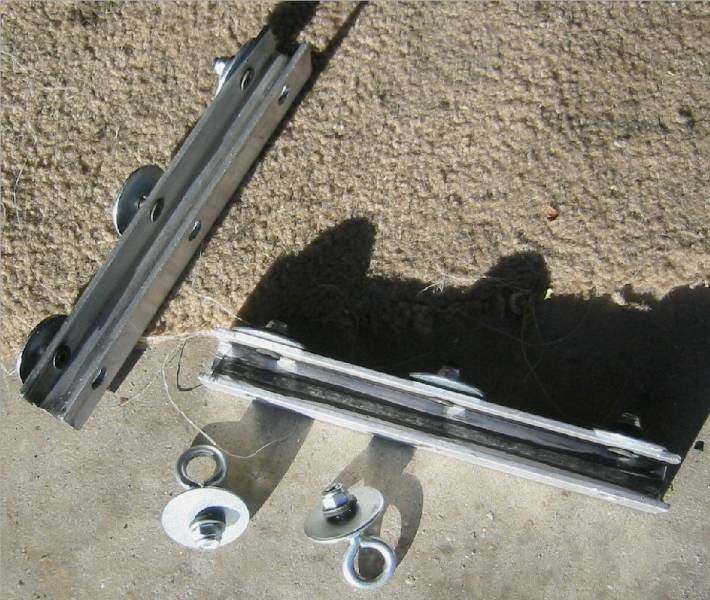
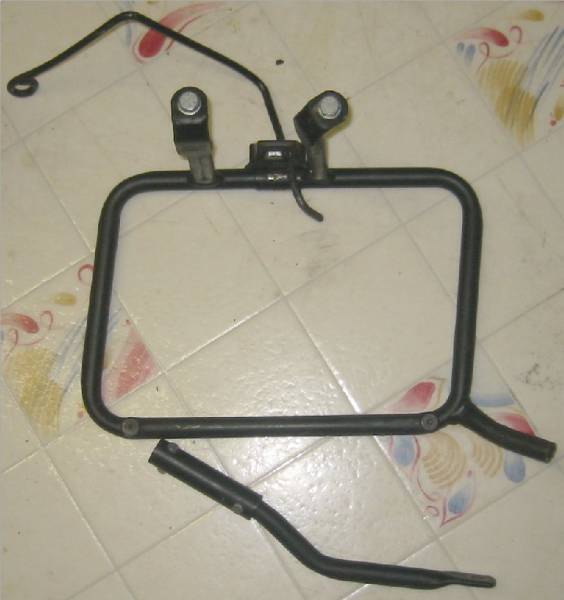
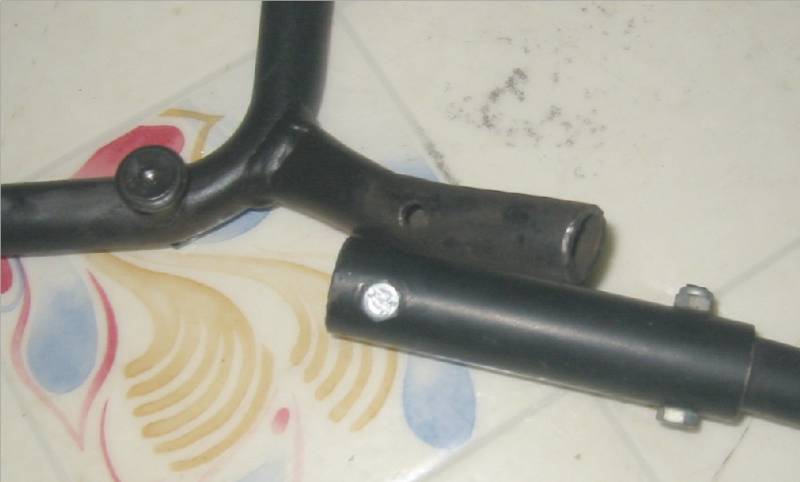 Another part of putting the bags on the airplane is carrying the mounting loops.
I accomplished this by cutting off the lower leg that shares the buddy peg bolt.
Then, both loops and all of the mounting hardware would easily fit inside one
bag. A piece of pipe, cross-drilled for 4 mm bolts, made reattaching the
amputated legs trivial. While the reattached legs were a bit wobbly before
mounting the loops to the bike, once mounted, they were solid as a rock. One
other item worth mentioning is the tie down inside the bag in the photo.
Another part of putting the bags on the airplane is carrying the mounting loops.
I accomplished this by cutting off the lower leg that shares the buddy peg bolt.
Then, both loops and all of the mounting hardware would easily fit inside one
bag. A piece of pipe, cross-drilled for 4 mm bolts, made reattaching the
amputated legs trivial. While the reattached legs were a bit wobbly before
mounting the loops to the bike, once mounted, they were solid as a rock. One
other item worth mentioning is the tie down inside the bag in the photo.
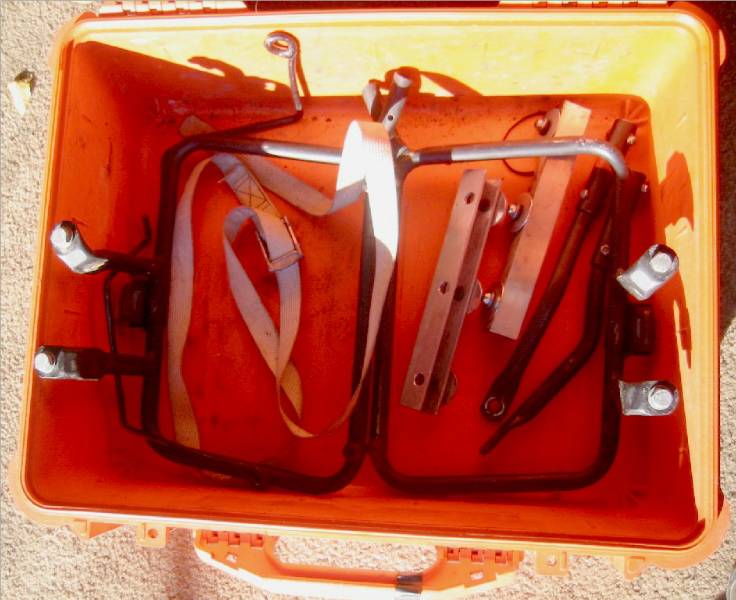 I picked up some of the tie downs that BMW uses to secure new bikes inside
shipping crates for free from my local dealer. Rather than make some sort of
cross-brace at the bottom rear of the bag loops, I simply loop the tie down
across the seat and through the handles of the cases. They’re held very securely
to the bike and the strap takes some of the “bending weight” off the bag loops.
All of the attachment hardware easily fits in one bag with plenty of room left
over for other goodies.
I picked up some of the tie downs that BMW uses to secure new bikes inside
shipping crates for free from my local dealer. Rather than make some sort of
cross-brace at the bottom rear of the bag loops, I simply loop the tie down
across the seat and through the handles of the cases. They’re held very securely
to the bike and the strap takes some of the “bending weight” off the bag loops.
All of the attachment hardware easily fits in one bag with plenty of room left
over for other goodies.
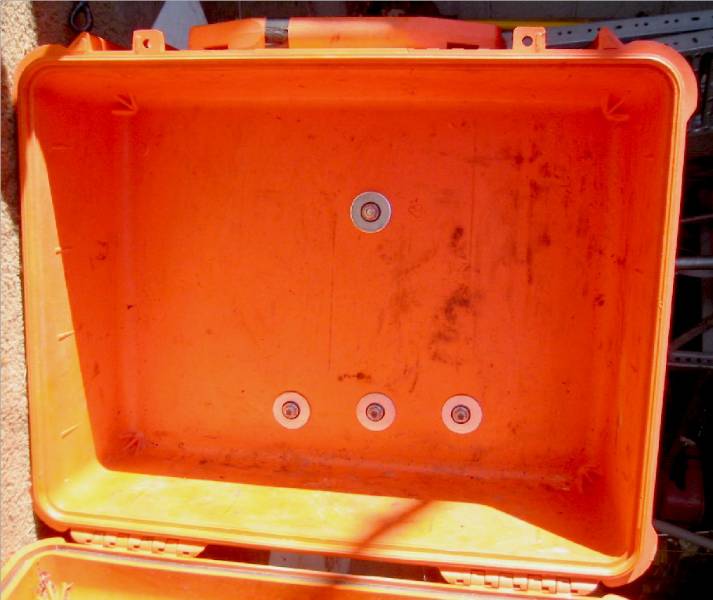
 Pelican sells accessories for their cases. They don’t sell anything to go inside
the lid of the 1550, so I bought a pair of inserts for the 1400 series. They
attach with sticky-back Velcro, so they work just fine. The one pictured is the
“photo” insert. I also got a “document” insert for the other bag. These are not
very expensive and certainly add utility. (What’s pictured is not what I had
there while I was actually using the bag.)
Pelican sells accessories for their cases. They don’t sell anything to go inside
the lid of the 1550, so I bought a pair of inserts for the 1400 series. They
attach with sticky-back Velcro, so they work just fine. The one pictured is the
“photo” insert. I also got a “document” insert for the other bag. These are not
very expensive and certainly add utility. (What’s pictured is not what I had
there while I was actually using the bag.)
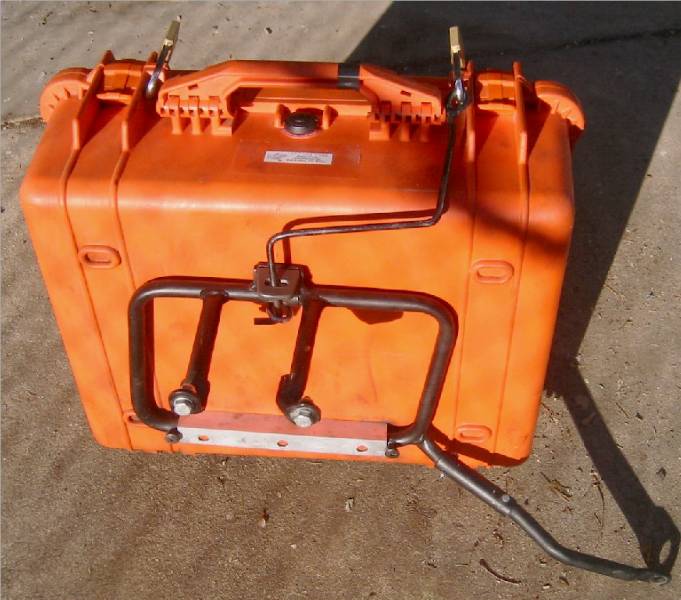 Here is a photo from the back, of the bag attached to the loop using a “special
rod” that I made.
Here is a photo from the back, of the bag attached to the loop using a “special
rod” that I made.
 Here is a photo from the outside, of the bag attached to the loop using a
“special rod” that I made.
Here is a photo from the outside, of the bag attached to the loop using a
“special rod” that I made.
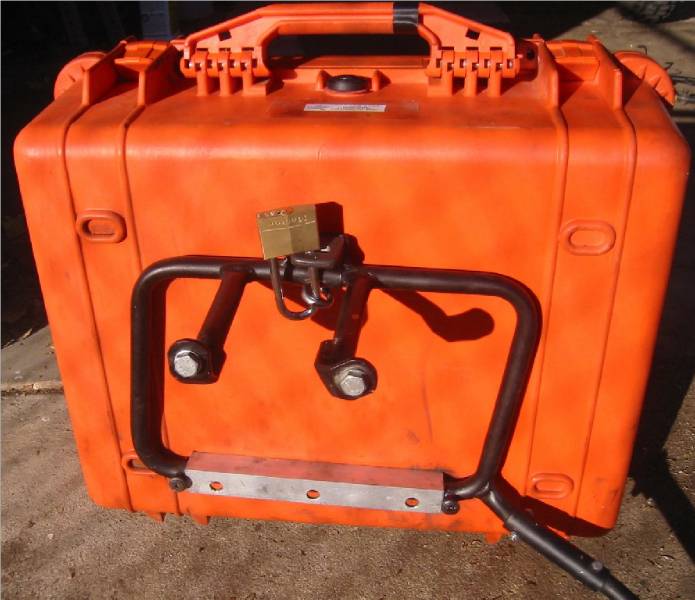 Here is a photo from the back, of the bag attached to the loop using a
long-shackle padlock. I bought six keyed alike padlocks at Home Depot for about
US$20.
Here is a photo from the back, of the bag attached to the loop using a
long-shackle padlock. I bought six keyed alike padlocks at Home Depot for about
US$20.
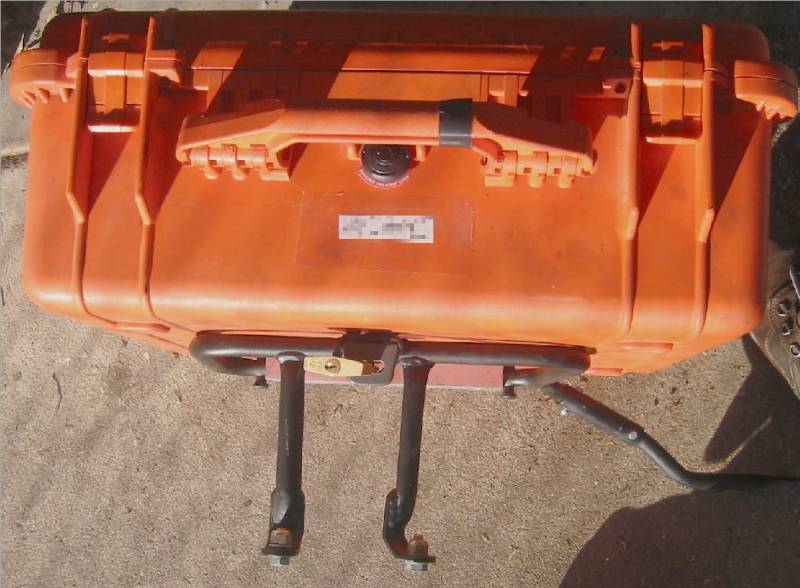 Here is a photo from the top, of the bag attached to the loop using a
long-shackle padlock.
Here is a photo from the top, of the bag attached to the loop using a
long-shackle padlock.
 The first trip I took with the bags was a weekend shakedown cruise of about 2000
miles round trip from Colorado to Arkansas and back. They performed flawlessly.
The first trip I took with the bags was a weekend shakedown cruise of about 2000
miles round trip from Colorado to Arkansas and back. They performed flawlessly.
The next trip I took with the bags was 20,000 miles round trip on Lufthansa
(Denver to Frankfurt to Johannesburg and back) plus about 4500 miles on the
ground in Southern Africa. Again, the system performed flawlessly.
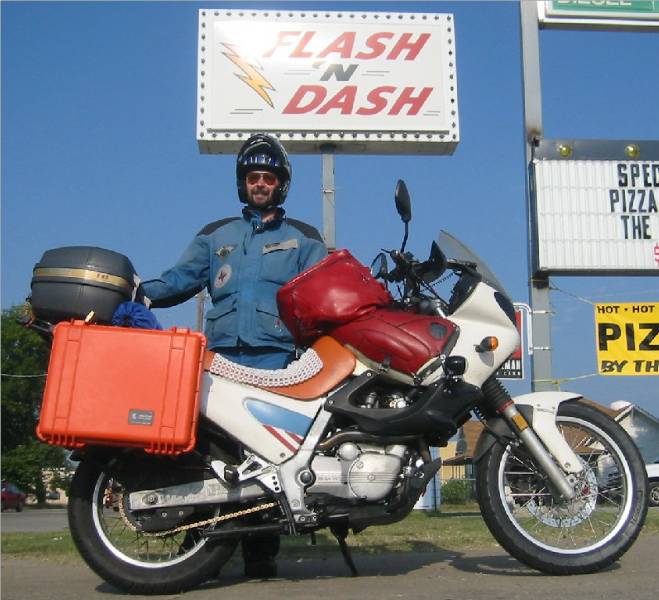
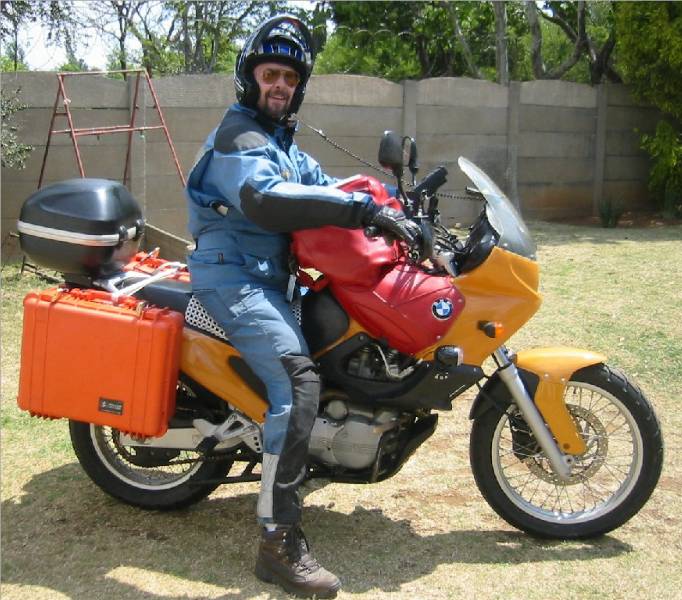 Here’s a shot of the bags mounted on the loaner bike I borrowed in Johannesburg
as I’m getting ready to head out for some adventure.
Here’s a shot of the bags mounted on the loaner bike I borrowed in Johannesburg
as I’m getting ready to head out for some adventure.
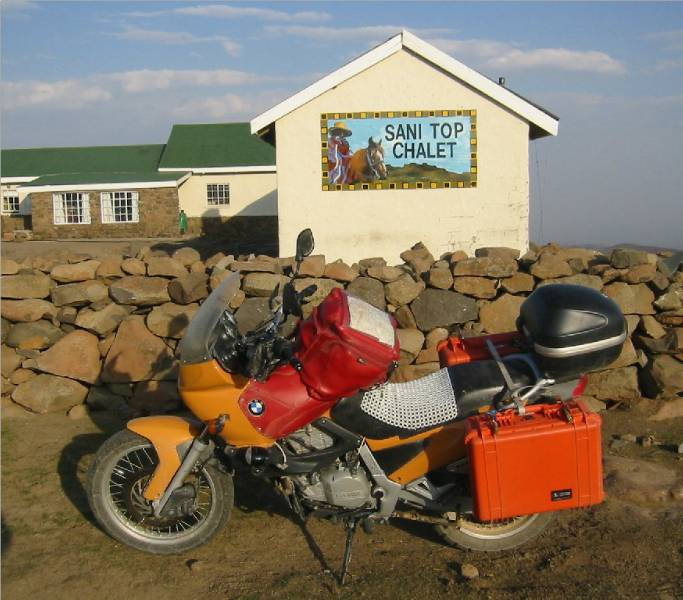 Here’s a shot of the bags, still on the bike almost 4000 miles into my African
Adventure, outside of the highest pub on the continent, in Sani Top, Lesotho. (Sani
Pass between South Africa and Lesotho is without a doubt the worst excuse for a
road I have ever encountered. Woo HOO!)
Here’s a shot of the bags, still on the bike almost 4000 miles into my African
Adventure, outside of the highest pub on the continent, in Sani Top, Lesotho. (Sani
Pass between South Africa and Lesotho is without a doubt the worst excuse for a
road I have ever encountered. Woo HOO!)
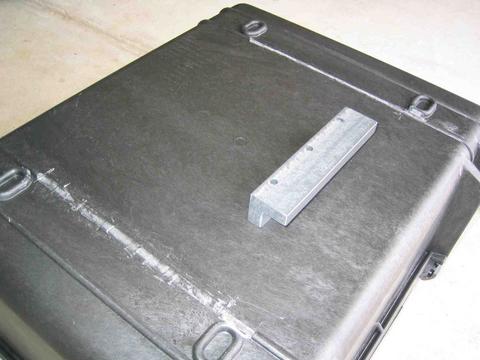
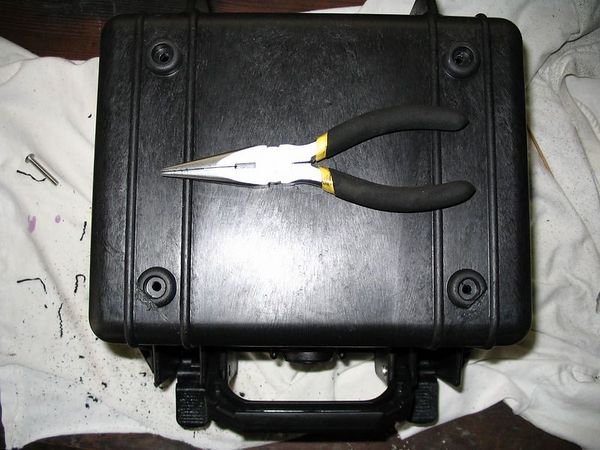
$35 Pelican Top Box
By Motoplaner
I wanted something to just carry some essentials (mainly tools, air compressor)
for off-road where hard side cases would be likely scraped off/destroyed.
Ordered a Pelican 1300 for $35. Didn’t want anything too big, and there was a
substantial price jump beyond this size. For long distance/camping I’ll mount
the 20” top plate and side bags to the Jesse mounts. Went to Ace and got some
stainless hardware, bolts, Nylocks, fender washers and neoprene washers for
vibration damping and waterproofing (I’m going to take it on and off) —$5.00
(got a bunch of extras too).
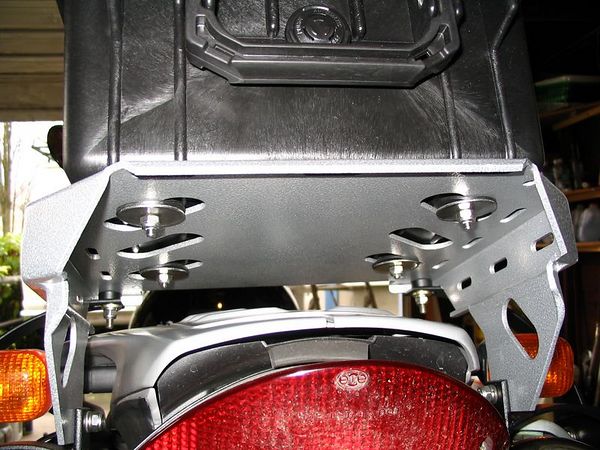
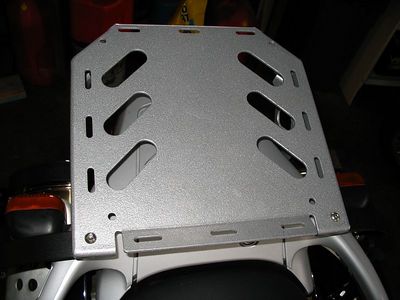 Saw that the “feet” of the Pelican about perfectly mated/recessed into the Jesse
rear rack slots (one could just grind these off and mount it any old ways).
Saw that the “feet” of the Pelican about perfectly mated/recessed into the Jesse
rear rack slots (one could just grind these off and mount it any old ways).
 The modified feet set right into those slots and it doesn‘t move 1/64“
any which way but up (before bolting down). I plan on removing the handle soon,
as it’s just additional weight/shrapnel. And what do people do to a handle? Yerk
on it as hard as they can, is what.
The modified feet set right into those slots and it doesn‘t move 1/64“
any which way but up (before bolting down). I plan on removing the handle soon,
as it’s just additional weight/shrapnel. And what do people do to a handle? Yerk
on it as hard as they can, is what.
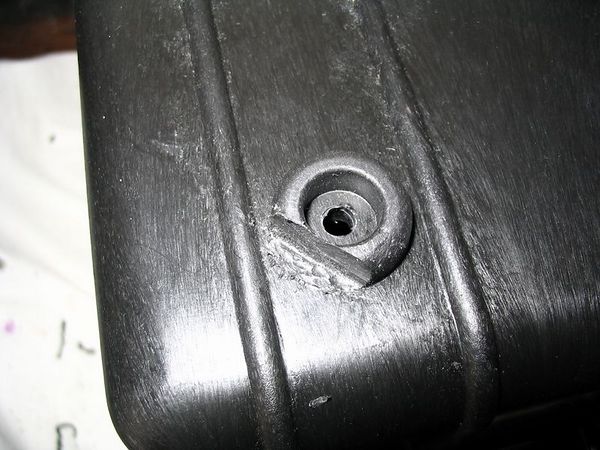
 Four feet/posts angle-cut to mate with angled slots.
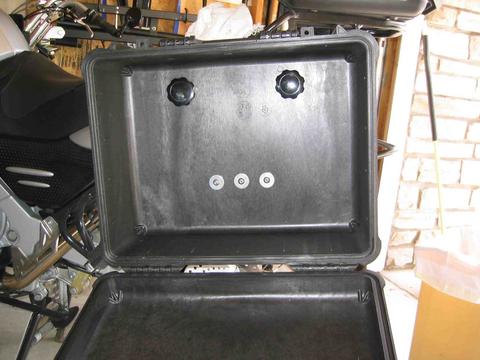
 Mounted view from below.
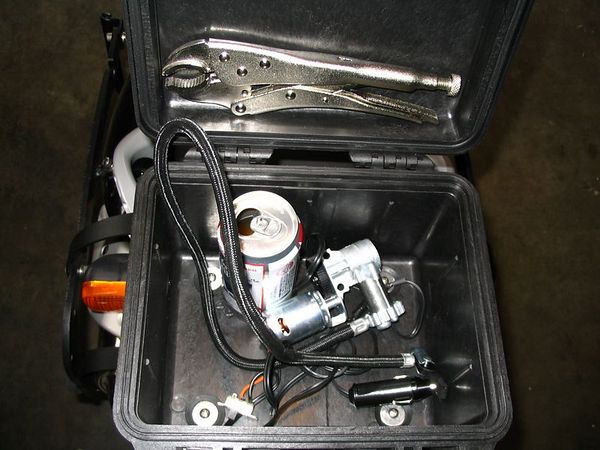 The bare essentials: air compressor, beer and big Vise-Grip (for scale).
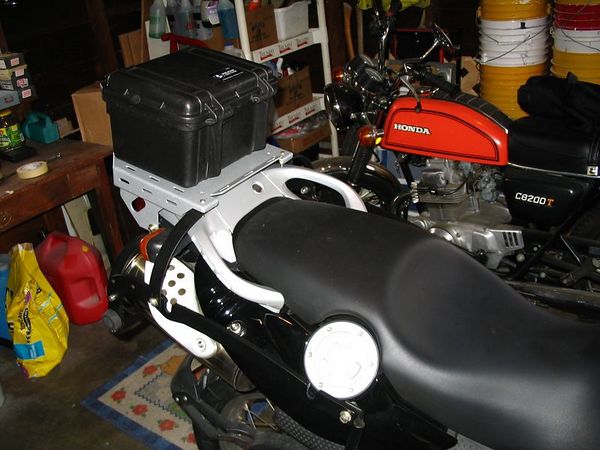
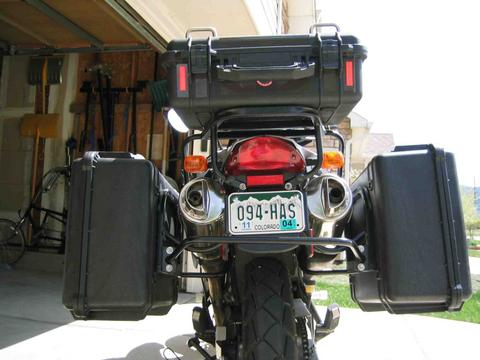
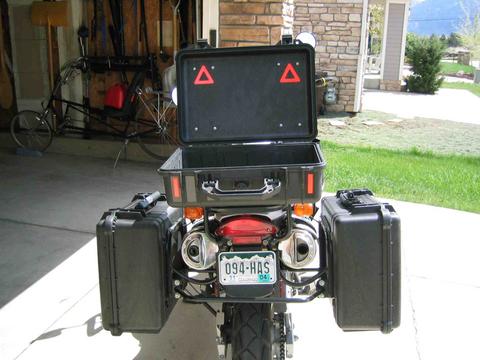
 Different views.
I'll probably add some reflectors and such. Anyway, that’s how I spent $40.
That's a Jesse rear rack. Jesse offers top boxes that are quite heavy and
expensive. I bought the big plate (bolts on to the top of the rear rack) to
strap my kitchen sink to. To have a Jesse rear rack you have to have Jesse side
bag mounts too. $. If a guy had a Happy Trails or some such rear rack (a more
stand-alone system), it'd be a simple deal (with the right size Pelican) to bolt
one on.
Touratech Racks - Installation
Guide
Scott (TX) #678
14-Jan-02
I installed the 35L and 41L rack/box assembly on my '99F. I wrote an
installation guide for them that I believe they are using.
1999 F650 Touratech™ Aluminum Side Case Installation Guide
PARTS LISTING
| Qty | Item | Location |
| 1 |
Left hand luggage rack |
Left side of motorcycle |
| 1 |
Right hand luggage rack |
Right side of motorcycle |
| 1 |
Union bow |
Connects rear of two side frames |
| 2 |
Hexagon bolts M6x25 |
R & L luggage rack bridge |
| 2 |
Hexagon bolts M6x16 |
R & L union bow connections |
| 4 |
Washers, M6 |
Union bow connections (2) Luggage rack bridge (2) |
| 2 |
Self locking nuts M6 |
Union bow connections |
| 2 |
Hexagon bolts M8x20 |
R & L Rear luggage rack to frame |
| 2 |
Hexagon bolts M8x30 |
Right foot peg bracket assembly |
| 7 |
Washers for M8 |
R & L Rear luggage rack to frame (4), foot peg space (3) |
| 2 |
Self locking nuts M8 |
R & L Rear luggage rack to frame |
RIGHT SIDE INSTALLATION: (the most difficult side)
LEFT SIDE INSTALLATION: (the easy side)
UNION BOW INSTALLATION: (almost done…)
FINAL STEPS
NOTES:
If you have any questions or problems, contact
Domanic at Cyco-Active. Tell him I sent you his way and he should take care of
you. Their information is:
-800-491-2926 (=491-CYCO)
CycoActive, inc
701 34th Ave.
Seattle, WA 98122 USA
http://cycoactive.com/
Touratech Installation Notes 2
by NormJ #473 Seattle
Here are some notes about my experience installing the Touratech racks and
aluminium panniers on a '99 Classic.
I followed the very good directions per the FAQ, but there were a few "oddities"
that I believe should be entered onto the board here so they will pop-up when
one searches the archives.
The left side was actually harder than the right. it's possible my rack was slightly wobbled or warped. basically, I had to loosen the left passenger peg almost all the way, (in addition to the instructions in FAQ) and slowly tighten everything up to spread out some of the slack in the system. the rear most bolt did not want to tighten for me, no matter what. It is a complete punk about letting you get a wrench and/or an Allen key on it. it's still not "tight", but is on as good as I could get it.
When mounting the left pannier for the first time, I discovered that (on my bike) there is not enough clearance to turn the steel L-brace that actually holds the pannier down. the corners of the brace bump up against the aluminium heat protector on the pipe. Easily fixed by simply bench-grinding the corners off the end that has the shaft meeting it. clears fine now.
On the right side, the plastic body panel would not install without shaving off some plastic, basically below the excess coolant tank. Then, I discovered that the front L-brace for the pannier needed about a 1/2" of the plastic to be gone in order to mount. The method that I used worked great and left a nice clean edge:
Cut straight into the plastic with a razor blade (careful!) the depth you think you need, the width you think you need.
Score the plastic on the back with the razor blade between the two cuts (3 or 4 swipes in the same groove).
Then work harden the plastic back and forth until it snaps.
I dressed up the edge with a really sharp chisel to make it look better and smooth the edge.
All in all I am super-stoked about the Touratech bags, and they carry all I need.
Touratech Installation Notes
3
from scx
For an alternative mounting method try http://www.touratech-usa.com/instl/pannier_instr.html
Touratech Zega Case Installation
on F650GS
by Dave #1513

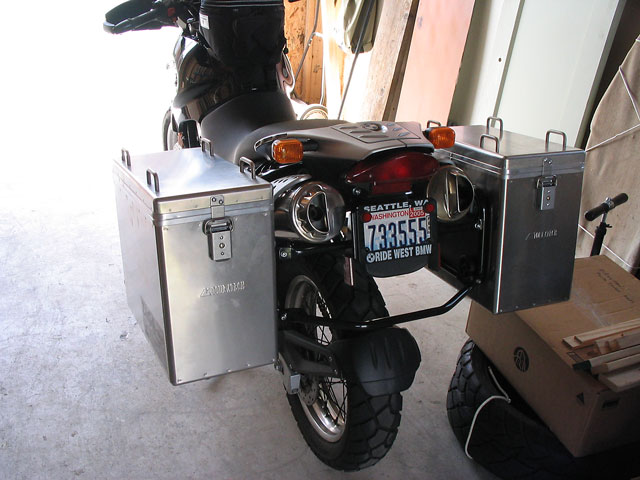
I suspect most here know this part, but as way of introduction: Touratech is a German company that makes lots of cool after-market accessories for "enduro" style bikes. They concentrate on BMWs, but produce bits for other makes as well. The Zega bag is basically a big aluminum box that mounts to a tubular steel rack. The US distributor for TT products is CycoActive, located in Seattle.
Luggage can be a religious issue for some; I believe that Zegas are the best luggage you can buy. (Jesse/Givi/Happy Trails owners would disagree, of course.) Their advantages (to me) include: They're square, so they're easy to pack. The lids remove. The lids include strap points to tie down a dry bag. They easily come off the bike, but when attached properly are very secure. They're waterproof. They're durable. They hold a lot. They look cool. Hey, if they're good enough for Helge Pederson, they're probably good enough for me. (No, I don't work for Touratech.)
I got the pre-mounted 35 liter (each) boxes. Pre-mounted means that the "pucks" that hold the boxes to the rack are pre-mounted, so I didn't have to position them and drill the bolt holes. I understand that the puck-mounting process is the most pain for any Zega install, and the part where you're most likely to make a multi-hundred dollar mistake and ruin a box. Unless you have some special need to position the boxes in an odd location, you should probably get the pre-mounted kit.
What you get from Touratech is a great big cardboard box. Inside the box are the Zegas, the rack pieces (left, right, and two rear sections), the mounting hardware and instructions. The instruction sheet is in German, so unless you're fluent in that language, the first step is to go to the Touratech web site and download the English language instruction sheet (977K PDF). The mounting instructions do a good job of explaining how everything goes together.
The installation itself was a breeze. It took (maybe) an hour, and that included a test mounting, then I took everything off and cleaned the threaded parts, then re-installed with Loctite.
The rack mounts to three points: The passenger foot-peg brackets, the threaded mounting points under the pop-off cover on the exhaust shroud plastic, and the threaded mounting points under the tail light. (I'm assuming these provided mount points are also used by the BMW luggage rack.) There is also a second cross brace that goes below the license plate to tie the two sides together.
The passenger foot-peg bracket mounting uses a split bolt design, very similar to a bicycle handlebar stem if you're familiar with that. This goes into the back side of the foot-peg bracket (which is open), then as you tighten it, it will expand and lock into place. Fairly clever, since it means you don't have to remove anything to mount the rack. (In comparison, on the R1150GS you not only have to remove the foot-pegs, you also have to replace the stock turn signals.)
I haven't dropped my F650GS (yet), but I'm confident that the bags will hold up to some fairly major impacts. The Zegas on my previous R1150GS survived a number of drops, and that bike weighed significantly more.
The main downside to Zegas on a F650GS (or any bike with high exhausts) is that the rack stand-off from the exhaust makes for a wide load, right at 38.5". (If you chose to get the 41 liter bags, add another 3" to the overall width.) The handlebars (with bar-end weights) are only 36" wide, so these may not be the best choice for someone who wants to lane split.
You can see lots more pictures (and a repeat of some of this text) from the install on my website. Dave #1513
Home
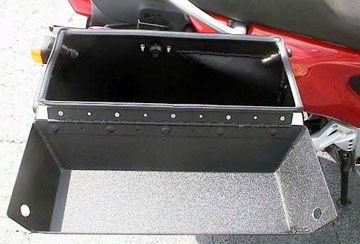
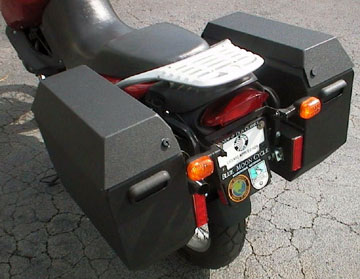
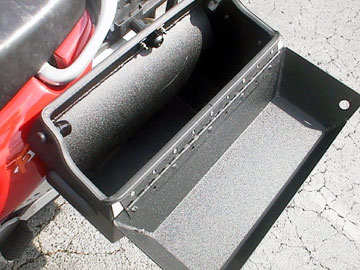
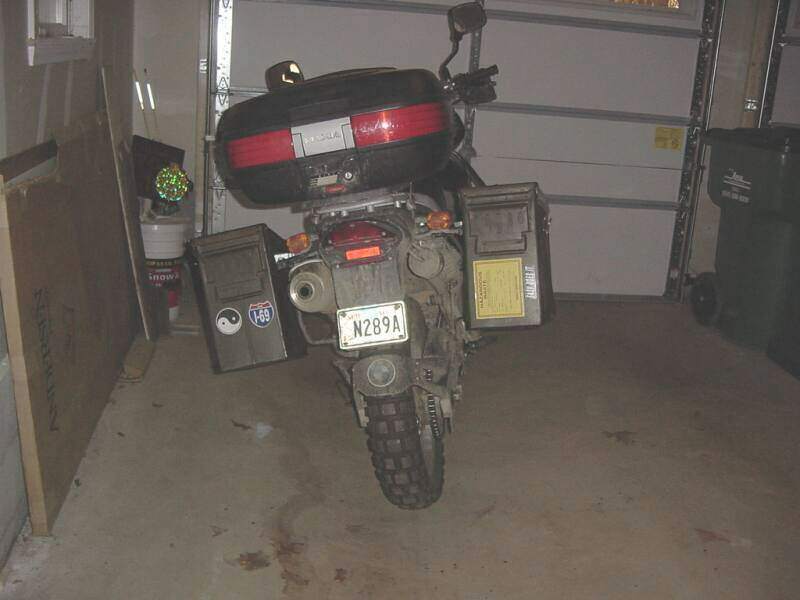
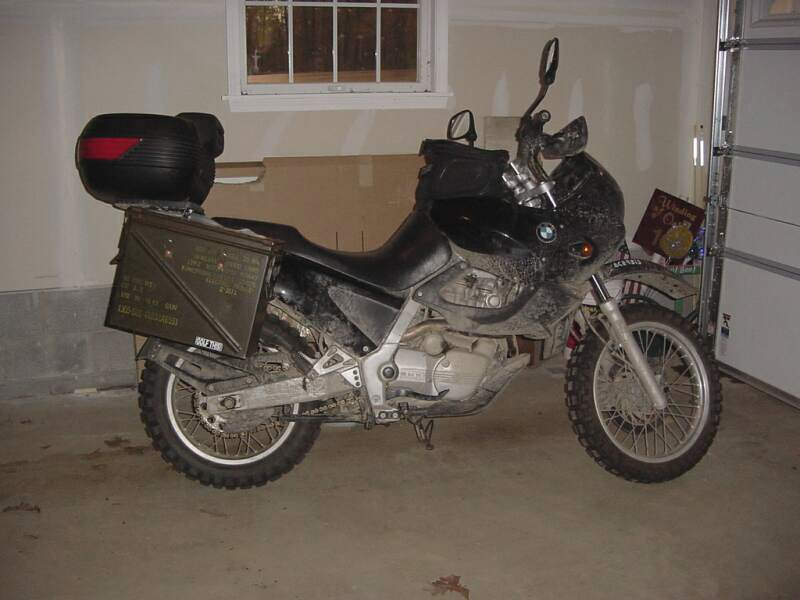
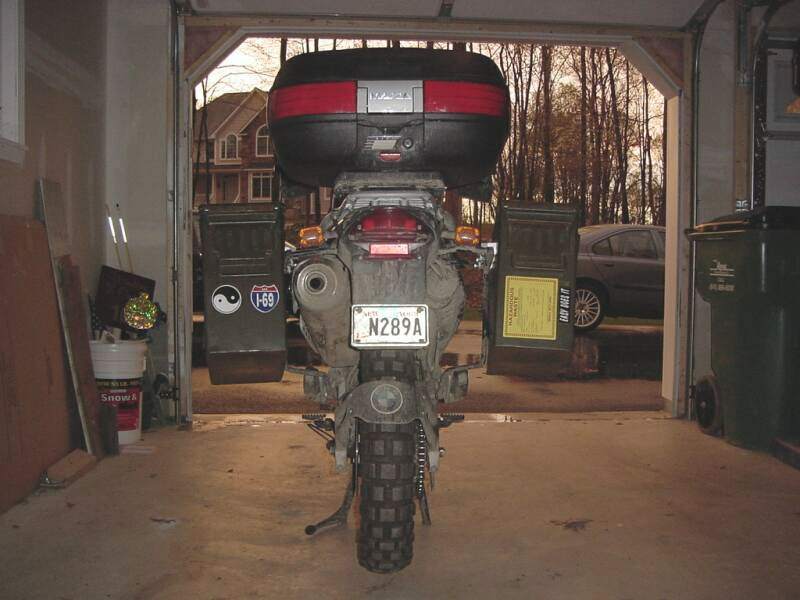
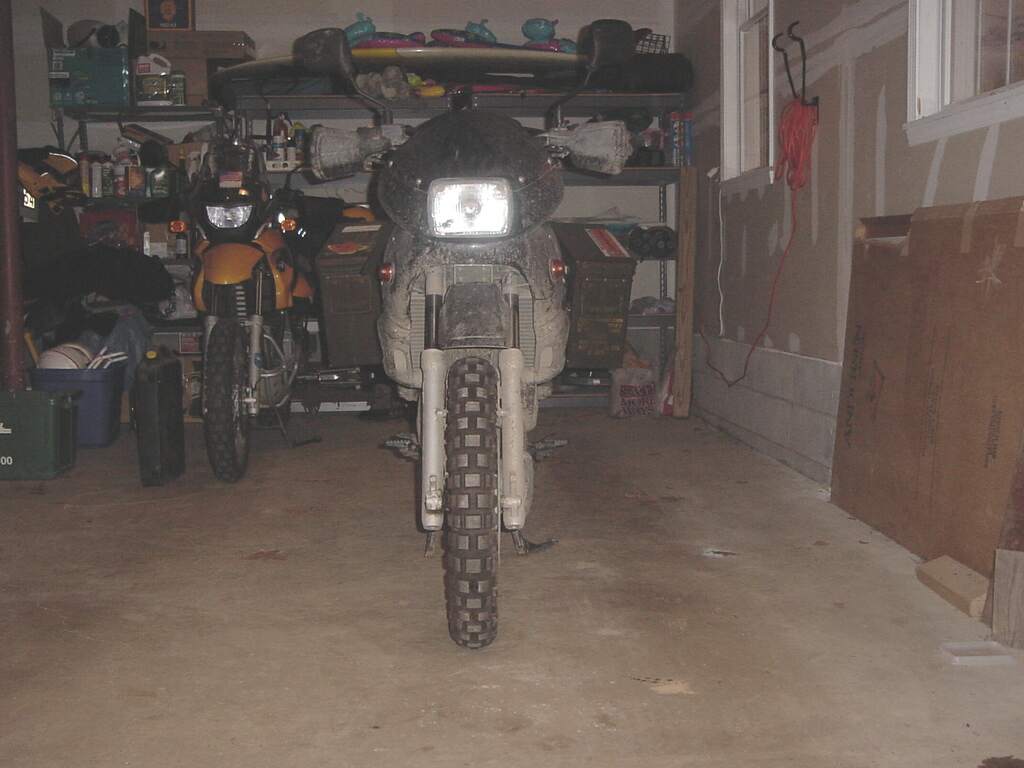
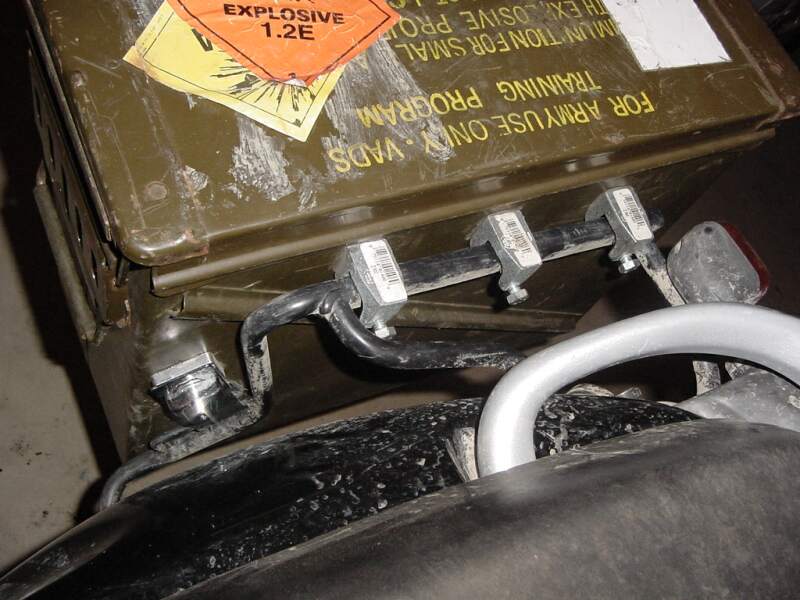
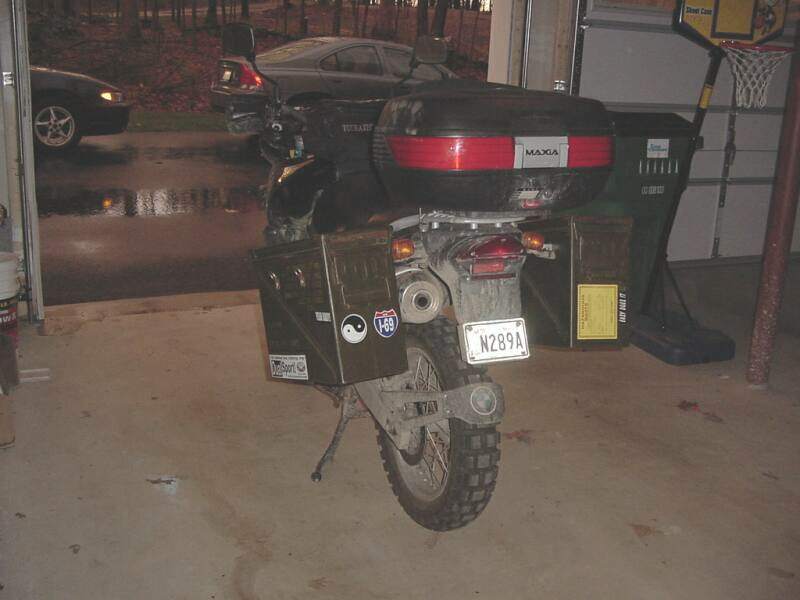
made Ammo-Can Panniers
20 MM AMMO CAN PANNIERS for the F650
from
www.wsw.net/mfrongi
by Mike#789
For those who have asked if this is possible, I used the BMW pannier rails and some hardware at home depot. the whole thing cost me about 50 - 60 bucks. I want to put a cross member in the rear, since the cans bounce a little when loaded up. They are heavy though, about 20lbs each, but waterproof and extremely strong. The cross member should reduce the bounce when I install it. I would not recommend them for off road use because of the weight, but I have done 5-6 hour trips at highway speeds, twisties and around town no problem.
Ammo Can Sources:
from Rand #1111
Ammo Can Panniers Source #1
Ammo Can Panniers Source #2
Very
Inexpensive Mounts and Bags
by Doug #1206
I just bought some of the GIVI bag mounts on eBay very cheap (less than $70.00) The part number says they are for up to 96 models only but they bolted on to my 99 model with no problems at all. Bought some plastic pistol cases for only $30.00 each at Galyans. Anyway, the whole set-up cost less than $125.00 bags and mounts. Looks great as well. There are still several of the mounts listed on eBay (the seller informed me that he had several) and no one seems to bid on them because they don’t realize that the fit 97 - 99 models. To mount the bags I removed the GIVI bag connection points and put in longer bolts that would go into the bags. I then secured the bags with wing nuts and a metal and rubber washer. I can remove the bags from the bike in about 1 minute each. (I remove my items from the bags not the bags from the bike, as in all cruiser-type bags, Gold Wings, K-Bikes, etc.) These bags are about 25 litres in size. I know they may not be Jesse or BMW Bags, but for under $125.00 for new mounts and bags they are tough to beat. Oh, and the top box is a removable one I got at J.C. Whitney for $59.00. I know I'm probably a cheapskate...HA HA... Doscocil sells some bags about the size of the small Touratech Zega 35L that are completely waterproof for about $65.00 each if you need.


Opinions on Aftermarket Luggage
Tips for Tank Protection, from Tank Bag Wear
I love having a lockable, waterproof top case. I can store my stuff, including two full-face helmets and gloves, or 1 helmet, gloves and a jacket, and I don't have to worry about them being stolen or getting wet. I've never felt any noticeable difference between riding with or without my 50L GIVI Maxia. I also have a tank bag, but I never use it. Mark #403
A tank bag will have a less adverse affect on the bike's handling, as the weight is closer to the centre of the bike and you do not have the top case (which is located behind the rear wheel) to act as a lever that will input unwanted motion into the bike's steering when hit by a side wind. Also, a loaded top case takes valuable weight off of the front wheel, which makes the bike less secure when steering and at high speeds. However, a top case is very handy for carrying and locking items when shopping or touring. Your decision. What is more valuable to you, convenience or handling and a more stable ride? Richard #230
I agree with Richard out of experience. A top case is the worst place to put extra weight upon a bike, a tank bag is the best. Try the following: ride your bike at say 40km/h without a top case and induce a fake wobble by simply using your hands. When you stop shaking, the wobble should stop right away. Then load up your top case heavily and do the same thing, but be careful, the wobble might not stop! Many bikes, although having a very sturdy main frame, suffer from a weak rear frame. RakaD
The GIVI 50L top case is the only way to go. If you ride two up. The backrest on the top box gives great support, and as others have said you can lock helmets, riding gear, etc. I ride often in windy conditions and at high speed, and have had no problems at all. KiwiDakar
A top case is great. I suspect some of the responses haven't used a top case on a F650, as I haven't experienced any troubles, even with the high winds across the Tacoma Narrows bridge. Rather I find the case great for commuting with a heavy laptop case, and providing lockable storage for the helmet or valuables at stores. The top case (at least GIVI's) offers a backrest for the passenger, which is important to my spouse. Best thing is probably to try a bike with one before deciding. Northwet #1101
I hate top cases, they effect the cross-wind handling and make swinging your leg over the bike a real pain. Tank bags are less intrusive and are a requirement if you are having to read instructions or look at a map. The biggest pain is filling up (not a problem on the GS) but this is minor. The free top box that came with the bike is in the garage with gardening tools in it. Neither are used! Andy #982
I think it all depends on how you use your bike. If you do frequent rides around town, but don’t like to carry around your full-face (or lock it to the wheel, for great pleasure of city dogs) only a top case can help. On the other hand, if you are touring mostly, don’t put your map, toll-paying valet etc. into your top case, the tank bag is for you. A top case can be roomy and tempting to stuff it with heavy things. (beer...) But don't! Consider two side cases instead. They have their own limitations of course weight-wise, and also there will be some places you won’t fit anymore :-( I like my top case almost empty or at least almost weightless while I am riding, and use it for my helmet, gloves (and a comb). Your pick. JenO
It's actually not a good comparison. A tank bag will only hold small stuff. A top case will hold big stuff (and small stuff). I commute on my bike. I need to carry my lunch in a soft cooler, my cell phone, coffee thermos, etc. So for me a tank bag isn't an option for the daily commute. I do use it on trips, when I want to have a map case and a place to put smaller stuff. Get both. Mark #403
I'm with Mark. Get both. I use them both when travelling, but the top case is on the bike always. Just don't overload it. Security is better on the top case. And remember, there are panniers available that throw over the gas tank (Aerostich). Marty #436
A lot of BMW bags and cases are very expensive – however the BMW Tank Bag for the F650 is priced reasonably and fits very well (I have the '99 Classic F650). I like the top case, but I only carry lightweight things in it. The tank bag has a clear map holder, which I like and I can keep my sun glasses, cell phone, sun lotion, camera, where it is very handy. So I vote first for the tank bag. Dick #420
The BMW tank bag for the GS/Dakar is really easy to install. You can carry lot of things in there. And you can expand it. Some helmets fit in there. For camera, money, stereo system etc, tank bag works better. Top case is great too, to put helmet, rain suit, or clothes. And lock it. Best thing is to have both!! But if you can't, buy the tank bag first. Guz
General
Buy a child's backpack with a clear rear panel. Get some Fastex buckle sets at a sporting goods store. Rig the buckles up so you can hook the "bottom" of the straps to the handlebars. Run a bungee cord through where the shoulders normally go and hook the ends whereever convenient below the tank/seat juncture. You can do the whole project for about $15. Cheap enough? Flash #412
Aerostich Tank Panniers
I love mine! I have had them about 10 years and used them on many motorcycles. At the National Rally Randy showed me a new way to mount them so that they sat very far forward. This allowed more engine heat to escape before hitting my legs. Craig#325
They work well for me, however, over an Acerbis tank you essentially run out of length on the cross straps. I use plastic containers to assure waterproofness and maintain shape. A secondary advantage is that they shelter the knees on cold rides. Ike#647
Whenever my F was fully loaded (Jesse luggage and Dry bag on the passenger seat), I felt like the front end was too light. If I still had the F, I would probably have gotten the Tank Panniers to help put a bit more weight on the front while travelling. I've seen people at rallies with the tank panniers mounted, and they seem to work well. Josh #581
I've been happy with them on my F650GS. I have the larger of the two sizes available. In addition to providing extra storage, they provide some environmental protection for my legs, which is nice when it's cold or raining. Cary in Vancouver.
My brother has a set of Aerostich Panniers and I have a set of Wolfman ones. On our trip to Mexico last year, he seemed to think they exaggerated his fuel filter/Vapor lock/out of fuel with 2 gallons left problem (yes, canister removed and hoses routed properly). I have never experienced this, and I didn't notice my bike running hotter, but the Wolfman bags mounted a little higher and forward than the Aerostich one, blocking less of the hole by and opposite of the petcock, thereby limiting the airflow less. And yes, either brand works great. David#476
I have a set of the Aerostich tank panniers that have been through h*ll and back for about 10-12 years. I am SOLD on them, the company and the products they offer. I do have a Marsee tailpack and tankbag, well built for sure, but I do not think up to 'Stich standards. Langlois
I have a set of tank panniers from Aerostich I bought second hand. I've put some 8 thousand miles on the bike since and many miles with these bags and I like them lots. I’ve stuffed them very full many times. I say that Aerostich makes great stuff. I don't have the waterproof panniers I just put stuff I want to stay dry in some sort of waterproof bag or container. I have noticed when they get wet they sag a little though. Will in CA
Baglux Tank Bags
Baglux covers and tank bags work really well. I had one that fitted by first F650 and R1100R. Sold them with the bikes though and have never need a hugs tank bag since. They are not worth the price unless you are going for the really huge bags (40 litre plus) then the stability from the good fit is worth it. The tank harness is specific to each bike so the fit on the GS should be fine. Andy #963
The BMW is OK but the zips are a pain. Baglux are better but very expensive (they have clips on and off BTW). I have an Oxford magnetic on the R1100. The bag is good but I don't know how good the strap on version would be. Andy Leeds UK #982
Bagster Tank Bags
Bagster covers are great and fit neatly around the tank with a hole for the roundels. Bags are little bulky but nice too. There are overpriced in the U.S. but less so in Europe.” Jean #636
Bagster makes a tank cover. They come colour matched to all the stock colours. I just figured getting a WHITE cover was not too bright a thing for me to do. The Bagster cover is about a half inch too short to have its holes reach the screw holes when the Acerbis is mounted. But if you get some hooks of a certain type at the hardware store... it will mount just fine. You will not see the colour of the tank, only the black plastic strip. But... the cover has holes for the badges where the Acerbis has no badges. You could buy some badges. I chose to get some naugahyde and fill in the holes instead. I highly recommend the Bagster system, particularly if you get more than one size bag to use with it. Some Bagster bags include an integral rain cover. Some don't. There is a hole in the tank cover that works just fine with both the stock (flush) or Acerbis (outie) filler caps. Flash #412
I have the big Bagster bag and Bagster's small, flat bag. Both have a map pouch which are easy to use. The big bag is way too much for daily commute. The small flat bag carries my wallet, keys, phone, PDA and assorted papers easily. That said, it is not really a replacement for a briefcase or full satchel. Nate
The BMW tank bag sucks AND it's pricey. A plastic bag from the supermarket and some duct tape would work better. :-) Seriously, I've had four on different bikes and I like the F650 one the least because: Small zippers are hard to work, wear quickly, and following a fill up in the dark, are next to impossible to make. Not to mention, impossible to work with gloves on. (find one that snaps on and off with Fastex fasteners and has LARGE zippers with LARGE pulls) Odd shape makes it impossible to load a map that you want to a) see and b) ever use again. (Get one with a large rectangle map pocket that will hold a standard map with at least 2 sections visible.) Not counting the side pockets, which are the only things I like about the BMW bag, It is one single compartment. This necessitates a lot of loading and unloading while travelling. And more than once I've dropped something delicate, like my camera, while trying to find something small in the bottom, like my eyeglass case or my house keys. David #476
Well, maybe I'm the only one that likes his BMW bag. The one for the GS is
probably quite different than for the F. The GS gas fill is not under the bag so
no worries there.
BMW tank bag for the new
models:
Good
1) Rigid sides so it holds its shape well when empty.
2) Holds a spare face shield nicely without hardly taking any space from the
inside.
3) Very easy to get on and off. When it's off there are no straps left flapping
around.
4) Very good fit to the bike (but will still scratch the paint if dirt gets
under it).
Bad
1) Has a hand loop to carry it but you can't use it like a
back pack. Here the rigid shape is a negative.
2) Front connections use an elastic strap material. You should not leave it
hooked up all the time or they stretch out and the bag will move around on the
bike. Mine is still OK after 14,000 miles.
3) Map pocket is an odd size so maps need to be folded to fit.
4) Tall aft end hits you in the belly when you lean out over the front (when off
road riding).
5) Zipper is too fine and can jam or come apart if you are rough with it.
In my opinion, the BMW bag is good for on-road use but not very good for
off-road. I think the choice has a lot to do with what you use it for.
When I purchased there were not many other choices. Sounds like that has
changed. Shop and compare. Brad #1002
I have the BMW expandable bra type tank bag. Bought it second hand through the CG. I find the size perfect and even when expanded to full size you can see the dials etc. clearly. I would agree with Bill re. the small zips which attach the tank bag to the bra .... grrrr .... they can be very fiddly. Absolutely impossible with gloves on! It is annoying when you stop to fuel up and have to bugger about to unzip one side to expose the fuel cap. My tank bag holds my Autocom Pro M1, CD player, CD case amongst other stuff (like a hand towel which I need to put under the CD player to stop it jumping ... even with 40 second anti-shock it just can't cope with the F's vibrations!). As Bill mentioned the pockets in the bra are really handy for holding the likes of a torch ... or in my case, sunglasses and lipstick! Very pleased with my purchase ... only complaint is that I think, in general, strap on bags are ugly. When I get to work the whole thing comes off as I hate to look at the bike with the bra on. Nicola (UK) #1061
I also like my BMW tank bag. It's small when in small mode and large in the large mode. I like the little pockets on the bra to hold helmet visor cleaning stuff and spare rear bulb and a small flash light for when it's dark and I'm putting the bag on the bra. This is one of the down falls of the bag. The small zippers are hard to manage, take practice and are impossible in the dark. I have heard others complain of the small zippers not being durable enough. So far mine are ok. Wamer #1021
I got the BMW with my Dakar a year ago and, after 15,000 miles, one zipper developed a tight spot that it wouldn't pass.My dealer gave me a new bag under warranty. I love it. I use it daily. Gwhis#1000
I have the BMW bag and it works great. Deep and well made. And it fits like it was made for the bike. TomO
The BMW tank bag for the GS/Dakar comes with a bracket that is mounted to the two screws that hold the central plastic panel. In the back is a hook that wraps around the plastic, between the seat and central part of the fake tank. It is really easy to install. Guz
My BMW tankbag [for the GS] was floppy, i.e. a bit loose on the 'tank' (but still perfectly usable!) until I discovered that for over a year I hadn't clipped it correctly. The zip fastener end should be hooked under the steel rail under the front of the seat – not to the plastic (which seems the obvious place). I had experimented with the correct way when I first bought the tankbag but had convinced myself that it was incorrect as the two front fastenings required serious force to stretch to the clips. The bag is more stable now (either empty or full). Seems an ideal size and could probably be used off-road without getting in the way. PaulW
The Funduro bag zips to a tank cover that uses one metal hook at the rear of the tank, in front of the seat and two hooks that attach to the lower front fairing, one on either side, just above the black plastic engine side cover. I have been happy with my BMW Classic tank bag. But maps do not fit into the map pocket, without folding them in a way that they don't like to be folded. Richard #230
I just installed my BMW tank bag. In the front metal part, that is in front of tank, where the bag is attached with the two cords, I notice that my Dakar touches this metal part, when I steer to the right and left (more so to the right). Is this normal? Zippo
Mine does not touch on the left but is very close. On the right the upper triple clamp touches at full lock by about 1mm. Unless the triple clamp is pushing the bag bracket a lot I would not worry. The bracket is flexible and you don't turn the bike to full lock a lot. Have you tried loosening the screws and moving the bracket a little to see if that helps? You may also want to put a small piece of duct tape on the bracket on the side that is next to the plastic tank cover. The bracket will rub and wear the paint down over time. Brad #1002
Those sheet metal formings are not well formed. Just push them back to the form you want. They are just to keep the tension on the straps. By the way, look that the lower hook is in the proper location – on the black metal under the plastic, to keep good tension. To install it, remember first the zipper and then the front hooks. Guz
I had the BMW (for the classic) and didn't like it because the pocket for the map was way too small (otherwise it was very good). Last week I got myself a Touratech Enduro tank bag. I have only used it for half a day, so I can't really say if it's better or not yet. The fact that it comes in three pieces, so you can ride with the tank bag, the map holder or both, is a great thing. However it is a bit bigger than the BMW. If that will be a problem I'm not sure yet. As stated above it is a bit fiddly to attach. I got a lot of abrasions on the tank with the BMW, but I left it on for a month while driving off-road, so I can only blame myself. Spakur #1117
I've got a BMW tank bag for my F650 Funduro (Classic). Would be better to have one or two 'pockets' in it, otherwise everything is all over the place. I had to accept that if I use it as my only carrier when going to work nothing A4 fits in. Ever tried to use a Tuff Map? Don't know whether they are available in the US, but here in the UK they are and they are A5 size, just right for the map holder. Seems a good, solid bag to me. Martin
I have the BMW bag and like it. I like that it has stiff sides... It's like a car trunk to me. The only problem is it bounces around during rough off-road rides, especially if I stuff it with a jacket. I think I'll leave it behind on the next off road event and use the smaller rear top pack (also a BMW). Jim #1022
I have the BMW tank bag. Fits well, is expandable, has a waterproof cover for use when needed and it is holding up well. A bit spendy but worth it to me. Steve #1130
DriRider Backpack Tank Bags
I use a DriRider backpack as a tankbag on my 96 F. Multipurpose bag for on/off bike. I sewed Velcro to elastic bands (sewing centres supply) to secure bag to bike. Map case neatly slips under webbing of bag. Pin a 100% 'nappy' under bag to protect tank finish. Everything is black to match bike. Works for me.
Marsee Tank Bags
I have a Marsee 8 litre bag. It works great. The only problem with it is I had to replace the front quick release clips with D rings. When the handle bars are moved to full turn the pinched the clips (broke one the day after I got it). The D rings work great. A little harder to remove but not real difficult. Grt Wht
The best small tank bag. I have the Marsee Rocket Pocket and it works just fine on my '99 F. Expanded it holds a lot. But even in its compact form it's no slouch. Mine contains maps, owner's manual and tech manual, digital camera, earplugs, tire pressure gauge, bottle of Slime, portable tire pump, bandana, little squeegee thingies for my gloves, bottle of visor cleaner and rag, hat (for helmet head), and registration & insurance card. I tend to take it off and put it in my lockable top case when parked anywhere but my own garage. Bob#550
I've got to give Rex Marsee and Marsee products huge props! Get this, I call Marsee's 800 number looking for some help in outfitting my bike with tank and tail bags for an upcoming trip. Who answers the phone, none other than the owner himself, Rex Marsee. Rex is a very cool guy I must say – sincerely interested in his customer's needs. He didn't have a lot of time right then seeing as he was handling all the phones I think but asked the gist of what I needed and said would call me back on my mobile. I pretty much blew it off, not thinking I would get a call. I only knew him as Rex at the time – didn't know he was Rex MARSEE. Anyway got the call later that afternoon. "Hi, this is Rex Marsee". I called back the next day, turns out Rex went over to a BMW dealer with some of his products and double checked for me what fit the best. He asked me where I was going to buy what he had recommended – I said Irv Seaver in Orange, CA. When I showed up at Irv Seaver, get this, they were waiting for me as Rex had called ahead and let them know I was coming and to "take good care of me". Thanks Rex, you got a customer for life. I can't leave David Diaz out @ Irv Seaver, he is a class act. A true motorcycle enthusiast as well as a seasoned competitor in the sport, not to mention just a nice guy. Yesterday was great – from Rex Marsee to David @ Irv Seaver BMW in Orange, CA: these guys set the benchmark for customer service and care. If you need luggage, call Marsee Products @ (800) 293-2400. If you need a BMW dealer or parts call David Diaz @ Irv Seaver BMW: (714) 532-3700. Colbster CA
That is the kind of customer service story that I like to hear. I have been using Marsee luggage for years and still have a set of his blue leather overalls (when he was making leather clothing) that I have been using for close to 20 years now. I have found all of his products to be well designed and well made. Richard #230
I know Rex and have bought several items from him. When you go to his manufacturing facility and see how they produce these fine products you will be amazed. He is always ready to go the extra step to make it right. DaveB
I've had good results with Marsee products. Bonnie
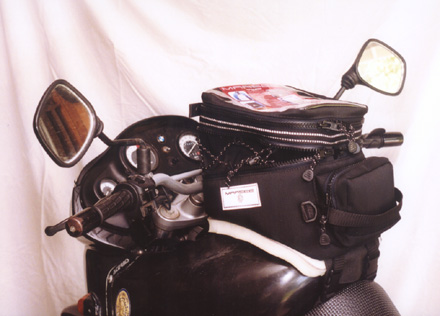
The design of my 1997 F650 is such that the regular tank bags I use on my old R
models just don’t fit. Added to my tank bag problem is the addition of an
Acerbis tank with its protruding gas cap. With a little advice from Don Weber,
the Marsee tank bag solves the problem of where to put the “stuff” I’d like to
have right in front of me as I travel.
A piece of high density foam, the size and shape of the tank-bag base, with a
hole cut for the gas cap, and presto, I am a travelling man! The Marsee fits
just right and is of the proper size to allow lock-to-lock turning in the
parking lot without tank bag interference.
Straps are provided to secure the tank bag in place. The mounting straps stay in
place and the bag is then secured with quick clips. The bottom surface is of a
material that grips the tank, so those with the stock tank need not worry about
the Marsee bag slipping and sliding. The bag is easy to remove when fueling and
has a hand-carry strap and a shoulder strap that can be converted to a backpack
arrangement. That is just the deal for college bound Chain Gang Inmates.
The bag is expandable and if even more space is needed, there are extra pouches
available. The material is water resistant, but for those hard-core rain riders,
there is a raincover as well. The zippers are large with large pulls, making it
easy to use when wearing heavy gloves.
The bag design is a job well done. Contact
Mr. Ed’s Moto for Marsee products. Don and Debbie Weber (mred@proaxis.com)
always have a good deal for Chain Gang Inmates. See all Marsee products at
Marsee
Products: motorcycle apparel, luggage and tankbags Steve #1
In search of a convenient, and safe, way to haul my camera(s), I finally bought a tank bag: Marsee Rocket Pocket. I tried the Tourmaster with outside pockets, but it was too big for the bike. Wolfman was out of stock and selling backorders. The local BMW dealer had a few Marsee bags, and the BMW bag (which due to price could not be considered). I think Marsee makes a suitable bag with an outside pocket, but it was not in stock, and I was hitting the road the next day. The Rocket Pocket features quick-release zippers (takes about 3 seconds to remove the bag from its mounting foundation), two inside pockets, and it is expandable. There is a strap that wraps down under the fork area and back up: each end has a nylon fastex connector on it. Under the seat is another strap that you wind around the metal seat support tubing, near the fuse box: the two ends stick out from under the front of the seat, with two more nylon fastex connectors. Using these connectors, you can rather quickly remove the entire bag (bag and base). Tuck the straps out of sight and you're back to a bagless appearance. According to what I was told, the Marsee is the only bag that has a compression leash which allows you to expand the bag by just the needed amount; no more volcanoes flopping in the wind. (However, I have yet to use it expanded. . .) For protection from high-frequency vibrations, I placed an 11"x14" packet of cold-pack gel in the bottom of the bag; this effectively cancels most all the screw-loosening vibrations. Size is listed as 11L, and cost for the bag was $100. Overall I'm very pleased with the size of the bag: any taller (e.g., 21L Wolfman) and I would feel crowded. As it is, I can easily see/access my heated grip and ABS switches. Any wider and it would interfere with my handlebar-mounted GPS when the wheel is locked. I was worried it would scratch the tank, but the dealer assured me the base was safe. Time will tell, but after 3+ hours of bumpy dirt and gravel, he seems to be correct. I can now keep the camera(s) handy for quick from-the-bike pictures, and not have them hanging off my body. My main complaint is the map pocket: a square/rectangular shape would be more useful than the slightly oval shape of this one, but it works, and is removable if you want to sit against a tree in the shade and read your route. See some pictures in the GS Gallery. Scott #1244
You've got to watch those nylon fastex connectors when the bag is off the bike though! I had my bag off once doing full lock manoeuvres and one of the fastex connectors interfered with the steering head. The steering head won, and the fastex connector snapped. Seacuke #1214
Last weekend I bought the Marsee Rocket Pocket from Cycle Gear, with the magnetic base (for use with my other bikes with steel tanks). I am very happy with the size, design and quality of the tank bag. All of Marsee's products seem to be of very high quality and are sold at relative reasonable prices, compared with some others that I won't mention. Richard #230
I bought the Marsee Rocket Pocket last week, and so far love it. Necr0
RKA
I have the small RKA bag. Very good attachment and small enough to not interfere with control when dirt riding. Mike
RKA luggage makes a really nice piece of luggage for the F650. It is a combination tankbag and pannier system. It is the greatest system I have ever seen. I had it on my bike and so pleased with it. You can use the panniers and tankbag together----just the panniers----or just the tankbag !!! And it is so stable on the bike. Expensive-----but worth it. Anon
RKA on Classic...map case way too small. Their rain-cover is solid black nylon...guess you're not supposed to read maps in the rain. I retrofitted the map case with the one from the Touratech bag (map case available separately) with minimal issues (both velcro on). Also picked up the Touratech rain-cover, which has a clear vinyl window in the top. It blew out a side seam the first time I got the bike going fast enough to inflate it with a little wind. Looks like the ultrasonic seam weld was poor, replaced under warranty. By the way, this vinyl rain-cover gets pretty stiff (brittle) in cold weather, so don't try to use it as a snow-cover. Since I have an Acerbis tank with an "outie" filler cap, doubt anything will fit well anymore. Marty #436
Famsa
I have a FAMSA 6way. Very versatile. it comes with a zip-off base with rubber straps and hooks and a
magnetic one too (which was brilliant when I had one of those old fashioned
metal tanks!)
about as useable as you can get. it does press the starter button of full lock
if its really full, but I can live with that. it zips off leaving the base on
the bike and there's backpack straps concealed inside. you can zip a second
thinner layer on for big packing. it has an expanding zip to give extra room if
needed, both layers have transparent map pockets on top, and it has 3 side
pockets and a waterproof cover which looks just like a shower cap! Adamx,
Devon, UK GSA #1001
http://www.touratech-usa.com/shop/index.html
Check out bags from Touratech (http://www.touratech-usa.com/shop/index.html, click on luggage, then other bags) and Wunderlich (one source is http://www.bmwscruz.com/). Both lines have tank bags that are specifically for the GS.
Got it. likes; expandable, good capacity, converts to backpack, good mounting system, no damage to paint (yet). Will actually hold a full-face helmet if you really want to. Used the map pocket to hold route sheets for a dual-sport ride. Reasonably priced, especially when compared to the BMW bag. dislikes; slumps over a little when not fully loaded. front straps can't really be adjusted tight enough to hold it upright. Wouldn't mind additional interior dividers. Not completely rainproof (duh, I didn't buy the cover). Overall, I'm very happy with it. Robin #790
I have one too. No damage to the paint for me yet either. I wish there as another small pocket on front (or the back, depending on your point of view) instead of the Touratech logo. I have to agree on the front mount - the strap tightening mechanism is just a bit too long, keeping you from getting a perfect mount ... it is tight enough though that the bag doesn't flap around. I wish it had a better quick mount/unmount system -- this one is a bit awkward. You have to get the bag at a near vertical angle up near the handlebars to get the mount's tabs to align with the bag's slots. That gets even more awkward when you have your gloves and helmet to manage at the same time - and even more so when the bag is well loaded. It's probably not as bad as I'm making it sound ... I just find it a little inconvenient. The new Denali bag from Wolfman has the extra pocket I desire, and what looks to be an easier quick release system - though I can't comment on the quality of the mount as I have not seen it in person. That's also why I don't know if it will be as paint-friendly. Check it out at Wolfman's site. Chuckles #912
Just got the Touratech, love it! Fits great and works well, I would highly recommend it. Jason #778
I've had this bag for a year and love it. Stays put. Easy on and off in my opinion. Easily expandable and roomier that you might think. Pain in the arse sometimes when you have to gas her up, but hardly a reason to steer away from any tank bag. Make sure you get the map holder that velcros to the top, as well as the rain cover. Once I got used to having it there, I hate travelling without it!! Derek
I've been using one for six months and have found it to be very good. No problem with gas-ups on the GS though ;-). Only thing is that IF you're "anal" about your bike my bag has made marks where the "piping" around the base of the bag contacts the paint. Personally I don't really give a crap and the marks are quite small but they are there nonetheless. I'd buy one again. PNR123
I have the Touratech and it's a good bag. The top-mounted map holder is detachable and it's got a rain cover (optional I think). It's a little fiddly attaching it to the front attachment apparatus but once done it's stable. It's got a soft plasticized bottom to protect the tank, but even so I've got some small abrasions on the tank. I'm thinking of buying the Wunderlich tank protectors to deal with that. The bag mounts at the front via 2 hooks and at the back (which is the front of the seat in this case) via a zipper to a piece of leather attached to the tank. When you remove the bag the mounting pieces stay on the tank. Not a good description, but the whole thing works well. LMcD
Just for the record, I picked up the Tourmaster TB-24 tank bag last night. Turns out it doesn't fit very well: just an inch or two too long to allow a snug fit. Scott #1244
Get one with Beaucoup pockets. My Wolfman bag for instance has 2 side, 1 back pocket, a Velcro closed space under the map pocket on top of a zippered pocket, and a completely different pack that velcros on top of the bag under the map pocket if I need it. I usually put a Camelback bladder in it for long trips.) A place for everything and everything in it's place. OH, and did I say LARGE ZIPPERS. David #476
Gotta go with David #476 on this one. Wolfman. Harl#380
The Wolfman Explorer tankbag is the only way to go. Mark #797
I too have the Wolfman bags and they work great. Especially in winter, they keep the wind from my legs and crotch. I don't need any cold wind up there! The keep the weight down too instead of a tank bag. Ed , Ohio USA #671
I have the Denali and I think its pretty much the same thing as the Explorer. Its a big bag (22 litres), but it fits on the bike very well i.e. it doesn't hit the starter or horn and you have full movement of the bars without interference. The fabric its made out of is little thinner than other bags I've had...you might want the rain cover. The Explorer is in the Aerostich catalogue for $117 and I paid $134 for the Denali at Wolfman itself in CO. I got the explorer tank bag for my Dakar this week and have it on the bike. Actually, they claim to make a bag called the Denali which is just for the F650 GS but I don't see anything special about it. It went on pretty easy and its BIG compared to the BMW bag. It holds 22 litres which swallows up my: full size camera and six rolls of film, volt/ohm meter, bag with paper towels and small Windex bottle, pot lid for the side stand, wood block on a string for the side stand, insect repellent, roll of electrical tape, roll of speaker wire, spare fuses, Allen wrench to tighten the racks, baseball hat, knit cap, bandanna, BMW dealer book, wallet, mace, foot powder bottle, jack knife, house key, spare keys for the bike, water bottle, sierra cup, spoon, cigarette lighter, Canadian money, owners manuals, and whatnot. It also does not hit the horn or starter and the handlebars go lock to lock without interference. But there's no padding on the bottom and the material seems a little thin. The map case comes off to take to the picnic table and is pretty big. Paul.
I've got the Wolfman Denali, which is the Explorer reshaped to fit the GS. I highly recommend it. SScratch
I have used a Wolfman Explorer on many humped tanks like the Quota, KLR, R1100GS, and both of our F650s. It is exceptionally durable, has a rain-cover, and Eric has exceptional customer service. Highly recommended! Bert #1131
I just picked up a Wolfman Denali and it works very well. It's not too imposing, and Ed with Moto-Sport Panniers says it's waterproof. I'm used to magnetic bags so this one seems more stable and is easier to adjust considering it doesn't have magnets that need to contact an angled tank. It's still in the testing phase for me – I'm keeping the original papers in the map pocket and inside the bag until it rains/snows, then I'll find out if it needs a cover or not. chppdlvvr
Check out the Denali. I bought one based on a recommendation on the Chain Gang board and it's a winner. As I recall, the cost was about $115, which is consistent with most mid-priced tank bags. BP in Atlanta
I have the Wunderlich and don't have anything negative to say about it, but also have no basis for comparison with other bags. It's made of sturdy, heavy material, is of relatively compact size when unexpanded, but expands to a quite large bag. It fits well. The map compartment is quite large. In the past I've never been a big fan of tank bags, but I do like this one. Mike #926
Tank Bag Damage: I have been instructed by experienced tank baggers, to apply 'pledge' to the tank to reduce scratching. It definitely leaves a waxy coating, w/out build up. Sounds like a commercial, but it does seem to work well. Barry#1054
I use the BarPack from CycoActive (Touratech basically). Check out the website at www.cycoactive.com Adam #906
This is a CycoActive designed and manufactured product. While they're also the Touratech USA distributor, this is their own product. DHP #711
RevPack makes a MapFlat that I have used a lot. In fact I have used many of their bags over the years--including some custom-made bags. I have found their service and products excellent. mspeed #1023
Dry Bags offered by Aerostich: Soft bags made of sturdy waterproof material. Nice size, throw on when you need them, leave them off when you don't. A buddy has them on his GSXR and they stay put at speeds well beyond what the F is capable of, even at terminal velocity. Harl #380
To those of you who have purchased the BMW bags for the F650gs. The bags are wonderful except that the silver covers are extremely fragile. I dented mine the first time I closed them with my thumbs. If the bike falls on them it wrinkles the covers. How to eliminate this problem, Line X. Spray on pickup bed liner. Wow they are Black and look good and boy are the lids strong. A good idea that works. And it mostly hides prior damage. Jo
You can get the spray on stuff at NAPA. However, the professionally applied stuff is much tougher. I have used both with success. Keith #714
2 types from BMW; System City or Integral. Sys. City are 15 liter and look like and are shaped like a briefcase, handle and all ( about 14wx6dx12h interior ). Integral are 35 litres, no handle and are angle shaped. City - $166US, Integral - $272US left and $299 right., If you get these new, you need 2 locks w/keys -$47.28, logos - $5.25/each and reflectors - $3.25/each. Side case mounting rack for either, $197US. All above NOT for the GS. Art
See the attached link for pictures of the two different types of bags. I had both for my Funduro and left the City cases on all the time for commuting and errands. The Integral cases make the bike wide as a whale but have a lot more carrying capacity. http://www.bmwdetroit.com/Accessories.htm. Anon
I have the bigger, Integral, cases on my 98 F. Plusses: Big - they'll hold a full face helmet and riding jacket in each, very nice when out for an afternoon with my wife in the summer when we don't feel like schlepping our gear around. They've also proven very durable and are, as advertised, almost completely waterproof. They don't look bad either they look like they belong on the bike. (this would be true with the city cases as well from what I've seen). Minuses: They're a bit awkward to get on and off sometimes. Because they are wide they tend to suffer more from wind interference than the city cases would. My dealer made a clever joke about them w.r.t. the fact that you have to pay extra for the badge if you buy them new. He said BMW has the prices all backwards. It's a $25 bag with a $300 badge! Sean
The expandable, silver, aluminium front bags are for the GS/GSD and are the only offerings from BMW. As everyone says they are very dent prone on the aluminium face and If carried on off-road rides the bumps and jolts can destroy the plastic mounting hooks on the back of the case. Calvin #840
Further to your post I wanted to answer your question on the size of the BMW expandable side cases which are 20L compressed and 31L expanded. This guy who wrote me also really took offence to the fact that I didn't like the BMW bags and said that if you coated them with Line-X truck bed liner then they would be protected. Funny thing is that yourself as a prospective buyer noticed the same deficiencies with the design of the bags. IMO, buying bags then coating them with goop makes no sense whatsoever. Why would somebody go pay $700+ for shiny BMW factory aluminium bags then go coat them so they didn't scratch
BMW part #'s are: left 71 60 7 661 765 $313 MSRP, right 71 60 7 661 766 $313 MSRP, Side case mounting brackets are $97.95 MSRP BMW pn# 71 60 7 653 830, Bag liners are BMW pn# 71 60 7 653 339 $113 MSRP ea. David H Park.
I wrecked a set of BMW touring bags in less than a week in
Europe. The hinges failed and the locks/catches jammed up. Only the BMW warranty
receipt stopped me chucking the things in the English Channel. I have Nonfango
on the R1100 outfit and find they are both bigger internally (less lock
mechanism) and stronger with metal hinges. My dad has GIVI on his Kawa and they
are very similar to the Nonfango but look better quality. Touratechs beat
everything but are expensive. The Touratech rack works well with soft luggage
too so that might be a better option for cheap off road kit. The integral bags are bigger than the
equivalent GIVI or Nonfango with less internal volume as the lock/attachment
mechanisms are over complicated and prone to jamming. Also, the plastic hinges
fail and you can't get the key out with the case open and unlocked. In order of
preference (best first) I'd go for:
1st Touratech/Jesse
2nd GIVI
3rd Nonfango
4th Good quality soft luggage on a rack from one of the above.
5th Cheap ex-army throwovers, rack as above.
6th Supermarket bags and Duck tape
47th BMW touring luggage.
At the time I <bought the BMW Bags> was young and stupid and thought the dealer
knew what he was talking about. Firstly the dealer tells me that the only
luggage available was the City cases or the Touring luggage (hope I made it
clear this is for a carbed bike), this is a down right lie. Next he takes a
month to get the racks because he knows nothing about F650's and can't use his
own computer, he gets K bike racks twice before the F ones turn up. He gets
another set of K ones with the F stuff so I guess BMW UK worked this one out for
him. He obviously knows nothing about fitting the racks so he just gives me the
line about it being easy and having full instructions. This is half true, the
racks are not difficult to fit, any German speaking monkey could do it. Next he
demonstrates the boxes and manages to jam to the release mechanism. His techs
strip the box and release the mechanism. The dealer finally gets something right
when he points out the 5 KG loading limit. As I am on a ferry two days later the
racks get fitted and off I go. Dealer gets threatened with serious damage in the
reproductive area if this stuff wrecks my trip. First problem is loading. The
boxes are massive externally but not internally. 5 kg of T-shirts has a larger
volume so you have to cram stuff in. You need three hands to close the case and
it usually springs open as you unlock to put it on the bike. Next problem is the
hinge. The left hand lid hinge split along the flash line and the case sprung
open in a supermarket car park in Brussels on day 4. Fortunately the pin stayed
in the mount half and a cargo strap round the lot kept it together. Only my
dirty clothes got dumped in the road. Day 5, packing to go home and the right
hand mechanism stuck again but gods an Englishman , so it jams with the case on
the bike and locked. Can't get the key out, so I have to ride home using the
spare in the ignition. Mr BMW now finally comes good (sort of). I think he
believed my threat to put the panniers through his shop window. Gives me a full
refund on the boxes and rack, but lets me keep the rack. The key comes out of
the box only after the techs use a grinder on the lock barrel to release it.
Next trip, Oxford soft panniers over the BMW racks work with no hassle for two
weeks with twice the amount of kit. I no longer use this dealer and will never
buy another BMW accessory if an alternative is available. I traded this F for an
R1100R and had Nonfango luggage. This and the GIVI have more internal space for
the same external and have metal not plastic racks on the R. I sold this bike
for another F and got Touratechs that are much better all round. I now also run
an R1100R with a sidecar and have gone to a Nonfango topbox and pannier on this.
Touratech cases locks: The integral locks are very slightly harder to break into
as the pad locks (chisel under the catch rather than blow to the lock). The pad
locks are easier to replace if you loose the keys and any fire station or
hardware store can break in for you and/or replace the locks. You still have to
open both ends of the box to get the lid back on as the closed end catch tends
to jump off its hook as you move the lid. Andy Leeds UK #982
I work for a dealer so I may be biased. If you're concerned about width, the BMW bags are the best choice. They expand and contract and fit tightly into the body lines of the bike. The cosmetic aluminium on the outside dings and scratches very, very easily, but I haven't see the problems that Andy described, even on units approaching 20,000 miles of usage. Things that you have to be careful of: the bags must be mounted tightly. If the bags become loose, adjust the upper mounting point to tighten the bags. Don't harshly pull on push latches and don't harshly push on pull latches. The latches that control the expandability have lots of movement but only fit together one way. Forcing the latch when it is incorrectly positioned can break it. Also, the BMW bags can be keyed to the bike so that you only have to carry one key. If purchased with the bike, the bags have the same 3 year / 36,000 mile warranty the bike does. Andy, did your delivering dealer explain the function of all the latches and demonstrate how they are used? They can be quite frustrating until they are demonstrated. If you're going to go off road a lot or travel internationally, the metal bags are nice because they are tougher and the bags and their mounting points can be more easily repaired when far from home. Paul#888
On the bags, lots to comment. First, the workmanship is good, the design appealing. I live and work and commute in an intense city environment (Guatemala city) and really appreciate the narrow width of the bags in city traffic. I also get out and into the field for several days to a week and appreciate the expanding extra capacity that the design provides. Major problem is their weight restriction of ONLY FIVE KILOS per BAG!!! For a set of luggage this expensive, it is totally absurd. This is 11 pounds each bag, I have a Kryptonite U lock for the bike that takes up not even 5% of the volume available in the bags and 50% of the weight limits. In my unscientific assessment the bags can be seriously overloaded in weight when and if you are on strictly smooth asphalt. I have done significant off road work here in Guatemala and been extremely nervous that they will burst off the bike if at all overloaded. I have unpacked the bags on these occasions and reloaded into duffels (2) on passenger seat and backrest. Not an ideal situation. I didn't know the weight limit was 5kg when I bought them (mea culpa and caveat emperor or something like this) but probably would have gone with an alternative had I known, given my tendency to off road here in Guatemala. Can't speak for the Givi's, either weight limits or quality. But Jessie makes good systems if you plan to off road at all. Neal.
I threw my Dakar down the pavement on the low side on Monday. Just on of those pleasures of cycling. Damage was minimal. Scratched front fender, windshield, bar-ends and handguards and broken turn signal. I had my Line-X coated BMW system cases on. The Line-X covers are amazing. Just scratched some. However I broke the plastic mounting ear on the rear. Not good. However I was able to order and have received a bag back and the cost was under $50 so looks like some bag parts are now available from BMWNA. Stuportech.
Hi I got the same problem. My BMW dealer told it was impossible to have spares for the side case. Looks like now it is OK. By chance do you have the number of those parts. I would like to order them (both side). Thanks. Arkadi34.
The BMW System Case
Bottoms part numbers are:
Left Case Bottom 17-60-7-659-611
Right Case Bottom 17-60-7-659-612
I have the complete list of part #'s if someone needs other system case part #
however I can't speak to the availability if the parts. I only know for sure
that the case bottoms are because I have one. Haven't had time to put it on yet
so I don't know how. For a temp fix of the old bag bottom I super glued then
epoxied over that to repair the old bag and it is holding. Stuportech.
The Aluminium covers are removable (i.e. the aluminium case comes off from the system case separately, ed) but they are held on by SUPER 2 sided tape and I have not been able to remove them without destroying them. Sorry. I had my covers coated and have had about 10 sets don't now and they do it with the covers on the bags no problem. If you get a slight bit of the covers to show at the edges in places black touch up paint hides this nicely. Supertech.
From my own personal close-up experience, crash bars or not, your BMW side cases will not withstand a fall without scratching or being ripped apart (in my case), or something in between those two. Right after I got the bike, I went to park the bike and accidentally left the side stand up. This resulted in my having to lay the bike down, not drop it. Many scratches and dents in the aluminium panel, but no other apparent damage. Drove the bike about an hour, and later noticed that one of the side cases was rubbing on the side of the muffler. Sure ‘nuff, the bag was almost melted through! My laying the bike down had apparently bent the frame in. Got a pry bar and bent it back out again, quite easily. Pretty cheesy design, in my opinion. Later that summer, I lost control in a deep sand road and took a spill. The side case was ripped in half and torn off the bike. Duct tape and Leatherman saved the day, but the bag was no longer expandable. I now have the Touratech Zega bags (aluminium). Sturdier, roomier bags with several more mounting points for durability. There are only two hard point attachments for the BMW mounting. Deborah, #1074
I've used GIVI on my VFR but went with the BMW case on the 650 (because it was a dealer option and I tend to go with that sort of thing if I have a choice). Both have worked out well for me. I've also got the BMW side cases (the metal ones) and they look nice, but won't last very long. They're already scratched and dented just from road debris and me getting on/off the bike and not swinging my leg up far enough. One of my friends has the GIVI side bags on is classic and although I think they look dorky, they've held up very well vs. my side bags. Kelly #1005
Having managed to put a few nicks and dents in my panniers, I decided to pull the aluminium facing off. This part is fairly simple since those covers are only glued on. Most adhesives are heat resistant only up to 300°F. I turned my heat gun up to 700 degrees and swept over the facing starting from the top down. The cover came off easily. Removing the gunk they put on the underside is a more tedious job. But, I got it clean and flattened all the unevenness out. Then I thought I could just use some flat head screws and screw it back on. On second thought, that will look terrible. Here is my problem: The adhesive that was used appears to be the same that is used by banks to attach credit cards to their solicitations. But, so far I couldn’t find a source for that sticky stuff. Does any club member know what that is and where I could get it? Also, I am sure, somebody makes that stamping for BMW. Does anybody know who? Maybe it could be obtained as replacement part. I know I am dreaming, but??? Werner
Is there a way to get the side cover off (98 classic) and change the battery without taking off the BMW bag mounts? I was not able to get this cover off when I tried. Don NY
I have the bag mounts and have no problem taking either plastic panel off of my Funduro. You don't even need to completely take the panel off, if you don't want to. Just let it hang down, while you check the battery. To get it completely off, just twist the end of the panel a bit to get it past the bag mounts. Richard #230
The official max load rating is 5kg each bag. This is regardless of the bag type and I guess is based on what BMW's lawyers think the frame will stand with a pillion and luggage. A standard Euro pillion is 75 kg by the way. I've loaded BMW cases to 12kg each on the R (rated at 10) and they burst open, but that was because the hinges bust. I guess they'll stand 10-12 on the F without too much hassle. If you are worried about warranty and don't have a pillion, get a stuff sack and put it towards the rear of the seat. BMW can't complain if you load 15-20 kg on there. Just watch the handling, weight is better low. Andy #982
To remove a lock from a BMW case you have to insert the key (not sure whether it should be in the locked or unlocked position), then using something like a paperclip, you can squeeze an internal spring to release the barrel of the lock. I seem to remember there is a small groove (at the bottom of the barrel?) where you can insert the paperclip/wire. I'm sorry this is so vague, but I’m working from memory here... having seen it done once. Bernard
NEVER believe the BMW dealership. I went down and broke a latch on a BMW hard case. When I called the dealership, they told me the part could not be ordered separately, only as a complete hard case. In a word: Horseshit. Complete thanks to Haakon who helped me. The part number for the suspension latch (i.e. connects to rack) is 46 54 2 303 652 The cover for the expandable hard case (variable in BMW parts list) is one of two numbers: Up to 7/00, 71 60 7 660 563; otherwise 71 60 7 659 599 That’s for just the cover, not the gasket or the adjustable frame. Nate
Man am I a happy
camper. My friends over at Wild West called this afternoon to say that the BMW
widgets we ordered for my sweetie's new little GS were in.
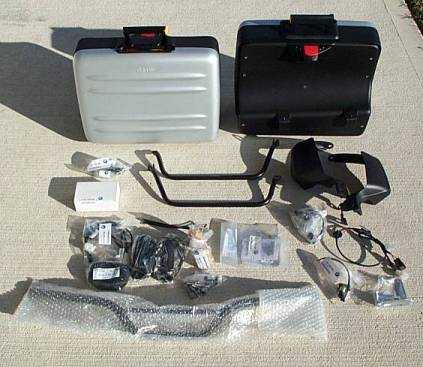
Expandable luggage
w/mounts, accessory socket, heated grips, and hand guards. Just ordered it all
maybe three days ago, so it was an unexpected treat. Well, the saddlebag install
was a piece of cake. There's a stainless lug (on each side) that installs after
popping a plug out of the bike's side covers, plus two mounting rails up under
the fender. The rails use existing holes and line up with very little fiddling.
All that's left after that is to fine tune the lugs' adjustments so that the
bags are snug, yet easy to get on/off. Only tedious thing is keying the locks.
Start to finish for everything, maybe an hour total. Half of which is spent
messing with tiny springs & tumblers for the locks. Arch
I have the expandable BMW cases, like them, and haven't had any problems so far. But I don't ride off road and don't try to load them with 80 pounds each. They probably wouldn't do well for someone whose idea of mechanical solutions is to use a bigger hammer. I like the expandable function very well. It's nice to have the smaller bags for around town. Bonnie #1158
I have to agree with Bonnie. I have no idea how much the BMW cases cost (I assume it's a lot), I got mine with the bike. I think they're very practical (that's a subjective matter, I guess). When in "slim-mode" they're also the narrowest cases, I think, making the bike still very usable for commuting and lane-splitting. Why BMW chose the equivalent of aluminium foil for the case cover is beyond me. Aside from messing up the optics, they're anything but "rugged" in their construction as well. Going off-road, I'd be too worried about the plastic hooks breaking off. As always, it depends on what you want to do. its_xls
Just did a 9500 mile trip with BMW cases on our Dakars. Here is what we found: five of the six lids either blew off or wanted to. One guy had two low-sides and destroyed both his bags to the point of uselessness. My bags were bent in an airplane shipment to Ecuador from Panama and never worked right since. One guy caught the corner of a guard-rail at low speed and broke the mount on the back of the bag. These bags should be used for styling only and should not be considered for a tour. sleddog1
I have an F650GST over in the UK and consider the design, quality, usability of the OEM to be pathetic. Mine leak, the liner bags fail to keep the contents dry, one suffered very bad scouring when some numb-nut knocked the bike off its stand, a handle came off in my hand. So would I recommend them? NO. My suggestion would be to purchase any hard luggage that isn't made by BMW, as mine are totally bobbins (Lancashire expression for well below par)! Reggie
I have the OEM bags also. They are not very durable. The aluminium covers get torn up easily (one of mine was moderately dented and scratched when I dropped the bike walking in the dirt). After a slow speed low-side (probably 10mph or less) in some muck on the pavement, part of the aluminium peeled away from the bag. I ended up replacing the lid for something like $90. The inner plastic shell on the stationary part of the bag also cracked in this same accident making the bag hard to expand/compress. On the plus side, I have never had a problem with leakage. Unexpanded, they will carry my laptop, lunch, a notebook, etc. and a few extra tools while still keeping a fairly narrow profile. Expanded, I can carry 4 smallish bags of groceries. Not the best choice for touring for sure, but OK for commuting and running errands. They are also super quick to put on and take off - of course this means that they're super easy to steal if you forget to lock them. If I had it to do over again, I would probably choose something else. Any top-loading case would have some advantages, in my opinion. Michael #941
I just measured my
bags. They don’t sit parallel on the bike. (I don’t think they ever did.)
Unexpanded: Measurement across, at the forward edge of the bags – 32”
Measurement across, at the rear edge of the bags – 29”
Expanded: Measurement across, at the forward edge of the bags – 37”
Measurement across, at the rear edge of the bags – 34”
I am very pleased with the bags. They’ve survived a couple of slow drops in a
gravel driveway, and you don’t really notice the scratches. They’ve been through
quite a bit of rain, including one four-hour long downpour, and they haven’t
leaked. I wouldn’t choose to go off-road with them on, but they’re fine for dirt
roads. They are super easy to take on and off. For me the expandable feature is
a big plus, because I can use them for back and forth in town, as well as for
touring. I recognize that they’re not “adventure-type” cases, so I don’t throw
them around, but I do kneel on them to get them closed when I pack for a tour.
They’re not too fragile. mspeed #1023
The older K bags (K75 + K100 RS, RT) are the same as the Funduro/ST bags with the exception of the left inner bag, which has a cut out on the F for the exhaust. The mounts, although different (tube steel for the F, cast for the K) are the same, and "City" bags will fit either, as will the right side bag. If you have K bags and want to put them on your F, you need the standard OEM bag mounts for the F and an F inner left bag. David #476
I have the K-bike "Integral" bags on my F650 "Classic". They fit right on the stock BMW bag-mount for the pre-GS models. With the exception that the left bag needs a special inside-half that does not have the bulge that would interfere with the F650's high-mount muffler. Richard #230
My experience with the K-bike bags is that if the bike falls over on one very hard, the INNER half is the one that "explodes." (Don't ask how I know.) If you can tolerate a slightly scuffed outer half, you may be able to pick up a damaged bag (broken inner, scuffed outer + hardware) for a decent price from someone who had the insurance company replace their whole unit. Build a bag for the left of the F650 by buying just the special inner you need. I also found out that the bags can be "plastic welded" back together if not severely damaged (Don't ask). Marty #436
My first time expanding the bags really puzzled me. You have to pull on those yellow tabs till they come loose. I think it is on the circle part. When you have all four pulled, then expand the bags by starting at one corner and working your way around. Rick #815
When I got mine they were very “sticky” at the start. I found that if you work on one corner at a time, in succession, and just a bit at a time, it should lead to success. Make sure you have the yellow “tabs” pulled completely free, before you start. When the bag is expanded (finally), sometimes the yellow “tabs” don’t want to snap back in. Check to make sure that the bag is expanded to the maximum. To shrink the bag, I place it gently (very gently) on its aluminium face (on a non-scratch surface, of course) and the back slides in fairly easily. (Unsnap the yellow bits again, of course, for this manoeuvre.) mspeed #1023
To expand the bags, make sure the yellow levers are totally released. The top portion snaps out, but then pull again and the centre section releases also. Then if you look, you can see where the case separates. I grab the top two corners at the outer section and work it loose, then grab the bottom, and alternate till it is out. When I had the bags out for the first time, I sprayed it with Armor All and that makes it slide a lot easier. TerryG
My right side pannier lost its aluminium cover last week :-( I went past a semi-trailer and got severe wind buffeting from it, and the cover came off. The bike was parked in the sun for a few hours before this happened. The cover is attached to the pannier lid with.....wait for it.....hot-melt glue and double-sided tape. On inspection I discovered the other side pannier was also starting to lose its cover as well. I returned both panniers to my dealer and have been told that BMW are replacing both panniers in total, not just the lids with covers. So.......I will need to modify them by securing the covers with stainless steel screws, so the next set don't fall to pieces. Jack, Australia
I had the same problem here in Louisiana, USA. Gets awfully hot down here and the glue, tape and cosmetic cover are a disappointing design and quality inadequacy from the BMW brand. I drove the 110 miles to the dealership for something unrelated and when I pulled into the parking lot, I swung my leg over a startlingly different-looking right side pannier. I took it off, took it inside and made some acute commentary on BMW's outsourcing. They fixed it under warranty, although they forgot to put the reflector on. Anyway, I am doing the same thing as you re: the bolts before it gets hot again. I'm going to drill neatly and use Allen bolts (hex key) to maintain the machined appearance and then coat the outsides with truck bed liner material to further ruggedize it and get past worrying about little dings if I dump it in the deep sand around here. Seems a shame to have to bolt on and coat something cosmetically appealing and seemingly sturdy by appearance, but function before form. I think apart from that, they're OK on durability provided one doesn't overload them. I have bounced around the backwoods cross-country and am confident they will survive my 2,000+mi RT tour through Mexico this summer. NothingClever
Anybody had any issues of poor fit after a slight fall? I laid my bike down ever so gently, but it caused one of the bags to not fit well, it's just a bit loose now. Hardly scratched it at all, and fortunately, it bore the brunt of the fall. I feel like the mount bracket may have got bent, but I can't tell by looking at it. Any experience with this? JonM
Yes, if the bike falls over you have to loosen the mounting brackets and put them back where they were. If you fall hard, the brackets on the back of the bags will break off. I am surprised to hear that some covers fell off. As you know these things are very thin and damage easily. I have tried to remove these covers before and had to destroy them to get them off. I have had most of the problems listed here. Fortunately all the parts for these bags are available and a relatively inexpensive. Some dealers seem to be unaware of this. I do seem to be a bit different from many here and I really like the BMW system cases. Coat the silver covers with Line-X and they tend to be quite durable. I have broken them but, as I said, they are repairable. Mine have been down the road at about 35 mph and stood up very well except for the rear hangers and it was less than 50 dollars to fix it. Yes there are stronger, bigger, heavier-duty bags available but they do have their drawbacks. Not the least of which is that they tend to break your leg if you get tangled with them in a fall and they don't come off. I don't do many long tours so I am not travelling a lot and need to pack lots of gear, but for commuting and weekend trips the BMW System cases are hard to beat in my opinion. Steve #1130
I fashioned metal hooks onto the panniers to replace the replace the 'weak plastic' ones engineered into the bags. I broke one of them off when I was extending the bag (if you can believe that), and I was going to have it replaced but I figured it would just break again. It works great, actually more firmly attached then previously. I can't wait to totally kill these panniers so that I can get some 'real' ones. Omniconn
I have had a pair of BMW cases for over a year and although the adjustable width is a nice feature, I hardly ever use it. I just leave them on the "fatty" setting. It's too much of a chore to adjust them for the payoff gained, especially if you're on a tight schedule. I use mine for work to carry raingear, workout clothes and documents and don't find it necessary to adjust them. I don't have much trouble squeezing between vehicles in parking lots and parking it next to my wife's car in a single car garage with the panniers on. Traffic and garage park-ability are a pretty good litmus test, it would seem, for about anything. As far as quality is concerned, the BMW bags are just eye-candy. They only give the appearance of being sturdy, like that famous aluminium briefcase manufacturer. Although mine held up well for a six-hundred-mile trip fully loaded with camping gear, they reach the limit of design and durability quickly for anything rugged. I have had both left and right covers come off due to the heat melting the glue and the wind ripping them right off. My long-distance trip to Mexico this summer will probably kill them despite the modifications to ruggedize them. If commuting to work, they'll get you some "ooohs and ahhhs" from the impressionable office folk. If doing some real touring, they'll only get you some undesired maintenance stops. NothingClever
Later update: SScratch just broke a mounting tab today putting his bike up on the centre stand. I dropped my bike just this past December and broke the plastic mounting socket off to where the bag had to be bungeed on. Also snapped a mounting tab but I had installed steel brackets for preventive measures because I knew the day would come that they would break.USD$616 for two plastic boxes with a Roundel is too much especially in light of the wimpy durability. I recommend you get something else, you won't be regretful that you skipped the dopey BMW bags that only look good. NothingClever
I have BMW hard bags [F650GS] and love 'em. They were easy to mount, go on and off in seconds, and expand to a decent size. Most of my rides are day rides and I really don't use them much...I found them used like new on this site for half the price of new. Renowaterdude
The BMW panniers [F650GS] are nice and can be painted to match the bike (if you so desire), but as for being durable? . . . not so nice. They are very easy to dent and from what I've seen they are not very strong if the bike somehow goes down. They break off easily, and once they are broken that's it! $500CDN each to replace + mounting hardware. In my opinion $1200CDN for a dual-sport hard bag system could be better spent on a bag of magic beans (better investment) Submariner
I'm very displeased with the BMW side cases.[F650SE] The locking mechanisms can pinch the h*ll out of your fingers if you aren't really careful, and they aren't very aerodynamic. My full face helmet won't fit in the right side bag, but it fits in the left side which I would think is smaller because of the exhaust system changing the shape of it. Actually they just plain suck. Colorado Bob #1297
Chase Harper Soft Bags
I wasn't comfortable spending lots of money on hard bags. I wasn't planning on any serious off road rides while fully loaded, and I didn't need some of the advantages offered by Jesse or other hard bags. So, I purchased Chase Harper soft bags (European Tour 4000--cordura, not leather) for about $150. On my first run from San Francisco to Tahoe, both bags showed some signs of melting (okay, my left side burned through). My "cheap" solution: I pulled out an aluminium sheet from my dad's shop and cut out a sheet for each bag. (I don't know how much a sheet would cost, but I imagine you could find some at a decent cost.) Went to Home Depot and got industrial glue, a long industrial Velcro strip and a flexible heat resistant material used to line starter motors in trucks/motorhomes, all for about $30. I glued the heat resistant material on to the aluminium sheets (both for extra protection and to keep the aluminium from scratching the bike), attached the Velcro to the sides of the bags and the back of the aluminium sheets. The flexible material can leave a discoloration on the body panel, so I bought some of the mesh Aerostitch Riderwearhouse sells to put under tank bags. The bags are not as wide as the handlebars, can carry a ton of stuff, are easy to get on and off, and don't melt (even after a 500-mile run, with only two short stops, and that included about 150 miles of very fast (and hot) interstate). Kevin #1121
Gearsack
I would suggest getting some high-quality expandable soft luggage. I own a set of GEARSACK bags (Australian), which double in size (22 L to 44L I believe) and also have quick mounting steel bottom rack system which greatly increases their carrying capacity (hard to explain, but nice in practice). I don't think anyone in the US carries them, but if you can find them, take a look. Mason #631
GIVI Side Cases
Installation of the top case bracket is a snap once you figure out BMW left one step out of the manual; just remove the turn signal brackets. I have the BMW top and GIVI 21L side cases and would recommend this get-up to all. Jason #778
GIVI hard bags are very nice, but I always thought Givi's expandable soft luggage looks great too. Some pics and info are here: http://www.calamander.co.uk/luggage/givi/givithrow.htm. These guys carry them in the US, but the info on the website sucks: http://store.yahoo.com/azmotorsports/t4voysadbag.html Mason #631
Givi E360 vs. E45/36. I use the E360s on my '97 F650ST. Get a WIDE LOAD sign. Nah, I think they look fine since what matters to me is the storage capacity. I bought the E50 Maxia topcase first and the styling of the E360s was closer to the Maxia than the E36s. I also bought the GIVI bag liners so no problem with stuff falling out. Good cases, IMO. I had my E21 cases on one cold day this spring and after about 40 miles I stopped to warm up. The right bag was just hanging on the two little knobs at the bottom of the rack. The latch had popped loose. I attributed it to the wingnut who put the bag on (me). Now when putting the bags on I push the latch home with the bag lid open so I can verify that it latches properly. I also give them a tug to double check. It wasn't a failure of the bag. Just careless installation. Just my experience. Raleigh619 ST
Givi E360 vs. E45/36. I have the E360s and a E45 topcase on my '01 F650GSA. Looks great! I ordered the E360s from Keith in Alaska (A plug for excellent service and price) who had them drop shipped from the U.S. Givi warehouse. The reflective strip on the handles of the E360s curves enough on the sides to be very visible to other drivers. The E360s take a XL full-face helmet (remove the internal paper holder from the lid). The E45 topcase has the optional backrest for the Missus who finds it very comfortable. I also added an Aerostich reflective strip around the center seam of the 45L case. The 45L case holds two XL helmets, or a large laptop case for commuting. I recently took a 'loaded for bear' camping trip, used all three cases, and still had room to strap a tent and canvas reclining chair on the rear saddle. Northwet #1101.
Givi Failure.? I've got about 8k miles on my Givi E28's and they failed me for the first time this morning. I was riding my normal route to work and took a moderate bump (1-2 inch w/moderate slope) at about 25mph. The latch connection on my left saddle bag released. The bag stayed w/me for about 25 yards then dropped into the road. Needless to say the cars behind were not happy, but I think they saw it coming off and were able to brake before it dropped. (Fortunately, the left bag was empty. Normally, I haul my work clothes, or laptop in there!). After retrieving the bag - scraped and gouged, but intact & unopened. I inspected the latch. It was still locked & mechanism seemed okay. The mounting rack appeared intact as well. I reinstalled & shook the bag trying to get it to release - I couldn't. I remounted and rode on. Two blocks later, again smallish bumps, bag is gone. I hit up a nearby loading dock-crew for some shrink wrap and used it as rope to secure the bag handle to my passenger grip and ride on...gingerly. Once at work I checked the bag & rack. I can't find anything busted. The latching mechanism is spring loaded though and maybe the springs can no longer handle the bumps. Andy #618 (MD - '99 F650)
I have a pair of E360 bags and an E45 topcase. You can carry all you need and then some, along with a passenger, with that setup. (Especially with a 30 litre tank bag.). GIVI from http://store.yahoo.com/azmotorsports/givibags.html. I had GIVI mounts on my '96 when I lived in France. I removed them and brought them to the USA when I moved to Colorado. They fit right on to my '98. The mounting holes are identical. Now, 2001 and on is a WHOLE different ball of wax. Stuff for carbed bikes won't fit fool injectered bikes and vice versa. Flash #412
My wife, Susi, has a lowered F650GS and she is 5'4". We have GIVI bag mounts with the GIVI 21L Commuter bags on her bike along with a Wolfman Explorer Tankbag. She is a schoolteacher and the bags work well and detach easily for when she needs to carry the bags or a bag into the classroom. The GIVI mounts are pretty easy to mount yourself and the bags are a click-on after the mounts are in place. The mounts can be found for about $175 and I think you can find the small commuter bags for $200. Compared to the $1000+ for all the stuff required for the BMW bags, they are a pretty good deal. You can always spring for an upgraded larger set of GIVI bags when the time comes. Bert #1131
I have a '99 classic and just put the PL185 mounts and E21 cases on. The trick with the mounts was, you have to remove the charcoal/vacuum canister from above the right side rear wheel well to mount the PL185 bracket correctly. They provide a good diagram of how it is supposed to go around the exhaust on the left side, but no diagram for the right side (maybe my kit was missing it). When you take the canister off, the plastic black bracket for the canister has two washers mounted in it – you pop them out, which will allow the bolts from the PL185 kit to fit through the canister bracket's holes, as well as the main frame. I had to buy longer bolts to get everything on correctly, but now it's solid as a rock. Mike-GeekSupreme
I just had the GIVI E41 installed, and I will rank them higher than the 360, which was my first choice before finding the 41. The 41 allows you to access them through a combo lock panel at the top of the bag. No key necessary. How's that for the perfect place for your spare MC and Case keys? The profiles are a similar size, and the capacity is nearly identical. 40 litres for the 360 and 41 litres for the E41. Stuflinn
I have had the 21's for a few years. I have been using them all the time for commutes, day trips, weekenders etc. They're narrow and you don't even notice they are there. They work well for clothes and other items, but I've never been able to put a tent or a sleeping bag in them...even in a compression sack. They are just too small. But recently, my wife and I have been planning some 3- to 4-day two-up trips, and the 21's won't work, unless I take nothing like Fonda and Hopper did. :>) So I scored some 45's for those longer trips. There's PLENTY of room in those puppies, but they are REALLY, REALLY, REALLY wide!!!!! To remind my lame self of the girth, I had to stick a piece masking tape with the word "WIDE!!" written on it between the tach and speedo. When I have them on the bike, I'm always inches from the gas pump, a parked car, or something else I'm pulling up to. I'd NEVER lane split with those things!!! The absolute best thing, and the MAIN reason I went with Givi is the huge versatility you can get with the frame. To me, it's the smartest option out there in hard bags. Derek
I rigged up E460 on Dakar using GIVI rack for R1200c. I recall the width measured is 115cm, or whopping 45" give or take. The racks are mounted almost flush with the exhausts on each side. This will be the case for GIVI rack or any after market racks of rectangular frame variety. E360 is 1 to 2 inches shallower than E460 I think, so your bike will be still a whopper. Try measuring exhaust-exhaust and give 1/2" play each side, add E360 depth (height?) to tally. I should have done this very obvious study before I rigged the rack. I put my tail between legs and went out and bought BMW bags. They have a lot of issues with cosmetic problems and bottom mounts, potential leaks etc. I can fix the bottom mounts with a couple of steel channels if they break. Latch parts seem replaceable. I am better off with bags breaking off (I can always strap them into the next town). If my saddle bag lid breaks off, or the rack breaks I will have more trouble. So I told myself and paid. TomN
I have a set of E-21 side cases and a E-33 top case, the side case are about the same width as the bars. They do not hold much but they are great for short trips and around town. No problem opening the E-21's with the E-33. The E-33 is only about 1" wider than the seat is on each side. The E-21 lids flip to the outside.The E-33 top case holds a helmet and my tankbag when parked or a sleeping bag when travelling. For longer trips I add a seat bag on the passenger seat and that's all I need. Peter #233
I personally like Givi luggage. They look good, are aerodynamic, easy to mount and lock, and tough. I saw a dealer drop one in a showroom and it bounced all over the place for about 30 feet and didn't even have a scratch on it. (It was black in colour.) Colorado Bob #1297
I have the Givi top case with brake light and side cases, all black. They're great! I have more room than some tourers! Don #1243
I have the Happy Trails metal bags. See the GS Gallery for pictures. Similar to the Jesse but about a 1/3 less money. They mount similar to Touratech. They appear to be a little more robust, are made in Boise, ID and are a bit cheaper. You can choose from several sizes and have the lids done any way you want them. You can choose powder-coating in three or four colours, and whether or not you want the entire box coated inside and out or just the inside to keep the aluminium from turning everything black. My 7 1/2" wide welded aluminium boxes are -35" total width mounted. You have total flexibility with the HT stuff. One BIG advantage of Happy Trails is that they are also GIVI compatible. This allows you the option of using different bags. You can also elect to use their top rack, which will accommodate a GIVI trunk. They are a GIVI distributor as well – for what it’s worth :-) Very nice folks to work with. I also have their skid-plate and rider/hiway pegs. Bert #1131
Actually it seems like the Happy Trails are a better deal as far as size goes. They seem about the same price as the Touratechs but not as wide. The 50L Happy Trails are just as wide as the 35L Touratechs. The 35L Happy Trails are 37" wide as opposed to 40" for the Touratechs. The Happy Trails bags for the 650 GS also curve under the exhaust and have the canyon cut. Kinda cool. Jessie
I have had the Happy Trails panniers for over two years. I use the little brass locks you get at the hardware store. Yeah, they clank around, but I never hear it! If you are worried about marring the bags, just put a bit of electrical tape or such under the lock area. Witzgall
The locks are way more secure than the integrated ones. I don't put them on unless I will be away from my bike for any length of time. I just throw the locks in the tank bag and they're there if I need ‘em. Bert #1131
I have had the Happy Trails for a loong trip - and yes the locks can be annoying
(but you get used to it).
Three solutions:
1: wrap the lock in duct tape. Works to deaden the sound and protects the
metal-against-metal wear. But the duct tape falls off in hot climates.
2: use a piece of bicycle inner tube to protect the lock - another traveller
apparently did this and was successful.
3: put some duct tape on the box itself where the lock bangs.
All said, I really liked the Happy Trails lock system. Very easy to use (without
lock) but a little complicated when you don't know the twist trick, which would
slow the casual thief. The best thing is that you can put a really intimidating
lock on them. Lance #1303
I have Touratechs instead of Happy Trails but mine also use small padlocks. My solution to the locks flopping around was to put a small circular piece of Velcro on both padlock and pannier (Velcro can be purchased in small circles with adhesive backing). That solved the problem. Mike #926
I was at Home Depot yesterday and saw a can of liquid rubber stuff (can't remember the name) that you dip tool handles or whatever into to give it a rubber coating. It was in the paint section - not sure why. Anyway, this might work for the locks. Rebecca
Hepco & Becker
I sent back a set of Hepco and Becker. The rack would only have fitted the classic if you cut and welded it back (top and footpeg holes out of position by 10mm plus) and the plastic boxes (are these the ones?) were covered in moulding flash. I run Touratech and they are great once you get the rack on. The Touratech aluminum boxes could be OK, I wasn't prepared to pay the extra and struggle with the rack. Andy Leeds UK #982
I'm doing research myself on luggage and here is what I found: from my experience the BMW cases are not strong enough if you do off-road (crashes happen quite often!). That's why I changed them for Jesse on my 1150.
So, I looked at some of the different aluminium luggage available in the market (price w/mount): - Zega/Touratech: $800, 2 sizes; 41 Litres (96 cm total width) or 35 L (90 cm), - Jesse: $995, 49 L, 91.5 cm - Happy-Trail: $820, 50 L, 100 cm. I think I will buy the Jesse, because they are the narrower for the capacity and are incredibly robust. OTOH, the Zega makes a nice table/chair. JL
Got Jesse's on my 97. Great product AND service. My only complaint is that I can't put my helmet in them (but I knew that going in), and he's now got bags that solve that problem. As to the gas filler problem, don't blame it all on the bags, blame it on BMW for putting the filler in such a dumb location. (One of the reasons I won't buy a newer F650 is because of this inaccessibility with luggage strapped to the passenger seat.) Marty #436
I have Jesse bags on my '99, and they are well-made, sturdy, expensive bags. I think their big advantage is the slim profile on the bike- I think they are the only hard bags that are narrower than the handlebars. If you don't mind a wider ass-end on the bike, I would be inclined to go with a boxier option like the Touratech or MotoSport panniers for ease of packing (the Jesse interiors are a little convoluted) if I had to have metal, or GIVI if plastic was ok. James #523
I don't like the Jesse's. You cannot open the fuel filler cap all the way unless you open the Jesse bag on that side. PITA if you are loaded down and prevents you from strapping stuff across the tops. AND the only time the auto-shut-off didn't work on the pump was with my Dakar putting fuel in my open bag. Mark R
I think the GS Dakar looks really good with the Jesse bags, as my buddy has them on his. I have the Jesse's on a '99 model and they really work good on this model, too. I agree the GS with 21 wheel is much more dirt suited than the 19 with low fender, although mine with smaller front wheel sure does a magnificent job off road, except MUD! Low front fender is a no for mud and it clogs quickly. Radiator protection is only other major concern for off-roaders and Jesse makes these, too. Good stuff. If I had to do over again, I'd have a tough choice also, because the carbs are less troublesome to me than the injected systems, BUT the injected system gets a ton better mpg. Along with 21 front tire, I like a lot. Its a toss up, for trouble free '99, or new stuff I like on the GS Dakar! I'm keeping the old one for now....Runs perfect and I can't complain. Randy #748
Mounting Jesse Bags: Watch your rear footpeg bracket when bolting the Jesse frame onto them! Mine cracked the BMW part, because the Jesse frame is not a perfect match to the footpeg bracket and using some washers on bolt in between the BMW bracket and Jesse frame will save you some trouble. Worked for me...The BMW rear footpeg bracket is pretty light duty to start with, so beware. Unknown.
I've owned three sets of Jesse's and would do it again, without question. My '99 650 is perfect with them. The only issue is the rear end of 650's are very, very easy to overload the ass end of these bikes. The bigger, better bags are able to carry more, so loading has to be done wisely! I carry tank panniers to move some weight forward around tank and this helps a lot....I've ridden with my bike at its gross weight on several trips without any hassles from bike, but loading is critical, IMO. 814 is gross for '99 650. I've weighed mine fully loaded with me aboard and did individual axle weights, too. I'm at 300 front tire and 510 rear. The bikes seems perfect with this combo. The max weights for your tires are printed right into sidewalls, FYI Randy748
I've got the Jesse's on my '97 Classic. They're smaller than the ones used on the 1100's. I don't find them too wide, I think they did a good job of keeping them close to the bike. Their mounting design is super. Very, very easy. I've had my Classic up to well over normal highway speed without any problems. I haven't broken triple figures, so can't speak for that. The bike remains very stable at speed. I even had it pretty loaded down for the rally last weekend and it rode well. I even rode it loaded over the dirt roads into the rally site. (couple miles) Through all the bumps (holes) it handled well with a full load. I don't think anybody would regret going with the Jesse's. They're just great bags! Shawn #1051
Touratech vs. Jesse. Jesse wins, that's the long and the sort of it. Just thought I'd pop in my two cents worth after having travelled 26,500 Km's from Argentina. The Touratech items look nice and all, but at the end of the day, they are made from extremely thin aluminium, and will buckle if you drop the bike when it's loaded. The rack that Touratech makes is strong enough, and the plastic mounts ensure a clean and protective breakaway in the event of going belly up. The boxes however in my opinion just are not up to the job of long distance touring, and I would have preferred the Jesse boxes had I known about them sooner. After one crash which ripped off the R/H box, it was hammered into shape easily enough, but the the water tight seal was no longer effective. On the left side, one single drop at o km/h left a nice little dent, again upset the waterproof seal, and bent the box inwards so that it's loose even when the mounting rings are tightened fully. For a month I used car tubes wedged between box and lid to provide a seal for the rain, which although effective, stretched the closing locks to the point where I had to use the tubes. Since then I used black RTV on the lids for the same purpose, and a snug fit - a good tip. The last gripe about about the boxes is that they need lining, otherwise you end up with this dust and oxidisation marks over everything in your box. Take one look at the Jess, and you'll see the difference for yourself. Solid, enamel finished, and even the standard mount is level with the seat, unlike the Touratech standard set up. Yeah, the Jesse boxes are heavy I guess, I haven't really sussed the difference out. And yes, the Ultimate journey guys busted the rear suspensions on their bikes. In short, Jesse is worth the extra money. 'nuff said. Jeremy, www.horizonsunlimited.com/tstories/andrews. Jaz #1126.
I also just finished installing the Jesse Odyssey panniers on my 01 GS. They mount extremely solidly, are well built, hold a lot, and look great. They are NOT wide enough to hold a helmet, but I would not have anything else! Their mounting instructions are simple and easy to follow. They are the new style, and are 37 inches wide, about the same width as the handlebars. They are definitely keepers even if they are a little wide.....much sturdier than the stock bags. Gene
I heartily agree with Gene. Their capacity is amazing. Shortly after putting them on, I took a spill and knocked one off and bent the support frame. The bag still fit well enough to get home, and a few minutes with a hammer and it is good as new. For off-road, they remove easily. The most amazing part is that they fit a case of beer on each side for that run to the liquor store! Rhonda #1191
Touratech Vs Jesse. I have to agree about their sturdiness. I went down on a dirt road, loaded so heavily I couldn't lift the bike without first removing some stuff, and I only had little scratches on the right hand box. No structural damage at all. On the other hand, if they DID get bent, I'd bet they would be a bitch to bash back into shape. you have to have linings in the Jesse's as well, or pack your stuff into small stuff sacks (that's what I do, which also keeps things organized). Vibration will eventually cause any hard objects to eat through the powder coating. The Jesse bags have also been improved over time. the closure and locking mechanisms are way better today than they were three years ago when I bought cases for my '99. Mark #403.
I have an 01 Dakar with the Jesse bags. Can't say enough about them. Fit and finish is great. No gas cap issues but you can rotate the cap by removing the screws and rotating it to where you like it if it is a problem, because it does get close. They are narrower than the bars yet provide huge capacity. They come right off and snap right back on. Awesome design. I suggest using the lock tight and carry a few spare nuts and bolts, they will work themselves out on a long/ off road trip so check them once in a while. Best bags...... you will be happy. Brad in SB #979.
The Jesse luggage can cause instability problems IF one of the rubber mounting "dampers" goes missing. In my case, the metal washer spacer behind the rubber ate a hole through the rear of the muffler shell, the leaking exhaust gas toasted the rubber (several times), and instant instability. I had to remove the stock muffler for welding repairs. Whether this is my fault (I allowed the muffler to get a bit loose due to a missing mounting bolt once, and the alignment may not have been perfect, and have abused it to the Arctic Circle and back) or the result of the Jesse mount design, I'm not going to debate here. I HAVE removed that backing washer, and also filed a big corner off the mounting tab off (closest to muffler). I would recommend that other Inmates with the Jesse bags examine the clearance between the back of their muffler and that bag mount. Downside is that the exhaust leak melts the rubber bag bumper, leaving the bag to move about (not good at speed). Marty #436-Chicago-97 F650F
More of a FYI than a complaint but take it how you will. Normal ride home, nothing out of the ordinary. I got home to see that my exhaust side bag was leaning towards the bike. Upon inspection I saw that the bracket that held the bottom mount had gone! Clean break! The bag had leaned in probably for most of the ride home as the exhaust had managed to cook the contents of the bag. I had to remove the bags and start the process I now refer to as Jesse Hell. After countless calls to Jesse and his people, they agreed to fix the bag and get it back to me in a few weeks. Sounded good, until a month and a half later I was still calling with no reply on the state of my bag. Finally after much phone tag and bother, my bag was "fixed" and returned to me. Not painted, and without mounting bracket! It was however marked for the holes for the mounting bracket, which turned out to be in the wrong place! That caused me to have to drill even more holes in the bracket. The paint to match the bags was referred to as "whatever they have in the store texture black", which of course did not match! So beware, they are great bags but don't expect the customer service to match. Very disappointed. Ginko
I have about 31K on the ST, most with the Jesse bags installed, and half with the Sputnik installed, and the only problem has been a broken tag on the cross brace behind the license plate. There will be problems with ANY product, but I am very happy with Jesse. Hal #15
With Jesse bags, has anyone rotated fuel cap (02 Dakar) so as not to open bag to refuel? Whitefish
I fuel with Jesse’s and gear strapped on with a cargo net and I have NEVER had to open the lid. I simply go at it in reverse so the hose coming from the end of the nozzle is pointing toward the front tire. I have done this every time and it works like a charm. You just have to make sure the nozzle is all the way in the filler tube on the bike. Denver Jim
I doubt that a helmet will fit in the Jesse's (not in my old style ones, for sure). Take a look at Helen Twowheels for bag liners. Marty #436
Bill said, “Touratech have a large, flat top that can be used for a table or place to put things.” Not sure how big of a "table" you need (or how you park your bike perfectly level), but if you flip open the Jesse lids (they're hinged, at least on the older version), the INSIDE of the lid gives you a small flat table with a LIP to keep things (tool kit, nuts, bolts, etc) from sliding off if the bike is NOT perfectly level. Marty #436
Jesse bags don't bother my wife on the '01 Dakar but the subsequent lack of space for both of us and limited horsepower do. Gerry #951
I think the F650 is a bad choice for 2-up. Yes it WILL do it, but the passenger won’t feel very comfortable. Space is an issue, and the light weight and lack of power also help to make the second rider feel just a bit less than secure. At least that's been my experience. I compare it to driving in shitty weather....yes your Geo Metro will make it, but you'd feel a lot better behind the wheel of an Audi Quattro, as would your passenger. The Jesse's are not in the way at all (also on a classic). Mark #403
Passenger accommodations on the F650 are far from optimal, mostly due to wind turbulence and limited seating space. In my wife's case (5' 0"), the Jesse bags are not the issue. This is for the older, pre-Odyssey bags on a Classic. Marty #436
Yeah, the Jesse bags are pricey, but I am happy with the set I installed on my '01Dakar. They are stout and the top rack option is a good one for lashing down a tent on one side and Thermarest on the other. Not to mention they are secure and solidly mounted, and when you unlock with the key, they can be removed easily. JoeDakar
Jesse bags: very sturdy mounting, good room, and didn't leak a drop. I suspect they might even give you and the bike a little protection if you dropped it. It can be gassed without removing the bags, but they are easy to remove and replace. The only disadvantage I have found to them is it is a little harder to get on and off unless your legs are long and it is harder to get the leverage you need to put the bike on the centre stand although it can be done. Sam #1238
I had Givis before I got the Jesses and decided after living with the Jesses for about a week that I should sell the Jesses and keep the Givis. For my money, Givis are a MUCH better system while travelling in the USA. I mean... the Jesses don't even have a carry handle! [on the Classic, Ed.] With Jesses, you have to make two trips down to the bike to get your bags if you're staying indoors. And there is no way to get a helmet into a Jesse saddlebag. That right there is the hallmark of a poorly designed touring saddlebag, in my opinion. The Jesse mounting system is "designed" so that you have to just about completely empty them to get the bags on/off the bike. Yeah, Jesse bags fit in snug to the bike. And they LOOK like they're secure. But to me, their drawbacks when it comes to everyday utility FAR outweigh the fact that you can fall over at speed and not destroy the bag. When I run my saddlebags, I USE them. I don't fall over at speed all that often. I prefer bags designed for how I use them, not how I MIGHT use them, one day, if I am unlucky or stupid. The everyday utility of the product I use FAR outweighs the "protection potential" offered by the one I don't. With Givi bags, you'll need at least a screwdriver or some other TOOL to break into them. The Jesses... anyone can open them with their bare hands, even a child. Once open, the Jesses can be removed with the allen wrench that lives in the bag. Even with the latch destroyed a Givi lock would still be locked, requiring a thief to DEAL with stealing the bag off of the bike, instead of just carrying it off like a Jesse. There are several other aluminium bag options out there. I'd suggest taking a good hard look at Zega cases before even considering Jesse bags. Flash #412
Will Jesse side bags fit with BMW top box? I don't think there will be any conflict, here's a good rear view of my F and Jesses. Necr0
Kappa
I was interested in the Kappa panniers (better price than Givi, and good quality, and specifically designed as sidecases, with 42 litre capacity, and I knew the guy, and ...) as well and ordered them. So I went to the store to fit the bases(?). Bases fitted just fine, the left one needed a little help, but it was ok. Once fitted though, the bases, the plastic side panels of the F650 could not be removed. The guy called Italy (the supplier) confirmed the part numbers and said that if I did want to remove the side panels, I had to remove the pannier bases also. So, I removed the bases and did not purchase the product. My point (sorry for the rambling) is that make sure the bases fit correctly... the cases as such looked like quality cases to me. Norm
I have the Kappa 21's (black) which would appear to be a Givi E21 clone. I use them for commuting and with a sports bag bungeed across the pillion seat for camping gear. The cases are mounted on Five Stars racks and are marginally more narrow than the bars, so reasonably manageable in traffic. They've also taken one almost stationary car-park spill, temporarily deforming to absorb the impact but no damage apart from some (barely noticeable) scuffing on the forward corner. Cases and racks from Riderhaus. I found them a good outfit to do business with. Rashers
Krauser
I am in the process of adding hard luggage to my F (Classic). I have decided to
go with the new Krauser K5 luggage and mounts. I am ordering these from
Riderhaus – whom I recommend highly!!!
They have excellent customer service.
1. The new Krauser bags (K5) are huge—2 helmets can fit in each bag. A smaller
K4 is available.
2. Riderhaus (located in Germany) claims they are better quality than Givi,
though they sell a ton of Givi.
3. You can order either side or top case mounts and both mounts integrate.
4. You can mount any K5 or K4 (or the older K3) to any mount in any position.
5. I don't think the mounts are as ugly as the standard square hoop or the Givi
wing rack.
Actually, the main reason I'm getting these is all I need are the mounts since I
already have the Krauser side case set-up on my Hayabusa - so I don't need to
get new cases/bags – just mounts. This is for more info on the
Krausers
from Riderhaus
The mounts for both side cases and top case, including shipping to the USA, will
be $234 ($131 side case racks, $66 topcase rack, $37 shipping). Gar #673
Magsbags
http://www.magsbags.com/expeditionbag.html
Used a set of Marsee Salami Saddlebags for about two months, waiting for my Jesse bags. Too small for me. Fit form and function were ok. Love the gear, just not big enough for the amount of stuff that I like to carry. Also use a Marsee tank bag, gloves and upper/lower suit. Whitefish
It seems that the promising-looking
aluminium luggage from Micatech bit the dust. In the late summer of 2003 the
Micatech website posted this terse note:
"We have put production of the Micatech Pilot luggage on hold for the indefinite
future. We cannot say at this time when (or if) production will be resumed. If
it is resumed, it will likely be only for the BMW R11xxGS and Adventure models."
I have the soft Moto-Sport Panniers and am happy with them. The aluminium backing makes the exhausts a non-issue and the quality is excellent. Gerry #951
I have a pair of Bavarian (37L) sized cases on my '99. I could go on and on about them, but I'll just say that I am very pleased with them. Karl #1012
Saddlebags w/o racks. Check out http://www.moto-sportpanniers.com/ Click on soft luggage, then scroll down to F650. They have soft bags with mounts for a flameless ride. SScratch
I was attracted to the Moto-Sport Panniers because of their smaller size, and must say they have held up just fine. With a great deal of off-road use, the mounts have not come loose and the panniers seem sturdy enough for the job. They are especially great for my daily commute to work and have been just the ticket for the weekend camping trips. Can't say anything negative about mine, they have been a great investment! Mike #976
I have them on my KLR. I got the "thin" version, the Baja, with the extensions that give me the option for more volume. With the extensions, the volume is 35 litres, 26 without. The case extenders look like they sliced a bag into sections, put the lid mounting interface on the top and bottom. You sit a section on top of the case, then put the lid on top of the extender. They secure with metal straps and the normal lock mechanism. Haven't used them much, but they seem functional as well. Quality of the bracketry and cans is excellent. They come with a fitted nylon bag, which greatly simplifies packing. They seal well. The pannier-to-bracket attachment can be fiddly, but is secure when mounted. Fitting the brackets on mine was complicated by an aftermarket exhaust system, but even without that the brackets needed minor alteration to fit, but no worse than some other accessories I've mounted. The installation instructions could have been better, particularly around panel modification, but that may not be an issue with the F650. I haven't crash tested them yet, and don't plan to, but from the general construction I guess they'd be fine. Overall, two thumbs up. Harl #380
I don't have the Baja's, but their soft equivalent, the Yukon II's, which are great, especially since they're light, waterproof and fit quite a bit. I found the Moto-sport people very knowledgeable and efficient (fast delivery). More importantly, when I told them I was a CG member, I got 10% off! Greg #1245
I installed the Moto-Sport panniers one year ago for a trip to Baja. Must say they've held up very well. I figured I would take them off after the trip for my normal dirt adventures, but they have proven so sturdy and convenient that they remain on the bike at all times, and after 10K miles, no problems to report! DesertDakar
When mine are attached, the black plastic disc things which hold onto the frame actually touch the exhaust pipe protection grill thing on the bike. I haven't noticed any melting or anything, but do yours do that too? Adam #906
No. The plastic is about 30mm away from exhaust. Maybe because I am using a Staintune pipe. I would strongly recommend soft panniers. So far the ones I have from Moto-Sport have proved their durability. On my last trip one pannier suffered two accidents. One time I had a spill when it was raining and the ground was muddy. The other time it got hit by a car. Both accidents only caused slight damage. Furthermore the inner liners have proved their usefulness. They kept the rain out. The only set back is that it doesn’t come with a locking system. scx
Mine touch the guards on my '02 GSA, but no biggie (doesn't hurt your leg…only warm to the touch). I haven't had mine long enough to say I absolutely like them, but I'm quite happy so far. And the 5% discount for CG members didn't hurt either! Greg #1245
I've had the aluminium boxes on for going on two years and 18 000 miles. They're too useful to take off for any length of time. They're not hard to remove - loosen 4 hex bolts and that’s about it. For my money, they're the best for the least. I don't favour the 'square edges' on the Jesse bags or Happy Trails. Get the 'liners'. If you're on the road for a while it's real easy to 'unload'. Also, Wolfman makes a bag that fits perfectly across the top of the bags and secures to the mount points. It makes travelling with sleeping bag and tent a little easier. MikeM
Moto-Sport Baja panniers are top shelf. Aircraft quality construction. (They need help in the technical writing department though, directions for installation are a waste of paper. They are very easy to install, directions not really needed.) I have two sets for the two Dakars. I also mounted a couple of loop clamps to store and secure the provided allen wrench. BMW top case mated to the integrated mounting system very well. The lids needed a positive stop system, which I easily constructed with a couple of crimp terminal eyes and 12 gauge insulated wire attached at the hinge screws. Driver72
Oxford Luggage
I had some Oxford Sports luggage on my Cagiva Canyon in the UK. It was great stuff. I brought it with me when I moved to the USA, and found that they wouldn't fit my Dakar. Well they would and did fit – I just melted them almost all the way through. They are well made though. Good products from a good company. Adam #906
I like Oxford too. They have a website. If you can't order on line from them, try searching. Andy #982 [You can order on line from places like Cusworth’s, ed.]
Roadgear Luggage
http://www.roadgear.com/softluggage/bags/index.cfm
I have a Jumbo Hauler that I have used on three different motorcycles over the years. The bag is great! Holds a weeks worth of clothes and equipment and mounts on the seat in seconds. Craig 325 Northern California
Touratech
Bags are an investment, likely for the lifetime of the bike if not beyond. I have the Touratech bags and they are great on the BMW. The BMW bags are crap, the aluminium finish which people expect to look new dents if you look at it the wrong way (I say so what but people seem to care about this cosmetic crap). The Touratech's are durable, lightweight (important), and easy to maintain/fix on the road. They lock nicely with integral locks and can use a padlock as well. It's easy to screw stuff onto the bag as it's made of aluminium. I just rode this weekend in/around LV, near Jean, Baker, all over the place. the rack stays on the bike while the bags are off. You want real bags with good mountings like the Touratechs for the off-road rattle and roll that you'll be doing. With the bag liners you can pre-load and unload at will. I’ve crash tested the bags a few times and you'll appreciate the extra protection! Frameworks are not the same. The frame/bag will shake a little bit but not much if fastened properly. Remember that you are travelling over dirt roads so everything vibrates. David H Park #711
I have the Touratech system on my 99 F. Very good cases (100% waterproof once you seal the mounting holes you drill) but it was a bit of a pig to fit the sideframes. Either BMW or Touratech got holes in the wrong places by about a mm. Never dealt direct with Touratech, everything from them is in German and mine isn't up to it. Bracken Motorworks in London are the agent for the UK and are a great bunch. If we had the choice in Europe, I'd compare to Jesse stuff before you buy. Touratech is 1000 times better than anything BMW make and a lot better than GIVI or similar. Hard luggage gives more support to your load, tends to be more waterproof and gives you places to lock stuff. Soft luggage still needs a frame to support the weight and stop it catching fire on the exhaust. It is however cheaper and maybe easier to pack. It also tends to be transferable between bikes. BMW luggage is overpriced, poor quality (hinges fail) and tends to be big on the outside and small inside. GIVI and Nonfango are better and cheaper. Touratech (and Jesse I guess) are stronger, bigger and can survive the odd crash. If you are a serious tourer and have the cash go to metal boxes. If not, a rack, top box (lockable space) and soft bags are a good second best. I have Touratech. Andy #982”
I bought my Touratech Bags from Ride West BMW in Seattle. I have been very happy with the product and the Dealer service. I did a 10,000k ride last fall though Mexico and I was very impressed with how every thing fitted either in the Pannier or strapped on top. JV
I have them on my 99 and they are first rate. A suggestion-when you mount them, mount them so the tops are flat/level. This way they make a great work space/table and place to set a coffee cup. They are wide so you won't be doing much lane splitting. You don't know they are there when at speed and the nice thing is that all your stuff can be stored inside and not strapped to the outside of the bike, with all the problems this raises. I chose them over the Jesse because they are wider on top. Bill No.391
I have the 35 litre Touratech panniers on my Dakar and feel they are an excellent choice. Bought from Tom at CycoActive and would heartily recommend them. I had Jesse's on my R11GS and they are very good, but I think they are somewhat heavier and I prefer the simplistic look and function of the Touratech. As noted on a recent thread, some have concerns about the attachment of the Touratech, and I admit to having almost lost one after the latch mechanism had vibrated loose, but that turned out to be my own fault and I haven't had any trouble since. I actually did have one of my Jesse's vibrate loose and fly off the bike, so careful attention to tightening the locking mechanism is important for both, and probably for others as well. The cases are detached easily. It's just a matter of loosening a large round "disc type" of fastener that screws into the attachment bolt inside the cases. Roger #827
Here's my two cents on the Touratech but you've first got to ask yourself what are you really wanting these for? If you want a smaller package for shorter duration, the Jesse would probably do very well. However, I was looking for a large set of box's that could handle a trip on the '99F from Texas to the Artic Circle and back with a few unknown points in between. I figured I'd be on the road somewhere between 30 and 60 days so I needed a LOT of space. The Touratech came through on that one with the 35L and 41L sizes. FYI - I also had the Aerostich tank panniers that held all my 'spare' bike parts should I need them. I also went with Touratech because they were a huge BOX that made packing easy. Open the top, there it is. Also, the Touratech with it's big box look had a very nice large flat top that had 4 footman loops each so that I could strap a riverbag to each one of them. That was very nice in the long run. I also figured if the bike fell over, what would be easiest to pick up? The thinner Jesse or the large Touratech. As it turns out, the bike did fall over (all by itself - honest) and it just leaned on the box. It was VERY easy to pick back up even fully loaded and I mean FULLY LOADED. Then price came into play. The Touratech was about 300 bucks less than the Jesse so that kind of cinched it for me. I added the integral locks from Touratech and had some custom bag liners made as well. Granted, the Jesse are thinner but I didn't have any situation where being 'thin' was required. I personally like the black finish on the Jesse a bit better but there's something about those big old gnarly Touratech's that have enough surface area to compete with a NASCAR car for stickers of where I've been. I hope that helps... You can see the bike with the box's at: http://www.scottstrance.com/artic_circle/pics/artic103.JPG Scott #678
If you want to look lean and mean, get Jesse. If you want to look like a pregnant matron in her eighth month get Touratech. What the hell were you packing for such a short junket to the Arctic Circle? All you needed should have fit into a tank bag. Jesses hold enough for a trip around the world and some. Werner #547
Before reading Werner's post, I was thinking the same thing, although he would know better. I think people who take trips on bikes tend to over-pack. I was reading a list of trips folks had taken on BMWs yesterday and almost all of them stated they regretted taking too much stuff. The more you take, the worse your bike will handle and the longer it will take to pack and unpack. I always take too much, and I always regret it. slow learner I guess. The Touratechs look like damn good cases. They are wider and the aluminium is thinner. but they also probably lock better. The Jesse's locks just keep honest people out. So it comes down to your needs, your aesthetic preferences, and your cash flow. Personally, I think the Jesse's look much, much better, but I would like to have the wide opening of the Touratechs. You can put a Jesse rack onto your Jesse cases which acts as a tie-down point and a handle. you can also simply install the d-rings as tie-downs, so both brands are similar in that respect. Mark #403
I'll add my experience with Touratechs – I've had them on since I bought the bike new in l999. The 35/41 litre is because on my bike, a '99 F650, the left side has the exhaust pipe coming up and if the pannier was the 41, it would stick out quite a way. I really like them and they will hold all my stuff without having to lash anything to the outside/top of the bike or cases--this is great ---I've noted before when this subject came up that I lost a Thurlow Deerskin motorcycle jacket off the back of my R100RT because I thought I'd lashed it on properly and in fact I didn't--sob, groan--no one to blame but myself. The Touratech panniers give me no problem at highway speed but I take them and the top box (BMW top box) off when I go dirt riding. I don't have the padlocks and don't find them necessary. There is a lock already in each hasp which is worked by turning a slotted bolt on the outside with a coin or small screw driver. The one thing I find better with the Jesse panniers is that they have a really slick release device for removing them from the bike. The Touratech are a bit of a hassle to remove. One releases the large knob on the top inside of the pannier and then lifts the bag off the lower mounting frame. The large knobs are really large discs in which the centre hole is threaded---they screw on to the bolt that comes through the side of the pannier. There are two of these in each pannier. Turn these to unscrew them, and the through bolt comes out and the pannier is then ready to be lifted off the lower mounting. The Touratechs are wide and you'll probably not do much lane splitting. Bill #391
I've got the Zega bags on my 01 GS and like them very much. Bought them pre-mounted and had no problem with the installation. Roomy. The lids on these lift off and have aluminum loops for tie downs on the top. Very handy since there's not a lot of places to hook a bungee cord. But, they're big, kinda like havin' a couple of bread boxes attached to the side of your bike. My husband has the Jesse bags on his 1100GS. They also are nice. Lids are hinged. Nothing on top for bungee cords. Both companies were good to deal with. No complaints with either. I think it really comes down to personal preference. One last comment, the Zega's do stick out further than your handlebars. I believe the Jesse's are supposed to be about the same width. It's easy to forget that you need a wider space when passing between cars. Deborah, #1074
Touratech cases locks. I added the locks on my 35 and 41L T/T boxes. It's a fairly simple process to do but does take some time and patience. (not to mention a large drill bit and some skill at auguring a hole out) They provide a decal you place over the old locking unit once you've destroyed/removed it. You simply ream out the center hole to the new size and fit the locks. I still think a determined thief could defeat them but it would take some time and skill. Way better then the stock lock system however. I've also got bag liners. A definite MUST HAVE, as the earlier thread indicates you get 'black stuff' all over everything. Scott #678.
I just recently got a pair of the 41L bags. I was up in the air about which size to get until the guys at Touratech said most helmets fit in the 41L bags, but none fit in the 35L bags. That did it for me. I can just fit my large Bieffe in there with a tight squeeze past the sealing lip. Yes, the 41's are a bit wider, but I'm not into lane splitting and after a week I didn't even notice they were there and I can still squeeze through all of the usual tight spots. No noticeable effect on bike handling either. The bike can still go 95 on the freeway without batting an eyelash. If you want to hold a helmet, go 41L, if not, 35L would probably be fine. Also, get the bag liners so all of your stuff inside the panniers doesn't turn black from rubbing on the aluminum. I also coated the inside of mine with contact paper (plastic sheet with glue on the back). It's not a pro job, but I can put my briefcase in there without worry. Mike (NM or VA) '02 GSA
Touratech 31L and 41L cases, sweet.... Nick # 1085
I have the Touratech 41L cases and they're great. I can stuff almost anything into them (Except my Nolan helmet doesn't fit. The BMW System 4 does) and people here in Canada think I deliver pizzas. I haven't had the misfortune yet to hit the pavement hard with them, though I once dropped the bike and because of the cases it was obviously a little easier to get the bike upright. The mounts did surprise me. One day I forgot to attach the upper mounts and I rode for a few blocks where both boxes were just suspended at the lower mounting points and were at a 45 degree angle. Not a single car tried to let me know (I guess to them anything on a bike is weird) and I only saw the problem when I stopped. The cases did not fall out. So, I think the mounts are good at least for city and highway riding, though the fasteners can get a bit loose with vibration. So, check from time to time. The 41L cases increase the width of the bike a little bit beyond the handlebars, so you have to think a bit like a truck driver when doing tight manoeuvres or corners (it's only a few centimetres). I got the 41L ones instead of 35 because I needed more volume. The 41L boxes will extend the bike's width slightly over 100cm (I think 102cm). I think this is illegal in Germany (I'm in Canada and we don't seem to have this restriction). Check the legal requirements in your country. Nelson O
During my recent trip from California to Tennessee the attachments for one of my Touratech panniers loosened and the pannier came off the bike. This happened after somewhere between 450 - 600 miles of fairly high-speed, steady interstate riding during the first day of the trip on a F650 GS. I believe the interior nuts connected to the two tabs which hold the pannier on the frame vibrated loose and that the system Touratech uses isn't totally adequate for a single-cylinder bike. The system involves a large, knurled, round metal nut with a nylon jam nut intended to keep the round nut in place. These are meant to be tightened only by hand, and I had certainly tightened them as tightly as was possible by hand. Single-cylinder motorcycles have vibration frequencies which tend to loosen fasteners and although this fastening system may be adequate for a multiple-cylinder bike, I don't believe it is for a single. I would suggest that anyone using Touratech panniers on a F650 not use the nylon jam nuts (these are totally nylon, not a metal nut with nylon insert) which come with the panniers. When I mentioned "meant to be tightened by hand" I was quoting Dominic and Tom at CycoActive (US Touratech distributor, as you know). I temporarily tightened the nylon jam nut, carefully and gingerly, with a wrench, but that would result in stripping the threads before very long, I think. I've since substituted a regular metal nut as the jam nut against the large round nut, and added still another metal nut as a second jam nut. Thus, each attachment point is secured with the large round nut, then a standard metal jam nut, then a second metal jam nut, both jam nuts tightened snugly with a wrench. This system never came loose during the rest of my trip. Other reasonable possibilities would be to use a single metal jam nut with a lock washer, or a nylon-metal lock nut as the jam nut. This was not the first time I had used my panniers and nothing had loosened before. But then it did, and the result was disastrous and costly. The cost of four metal nuts and lock washers is negligible and well worth the extra security, in my opinion. I can't think of any downside to replacing the nylon jam nuts with metal ones which can be tightened more firmly, and encourage anyone with these panniers to do so. It happened once, it can happen again. I hope this information might help someone else avoid such an occurrence. Mike #926
I always tighten the lock nut with a spanner; it hasn't stripped so far. I keep the tool kit in the pannier lid, so it makes sense to use the spanner. I also carry a couple of nuts and bolts that could be used to hold the pannier blocks. Belt and braces I guess. Andy #982
I tend to have the exact opposite: my knurled nuts (pun intended) vibrate and become so tight they are impossible to remove without one of those chain spanner wrench thingies. Norm #473
I've had the Touratech panniers since I purchased my bike in l999 and have had no trouble with them coming adrift. I’ve made trips from Wisconsin to Redmond for the MOA rally and many other trips of considerable length where I was travelling at around a 70mph average all day. To tighten the large knurled knobs on the inside of the cases, I purchased a humungous pair of water pump pliers from Sears, and before setting out, make sure the knobs are snugged down tight. Of course if I had to take the panniers off en route, it would take someone with hands stronger than mine to loosen the knob. Just make sure you snug up the large circular knobs on the inside of the panniers before setting out and you will have no trouble. Bill #391
I have had the panniers on the bike for almost 4 weeks of daily 100+ mile commuting in and around NYC, they are 'loaded for bear'. Not once have I noticed the large knurled 'nut' work itself loose. What I am more concerned with is the fact that the puck is fastened to the box with a silicon adhesive and a screw. I think it would be better to have used a through bolt assembly other than a screw type. If anything, an overload of the case will case the puck assembly to fail. I am going to through-bolt mine as soon as time permits. Nick #1085
The two top “pucks” in each pannier are held in place by the bolt that goes through them and into the pannier. The large knurled knob screws onto this bolt and holds all in place. These bolts hold the pannier to the top mount rail. The bottom two pucks in each pannier do present a bit of a problem – at least for me, They are held to the pannier by four screws that go through the pannier and into the puck from the inside of the pannier. These pucks provide the seat for the pannier on the bottom rail of the pannier mount. I had a couple of these screws that stripped out the screw hole in the puck but the other screws seemed to be holding the puck firm to the pannier. Thanks, Nick, for the suggestion of through-bolting the bottom pucks. I got four #l0 1½" stainless bolts, self-locking nuts and flat washers. Ran a drill through two of the holes opposite each other in each lower puck. Then wrapped the bolt end tight up near the head, with nylon/teflon plumbers tape. I put a nylon washer on the bolt so the head rests on it and not on the aluminium pannier, ran the bolt through, put the large stainless flat washer on so that it rests on the puck and put the self-locking nut on. Thus there are four bolts for each pannier, two in each of the two lower pucks. This will ensure that the pucks and the panniers don't come adrift. Only took a few minutes to do it. Bill #391
When I discussed purchasing my panniers from the US distributor (CycoActive) I asked about the pre-mounted vs. non-mounted option. They explained that the non-mounted version is simply the pannier boxes with no holes drilled for the pucks which clamp the pannier to the brackets attached to the bike. Thus, if you don't purchase the pre-mounted panniers, you will have to drill several holes and bolt the pucks onto the panniers, being very careful to align each hole directly. If you purchase the pre-mounted version, the pannier boxes are ready to put on the bike and ride, after you've installed the round brackets onto the bike that is, and no drilling is required. I opted for the pre-mounted set, feeling that the cost was well worth it, especially considering the risk of making an error in the hole drilling (which in my hands would be a substantial risk!), and ruining a pannier. As far as I know, only the two sizes are available. For the F650 most riders choose the 35 litre size as the 41's are huge on the relatively small F650. But, if you want the absolute maximum storage space, don't care about appearance, and the extra width isn't of concern (regarding hitting something as you ride by), then the 41 litre size would be the way to go. I purchased the integral locks, without seeing them first, but they seem so flimsy to me (it appears they could be broken simply by strong upward pressure on the clasp) that I've never installed them. So I use small padlocks when in a situation I want the boxes really locked. They don't have to be the padlocks Touratech sells. I found some nice ones which fit perfectly at a local lock shop, all four keyed for the same key, at a considerably lower price. My solution to the locks flopping around was to put a small circular piece of Velcro on both padlock and pannier (Velcro can be purchased in small circles with adhesive backing). That solved the problem. The lids can be securely latched with a screwdriver or coin (I carry a Swiss Army Knife for that purpose), but of course anyone who comes along with a coin or screwdriver can also open them, so I use the padlocks when out of sight of the bike. Mike #926
Aluminium panniers oxidize and leave black marks on anything placed in them. Based on the advice of a GS Adventurer rider with Touratech panniers, I picked up a spray can of truck bed liner. I cleaned the interior of the new Touratech panniers (pre-mounted – only way to go) with rubbing alcohol and masked with tape around the opening. I removed the threaded tighteners and then sprayed the interior with several light coats at five-minute intervals. The spraying is supposed to be at temperatures above 70 deg. F (21 deg. C) and takes 24 hours to dry. The result was a nice crackle black hard finish with no paint runs. One caveat, don't do the spraying anywhere where the fumes can get into living quarters. I didn't paint the interior of the lid but used several coats of quality wax instead. Northwet #1101
There is a new support forum by Touratech on the net. Unfortunately it's only in German but the answers are very competent. Robert #1071
Here is a (poorly) translated version. Interesting though. Ted in TO
I really liked dealing with Touratech. They sent out one set of boxes which arrived about four days after I ordered them. They got crunched by UPS, so I had to send them back. I called them up and let them know that I was going to the Trenton rally within a week, and they sent the replacements without ever seeing the bags I sent back. Very nice people, I'll definitely do business with them again. The cases don't get hot inside, or at least no hotter than the ambient temperature. I've never reached into the bags and noticed them to be warm at all. On my trip to Canada last year, I strapped a rather bulky old sleeping bag to my passenger seat with a cargo net, and had a "rain cover" of a garbage bag. No melting. I have had passengers mention that the left footpeg (which runs close to the exhaust) gets a bit warm. The Touratechs pop off in about a minute each. I ride to work each day in downtown Chicago, and width is not a virtue in this environment. I put them on when I need to carry stuff, or get groceries, and probably have them on and off three or four times per week. I went on two long trips last year (To Trenton, around the north side of Lake Superior, and 5000 miles round trip to S. Dakota, Wyoming, Colorado, and Arkansas) and didn't notice significant drop-off in mileage. I tend to get high 40's to low 50's, which is similar to what most other owners at my altitude report. Top-end speed? I was going upwards of 95 mph for about two hours in Wyoming; absolute top speed of the Dakar is around 105-110. It was windy, and the Dakar is tall anyway. You will get tossed around a little, but I don't think the bags make much difference. I think the weight in the bags makes more difference than the aerodynamics at the speeds we're talking about. Only thing I'd advise about going dirting with the bags is to pack lightly. I did some dirt in Colorado with the bags on, but the Dakar is much, much more capable without the extra weight. RobinC
I received a set of Touratech 35L panniers + rack for my F650GS. I bought the non-premounted version. I want to mount the panniers "centred" on the rack. I noticed that (on both panniers) one of the four holes, needed to mount the puck, is on a weld. I have seen pictures of many Touratech panniers and the weld is not always on the same place. Most panniers I have seen had the weld more to the edge/side, not close to the puck. Is it ok to drill on the weld or is it better to mount the panniers more to the front or back on the rack? Maarten
As long as the weld is long enough that you don't weaken the weld, or the integrity of the join, by drilling through it then there's no reason why you shouldn't do it. The only thing I'd beware of is, if the weld is rough or at a different *height* to the rest of the frame it may affect the alignment of the pucks and how they fasten to the case, but I guess it's nothing that a small grinder wouldn't take care of. Trevor #999
I also did all the mounting of my Zega-cases and did the drilling just a few millimetres from the welding. But I don't see any problem in drilling where the welding is. Dan
According to Touratech their 35L Zega cases make an F650GS 100cm wide, while the 41L ones increase this to 108 cm. In my opinion, this is doable for travelling, but a nuisance (especially the 41L) in everyday city traffic. Robin
I have a Givi top case and Touratech panniers on my classic. I like the Givi for daily stuff (two helmets fit in it) and when I am touring (on and off road) I put on the Touratech panniers. No problems so far, even though I have taken a few falls. The Touratech panniers are in my experience very robust, but I can't compare them to Happy Trails or Jesses, since that option is not available in Europe (or at least it's too expensive compared with Touratech). Spakur
http://www.ventura-bike.com/english/products/pack_system/index.html
Have the Pack-Rack and Aero-Delta III. (click Aero-Pack button) installed to my GSD. Easy to get, installs in minutes, no effect on balance/handling, not bad for vibes off road, etc. Jed
I have used Ventura stuff for about 5 years. They are built really well and I have used them in conjunction with the BMW hard luggage on my Dakar. I had them on my Honda Superhawk before that and have taken a 5 week trip living out of the Ventura system. I always put my stuff in plastic bags within the luggage to ensure that items don't get wet. They are very water-resistant and it depends on the kind of storm you are in. I have ridden in a slow, constant drizzle for 8 hours and the bags have never leaked. I have ridden in an 8-hour gale and the inside got damp but not soaked. The rain-cover that they supply is a piece of crap and tries to leave the bike unless you bungee it six ways from h*ll. Easier to just line it with the garbage bags. The small pockets never seem to leak at all. I get my stuff from Sport Touring Accessories at Deal’s Gap; they have been very nice to deal with and I have had quick delivery. NCRedRider
I bought a Ventura Aero system for my bike a couple of weeks ago for a trip around the South Island of New Zealand. We went down the West Coast where they get 20 feet of rain per year. The raindrops are as big as golf balls and nothin' is waterproof, even the fancy American Tee Bags on my mates’ cruisers. Everyone put stuff that we wanted to keep dry inside plastic bags, and this worked a treat even though the water got inside the bags. Cam
A friend of mine has those bags on his Buell, he likes them very much. He lost one of the screws and they sent him a bag for free in case he lost another one. They are waterproof from the inside out so I imagine it works the other way too (we used it as a cooler with lots of ice and it held the water.) MasterITRIT
I don't know that I would recommend what I used. I bought a set of Wolfman panniers and tank pannniers. I used the set in Baja without any support. The bags themselves are great, and I've lots of Wolfman bags and love them. But I just strapped em to my F and made some extendo's to move the heat shield on the exhaust out about 1" and sewed a piece of leather to the left bag where it rested on the pipe. This all worked pretty well, but it wasn't very stable, and was a concern off road and in windy conditions. (Although it DID perform flawlessly.) I also have a Wolfman tail pack that I use often, still. The tank panniers seem to block a lot of cooling air coming from the engine compartment and that combined with the extra weight (I think) made the fan come on a lot more than normal. If I ever need to use the set up again, I will get a rack from Happy Trails, or an OEM set to secure the bags. David #476
Being the cheapskate I am, I hunted down the Aprilia 32L Concept case, which I adapted to the BMW rear rack with some longer nuts and bolts. The Aprilia Concept back box and mounting plate with 2 keys sells for $69 brand new. It is made by GIVI as is the BMW case. Dana #1159
Installation of the top case bracket is a snap once you figure out BMW left one step out of the manual; just remove the turn signal brackets. I have the BMW top and GIVI 21L side cases and would recommend this get-up to all. Jason #778
I have the BMW top box and am very pleased with it. I also have the E35 Traffic II (with brake light) for my 1150RT. Provided you don't need space for two off helmets, I recommend the E35 highly. It's taller than wide, meant only for use as a top box (not as a side case). It's lighter and has a more convenient shape than some of Givi's larger cases that can be used as side cases as well. I used to have E50 Maxia's on another bike and, while they are humungous, I much prefer the E35 as a top box. Cary
Here's my mates reply. "On my first F650GS I had a GIVI Simply 450 top case which was "simply" awful and quickly removed. It really upset the handling as it sticks out much further than the BMW one and catches the wind past your body when riding above 50 m.p.h. The BMW one is much better quality and does not catch the wind or upset the handing. I do not know how much weight it will actually "take" but have had over 15Kg in it. Trevor #999
I'm happy with the top-case mount and a few dry bags of varied size. Throw in a few strong tie-downs and you're set. Andre Whistler, BC #1119
I love my case as well. I found it to be a great place to store your helmet. The case is waterproof and it is amazing how much you can stuff into it. - Rick #815
I have the BMW Top Case and expandable saddle bags. I feel that this is the best luggage system BMW has made for any bike. I'm always amazed at how much I can carry. Dave # 717
I haven't read any of the responses, but no doubt that folks would tell you to buy the Givi case. I am here to disagree. I think the Givi cases are not nearly as well made as the BMW case. Sure, it's bigger, but the solid construction of the BMW case is beyond comparison. I've had my BMW case for quite some time now, and have no complaints whatsoever. Now, if only they made a bigger top case... Bernard
I have to disagree with Bernard on this one. My BMW side cases didn't last 100 miles until the locks went and the top case is the same construction (mine is in the loft with exactly 73 miles use, dealer to home to the loft). I've run thousands of miles with Nonfango luggage and with GIVI on my dad's bike and never had a hint of trouble. The GIVI stuff is simpler, cheaper and more serviceable. In any case I'm not a fan of top boxes as they carry the weight too high and make getting on and off a pain. Andy Leeds UK #982
I also have the BMW top box, but like Andy #982, I prefer the weight lower and the ease of mounting w/o the top box on (plus I can't carry a laptop in the top box – I can in the saddlebag). Both top box & saddlebags have their advantages and it's nice to have a choice for my commute. Andy #618
I’ve had the BMW top case since buying my 99 F650 new. Like it a lot – the only modification I had to make was to add a chain to keep the lid from snapping back and breaking the hinges. Would have thought the manufacturer would have done this. I used a couple of small suction cups with a hook that was attached to each – super-glued them in place and put a short length of small chain to keep the lid at the right angle when open. Bill #391
The BMW top case is incredibly hard and well mounted. Easy to remove but it vibrates a little on bumpy roads. The BMW side cases for the F650GS are made by SHAD, at least mine have that logo. Very well designed, good looking and well engineered but medium/low quality in materials. I wonder why they did not make them as well as the top case. Guz
I use the BMW 31 litre top case on my Funduro, instead of side luggage. That way my 650 remains nice and slim. If my handlebars will go between obstacles, the rest o f the bike will go through with room to spare. The BMW accessory top case works well for me, and GIVI also sells very nice top cases in a variety of sizes. One thing I like about my top case is that stuff doesn't fall out when it's opened, which has been known to happen with side cases. Stephen #297
Does a 1999 topcase fit a 2001 GSA? Needs a top box mounting kit, GS only, available from BMW, about $134. Yes, a '99 31 litre BMW box will fit. Art #884
It is expensive, and a pain to install, but in my opinion the BMW tail rack with the top case is great. I use it everyday for trips around town and long journeys. The tail rack itself looks great too. I've ridden with guys who have strapped soft bags to a tail rack and they just don't do as well as the hard case (flopping around and waterproofness). Rod
I have a GIVI E460 top box. It is good but does tend to catch side winds and the bike tends to tip into low speed corners when the top box is loaded. Justin, UK
I just finished installing the GIVI E360 case on my 2002 F650GS. I ordered it from Arizona Motorsports and it arrived in exactly 7 days (I highly recommend them - great prices and fast shipping). GIVI really knows how to a design their cases. The E360 is so airtight that when you open the lid, you can actually hear the air rushing in. The silver finish is very professional and has a sparkle that picks up the silver highlights on my GS. The interior provides ample room for my helmet, leather jacket, gloves, sweatshirt and other stuff with no problems. Total installation time was 1.5 hours: one hour to study the diagrams and pre-assemble the rack and the remaining 1/2 hour to do the actual installation. One important note: The silver metallic styled case (#E360A903) initially came with grey bottom half that didn't match my bike (it was not black as I had expected). I called Arizona Motorsports and they cheerfully suggested that I order a spare black bottom case. Only $40 and they shipped it to me within a few days. Swapping the bottoms required punching a small hole in the silver lid in order to remove the pins. Other than that, the black and silver combination really looks great on my red GS. The E360 case was $230 and the mounting bracket was $98. I highly recommend them! The ability to dismount and walk away from your bike without having to lug your riding gear with you (i.e. helmet, jacket, gloves) is a pleasure. Mike
3 weeks ago I installed a GIVI E460 and used the regular E250 bracket that bolts up to the stock luggage rack with 4 small J-bolts that I bought at the hardware store. No problems so far and I sure like all that luggage space! William
GIVI E460 top box: I tried the GIVI box on a demo Dakar and found they were great. You can get two helmets in as well they leave a lot more room for the pillion as the box sets back more than BMW as well you can angle the bracket/box. I have ordered one for my new Dakar. I'm not going to wire the lights in. Dean
I’ve got a GIVI Simply Model E450 - 45 Litre on my F650 1995. It works great and it’s the cheapest Large GIVI box (at least here in Sweden). To remove the saddle after the installation is a little tight, but with some force it’s possible. This is because of the need to fasten the 4 bolts as far from each other as possible to get it stable – especially if you’re giving someone a ride and that person leans their back against the box. I like the GIVI for daily stuff (two helmets fit in it) and when I am touring (on and off road) I put on the Touratech panniers. The only problem I can think off with GIVI is that since they are black, the stuff stored in the box gets really hot. Otherwise I have used the GIVI with or without the Touratech panniers and done a lot of off-road trips. No problems so far, even though I have taken a few falls. Spakur
I have the BMW top box and am very pleased with it. I also have the E35 Traffic II (with brake light) for my 1150RT. Provided you don't need space for two off helmets, I recommend the E35 highly. It's taller than wide, meant only for use as a top box (not as a side case). It's lighter and has a more convenient shape than some of Givi's larger cases than can be used as side cases as well. I used to have E50 Maxia's on another bike and, while they are humungous, I much prefer the E35 as a top box. Cary
I have and recommend the GIVI E45 top case and E360 side cases on my '01 F650GS. They work well and the side racks are very well braced. My wife finds the top case and the optional backrest pad comfortable. The one additional accessory I ordered was a kit to key all three bags the same. Haven't installed it yet, but I had the same option on my old BMW Mystic and it's nice to reduce the number of keys carried. The effect from side winds was less than I expected. Normally I use the top case for commuting to work to hold my laptop case, and to store the helmet when I get there. The side cases are for longer trips or motorcycle camping. Northwet #1101
I have one on my 01 Dakar, looks fine, holds the helmet, has a bonus of a backrest for the occasional passenger. Comes off fairly easily for luggage and the rack is SOLID. Robert#978
I use a GIVI E53 top case, I am still looking into installing the integrated rear brake light in the back of the top case. Installation was cake, took me less than 20 minutes. cat0002 #1056
I ordered the GIVI E360 from Arizona Motorsports and received it in 7 days (I highly recommend them - great prices and fast shipping). GIVI really knows how to a design their cases: the E360 is so airtight that when you open the lid, you can actually hear air rushing in. The silver finish is very professional and has a sparkle that picks up the silver highlights on my GS. The 40 liter interior provides ample room for a helmet, jacket, gloves, sweatshirt and other stuff with no problems. Total installation time was 1.5 hours: one hour to study the diagrams and pre-assemble the rack and the remaining 1/2 hour to do the actual installation. One important note: The silver metallic styled case (#E360A903) initially came with grey bottom half that didn't match my bike (it was not black as I had expected). I called Arizona Motorsports and shipped me a spare black bottom case. Swapping the bottoms required punching a small hole in the silver lid to remove the pins. Other than that, the black and silver combination really looks great on my red GS. Mike, Houston
I have the GIVI E45 on mine. I love it. The top case was a breeze to install but the side case bracket was a little tough to get lined up. GrtWht
I have the E52 Maxia top box using the Five Stars Rack from Riderhaus on my Dakar. This rack is much stronger than the GIVI top case rack. Two helmets fit easily with room to spare. With the five stars rack, you can still easily access the tail and remove the seat. Also, the rack alone provides good additional tie down points without the top case. AL #1043.
Just received my Givi E460 topbox and mounting hardware for my F650GSD. I'm stuck on the very first step! The mounting bracket seems to bolt to the threaded holes back by the license plate, but can't see anyplace for the front of the bracket to bolt to. I even ran to my local BMW dealer to see if they had any ideas but they were as baffled as I am. I know some of you have done it and can make this as easy as it should be. I've searched the archives and the FAQs but can't find a solution. Thanks for your help. (LATER..... ed.) Thanks to everyone for your help. After talking to Givi, it turns out I did receive the wrong part. For anyone else who orders this part, make sure you order part #F639 as Rebecca suggested not part #F188. The part I got is for the very first (2000) GS models that came out. KAB
GIVI top case, only way to go. If you are going adventure riding 1-2 day trips and pack light as the top box is only for light loads. I have been out on some rough adventure rides and have had no problems with the GIVI box. I have seen riders not able to get around trees and tracks with side boxes. KiwiDakar
I have a GIVI top case and would highly recommend it over the BMW top case. The mounting for the GIVI is much more solid. You can get the GIVI cases in different sizes, but I'd recommend getting one big enough to hold your helmet (I have the E460 which is quite roomy) so you have a nice place to lock it up along with other stuff, instead of having to carry it with you everywhere. I also have the BMW side cases - I like the slimmer profile but they are a bit awkward to pack. They only go on the bike for long trips. The top case is usually on the bike all the time. I haven't ridden with my top case loaded up with a lot of stuff so I don't know how that would affect handling. Rebecca
I use various top-cases I've "collected" over the years on my F650GS, including the "biggest" GIVI sometimes, with the Motorworks rack and various fittings, depending on what loads I'm carrying. Even when the top-case is heavily loaded it's still a lot less weight behind you than a pillion passenger. Only once when I carried a very large and heavy 12V battery on the back did I notice any difference in the handling. I must admit the biggest GIVI doesn't look "pretty" so I normally use a 'Nonfango' top-case (bought in the UK). If you want a *big* case I'd go for the E460. They do look big when the bike is on its own, but as soon as you get a rider sitting on it, the bike looks ok. I live in a city where there are lots of motorcycle couriers riding around with huge boxes (and the pizza delivery guys) so I don't feel odd or unusual when riding with my biggest top-case. Trevor #999
I'm using the GIVI E35 - it's no wider than the body section of the bike, 35 litres of course. It's roomy enough for a full-face helmet, gloves and jacket. RayD
The GIVI has the universal plate that allows its bags to be installed either as a top case or side case. This is very convenient, but installing the GIVI top case alone utilizes a different rack set up than a 3 case set up. If you want to add side cases later, you will have to re-do your top rack, and if you decide you like the BMW side cases, you're out of luck since they take up some of the same space. The way I did it, was to buy the BMW Rack, and the GIVI Top Case. I installed the GIVI plate on top of the BMW rack. ['03 F650GSA ] It took some additional drilling and work, but I now have the best of everything. I've got the elegant installation of the BMW rack, and the much larger GIVI plate, allowing me to carry items more securely than on the BMW rack. I also can use 1 plate for several cases. I can use a Traffic Trunk for every day riding, and put a larger GIVI case on for long trips. The drilling I did was on the metal base plate of the GIVI mount so I could mount it tight to the BMW Top Case mount. After that everything just bolted right on. An unanticipated benefit to my install is that there is not enough clearance between the upper and lower mounts that no nuts can fall off the bolts. With the plate in place, there is less clearance than the length of the bolts. stuflinn
I have the Givi top box with the BMW side cases. I really like this set-up. No problems accessing the tail storage area. I picked the Givi over the BMW top box because you can get different sizes and I wanted one that would hold my helmet and my gear. I didn't have to do any drilling to get both on. If you put the Givi rack on first, the rails for the BMW cases will "stretch" to reach the holes by the license plate. Rebecca
The Monolock series cases and the Monokey series cases are 2 different animals. Both do NOT attach to the same brackets. The E34 case is a Monokey series. The E29 case is a Monolock series. It can get real confusing. Check with Givi at 1-877-679-4484. Someone mentioned that the black Givis get hot inside. That's probably true, BUT my Givi top case is silver and it stays so cool I can hardly believe it. My BMW soft tank bag is like an oven on wheels though. Colorado Bob #1297
Check out The Arizona Motorsports Group. They have a lot of Givi information and were VERY fast with my E460 topcase and mount. bbb986s
From The Arizona Motorsports Group web page: The Givi has two types of cases. The motorcycle Monokey cases and the scooter Monolock cases. The motorcycle cases are of heavier construction and use the 3-point Monokey mount system plate. The Monolock scooter cases are of lighter construction and use different mount and plate.
The E-33 top box is mounted to the Givi plate that comes with the mount for the Monokey top cases. I had an E-46 top case first but after the sub-frame under the rack developed some cracks I switched to a smaller top box. Peter #233
JC Whitney Topbox
Inexpensive Top Box. Have a look at my JC Whitney Top Box. It has worked very well for me the past 7 months and 7,000 miles. Kevin #1092
I have the same one myself, and for the money, I like it a lot. Not sure how it will hold up over time, but I could buy 4 of them for the price of 1 BMW top box! Tom in Tallahassee
Just ordered and installed a JC Whitney, Removable (with key) Top box. It holds a full face Helmet and all. So far it looks and great and bolts right on to the rear rack of the classic models. I ordered it just to give it a try ($57.19 US) so far so good. I didn't find any reference to it in the FAQ's, I would like to post some feed back on it there. I don't have any Givi's or others to compare it to, but for the price I do highly recommend it, and the removable part is cool. Doug65 N.
I have the Aprilia "New Concept" Scooter box that I bought about 3 years ago. It sounds a lot like the Whitney box, mates directly to the F650 Classic Back Rack, Unlocks and is removable with a Key. Totally waterproof, holds a full face helmet and doesn't cause any buffeting. It was about $70 from local Aprilia Dealer. Dick #420
Kappa
Well I have a Kappa top box on my F650(1999) for the last 2 years and I am very happy with it. Norm.
Pelican
I have been grousing around for a luggage system for the past couple of years. I really was not too keen on the panniers idea. I didn't like the idea of restricting my width clearance. Nor was I happy to fork over the better side of a grand for the pleasure of becoming a wide load. I wasn't real happy with the top box offerings either, since they are way over- styled and as a result are flimsy and don't match the "lines" of the bike. I would rather lack styling than mix incongruent styles. I have previously travelled with a milk crate strapped on the back, so I wanted something in that vein. Of course a milk crate is quite porous and I demand waterproof protection from my luggage system. Entering "waterproof" and "luggage" into Google gave me Pelican. It looked like a winner. I ordered my case, the 1650, based on what I felt were optimal dimensions for living out of, for ... eternity. I had to create a mounting plate to give it a bit more stability, but I am not too sure it was absolutely necessary. Bolted the plate on back and mounted the case right on top. Only four bungees! Bada bing, 90 litres of storage (3 square feet), for only 200 bucks. Now I can ride off into the sunset for eternity. I admit it may be a bit much, but the profile is low and the box is cavernous, i may reconsider once I load it up and there is 90 litres of weight back there. But I am quite thrilled, as I have been wringing my hands over this for the past two years it seems.
I am rethinking it. I load all the tools right at my back to keep the weight agreeable. It does take some getting used to. I have taken it for a few test drives. I am in the process of finding a better way to secure it; the bungees just don't cut it on the corners. Originally I had it crosswise, now it sits parallel to the bike's length. It was just impossible to handle with it all sitting way back on the rear. Now the weight distribution is reminiscent of riding two up, if not better. I am looking at a ratchet tie-down solution now, or possibly Helen Twowheels' straps. But I would like to retain the ability to open it without unbinding it all. For pictures see the Gallery section. WillK
Touratech Topcase
Just an FYI for those inmates that are considering the Touratech top box. I am shooting myself in the foot here telling you this for when I sell it, BUT I would rather give an honest interpretation and take it from there. I ordered the top box and bracket way back God knows when from TT USA. Nick is a real nice guy but Germany should get their act together. It took near 2 months plus to get the box and the bracket here. As you well know these are not inexpensive items to say the least. Upon arrival the fit and finish seemed fine. BUT once the bottom plate is mounted the mating plate has to be mounted to the bottom of the box...no problem. The PROBLEM is the tolerances to get the box to drop and slide onto the plate after it is mounted is a B*TCH...can you say hand fit...a pain in the *SS to say the least. Needs work there. So after about 2 weeks of riding with the box I notice two things. 1) If you ride with the box empty you get a HORRIBLE harmonic-type hum from the vibration of the bike through the box and this is magnified due to the box being empty...real annoying...I now keep some stuff in it to dampen the vibration. 2) The mounting hardware, as in screws and bolt caps, is terrible. I noticed last eve an extreme amount of play in the box-to-plate, plate-to-bracket fit. I tried to tighten the screws and in order to get them good and tight you near have to shear them off...actually one did...soft metal...off to the hardware store today. The plate-to-bracket fit is getting worse in the sense that the aluminium is wearing...and there appears to be no way to take up the 'slack'. This is only two weeks. I do not want to know what it is like 2 months from now. The panniers, I love them...although it took forever to get them too. Why so d*mn long for such expensive items? As far as the top box goes, save your money and buy a GIVI E360. Should have never sold mine. Nick #1085
I had the same type of harmonic vibration when I mounted the BMW top box on my 1997 bike. I then purchased the Aprilia (GIVI) 30L universal-fit top box ($80) for my rear rack and have been happy ever since. Richard #230
I took it upon myself to ask CycoActive/Touratech USA about Nick’s dissatisfaction. Here's some of the reply. A long time ago I was also thinking about a top box but followed their advice and my own gut feelings that it wasn't the way to go. As you might be able to see from Touratech USA's reply they don't just blindly sell the products in the catalogue and as they are active users themselves they have input and suggestions as to what works well and what doesn't work. "The top box brackets are always sticky in the beginning. You have to lubricate it with a little grease for a while in the beginning. It will work much better after it breaks in, then you can wipe the grease off. The two clear rubber pads (adhesive) go between the two plates to stop the buzzing, it is essential to prevent wear, not just for the noise. After you drill your holes you choose a location for the pads where they make sense (on the upper plate, a little in from each corner). Can't pre-install the pads or it's too sticky to take apart for the virgin assembly, you have to wait until after it's all bolted to the bike when you have some leverage on the parts (after one is bolted to the bike, the other is bolted to the box). Over-tightening the bolts doesn't make any difference - the solution is in the rubber pads. We don't particularly like top-boxes for the standard reasons (too big, too high). The bracket is CNC'd out of plate aluminium, it's rough in the Touratech industrial off-road way. There are certainly slicker, molded parts available, GIVI for example, but the Touratech customer generally wants the aluminium. And it's lightweight, waterproof and it matches the Zega panniers. Dominic clearly recalls advising this customer against a top-box, but he wanted it so we ordered the bracket from Germany. We don't carry much stock for Funduro. Funduro is not a Touratech focus model, it's unlikely TT-de will create or update any parts for Funduro." David #711
Nick [at Touratech USA] specifically urged me away from the top box when I inquired; that it is their general policy. Norm #473
Funny, I remember speaking to Dom on many occasions. He never advised against the top box. The conversation was not to ride with stuff IN the top box, not getting the top box itself. Funny the talk about the pads...when I called him he had NO IDEA what they were for…or where to place them. I have no problems per se with Nick....super nice guy; albeit with his hands tied. I just think the TT top box is crap. Let me re-phrase, the mounting scheme is silly. The GIVI is drop slide click. The TT way is drop...oops wedge…slide a little, force down...slide a little more, and oops almost got it......ummmm groan there.... The rubber grommets as supplied are the type of rubber feet that you would put on the bottom of a radio etc. They are too small for the job they are required to do. it would have been better to have the bracket permanently attached to the box for a more secure fit with less play. While the panniers are great, I do use a top box more often than the panniers. As I need a top box daily either I live with this lousy scenario or return it and go back to my GIVI. Even more disturbing is that after 24+hrs of an email to TT USA and AG, no one has seen fit to even respond to it. Customer Service is Non-Existent. Nick #1085
A new item at Aerostich, “MotoFizz Camping Seat Bag”. No personal experience but a good company with great products. This bag is big with good features. If I had not just had a good quality duffle bag modified at my local seamstress I would buy this one. Still may buy one even though it’s pricey. One key is compression. When the thing is not full, being able to make it compress till it’s hard and sturdy. Catalog number 9027 $157.00 Riderwearhouse Will in CA
We got a Jo's U-Pac that we really like a LOT. Rests on the rack on the back of the bike and on the saddlebags and holds a TON of stuff. Well made too. Nancy #764
I will have to complain that the last Marsee tail pack for my F650 only lasted 68,000 miles before I replaced it. It is still in one piece but kind of saggy and faded. I know it is hard to tell on a computer but this is sarcasm and let me add the :) to the end. I replaced the old bag with a brand new Marsee. Steve #417
Check this site out. I have one of the Roadgear Jumbo-Sport models. This bag just flat out works and fits right on the back of any bike including my F650 or R1150R. Right now I have about 15,000 touring miles on my bag and it still looks great. Craig #325 http://www.roadgear.com/softluggage/bags/index.cfm?entity=3&This_TopicOrder=3
The Chase Harper Stealth tail trunk I have now on my DRZ is 10"X10"X5", it
expands to 8" tall. I think they removed that feature on the current ones.
http://www.chaseharper.com/TailTrunks/4350.htm MikeS
Beware of tank covers. They can accumulate dust and dirt under the cover and dull or scratch your paint. You need to take the cover off regularly and wash and wax the tank to keep this from happening. You need to decide what you are trying to protect the tank from (fading, scratching by your riding suit, bird poop, or micrometeorites falling from the sky, etc.) and decide if installing a cover is worth it. Richard #230
Here in Oz a guy makes a gorgeous carbon fibre tank protector for the GS (which doesn't help you..), they are about $150 Aus ($80 US?), thick and shiny. Russell M
Bagster makes a tank cover. Look at some of the pics of my bike. The red thing is a Bagster cover. They come colour matched to all the stock colours. I just figgered getting a WHITE cover was not too bright a thing for me to do. Flash #412
Bagster covers are great and fit neatly around the tank with a hole for the roundels. Bags are little bulky but nice too. There are overpriced in the U.S. but less so in Europe. www.bagster.com. Bagster is now making a cover for the 650 GS on which you can attach their standard bags. The bags are OK and the covers are gorgeous. I have one 30 litre bag and a cover for my carburetted F650 and I am very happy with it. I don't know about availability in the US but I think they ship from France. I am not affiliated with them. Jean #636
Baglux covers and tank bags work really well. I had one that fitted by first F650 and R1100R. Sold them with the bikes though and have never need a hugs tank bag since. They are not worth the price unless you are going for the really huge bags (40 litre plus) then the stability from the good fit is worth it. The tank harness is specific to each bike so the fit on the GS should be fine. Andy #963
The following response from Riky Cross about the Rally Tank Guard may be of interest. “About your tank protector. We have code 109 O for your bike. The price is euro 138. The transport is not included. This item is not ready now, but will be ready in about one month. [December 2002, ed.] The cost of the transport is about euro 120. We will apply a 15% discount if you buy directly from us.”
BMW Racks
At the time I <bought the BMW Bags> was young and stupid and thought the dealer knew what he was talking about. Firstly the dealer tells me that the only luggage available was the City cases or the Touring luggage (hope I made it clear this is for a carbed bike), this is a down right lie. Next he takes a month to get the racks because he knows nothing about F650's and can't use his own computer, he gets K bike racks twice before the F ones turn up. He gets another set of K ones with the F stuff so I guess BMW UK worked this one out for him. He obviously knows nothing about fitting the racks so he just gives me the line about it being easy and having full instructions. This is half true, the racks are not difficult to fit, any German speaking monkey could do it. Next he demonstrates the boxes and manages to jam to the release mechanism. His techs strip the box and release the mechanism. The dealer finally gets something right when he points out the 5 KG loading limit. As I am on a ferry two days later the racks get fitted and off I go. Dealer gets threatened with serious damage in the reproductive area if this stuff wrecks my trip. First problem is loading. The boxes are massive externally but not internally. 5 kg of T-shirts has a larger volume so you have to cram stuff in. You need three hands to close the case and it usually springs open as you unlock to put it on the bike. Next problem is the hinge. The left hand lid hinge split along the flash line and the case sprung open in a supermarket car park in Brussels on day 4. Fortunately the pin stayed in the mount half and a cargo strap round the lot kept it together. Only my dirty clothes got dumped in the road. Day 5, packing to go home and the right hand mechanism stuck again but gods an Englishman , so it jams with the case on the bike and locked. Can't get the key out, so I have to ride home using the spare in the ignition. Mr BMW now finally comes good (sort of). I think he believed my threat to put the panniers through his shop window. Gives me a full refund on the boxes and rack, but lets me keep the rack. The key comes out of the box only after the techs use a grinder on the lock barrel to release it. Next trip, Oxford soft panniers over the BMW racks work with no hassle for two weeks with twice the amount of kit. I no longer use this dealer and will never buy another BMW accessory if an alternative is available. I traded this F for an R1100R and had Nonfango luggage. This and the GIVI have more internal space for the same external and have metal not plastic racks on the R. I sold this bike for another F and got Touratechs that are much better all round. I now also run an R1100R with a sidecar and have gone to a Nonfango topbox and pannier on this. Andy Leeds UK #982
BMW Top Box - GS - What Are These Brackets For That Are In My Way.? When installing the factory top case mounting bracket, you need to remove the two black metal angled brackets that provide additional support for the rear turn signals, if present. The instructions that I had didn't mention removing these, but they prevent the metal topcase bracket support from fitting properly. There may be a way to modify the turn signal brackets to fit under the topcase bracket--I'm not sure they're all that useful. AaronW
The tail of the F650 GS looks nice, but it's plastic, fragile and if you strap down anything more than a sleeping bag, it'll break. (That assumes you can find any tie-down points to hook your bungees to.) There are lots of aftermarket luggage racks out there which will enhance your cargo. Spend the money and save your tail. I'm not allowed to mention my favourite brand of luggage rack. DavidP (Mr. BestRest)
CargoRest from BestRest Products
This is what the manufacturer has to say about
the CargoRest:
F650GS CargoRest - Until now, no one produced a practical and usable cargo rack
on an F650GS. The tail end of the bike looks nice, but all that plastic made it
impossible to carry anything substantial. Rising to the challenge, we solved the
problem in a manner that adds incredible cargo capacity to this feisty little
GS. Our newest design uses mounting bracketry crafted from 3/16 steel with a
black powder coat finish. The cargo deck is 1/8 aircraft aluminium. Together
they form a platform sturdy enough to carry bulky or heavy loads. The CargoRest
bolts in place without modification to your motorcycle. It won't interfere with
your saddlebags and you don't have to remove or modify the exhaust, taillight,
signals or other gear. Installation is quick and easy, using only the tools in
your toolkit and the hardware and hex wrenches we provide.
Yes, the BestRest CargoRest is definitely designed to work with the Touratech panniers,
as well as other manufacturer's bags. David, BestRest
The choice is obvious: http://www.bestrestproducts.com/products.htm#F650GS We have BestRest racks on all of our BMW's, meaning our family and three of our friends. Very well built and all kinds of ways (tie-down holes) to hold your gear. I pack a full 9 x 9 tent and two Helen Twowheels bags (another great product) on mine, plus I tie my camera gear on the top. It’s a nice full platform which makes it easy to pack. Mad Russian
I installed the
Best Rest Cargo Rest on my 2001 GS last week and used it last weekend. Excellent
piece of work, well-designed and amazing the amount of thought put into building
it around all the parts on the bike. I got the smallest one and it's quite
sufficient for me. Well-made, clear and precise instructions for installation.
I'm VERY happy with it. One problem I was running into with other brands (Five
Stars and Givi) is that they didn't work with the OEM luggage.
I originally ordered the Touratech, but if you want one this summer, you might
be out of luck. I was on a waiting list and it would have been weeks before I
got mine. . . maybe. The folks were nice there, but I needed a rack before then.
Nancy #764
For pictures and opinion from TrayB of CargoRest installed with a BestRest BackRest see The GS Aftermarket Luggage FAQ.
Five Stars Racks
The Five Stars rack is really nice too. A bit bigger and sturdier mounting than some of the others out there. I don't remember the exact price. I bought it, and a GIVI 40litre top case, for around $275. I think the rack alone was $125 or so. It has a black powder-coat finish and mounts on the two points below the taillight and to the two mounting points under the round tabs on the side covers. It's very sturdy; I generally use the side tubes on it to lift my bike on the centre stand, instead of the stock grab rails. I got it from a vendor on the Chain Gang site, Riderhaus I think. P7HVN
I ordered the Five Stars Racks after seeing them in the FAQ link. After about 5 weeks, the package arrived, and I installed them. Of course, the instructions are in German, but the pictures were in English, so I didn't have a problem. It is NOT difficult to mount. Get yourself a metric ruler and measure the diameter and length of the fasteners. Then use the picture diagram and match the fasteners to the proper location. It is easy to do. Just like an erector set when you were a kid! Anyway, I'm really impressed – nice welds, excellent quality and a nice wrinkle finish (powder coating I think). When the bike falls over, at least the brackets won't twist or bend...as long as I'm not going too fast!! With this system, I can utilize my small GIVI's from my Classic Funduro and I have a decent rack to strap my camping gear to. If you prefer to have hard bags and don't want something as wide as a Gold Wing, this is the way to go, in my opinion. Steve #1059
Link to Sojourner's English translation for instructions.
Every time I read something about installing the Five Stars rack, it seems to include having to drill out or adjust something to make it fit. Never seems to be a simply bolt on job. Logan's Ride
Installed the Five Stars side and top racks a few months back. No drilling or other messing about. They went together as per instructions. Thanks to Sojourner for his translation from German to English 'though the diagrams are pretty unambiguous. Supplied by Bob and Laura at Riderhaus. All in all a good solid rack. Rashers
GIVI Racks
Have the GIVI E21's and the rear rack. Its only been several thousand miles, but I have had no problems at all. The rack is braced and supported and is very strong. Had a slow speed tip over in the mud without the bags on, the GIVI rack encountered no problems, however I cant say the same for the HB engine bars. I would buy and suggest the rack without reservation. Jason #778.
Happy Trails Racks
HT Rack Evaluation. I have installed the side racks for soft luggage and rear rack that Happy Trails makes for the Dakar on my bike. The side rack mounts in two places and though they are sturdy, the mount points are not symmetrical so the front of the rack moves a little when you push on it. I wish they had taken advantage of another mounting point under the seat area to run a strut to. That would have made the side racks sturdier. But they look OK. The rear rack is very nice...it is nice and roomy and very solid on the bike...you could tie a rope to it and lift the bike up to the rafters. The rear rack's front most mounting brackets didn't quite reach the mounting points on the bike and I had to assemble everything as much as possible and hit it with a sledgehammer to make it line up. But it lined up. The side and rear racks piggyback onto each other and use the same tapped holes on the bike to mount to. Consequently, when you tighten the bolts the bolts do not feel nice and snug. I don't have any experience with these racks, but it appears the bolts will loosen because of this rather easily. I used Loctite and lock washers on the bolts (not supplied) also I plan to sung them up on a regular basis while on the road. The racks look great on the bike and appear ready to do the job. I'm pleased with them. Paul in NJ
Just got my Happy Trails Racks for soft luggage. They bolted up to my 01 Dakar in five minutes. Two thumbs up! Now...what would be the downside of buying plastic dry bags with those Fastex buckles and bungeeing them to the racks instead of soft luggage. Anon
I always thought the Happy Trails rear rack or the rack from Riderhaus looked pretty sturdy. Both of these are sold minus the side racks for luggage and can be fitted for top box applications. Sean-STL
Another nice feature of the Happy Trails mounts is that you can add an adapter to their mounts that will allow you to use any GIVI bag. I use some inexpensive GIVI Commuters during the week if I need to have a small detachable bag that can be carried in somewhere. Great product, great service, and nice people to deal with. Bert #1131
I have had the Happy Trails rear rack on my Dakar for a year now. No problems. I use it to hold a gallon and a half water jug for long trips. Echo
I used the Happy Trails rack around North and South America – the one thing that never failed. It is really strong, especially compared to racks I saw on other bikes. It is a bit of a pain to replace the rear lamp if it goes, as you need to remove the rack, but on the upside the rack offers lots of places to use when grabbing/lifting the bike. Lance #1303I
I stopped by their shop last week and they (thanks, Todd) were kind enough to install it for me. Once it was on (20 minutes), I picked up the rear of the bike using the rack: very strong (not me, the rack). The model they now sell is slightly different than the one on the web page (in a good way), and I think you can now change a rear bulb without taking the rack off. Also, they now offer it in black and grey (contrary to the web page, which says black only). The grey does not match exactly the silverish tail end of my Dakar, so I went with black. Looks fine. Indeed, when my wife first saw it, she said, "THAT looks NICE," instead of, "How much did THAT cost?" :>) Scott #1244
Hepco & Becker
Hepco & Becker make a rack to fit the GS/GSD. It is specially for their TopBoxes and is remarkably like the Motorworks version. Gary, Dublin Irl 650GSD&1150GS
Motorworks
For Photos see the GS Gallery.
I completed the install at 3AM this morning. It took me 4-5 hours to get the damn thing on! Now that it is on and I stand back and look at it, I am very happy with it. I think that you could hoist the whole bike up in the air by hooking onto this rack. It took me a long time to figure out how to install it. The directions are written in German (I think) and the two illustrations do not clearly show where the bag of fasteners are used. There are various washers and spacers that were hard to figure out where they went. I finally figured out that one bolt replaces an existing bolt in the bike. It also took a while to figure out how much dis-assembly of the bike to perform. I decided that the two plastic side panels over the mufflers and the rear tail light/license plate assembly needed to be removed. I discovered that my tail light assembly was cracked in the process. That assembly is a very poor design! The tail light housing has three bolts captivated in it's plastic that are used to mount it to the plastic piece that mounts to the bike. I plan to rework it using aluminum stand-offs female threaded on both ends - one end to attach the lens to the housing (tapped small dia,) and the other to attach the housing to the plastic piece that mounts to the bike (tapped larger dia.). I had to figure out that the top rack mounting points had to go on the outside of the left and right side brackets. I also had to determine what order to install and tighten the fasteners. It also helped to tighten some but not all of them, align the parts, then loosen them until later on. It also didn't help that the shape/bends on the tubular rack were off from perfect alignment. I recommend that two people install this thing. An extra set of hands would have helped a lot because I had to flex the rack and brackets in to different axis at the same time to get all the bolts to line up. I used thread locker on all fasteners except the ones that used nyloc nuts. Well, its on the bike now! Now all I have to do is fix my tail light assembly and mount my top box. The rack looks to be square to the bike and in a good position. I'm pretty sure I got it installed correctly. One note on the racks finish. It is painted (light gray). The photos I saw made me thing it was plated or at least powder coated. I scratched the paint in a couple places at the mounting points due to the difficult install. This thing is steel so now I am concerned about rust down the road - we'll see. Kevin #1092
I know that the Motorworks rack works with the BMW fittings, as the BMW pannier rails use the same rear fixing point as the rack. The rack fits *outside* of the BMW rails. I presume the Touratech similarly, as the forward fixing points on the Motorworks rack are *ovalled* to allow for a bit of fore and aft movement. The Motorworks is a really good rack. It's called the ACA66707 Luggage rack F650GS/PD. Motorworks should enclose some instructions that I wrote for them last year, but here they are again. Trevor #999
A bit on the small side but is very strong. My large "industrial" top box is bolted to it. Colour is matching BMW silver. Jack .
Touratech
The Touratech rack works well with soft luggage too, so that might be a better option for cheap off road kit. Andy #982
Modifying or Making or Mounting Various Bags or Boxes
Saw a BMW up at Donner Observed Trials with Pelican cases. There were some existing brackets from other cases and the Pelican's were attached to those with some angled aluminium. Sorry I didn't look real close but some of the marine waterproofing agents will work to seal any holes drilled for fastening brackets etc. Another good thing about Pelican's is they come in many sizes and shapes. Check the discount marine stores for these as well. wamer #1021
I have several Pelican cases, which were used on canoeing expeditions around the Arctic, etc. But, because of expense and weight, I use Doscocil multi pistol cases as top boxes on both my R80GS and the F650; smaller model on the F. They are just as watertight but do not have as easy a solution to locking. They are mounted by drilling two holes in them and bolting them to the machine. The fasteners are covered with silicone and a small piece of duct tape to reduce the possibility of abrasion on the contents. When I bought the pistol cases they were about 44 and 54 dollars from Cabela's. Ike
Here are some links about mounting Pelican cases on a KLR650. Good luck with the
F650:
http://www.sagebrushmachine.com/pelcase.html
http://www.geocities.com/MotorCity/Downs/6164/page92.html Northwet
#1101
I have a problem with the security of leaving my tools, on the bike, inside a soft case. So, I bought a Pelican Case and attached it to the rear rack. See GS Gallery. I bought it for $31 locally, it is their 1150 model, I believe. They are available all over, especially camera shops. The beauty of Pelican is that they are waterproof and indestructible (well so they say). The price was less than the dirt bike soft cases and it mounts very sturdily with a trip to Home Depot. I went to Lowes and got 4 of the 3/8" pipe holders. You can see the ones in the photos, stainless steel with the rubber protector. Then I used stainless bolts and washers to make the simple connection. By the way, I buy stainless steel bolts at such a low price that I use them for everything. There is a national supply house http://www.metricmcc.com (Metric & Multistandard Components) that has anything I could dream of, bolt-wise that is. For a couple of pennies each I load up on exactly the bolts I like. Mostly 5mm hex-drive bolts with Nylock nuts. I buy them 100 at a time for a few dollars. RL, Dallas
I've looked at the Touratechs and the Hepco & Beckers (beautiful!), but they can only be imported at great cost to where I am. So I am eager to build a set of sturdy aluminium panniers and a modified version of the BMW frame that carries the whole lot. My plan, so far, is to have a replacement rack welded up using mild steel. Then rivet together a development of a pannier with a slightly hardened alloy (Dural would be ideal, but it's difficult to come by), and eventually attaching the hinges and clips/clasps with rivets too. Has anyone tried this? Is standard aluminium too soft (prone to cracking when blasting along at 90mph on dirt?), should it be welded rather than riveted? Bernard V
The problems I see are: the bike's frame strength....it needs reinforcing if you want to carry any "expedition" loads; and the BMW luggage frames are too wimpy to carry any serious weight, so hanging your own boxes on the standard frames won't work either. It needs a ground-up build job on mounting frames, along with a custom reinforcing job on the bike's frame. I would probably make the boxes from aluminium, but fit the corners with those rugged corner pieces that are used on "roadies" shipping cases. Sounds like a few days work for a MIG welder :-) Jack, Australia
Aluminium will crack if used as a load-bearing material in the wrong way. It is a poor fatigue material in many grades, so cracks start at mounting holes etc. and spread. You need to look at using thin material with a supporting under-tray on the rack, versus thicker unsupported material in a bolt-on box design. The supported design is lighter and stronger in many materials. Touratech uses unsupported aluminium but I don't know what grade. Rivets vs. welding is another design choice. Welding is harder but is waterproof. Rivets fail due to corrosion but are easy to fit or replace. Using do-it-yourself type materials, I'd start with a steel rack with L-shape (maybe hinged) rails/brackets that go under a box and take all the weight. Fixed L brackets can be braced, hinged ones can be braced with bolted ties. If possible buy a waterproof food-container/ammunition box as the container and bolt it to the rack when in use. The rack wants to bolt to the bike and across the back wheel but can be welded everywhere else. Think "soft bag support" when you design the rack and you can use a very light box. Tube is stronger than angle iron for the same weight, but is harder to fabricate. Chris Scott’s book has a few good designs. I made a set for my MZ out of 15mm angle iron, using army rucksacks as the boxes. I had an old .303 ammo box for one side but never managed to get a second one, plus it was heavy. You need to add to the sub-frame’s strength rather than just hang weight on like BMW does. Bolt your rack to the frame on both BMW bolts, to the pillion foot pegs and foot peg mounts and across the back of the wheel to stop flexing. The lower the mounting, the better the bike will ride upright and the more effective the brace across the back will be. That said, too low and you add weight just to help the boxes ground! Andy #982
Saw a pic of an
F650GS with soft bags on it in another thread. I always thought they would just
melt on the pipes. What sort of soft bags are you using and how do they work for
ya? Any melting of bags or contents? Shazam
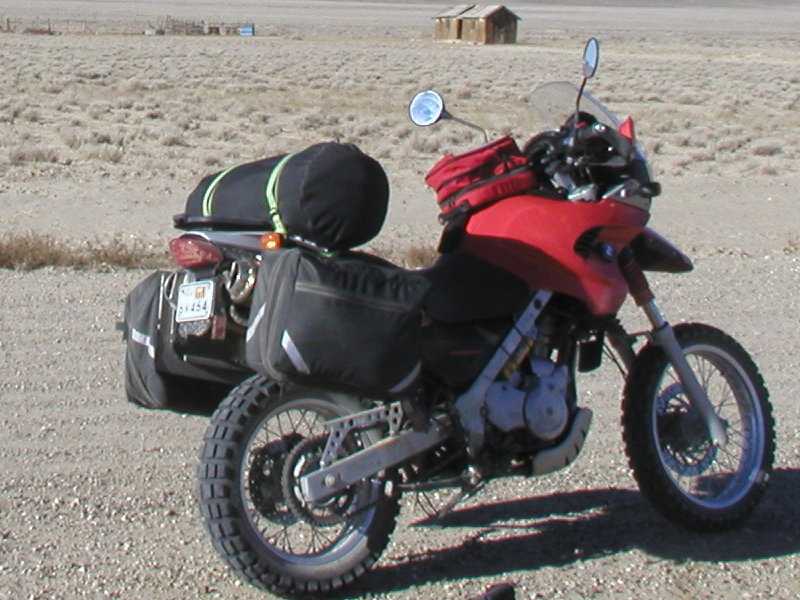
Most people use something to keep the bags away from the exhaust, either a metal framework or some heat-resistant material. Even with these measures the items near the exhaust tend to become warm. FrankW
Try Happy Trails. They make awesome racks (side pannier mounts) for the KTM's ,KLR's and I'm sure for the f650 too. Maybe you can get an Ortlieb or some of the watertight bags. There are many and some of them are really well developed. I use to work in a bike shop and I used to inflate the Ortliebs with air, and leave them there to see how much they would last. Those things are tight. About a week. On a bicycle they can help you float the bike (in river-crossing situation); on the motorbike that is not going to work. About Aerostich – those guys charge ABOVE premium for everything they sell. "Price of convenience”, I guess. Check out www.pinkbike.com or www.ridemonkey.com. Those are bicycle sites and their flea market and new sections are great. Many high-end, or at least commuter, bicycle shops carry them. I think that is the perfect combination: Happy Trails are the BOMB and Ortliebs are even better. RicardoK
I have been using REI bicycle panniers, with custom-made adapter plates that allow the cleats on the bag to snap in place just like on the bicycle. And all this is mounted on a set of Happy Trails NW racks. I still cannot figure out why the motorcycle industry has not tried a cleat-type mounting system on soft luggage instead of hokey straps. Bentspoke
Happy Trails do make incredible racks for both soft bags and hard cases. The Ortleibs are absolutely fantastic. Can you say 'Waterproof'? Big-time waterproof. Bags are made of river bag material: pvc-coated nylon I think. Roll top, just like a river bag. Very nice. AndrewH
Ortlieb: Nothin' like'em. Waterproof. Dustproof. Bombproof. No fiddly zippers, only four straps. No pockets. No extra “stuff”. Bicycle gear: I use bicycle stuff on my motos, but the panniers I've seen aren't near so tough as the Ortliebs. Oh, except the Ortlieb bicycle panniers. I haven't done it, but I'm pretty sure my KLR would just bounce off the Ort's. Many times. Some folks like lots of pockets and compartments. I don't. Just more stuff to break and less room to put something big in. A ¾-full grocery bag of supper fixin's fits perfectly in the Ort's. Clip-on bags are attractive in some ways, but anybody who used to sail (me, f'rinstance) likes things like straps and lines better than small pieces of hardware. Stephen
Here's what I think you are looking for. I saw these at a Rally in Colorado last
summer. They had a set installed on a Dakar and looked pretty well made.
http://www.moto-sportpanniers.com/index.html
Nylon saddlebags without some kind of (preferably aluminium) shield will make
your bike smell funny for a long time. Oh, and your bags will melt. I have a
Tour Master Cordura tail bag and it works great, but one day a strap from it
came to rest on my left muffler. It melted the (nylon) strap in a hurry and it
took about 500 miles to burn all the way off.
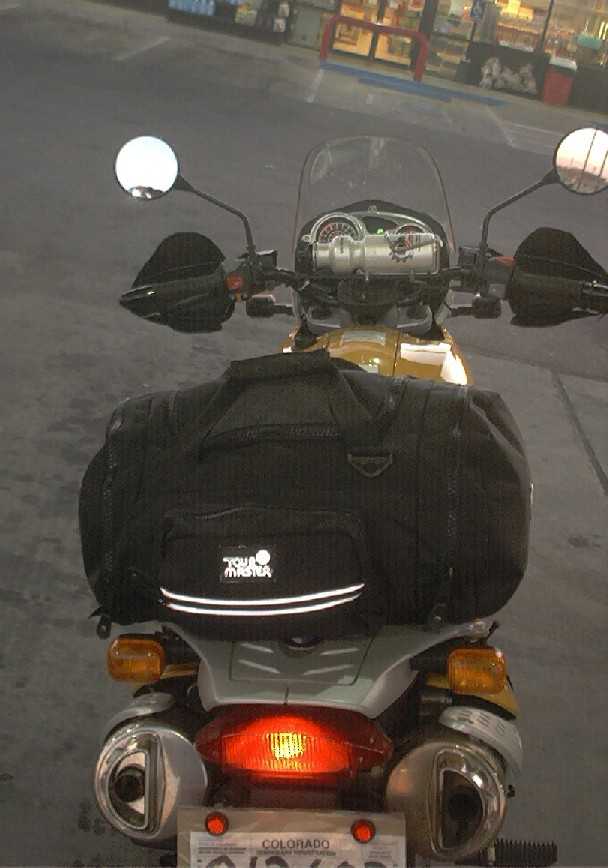
Cheap but smaller version (on sale, even) here:
Tour Master tail bag
The attachment system is really good on these bags. The real deal tail bag like
mine (bigger capacity + reflective stuff) is the Tour Master Cortec Deluxe. They
are very durable - I've had mine fall off my bike at 60mph (yeah... forgot to
strap it on) and you can't tell I've even used it on the bike. Manufacturers
suggested retail price is $59.99. Chppdlvvr
You may be able to use the Whitney bags as "gas tank" panniers (I know the real tank is elsewhere). You'll likely have to add a few straps and stuff to secure it (Campmor is the Whitney equivalent for camping stuff, like the straps and Fastex fasteners you might need). If it's an issue, protect the "tank" from scratching. As for bungee points... I bought an 18" "soft tie" (used for towing motorcycles...basically a nylon strap with a strap loop at each end). Put a female snap (we're talking the BIG ones like they use on leather vests) in the centre of it, and screwed/glued the matching male part to the bottom of the seat pan. Remove the seat, snap the strap on, hang one loop out each side, then re-install the seat (protect the seat edges, if this is an issue). Works on the Classic to give me a tie down point between the driver and passenger part of the seat, on each side of the seat. Match that up with a set of Helen Twowheels' straps to extend back to your luggage rack, and you can strap a HUGE waterproof boundary bag back there. Marty #436
Has anyone used Kathy's Super Duffel as featured at http://www.bmwbobs.com/store/accessories/Kathys.html ? F650GSter
Never used Kathy's...but have yet to meet a zippered bag that doesn't leak in the rain. I have used a 70L Seal Line Boundary bag for many years (I got a black one). You might want to consider a Drybag as well. Measure sizes before you order. Marty #436
I have two of those [Kathy’s] that I got last year. Basic...., so-so, really nothing more than a fabric bag. Art #884
There are plenty of water-proof, and durable, backpacks and bicycle packs out there for far less money than "motorcycle" equipment. Anybody have any good reasons why a person couldn't use this kind of stuff? I have a tail rack on my bike, kind of like what the call a "sissy bar" in the cruiser circles (Check out the Pack-Rack here). That means I don't actually have to wear the pack and could possibly tie two good-sized packs, back-to-back on the rack. Wow, that was a lot of rhyming. I figure I could easily get two 75-litre packs on there - that's a lot of storage space! RickS
I would not be a fan of any "backpack" while riding...you don't want to risk getting hung up on something or landing on it or its contents if you leave the bike. Not to mention the comfort of wearing it for long trips. With bicycle packs, the concern is ...durability, mounting and waterproofness AT HIGHWAY SPEED (as compared to walking or bicycle riding speeds). You could probably get away with strapping two drybags back to back on the sissy bar. Just remember that the Motorcycle Safety Foundation suggests loading heavier objects within the "load triangle" (corners at: front axle, rear axle, top of rider's head); so a good portion of your drybags would be outside of this zone. Or to put it another way, the weight would be carried higher and more rearward than optimal. That is why motorcycle luggage usually consists of tank bags, saddlebags, tank panniers (mostly within the triangle) and top cases (only for lighter items). If you go this route, try to distribute the heaviest stuff low and forward (which may not be optimal for access). Loose luggage can cause stability problems at speed, handling problems when cornering (especially emergency swerves), and a change in front/rear weight distribution that is also bad. Take the "load triangle" concept with a grain of salt, but as a good rule-of-thumb. A little information here on luggage, along with LOADS of information on "what to take with you". Marty #436
150L of possible stuff hanging on the rear of the bike would probably seriously compromise handling and braking, to say nothing of trying to ride in a crosswind or pass a tractor-trailer. Most motorcycle accessory companies sell backpacks with motorcycling in mind, some even aerodynamic. I personally find that off road it's better to use a small tail pack and a backpack than a larger tail pack with assorted stuff bungeed on. That way that weight stays with me (and I try to keep the backpack light: clothing food, etc. Only my camelback is heavy, at first.) I use an EMS 2500 with chest strap and waist strap firmly in place and it keeps the pack solidly in place. (And the straps out of harms way!). I've got a lot of miles under the belt with a backpack, and the only problem I've even had is getting the d*mn thing on in motorcycle gear! David #476
I have the Happy Trails rear rack and side racks for soft luggage on my F650. On trips I mount a 1½-gallon wide-mouth cooler to the rear rack. I add a half bag of ice to the cooler, and water as needed. On the seat behind me I fasten a pretty large waterproof duffel bag that weighs about 30 pounds. On the side racks I bungee-cord a waterproof rafting-type dry bag. I use three cords, and they are new before each trip. These weigh less than 10 pounds each. On top of the duffel I use a bungee net or two, which holds a day-type pack that I put food in. Wedged in there is a folding cot I bought at Campmor for $25. The dry bags are good. You have to be a little careful not to burn them on the exhaust pipe or hole them in any way because then they aren’t dry bags any more. I experience no handling problems with this set-up...in fact it seems to handle better with the weight. I’d be a little leery of adding such large bags to a sissy bar type arrangement...especially so far back and up in the air. Echo
Kayak and rafting bags will keep the contents dry, but the problem I had is they often have backpack-type straps for carrying, and these flop around while riding. Also they do not secure as well as motorcycle-specific bags. The last thing you want is to have your gear fly off while riding, or have a strap that you thought was secured come in contact with your moving wheels, chain or belt. I have found that motorcycle-specific luggage just works better. As for price, in many cases they are about the same. Keep in mind that while "motorcycle gear" carries a premium price because it is a sport, recreational activity, yadda yadda yadda, the same is true for kayak and rafting equipment. I have found Helen Twowheels bags to be quite good in that they keep my gear dry. They secure safely and are reasonably priced. Bruce B
I have found a company online that makes custom aluminium rafting dry boxes They make them any size and to many different specs, and at about $135 each. http://www.legendmfg.com/dry_boxes.html Now that would make for nice large aluminium bags and mounts all new for under $300. Compare that to $1000 for other aluminium systems. Doug #1206
Carrying Liquids
See also Aftermarket Fuel Tank FAQs –
GS and
Classic.
I saw somewhere that someone had positioned a small half-gallon jerry-type can for emergency fuel to the front side of the case....over by where the passenger’s legs would be. In the Touratech catalogue they sell a bracket piece that can be attached to the pannier... Check this carrier out as well. http://www.jcwhitney.com/product.jhtml?CATID=14936 Then in the Aerostich catalogue they have some bungee attachments that can be bolted to the bike. A combination of the two just might work! Now to find the suitable container... Found this can! http://www.autosportcatalog.com/index.cfm?fa=p&pid=247 In 2.5 gallons would be great. Nick #1085
When I rode to Alaska I used a set of tank panniers (RKA, but Aerostich ones should work as well). Used metal fuel bottles rated for backpacking stoves. One 1.5-litre bottle in each pannier. Could have fitted two bottles in each pannier, if I had wished (other uses for the extra space, though). Marty #436
British Pacific in California sells 5L NATO cans that might to the trick if you need more volume. I've got the large version for off-roading. I had them in various positions in the back of my LR and the doggone things just do not leak. The mechanism also locks into place and it is just about impossible to dislodge. You can also buy a spout that is slick. It makes you wonder why the Jeep crowd would use those cheap red steel cans that they tend to favour. Those d*mn things are dangerous. See http://britishpacific.com/offroad/jerryCans.html Gerry #951
I was thinking of mounting two 5L gasoline canisters (steel) on the front of the panniers, i.e. directly behind the legs. I have seen them mounted at the front too, but maybe at the rear is better (I've also seen them below!). I haven't bought the canisters yet, as they are impossible to find here in Canada (you can get plastic ones but not steel, and plastic is just no-no for a bike, in my humble opinion). I know I can find them in the States, though. 5L canisters will just about fit on the 41L panniers. The problem is the lock on the Touratech pannier, which takes up a chunk of space, front and rear, and makes it more difficult to attach large things. The other problem, and more serious is the weight issue, and I don't know if the standard sub-frame will handle the pannier and a steel canister. Nelson O
Not a good idea at all, in my opinion. I wouldn't put any canisters of any type on the panniers. The weight on the pannier frame and sub-frame isn't good. If you want to carry water get a carbon-fibre bash plate with storage area 2L-3L like on the F650RR. Otherwise you should use a 5L Ortlieb water sack, just don't fill it so much. This can then go in a roll bag or on the pannier lid. When not full, it rolls up for less space. Fuel, just get the Acerbis tank; that should do it for you. Otherwise get the Acerbis rear square tank. Which bike do you have? Touratech TT39 kit for the GS series will do the gas just fine. The 41L are huge, too much for the F in my opinion. David H. Park #711
Will This Bag Fit with That Exhaust?
With most, if not all, of the aftermarket racks the smog can has to go. Or you can make a couple of brackets to attach to the bands going around the can. I still have mine on and have never had any problems with it. Peter #233
Can you fit or retain the BMW expanding panniers to either or both the GS and Dakar if you have a Remus or a Sebring replacement set-up? Tim R
Both can be used with BMW panniers. However the clearance between the panniers and the exhaust is pretty close. One of my riders had his left pannier melted with a hole. That was due to a small accident that damaged one of the plastic holders of the pannier, which cause it to hold loosely. scx
I watched the mechanic fight, curse, and many other things trying to get the OEM saddlebags to work with the Remus exhaust. Wasn't going to happen. Seems the muffler cans are oval-shaped rather than round. Can't seem to pick up the bags up far enough without hitting the muffler, trying to get the bags hooked on the pin. Pipes had to be returned, and the OEM pipes reinstalled. Greg
I had the same question for the Staintune exhaust. Someone on the old board confirmed that it's compatible with the side cases, and now I can confirm it. its_xls
Staintune is designed to work with BMW expanding panniers. Before installing Staintune on my F650GS, I asked the Staintune USA vendor this question. y2kcorvette
When I ordered the mounts from Jesse, I specifically mentioned that I had a Staintune muffler (more than once) and that I needed the mounts with whatever is needed to install them with a Staintune. However, when I went out to mount them today, the back end of the mounts hits my muffler. What do I do to fix this? Chris, Tokyo
I have the Jesse/Staintune set-up. When I picked up my cases and mounts at Al's shop in Phoenix, and told him I had a Staintune, he modified the left carrier for me. It involves welding in a semicircular bypass to go around the muffler. Al did this, but he welded in the by-pass the wrong way (the by-pass should go inside, not outside, the muffler. When looking at it from the left, the carrier should be between muffler and wheel.). When I got back to Canada, I took the carrier to my local machine shop. The welder simply cut out the by-pass, turned it around and welded it in again. I suggest you take the bike and carrier to a machine shop in town, show the welder what you want, and he (or she? in Tokyo?) will do it for you in less than one hour. It's no big deal. You should also stick on a short extension on the muffler, so as not to fry your left turn signal. Werner #547
I bought my Jesse’s used and called Al about fitting them around the Staintune. He suggested that I might just want to bend the mounts by hand before bothering to order a modified set. So I did my best Charles Atlas impersonation and then they fit. Mason #631
I took a better look at the mount and it seems that they have ground the end to
fit around the muffler. I think I will have something welded on the inside edge
(opposite from the muffler) where it is thinner, after I get it all mounted
right. Don't want the thing snapping in Siberia next spring! My problem was that
the rubber part next to my hand in the pictures was hitting the muffler. I think
that it won't last long in contact with hot metal all day. Chris, Tokyo
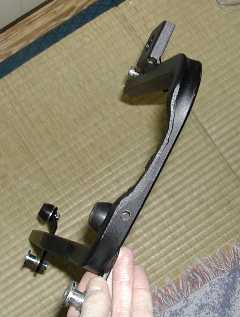
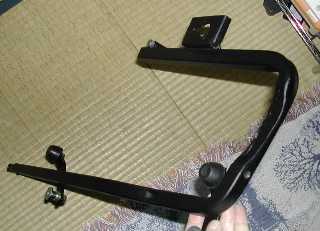
The cut-out should do it. Don't worry about the rubber bumper. You may not be able to clear the muffler with it. I cut off a section of the bumper, but what's left of it does the trick (to keep the box from rattling after being mounted). Werner #547
Be VERY careful of how close the tab that holds that rubber bumper comes to the muffler. With my STOCK muffler, the corner of the bracket managed to wear a hole through the end of the muffler (I've since cut off and rounded off that corner, but the bag must have "bounced around" on the mounts quite a bit to make contact. But I do pack it FULL). The escaping exhaust turned a series of rubber bumpers into ash. I could tell each time that had happened, as the bike started to develop a "mild" high-speed weave, due to the bag moving around unrestrained. I tried JB Weld on the hole, which also vaporized. I finally removed the muffler, and had a local welding shop weld a "patch" over the hole (and resisted the urge for a cat-ectomy while it was off!). The welder was astonished that the muffler really WAS stainless steel. He was expecting rusted out, chromed steel. Marty #436
Bicycle Rack
on the F
Q. Has any one ever seen a bicycle rack for a motorcycle?
A. Yes.
1. Here is a picture I found a couple of years ago I think is a good design. http://www.rezolvdesign.com/bikerack/rack.jpg will probably do something similar unless I hear something better.
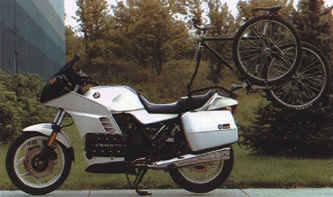
lee@rezolvdesign.com.
2. by Josh #581
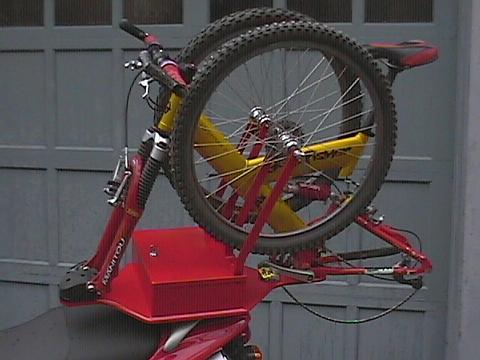
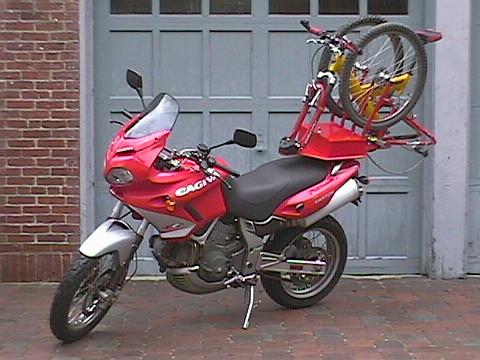
This is a pic of a pretty neat rack that one guy made for his Gran Canyon. An excerpt from the message that he posted on the Gran Canyon list follows:
I had a MTB rack on my '89 Transalp which was pretty simple (a board with a fork-clamp). When I got the GC900 I wanted to do something nicer. How? The base is just 1/2 plywood. The wheel holders are bolted though a locking steel box. The steel box severs 2 purposes:
The whole rack is bolted to the bike through the base of the steel box using the pre-drilled top-box holes on the GC900 rear rack. When the steel box is locked, the rack can't be [easily] unbolted from the bike.
The small lock box provides a place for my street clothes when I'm on the trail.
The MTB is secured to the rack via a locking Thule fork clamp for a pickup truck bed and a U-bolt that holds the rear chainstay to the rack. The wheels can be locked to the rack by looping a cable through the wheels and putting the cable ends in the lock-box through cut-outs. The cable is secured when the box lid is shut. The whole thing is designed to be theft-proof, but I have never left the Motorcycle anywhere with the MTB.
How's it Ride? I don't notice any more wind noise with the MTB on the back. The added weight and slightly higher center-of-gravity are noticeable, but not nearly as bad as having a pillion passenger. What would I do differently? If I was going to build another, I would spend more time trying to source a cooler-looking lock box.
3. I've seen a couple of designs and glimpsed some on BMWs supporting riders on the Tour De France. Here's a link with some pix of different designs: http://hometown.aol.com/mschue5938/mschuette.html Northwet #110.
4. I have a rear rack on my Dakar made by Happy Trails. I took two long carriage bolts and two long pieces of iron gas pipe and bolted them to the two holes in the rack that the carriage bolts fit into. So I have two upright posts on the rack lkind of like horns. Everyone asks what is that for? My friend Scott says Im going to be impaled on them. I did it to lash my 1 1/2 gallon water jug to the rear rack, but it also serves as a method to carry my moutain bike. Sorry cant do pictures., use you imagination. Its suitable for low speed carrying (<30mph). PaulK.
If you remove the lockable tail cover, you will find a three wire wrapped
cable on the extreme left side that clearly goes through to the tail light (
not either of the 2 wire wrapped cables going to the signals ). Unwrap a 3 or 4
inch section of the cable exposing the three wires ( run/brake/ground ). You can
splice in there and can choose the GIVI light to be a running light or brake
light
depending on which hot lead you connect to. Sorry I can't provide the color
codes because my cable is re-wrapped with no colors showing. If you don't have a
wiring chart available, you might just expose a 1/4 of each of the three wires,
use a bit of trial and error as I did, and once you know the right wires to
connect to, close it up with electrical tape. Make sure the splices are strong
and taped well; better to do it right than do it over. Art#884
Although I don't have your setup, I did wire a set of Hyperlights into a standard GIVI topcase. I crimped piggyback connectors at the end of the Hyperlites, and connected them to the tail light, then I piggybacked the original wires on to that. No splicing was needed. Additionally (you may not need this), I put a plastic covered connector between the tail light and the HL's which allows me to quickly disconnect it to remove the case. All connectors available on Radio Shack. Alvaro #890
Bag/Case Repair Tips
F650GS SYSTEM CASE REPAIR
TomO-AR 650GS;1150GS Adventure
When the aluminium skin on the BMW system cases gets scratched and then dented, a viable repair is to coat them with a rubberized liner such as sprayed in pick up beds. This will describe an inexpensive do-it-yourself solution.
Go to your auto parts store and purchase the spray-on liner in a can, body filler material ($6/quart), a rasp scraper, 150 grit sandpaper, etc. [The liner spray can tells you what you need.]
Without removing the aluminium skin from the cases, clean and sand the surface.
Mix up the “bondo” and fill the dings and dents. Let set. Rasp it smooth. More bondo as needed.
Sand all smooth again.
Carefully mask off the lids. The liner material will spay on the exposed part of the case, so be as careful as you can in your taping job.
Set up the spray “booth.” Best if well lit and chest high with access on all sides. Then add newspaper screening with more masking tape to the tape already on the bags so that the bags are draped with paper to protect them from overspray.
Wipe down the lids one more time just before spraying.
[Most important part of the job.] Practice spraying on a piece of taped up newspaper. Get your strokes down “on paper.” If you go back and forth over the bags, the material builds up about 2-3” in from each side. Better to go from left to right, stop, come back to the beginning without spraying, and then spray left to right again on the next pass, etc. until covered.
Watch the edges near the case opening – you may need to spray those areas from a different angle to get them covered. Spray two coats. The first is to cover. [The instructions on my can suggested 4-6” – that was too close.]
Let dry for 5 minutes. Then apply the finish coat from further away [10-12”] in a nice even pattern. [Instructions on the can tell you how far, etc.]
Let dry 24 hours.
Material
cost - about $22
You may want to consider taking it through step 5 and then taking the cases to a
professional liner company to get a price on them spraying the liner on. Some
Chain Gangers (errr.. "Inmates" ed.) have posted prices of $35 and up to get it
done. Another rider told me of a $100 charge by one shop for a similar size job.
As a follow up to my previous post on repairing the aluminium covers for the F650GS system cases, I have been sharing email off site on a couple of questions. One suggestion was to remove the aluminium skins and just go with the plastic underneath. But I have a question – what does it look like? Will it be like Darth Vader without his helmet? Or, is it a workable solution?
I would be interested in an email photo of a case with the skin off if any of you can do that.
Another idea is to remover the aluminium skins (I understand they are attached by double sided tape), then you could spray the plastic directly with the truck bed liner stuff. Should work well.
More on those "famous" aluminium covers
Q. How do you get the covers off the BMW cases? I want to put Rhino liner on my BMW system case covers. (To make them stronger) I see the metal piece in there but you can't hammer it out, it seems ‘cause the other side of the hinge is covered. Bryan #1157
A.
The peeling part would render them pretty much worthless to put back on. I rode 150 miles to Shreveport one time losing a cover in the process. When I got there I discovered the loss for the first time. It left the case without a single hint. I looked for the cover on the way home. Sure enough, there it was lying on the side of Interstate 49. It was like aluminium foil. Looked good in its original state but couldn't be smoothed back out once touched by human hands (or the heat and wind). My vote would be to do the sanding while still on the plastic case, mask it for overspray, spray it with the store bought stuff and then do the bolt-on mod. NothingClever
I have had about 10 sets of these covered with Line-X. No need to remove the lids. They mask them off and they look good. Steve #1130
I agree you don't have to take the covers off, but beware. My Line-X guy did a rather poor job of masking and then a poorer job of razor- knifing the excess Line-X off. Also, The whole aluminium skin (with Line-X coating) came flying off one hot day, so I had to install 4 small screws on each side case to hold the skins on. Been fine ever since. Rod P
I do not know how to "open" up the hinges, but have taken off
the outer half (the piece that you slide out and in to expand the cases). It is
easy to do. If you pull the large black plastic pieces in the front and back of
the cases (the plastic piece that the yellow locking flaps are fastened to)
inwards far enough to clear the small square protrusions that you lock with the
yellow flaps, you can pull off the outer part of the cases. I have had them off
for cleaning and to be able to use some dry lubrication on the sliding parts.
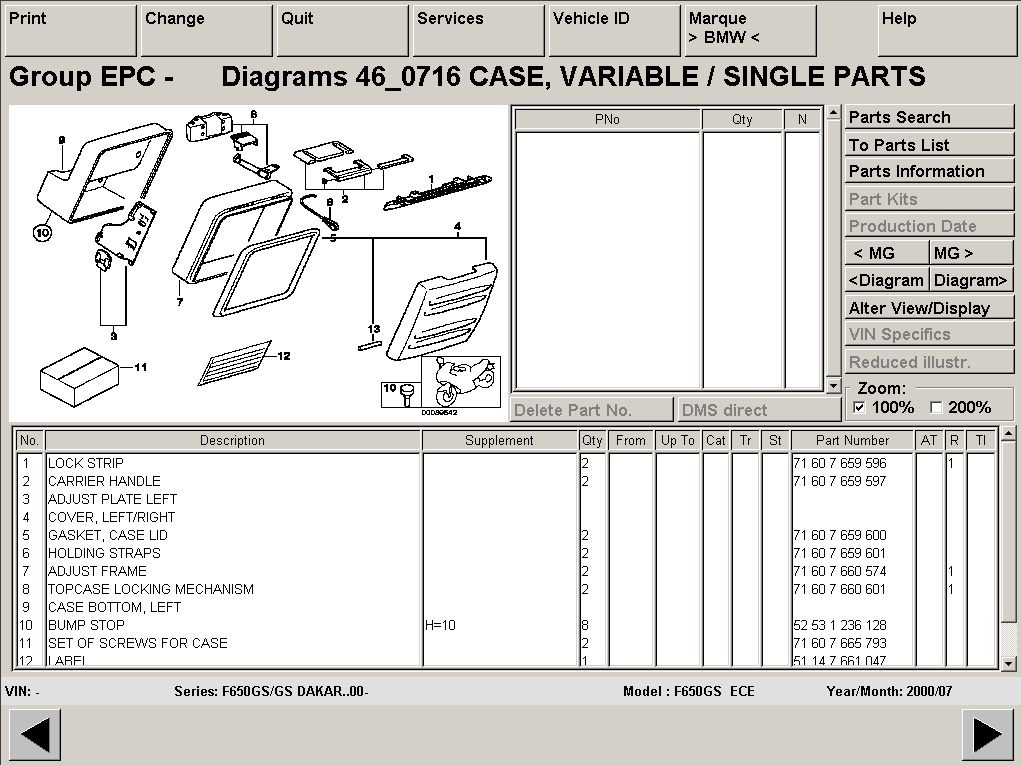 Bend part 3 inwards to remove parts 4, 5 and 7 Haakon
#626
Bend part 3 inwards to remove parts 4, 5 and 7 Haakon
#626
The cases
were easy to put on for the most part. About 60 mins. to do. I like the cases
but it obvious that the outside cover is weak. I ordered them from ChicagoBMW
and there was a small dent in one already when I opened the box. You can see the
dent in the picture below. It looks like someone pressed their finger against
it.
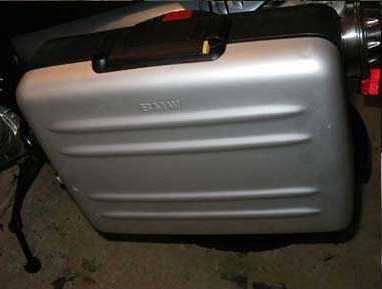
 Bryan #1157
The BMW cases are a good thing, BUT they need a small
modification. The aluminium covers are secured to the case lids with......double
sided tape and hot melt glue! I not long ago got a new set of cases under
warranty. I was on a club
ride one day and left my bike parked in the hot sun for 4 hours or so. Hopped on
and headed home.......a semi-trailer going in the opposite direction buffeted me
badly, and the right side case aluminium cover was 'sucked' off the lid and hit
the road 10 metres behind me. Fortunately the rider following was far enough
behind not to wear it as an instant fairing!
I stopped, recovered a badly bent lid AND discovered the left side one was half
off as well. So.....either, don't park you machine in the hot Sun OR secure the
outer covers with screws etc.
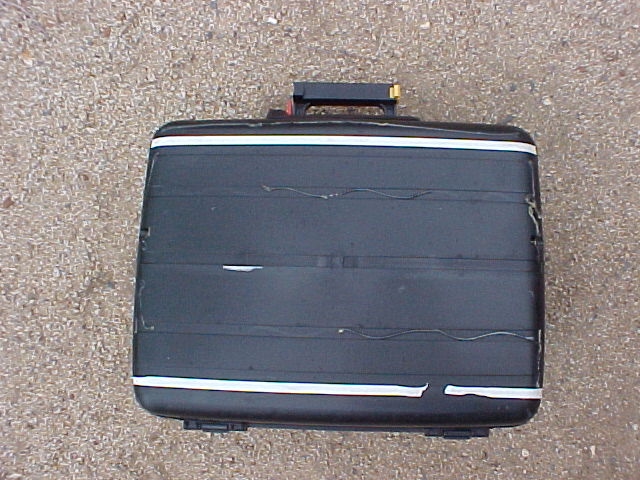
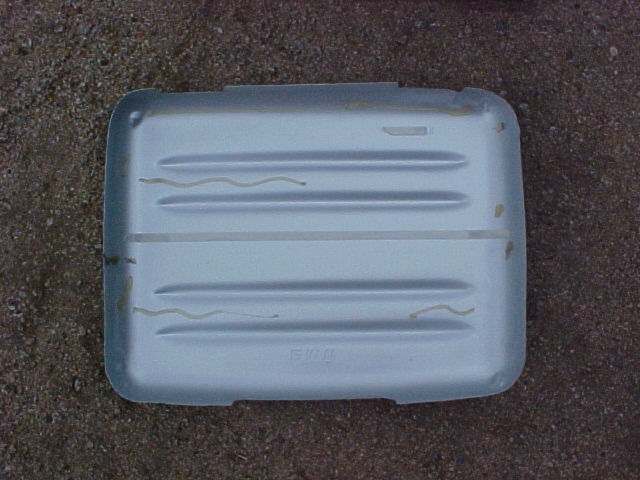
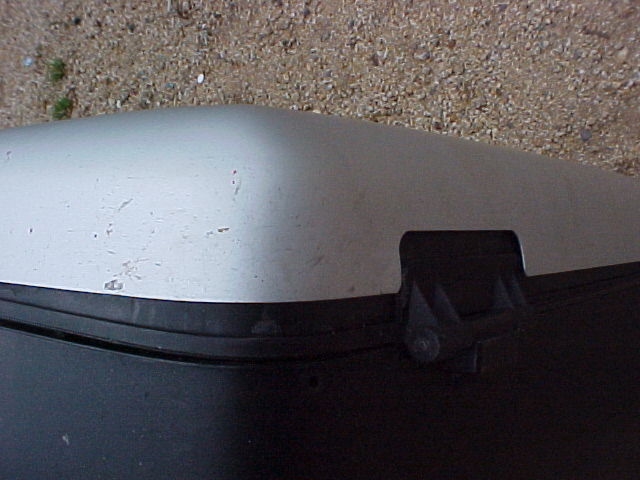 You can see the
feeble amount of hot melt glue and double-sided tape they use. The left one had
started to come apart at the bottom of the lid (as mounted on bike)
Jack in Australia.
You can see the
feeble amount of hot melt glue and double-sided tape they use. The left one had
started to come apart at the bottom of the lid (as mounted on bike)
Jack in Australia.
This is the allen bolt and neoprene washer repair job I completed to keep the
cosmetic aluminium shells in place. Ran 'em in the heat and rain and parked in a
downpour and no worries to date. The photos to secure the chintzy aluminium
covers on the BMW bags are self-explanatory from left to right. Seems like Jack
from Australia and I (here in Louisiana) share a common malady of lost covers
due to high-heat. Couple of things to add – I marked prior to drilling and began
with a small bit first for a pilot hole and then a bit slightly larger but still
smaller than the allen bolt, to ensure a snug fit. No silicone needed for
waterproofing. After I finished, I did find some neoprene washers that were
already bonded to regular flat washers, and those would be ideal. Lastly, a
fifth bolt could be added in the very centre but would be cosmetic only. Total
cost was about USD$8. Total time was about 2 hours. Checked on using Rhino
Lining or Line-X to coat the bags to 'ruggedize' them for scratches, dings, etc.
but no company will do them unless the surface is roughened, and nobody wanted
anything to do with scratching the cases. Oh well, the covers are secure now and
whatever scratches and dings they get will just add character.
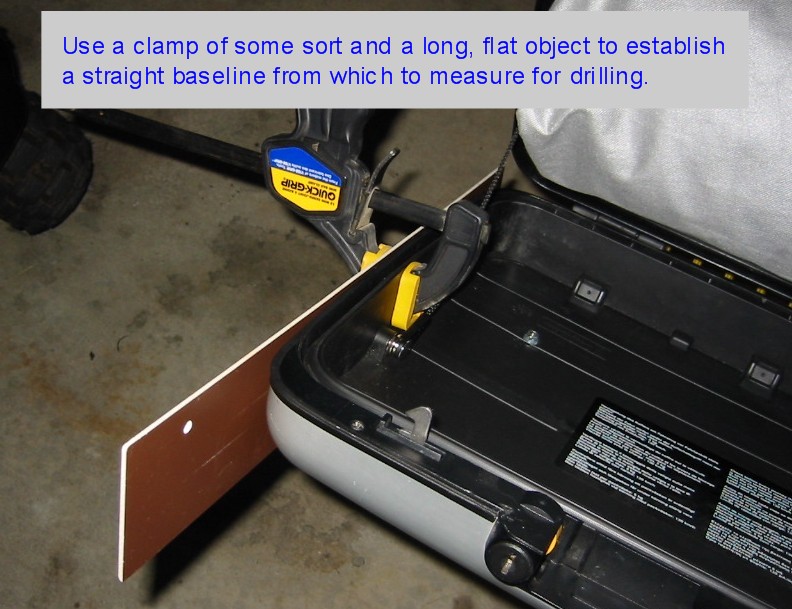
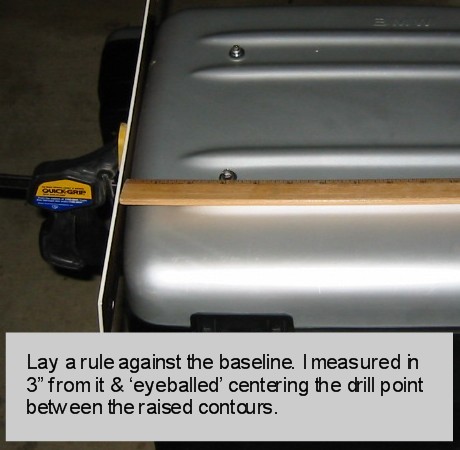
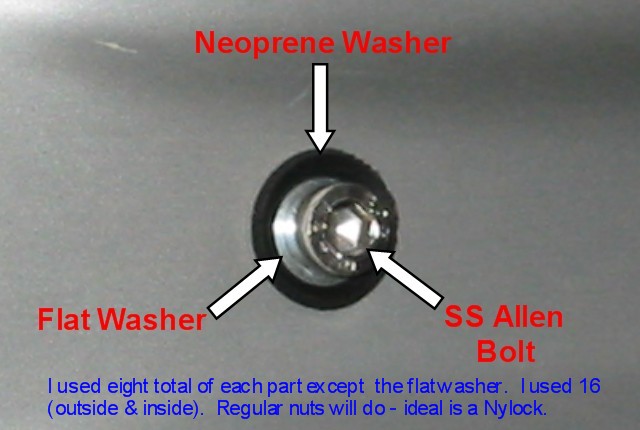
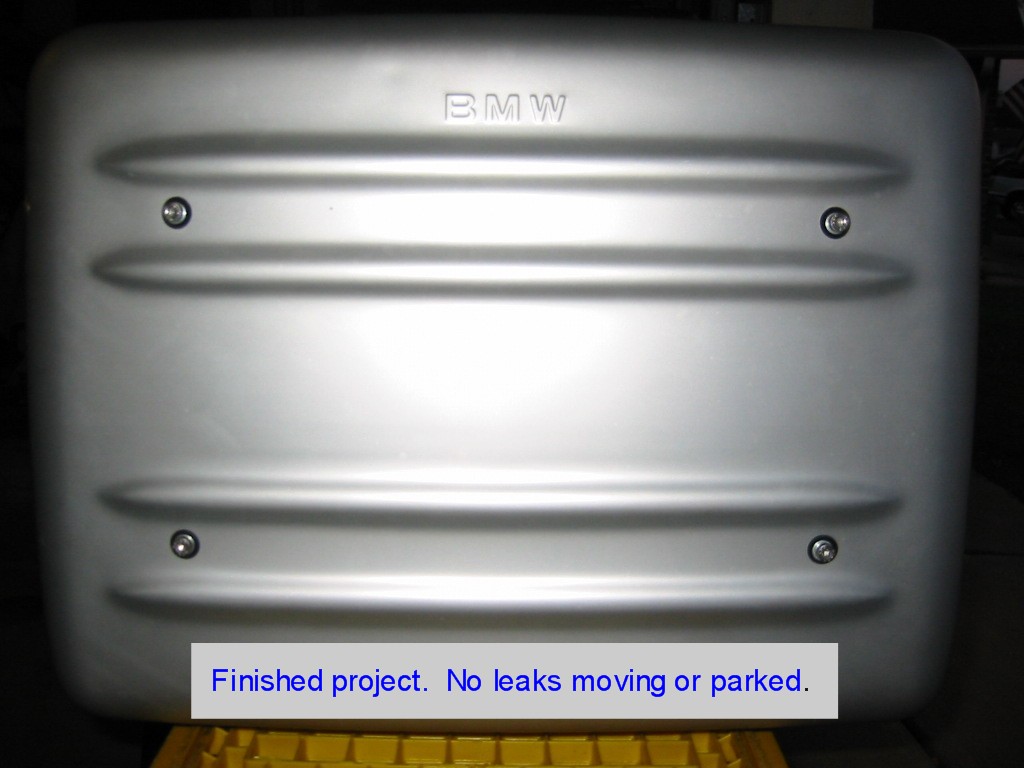 NothingClever
Just finished with several of the mods suggested in the FAQs on the dent-prone Factory expandable bags. LOOKS GREAT! I put two small machine screws on each side to assure that the stick-on metal covers don't depart. Then, I scuffed up the metal covers and sprayed several nice coats of truck bed liner (from Autozone) on the covers. The difference is (to me) a much more rugged, solid look to the bags and bike overall. Thanks to whoever came up with the idea of using truck bed liner to cover these things. The dings and dents are practically impossible to see.
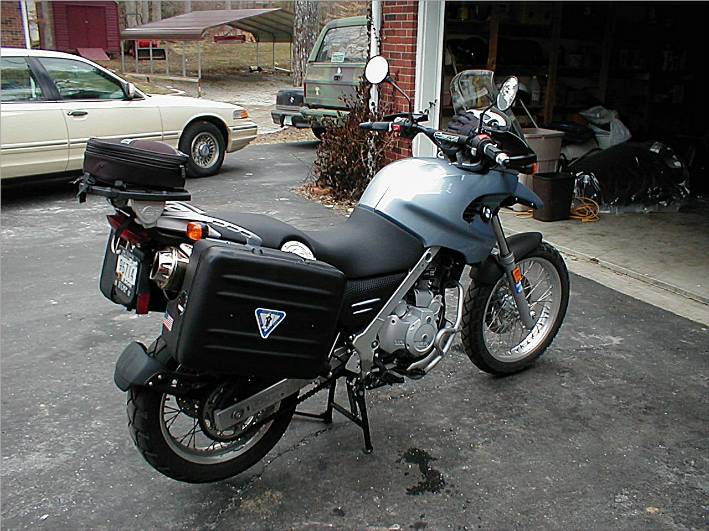

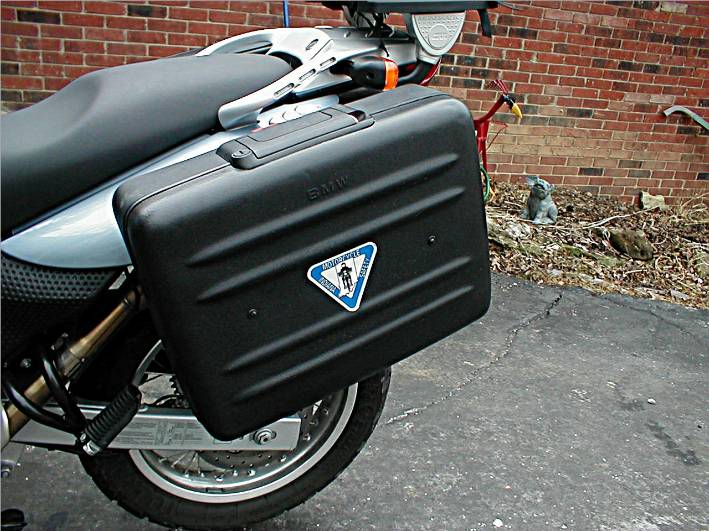
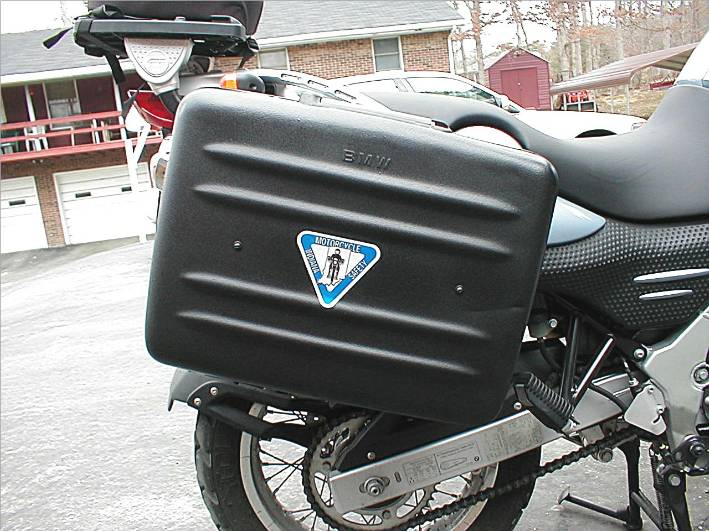 Rick #939
Reinforcement Before the Lug Breaks
NothingClever
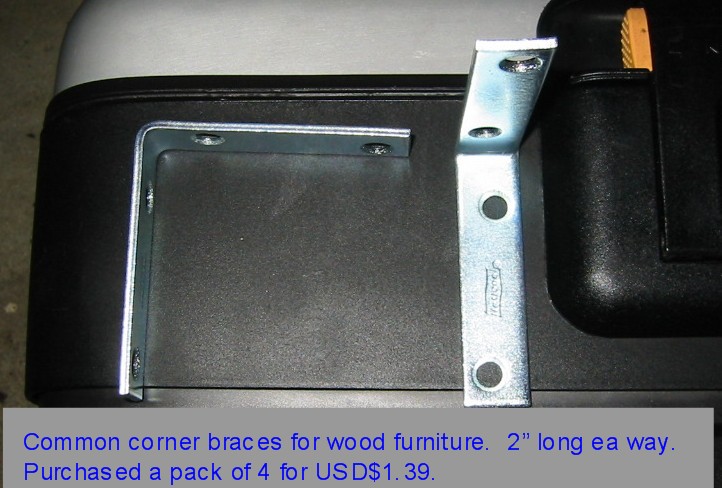
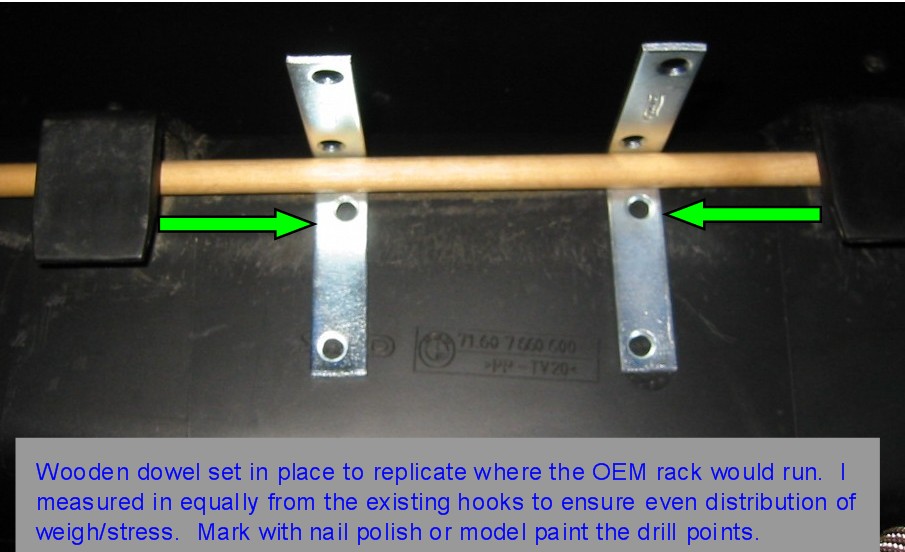
![]()
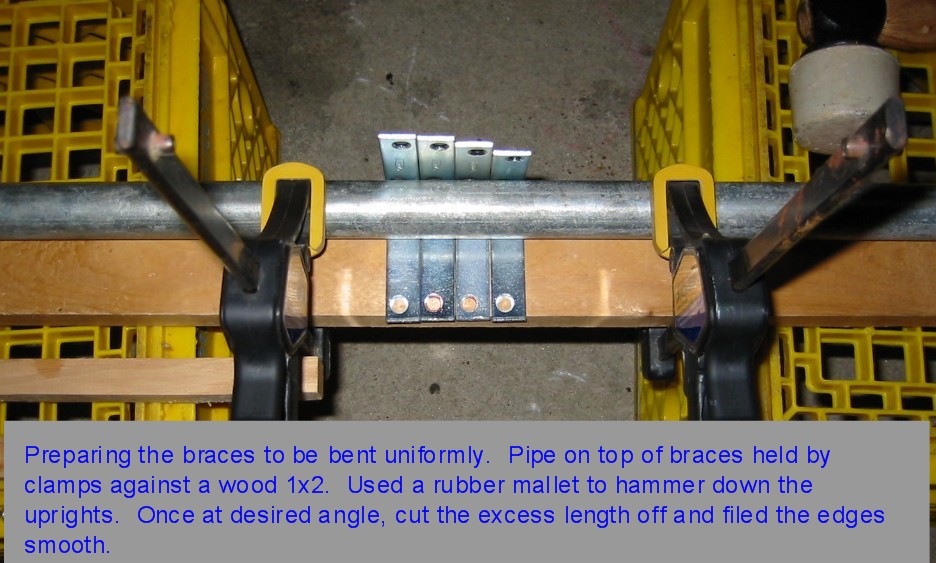
![]()
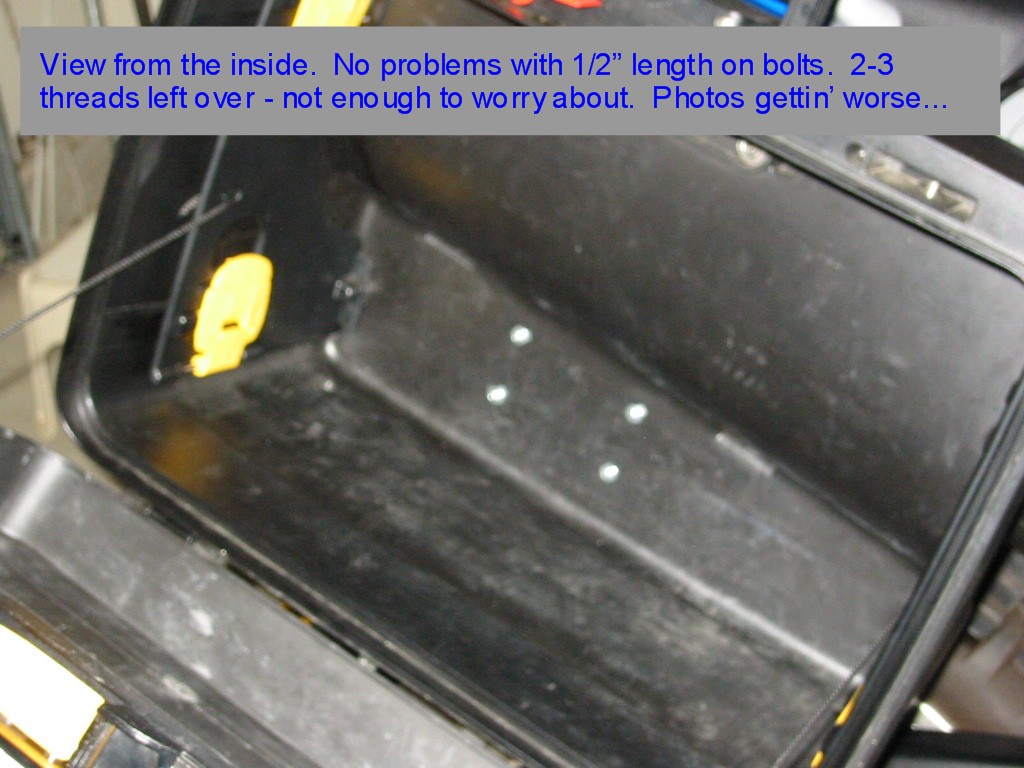
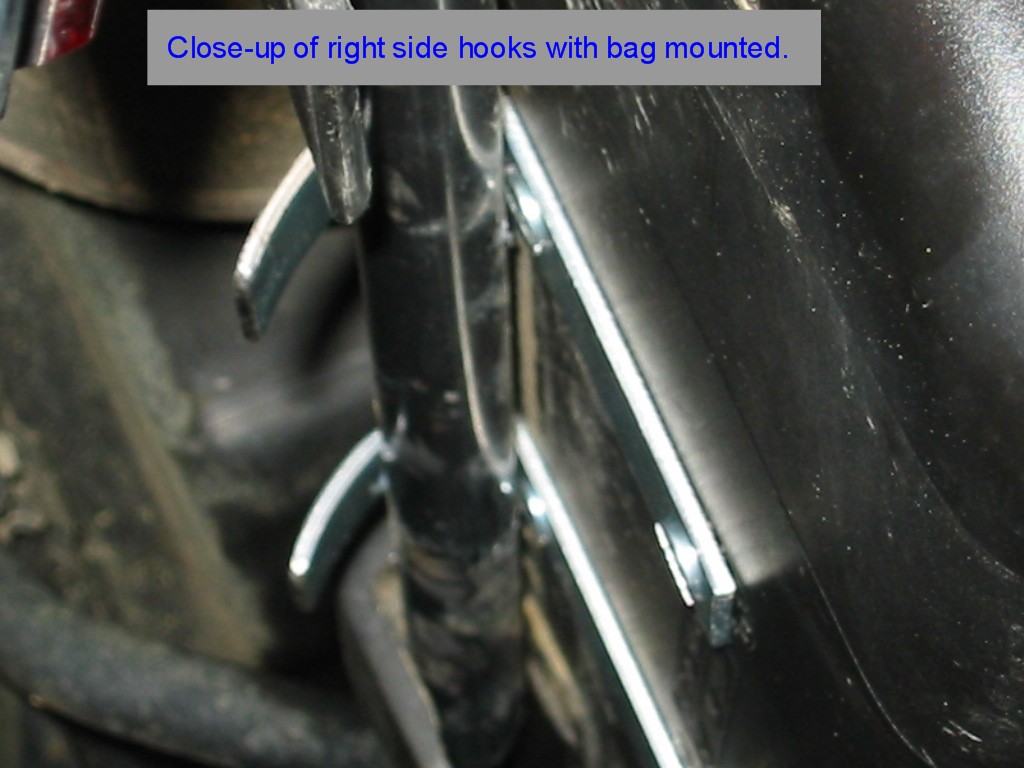
![]()
Broken Lug Repair/Reinforcement
I bought some corner brackets at Home Depot or Ace (can't remember which). If
you place the corner OVER the edge of a 2x4 end and screw it down on the flat
side, you can hammer the over-hanging edge of the metal down over the 2x4 end
and it is exactly the right size and angle. I just lucked out trying it this
way! It makes an L-shaped bracket (holes already there, no need to drill). Use
some epoxy bonding agent, and bolt it through the plastic. Make sure that you
place it properly and account for not having the rubber 'spacer' or it will be
h*ll to get it to seat and latch properly. I made four brackets and keep them
with me (bolts attached) just in case those WEAK hooks break again!
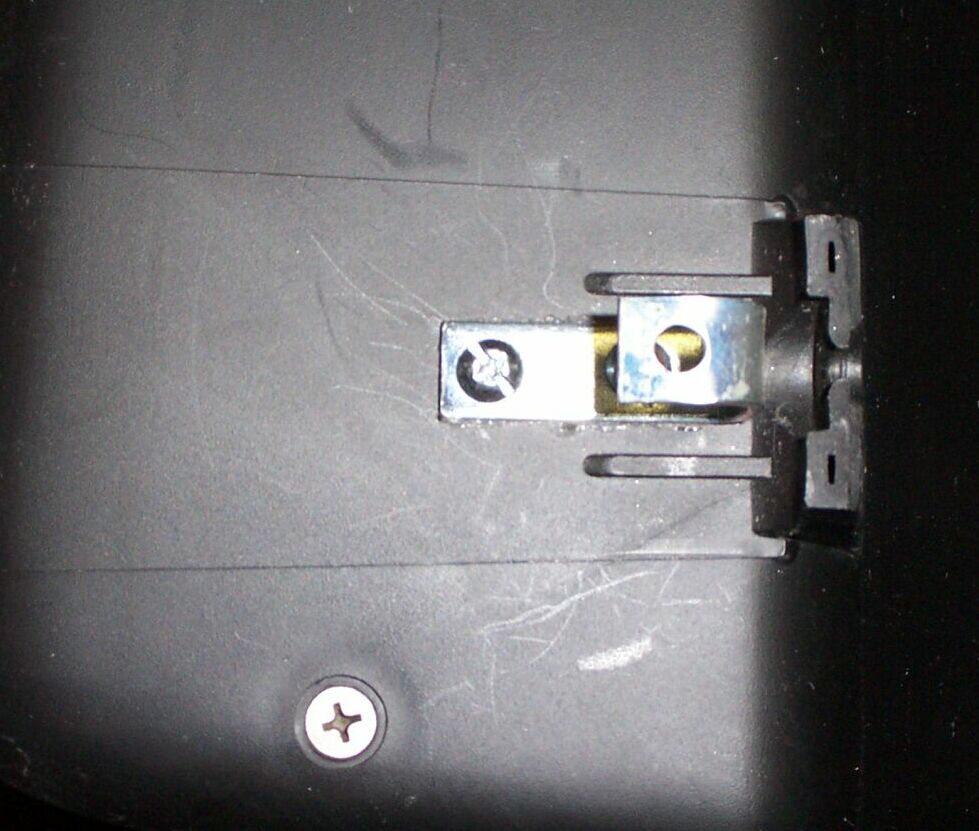
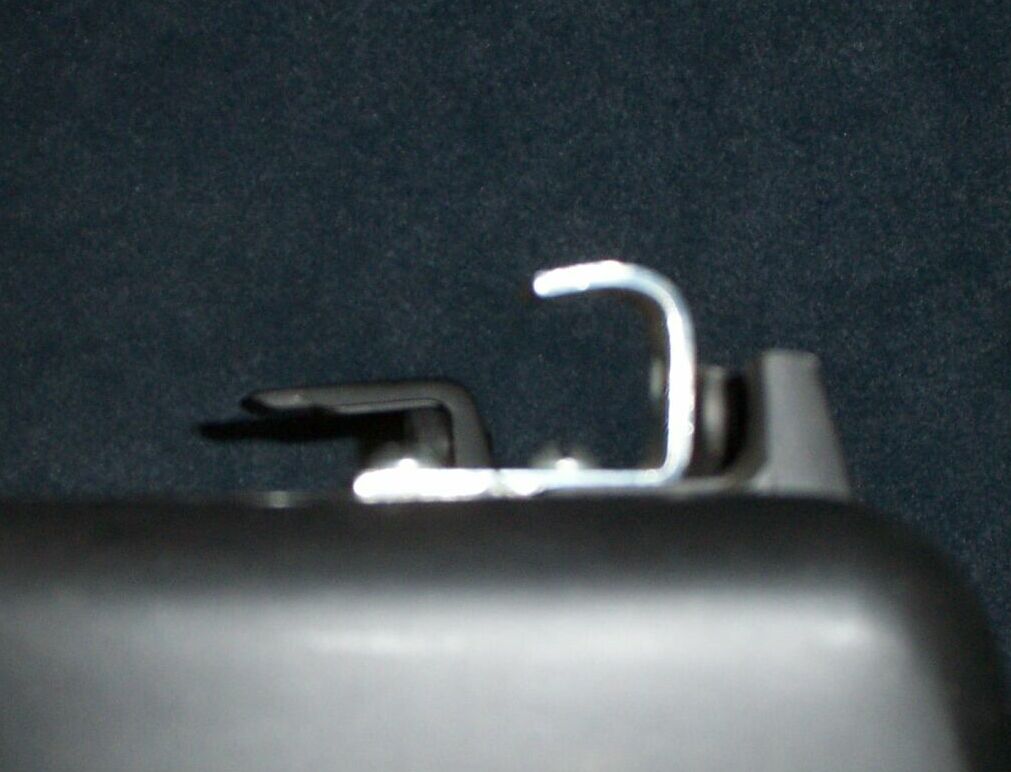
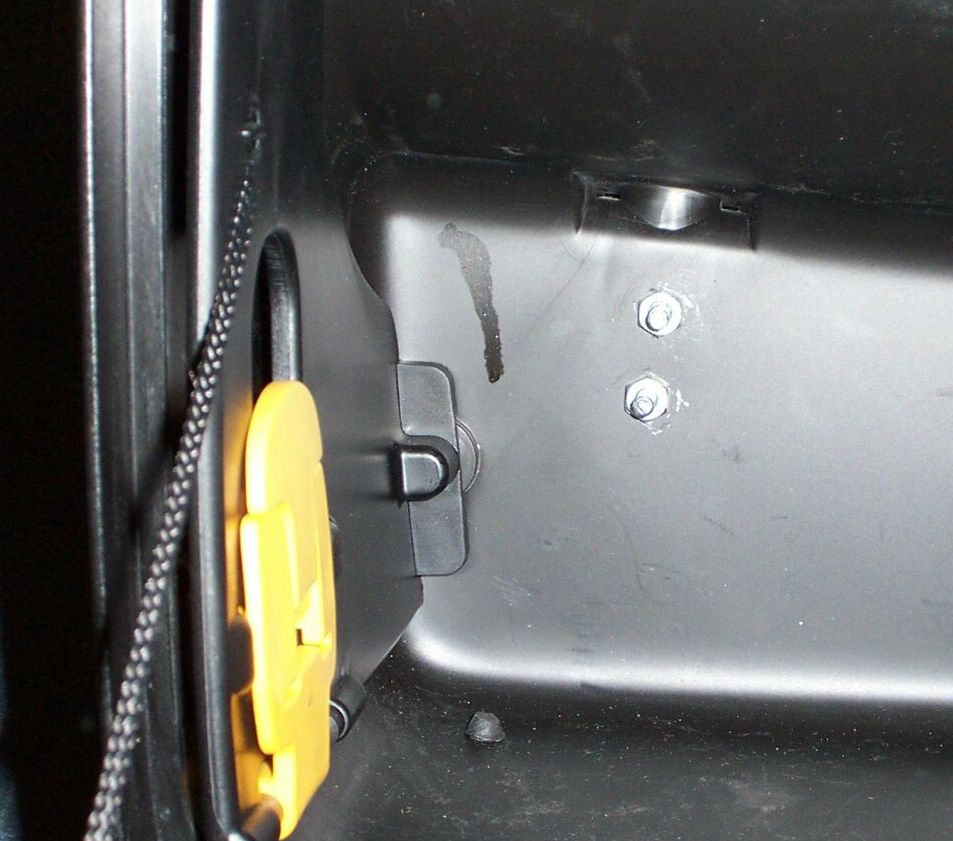
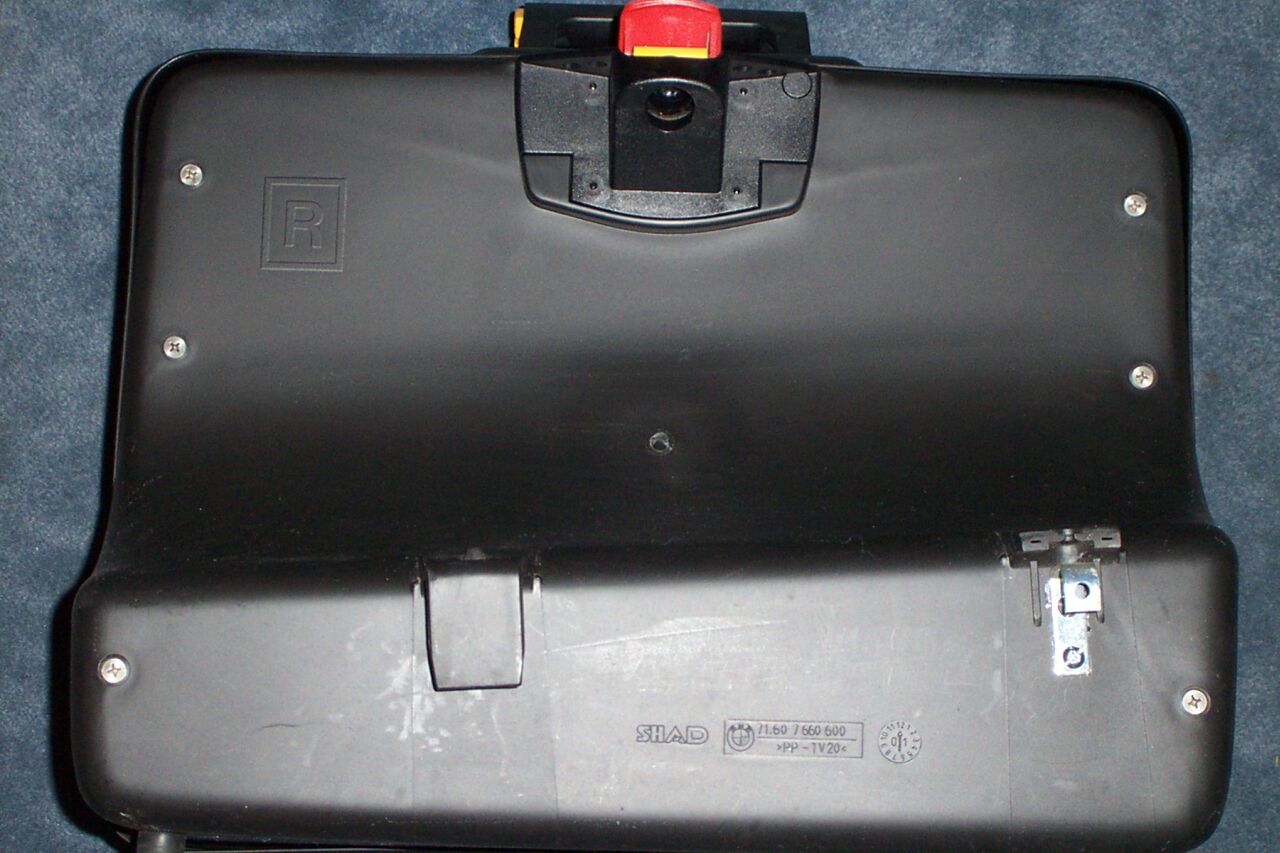 Omniconn
I have repaired those with Devcon Plastic Welder. I have also replaced a back on my bags. They are available and not that spendy. Steve #1130
I broke mine while yanking (not very hard) on the cases in an attempt to expand them. I took it to a bumper shop (Fairmont Electroplating in Calgary) and they plastic welded it for me. It was ready for pick up in about 1½ hrs and cost me $60 , you could never tell that it had ever broken. I'm very pleased with the result. The guy said it was very easy to weld as it was a common polycarbonate (I think that's what he called it). PNR123
I went to a scrap metal guy I know well, then got another place to cut and bend
to suit. It is just larger than 90 degrees. Two pieces of stainless steel (0.5
mm thick) 225 millimetres by 90 millimetres, folded at 45 mm length ways. To
drill the necessary holes a drill press is almost necessary as stainless steel
is really hard. I drilled out the holes to make room for the ends of the rubber
grommets. I used 5 mm stainless steel screws and Nyloc nuts through into the
pannier, with plates inside to take the load. I didn't use screws on the ends of
the lugs, as there is little room, and as the stainless steel is not flexible
there is no need. All up the repair cost $4 for the SS sheet, $5 to get it
cut and bent and about $4.50 for the bolts etc, then I only used 2 per pannier.
I used araldite epoxy for the broken hook, but with the brackets there should be
no more weight on the plastic.
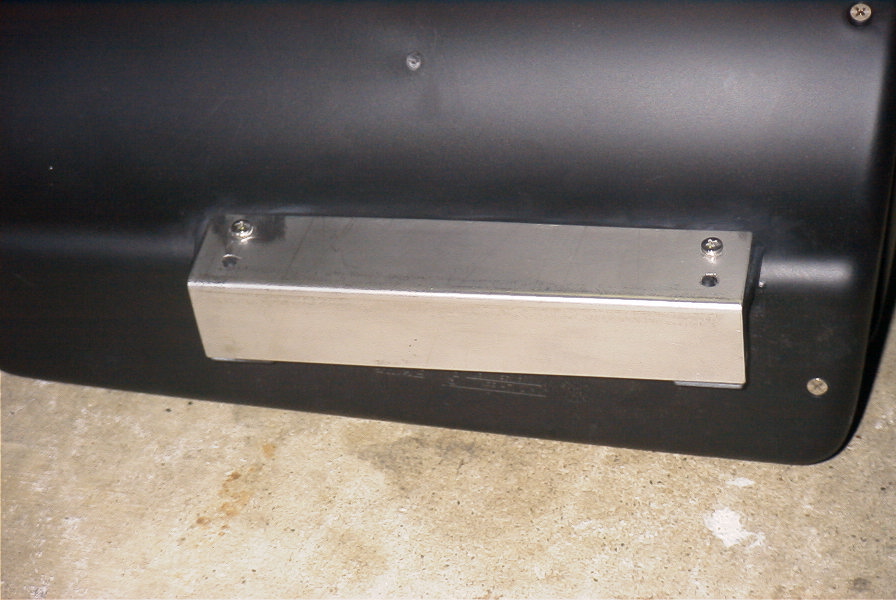
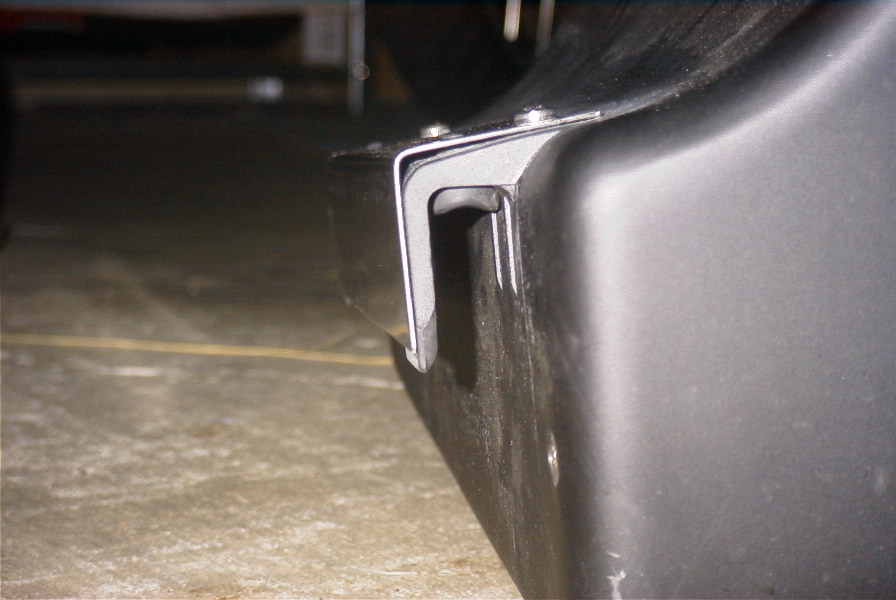
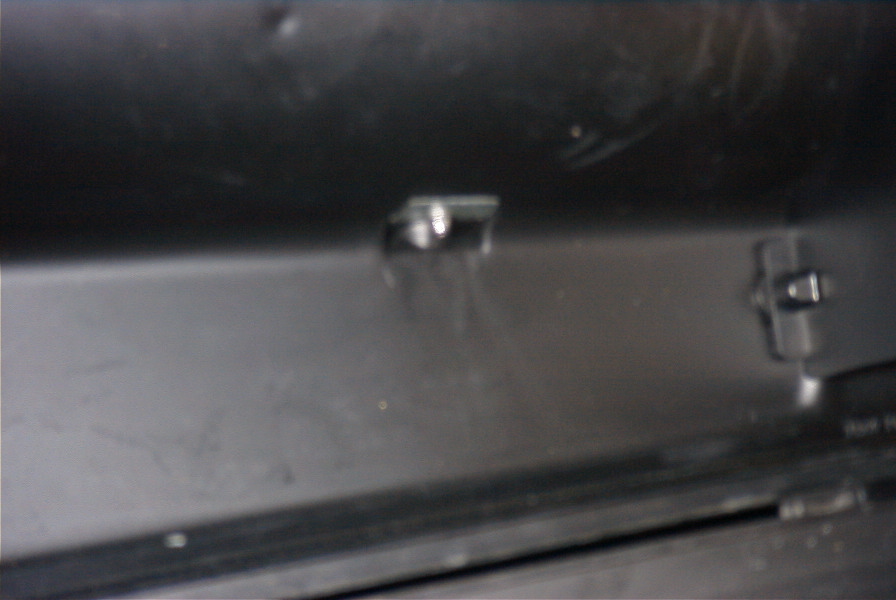 Annie
Annie
A "case" of the F650GS wobbles
Q. I dropped my bike yesterday and scraped up one of my new system cases. Not too bad though. Thing is, it is wobbling now. I'm not sure why. It seems to be seated in well to the latch. Has anyone had this problem before? Bryan #1157
A.
Several people have bent the mounting “rail” by dropping the bike, with the result that the bag no longer sits properly (wobbles or binds). Doesn’t have to be a big fall; a small tip-over will do it. If that’s what has happened, you have to bend the rail back to where it was originally – pry bar, Arnold Schwarzenegger imitation, or something. But exactly how far is trial and error – you try and make it look like the other side. As Deborah #1074 said, “Pretty cheesy design.” You can compensate a bit by raising or lowering the mushroom-shaped post that the latch sits on, but it has its limits. mspeed #1023
I had this same problem with one of my oem side cases after dropping the bike while getting off and stepping in some wet oily leaves. The issue was that one of the plastic hooks on the back of case, that hook onto the rail and stabilize the case, had broke off. I re-affixed the hook using some marine epoxy. So check out those plastic hooks on the back of the case. Jomifo
Did you check the top frame lug? On my bike it was bent up. Thus the case was hanging too high and did not reach down on the lower rail. The small rubber blobs were hanging 2-3mm over the rail. The reason I would first suspect a bent lug is both the frame/ lug design and what most often happened when I “lay my bike down”. With a partly faulty weld, the lug is strong on down forces but easily bent upwards. When I lay my bike down it is almost always due to rear wheel slip. This causes the bottom of the case to touch the ground first and will put a great upward strain on that top lug. I used a large monkey wrench to bend it back down. The second time that happened I detected the faulty weld and had to re-weld the lug. With the help of a straight edge across the frame rails you might be able to check the height of both lugs. Haakon #626
My plastic 'clip' broke completely off...had to fabricate a new hook which I like better anyway because it is metal and I have spares. Plus if I knock one off on a trail I won't have to strap it to my lap for the road home...hehe... Omniconn
I just fixed my wobbling cases. Here’s how:
Materials-
• ¼ inch thick paint stirring stick
• Duct tape
• Electrical tape
I cut off a piece of wood that fit along the portion of the mounting hooks on
the rear of the cases. I then affixed it with duct tape and covered the duct
tape with electrical tape to blend in. They now work better then when they were
new! Facito
Others
Repairing ABS Bags
How Safe is the Stuff in your Luggage?
Ever had something stolen from your bike's luggage? I'm wondering how often people have had their luggage messed with when travelling on a motorcycle. I'm particularly curious about the short stops like for meals, gas and bio breaks. Is there a higher instance of theft with soft-sided luggage and duffels vs. hard bags with locks? I personally have never had a problem but I'm careful about leaving the bike in plain sight. At events where I might leave my riding gear on the bike I lock it with a cable because I don't have hard bags. I never hear any stories so I'm thinking it must be pretty rare. BradG #1002
Save my K bikes, I have soft luggage on all my bikes, I rarely even take my GPS off the bike unless I need to work with it. Maybe I'm dumb and lucky, but I've never had a problem. David #476
Never anything I can prove...although my toll way changer seem to get empty quicker than I would expect. I have heard of helmets and the like disappearing from tents at rallies occasionally, but very infrequent. I try to lock stuff I can't live without in the hard luggage or with a cable, just in case. Most people are so scared of "bikers" they don't even go close to them! (At least there is SOME benefit to the "bad biker" stereotype). Marty #436
I had a tail bag opened once when my bike was parked backed up to the curb. The bag had been opened, but nothing was taken. There was just some raingear and gloves in it. It appeared to be an opportunistic look by someone. After that, when I was in a situation that made me nervous, I would put the raincover over the bag to help those who were overly curious resist the temptation. If someone is really out to steal stuff, they will do it, though. I keep any valuable stuff in the hard bags. Bonnie #1158
Yes, maps. They weren't inside of any luggage, just inside my helmet cable-locked to my bike. That was back in Germany. Never anything here in the US (and I left my key in the ignition for ~30 minutes once) in front of a Radio Shack. its_xls
I haven't had anything stolen yet, but I am paranoid... On the trip I am on right now I have some hard luggage and an extra cable to lock up my suit if necessary. Spakur #1117
In Victoria, B.C. my buddy's Gold Wing was parked about 30 feet from mine. Mine was under a light in a centre row, his was in the dark against a hedge. Not only were things stolen from his luggage, but part of his luggage was stolen. Two Hopnel pouches were taken off the bike. Police there speculate that it was the town's ever increasing population of heroin addicts. dl1800
Anything in soft luggage can be taken even if it's locked up. All that it takes is a knife and a willing culprit. Short stops where the bike is in sight just about everything can be left on. Where you need to walk away and the passers-by are iffy is where things change. I don't use a tank bag because this a) gets in the way of the off-road ride but b) is an invitation to carry too much stuff in an insecure location. I use the BarPack from CycoActive which gives me maps and stuff yet is easy to take off to stuff in a pannier or carry with me in a second. I also carry and use from time to time a small flexible cable lock. When in places like Latin America I've successfully used the Pacsafe system for my roll bag or leaving the riding gear either on or off the bike. Ed just had some stuff stolen from his tank panniers and Jessie luggage. Here's what happened to Ed: "Locked tight. It's still locked even though both lock mechanisms were rendered useless in the robbery. Basically they tried to pick the locks, destroyed the keyholes in the process and then just pried the sucker open. I have to pry it open now to use it too. It's a 5 second process with a small lever, an allen wrench, or a finger." Since the Touratech's have good integral locks as well as external padlocks this wouldn't have happened. It happened to Ed in Venezuela but that doesn't matter. If you leave the bike, lock anything that can be locked, even if in a "safe" motel. DHP #711
I always have hard luggage, never a tank bag (well at least after my first big trip—what a pain to deal with each time I stopped…) and have never had anything stolen from the bike. The worst potential culprits are border officials at a few borders: India, Pakistan and much of Africa are notorious. I never open more than one box at once and watch very closely. Also one or two Western countries (Britain in particular, USA is very safe) seem to harbour thieves. Lance #1303
I don't worry about the contents of my tank bag. But I generally take my radar detector and GPS with me when I leave the bike where I can't see it for more than ten minutes or so. I figure those bits are the "gimmes" (in plain sight) that a thief of opportunity would be thrilled to snatch and I'd be ha$$led to replace. But I'll sometimes leave my camera in my tank bag. I had Givis before I got the Jesses and decided after living with the Jesses for about a week that I should sell the Jesses and keep the Givis. Yeah, Jesse bags LOOK like they're secure. But anyone can open them with their bare hands, even a child. Once open, the Jesses can be removed with the allen wrench that lives in the bag. Even with the latch destroyed a Givi lock would still be locked, requiring a thief to DEAL with stealing the bag off of the bike, instead of just carrying it off like a Jesse. Flash #412
It would seem that for the most part there is little problem with things being lifted from the bike. Having a small pack or convertible tank bag would make it easier to "grab" the expensive stuff to take with you. BradG #1002
.jpg)
.jpg)
.jpg)
.jpg)
.jpg)
.jpg)
.jpg)
.jpg)
.jpg)
.jpg)
.jpg)
.jpg)
.jpg)
.jpg)
.jpg)
.jpg)
.jpg)
.jpg)
.jpg)
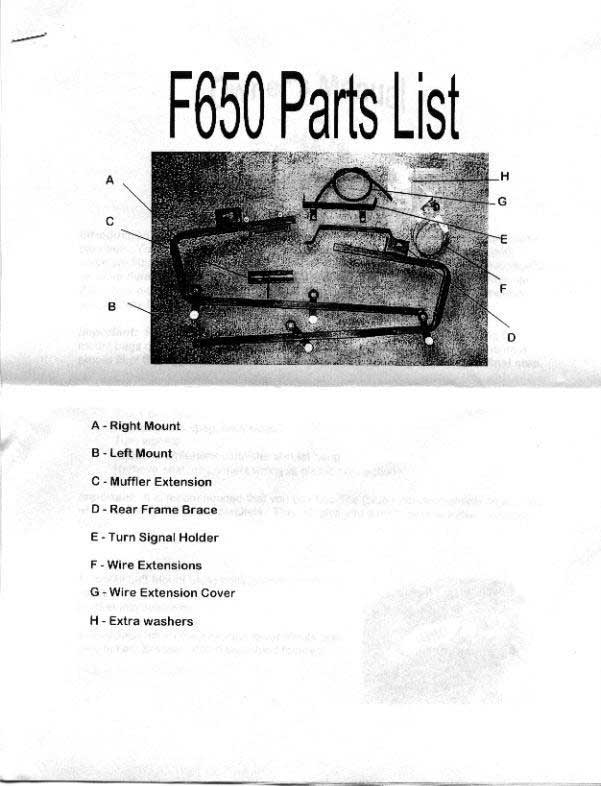
.jpg)
.jpg)
.jpg)
.jpg)
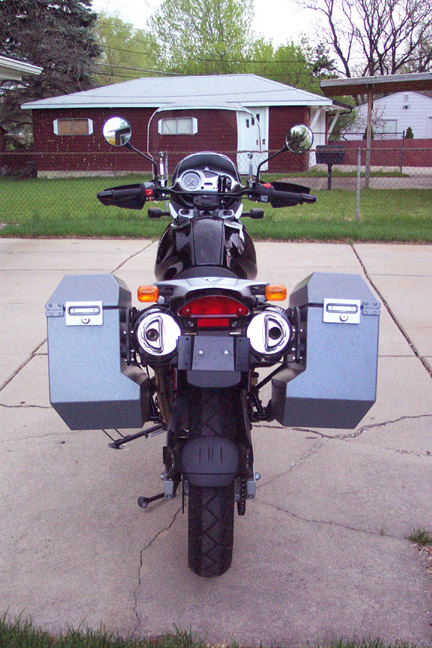