Classic Valve Shim Change FAQ
by Kristian #562
Please read the Disclaimer before
attempting any work in this FAQ.
Last Updated: 28 January 2007, by Winter #1935
For other related FAQs:
Introduction
This FAQ is
for CHANGING the Shims after you have checked them and found them to be out of
specification. For simply performing a Valve Shim Clearance check refer
The Valve Check FAQ. This is a simple job you can do yourself
and save some money doing it. BMW recommend the Valve Clearances are checked
every 10,000km or about 6000 miles. You should change the shims when they are
OUT of spec. If you are new to all this or have additional questions, it is
recommended you also read the Valve Misc. FAQ.
Note that while this FAQ was
primarily written with the Classic in mind, it can be used as a guide for
CHANGING the Shims on Both Classic & GS/Dakar. For GS/Dakar Specific
information, see the
Valve Shim Adjustment GS Style part of the GS/Dakar Shim Check FAQ.
Tools
- Set of Feeler Gauges with gauges
in the approx. range 0.03mm - 0.30mm. Get a set with 0.01 increments between
0.03 and 0.10. What is important are the increments between the numbers,
so you can measure the clearance to an accuracy of 0.01mm. Don't forget you can
double up the gauges, so if you have gauges that go from 0.03 to 0.10 in 0.01
increments, i.e. 0.03, 0.04, 0.05...0.09, 0.10, then it jumps to 0.15,
0.20, don't fret!. Just add 0.05 and 0.06 and you will have 0.11, add 0.05 and
0.07 and you will have 0.12 etc. Don't worry if yours don't have an 0.35mm or
0.45mm, just add 0.20 and 0.15, or 0.15 and 0.30 etc. (Thanks to Aleksander in
Dubai for the Q's :-) ). Hopefully your Classic Valves will not be less than
0.03.
- 10mm Socket for Valve Cover Bolts.
- Allen Keys (In BMW Toolkit) to take tank off.
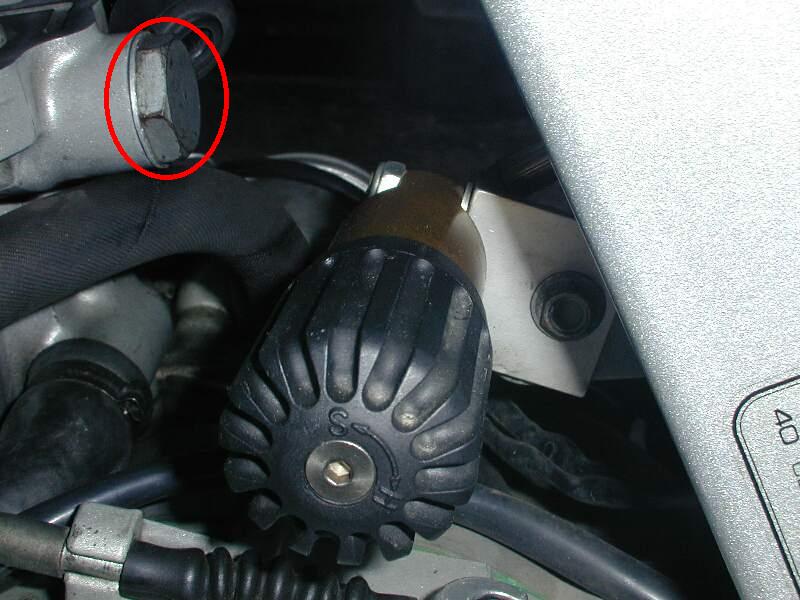
- 22mm Socket for Chain Tensioner Bolt (LHS Rear)
Chain-Tensioner Bolt
- 10mm Socket for Tank.
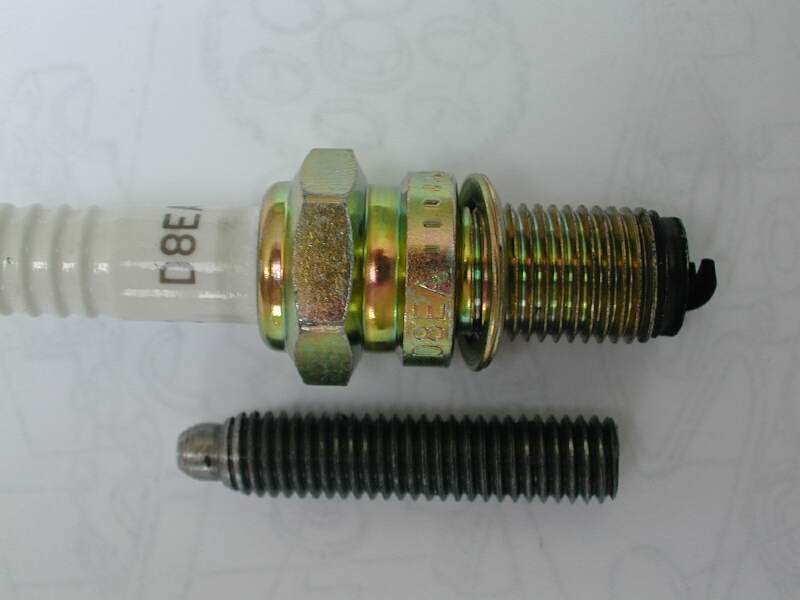
- Spark Plug Spanner.
- A Top Dead Centre (TDC) Bolt. Here is an
Original TDC Bolt. This is nice to have, but not ABSOLUTELY necessary as
discussed in the separate TDC Bolt FAQ.
- Pliers to undo the clips and Take the Tank off.
- Torque Wrench for the range of Torques
specified in the Common Torque Table.
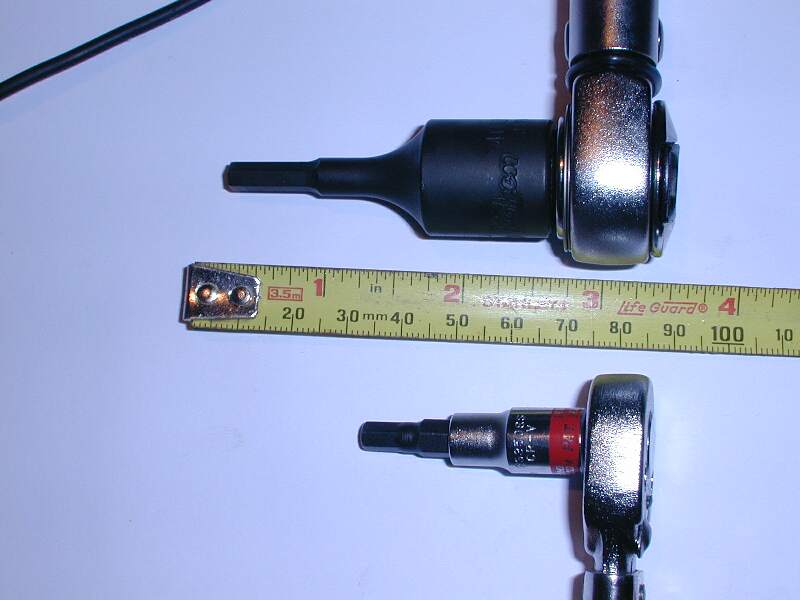
- 5mm Allen Key Socket for Camshaft
Carrier Bolts. Recommended: 1/4" Drive Torque Wrench and either a 5mm socket with
a sawn-off length of 5mm Allen Key or a 1/4" Socket and one of those 1/4" Drive, 5mm Allen Key Bits. See (Small Bit). Note the difference is length.
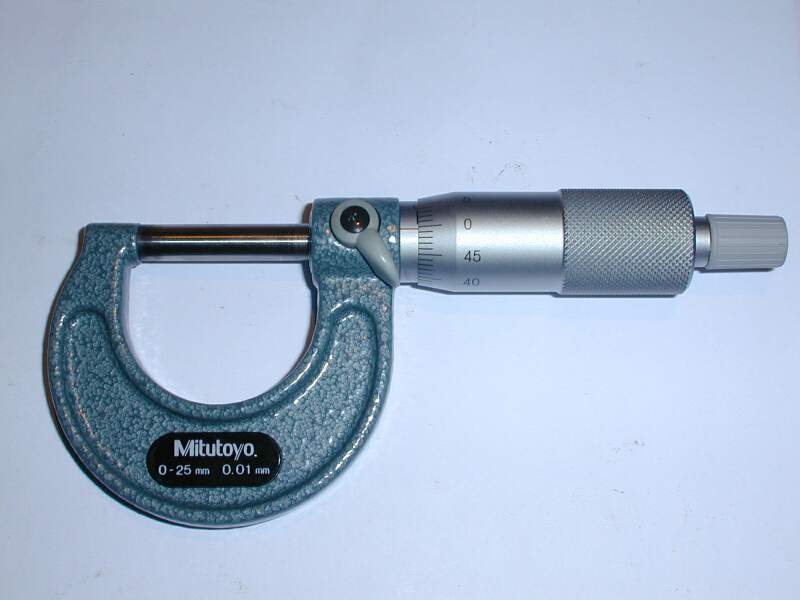
- Micrometer - Not essential if you know
what Shims you have in already, and what you bought as replacements, but a
cheap US$7 will be able to tell the difference between 2.40mm & 2.45mm. I
got one that measures 0-25mm (Your shims will probably never ever need to be
bigger than 3mm !) with an accuracy of 0.01mm. See
Micrometer for a Photo.
Parts
- The only parts you MAY need are some
more Valve Shims if the clearances are actually out.
See the Misc. Valve Questions FAQ for more
information.
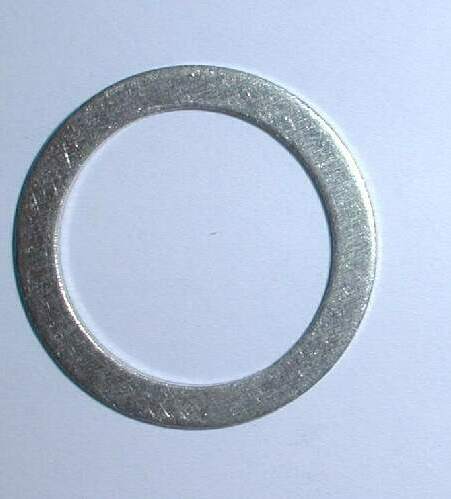
- A new Crush Washer for the Chain
Tensioner Retaining Bolt, though at a Pinch it'll last 2 Valve Shim changes.
Note this IS the same
size washer as the SUMP PLUG
crush washer.
- A new Crush
washer for the TDC Plug Bolt. Again it'll last 1-2 Valve Changes. Crush washers
are generic items, you don't have to buy them from BMW.
- A little bit of oil.
- Zip Ties.
What is the Part No. of the TDC Bolt-Location Crush Washer?
- It is an A8x13 copper washer available at a lot of good auto Shops.
Aluminium Works OK too. BMW Part No. 11 11 2 343 010.
Valve Shim Part # Table
| mm
| inches
| BMW Part #
|
|---|
| 2.00 |
0.0787 |
11 32 1 460 147 |
| 2.05 |
0.0807 |
11 32 1 460 148 |
| 2.10 |
0.0827 |
11 32 1 460 149 |
| 2.15 |
0.0846 |
11 32 1 460 150 |
| 2.20 |
0.0866 |
11 32 1 460 151 |
| 2.25 |
0.0886 |
11 32 1 460 152 |
| 2.30 |
0.0906 |
11 32 1 460 153 |
| 2.35 |
0.0925 |
11 32 1 460 154 |
| 2.40 |
0.0945 |
11 32 1 460 155 |
| 2.45 |
0.0965 |
11 32 1 460 156 |
| 2.50 |
0.0984 |
11 32 1 460 157 |
| 2.55 |
0.1004 |
11 32 1 460 158 |
| 2.60 |
0.1024 |
11 32 1 460 159 |
| 2.65 |
0.1043 |
11 32 1 460 160 |
| 2.70 |
0.1063 |
11 32 1 460 161 |
| 2.75 |
0.1083 |
11 32 1 460 162 |
| 2.80 |
0.1102 |
11 32 1 460 163 |
| 2.85 |
0.1122 |
11 32 1 460 164 |
| 2.90 |
0.1142 |
11 32 1 460 165 |
| 2.95 |
0.1161 |
11 32 1 460 166 |
| 3.00 |
0.1181 |
11 32 1 460 167 |
Torques
- Valve Cover Bolts 10 Nm
- Cam Carrier Bolts 10 Nm
- Chain Tensioner Bolt 40 Nm
- TDC Plug Bolt 25Nm.
- Tank Rear Retaining Bolt: Just Nip it
tight, no need to over-crank it. Same with the Allen Screws for the fairing,
but gently does it or you'll damage the plastic.
- Spark Plug 20 Nm. For New Plugs,
follow the directions on the Packet.
Procedure
A. Remove Tank
Why? To access the Valve Cover.
How? See
Gas Tank Removal-Replacement
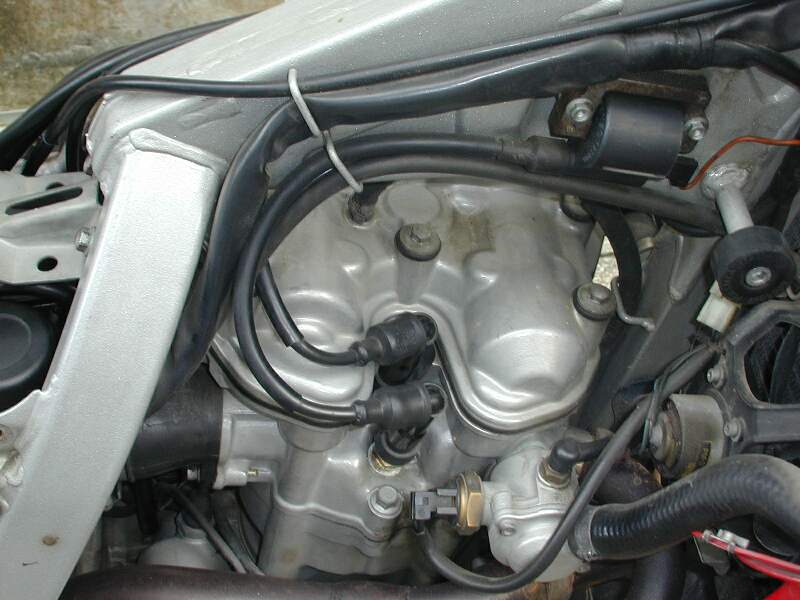
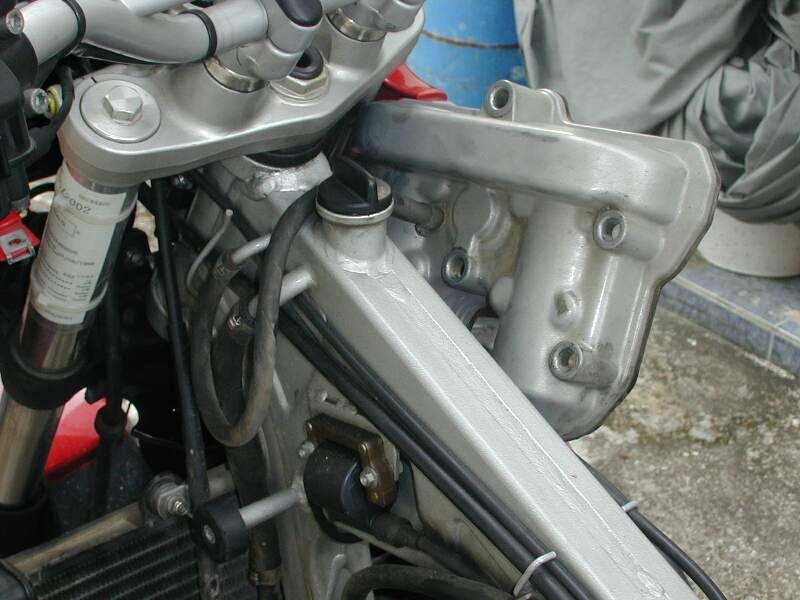
B. Remove the Valve Cover
- When the Tank is off you faced with this: The Valve
Cover. View from LHS.
View from RHS
- Gently pull off your Spark Plug Leads and remove a Spark Plug. This will allow
the Crank to be able to go a full cycle without fighting against Cylinder
Compression.
- Removing the Valve Cover entails undoing 6# M10 Bolts. You should
leave the Valve
Cover attached to the Breather Pipe, put a cloth around it and tie a piece
of string through a couple of the boltholes, hoist it up, removing it out from
the LHS Side of the Bike and over your handlebars and tie it firmly in place,
out of your way. Don't twist the Breather Pipe Hose (let it rotate at the Valve
cover if possible) if it's an older pipe and brittle, it may break.
The OEM clamp holding the cover vent to the vent hose is
non-reusable, so if you do take it off have a spare (small, about 10-12mm) hose
clamp handy to replace it.
You CAN get those OEM clamps back on, but it's not easy and not always
as tight as when you take them off. Bottom line is you don't need to remove it.
- The Cams and underneath them, the Shims, will be exposed.
The bike MUST be cold, even after 4 hours
I got a 0.01mm difference when compared to leaving it overnight and checking it
again.
C. Re-checking Current Clearances
- It is highly recommended that you check to see if the current clearances
are in fact within or out of specification. if you haven't
checked your Valves before refer the
Valve Shim Check FAQ before trying to change your Shims.
Valve Clearance Specification - Classic:
The "Classic" BMW Manual specifies:
0.10mm ~ 0.15mm or 0.004" ~ 0.006"
for Both Intake & Exhaust
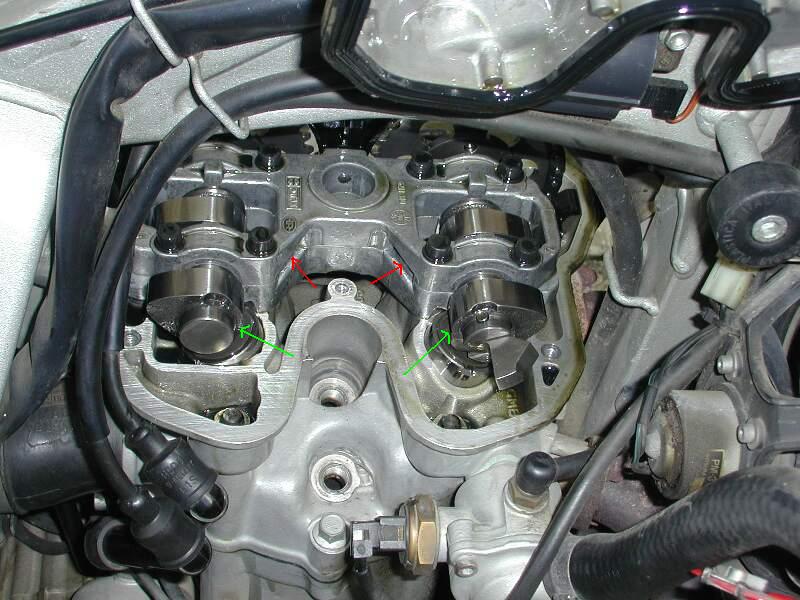
- Re-measuring the current clearances:
- You can put feeler gauges under the Front TWO as they are
easy to access. Just get the Gauge UNDER the Cam (Egg-Shaped-Thing) and on TOP of
the Shim disc. The space is VERY SMALL!
- For the BACK TWO, you must insert the Feeler Gauge in the about 10mm x 3mm Slots
in the SIDES of the Aluminium Cam Carrier. You can see them both in this
picture:
Cam Lobes
D. Determining the new Shim Sizes
- Note the nomenclature here. When talking tight or loose
clearances we talk about what you actually measure, NOT what the Valve is
in doing in the head.
- OK, you've checked your Valve Clearances and some of them
are out of spec. How do you know what to replace them with. You know the clearance and
you know it must be either increased or decreased, but without knowing the current
shim size how do you know which way to go and which ones to buy? The answer
is if you haven't already done this job once and taken a RECORD of
what's in there now, you don't know. I do not know for a fact, but I very much
doubt the same shim sizes were put in at the factory for every bike.
- If you are at the lower end of the range,
i.e. 0.10mm, (Tight Clearances) Flash recommends leaving it to see which way
they go. Other Chain Gang members have been told by their dealers loose is
better than tight, as the clearances very often, but not always, decrease
as the valves seat with wear. It is advisable however, not to wait
another 6000 miles to check, or a burned (exhaust) valve may result.
- Johnathan #145 notes "You want
them tight for better performance, however, on the F650 too tight can and will
get you into trouble with wear on the cams. At least on the carbed
engine. For the new GS, this isn't the case because the cams in the FI
engine are made of a better quality metal than the carbed version. The
cams (and I believe the head Ed.) are the only parts that Rotax does not make
the for the FI engine." Please note I only put this in inverted commas as I
cannot easily verify this information.
- One of the additional reasons to avoid
too tight (i.e. < 0.10mm) exhaust clearances is the possibility of damage by
overheating (burning) an exhaust valve. This occurs because the valve is
actually open more/longer and contacting the cylinder head less and is
therefore unable to cool properly by heat transfer to the valve seat in the
water cooled head. (The camshaft quality problem is rumoured to only
affect some bikes across one and a half model years, '96~'97~'98.) So for an
exhaust valve, if it is unlikely to be checked for another 6k miles, stick with
0.155mm rather than go to 0.105mm and risk wearing down past 0.10mm. For most
people, longevity of the engine is more than worth a slight loss in power.
- Now various dealers and after market parts places will
sell you either individual shims, to sizes you specify, or a block of commonly
used Shims of various thickness. You'll
normally find it'll be one of those. The shims come in increments of
0.05mm. Alternatively you have to take OFF the Cam Carrier (See Section E
below) and remove the current shims and beg, steal or borrow a micrometer
and measure the current size, so then you can go back to the dealer and tell
him which sizes you want. Note that a cheap US$7 Micrometer will be able to
tell the difference between 2.40mm & 2.45mm, so treat yourself.
- Note that you can also use the
Shims that are currently in the bike in another location that needs the Shim
size you currently have, if you didn't get the right replacement sizes and you
want to get the bike back on the road. This means it is possible to replace
just one of the Shims and swap some of the other ones around, depending on the
sizes you need. The Shims themselves don't really wear "out" (of course there
is some wear), so don't think of it as
"renewing" your shims. What happens is the Valve Seats get worn, because this
is where all the hot action is, literally, particularly the exhaust Valves.
However, the Shims are not really that expensive and while
it's probably OK, certainly it's OK in an emergency, in higher mileage
applications and on other types of engines, Shims have exhibited wear
patterns. At 6k miles, probably not a problem. At a greater mileage, probably
inadvisable. They're pretty cheap, so it is advisable to buy a few extra and
you will then also have some spares for future valve adjustments.
Note:
- TIGHT valves (small clearance) are open longer and the motor breathes better and makes more power but the valves don't last as long.
- LOOSE valves (lots of clearance) are closed longer, run cooler (due to ability to transfer heat to
head), last longer but don't make quite as much power.
E. Taking off the Camshaft Carrier
- OK, you've determined you need to change
the Shims and you need to know the sizes currently in the bike or you have your new shims and just need to change them.
To do this you need to remove the
Camshaft carrier, which is the frame
which holds the Two Camshafts in Place like a Sandwich, then lift the Cams up
(in the frame) enough so that you can get to the shims and remove them. You do
NOT need to take the Cam Driving Gears off the Cam Shafts and you do NOT need
to remove the Camshafts completely from the Camshaft Carrier.
- STUFF SOME RAGS IN ALL PLACES, ESPECIALLY AROUND THE CAM CHAIN,
WHERE SMALL BITS, SHIMS, TOOLS ETC CAN FALL DOWN!
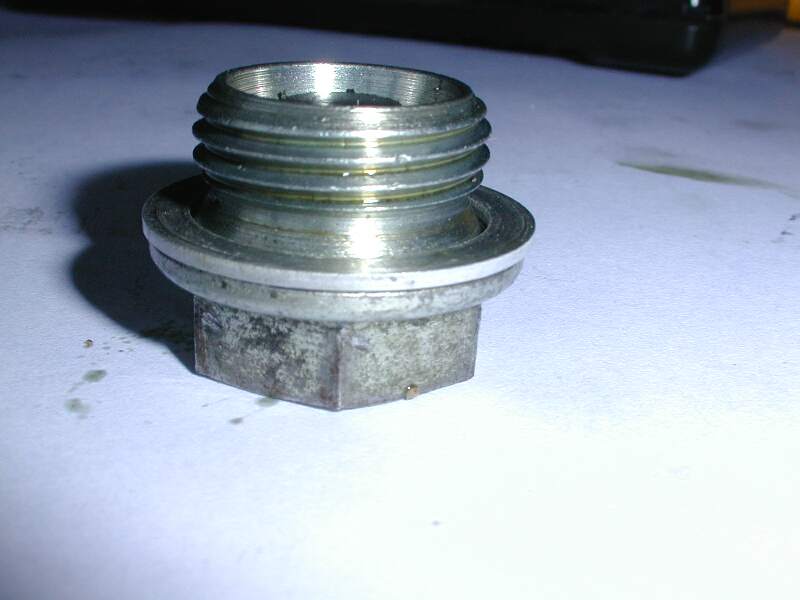
- First you need to be able to get the Cam Chain loose
enough to lift up the Cam Carrier enough to get to the Shims. To do this
you need to undo the Chain Tensioner, (Chain Tensioner Bolt
Location) accessed from the LHS of the bike at the back side of the
engine. There is a large 22mm Bolt. Undo this bolt. Note the Crush Washer
should be replaced when reinstalling. It is the same size as the Oil Drain
Plug Crush Washer, or at least that washer fits, so if you have a spare
one of those you could be in luck. Behind the bolt is a Steel Cylinder,
which is the "Hydraulic Tensioner" itself. The steel cylinder pushes up against the
Chain Tensioner Guide under OIL PRESSURE. The BMW service manual "Engine Oil Circuit" diagram
shows the chain tensioner as shown as being fed off the high pressure oil line.
So it only tensions when the Engine is running. Elsewhere in the manual it's described as a "Hydraulic Chain Tensioner". Remove this
cylinder so it doesn't drop onto the ground and
score the sides of the cylinder.
Note that you can UNDO the Chain
Tensioner Bolt with a ring spanner, but the darn Carbs can get in the in
the way for torquing it up. Here's a recommendation:
"With a new washer, and using recommended sealer (e.g. Yamabond as a substitute for
ThreeBond 1209 on the washer), I just do mine by hand. Gingerly. I can't see that setup
withstanding 40Nm forever. I think I can get a small torque wrench in there
with some strange adapters, but it only goes to 30Nm, which is plenty as far as
I'm concerned. You can easily tell if it leaks - looks like a good candidate
for drilling and safety wire to me, good washer and sealer, and forget the
40Nm." Hombre sin Nombre. See
Where can I get Optimoly MP3, Loctite 243 etc. Are there any Substitutes?
- At this stage I highly recommend tying the Cam Chain to
Gear wheels with some zip-ties.
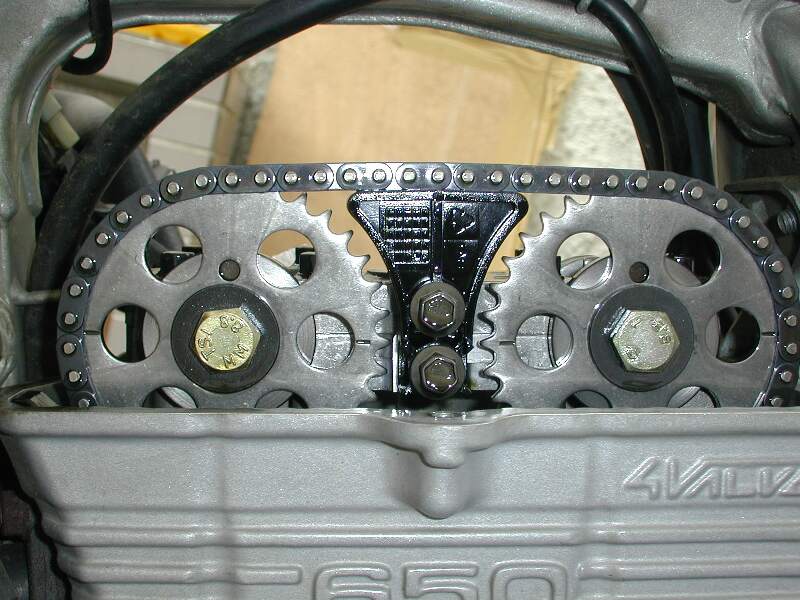
IF YOU WANT TO CHECK YOUR CAM BEARINGS AT THE SAME, you
CAN remove the Black Plastic T-Piece in between the Timing Gear
Wheels, however this is NOT Necessary.
These two bolts tie the Upper Frame and Lower Frame Together, and if you
don't remove it the Cams can be lifted with the Cam Carrier, as one unit,
at least enough to access the Shims. See here for a picture of the
T-Bone Spacer.
(Note Marks not lined up in this Photo)
- If you want to you can take the chain off the
Cam Driving Gears, but it is NOT necessary and the advantage of leaving
the chain on the gears, (and tying them to the Gear wheels with some
zip-ties) is that your chain doesn't move with respect to the Gears. If
you do decide to take them off to have a really good look around in there,
MARK the position of the Chain with respect to the Gear Wheels so you know
where they go back. Also MARK which Cam (with Gear Wheel attached) is the
front (Exhaust) and which is the rear (Intake). If you do take the chain
off, tie a piece of string onto it first, and tie the free end to the
handlebars. Be careful you don't accidentally drop the chain into the
Cam-chain Well.
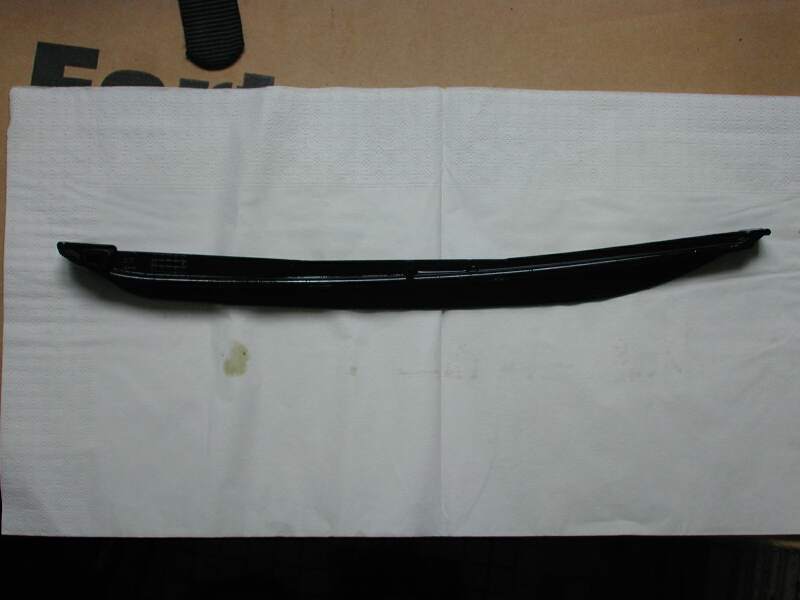
- You can also remove the FRONT Black Plastic Chain Guide
(Don't try and take out the Rear one) by just GENTLY pulling it upwards
and slightly backwards. This will loosen the chain some more and let you
really get the Cam Carrier up. See here for what it looks like when it's
out:
Front Chain
Guide.
- Note that The rear cam chain guide rail has a bolt stuck
through it at the bottom and will NOT pull out.
- At this Stage I highly recommend putting a Large
Cloth in the Cam Chain Well so you don't drop anything (like the Shims)
into this well. Not a good idea.
| Hint for removing the cam carrier |
|---|
| A word of caution---Even though I had a rag stuffed down in beside the cam chain, [the washer from the cam carrier bolt] still made it's way down there. I would advise not pulling the bolts out of the cam carrier but loosen them until they are free of the head and then pull the entire cam carrier and bolts out as one unit. Return them the same way. Maybe it will save you this pleasure. jagdkampf #1761 |
- Remove the Camshaft Carrier. It has 8 Allen-Head Key
Bolts in it. Check you have a Torque Wrench and Allen Key Socket that has
a low enough combined height to fit under the Frame of the bike for when
you go and torque them up. The frame is actually in two parts, a lower and
an upper frame, but as they are tied together by the T-bone, they will
come out as one unit. Loosening the bolts undoes both in any case. Lift up
the entire frame and prop with a wooden block, to access the Shims.
- If you took out the
black plastic T-Bone, you can lift off the upper frame only. The lower
carrier can remain in place. This will give you access to the Cams, which
you can now lift up and prop in the air with a Wooden Block, just enough
to get the Shims out.
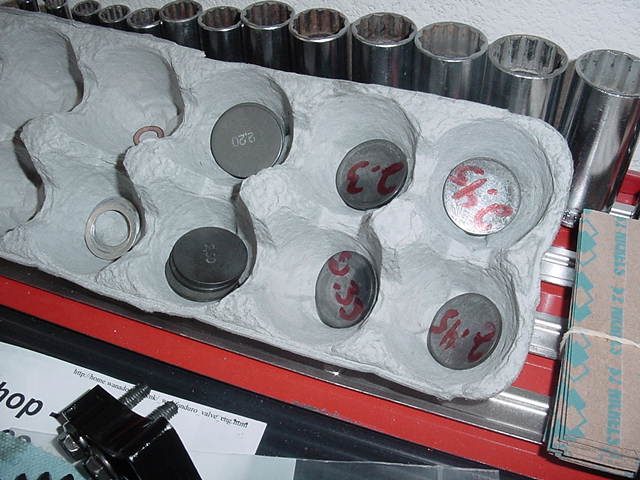
F. Removing the Shims
- The Shims sit in Shim Buckets, (like an upside-down
bucket) which fit over the Valve Stems & Springs. They look like little
silver coins and are around 2.5mm thick, to give you an idea of the size. The
Shims sit in a small well on the top of the upturned Buckets, with two little
slots on the top and close to the edge of the Bucket. The Buckets can be easily
rotated to give you better access to the little slots. Don't worry you are not
unscrewing them or anything!
- Using either a very small
screwdriver, a toothpick or some other small and thin object gently prise the
shim out of the well, gaining access via the slots. It is held in place only by
Oil Suction, and when prised free comes out easily. Do one at a time and take
care you don't drop it anywhere into the engine. See tip above about cloths.
- Clean, measure and/or mark each one with thickness and/or the Shim location, so
you know where it came from, in case you don't have a micrometer but do know
the old thickness. Make sure they are clean and free from specks of sand or
grit before you pop them back on. Some people use surgical gloves.
| Johnny K Note |
|---|
| "I found that even with some nicely sharpened tools it
was tough to budge the shims with the buckets in place, due to oil surface tension/suction. However, if I raised the bucket 1/2" or so, whatever that
space is that's available below the raised camshaft assembly, I could then push
upwards on the shim edge and it pops right out. Another advantage is that with
the shim and bucket in contact with the cam assembly, the freed shim is less
likely to flip out into the sump. Took your advice about the rag stuffing too
though. There is no way to get even the skinniest prying utensil under the shim
if it's fully in the bucket. The space in there clearly is deeper than the
slots. So when you pry you are really just pushing with friction against the
side of the shim. That's why it helped to have the bucket up so I could be
pushing upwards against it, I assume. I also noted as you suggested in the notes
that the new clearance should only be measured after turning the engine over a
full rev. The oil on the new shim must be forced out and off before the reading
will be
accurate. I discovered too that the shims from 2.25 to 2.75 (that diameter) are
pretty common in the mc world. Since a BMW dealer is a ways off, I
tried a guy locally who builds Rotax race engines for track racers. He had a
whole assortment of shims that were Yamaha that he uses. I just swapped
mine for one of his." (Thanks, Johnny K).
|
| Werner #547 Note |
|---|
| The rag works well, as Flash says. But you can be doubly sure by lifting out the
whole cup holding the disk. (Do one at a time, so as not to mix them up during
reassembly). Then you can sit down on your barstool and remove the little disk
with your pointed nail while sucking on a tall bubbly.
|
G. Replacing the Shims
- Well, from "D" above, by now
you should have been able to calculate which shim should go where to be in
spec. So pop them back in at the correct location. As far as I know there is no
correct way up, although I would say if you can see a smooth side, face that
up.
- It is a good idea to wet everything with oil (both sides of
the shims) during reassembly.
H. Replacing the Cams/Carrier/Chain/Chain Tensioner/Tank
- If you took out the T-bone Spacer,
before you replace the Cams in the lower carrier, make sure the lobes are nice
and clean. Inspect the Lobes (and Cam Bearings if you took the Cams out of the
Carrier) for pits, marring or flaking. Note this is a warranty item if
found. Each CAM runs about $375. Make sure both
the Cam lobes and the Cam Carrier bearings are nice and clean. Replace the
Upper Frame.
- Make sure the new shim (or opened cam
bearing) and the cams and bearings are well coated with oil for installation -
they should not be installed dry and left dry, as it will take several engine
cycles for the oil pressure to reach them. The cams and buckets can be
slathered as they are re-installed or just before the valve cover goes on, but
the cam bearings should be wet with oil when re-installed.
- Replace the Cam Carrier, checking the
timing marks still line up on the Gear Wheels
Timing Marks. (They should
do if you zip tied the chain to them!). Check the Cam Gears are able to be
toggled and are not pinched, then Torque them up. The Torque value is 10N.m.
Check you can Toggle the Cam Gears once again. The Manual also says to tighten
the Camshaft Carriers from the inside out. The inside is the flatter,
less pointy end of the Cam Lobes as they are at TDC. Tighten once by hand
lightly, or to 5Nm, then finish with 10Nm.
- Don't worry if when you put the Cams back, the timing marks are out, it is
possible to lower the chain far enough so that it disengages from the drive gear
at the bottom end (i.e. in the Crankcase) and goes along one tooth, as long as
you STILL have the TDC bolt in place. You can simply cut the zip ties and put
the Cams back WITH the marks on the Cam Wheels aligned WITH the lobes outward.
- Note: It is very difficult to properly
access the rearmost RHS bolt with a 3/4" drive torque wrench and a
3/4" tool bit as it is just too high and just won't fit between the frame
and the Bolt. I made up a 1/4" drive, 5mm bit for a 1/4" drive torque
wrench. See (picture) Otherwise that last bolt must be torqued by feel, based
on the torque you put into the other 7, so do a few of the other 7 first to get
a feel for it.
- If you took it off, replace the black
plastic T-Bone Spacer. Only do this after you Torque the Carrier Bolts and use
Loctite 243 on these bolts.
- Replace the long black plastic
Cam-Chain Tensioner Guide by feeding it in behind the chain (at the Rear of the
well), keeping it close to the face of the well, until it engages at the bottom
of the well. Make sure it's properly seated.
- Reinsert the Chain Tensioner Cylinder,
giving it a squirt of oil before you feed it in, followed by the Large Bolt
(complete with new Crush Washer). Torque Bolt to Spec. (40Nm). The manual also
recommends using ThreeBond1209 or Yamabond on the washer. Be careful to NOT
exceed 40Nm torque as it seems an excessive amount of torque on such a thin and
delicate portion of the engine. Be careful NOT to put too much of any
silicone-based sealer anywhere, e.g. threads as it can get into and clog thin
oil passages. See
Where can I get Optimoly MP3, Loctite 243 etc. Are there any Substitutes?
for a more detailed explanation.
- Note:
The Chain Tensioner cylinder is a miniature hydraulic cylinder, acting as a
self adjusting spring on the cam chain guide, pressurized by the engine oil
pressure. If its tiny check valve is leaking slightly, it will reseat and allow
you to install the Large Bolt easily. If it's not leaking, it may seem too long
to re-insert and install the Large Bolt. You must de-pressurize it by looking
in the opening, finding the tiny ball bearing check valve, and pressing it open
with a pin to allow oil to leak out. This will allow it to shorten enough to
install the Large Bolt. If you think you have a problem with noise from a loose
cam chain, especially at start-up or low oil pressure, or find wear on the
chain guides, this is one of the parts to consider replacing.
- Give the Cams, Bearings, Shims and
Cam-Chain a squirt of oil, check you haven't left anything in there that there
shouldn't be there. Use a flashlight! Make sure no bolts are loose.
- After installing new shims and tightening the cam carriers/tensioner, but before
installing the valve cover, it's worth taking out the TDC locating screw and
rotating the engine by hand a few times, with the Socket in the Flywheel, just
to see if everything is right.
This is the important part, to spin the motor around at least two revolutions,
maybe four, and measure again before you button it back up. (The oil film will
take up some of the clearance until you spin the motor to squish it out.)
It is a
REALLY good idea to re-measure the clearances also, just to make sure. It's
better than finding out at start-up that it was re-assembled 180 degrees off.
Do not worry if they are not exactly what you calculated!. Close but not exact.
The difference is mostly in the Oil Film.
- Check the Seal Surface of the Valve cover is clean, Check the seal is in its
groove, Replace the Valve Cover, Torque the bolts to 10Nm.
- Replace the Tank. See
Gas Tank Removal-Replacement
That's it. Ride off (into the Sunset) and
Ride Safe. Go home, have a few beers with the money you just saved, and feel
very very satisfied.
Time
Lots of Leeway here. You should be able to do it much faster.
- Tank off - 10 to 15 mins
- Valve Cover off - 5 mins
- Check Existing Shims, Write down the Numbers, Calculate
the New Shims Sizes. 10 to 15 mins
- Chain Tensioner Loosened, Chain Guide Rail Out, Zip
Tie-Cam Wheels, Cam Shaft Carrier off 15 mins
- Take Out, Replace Shims. 10 mins
- Replace Cams/Carrier/Chain/Chain Tensioner - 15 mins
- Replace Tank - 15 mins
See also these beautiful photos of the Valve Shim Replacement
Valve Adjustment Photos from Jim Powell.
Jim also likes to be called John :-) and likes cars (blah!) with 400HP!
Note in Jim's Photos, the Timing is off one tooth!
Many thanks to Flash, Richard, Todd, Marty436 & Johnathan Gifford,
for all their very constructive comments which are reflected in the FAQ.