The Clutch FAQ
compiled & edited by Kristian #562
Please read the Disclaimer before
attempting any work in this FAQ.
14/11/01
If you are looking for information about installation of Stiffer Clutch Springs
see the
Stiffer Clutch Springs FAQ
If you are looking for information about Clutch Rack & Pinion problems, see the
Clutch Misc Probs FAQ
If you are looking for information about Clutch Adjustment see the
Clutch Adjustment FAQ
If you are looking for information about Clutch
Slippage see the Oil FAQ before considering Changing
your Clutch!
New Clutch Plates and
Springs Installation FAQ
by Kristian #562
This FAQ is about the
installation of New Clutch Plates and Springs.
How do you know when
they’re worn?
What are the Symptoms.?
-
The Clutch slips
(or rather the Plates slip), particularly when you drive up a steel hill in low
gear.
-
BE AWARE
however, that it’s a Wet-Clutch i.e. bathed in the same Engine Oil that
lubricates the rest of your bike.
-
"One of the most probable reasons for a slipping
clutch (assuming everything is adjusted OK) is the use of EC (Energy Conserving)
rated oils. (Has an EC in the API - American Petroleum Institute) star logo. Not
sure if you have them in HK or Yurp, or how they are marked (probably NOT with
an API symbol!) but they are very common in the US, especially with the
synthetic oils. The EC additives are VERY BAD for use with wet clutches, cause
excessive slippage, and are difficult to "wash" out if used - might take several
oil changes. In other BMW's with a dry clutch, using EC oils is common, so it's
probably a common mistake in the service shop also."
-
When I took mine
out at about 25,000 miles to replace the Springs, the old plates JUST looked
like the new ones. So my guess is a LONG time.
-
I can’t tell you
how many miles they’ll last there is no “Magic Number”, because it depends on
your driving style, whether you do a lot of highway, or lots of clutch-work
(i.e. slipping) in and around town, your engine oil type, how far you drove with
low engine oil or perhaps how far you drove with emulsified engine oil when your
water pump fails.
-
So before you go
wasting some money and time on New Clutch plates, try fully synthetic oil (not
just the Semi-Synthetic Stuff). Ramey of Ron Woods racing has previously
observed that with e.g. Redline FULLY Synthetic Oil people with Clutch Shifting
Problems went away happy. I can’t say THIS will fix your problem, but try it
first. You should be using Fully Synthetic after 6000 miles anyway, to protect
your engine after the break-in period.
What Tools
will you need ?
- Will you need any Special Tools.? No, actually most of
the tools for removing the Tank and the LHS Engine Cover are in the little
tool-kit under your seat.
- You will need a Torque wrench to Torque the Clutch
Spring Bolts and Engine Cover back up though, with the appropriate sockets.
See The
Torque Table for a list of Torque values.
- You will need a little patience.
Parts needed:
-
21 21 2 343 464 - Set of Springs and Clutch Plates. Your
NORMALLY only Need the FIBRE Discs, Not the steel ones!
NOTE:
Check these numbers (Which MAY depend on the YEAR of your BIKE with your Dealer
as the Clutch WAS modified earlier on. You should replace the springs with
the disks!
-
11 14 2 343 240 - O-Ring for Coolant Draining Screw.
-
11 14 2 343 038 - Gear Shifter Seal, Recommended. (Can be bought in
any Seal & Bearing Shop).
-
?? - The LHS Cover Gasket. In
case you do damage it removing the cover, bit if you are careful and
lucky...you won't need one.
And if you WANT to (Preventative
Maintenance):
-
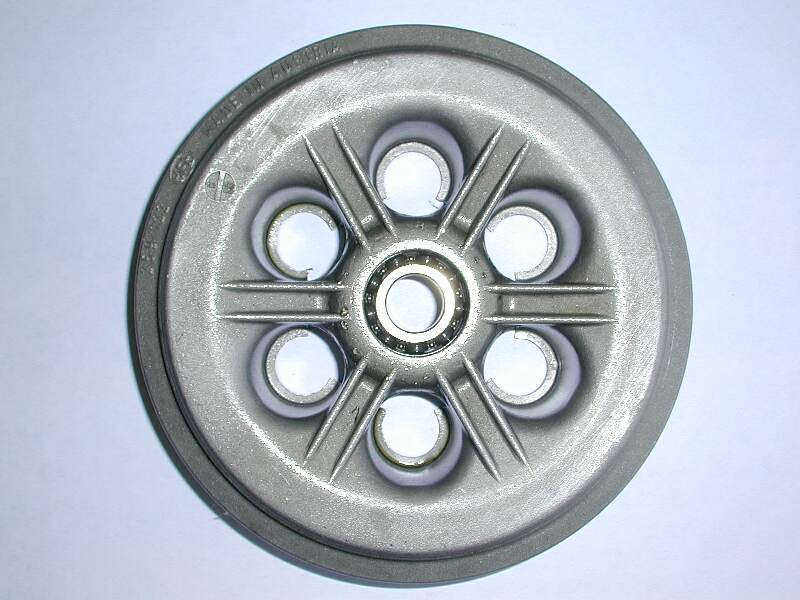
If you want to do preventative
maintenance change the Ball Bearing in the Middle of the
clutch pressure plate. Easy & Cheap. The Bearing # is
15x32x9 (Any Bearing Shop will have one!. BMW part #
21 21 2 343 173. The
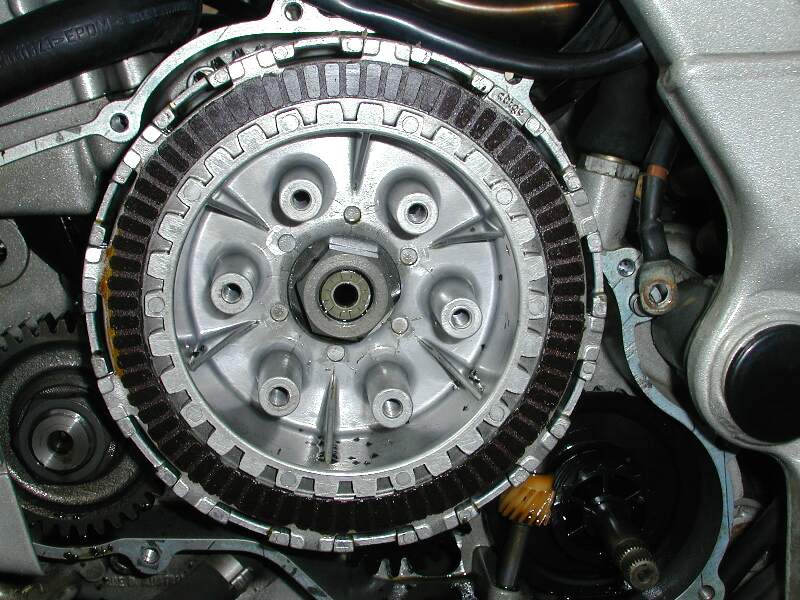
Bearing Number is 6002. (Part 13 in the diagram). If you do replace this
bearing, which should NEVER wear unless it is misaligned because it really
doesn't get much load, be careful you properly heat the clutch basket plate it
fits into AND you freeze the bearing or you will break the cast clutch basket
plate, which looks like both a quite fragile and expensive item. My bearing
just dropped in. Do NOT hammer this plate.
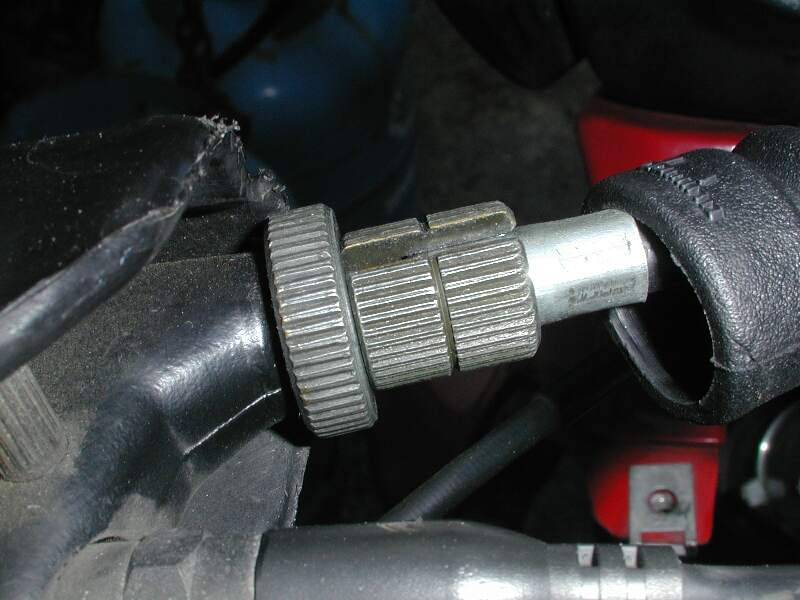
- The Part # of the longer 6" vertical shaft,
that rotates, with the cable end lever spline on one end sticking out of the
engine cover, and the gear (rack) teeth on the other end, is 21 21 2 343 177.
See the Clutch Misc Probs FAQ for reasons
why.
- Also for preventative
maintenance you MAY want to change the
Release Bearing in the Middle of
the Clutch Basket. The Part# of the fat 3" Horizontal
Rack
(release bearing), pulled by the above (177) part, inside the engine at the
end of the clutch basket, that actually pulls/loosens the clutch late pack, is
21 21 2 343 175. See the Clutch Misc Probs
FAQ for reasons why. Clutch
Release Bearing: Part 14
in the diagram. Essentially
the RACK discussed above.
- ONLY if you have to do the
Clutch Releaser Arm Shaft Bearings (Major
PITA) also check the Part Numbers FAQ.
- You MAY want to consider replacing the six screws at the
springs. There is ONE case of the head of a screw being sheared off, although
this is NOT common. The Torque is only 10Nm, so it should NOT happen. (See
Should I replace the 6 Screws
below).
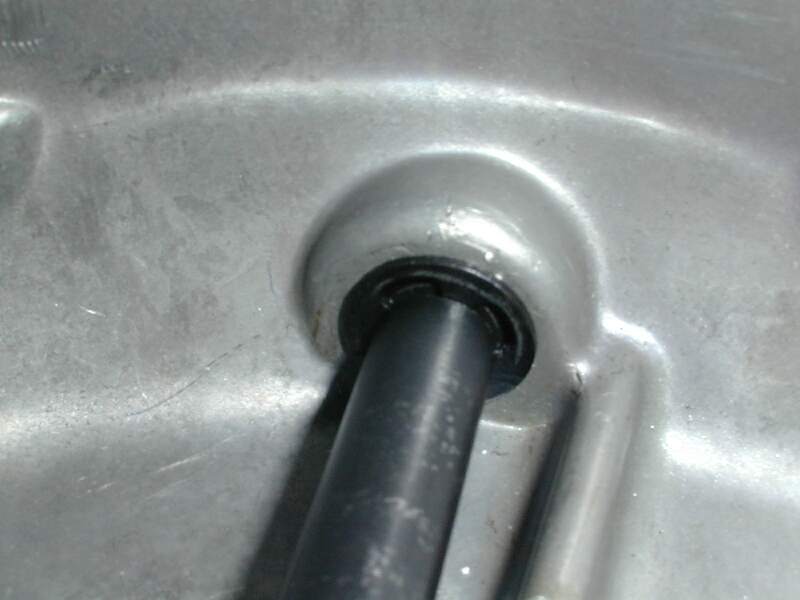
I’m very much of preventative maintenance person and seals
are cheap. I would highly recommend, while you’re in there, to replace the
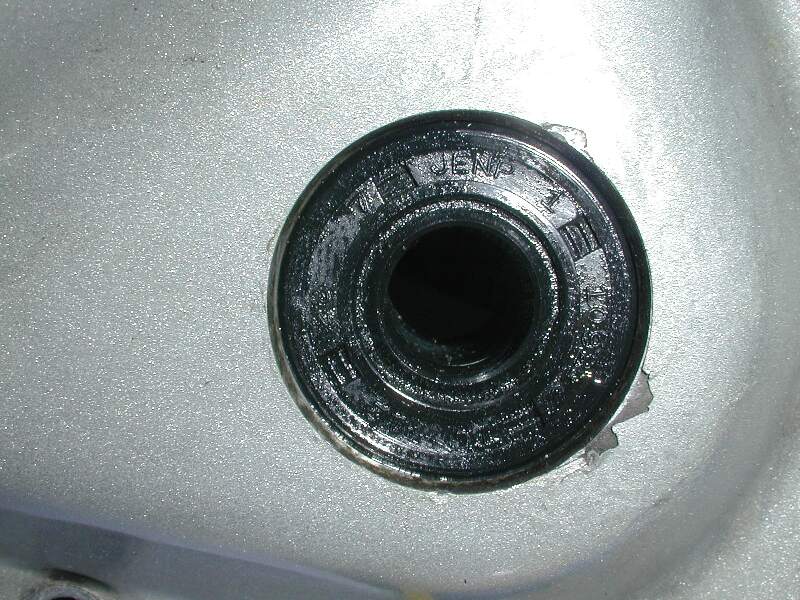
Gear Shifter Seal and the
Clutch Shaft Seal (Photo shows location only). The seal sizes are Gear
Shifter Seal 12x28x7mm, Clutch (Actuator) Pinion 12x18x4.5mm. They didn't have a
12x8x4.5mm for the Clutch Shaft Seal so they gave me a 12x18x5mm (But half a
millimetre thicker works just fine). If it was one of the diameters it would be
a problem.
So what’s the
Procedure?
You may wish to consider
doing this concurrently with an oil change,
i.)
Drain your Engine Oil.
1.
See here for the
Oil Change FAQ. You should do this first and leave it awhile to cool,
because you will want to do this with the engine HOT to Drain the Oil properly,
however you don’t want to be taking the Engine Cover off while Hot. Btw, just do
the first part of an oil change, i.e. only DRAIN the OIL, do not refill it until
after the Clutch Plate Replacement.
2.
Flash #412 notes. "I didn't want to drain the whole mess, so I
only pulled the bottom drain plug after letting the bike sit overnight. Not very
much came out. I put a BUNCH of newspaper under the work area, but it didn't
lose very much more oil while I was working on it. I drained the oil into a
clean container and then poured it back in when I was finished. What I am saying
is that if you are doing this PREVENTATIVELY, you do not need to drain out ALL
of the oil, just the sump.". So if you just changed your oil, you can just drain
the sump.
ii.)
Remove the Fuel Tank.
1.
You need to do this to get access to the radiator. See the
Gas-Tank Removal + Replacement FAQ for details. One guy tried (and managed)
to refill the Coolant without removing the Gas-Tank, but even he doesn’t
recommend it. See the
Coolant Change FAQ if you really want to know how he did it.
iii.)
Drain the Coolant
1.
Check the
Radiator Cap for grunge and clean it.
2.
Locate the
water pump cover which is on the left side of the engine towards the front.
3.
Remove the lower of the three Allen bolts and have a bucket ready.
Put your bike on its side stand to empty some more coolant. Remove the remaining
2 bolts on the Water-pump cover. There is NO NEED to remove coolant hoses off
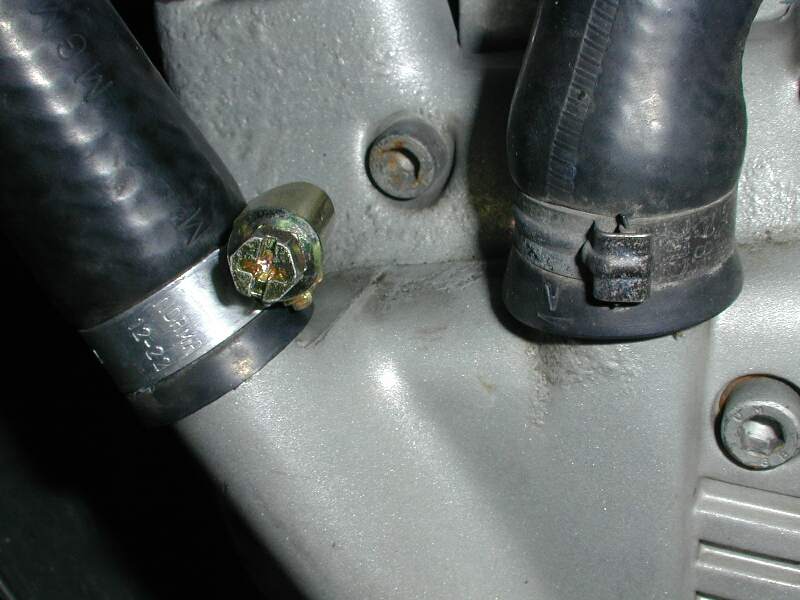
the impeller housing to do a water pump seal replacement, just roll the housing,
hoses still connected, up and out of your way, with string if necessary. If you
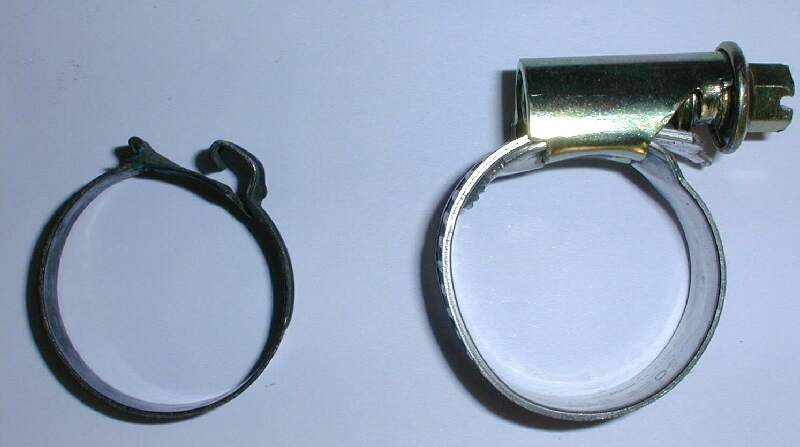
do decide to replace the clamps, get some of these:
New Clamps. Here's shot of the
old and new clamps.
iv.)
Remove the LHS Engine Cover
1.
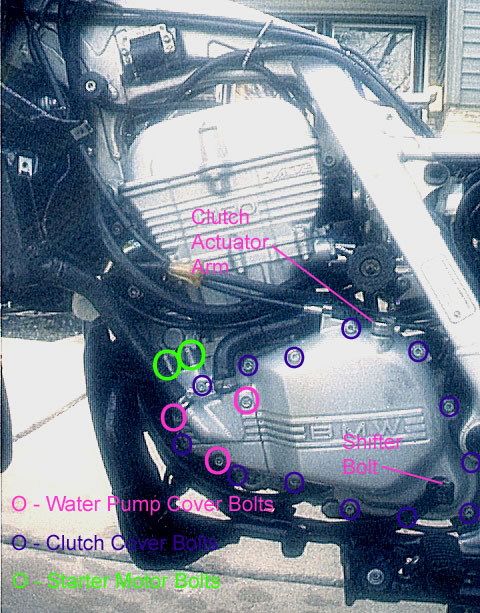
Remove the two bolts holding the starter to the LHS Engine Cover
and let it hang. Marty #436 provided this great annotated
Photo of the
Cover.
2.
Remove your
Gear Shifter. All it takes is undoing the Allen Bolt and wiggling it off the
spline. Note the position first and if you haven’t moved it down one notch,
now’s a good time to consider it. See the
Gear Shifting FAQ.
3.
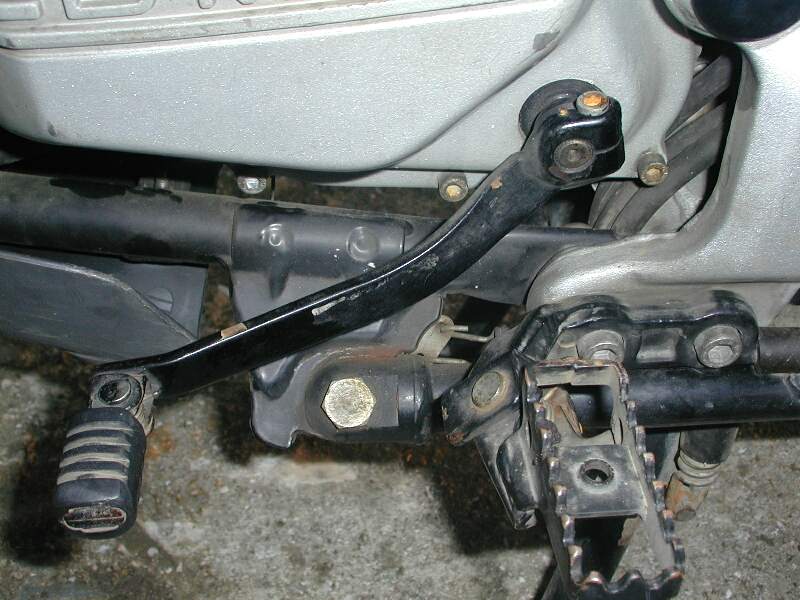
Remove the Clutch Cable off the
Fork Lever on top of the LHS Engine Cover. This entails
loosening the clutch cable at your Clutch Lever on the handlebars, so there
is enough play to get the cable off the Fork Lever. Flash #412 notes "You don't
NEED to slack the cable adjustment at the grip. What I do is pull in the clutch
lever with my left hand and grab the cable sheath down at the bottom with my
right hand. As I let off the lever with my left, I pull the sheath with my
right, getting enough slack down there to slip the cable out of the slot.
(Putting it back together generally requires slack, however.)". NOTE!
"How do you get the actuator arm off of the splines without
hurting anything. The Clymer just says remove the bolt and remove the arm. I'd
hate to apply to much force and damage something." Basically it's a B**** to get
off if the bolt has been tightened even close to the right torque, or over it. I
ended up spreading the thing with a screwdriver in the slot and a bit of LIGHT
GENTLE twist. Heed the advice about NOT overtightening when it goes back on.
Tap a small (pocket-sized) screwdriver into the expansion slot (but NOT into
the casing) enough to open it up. Just a little bit will be enough to get it
off. Too much will break the lever (you have been warned).
4.
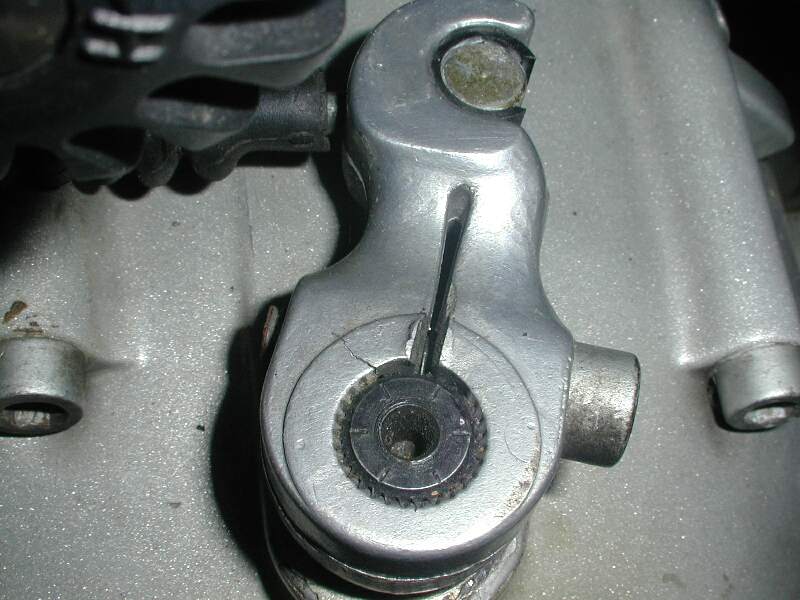
Get a Pencil or Magic Marker to mark the position of the Clutch
Fork with respect to the Engine Cover, for when you re-install it.
5.
Remove the engine cover (Allen) bolts and note the location of
each bolt. (some are different lengths, but most are the same length).
6.
Gently coax the engine cover off and watch out you do not damage
the
Shift Lever Seal on the spline, if you are not going to replace it. Watch
how much the Clutch Fork Rotates until the Cover is free, because this will help
you set it to the right position when you replace it. You need to keep the whole
deal straight and gently wiggle the casing. The aluminium clutch lever arm
rotates clockwise, which should roll the shaft teeth off the Clutch Release
Bearing Rack. Be gentle and take your time, keep the casing straight or the
casing locating pins, the release bearing and the impeller Drive Gear all
conspire to jam you in. For details of what I am referring to when I talk of the
Clutch Release Bearing see the
Clutch Cover Removal FAQ.
7.
In addition, the paper gasket on the casing is very fragile and
rips easily. So, avoid curling your fingers around the inside. If you rip the
gasket, you will have to buy or make a new one out of gasket paper.
8.
Now you’ll see the
innards.
v.)
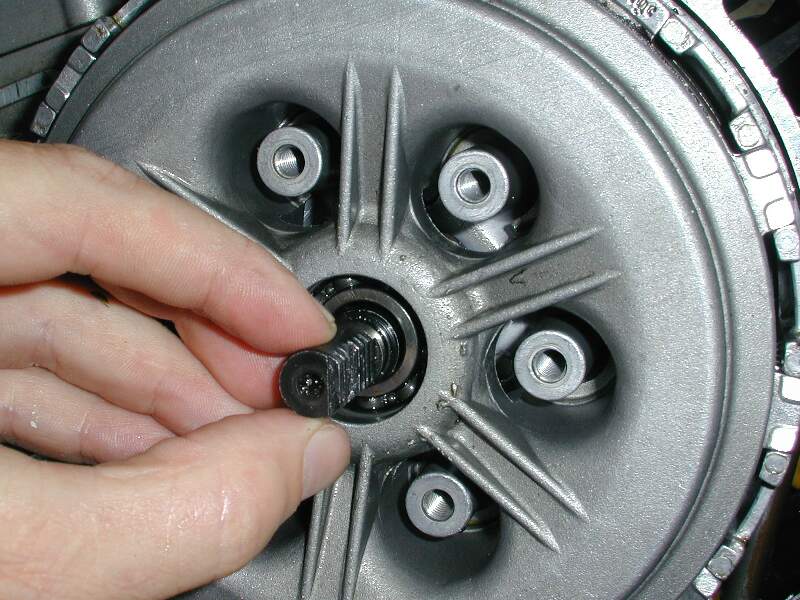
Remove the Clutch Springs & Plates
1.
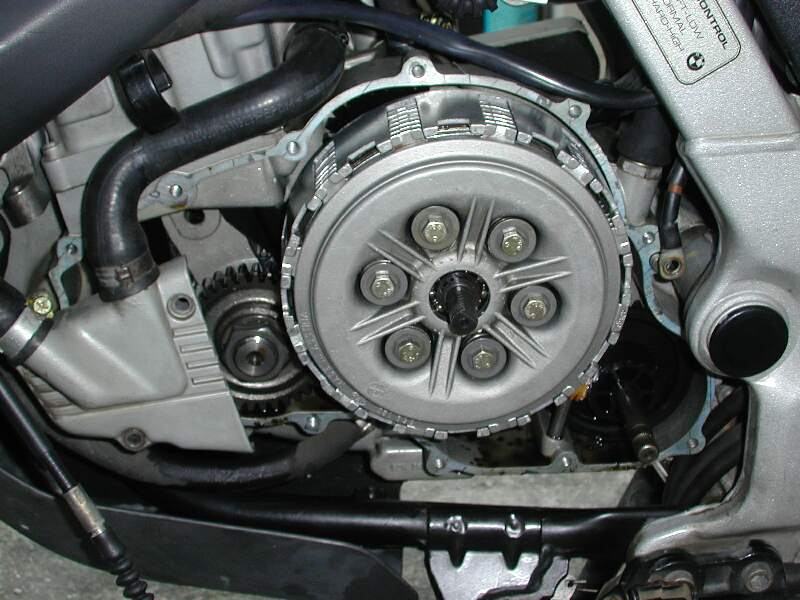
Now you have to remove the 6 bolts (with the
spring behind them) from the
clutch pressure plate and ease the pressure plate off. Don’t lose the
washers and don’t get the New and Old Springs mixed up. The BMW Manual
recommends replacement of the Fibre Plates and the Springs simultaneously.
2.
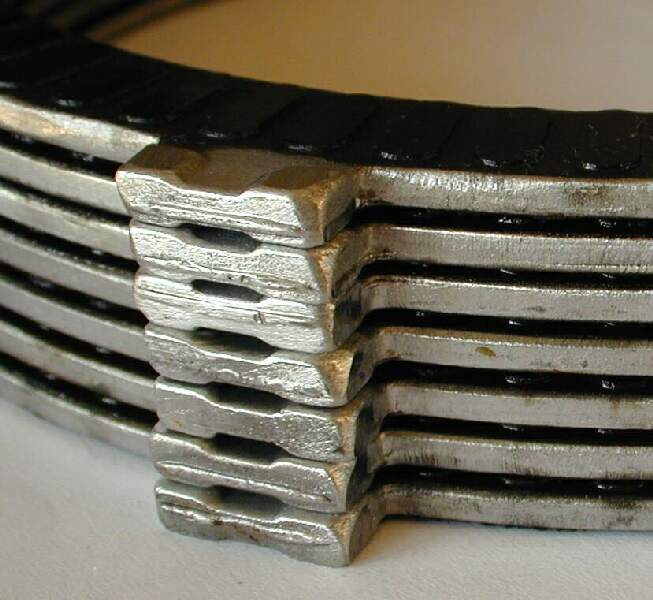
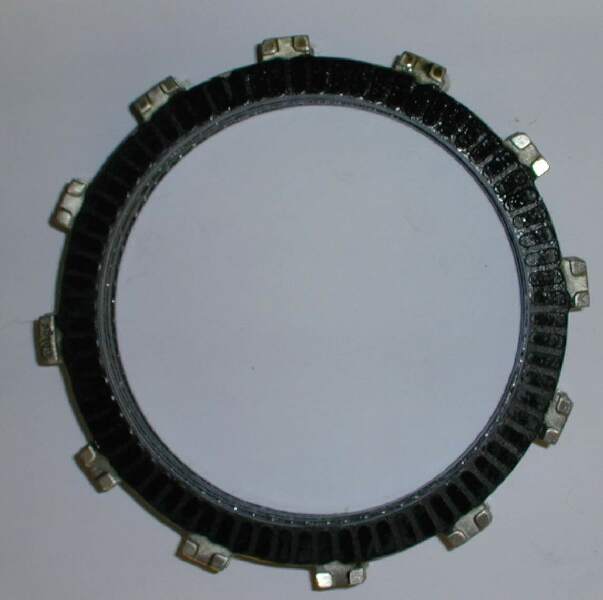
Ease out the
Clutch Stack (Fibre
Discs and Smooth Metal Discs are interleaved) AS A WHOLE UNIT. You can take
them out individually if you wish, but remember the order and the orientation. A
magic marker across the tabs helps with the orientation to each other. "
3.
Don’t forget to remember the order in which the clutch discs and the
metal discs are in.! . Before disassembling the clutch (just 4 or 5 screws with
springs behind them) take a look at the discs in order to see the sequence and
the surface the discs are inserted. (You can insert them "the wrong way", so
take a close look)."
4.
Keeping the Smooth Discs in the same order they came out, and keeping the
tabs lined up in the order they came out, check them for wear and for true.
5.
Soak your fibre discs in oil prior to installation so the don’t rip to
shreds when you first use the clutch.
6.
If the Smooth Metal Discs are OK, interleave the new
Fibre Discs between the old smooth discs and replace them into the
Clutch Basket. Make sure the last fibre disk is set into the slots in the
"basket", offset from the rest of the discs. Note that this is dependent on the
YEAR of your Classic however as the Clutch was changed in about '95 or '96.
7.
Now is a good time to check the condition of your clutch release bearing
(The
RACK in the middle of the pressure plate) and of its mate, the
Clutch Spindle, because if they are failing they will could soon look like
this. (refer the
Stiffer Clutch Springs FAQ for more information).
8.
Before you replace the pressure plate, check the
bearing on the inside for wear. i.e. feel if the bearings are crunchy or the
bearings wobbly.
9.
Replace the Pressure Plate, then install springs, washers and bolts in
that order, doing each up as far possible by hand first. Torque them up the
working with pairs of bolts across the diagonals. The specified Torque is 10Nm.
vi.)
Replace the Gear Shift Seal (and Clutch Spindle Seal if so
required)
1.
Gear Shift Seal: Just pull out the old one with a screwdriver or better a
stiff plastic rod, taking care NOT to scratch the metal surface, grease the new
seal and push it into place. The writing on the seal faces outwards, in case you
forget.
2.
Clutch Shifting Shaft Seal: Either you can either try to prise the
old one out with the Clutch Shifting Shaft in place and fit the new one over the
top, or you will need to remove the
E-Clip inside the casing, just under the seal, pull the Clutch Actuator Arm
out, replace the Seal (which is easier to get out this way) and then replace the
Clutch Actuator Arm and E-Clip. Have a look at the
Clutch Cover Removal FAQ for more details.
vii.)
Replace the LHS Engine Cover
Note: The Clymer Manual says
something about Bleeding the Oil System.
1.
Putting the casing back on is a harmonic convergence of drive
gear, shift lever and clutch arm and bolt alignment. If you noted how much the
Clutch Arm turned when you took the cover off, you will have a good idea of its
starting position when you replace the cover. It should start from about 3-4pm
(facing the LHS of the bike) and turn anticlockwise back to its original
position as you push the cover on.
2.
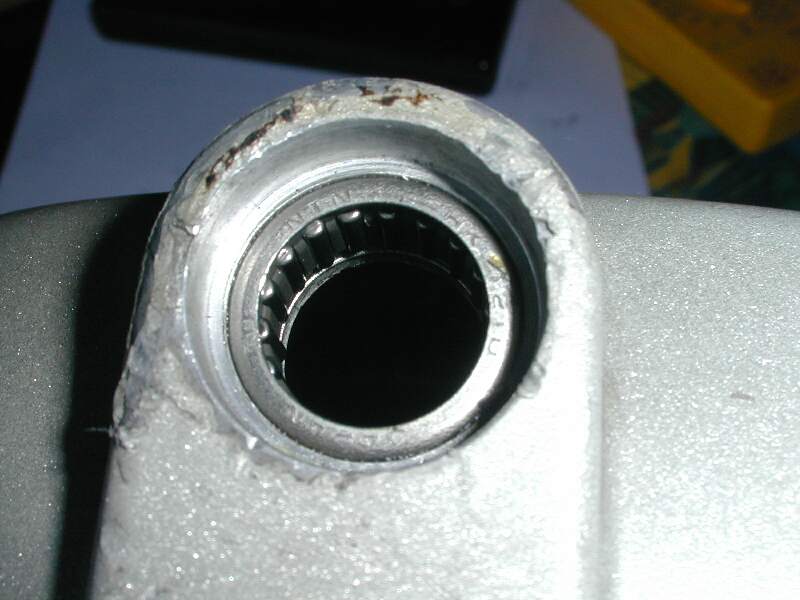
The Clutch release bearing (Flat
Rack with Teeth, Bottom of Picture) that sticks out of the centre of the
clutch pack always wants to rotate with the
Flat Side UP, (Note Clutch springs are off in this Photo, but will be in
place if you just do the water pump) because of the weight distribution. It
keeps rotating until the Teeth face about 5 o'clock, making it impossible to get
the cover back on. To get it into the Clutch Cover the Rack must be horizontal,
with the
Teeth facing towards the rear of the bike so that it will properly mate with
the clutch shaft. You can get around this by taking a pea-sized dollop of
generic grease (not hi-temp) and putting it between the rack and clutch pack to
keep the rack from rotating. THEN the cover should go right on.
3.
Eyeball your shift gear on the plate and the internal gear and
push lightly. You may need to gently rotate the impeller to allow the drive gear
to mate with what drive sit. YOU WILL KNOW if its set in right because the plate
moves in quite a bit when correct. Otherwise, you're just jamming. Again, watch
your paper gasket. You will tend to gravitate towards grabbing it with your
fingers and ripping it. BE PATIENT when putting the engine cover back on and
watch out for proper alignment of the Shift Lever Shaft and the Clutch Release
Shaft.
4.
Do up your Case-Bolts to Torque Specs.
5.
Do up your Starter Motor to Case Bolts to Torque Specs.
6.
Replace the
Gear Shifter Lever on the Spline. Make sure it line up with your earlier
marks. You might like to consider moving it down a notch at this stage. See the
Gear Shifting FAQ for details.
7.
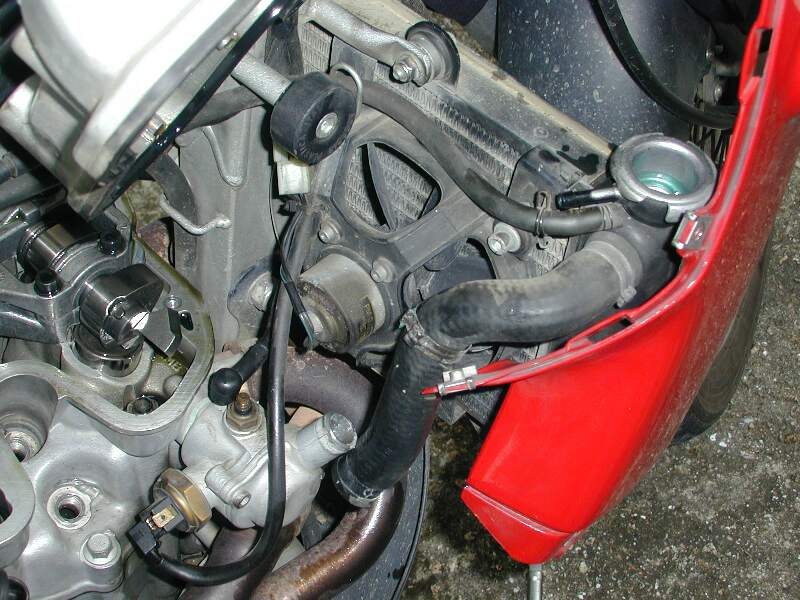
Replace the Clutch Cable in the
Aluminium Fork (Note mine is cracked in this photo) and re-attach the cable
at your handlebars. Adjust to the recommended Free-Play at the Clutch Lever on
the handlebars. Do NOT overtighten!
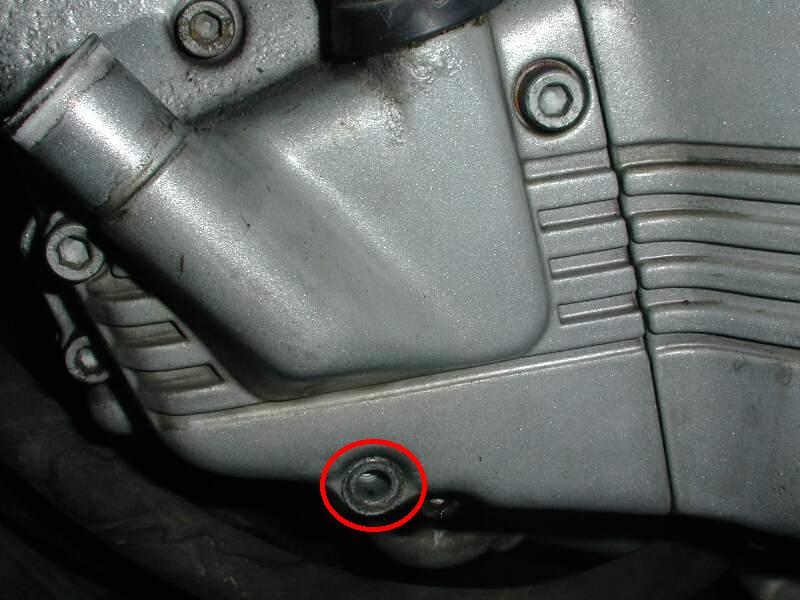
8.
Check the
Large O-Ring behind the Water Pump Impeller Cover and if required replace
it, first cleaning the groove it was in. If required, replace it with a new
O-Ring, return it to it’s location against the LHS Engine Cover and replace the
3 Allen key Bolts, torquing to spec. Note the crush washer on the lower (drain)
bolt should be changed, but you can re-use it once at a pinch. The bolt also
requires Loctite.
viii.)
Replace Fluids
1.
For Coolant replacement refer to the
Coolant Change FAQ.
2.
For Oil replacement refer to the
Oil Change FAQ. It might be a good time to change your Oil & Oil Filter too,
depending on the state of your Oil since you noticed the Water Pump had failed.
ix.)
Replace the Tank
1.
For Tank Replacement refer to the
Gas-Tank Removal + Replacement FAQ.
That’s it. Go out for a ride.!
Thanks to
Hombre sin Nombre
Cheers & Rgds, Kristian
Feedback:
Broken Pinion/Rack
-
by Kristian #562. Refer the
Stiffer Clutch Springs FAQ
&
Clutch Cover Removal FAQ for details of
my Clutch Problems.
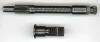
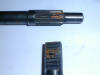 The first set that failed.
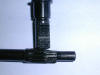 The second set that failed.
-
F650 1998 with slipping clutch. Two different dealers said, that clutch is NOT
slipping and everything is normal. So I made no changes. F650 GS 2000 with a lot
of slipping. So I changed to stiffer springs from Team-Pami. Then the clutch
cable broke twice and lately some parts of the clutch (The Rack & Pinion (ed.))
broke the same way as Kristian described it. Now I have the OEM parts again and
there is slight slipping. Maybe I will use a different oil. We will see. by Robert #1071.
-
I was attending the European Riders Rally in
Burkesville, KY riding on one of the guided tours (paved road, hills, curves). My wife was on the bike with me, luggage was
removed. Very early on in the ride I noticed the clutch felt strange. At the
first stop, I asked Merrill, my brother, to check it. He thought it was "about
gone" and we adjusted the cable to take up the slack in order to nurse it back
to the campsite and then home. When I got it home and removed the side cover I
noticed the busted tooth on the rack and deduced that the pinion slipped over a
tooth, causing the slack in the cable and, hence, the odd feel of the clutch
lever. My guess (and Merrill's) is that that particular tooth gets more stress
than the others. In other words, the spring tension is strongest when that tooth
is being engaged by the pinion resulting in metal fatigue. I never found the tooth or enough pieces to make
a tooth. I hope it fell out in that puddle of oil when I removed the side cover.
Or perhaps it will eventually get stuck to the drain plug. Anyway there it is
(picture attached). Bike is a '97 ST that seldom sees dirt except for campground
roads and my driveway. Mostly ridden on two lanes at about 60 mph if I can.
28,000 miles, stock clutch springs. I estimate that, with the wife and luggage
that weekend, we had almost 400 lbs on the bike, so we had it maxed out. Hope
this helps someone. by Raleigh
-
-
Hi, I
have a 1998 F650 Funduro and my clutch seems to have broke, at first I thought
it was just the cable but the cable is still intact. Before it got broke, it
started emitting some whistling and mechanical noises and soon after it lost
it's tension and the lever went loose, I also noticed that the lever on the
clutch compartment is stuck, or rather, there is no force pulling it back again
like before. I am not familiar with clutches but I hunch it's some sort of
spring or something like that. The engine still runs fine. It was the ball
bearing! I managed to find what went wrong. Thanks for your precious help guys.
I have drained the oil already as I don't mind an early oil change since I use
it everyday. I noticed there were a lot of iron filings on the sump plug's
magnet, almost full actually, much more than ever before. I don't think it's too
bad since they're all very small fragments but it's a bit too much in my
opinion. I wish you could post your views on this matter. I can't lift up the
actuating arm, actually I can hardly push it back and forth, it seems to be
jammed really, however, if this helps, I can still change gears and the engine
runs perfectly as before, matter of fact, I managed to keep riding all the way
to my garage when the clutch broke, as I initially thought it was just the cable
and the gears still work on low revs. I have never experienced any slipping
whatsoever, except on those few minutes before it went. when I actually manage
to pull the clutch arm forth, I am able to reproduce the whistling noise I
described before. Found it.! It was the ball bearing on the clutch sprocket that
had worn out. This explains the excess iron filings on the sump plug as well as
the 'whistling' noises which as I had hunched, was the sound of a loose ball
bearing spinning around while the clutch was actuated. I shall be sending in the
photos along with my membership to support this great site! Thanks again all of
you for finding the time and good will to help me out. Later on today I shall
pay a visit to the bloodsucking dealer over here in order to try and purchase a
replacement part. This reminds me, is it right for them to charge me the
equivalent of US $30 for a clutch cable which I used to get for just US $7 for
my Yamaha? My clutch release bearing, (part number 14 in the
diagram)
has been literally crushed to pieces after just 2 years, I managed to get the
replacement free of charge but I need to know how difficult it is to replace it
and what special tools (if any) are required for the job and what to keep in
mind and be ready for. MarconeNRK (Mark Bishop, Isle of Malta.)
-
I was even
thinking to send you a digital picture with my rack, that looks EXACTLY like
Raleigh's one. I was luckier in finding the missing teeth still stuck in the
pinion. I have seen a dozen of times the rusted, stripped rack, discussed in
relation to the stiffer springs though. gim (orange '97ST)
-
Clutch wont fully
engage: '99 f650 w/26K miles. Last night, all of a sudden, my clutch started
behaving strangely. it won't engage completely and will slip at 50%+ throttle.
it's as if something internal is keeping the release mechanism from
"un-releasing" completely. so externally, the cable fork stops before it
should. Now there is slack in the cable so the hand lever has about 3/4 inch
free play. clutch operation is otherwise fine. it completely disengages,
shifts well, and starts to engage fine. and riding gingerly, it got me the 20
miles home from work. but twist the throttle and it slips. As I said this
didn't come on slowly. It's not like clutch wear. it was an instantaneous
change in the way the clutch engaged that I could obviously feel at the lever
since it was no longer getting pulled all the way back to normal position.
Well, I found the problem. Same as a problem mentioned in the FAQs. A tooth on
the release head broke and got wedged between the splines on the release shaft
(bending one of them). so both have to be replaced. off to call the dealer.
although I have a new gasket, I'm reusing the old one. it's in great shape and
quite new since I replaced it when I replaced my water pump a few K miles ago
(so I won't be replacing the pump now). by the way, I almost went crazy trying
to get the clutch cover off. I KNEW I'd taken all the bolts out, but it
wouldn't budge. I beat on it with a rubber mallet...nothing. turns out, the
broken tooth on the release head (which was still attached by a metal hair)
had wedged into the splines on the release shaft, and was keeping the thing
from rotating and releasing the side cover. only when I turned the release
shaft (clockwise) with some pliers did the cover come right off. Mark #403
-
Replace the
BEARING in the Clutch Basket FRONT Plate, I have a post of one that went
toasty, MarconeRK in Malta's whined itself to Death. Cheap (from any Bearing
House, not BMW) and Cheerful and easy to get out with Gentle heat. WATCH it
carefully, it is CAST, and if it cools too quick/you hit it or drop it it will
BREAK. See mine (Unbroken in the FAQs). Replace the little seal around the
Shaft, MUCH easier off than with it on, although possible ( I did it on my
almost NEW GS with it on). Also Cheap. Get a new circlip for the Actuator
Shaft maybe, and a new circlip and 2 new ones of those Springy Washers behind
the Rack if they're weak. All cheap peace-of-mind parts. That's it. Oh and
CHECK the two small bearings each end of that shaft, they are are REAL PITA to
replace, but mine were toast because the little bits of rack/spline got in
there and munched them up. You can only really check it with a NEW shaft.
Check it goes round OK. Also check that the bits didn't munch the soft alu
casting where the rack slides in/out in the Clutch Cover plate or it may Jam.
And CLEAN all the places in the bearing well of all the little rack bits
CAREFULLY. Kristian#562
Clutch Plate Problems/Replacement
-
The friction
plates cost 17.50 each. There is no need to replace the metal plates unless
they are damaged. There is a clutch kit that includes the 7 friction disks and
6 springs for 100.00 dollars. This is the way to go. You should replace the
springs with the disks. My springs were at or 1mm below the minimum and 10k
later I replaced the clutch again. The new springs were 1.5mm longer than the
used ones. I guess this is enough to make a difference. At 73000 miles my
bearings and cams are in perfect shape so I did not change them. I plan to
replace them next winter at around 90000 miles. I don't have the part number
handy for the kit but it was listed on BMWs parts fiche with the clutch stuff.
Steve#417(in,us).
-
Q. The question is, how many miles before I
should be going inside the left cover to measure the clutch stack? What mileage
can I expect from the OE plates? Has any one gone inside, measured and decided
not to change? If so was the wear rate linear?. If its going to last to 30000
miles, that's all next year, so sure it'll stay where it is. If its going to go
at 20000 it wants replacing now while I have the time and cash and space to
work. I'm just trying to avoid going to Morocco two days out of the work shop or
worse still two days before needing to go into the shop!
-
I have got 30,000 miles on my bike and my original
clutch is still clutching. Why go looking for trouble? My motto is if it is
still working, don't check it, you will just see something that will worry you.
(My R65LS had 62,000 miles on it when my dealer told me that the clutch was only
50% and I should install a new one. So I did - and ended up selling the bike 6
months later.) The only thing I check for wear are my brakes and tires. Not
being able to go is one thing, not being able to stop is another. Like all
things that wear, it really depends upon how you use the clutch. In my
experience, wet clutches can last 100,000 miles if you don't slip them much when
taking off from a stop or if you do a lot of long-distant traveling and rarely
use the clutch except to shift. However, if you like to slip clutches for fun,
are a motorcycle courier, motorcycle magazine tester or extreme-sports
exhibitionist, a clutch might only last 10,000 miles. I guess you just have to
flip a coin. However, I think if I was taking a long trip like you plan to do
and intended to go to the effort of taking the clutch apart to measure the
plates, I would just plan on buying new plates and replace them while under the
clutch cover. If you really want to measure them, no doubt the maintenance
manual has thickness wear limits, but I don't have a clue if the wear on a
clutch is linear, so I don't know how much knowing the thickness of the plates
is going to help you. Richard #230
-
I'm at 25K miles, and not a hint of trouble. Never
measured. I'm sure others here have gone much farther. Raymo #1173, Chicago,
2001 F650GSA
-
I have 27K on the stock clutch so far. If you're
really curious, take a look at 20K when you should preventatively check
(replace?) the stock water pump seals/shaft. Marty #436-Chicago-97 F650F
Should I
replace the 6 Screws?
-
Anyone recommend
a specification and source for screws that are not made of sponge metal? I
need the name of the metal or process or whatever, since I don't know the
terminology and can't search without a such a spec. The screw says 8.8 on the
head, and the manufacturer's initials are in Cyrillic, which probably explains
the garbage metal. I want those black ones, like at the cam carrier, supposed
to be stronger. I was putting my clutch plate back on after replacing the
clutch rack thingy (which also seems to be rather weak metal), broken spline
at 11000km), and I spun the head off one of the six spring screws, before
10NM, not enough torque to break a toothpick! I do recommend that anyone who
goes in there replaces the screws at the same time. BTW, should I be okay to
ride for a week or two with only five springs? Aleksander in Dubai 98ST
-
Normal Bolts come
in two flavours, Grade 8.8 (450MPa) are High Tensile Bolts, Grade 4.6 (195MPa)
according to my Steel Designer Manual are lower strength. (ah the Joys of
being a Civil Engineer) These bolts only really need to be nipped up against
the spring, not massively torqued, boy you must have got a REAL Dud if you
managed to kill that one, or cross threaded it or something. I hope you
haven't damaged the MUCH SOFTER Aluminium basket that it goes into, THAT would
be a major $$ PITA. I shouldn't imagine 5 bolts will be too much of a problem
for a week, but ANY decent hardware shop should have a bolt that will fit,
today. Kristian#562 HK ex'96F, '00 GS
-
You MAY want
to replace the six screws at the springs. You'll have to take them off to
replace the bearing release thingy that you broke, and they are not re-useable
or replaceable with ordinary screws (well, you can use ordinary screws, but
you probably shouldn't), since they're stretch screws. I recently spun the
head off one while reusing them, and faced a huge hassle getting the stud out,
needing to completely disassembly the clutch. The procedure is easy and even
fun, so go ahead as Kristian says and do it yourself. Only other consideration
is that you might want to have a new LHS cover gasket on hand, in case you
tear the old one. As part of my follow-up research on getting better screws
for the clutch plate (the six that hold the springs; one of mine lost its
head), I got the following reply from Motorworks:
=====
Hello Aleksander
...The problem is these are stretch bolts, designed to distort when correctly
torqued ( 10NM ), and so resist working loose in operation.
But if re-used they will not work properly, and possibly shear. We do sell
Allen socket driven, M6 black clutch bolts for the K's and 8valve R's, but
these are again stretch bolts and not designed for reuse. CLA54417 55p each
p57, but would recommend staying with original.
Best wishes
Ben
Motorworks
www.motorworks.co.uk
=====
So, if you're going in there, get new screws first. You're right that the
stretchy screws are not mentioned in Clymer (or the FAQ), but Clymer does say
replace the springs if they're below wear limit (p177). But here's another
Clymer typo: the service limit of the clutch plate stack cannot be 35.0mm.
It's only that size if you insert the friction plates (p182). Aleksander in
Dubai 98ST
-
Very interesting!
Thanks for sharing those comments, especially in their original form. Both the
Classic and GS Service manuals specify that new clutch springs are to be used
every time the clutch is serviced, but make no mention of replacing the bolts.
The Clymer mentions replacing neither springs or bolts. And as far as I can
tell, there are no special footnotes on those parts in the parts information
available to me. But Motorworks has great F650 experience and knows a lot
about F650 parts that we have never heard before. Todd #389
-
I've had mine
apart three times and never replaced the clutch screws. I never heard of bolts
that stretch at 10 Nm torque. Flash 412 (CO)
-
No I also didn't
replace the Clutch Screws, even though I had them on and off twice. Mine was
'96, Flash's a '97 and Alexander's a '95 I think. I appreciate what Flash is
saying and 10Nm is PEANUTS but still for the Money and from the info Alex got
previously, I think you can probably replace them for peace of mind, with some
decent bolts from your friendly hardware store.
-
Kristian, did you
(or anyone else) replace the spring screws? I'm not planning to replace them.
they came out easily, and I can't imagine that at 10nm, ANYTHING will happen
to them. while I was in there, I measured my friction plates and springs and
everything is JUST passable, according to the limits stated in the Clymer
manual (haven't cross-checked the BMW manual). So, I figured I'd be replacing
all the clutch plates and springs within the next 5-10K miles anyway.
replacing those should be a snap. but I'm wondering if anything else should be
replaced while I'm at it? like bearings....? that would make it a more
complicated job, but hey, anything's possible...right? anything else that
ought to be replaced? Mark #403
Many Thanks to HsN and Flash #412.
Removing the NUT holding
the Clutch Basket on
by Flash#412, Kristian #562
The Problem: I finally got the parts, courage and
weather to pull my motor (need to replace a shift fork). The clutch basket nut
will not come off, by the way mine is a 27mm. I was going to take a propane
torch to it but couldn't find it (the torch). I figure if I carefully heat the
nut it will come loose. It is really on there I was standing on the rear brake
and turning the socket wrench and I could hear and feel the wheel slip. I only
weigh 260 pounds, maybe that is not enough pressure on the brake. I also took a
hammer and drift and tapped the nut all the way around and the thing just won't
let go. Will I do any damage if the trans rotates the wrong way while I try to
loosen this thing? His Answer: I finally got back to my clutch nut. I
bought an impact wrench and a Mapp gas torch. I also fabricated an iron ring
with some angle iron to put pressure on the clutch basket while locking the TDC
bolt in place. After heating it up it spun right off. Now its back to the
transmission. XtreemLEE
Solutions:
-
Lots of Heat, A
long BREAKER Bar, lot of brake resistance and a little help from the TDC Bolt
(You did put it in right?) will go a long way. Don't try and undo it straight
off the TDC bolt w/o heat and brakes, that little head isn't very big.
Apparently Motion Pro make a Clutch Basket Holder, for just this sort of thing
(mentioned in the Clymer manual).
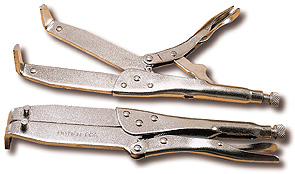
Here's some Pic's of the Motion Pro Tool:


 available at www.denniskirk.com
-
Basically, USE
the TDC bolt to help you. This excerpt is specifically for the
Flywheel BUT it is a similar Problem, just on the other side of the
Crankshaft. With regards to having the TDC bolt in place when you undo the
Flywheel Nut, you have a gearing disadvantage on the bolt by whatever gear you
have it in when you go to loosen the countershaft nut. You have a disadvantage
of only the primary drive when you go to loosen the Clutch Basket Nut. The
alternator nut is ON THE CRANK and you are reefing right on the bolt. But...
what're you gonna do? You HAVE to hold the crank somehow. Putting the Clutch
Back together is one option.
-
An impact wrench
on the rotor nut against the TDC bolt is the only other one I can think of .
-
Take one pressure
plate and one friction plate from the clutch pack. Drill several holes through
both of them. Rivet them together with about six or ten steel rivets. By God
THAT will lock the clutch so it won't spin. Then you can use the TDC bolt, the
brakes, a long breaker bar, heat, cussing and everything else. The clutch is
not disengaged if you have one friction plate and one pressure plate
locked together.
-
Q. Putting
it in gear didn't seem to help?
A. Not if you don't have the clutch pack in place.
-
Q. Will
heat hurt anything other than that O-ring you say is in there?
A. Not if you don't go crazy. There are a couple of plastic gears on
the oil pump drives behind the clutch basket though.
-
Q. The
pressure plate locks on the shaft and the friction plate locks to the outside
of the basket therefore it wouldn't move when trying to turn the nut other
than tearing the rivets out? Sounds like a tool to be made?
A. You can also buy one at many motorcycle accessory stores. Take a
pair of clutch plates with you to be sure to get the right one.
-
Q. Yeah
steel rivets not pop rivets, hmmmmm how much is a friction and a pressure
plate?
A. LOTS cheaper than letting the dealer do the job.
 The first set that failed.
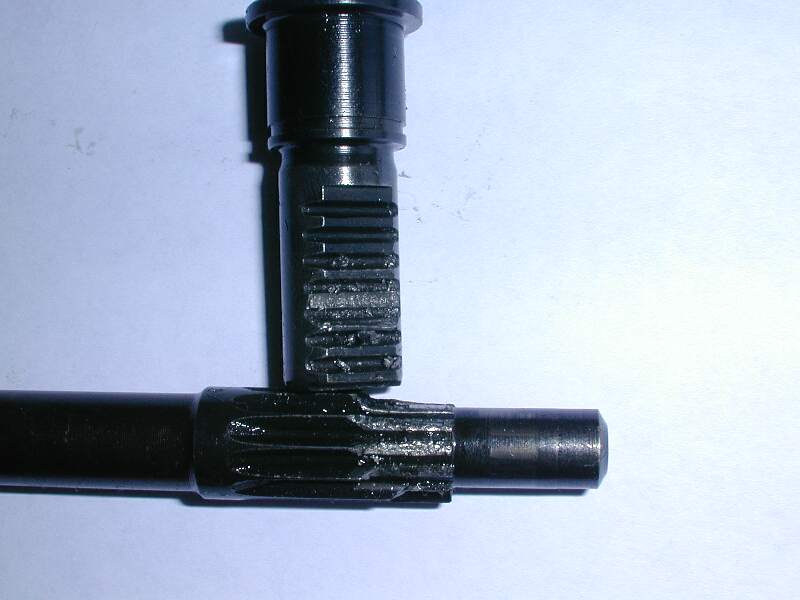 The second set that failed.
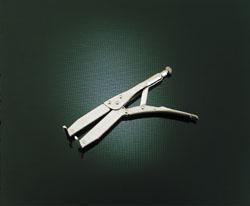