TIMING KEY FAQ/FLYWHEEL REMOVAL FAQ
compiled & edited by Kristian #562
Please read the Disclaimer before attempting any work in this FAQ.
Photos from Flash #412
Ron
Woods Timing Key Installation
(Also useful for Details on Flywheel Removal
& Reinstallation) - Anyone have any more Photos for me PLEASE.?
by Kristian #562
I installed it myself and took it out myself. It's not rocket science, but
you need to be a little bit mechanically minded AND have a couple (at least ONE) BMW Tools.
Tools: You will need
-
2-3 Allen Keys (All In Toolkit)
-
BMW Flywheel Puller (US$15 from Team
Pami) or Buy one from a Japanese bike shop, I think. It fits a handful of JAP
bike rotors, too.
-
Bolt to Hold Engine at Top Dead Centre (US$5 from Team
Pami)
-
Torch
-
Torque Wrench and Large Socket for the Flywheel Nut.
Sorry I cannot remember the Allen Key/Socket sizes.
-
Small Blowtorch
-
Loctite. Note that the Clymer Manual says
you don't need Loctite on the Shaft when reinstalling. Why? Flash says "It is a
TAPER. NEVER put ANYTHING on a taper. Clean it and assemble DRY."
-
Large Drain Pan or Cloths for under Crankcase
-
A piece of wire or plastic zip tie
-
Patience (Yes it is a tool :-) )
Parts/Consumables:
-
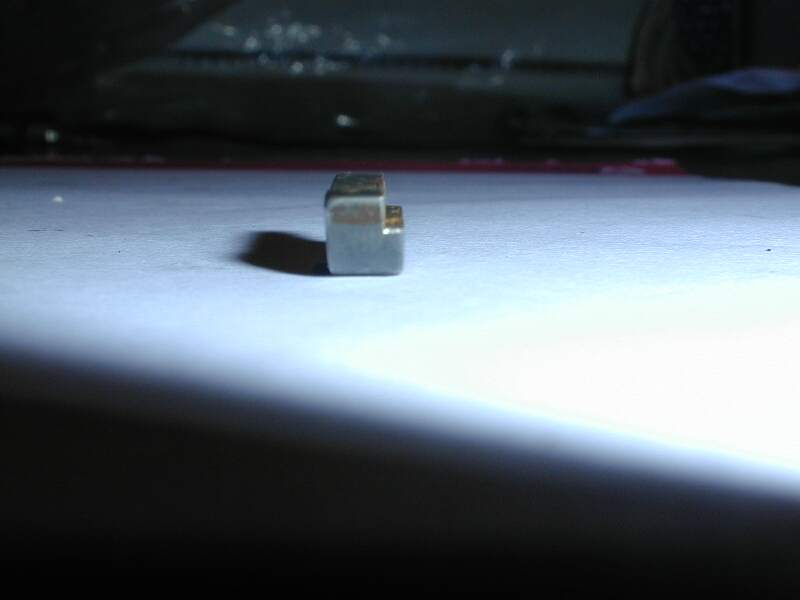
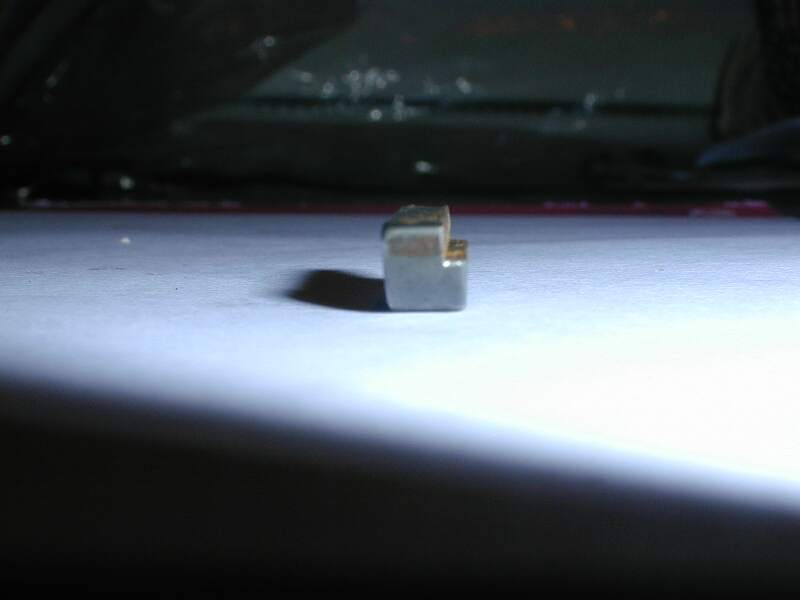
The Woodruff Key - It took a while to get the $US10 Key
out of Ron Woods.
-
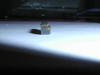
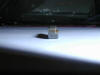
They look like this:
-
New Oil (If you elect to Drain the Oil – Recommended)
-
New Oil Filter & Crush Washers (If you elect to
Drain the Oil – Recommended). Refer the Oil Change
FAQ.
-
Possibly a new Flywheel Cover Gasket, but if you’re
careful…
-
Crush washer for TDC Bolt
-
The crank-holder tool/bolt costs less
than US$1 at a dealer in the USA.
-
Absolutely NO problem with re-using the
Cover Gasket, if you get it off without ripping it, so BE CAREFUL.
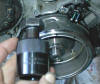
Theory:
As you can see from the pictures above, there is a cut-out in the Normal
Woodruff key, across about half the width of the key. The key sits in a slot on
the Crankshaft on the RHS side of the engine and the Flywheel/Magneto sits over
the shaft. The Flywheel/Magneto’s location, with respect to the shaft, is
governed by a slot along the inside of the Flywheel. On the outside rim of the
Magneto is a little magnet which when it rotates past a pickup (Magnetic Flux)
fixed to the Crankcase, generates the Energy for the spark. So now imagine
first the normal key sitting in the shaft and the Magneto sitting over the
Shaft and fixed in location by the Key. Imagine the Piston is some way, but not
too far, past Top Dead Centre (TDC). Now if you make a cut-out at the rear of
the key, you can then rotate the Magneto with respect to the shaft, by 4
degrees (Of course this depends on the cut-out). This will rotate the Magnet on
the RIM forward of the pickup. Now if you fix the Magneto onto the shaft in
this position, when you rotate the engine such that the magnet is at the
pickup, the piston is just past TDC when it fires and supposedly more
energy is imparted to the piston, partly due to greater compression at firing
and partly because of the longer stroke
The cut-out also make the key WEAKER, so make sure you LOCTITE the
Magneto/Flywheel onto the tapered spindle properly or it will shear off. It has
happened to some people.
Installation Sequence:
Some of you may disagree with the order I did things in, but I did it this way out of
sheer laziness and not wanting to drain my (just changed) oil. It was OK, just a
little messy. Those who have to change the oil or want to do it the right way
can drain the oil from Both Reservoir and Sump, but that's another story.
Note, if you didn’t elect to drain the oil first, before you do anything,
first ARRANGE YOUR CLOTHS/PANS UNDER THE BIKE.!
1. Installing the Bolt to Lock the Engine at TDC:
-
Remove one Spark Plug. Reasons are to both measure the TDC and
if you don't you will get massive compression and won't be able to rotate the
crank.
-
On the LEFT Side of the Engine Underneath the water pump is a
Stainless Aluminium Bolt with an Allen Head. It leads into the Crankcase. In
order (I'm LAZY) to NOT have to drain the oil first, I lent the bike over to
the Right against a wall (While on Centrestand i.e. One leg so tie it back and
make sure it is STABLE), and removed the bolt which has a crush washer under it
which should be replaced after about 2-3 uses. The leaning will (mostly)
prevent oil falling out the hole.
-
Now what I did the first time is to engage first gear and
rotate the Crank using the back wheel. This can be more easily done using a
Spanner on the Flywheel nut, by removing the (Higher) Plastic Bung which is on
the RHS of the bike, on the Flywheel Cover. No Oil will spill out because this
is higher than the oil level. This last method is recommended.
-
Put a small screwdriver or steel pin into the Spark Plug hole
(You will need help here from (Girlfriend / Wife / Son / Mate here) and rotate
the Flywheel Nut with your Socket until you feel the piston comes up all the
way to the top and I found just a fraction over. If you don’t have the right
Socket to fit inside the Flywheel casing, those of you with 97 onwards could
also put a spanner on the countershaft nut and do it that way, but do it
clockwise.!
-
Now you will need to take your torch and shine it in the hole
where you took the Stainless Allen bolt out of. You should see one of the crank
weights with a groove in it. If you're not sure get your helper to rotate the
wheel SLOWLY while you look into the hole with a torch and WATCH the Crank go
around. The weight will disappear at Bottom DC and reappear, so watch
carefully. As it nears TDC go very slowly and you should see the groove.
-
When you do, and ONLY when you do screw in and tighten up the
TDC bolt. This locks the Crank at TDC. You don’t need to over-tighten it as it
goes in a slot.
Note: TDC with the Flywheel Cover removed is about a finger or small thumb
width between the Ignition Pickup at the top of the engine and the small
rectangular steel plate that induces the current for the spark as it passes the
pickup. The Rectangular plate is one finger FORWARD of the pickup, i.e. toward
the front of the bike.
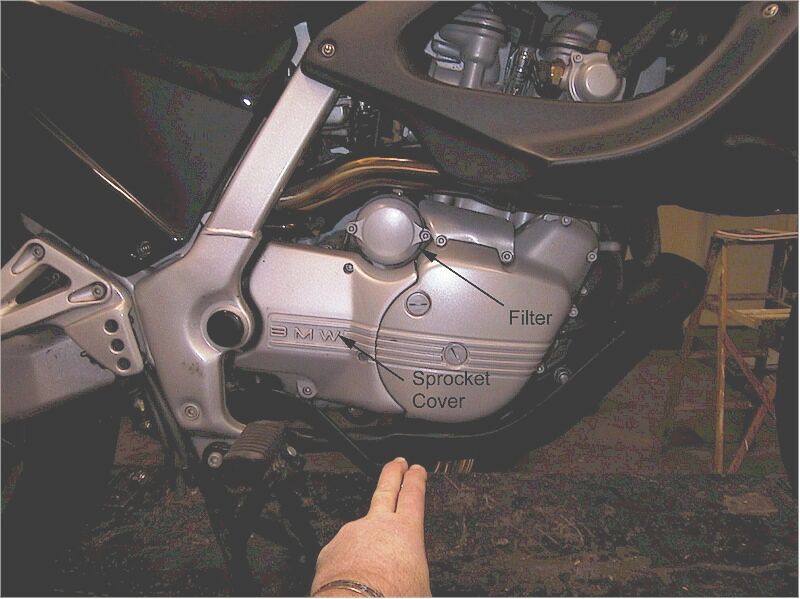
2. Removing the Flywheel cover (Right side of Engine).
If you didn't drain the oil first, lean the bike well to the LEFT and
stabilise as per 2(b) above.
-
You will need to first Remove the Countershaft (Front) Plastic
Sprocket Cover (3 x Allen Bolts)
-
Then undo all the (about 8-9) Allen Bolts from the flywheel
(stator) cover housing. The upper two are attached to a plate covering the wires to the
pickup.

-
Now, there is quite a bit of magnetic pull on the cover, so it
won't come off really easily. If you want to save the Gasket (and you can) you
will need to be very gentle and ease the cover off evenly all around.
-
WATCH OUT you do not LOSE the washer which sits on the
Gear shaft for the Gear that sits BETWEEN the Starter Gear and
the Flywheel Gear. It tends to stick (Due to surface tension in oil) to
the inside of the Flywheel cover and then drop onto the floor. There will be
some oil spillage.
-
Open up the cover to the left like a door and take a piece of
wire or your zip tie and tie through one of the bolt holes, onto the frame.
Your seat should already have been removed.... :-). That will hold it out of
your way.

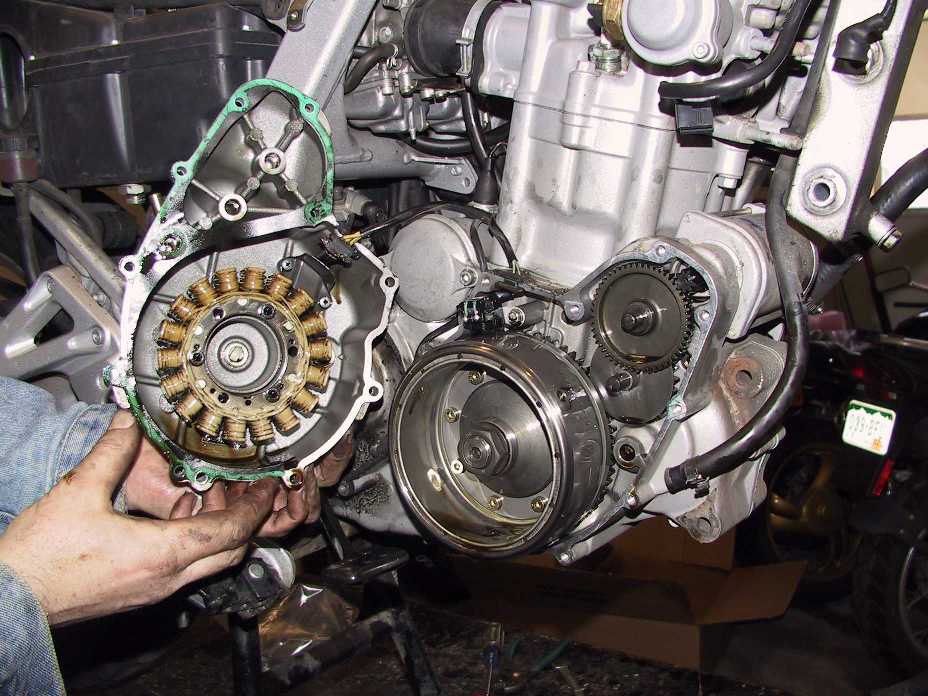
-
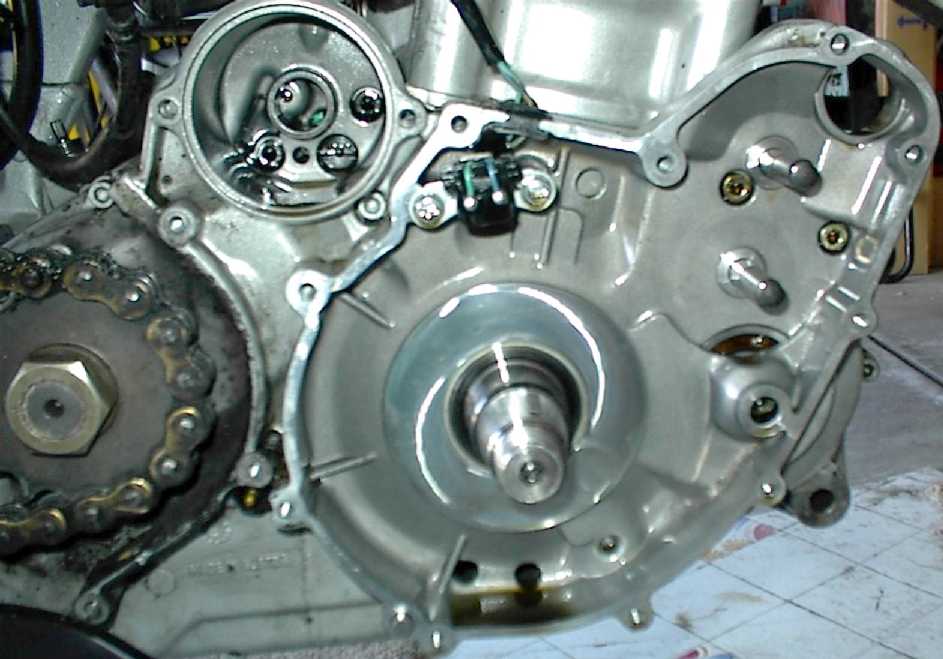
You will see the flywheel, the starter
Gear and the
Gears in between. If you JUST want to look at the Stator, it is on the cover. No
starter and no flywheel removal required!
3. Removing the
Flywheel.
-
Now take your cloth and WIPE all surfaces around the Flywheel
nut so you don't asphyxiate yourself, then take the blowtorch, heating tool and
heat the Flywheel nut.
-
ASSUMING you were successful with the TDC bolt, you can now
remove the nut retaining the Flywheel. If you haven't yet installed the TDC
bolt, and you drained the oil, INSTALL THIS NOW, using a spanner on the
Flywheel nut as described above to turn the crank. (Make sure you're in Neutral
to do this). Refer the TDC Bolt FAQ. Before
removing the 30mm NUT put the bike in gear and hold the rear brake when trying
to break it loose. If you have problems removing the nut, refer
Additional Tips on Flywheel
Removal below. (Careful use of a propane torch should be ON THE
NUT ONLY, NOT THE ROTOR!)
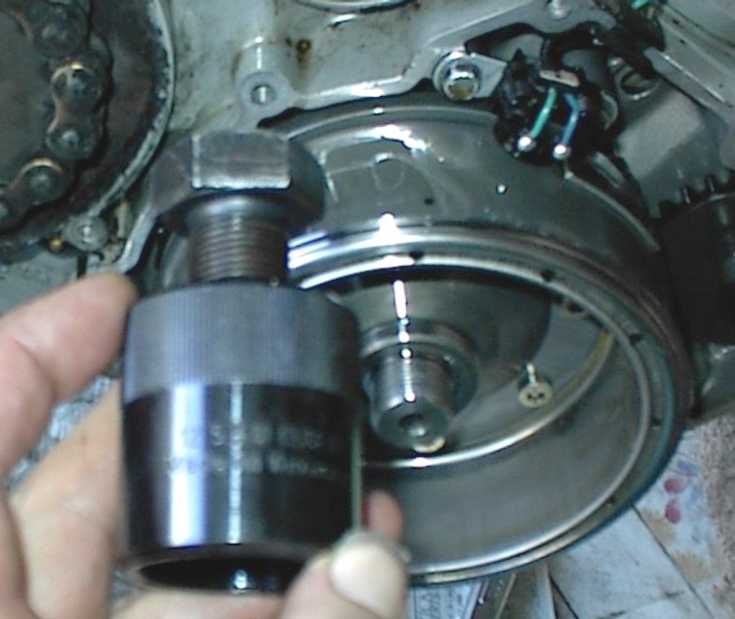
-
OK, when the nut is removed, screw on the Special BMW Flywheel
Puller Tool and screw it over the flywheel, then tighten up the centre bolt
until the old Loctite "Cracks". The Heat should have helped you out
here, if it doesn’t come apply more heat and use a longer handled Socket
Wrench.
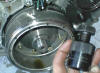
-
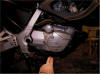
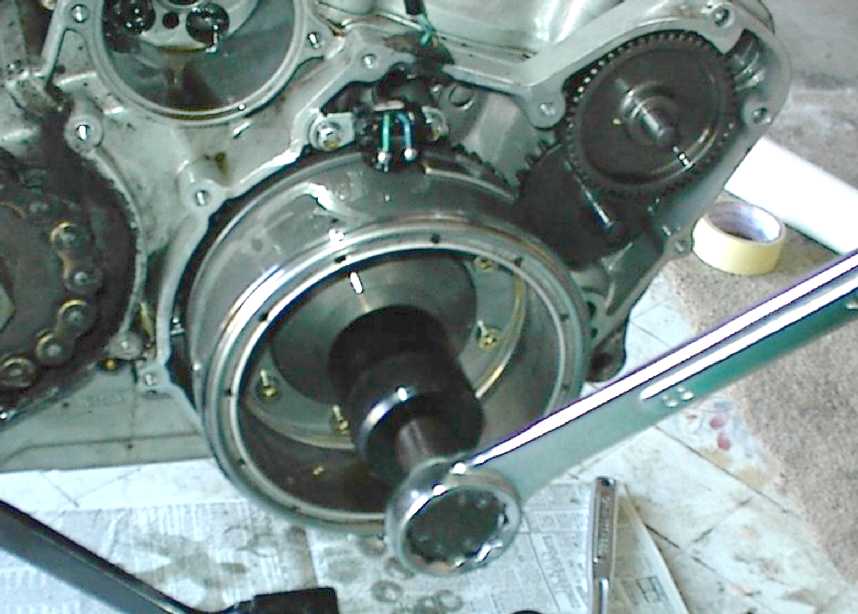
Again there is a fair bit of Magnetic pull, but you can now
ease off the flywheel to reveal, Lo & behold, Tada, the Pathetic little
woodruff key that you've spent all this effort to get to. It should be at or
close to the top of the shaft if you got TDC right. This Photo also has all the
gears off which you do NOT need to do.

-
Using a PLASTIC or wooden drive or gentle screwdriver action
tap the front and back of the key until it pivots and loosens in its groove,
then gently tap it out.
-
Equally gently tap in the new key with the CUT OUT SLOT facing
the REAR of the bike. This will allow the flywheel to rotate a bit more
clockwise effectively giving you the timing advance you’re after.
4. Replacing the Flywheel.
-
This was the Hardest part for me and boy did I struggle the
first time. Then my Girlfriend came out and it was on in 30 seconds (The
flywheel :-)).
-
Here's what you do. CLEAN VERY thoroughly the shaft and
flywheel (inside). The BMW Manual says use Loctite (the More Permanent Stuff)
i.e. BMW or Rotax specifies freakin' Loctite 648, pretty strong stuff, on their
flywheel taper. Note that the Clymer Manual says you don't need Loctite on the
shaft when reinstalling. Why? Flash says "It is a TAPER. NEVER put ANYTHING on a
taper. Clean it and assemble DRY."
-
Feed the Flywheel gently onto the shaft making sure you line
up the groove in the flywheel to the woodruff key. It will NOT go onto the
flange on the Flywheel Gear straight away. If it does, Go Buy yourself a
lottery ticket and Propose to your Girlfriend, Remarry your wife, whatever. Do
not force it and do not at this stage rotate the partially placed flywheel on
the shaft as you will damage the woodruff key.
-
What you need to do is actually rotate the whole flywheel and
shaft together. To do this you need to YES, you guessed it, remove the TDC Bolt
or at least unscrew it partially. Boy sure looks like removing the oil first is
a good idea now doesn't it, leaning the back and forward is a Royal PITA.
-
OK having released the Crank to rotate freely and assuming
your one Spark Plug is still out, engage Gear and get your helper to Rotate the
Crank, with the Allen Key. She/he should rotate it Clockwise while you push
gently, the flywheel back onto the shaft and over the flange. It only requires
a small rotation but it requires rotation. It'll just pop on.
-
Now when it does before you get all excited and do up the nut,
you will have to re-engage the TDC Bolt. So look at Step 2. again.
-
THEN Rotate the flywheel clockwise on the shaft so that the
groove comes up against the cut-out in the new key. h. Put some Loctite on the
threads of the shaft and replace the Nut, Torque to Spec.
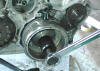
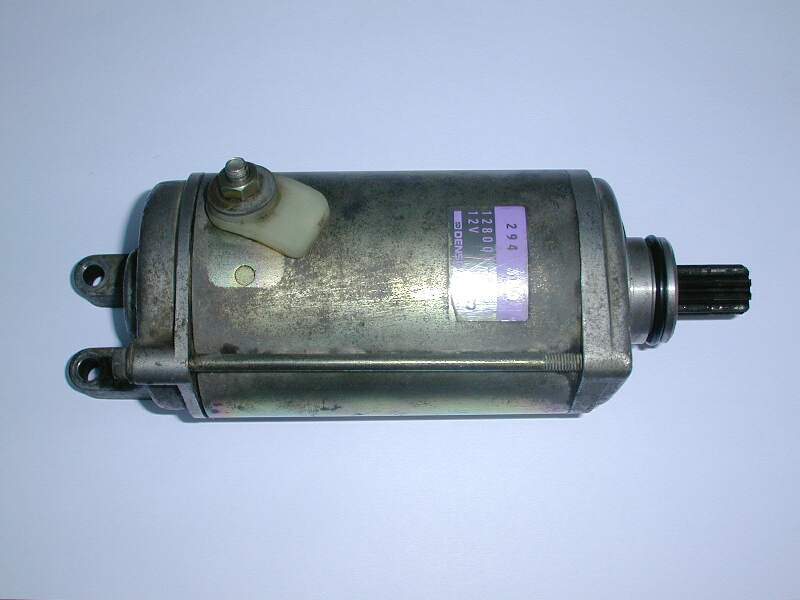
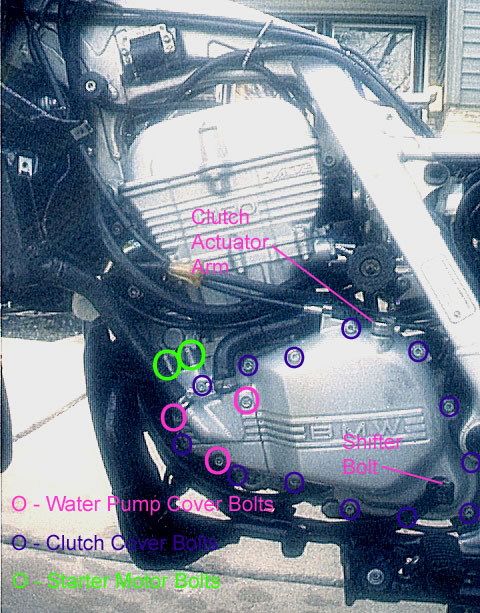
Alternatively, if it just won't go back
on, pull the starter motor
back after removing
two bolts
(marked Green in this photo). (You don't have to pull it out all the way, just
slide it back far enough). Then you can spin the big gear behind the flywheel
WHILE you push it straight on. No problem. THEN stick the starter back in place.
5. Replacing the Cover.
-
Wipe all surfaces clean and if you bought a new Gasket smear
it with oil first, both surfaces. Put a small dab of RTV on the rubber
where the stator wires pass
through just to be sure.
-
Check the washer from 3(d) above is in place, the rubber
surround to the ignition pickup wires are in place and gently ease the cover
over the flywheel. It will try to pull on strongly due to the magnet. Be GENTLE
or you will rip the Gasket.
-
Do up the Allen bolts going around the cover doing each a bit
at a time, then torque. Don't forget to put the top plate back (2 Allen Bolts).
-
Replace the Sprocket Cover. e. DON'T FORGET to REMOVE THE TDC
Bolt and reinstall the Stainless Plug Bolt. Put a new crush washer one, they
are pittance cost-wise, but if you can't get one you can use the old one.
-
Crank her up. It may be leaner so check out this site to make
sure your plugs are a good colour and not overheating:
http://www.nightrider.com/biketech/spkplghnbook.htm
Time:
You can complete the Whole Job
(including the Oil Change) in about 2-3 hours and it is recommended you do it
to coincide with a regular Oil Change.
Cost:
-
New Oil –Choose your Poison, just make sure if your
bike is > 6000 Miles it’s Fully Synthetic.
-
New Oil Filter – About US$10
-
LHS Flywheel Cover Gasket – US$6.50
-
Woodruff Key - US$10
-
Special BMW Flywheel Puller Tool US$15
-
Crank-holder tool/bolt US$1
OK now you've read all this stuff, TEAM-PAMI in Germany, to whom I have no
affiliation did some Dyno runs with the Ron Woods Key
and reckon the stock is actually optimum power for this bike. Saying that I
felt it DID give me more oomph low down, but it was running so lean when I
chopped the plugs I'm sure I could see little bits of Aluminium on the plugs
from the head. Not a good sign. I could definitely have richened the mixture a
bit as I was lean from my Staintune and Airbox Organ pipe Cut-out, but in the
end I did all the above once more and replaced the original key as I thought
about Team-Pami’s comments. I think if you did it like Ron Woods did, maybe one
of those rather expensive Nikasil Pistons would be in order :-). This would be
the LAST mod I would do. Pipe & Rejet nets you more power and an Ohlins
shock is a very nice but expensive replacement for the Stock Shock.
Cheers and Regards and a Big Thanks to Richard230, Harl, Fede, Craig, Todd, Flash, Walter and Mark58 the latter who wrote
the following oh so true statement:
- I don't know your riding background, but if you're like the majority
of folks, you'd be far better off taking an advanced riding school than
spending a couple mortgage payments worth on aftermarket exhausts and trick
performance parts. Most folks don't use half of what they've already got. I
realize this is heresy and that there's a time-honored tradition of fiddling
with your ride to personalize it, but a lot of times those bikes that have
been "upgraded" are really messed up. If you know what you're doing, then a
freer flowing pipe, jet kit, airbox mods and so forth can eke out a few more
HP and smooth things out a bit, but the dollar spent to HP gained ratio is
pretty high and the effect lasts until you get tired of your current bike.
Good riding instruction lasts forever. You could also spend the money on good
riding apparel. Your call.
Other
Comments on the Ron Woods Key
1. by email from Team-Pami
- Hello Kristian, We have done several dyno runs
with more or less advance - and found that with the stock ignition box no....590
(three last no) we have had the best overall result. PS. All Paris - Dakar
engines run this box ??? Gottfried - Team Pami info@team-pami.de
2. by Walter #466
I have the Staintune (baffle out), Dynojet kit,
and Ron Woods offset Key. I've run close to 10,000 miles with this set up and
love it. I'll be putting the full Woods kit in soon. With this set up I can
stand the bike straight up in first gear, bring the front end up in second, and
reach an honest 105 mph (by GPS) quickly. I did all the work myself and if you
are mechanically inclined it's not hard at all.
The installation of the key is not hard provided
that:
- You know how to change the oil.
- Have the special BMW tool for pulling the
flywheel (about $27.00), the special bolt to lock the motor at TDC (about
$3.00), and the special tool that screws into the cover to help removing it
(not critical, about $3.00).
- Have a small torch to heat the flywheel.
- Knowledge that with the motor at TDC the notch
in the crank will be facing "up" and you place the new woodruff key with the
cut-out facing the rear of the bike.
- When you replace the flywheel you turn it
clockwise against the notch, use high strength Loctite and torque the nut to
100 nm (if I remember correctly, if you do this I will look it up).
- Have a new gasket for the cover.
- Ron Woods gave very little instruction over
the phone, and none with the key.
- This is slightly involved, but not hard if you
are at all mechanically inclined.
- If you would like to call Ron Woods the phone
number is (949) 645-0393, and their fax number is (949) 645-8692.
- The Ignition advance key install should take
less then an hour."
Additional Tips on Flywheel Removal
by Flash, Hombre sin Nombre
See also
Clutch Plate Springs FAQ - Removing the NUT holding the Clutch Basket on
Problems removing the 30mm NUT that holds the
flywheel on? e.g. So far I'm stuck at
getting the alternator flywheel off. I cannot get the 30 mm nut off. I tried
putting the bike in gear and holding the rear brake when trying to break it
loose, (per the Clymer manual) but no luck. I just keeps moving the flywheel and
the crank *counter clockwise* (will this screw anything up?).
Some bolts cannot be undone alone - you may need
a strong and beefy assistant to steady the bike and hold the brake, and you'll
need a proper breaker bar (extra long socket wrench). If it's assembled with
Loctite 243, use of a heat gun (or careful use of a propane torch ON THE NUT,
NOT THE ROTOR!) may be necessary. If a previous mechanic mistakenly used Loctite
648 (per OEM) or Red Loctite, serious heat will be REQUIRED, not optional.
Get a 30mm socket for a half inch drive. Get a
half inch BREAKER BAR. If necessary, get a piece of iron PIPE that fits over the
breaker bar. Put the motor in gear. Put the TDC bolt in. STEP on the brake
pedal. PULL ON THE BREAKER BAR WITH THE PIPE ON IT. If you are pulling in the
wrong direction, you will be tightening the nut (s).
(Although with the clutch out, having it in gear doesn't do shit.). If you are
afraid or just CAN'T get it to budge... tote the bike to any place that has air
tools and get them to use your socket on it, with an air wrench. Two seconds
later it will be off. (Clutch or alternator, four seconds for both.)
The next level involves use of a large commercial air impact wrench for removal,
however, use of heat is still recommended, as if there is Red Loctite in there
and it's not softened with heat, you can break things or rip the threads right
off the assembly. (Not likely in this case with a hardened crank, but you never
know.)
If heat AND an air wrench won't get it... eww.
If you have the proper wrench setup, don't be
afraid to get the nut up to 100 degrees centigrade (212F), maybe even 225F. No
higher or you start to ruin seals, and the magnets in the flywheel don't like
excessive heat either. Best to start off organized, all tools in place, a dry
run, quickly apply massive heat on the nut with precision, remove and cool down
with a fan. With regards the heat, I'd be a bit concerned about the magnets
because there ARE no seals.
The Clymer manual shows a "rotor holding tool"
that they use. There are also Motion Pro Clutch Basket vice grip pliers (which
seemed to beat up the clutch basket). (Neither worked for this guy, ed).
With regards to having the TDC bolt in place when you undo the Flywheel nut.
You have a gearing disadvantage on the
bolt by whatever gear you have it in when you go to loosen the countershaft nut.
You have a disadvantage of only the primary drive when you go to loosen the
clutch basket nut.
The alternator nut is ON THE CRANK and you are
reefing right on the bolt. But... what're you gonna do? You HAVE to hold the
crank somehow. Putting the clutch back together is one option. An impact wrench
on the rotor nut against the TDC bolt is the only other one I can think of. Or
FINALLY (not recommended), I suppose you could drill the nut and break it off
with a chisel if all else fails.
Non starting engine after Removal of
Flywheel
by Flash #412 &
jp7474
The Problem:
I bought a F650 97 for practically nothing, but I had to do an engine rebuild on
it. Before doing it, it was starting but running with very high vibration
(abnormal even for a 1 cylinder). I did the job, put the engine back in place,
but now it's impossible to start it.
When I first tried, I got very big backfire but it was due to
a Valve timing issue. I readjusted the timing, and now the backfire issue is gone.
The chain tensioner was not doing the job and the drive chain was really slack.
After corrected that, the backfiring problem disappear. But still not starting.
So probably it's not a
gas problem cause it was backfiring before but
Battery, starter motor and electrical components are working fine.
I don't think that I have set the cam lobs in the wrong
50/50 way (If the Clymer manual is right), I looked at that several times.
The work done on the bike:
The engine was removed from the frame and I changed the piston, new ring set. In
having the engine apart, I open the engine lower end to investigate if balancer
shaft and crankshaft were correctly align and if there was any part to change
(for the big vibration problem). I put everything in place correctly and close
back the crankcase.
Here's the parts that I removed from the engine and put back in place: Everything that was needed to access and
separate the crankcase!!!
As reference, I used the Clymer manual.
I know that the problem can be a lot of different things.
The Things to Check and how to check them
-
Are you SURE you got the cam timing correct when you put it back together? There
are lots of ways to put the cams back in, most of them wrong. Even if the lines
on the sprockets line up with the head, there is a 50/50 chance you got them
wrong if you weren't paying attention to the lobes.
-
Pour a tablespoon of raw gas in the spark plug hole, replace the spark plug and
try it again. If it runs a few good licks, your problem is fuel delivery, not
spark or valve timing.
-
Don't
worry about checking whether the automatic compression release valve is properly
re-installed and is closing properly as the idle increases, because if it won't
START, it sure won't idle.
If you
don't have fuel delivery problems,
ASSUMING that you have GOOD SPARK PLUG WIRES and GOOD SPARK PLUGS and GOOD
COILS, you have either ignition timing or valve timing problems.
-
I am gonna guess that you put the cams in wrong because there are so MANY
possible ways to mess that up unless you pay close attention and/or know what
you are doing.
-
Is the cam with the little lever on it to release the compression place over the
EXHAUST valves? That cam (with the compression release) should be the one on the
exhaust pipe side of the head, not near the carbs.
-
When you have the TDC crank-stop bolt in, do the LINES on the camwheels more or
less line up with the top surface of the head when the tensioner bolt is loose?
And when you crank the motor over TWICE (or more) and WATCH the valves, do they
do this...?
1) intake valves open and then close
2) nothing happens for almost 360 degrees
3) exhaust valves open and then close
4) during the very end of step three, step one happens at the same time (known
as overlap)
If the answer to any of these questions is either "no" or "I don't know," then
you need to be SURE that you have that stuff right FIRST.
Timing
-
I just opened the valve cover to have another look at the cam position.
I put back the TDC bolt in the crankshaft slot and noted the following:
1- The Exhaust Cam (with the compression release mechanism) is at the right
place on the exhaust pipe side of the head.
2- When the tensioner bolt is loose, the lines on the camwheels are line up with
the head surface.
3- Exhaust cam is pointing more or less the front of the bike (small portion of
the lobe)
4- Intake Cam is pointing more or less the rear of the bike.
5- When cranking the motor, the 4 steps described above were fine. Except that I
would say it is more 270 degrees than 360.
I tried back to start it but, nothing.
''How far did you move the ignition
timing when you moved it? HOW did you determine it needed to be moved and how
did you set it. '' I though that putting back in place the woodruff key /
Flywheel / Magneto, no more adjustments were necessary!
(the key flywheel and magneto were put back on the shaft without any
adjustment).
Please
explain how you readjusted the Valve timing.
-
I reopened the valve cover and found that the chain was very loose due to the
chain tensioner. I just removed the tensioner, the inside cylinder was jam and
no pressure was put on the chain. I did correct that and I closed back the
cover. After that, no backfire anymore.
Checking Electrical Problems
-
OK... it sounds like the
VALVE timing is right. That means that either you have
bad SPARK timing which doesn't' just change all by itself or else bad SPARKS due
to defective coils, spark plugs, plug wires or the most likely suspects, plug
wire CAPS.
-
Look for info in the FAQ on spark plug caps.
-
To do something quick
and dirty which won't cost much at all, you can buy some rubber spark plug caps
at any dirt bike shop and try them just to see if your bike will run. It is NOT
recommended to run them for very long. Go with resistor caps (as discussed in
the FAQ) if you find that WAS the problem. After you eliminate the plugs/caps as
the source of the problem, let's talk again.
-
I changed the plug wire caps and replaced them with the XDO5F 5Kohms resist from
NGK.
1 - I did test the Resistance with a multimeter between the end of the new plug
Cap and the orange wire at the BACK of the coil. Result at 20Kohms were in the
range of 14.4 to 14.6Kohms on both coil. Target for this test in the F650 Faq is
results between 10-18Kohms.
2 - I put everything in place and I tried to start it again but with no results.
3- I removed back the coil and plug as a whole and test the resistance again
(from plug to coil orange wire) but now, it went down @20Kohms test to 9.7-9.8
on both unit. Does this mean anything? (if I'm using the multimeter @200K, it
giving me back the 14.4Kohms measurement).
-
If you stick a spark plug into the cap and ground the plug on the engine, when
you give the starter button a push to crank the motor over, do you get a nice,
fat BLUE spark in the plug gap?
-
Yes, on both plug with the new cap i got nice blue spark in the plug gap.
Then
it's Spark Timing
-
OK then... check the timing with a timing light next, I guess. I'm not sure how
to do this on the F650 without looking in a manual. I would imagine that one of
the little plugs on the right engine cover comes off and reveals SOMETHING.
Worst case, you could pull the valve cover off and look at the lines on the
camwheels with the timing light. The spark should be somewhere about six or ten
CRANK degrees before TDC opposite of overlap. Cam degrees would be half of crank
degrees (because the crank goes around twice for every single cam rotation). In
any case, the lines on the cams should be CLOSE to parallel to the head when the
timing light fires. Oh... and this is a lost spark system, which means it fires
EVERY revolution.
-
If the spark timing looks right, then I think you need to check the compression.
I'm not sure how to restrain the compression release on the exhaust cam, but you
will HAVE to do that in order to check the compression. I think you can use a
piece of electrical tape to hold it in place.
SOLUTION
-
For sure there is a ignition timing problem!!!
-
I don't have a timing light so
I call somebody to get one and he said to me ''by
the way did you removed the alternator rotor, the hub and the freewheel
apart??'' The answer is yes!!!
-
When I put back the hub on the rotor,
I missed the timing by 3 bolts (90
degrees). I don't know how but I did it! I don't have the special rotor
puller so I will get the bike this week to the shop and have it removed. I'll
keep you posted.
-
Fix that and she'll probably fire right up. You won't need a timing light,
unless you WANT to use one to verify that the timing is right once you have it
running.


