
compiled & edited by Kristian #562
Please read the Disclaimer before
attempting any work in this FAQ.
updated 28 Feb 2003
GS/GS Dakar LHS/RHS/Centre Panel Faux Tank Removal Procedure
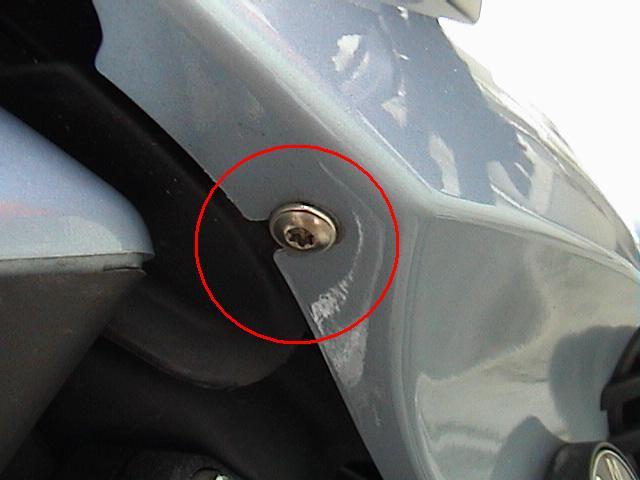
Removing the Little Round Plastic Inserts for the Luggage Rack Mounts on the Side Fairing
See the GS Aftermarket Windshield FAQ or the Classic Aftermarket Windshield FAQ for Opinions on Windshields
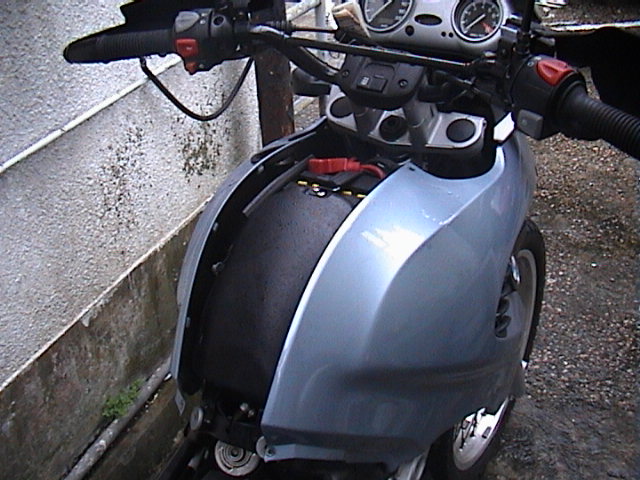
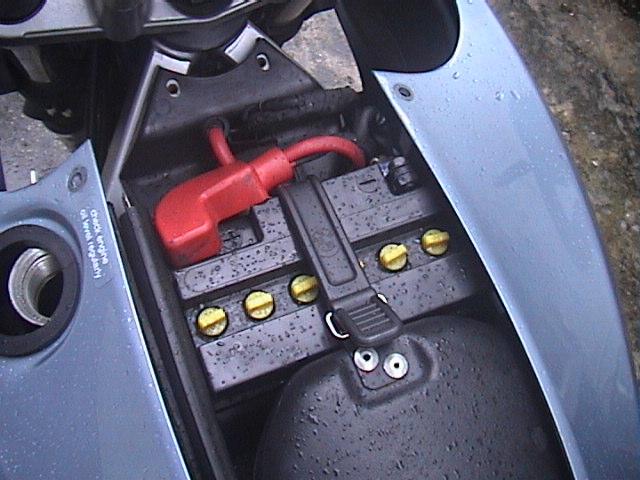
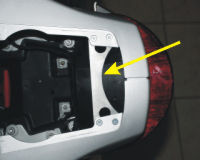
Can I access the GS Battery without removing ALL the darn Panels?
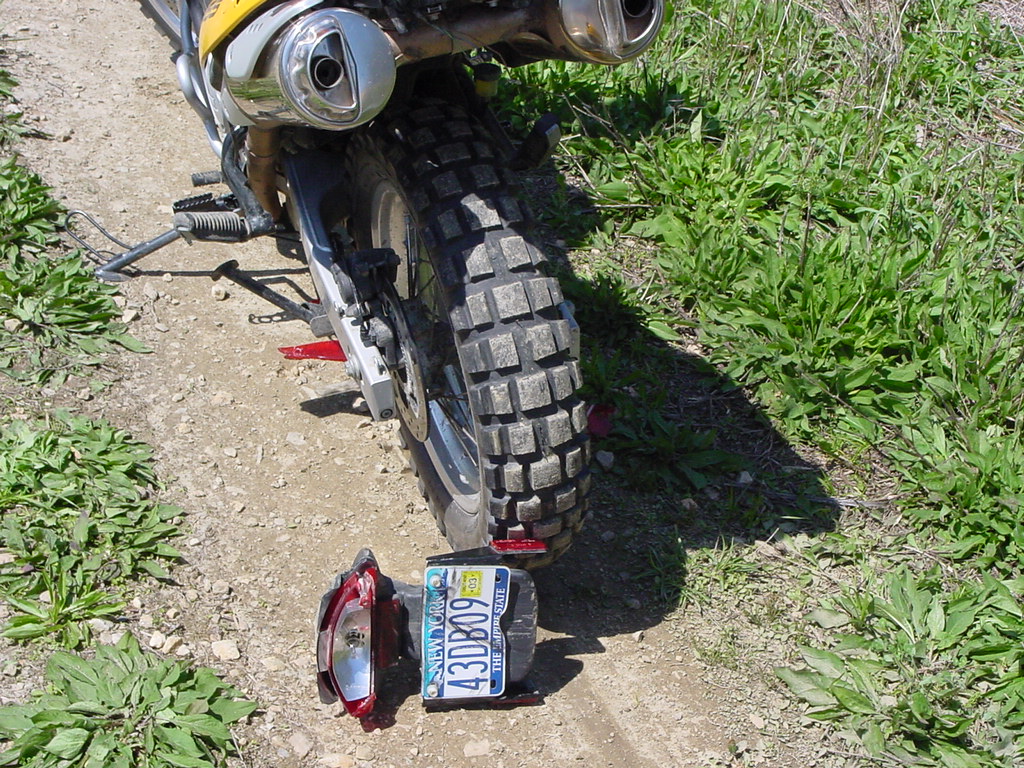
My Rear Tire ate my License Plate! What's up? - (Tail Light Assembly Failure)
Missing Something Back There ? The Rear Panel on Early F650GS's that goes astray
For Low Front Fender refer Front Fender Mods GS
What is the best way to secure the trim bits on GS fuel tank?
GS/GS
Dakar LHS/RHS/Centre Panel Faux Tank Removal Procedure
by Kristian #562
06/08/02
RHS Panel
Remove the seat.
Note that including the Turn Signal Mount screws, there are Seven Torx Screws for each side Panel. Six of the total seven Torx screws are removed and one is loosened. Loosen that screw.
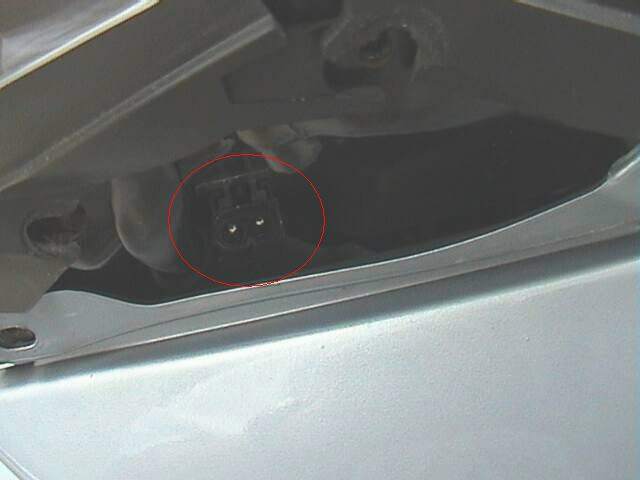
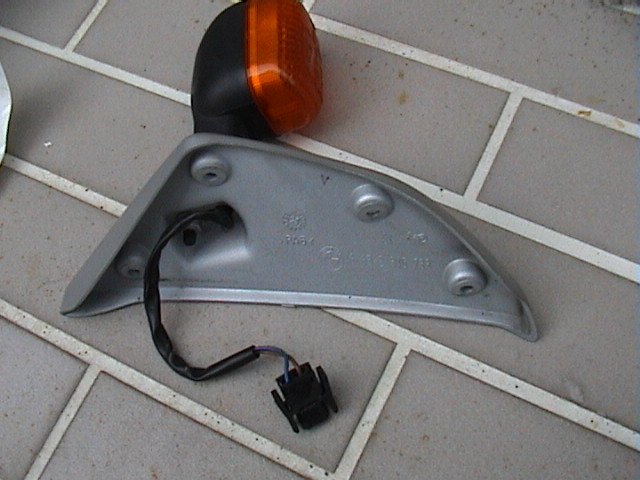
Remove the Turn Signal, by undoing the four screws that go through the silver-colored plates to which the front turn signals are attached. When these four are removed, the turn signal will hang. That's OK. Here are the left and right turn signals (four Torx each). You can unplug the turn signal wires (Just squeeze the black tabs at the sides and pull gently) if you want and remove them completely from the bike (very good idea).
Remove the following remaining 2 screws: the left-most screw that is exposed when the seat is removed, the screw at the front of the "gas tank" slightly forward of the black filler cap.
Putting your hand at the bottom (lowermost) of the Panel, GENTLY remove the right fake gas-tank panel by pulling gently, directly outwards. Do not BEND the Panel outwards.
The lower part of each "tank" half fits in a rubber grommet on the side of (and forward of) the engine. Be gentle or you will break the male fitting on the panel. Use Vaseline on the grommet before installing the panels and assembly/disassembly will be easier next time.
LHS Panel
Follow steps 1-4 above, but between steps 4 and 5, remove the black oil filler cap before taking the left side off. Put the oil filler cap back on so you don't lose it or drop anything in there.
CENTRE Panel after removal of RHS and LHS Panels
Remove the final two screws that hold the center panel in place and remove the Panel.
Replacement is the reverse of the above. If you're going to do it often consider buying a magnetic Tip Screwdriver with Torx Adaptors.
After you get the Faux Tank off, check the Battery Overflow Connection. Refer Battery Drain Tube - A Better Connector
by Kristian #562
Mar '02
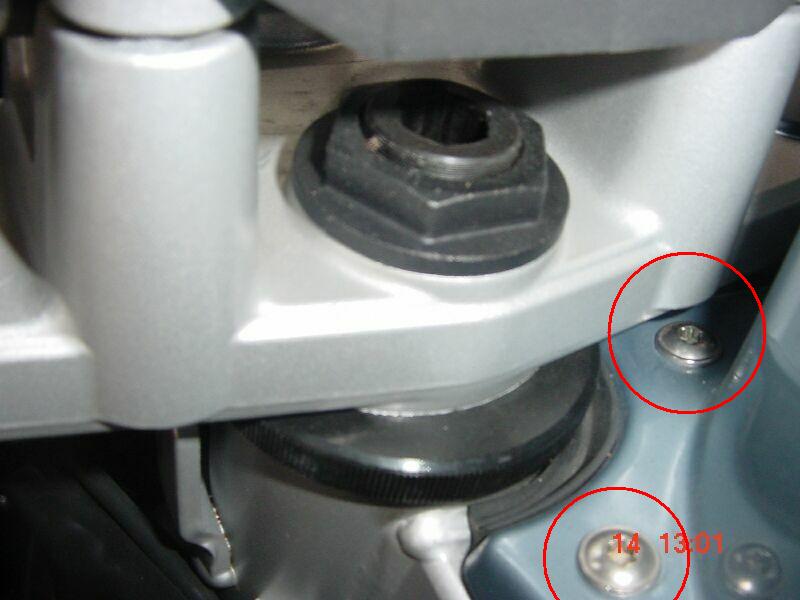
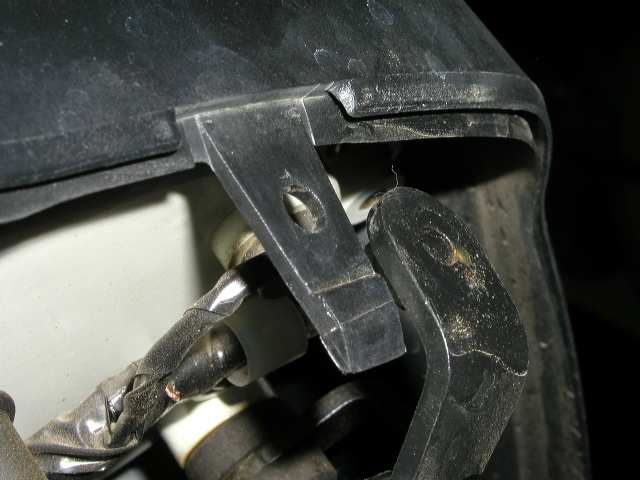
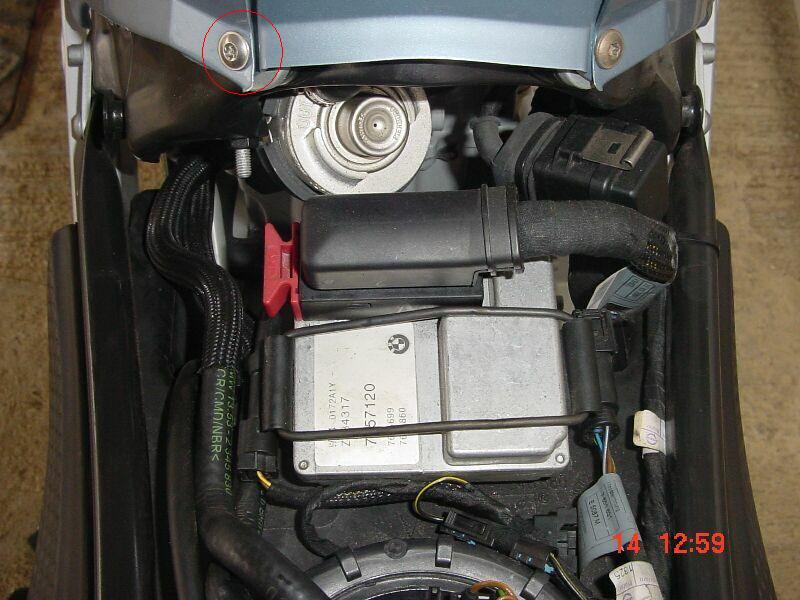
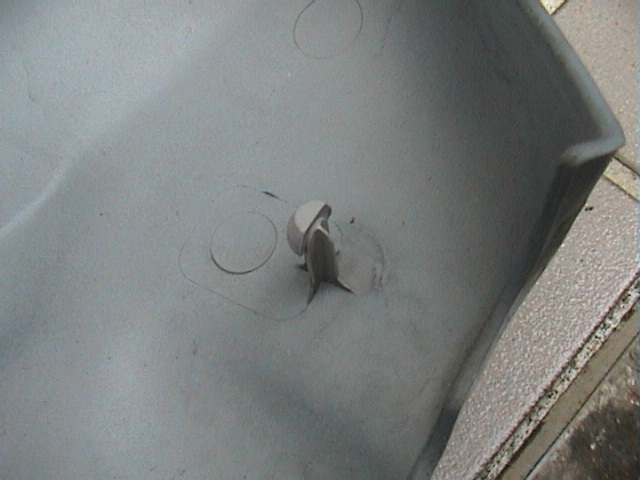
At some stage, you might want to remove the Little Round Plastic Inserts (Circled red in photo) for the Luggage-Rack Mounts on the Side Fairing. I had to remove the fairing to install my Motorworks Rear Luggage Rack. INSTEAD OF trying to poke something thin into the Gap from the top and ruining the plastic and paintwork by prising them up, try this:
Take a long thin screwdriver with a Flat Blade about 4-5mm in width and insert it into the little "cooling fin opening" (Green in Photo) opening CLOSEST the Insert you wish to remove.
If you poke your head underneath the rear of the bike you can see what you're doing. (DO NOT try this when the bike (EXHAUSTS) are hot, unless you have a cast-iron head.).
Fit the blade into the little tab and VERY GENTLY twist it.
The Insert will just pop up, allowing you to remove it from the Top.
The Inserts are always lined up the same way, due to the mould of the fairing
they fit into, so this works every time.
by Kristian #562
Jul '02
I got sick of removing all those darn screws just to access the battery. i.e. 7 No's for the RH Panel and 4 No's for the Centre Panel.
So I got to thinking if I ONLY wanted to access the battery, can I get the CENTRE Panel out by itself. The answer is, YES you can.
Unscrew the four centre panel screws.
 (RHS Similar).
Then, starting with the RHS Panel and starting from the rear of the panel working towards the front, GENTLY lift the RHS Panel tabs up and out of the slots in the Centre Panel. Do not pull the panel sideways away from the bike too far, just enough to get the Tabs out. Be GENTLE.!
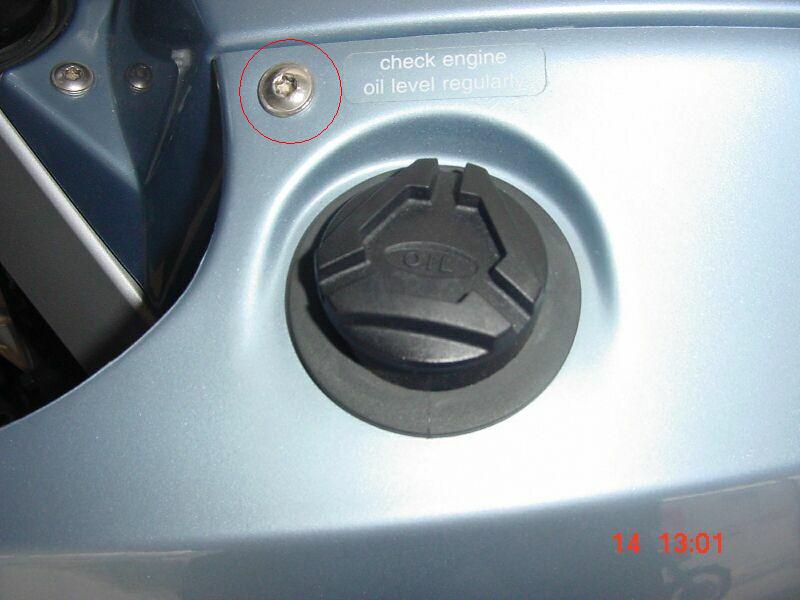
Undo and remove the Oil Tank Filler Cap (You can do this with the Spark Plug Spanner if it is too tight).
Similarly to the RHS Panel, starting from the rear of the panel working towards the front, GENTLY lift the LHS Panel tabs up and out of the slots in the Centre Panel. Now that the RHS Panel is free, you can actually tilt the centre Panel slightly to help you free the LHS Panel tabs from it.
When you get to the Oil Filler Cap area, lift the LHS Panel up and just over the little internally threaded spout of the Oil Tank, moving the panel to the side just enough so that it doesn't slide back. That's it. Easy Peasy.

So far there aren't enough cases to call it widespread, but it has happened to a few people. This is the black plastic assembly that attaches to the swing arm and wraps around the rear tire. It's primary purpose, besides being a reportedly legal requirement in Europe, is to prevent mud from splattering up onto the license plate and tail light. It also may prevent some rocks and debris from being thrown up and into the riders following you when off road.
It appears these assemblies fail on their own, or when subjected to the stresses of off road riding. A much higher incidence of failure is reported by those that have installed knobby tires. The assembly is flexible enough that under some circumstances it comes in contact with the rear tire. The result is eventual failure of some part of the assembly. If it goes unnoticed there is a good chance it will be torn partially or completely off.
Reports failures and solutions from members
Hey all, the mudguard on the rear wheel of my '01GSA just went south for the winter. First heard a lot of rattling, and thinking it is from my topbox, ignored it. When I heard the rattling with the topbox removed, I investigated and found that the bracket on the left (seen from behind) holding down the mudguard has broken clean off. As far as I can tell, it did not break out of the plastic, but out of the weld holding the bracket down. As a result of the loading on it, the mudguard has fatigued and several rather large cracks are visible. I have not been using my bike off-road - normal everyday commuting -> so I am wondering if anyone has seen anything like this before! My bike has 11300km on it and is 10 months old - so I am going to nail my dealer to replace it under Warrantee. Hey, quick word : Remember a while my rear mudguard broke loose? Well the dealer says he has seen a few bikes with this problem, the weld holding the rear mudguard down on the left @ the brakes constantly rips loose ! Any case BMW is replacing the F'ing ENTIRE REAR SWINGARM just because the stupid non-critical weld broke loose. Any case it is under warranty. Mavman on Advrider.
Mine broke on one side too. The dealer fixed it on warranty. maphead#1019
I broke mine, I think, while changing a wheel. Maybe not. They're cheap to replace. Roy#1095
I found out what they were for when I was following Beau A. at the Jailbreak GS ride. A couple of good-sized rocks came sailing past my helmet, and one connected. If you are concerned about people behind you, leave it on. I also have a bit of reflective tape attached to mine. My theory is that a bit of the bike that moves a lot is more visible than one that is relatively stationary. Robin #790
The part of the
'bra' that makes a little guard over the abs sensor is protecting a possible
weak point, if you rip that sucker out on a branch, you're riding slooooow all
the way home.
Mine lives on a shelf in the tool cupboard, btw. I too took it off when I got my
tkc80s... Adam #1001
I just cut off the part that is behind the axle, and left the chain guard in place. gwhis #1000
It tried to eat my rear tire, so I took the whole thing off about 20,000 miles ago. I don't think you need any of it. Leo #699
I ditched mine the day I installed TKC-80s. mark #403
I have discovered that the rear plastic appendage on my GS is coming apart......marks on the hub, near the sprocket reveal the plastic guard is hitting the hub while riding on rough roads...that's everywhere...around here :-) I have removed the right side section of the guard and discovered that the inside part that is next to the hub, has come apart. It looks like the plastic seam where there is a joint, has failed, allowing it to flex up and down, occasionally hitting the hub. I either need a new one.....which may fail again anyway, but it looks easy to drill and bolt the offending join in the plastic. Jack, Australia
My mud guard decided to get friendly with the edge of my TKC80 tire this weekend (best guess). While I won't miss the flimsy POS I guess it knew just how little respect I had for it. By the time I discovered most of it was missing I had ridden maybe 20 miles. In that time the remains of the thing managed to beat the heck out of the rim. Mostly cosmetic but real ugly. I should have removed it long ago. In case you're wondering, the ride was pretty tame, just a lot of washboard and gravel. Brad #1002
Instead of replacing the lost mud guard I opted for after market guards of my own design made from aluminium. This eliminates the wrap around feature and mud does seem to collect on the tail light when riding in sloppy conditions. I plan to make a small "duck bill" to fit under the license plate to catch the fling from the tire. Brad #1002
Q: I'm having
problems with my rear tire eating my license plate assembly? Rear suspension is
set as hard as it will go but still munch, munch. I saw Touratech has a 13.00 US
part they say will fix this problem sounds too good to be true.
A: I think I have the part you are talking about, but it won't help the tail
light from shaking around. It is a small piece of aluminium that you install
underneath the lock plate between the two pieces of plastic in front of the tail
light. Stiffens the tail but not the shock mounted shaking license plate.
Mine broke on 2 of the 4 places. Was about $20.00 or so from the dealer. I didn't put back on the HEAVY license plate frame this time. I believe it is too heavy for that application, so I made one of out a plastic 5 1/4" blank from a computer case (the ones you use to fill the hole when you don't have a 5 1/4" floppy drive). Wanna see damage from it? Check out http://www.wsw.net/F650 We'll see how it handles the off road. BillW#930 [ed. see bracket removal idea under GS License Plate Bracket Removal]

BillW's Tail-light
Touratech, it would
seem, have a Strengthening Unit for that:


 See from
Touratech USA or
Touratech
Germany
See from
Touratech USA or
Touratech
Germany
A CG member makes and sells a simple part to reduce the amount of flex in the tail light assembly that installs above instead of below. See the Tail Hook under products at http://bradfordgreene.home.attbi.com/guardsweb/.
I know of one member that had the tail light lens (the red plastic portion) simply snap off after running through a rut while off road. It broke right around the two screws that hold it on. We stuck it back on with duct tape for the ride home. On another ride over some long wash board roads I spotted a Dakar rider using duct tape to secure the entire tail light assembly. It had broken off much like Bill's #930 did. Brad #1002
There Goes another tail light. Is anybody else having trouble with the f650GSD shucking taillight assemblies? This is becoming a thorn in my side.I have lost my tail light and licence plate three times now all in rough conditions. It seems that the engineering wizards have located the plate right over the center of the wheel at full compression. I cut the plastic mud flap off and raised the plate about an inch but still IM catching the plate on my knobbies. does anybody have an aftermarket solution for this problem surely IM not the only one Best Regards. Todd
Touratech makes a little brace for the problem. It appears that the stock assembly flexes, and this brings it into contact with the rear tire. Touratech part 051-1202 $18.80. Jinx
Even though my Dakar tail light assembly is very wobbly, I haven't had any problems with it (yet). I have lost the bolts out of the dicky looking mudguard thing. I don't remember bottoming out the rear yet, only the front. Ziegfried
I had my brace powder coated before installing, as it seemed to be bare aluminum and I wanted a no maintenance installation (coated to prevent corrosion) and think powder coating would stand up to the elements in that area better than the usual etch/alodine/fluid resistant primer/polyurethane paint process I commonly play with. I also smoothed all the edges and holes before handing it off to the powder coater to prevent possible cracking, though it is thick material. It came out very nice, and limits the tail light from flopping around. Having done some sheet aluminum work before, it seemed like a well made brace. Recommended. Advrider
It rocks Just installed mine - short of shitty German instructions it works like a champ - license plate and tail light are now they way they should have come from the factory. PhilSpace. Advrider.
GS License Plate Bracket Removal
by Brad #1002
09/10/2002
For GS models delivered to the US (California specifically but may apply to others) the official government license plate is attached to a painted metal bracket which in turn is attached to the taillight assembly. This bracket also provides a mounting for side facing red reflectors. There are two flaws in this design. First the tabs on the side that provide mounting surface for the reflectors can catch on the rear tire anytime the suspension is fully compressed if you have removed the stock rear mud guard. This is made worse if the bike has knobby tires (i.e. TKC80, MCE Karoo, etc.). The entire taillight assembly is mounted in a way that is flexible and this contributes to allowing the bracket to contact the tire. If you still have the mud guard in place the bracket may still deflect it enough that the mud guard catches the tire and is torn off. Secondly, the bracket is fairly large and the added weight makes the flexing issue on the taillight assembly even worse (under any conditions). If you are willing to give up the red side reflectors (a possible vehicle code violation in some states) you can remove this bracket and mount the license plate directly to the plastic fender. Shown here.
The benefits to doing this include:
Tools
T25 Torx - for screws that hold
the bracket to the taillight
Drill bit - 7/32" (?mm) and a small pilot drill
if available
8mm wrench for the nuts on the above screws
What ever you need to remove the license plate itself
Hardware
You can probably just reuse the
hardware above. Any manner of attachment is possible. I'd suggest one that makes
it a more work for someone to steal your plate.
Work time
Should take less than 60
minutes.
Modification process (for an F650GS or F650GSD)
Optional No Drill Mounting Method
You may find that your plate can be
mounted using the two existing holes (the ones that were used to mount the
removed bracket). However, it requires you
mount the plate 90 degrees.
This may attract the attention of the police and give them a reason to pull you
over. Strictly speaking it is illegal in most states but I see it
once in a while so it may only be a problem if they are looking for
a reason to stop you.
Please make sure that you lock the rear
panel after washing your bike, I have just lost mine and according to BMW agent
,I am No 8 in the queue. The best advice is to use cable ties, and make a kind
of a cable link that will ensure the rear panel is still attached to the
motorcycle in the event of you forgetting to lock it, or it comes loose and
drops of while driving !!!! I did not so are waiting three weeks for spares !!
update August 19, 2000
The Chain Gang's volunteers have seen this happen personally while on a BMW demo ride at MOA's 2000 rally in MI. Although the latch has been redesigned, the problem is still occurring.
update February 19, 2002
Touratech (www.touratech.de) have a small plate that you screw in the back, to keep the ends together and help stop the thing falling apart. See
Reinforcement H1 F650 Euro 10,00 Part # 040-1305
Like for all manufacturers, the only valid endorsements are from satisfied customers, not from this site. You could even make your own.!
update November 5, 2002
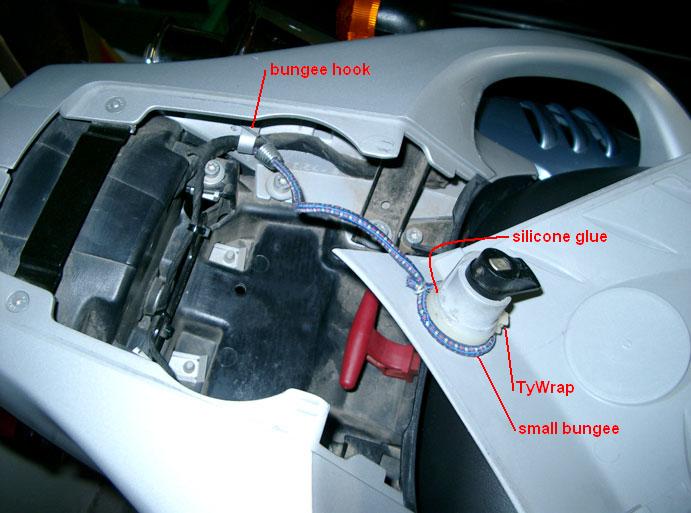
It is easy to make a lanyard to secure the cover to the bike. I made one out of a small bungee cord, TyWraps and some silicone glue. One end of the bungee is hooked to the bike and the other affixed to the lock cylinder on the inside of the tail cover. Here is a picture of the result. Got a better way? Tell the FAQ master about it. Brad #1002
Feedback
Just came in from a brisk ride here in the GREAT WHITE NORTH (OTTAWA), and noticed my duo seat compartment door was just hanging on by it's lock. This has happened before but I figured I just closed it wrong the last time I removed it. I Since checked it and it seems like it just isn't fitting properly, is this a common problem with the GS?, is there a quick fix without doing any cosmetic damage?, or should I call in the BIG BOY'S (BMW) '02 Mandarin F650GS, "Newfie Gullie Jumper", Ottawa, Canada.
I thought the same might happen to my "compartment cover". It really doesn't elicit much confidence that it will stay put when you lock it. I put a keyed rubber coated cable lock in there thinking how clever I was (It's a good fit). I will rethink that. Surely there is a better way to secure this the cover! Darren '02 F650GS, Ontario, Canada.
If you are referring to the tail compartment cover it is a known characteristic. You're lucky you didn't lose is completely like a lot of us have. After I lost one I used very small bungee cord, wrapped one end around the lock cylinder, glued it with silicone, and tied the other end to a brace on the base of the compartment. Now if it comes loose it will just dangle until I discover it and put it back. Touratech sells a small metal latch reinforcement that might help keep it in place. One thing to avoid is putting anything heavy in the compartment that is free to bounce around. One good bump and it will fly up and knock the cover right off. For example don't keep a disc lock in there unless you tie it down. The only thing I now keep in mine is a rag. The replacement one I got (under warranty after some sweet talkin) fit a little tighter but I suspect they loosen up after some hours of riding and use. Let us know what, if anything, they do for you. Even the review of the bike in a motorcycle mag (CW I think) noted the loss of the cover during their testing. As with some other things on BMWs "it iz zee riders failure to operate zee machine co-rrectly not a fault of zis machine". ;-) Seriously, you have a right to make the complaint to your dealer but I wouldn't get too worked up about it. It's a pretty small fault in an otherwise great bike. Brad, N. CA., 2001 F650GS - Inmate #1002 --- Check the FAQs --- bg's stuff - protect your F650
I don't get it. There is NO WAY that tail cover will come off my GS without unlocking it. Art 884
Mine's ok too!! If I recall correctly from an earlier reply on the old message-board, (which we are unable to search), when BMW discovered the problem they moulded an extra half-inch or so of plastic onto the end of the cover. If you look at the later modified ones you can see the join. :~)) Trevor 999 UK 01 GS
My cover came loose and went away the second time I rode my 2001 GS (on the way to the dealer!). Dealer's parts guy said they had never heard of that happening. Ordered a new cover, emblem, lock (about $42) and had them install it and re-key the cylinder. I used a piece of safety wire to secure mine somewhat. On a 200 mile ride on Sunday, mine came adrift again and was tenuously held on by the safety wire. A more secure lanyard will be on by this weekend. It appears that the plastic-on-plastic latch is the culprit. It flexes and comes loose even when secured and double checked. May have to resort to a Dzus quarter-turn fastener or a locking pin; have a box of that stuff on the shelf from racing days. '01 F650GS, Honda Hawk GT, Honda FT500 Ascot. BP in Atlanta
As I recall, when BMW hosted the GS model introduction for the World press (those were the bikes that used the "ringer" FI program that made them run like stink), half of the tail compartment lids flew off and were lost. This was widely reported in the press reports. Richard #230: 1997 Funduro, 2002 R1150R, 2002 Yamaha YZ1, 1993 Honda CB750 - Pacifica, CA, USA
It's a known fault. When I test rode my GS, (it was a dealer ex-demonstrator), it was missing it's lid. When I picked it up it was equipped with a new lid complete with a small bungee cord to keep it in place. The dealer told me that it was policy for BMW (UK) to replace any lost lids with one with the bungee cord safety device. (At a price of course!). Having said that I always make sure the lid is secure, and haven't had any problems in nearly eighteen months. neillw001
What is the best way to secure the trim bits on GS fuel tank?
Both models of the GS have colour accent trim bits applied to both sides of the plastic fuel cell (tank). There are two pieces of colour matched trim on each side. These are secured to the fuel cell using some kind of adhesive. The position of these is such that the rider's boots or pants will rub up against them. It is worse when riding in the standing position. As a result, they are known to fall off on occasion. Many members have reported that their dealer replaced them under warranty the first time. Subsequent loss required them to purchase new ones.
Two solutions to this one. One, just forget about it, or, two, when replacing them use a stronger adhesive. People have used silicone glue successfully. Use a glue that is safe with plastics. Remember the fuel cell is plastic and you don't want to use a glue that could compromise the integrity of it. A new set is reported to be about $30 USD. To make sure you don't loss the ones have now you can carefully pry them off and re-glue them to prevent future loss.
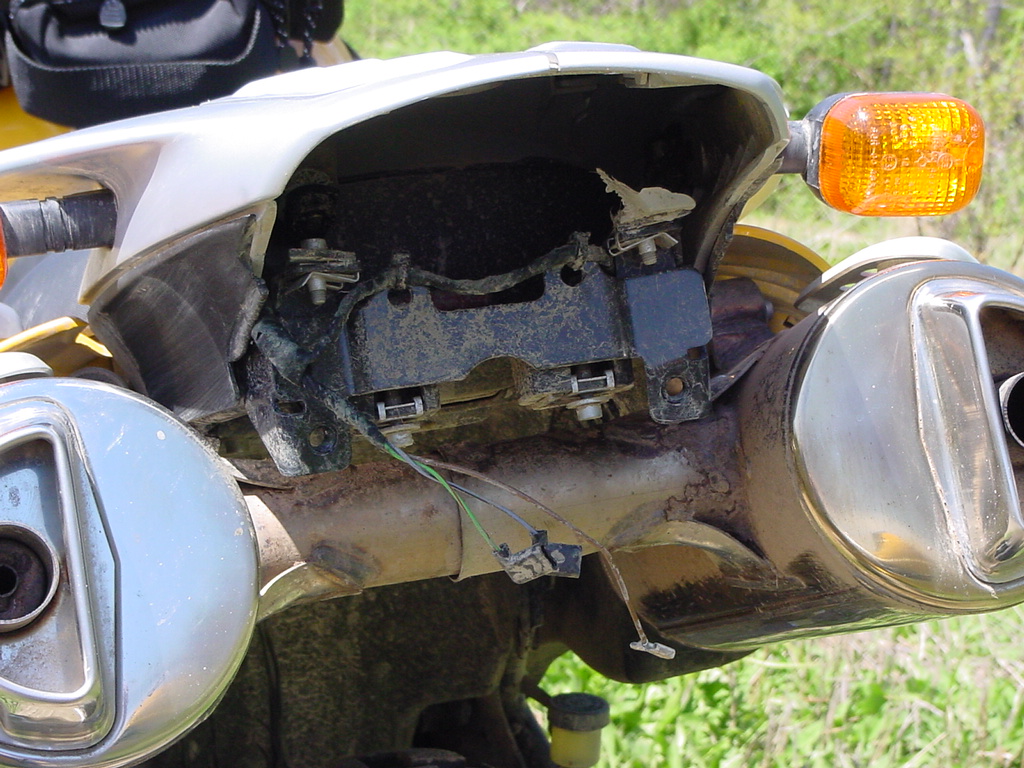
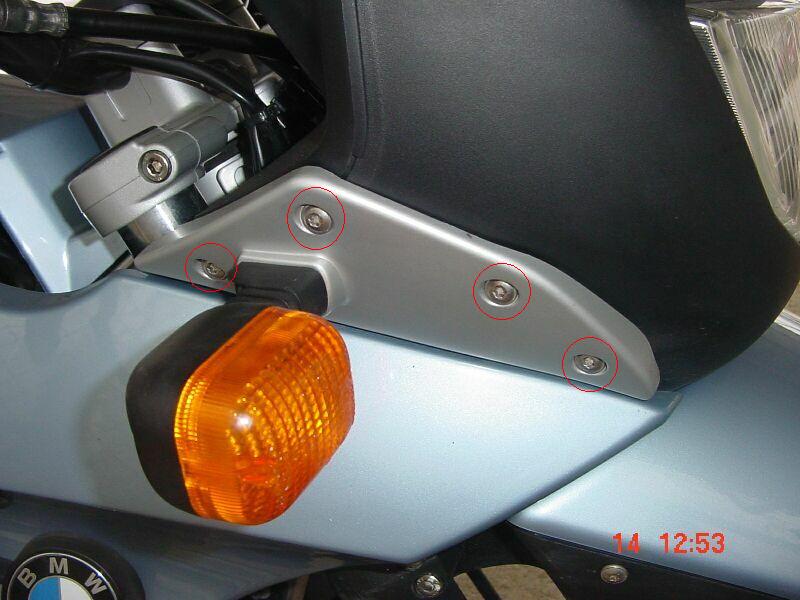
Fixing the
Headlight Shroud "Anchor Screw" Abomination
by Seacuke #1214
On the BMW F650GS, there is a plastic "head" that
holds the console and the headlight. This "head" is built of two pieces of
plastic which are held together by two plastic screws and some tiny plastic
anchors (when the turn signals are removed). In my opinion, this part of the
bike should be held together in a more stout manner than it is.
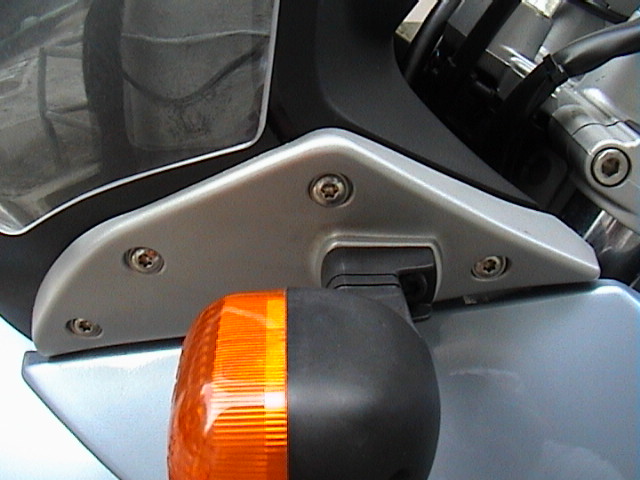
As I was
working on installing my
Hodger
voltmeter, I decided to take care of this problem as good as I could.
I had some spare nuts and bolts laying around, and a couple of counter-sank
screws with nuts looked like ideal candidates. I used some stout epoxy-like,
silicone-like glue to
tack
some nuts to the little plastic tabs that the stock "anchors" were supposed to
hold on to.
Another
look
The counter-sank screws get nice and flat when
the head is
screwed together, staying out of the way of any windshields. The added
tension of the screws should help to hold the bolts in place when I'm doing more
rough terrain. In any case, these screws and bolts are a huge improvement over
what's put there in the factory.
Feedback
The problem is those Plastic Plugs provided are too small and don't have enough Splay. I used a couple of straight (Not Tapered) wood screws with a very very coarse thread and it works perfectly, straight into the plastic below. Kristian#562
After adjusting my headlight last night, I noticed that the headlight itself had "fallen in" to the housing. I proceeded to take the turn signals off to get inside and see what was going on. The right side adjustment screw had worked it's way out of its little plastic POS holder/anchor. I popped it back in but it seems like a jenky fix, probably will come out again. After being bummed about the poor design of the adjustment screw (too much plastic), I started to put the whole thing back together. It took me about an hour to do what should have taken 5 minutes! The two pieces of the headlight housing never really meshed together like it was before. Seacuke mentioned about the two plastic POS pieces that hold the two pieces together at the top middle. Like I said, I never was able to get the two pieces to fit flush with one another. I just gave up. Seems like when you tighten the turn signals back down the whole thing comes out of whack. Also, when putting the screws back into the turn signals, some of them (maybe 3 out of them went it real tough and I'm sure they weren't tapping correctly, even though I backed them out and in carefully. Just couldn't' get them back in without some work. I'm almost positive I got some strippage. What a poor design of the whole area. Is there any tricks to getting the thing back on flush? After what I went through last night, I'm thinking I should just leave the whole thing alone forever. Seems like one more shot at it and I WILL HAVE STRIPPED SCREWS. I'm just worried that it's going to fall apart again when I'm far from home. THAT WHOLE AREA IS A FRIGGIN CLUSTER F. I wish I were man enough to take it all apart and put it back together MY WAY with some good quality fasteners. '03 F650GSA - Titan Blue Colbster, CA
I have had three of the plastic anchors fail on three different GS's. Truly a poor design! The plastic piece that the white anchor pops into is very thin. I have used zip ties as an in the field fix, but do not expect them to last long. Until they redesign the mess, any repair will probably be short lived. Keith in Alaska #714
Color Insert Thingy on Side of Faux Tank Fell Off?
Has it happened to many people? Yes, it would appear a few have been afflicted by it, although it is minor, so many wouldn't probably report it.
I have a '01 GS and recently one of the color inserts that are on the side of the dimpled black plastic around the fuel tank fell off. There doesn't seem to be any way to tighten these things and I didn't drop the bike, it just wasn't there one day. The other three seem to be on firmly. Anyone else lose these things and, more importantly, will the warrantee cover it? mark#797
The first time mine fell off, my local dealer replaced them for free and no problem. The second time they came off, I had to order them and pay somewhere around $30.00 for the whole kit. When I installed them, I used a silicone glue on them and they never came off after that. Just about everyone I know with a late model GS, has had at least one fall off. Beau A. #645
Yeah, they all fall off. If you want to keep them, I would suggest pulling them off and re-gluing them back on. I used "Marine Goop" on mine and so far are holding up well. SScratch '01 Dakar Nashville
Swapping GS to GS/Dakar fairing or Vice Versa?
 Yup. Completely Interchangeable if you can find someone to do it.
Bill1031 did it. Here's a Dakar with Yellow GS Panels.
Yup. Completely Interchangeable if you can find someone to do it.
Bill1031 did it. Here's a Dakar with Yellow GS Panels.
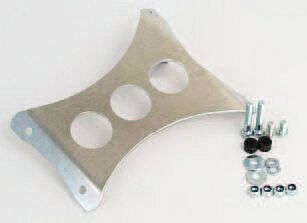
Weak Subframe Mounting Bolt
Point
Courtesy of DHP#711
Original Text Here. You might want to add some of the details for the weakness of the subframe mounting bolt point from my website.