compiled & edited by Kristian #562
Please read the Disclaimer before
attempting any work in this FAQ.
Last Updated: 28 August 2006 by Winter #1935
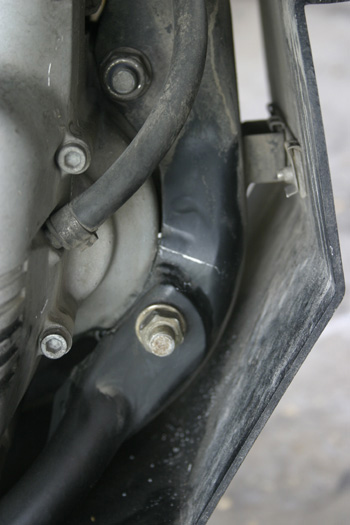
I have two 1997s...one with 111K and another with 34K. Both have cracks in frame located as seen in photo. The bike with 111K has greater problem; the fame piece is cracked on both sides, nearly all the way through. The 34K bike has just the beginnings of the same problem.
In the photo, the crack is marked in white to accentuate the break. It is located on the right side (and left side as well) just above the lowest mounting nut directly down from the upper oil drain...or follow the frame tube forward from the foot peg to locate the place. Prof
Kristian #562, Peter #233, Mark #403, December 01
Vibration and overloading has been known to crack the Rear Sub-frame, just below the Plastic Luggage Rack, under the black Plastic Cover.
I had mine welded up and strengthened. I have the large 46l GIVI Top Case, but too much beer wasn't good for the frame.You have to remove the Rear rack and that black plastic cover to get at it properly.
Mine cracked the same way after using aGIVI 46l case. I had it welded & reinforced and I added two l brackets from the back edge down to the back end of the frame (mounted to the two holes). I think it happens because the case mounts pivot on that thin strip at the back mount and once that breaks it starts working the next point. I also switched to a smaller 33l case. I will have to check and see if it survived this season. Peter #233.
Apparently sub-frames are available.and no, it's not simply a repair. they will likely start at the crack and work forward until they find bolts instead of welds. and since the whole sub-frame is welded, that means replacing. no confirmation yet if that is what they will do (replace), but that's what the tech thought, said they'd done it before for the same reason. BMW will not have anything to do with welding. I even asked him, why wouldn't you just weld it? but when it comes to warranty work, I generally let them do what they want. seems ridiculous. but if they replace it, they will also be replacing the paint marks eaten away by the leaking battery/hose connection, so that's another benefit for me. I figure next time I'll have tohave it welded, since my warranty will probably be over by then. Mark #403
Anonymous, October '01
The centre stand has three adjusting screws: One to adjust the "riding" position of the centre, two to adjust the "standing" position.
The screw to adjust the riding position is on the right side of the stand. Turn the screw clockwise (don't forget to loosen the nut that holds the screw in position), to higher the pos of the centre stand while riding, et vice versa. This is necessary if you're not abl to push the centre stand down with your foot correctly, because the lever you put your foot on is too close to the frame.
To adjust the standing position of the centre stand put your bike on the centre stand and look beneath the bolts that connect the centre stand to your frame. There is one screw under each bolt (left and right side). They are similar to the first screw. Turn them clockwise (INTO the centre stand) an equal amount of way to make the bike stand more secure, but you'll notice that's its more difficult to get the bike from the stand back on the road et vice versa.
Note: The nuts on all three screws, that are designed to hold the screws in their position, like to become loose thus leading to a loss of the adjusting screws (and to a correct working centre stand). So check them regularly.
Jon (UK) & Trevor (UK) # 999, 09-Nov-01
A few weeks ago I posted about the wretched side/prop stand on my f650 1996, and the way it springs back without warning.

http://www.srcinc.net/forkbrace.html
They've even supplied a FAQ about their Fork Braces, with a note for the F650: http://www.srcinc.net/fork.htm.
They're also selling them on this site: Dual Star Fork Brace. This is the same as the SMC one apparently, at the same Price.
NOTE: Lots of people fix their "Steering Twitch" with a Heavier Weight Fork Oil. Refer the Fork Oil Change FAQ.
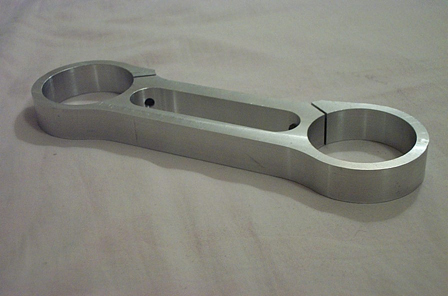
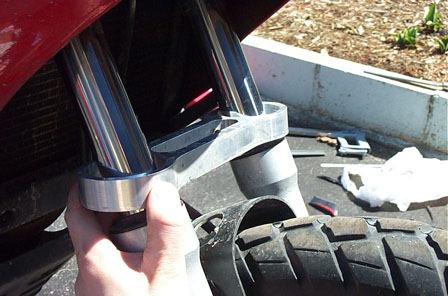
Raceroo made his own Fork brace: Here's the CNC Code if anyone has access to a CNC mill and the required material so that you can make your own.

|

|

|
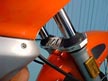
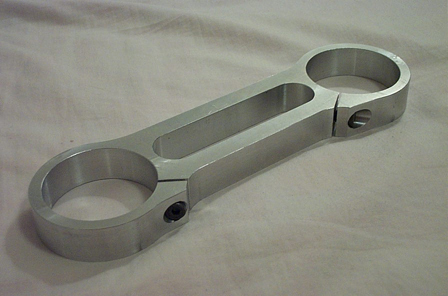
| My Bike | The Original Brace | The New Brace |
|
|
|
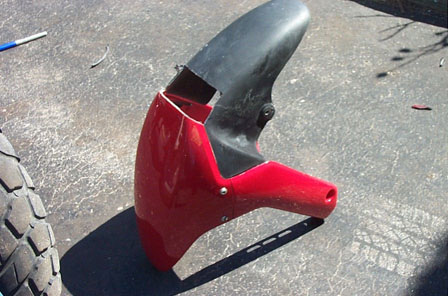
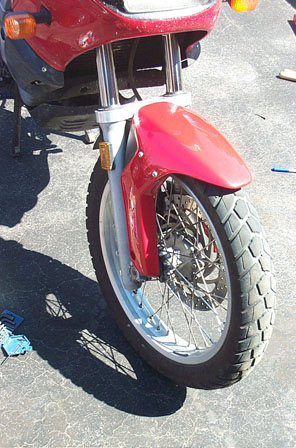
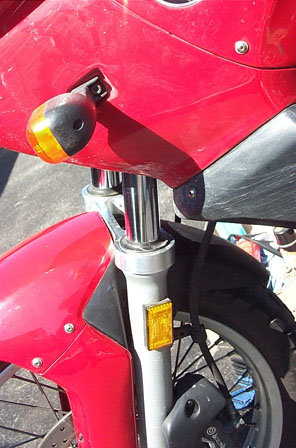
| Fitting the Brace | The Fender Cut-out | The New Brace on the Bike |
Q. Would it have been more difficult to make it similar to the
SRC brace, with a rise over the fender, rather than a cut-out?
A. The rise would have to be over an inch to clear the fender on
the regular F650.
The SMC brace is shown on an ST with the smaller wheel, it doesn't have the clearance issues, though if you look where it is mounted, it would have the same issues with a regular F650 fender, at least I believe so.
I considered making a rise, hence I got more material than needed for just one brace. But the added weight and complexity wasn't worth it. (So I split it in 2 and made 2 braces) You can't even tell that the fender is cut unless you look for it. Besides with the way I made mine, it is much stronger and notice the clamping is by only one screw (hidden in the back of the brace) for each fork, it is not split in half. This means you have to slide it over the forks, i.e. drop the forks out of the Clamps, but it makes it a much more solid clamp.
And yes I made it and designed it myself, I've got a mechanical engineering degree, but right now I am doing a tool and die apprenticeship so I am able to make the odd project for myself :-).