Ignition Switch
FAQ
compiled & edited by Kristian #562
Please read the Disclaimer before attempting any work in this FAQ.
Updated 16 March 03
Problem:
This seems to be a known problem especially in cold
climates. What happens is the little red plastic cover that protects the
ignition mechanism gets stuck, gets brittle, gets worn and one day you stick
your key in and the darn thing just breaks, scattering little pieces of red
plastic down into the mechanism.
Here is some feedback on symptoms:
-
The FAQs says it
breaks especially in cold weather. I've been riding in cold weather for 4
months, but today when it was 70 degrees out, the red plastic piece
disintegrated. The FAQ says that maybe the pieces can be pulled out with a
tweezers. I got half of it out, along with the spring, but I couldn't even find
the rest of the pieces. I dug around with paper clips, etc., but nothing, and of
course the key wouldn't go in. Got an $80 tow paid for by my insurance roadside
assistance program. BMW dealer said they have had 3 F650s towed in during the
past month for the same problem (mine is a 1999). Dealer said lock can't be
disassembled, cleaned, and put back in. Have to get a whole new lock for $80
plus about $90 to install, PLUS I get to wait for 2 weeks for the lock to be
shipped! I asked if the red plastic piece could be removed from the new lock, so
this doesn't happen again and he said no. I think I'm the one who started all of
this when mine self-destructed a few weeks ago. The key wouldn't even go into
the lock at all, so I HAD to get a new lock. And I only found one (1) spring
while attempting to "fix" it. My other spring is probably jammed down in the
lock somewhere. Now I have a NEW lock with another crappy piece of red plastic
in it. If you had written this last week, I would have gotten the lock from my
local dealer, took it home, turned it upside down, and removed the red plastic
with gravity in my favor (much easier than turning the bike up-side-down). I
have my old lock, but haven't had time to really check it out. I'm not even sure
how to take it apart. It's pretty well totalled inside partly from me and the
dealer picking at it to no avail. I guess I got a good deal though. The lock
sells for $80, but I had a 20 % discount coupon. The BMW manual says it takes
1.5 hours to remove the old lock and install the new one. So, at $60 per hour,
that's $90 plus about $62 for the lock = $152. Since the bike was tied up for 3
weeks waiting on the new lock, and I wasn't feeling particularly energetic, I
had the dealer do the 12,000 mile maintenance which included checking the valves
(they didn't need adjusting), oil & filter, no spark plugs (mine are almost new
"extended reach"), and the rest of the 12k stuff for a total of $273 (that
includes the lock and labor) ! Another BMW dealer 70 miles North of here wanted
$570 for just the 12k service. And the bike still runs ! They didn't screw
anything up. Colorado Bob
-
When my plastic
cover let go, I flattened out a paper clip with a hammer, heated it red hot with
a torch and pushed it into the lock. The plastic melted around the paper clip. I
waited a few seconds for the plastic to harden and it pulled right out. I'm not
convinced the sun is the whole problem. My cover failed after I had a new key
made. I took a good look at some of the pieces I retrieved from the lock and it
looked like the sharp edges of the key had chewed it up. I have de-burred all my
keys. Can't say this will stop the problem, but it can't hurt. Good luck. Socal
99f
-
I think the real
problem is how much time the red plastic part has been exposed to sunlight. I
have never heard of the red plastic part on the seat lock failing (likely
because it is not exposed to as much direct sunlight when the bike is parked). I
keep my bike covered at all times, either in the garage or when parked outside.
After 6 years I still have my original plastic lock hole cover. However, I do
note that all other BMWs seem to have a metal cover, rather than a plastic one.
I wonder how we got so lucky? I will also note that about half of the people
that have had this problem have been able to remove the plastic parts from the
lock and get the lock working again. So it is certainly worth trying everything
you can to remove the broken pieces. Richard #230
-
Ignition
Self-destruction. Pulled the key out of my ignition yesterday, and had the "dust
door" (the little flap that keeps junk out of the key hole) come apart on me. I
was able to remove the piece, but realized the reason it busted... one of the
tiny posts that held it hinged in place had come off... and was deep in the
depths of the locking mechanism! Had a locksmith work on it for an hour (he saw
the small red part in there) but couldn't get at it. The key will go in, but
won't contact all of the pins, so it won't turn. The bike's basically
immobilized!! Had to put it on a trailer and take it home. Anyone else have this
problem? Seems like a little part like that should be more resilient (why
plastic instead of metal?). I have an extended warranty (it's '99 with only 4000
miles). Will that be covered? What' the easy fix? Ty.
-
Two hex bolts hold
it and the cable guide from the bottom. I have never removed the assembly, but
had to replace one and tighten both bolts at one point. Looks to me like it will
drop right out and you can turn it over in the space between the tank fork tubes
Chris in Santa Cruz, CA #782
-
Just got my Classic
back about 2 weeks ago with the same problem. Are you sitting down ? Originally
the dealer ordered a core from Zadi to match my key. Waited 3 very long weeks
for it to come, which is reasonable. Was told 2-5 weeks. Anyway, it arrived and
did not work. Key wouldn't turn in the new core!. Words of Wisdom: Don't
underestimate the value of a great relationship with the Service Manager at a
dealership. BMW NA authorized a new lock system (ignition, gas cap, seat lock)
under my 3 yr warranty, which I was 2 yrs, 364 days into (WHEW!). There is a way
to take the ignition core out, and it apparently can be "turned on" with a
stick. I never tried it though. I'm doing a couple of things to prevent it from
happening again, because it IS the same Zadi switch as the first one that
failed. 1. Leave the key in WHEN it makes sense. I use to take the thing out all
the time. 2. RAIN IS BAD !!!! VERY BAD !!!! Someone here suggested a WD-40 cap.
I'll cover the thing with that cap when it's going to sit outside in the rain
for some reason. 3. I need to follow up with this one, but there is a
graphite-type "lube" that apparently helps. Good luck. I hope everything works
out *quickly*. Derek (Maryland, USA)
-
This happened to me
just before I was about to set out on an 11000km trip. Here is what worked for
me...Take a needle and hammer it on the end against some metal so that the tip
gets impacted. This should create a very small hook. By jabbing the needle into
the lock and pulling it out, I eventually hooked the very small piece of plastic
that got stuck in there. Good luck is all I can tell you! RacerRoo.
-
So I’m riding my
bike home tonight after having Steering Head Bearings installed at the dealer
and as I’m approaching my street, the bike starts stuttering. Well, it starts
turning on and off, really, like it’s stalling, then it comes back on. This gets
worse and worse until it just dies… no power, no nothing... I’m pushing it off
the street, and turn the handlebars and VOILA! the lights come back on. I turn
the handlebars in the other direction, and they die in the middle and come back
on again once all the way to the other side. STRANGE, me thinks. But I come up
with the great idea of riding the bike the last ½ mile home by swerving
continuously from one side to the other. The bike is going and stopping and
going and stopping. I get it into 2nd and I can’t seem to keep it swerving
dramatically enough to keep it running. After 300 yards of this, I pull it over
and call it a night. I figured that all of this stopping and starting and jump
starting, etc. can’t be very good for the bike. So now my bike is down the road
sitting in some stranger's driveway waiting for me to give it the sunlit
inspection tomorrow. I figure there’s a short in the ignition switch or
something under there. Either the boys at the shop fried my wires when they were
brandishing that blowtorch around, or I’ve got a bum ignition switch. I could
hear the power turn on and off as I turned the handlebars with the engine off.
Has anyone ever heard of such a thing?! NewMexEd
-
It is the the
ignition switch wiring, as said in earlier postings. When my GS died in the
middle of nowhere "my" mechanic told me to check the "full" right and left
steering as that was the MOST common fault on F 650 bikes with those exact
symptoms. He even showed me a fax he had sent BMW Norway AND BMW Germany to tell
them of the problem. You said so yourself, full right lock=dead engine, straight
forward to full left lock= no problem. You probably was near to breaking the
wiring by normal riding, but was lucky enough to have BMW mechanics do the final
bending. haakon#626
-
Mine croaked. Some
of the little red bits fell down inside. What a PitA. After Rebecca resurrected
my lock for me (thanks, Rebecca!) I needed to find some sort of cap to cover the
lock. I misplaced the milk cap I had in France that worked so well. Then... I
found that a WD-40 cap sort of snaps right on over the lock. It is a little
deeper than it needs to be, but fits so well that I don't mind carrying it in my
'Stich pocket whilst riding. And it is RED, too. Yet another use for WD-40.
Flash #412 (CO)
-
Lock and key
problem. The little plastic rain cover - spring loaded - on my ignition lock
finally shattered last weekend. It had been cracked for quite a while. I got on
my bike early in the morning of a perfect late-summer day and simply sat there.
The key wouldn't go in fully. I tapped it down, but then it wouldn't turn. It
worked in the gas tank lock, so I was pretty sure I knew what had happened. Of
course it was Saturday on a long weekend and every shop, BMW service department
and most bike shops were closed! So... I managed to figure out how to remove the
lock from the ignition package - quite easy albeit a clumsy process. You can
start the bike once the lock is removed by simply turning the ignition switch on
with a screwdriver. I took the lock to a locksmith and he removed a few
miniscule bits of red plastic from the interior. I reversed the process and was
back on the road that afternoon. My morning wasn't wasted - I learned how to
remove the lock. Not as much fun as riding, but informative. Anyone know the
approx. price of replacing an entire lock unit? Don't need one now, but without
the rain cover, I suspect I may have problems in future with moisture and seized
tumblers.
-
As I mentioned
recently, my classic is holed up in the garage because that RED PLASTIC FLAP POS
shattered in the core and the key won't friggin turn. Now I've learned that it
may take 1 to 5 !@#$ WEEKS to get the new core, key matched and all. Considering
I'll be sentenced to Cage Purgatory for about a month, does anybody know of a
bike dealership that has a 30 day full refund guarantee on a new bike purchase ?
I'm suddenly interested in a SHORT term purchase. Derek (Maryland, USA).
-
Carry a dental
pick. If you have the tool to pick the bits out, then Murphy will leave you
alone. Either that, or if he DOES strike, you'll be able to deal with it. Flash
#412 (CO)
-
I managed to get my
broken "red thing" out with a paper clip from the video store I thought I was
going to have to rent a room from. I'd put one in my jacket pocket. Can't hurt
and it don't weigh nuthin' marksam911
-
The little metal
doors break off too. If it breaks off, be gentle and it will come out. Just make
sure you have some tiny tweezers, and a couple wire paper clips, maybe with a
pre-bent hook, possibly a tiny LED flashlight keychain in your bikes toolkit.
Todd #389
-
I *had* to remove
that POS by necessity about 100 miles from home about two years ago. Argh!
Luckily for me, I was at a gas station where they had some tweezers that did the
trick. I don't have any advice or instructions for removing it easily so, yeah,
it may be a PITA to get that POS out. But IMHO it's better to deal with
the aggravation at home, at your leisure, with proper lighting and tools rather
than on a dark, cold, rainy roadside in the middle of nowhere when you're
already late to where you wanna be. That cheap thing is gonna break sooner or
later. You can wait or you can take control. Your choice. Ken #784
Solution:
1. Most people get a very small pair of tweezers and fish
the bits out so at least you can get the thing started.!. However, you're still
stuck without a cover, and if any water gets in there and freezes.
2. Remove it BEFORE it breaks. Cover it with something
else. See
Ignition Switch
Cover Removal FAQ (Before it Breaks)
How do I Remove the ENTIRE Lock: (Not
Necessary for the Broken Ignition Switch Cover Problem )
The cost of a new lock is about US$70. If you want it
factory-keyed to match the rear lock, you'll probably have to wait for 3-4
weeks.
Factory Manual via Colorado Bob
-
I got a look at the F650 factory manual today and you
wouldn't believe what it takes to get that switch out !
-
Remove front and side fairings, windshield, headlight
fairing,
-
REMOVE HANDLEBAR AND UPPER FORK BRIDGE,
-
DRILL OUT AND SHEAR OFF A SCREW THAT IS IN THERE (A NEW ONE
COMES WITH THE NEW LOCK),
-
and then recheck the backlash on the steering bearing when
putting it all back together.
-
No wonder I couldn't figure out how to get it out while I
was sitting on the side of the road.
-
Dealer says he MIGHT be able to get the old one out in a
few days.
Flash 412 (CO)
-
Remove windshield - 4 screws
-
Remove side covers - 5 screws each
-
Remove fairing - 4 screws to tank on each side, 2 screws to
bracket, unplug lights, set aside.
-
Using a Philips screwdriver, remove switch from bottom of
lock.
-
Take a piece of hacksaw blade in a pair of vise grips and a
saw a slot in the shear screw.
-
Remove shear screw with flat screwdriver (if it hasn't
fallen out already).
-
Remove other lock screw with Allen wrench.
-
Fix lock.
-
Reassemble in reverse order. (Use two ALLEN bolts and
LocTite to secure lock and switch.)
-
Whole thing should take about 45 minutes or an hour, plus
time to clear the lock.
-
Or... just pay the dealer $300.
Prevention:
I would add a dose of Tri-Flow. I've
seen this stuff forever and never used it. While on my trip to BC this summer,
my Triumph IGNITION switch became very sticky after several days of rain to the point
I was worried it would fail while on the road. (Same switch & red thingy as the
Fs) I stopped in at a locksmith thinking a dose of graphite lock lube might fix
it. Locksmith sold me a small bottle of Tri-Flow, which he said is all he uses.
It worked great. Two drops and switch was back to normal and has stayed that way
since. (3 Months).
-
WD will CLEAN the lock, but it won't
PROTECT it from corrosion. Tri-Flow will, as well as lubricate it.
-
Others have put a little Plastic Cap over the lock
mechanism to try and protect it.
-
The cost of a new lock is about US$70. If you want it
factory-keyed to match the rear lock, you'll probably have to wait for 3-4
weeks.
-
Flash#412 found that the red cap from a WD-40 can fits the
lock housing perfectly. Todd#389 tried 3 cans and still can't find a big enough
can of WD-40....
Tumbler Removal
Ignition Switch
Cover Removal FAQ - BEFORE it
Breaks!
by Mike E. (car0tene)
Gidday,
My bike is a 1996 F650 'Classic' and
lately I have been concerned about the potential drama of having the 'red
plastic ignition lock cover problem' where the plastic lock cover in question
becomes that fragile by either UV damage or by intense heat
changes/differentials that it breaks off and becomes lodged in the ignition
lock, preventing the bike's ignition key from being fully inserted and the bike
from starting.
Since my bike is now a 'relic' (1996)
and the fact that Australia can be a pretty remote place, (but lets face it, 10
km from home on any back road early on a Sunday morning can be just as
'remote'), I decided to remove the red plastic ignition lock cover as a
preventative measure, hoping that in trying to remove the said piece of plastic
that I didn't end up causing the problem by having bits of the plastic end up in
my lock during the removal process. Thankfully, this did not happen and here is
my version of how to do it.
Red Plastic Ignition Lock Cover
Removal Procedure
Warning
If it all goes wrong you will have
caused the problem that this procedure tries to eliminate. (That's life...one
big risk taking event !)
Tools Required
-
Nice bright work area.
-
Standard size sharp bladed 'Stanley'
knife. The multi-section snap off style. Have at least two spare blades
available.
-
Set of small flat head 'jewellers'
screwdrivers.
-
Small pair of pliers with a ribbed (good
grip) jaw.
-
Household vacuum cleaner. Powered up,
ready to go and collocated near the bike just in case of emergency.
-
Small pen light torch for looking in and
around the ignition lock.
-
A plastic cap from a standard sized
spray can of WD-40. Preferably the type that has a 'slot head' since this has a
bit more plastic ribbing inside the cap, making it a bit stronger.
-
Curved fingernail scissors. Yea, really
!
-
Safely spectacles.
-
A 'tube of superglue' and a 'strong
magnet'
-
Helmet, jacket and gloves to go for a
ride afterwards. You might feel like celebrating !
Time Required
-
About an hour of non-rushed time i.e you
should not be stressed before you start this job.
-
No distractions.
-
No need to use the bike to go somewhere
important, just in case it all goes wrong.
Conventions
-
The right hand side of the bike equals
the side of the bike with the front brake lever.
-
Verbose instructions for clarity. (I
hope !)
Procedure
-
I read all of the info I could find on the problem via the Chain Gang Web Site
to gain some background info. Acknowledgement given to those that came before.
-
Unlock the bike and take the ignition key out.
-
Put the bike on it's centre stand.
-
Give the ignition lock a preliminary clean using the vacuum cleaner, just in
case there would be any crud resident that might get dislodged during the
removal process. Using a small screwdriver, slide the red plastic cover over to
the right to open the lock up and allow the vacuum cleaner to be placed over the
ignition lock to do its thing. You won't get a complete vacuum seal with the
small screw driver in the way, but its better than nothing. Even if this step is
perfunctory, you will at least have the vacuum cleaner all set up and ready to
go in the event of disaster.
-
With the ignition key removed from the bike and the red plastic cover fully
extended to the left covering the lock entrance, align the sharp point of the
Stanley knife along the divide between the most right visible part of the red
plastic cover and the vertical line of the bike's ignition lock metal cover
plate.
-
Start cutting along this divide line using gentle down strokes of the knife
until a decent groove starts to develop where upon the cutting forced can be
increased.
-
If you push too hard or the knife slips, you can accidentally push the red
plastic cover over to the right where it will go behind the metal cover plate (i.e
key inserted - lock open position). This is not too much of a problem as the red
plastic cover will normally come back out from underneath the metal cover. The
only problem would be if the plastic groove cut by the knife has causing some
upper side ridges to develop on the plastic, which could jam the red plastic
cover piece under the metal cover and the lock would be left permanently open
with the red plastic cover now inaccessible and stuck underneath the metal
cover.
-
Since the red plastic ignition lock cover is a bloody hard little bit of
plastic, it will take quite a few slices of the knife to get through it. I went
through a couple of knife blades because as soon as the tip would blunt, I would
snap it off and use the next one. Every now and then, I inserted a small flat
headed screwdriver into the groove and tried to widen it a bit, so I could see
if I was making any progress. The torch is good for having a look too.
-
Every now and again I used the vacuum cleaner to suck up any plastic swarf.
-
Eventually, the knife will get through the plastic and by slightly widening the
groove, as mentioned above, you will see metal on the underside of the red
plastic piece meaning you are through.
-
The red plastic ignition lock cover is now cut in half should be sitting there,
still in the fully extended 'ignition lock covered position'.
-
Now comes the tricky part. Getting the plastic out without having it drop into
the lock itself.
-
Insert a small flat head jeweller's screwdriver into the base of the ignition
key slot and lever up the red plastic half that is visible. You should be able
to get it poking up and out at an angle where upon it can be gripped with some
pliers and removed.
-
With this half of the red plastic cover removed, the remaining half should now
be sitting precariously in middle of the ignition lock. The two small springs
that mount into the remaining red plastic cover's rear moulding lugs will now be
fully extended, pushing the remaining plastic cover to its current position.
-
The remaining half of the red plastic cover piece must now be removed, without
it or its two attached springs falling down into the mysterious depths of the
ignition lock.
-
Carefully
put a minuscule dot of superglue on the two springs, assuming they are still
attached to the moulding lugs on the remaining half of the red plastic ignition
lock cover.
-
Let the glue set and use the same screw driver lever action to get the plastic
out, now hopefully along with the two springs that are now hard fixed by the
glue.
-
An augmented extraction method to the screw driver lever action, could be to use
a strong magnet to pull the attached plastic piece out by its metallic springs,
again using the screw driver to get the red plastic piece into a good position
for the magnet to do its thing.
-
I put the two halves of the red plastic ignition lock cover together, looking
for a perfect fit with no gaps, meaning that no plastic was left behind. (Just
like a surgeon counting the surgical instruments after the operation is
complete, to make sure none were left inside !)
-
And with that last action the job was done, the sweating was over and the heart
rate went back to normal.
-
I then powered up the vacuum cleaner and gave the lock a good clean, this time
getting a good vacuum seal with the red plastic cover piece gone and the lock
open.
-
Of course with the red plastic ignition lock 'cover' removed the lock has lost
it's protective shield. When your riding or parked , with the key in the
ignition, and its pouring with rain then a certain amount of water is going to
get into the lock anyway. But with the key out and the lock devoid of a cover
then even more water will get in, so it would be a good idea to fabricate some
sort of protective cover.
-
As luck would have it, the plastic cap from a standard size spray can of WD-40
has just the right diameter to fit over the ignition lock plastic surround,
there by protecting the ignition lock from water entry.
-
The plastic WD-40 cap (which is ironically coloured 'red' here in Australia)
will have internal plastic ribbing which will need to be cut out to allow the
cap to press down and around the ignition lock surround. I noticed two types of
caps, one was a fairly flimsy affair and the other had a flat screw driver head
like moulding on the outside top of the cap. This cap seemed to have
better/stronger ribbing inside it.
-
I used a small pair of curved fingernail scissors to cut the internal ribbing
out of the inside of the WD-40 cap. If you cut only about 15 mm of length out of
each 'rib' then the remaining 'rib' will form a nice 'stop' and you will know
when the cap is seated well.
-
I made sure that the WD-40 cap had no loose dags or swarf from its incisions,
just in case these were to end up in the ignition lock. Now wouldn't that be
f**king ironic !
-
And that's it. One potential F650 problem eliminated, 17 more to go. Only
joking. Ya gotta love this BMW.
car0tene - 1996 BMW F650 - Australia
Ignition Switch Short
David #476, Bryan #179, Todd#389, Tomw#773, Oliver
December '01
Q. I have a short somewhere in
the ignition switch. Turn the handlebars or wiggle the wire on the bottom of the
switch and it kills all electrical to the bike.
A1. Replacing the Switch:
The usual fix is to replace the switch
(not the lock cylinder, just the switch). You can replace it around $ 80, or you
can try taking it out, finding the broken wire and re-soldering it.
A2. Fixing it is Not Difficult:
Assuming it's a Classic F, yes a number
of people have eventually had this problem. (Technically it's a disconnect, not
a short.) Sometimes the slack wire on the end of the switch is not long enough,
and pulls the wires where they are soldered on the bottom of the switch. You can
remove the switch bottom easily enough and have the broken wire carefully
re-soldered, or you can buy a new part.
-
When you reinstall, pay attention to making sure the wire
has enough slack and can move freely when you move the handlebars all the way
side to side, without the wire pulling on the switch.
-
It is important to redirect the ignition harness so that it
doesn't bend back n forth by hitting the frame -- this way you will avoid the
same problem in 3 years or so
-
The ignition harness is connected by two screws which are
hard to reach -- it helps to have a short Phillips head screwdriver
If the loose wire is dark green with
no secondary stripes, then:
The green wire is "switched" plus. That
means when you turn your ignition in the "on"-position you connect the green
wire to battery plus (a red/white wire).
So just take a voltmeter, ground one of
the two cables of the voltmeter, turn switch to "on"-position and try to find
the connector which has plus. Now turn the switch to "off"-position and make
sure that no current appears when you use the voltmeter on the very same
connector.
Then just solder the old wire to the
connector.

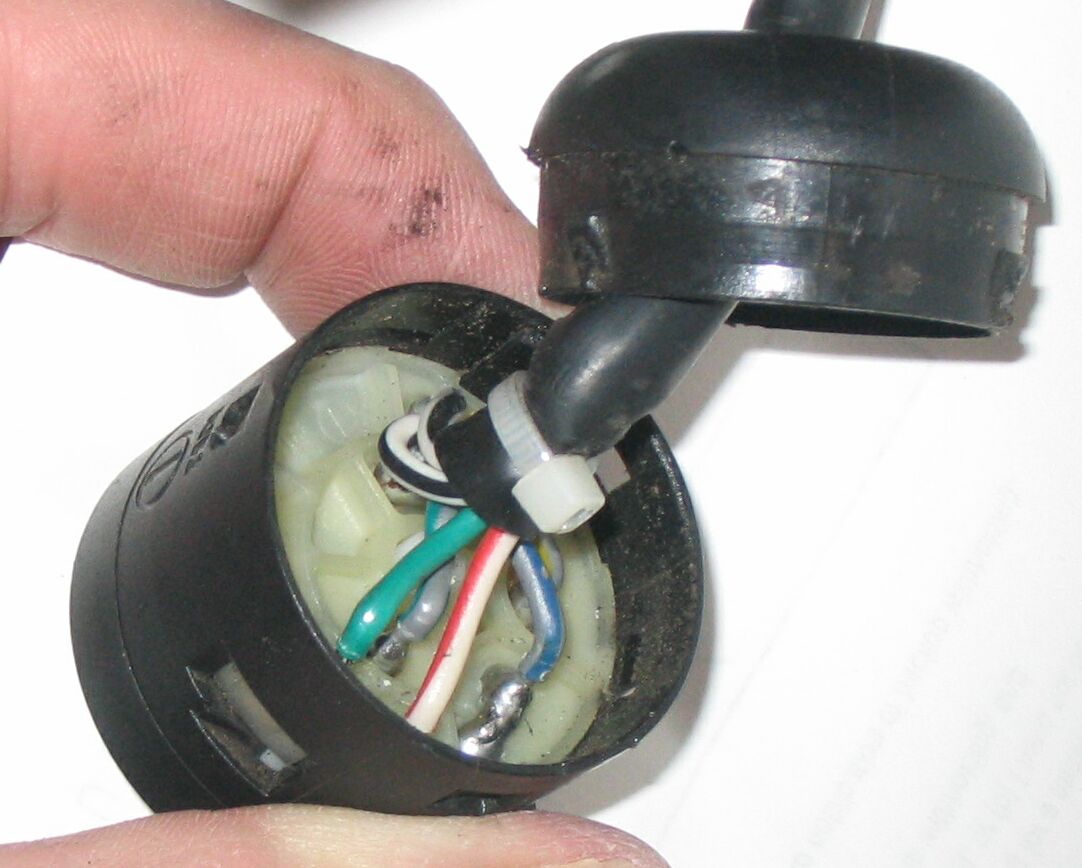
Here's the photo I mentioned in my post. My soldered connections turned out
to all be intact. It was only necessary to pry on two of the tabs to take the
end cap off the switch. Note also the tie-wrap on the cable, thus taking stress
off the soldered connections. Thanks to Scott in SA
Feedback on Broken Ignition Switch Wire:
-
I recently had an
ignition switch problem on a 97 classic that caused the bike to go electrically
dead--green wire had worn through under the insulation right at the base of the
switch. Turning the front fork full left then right was the tip-off, since it
would come and go depending on how much the green wire was stretched. NormJ#874.
-
I have not read
your problem very carefully, but your problem may be related to the following (I
have seen this a couple of times at the garage where I service my GS): One of
the cables leaving the ignition switch gets internally cut because of fatigue --
as the ignition switch moves together with the handlebar. If that is the case,
it explains the intermittent behaviour. You would need to cut the cable at that
point and solder a new piece of wire to bypass the damaged point. Naris, Greece.
-
Last night I took
my F650GS apart to fix this broken cable problem, and guess what. It was indeed
the GREEN cable which was broken (as mark has written before). I wonder why out
of all 4 cables that run through the same tube, it is always this particular
one! I was very disappointed with this sort of failure after less than 2 years
of use and approx. 25,000 Kms. Especially from a BMW. Anyway, now the bike runs
fine! Naris.
-
I have discovered
when the wire into the ignition switch is wiggled the lights come on so it must
be a loose connection. I have looked at the FAQs but am still unsure as to how
easy it is to replace the switch. Les#1007(UK) '97 F650ST.
-
I came out of work
last night and fired up the 99F. It started right up. I let it idle on the
center stand for a minute while I put on my gear. I grabbed the bars, jumped on,
and before I could even rock off the center stand, it went totally absolutely
dead. No starter. No lights. Just dead. It was cold out, about 40F. Any
suggestions on what to look for?. It's a 3-day weekend here, the sun's out, I'd
really like to be riding. Scott S in WA
-
I haven't seen it
mentioned yet: the wire exit from the underside of the ignition switch. There's
nada to protect the wires against wear on the sharp edges (albeit plastic) of
the switch. Two of my wires were worn partially, and on another I could see a
glimmer of copper. Bit of rubber tape, all nice. Aleksander, Dubai. 1997.
Ignition Switch Short -
EMERGENCY FIX
-
It hasn’t happened to me yet, but it has happened to a few others
- the key won’t turn in the ignition and you were planning on getting home
before dark. Don’t despair, just take a close look at the underside of the
ignition switch. Take note of the two Phillips head screws - remove these and
the ignition assembly drops away. There is enough slack in the electric wiring
to bring the ignition assembly up to the handle bars. Tape or bundle wrap it to
the handle bars so as to allow lock to lock turning. Stick a small screwdriver
in the slot and turn clockwise…viola! Ignition on! Drive home before dark!
Loose Ignition
Cable Guide Assembly or Ignition Lock
The theft proof bolt that fell out should have blue LocTite on it from the
factory and should never have fallen out.
Symptoms:
Buzzing sound from the front of bike (1997 F). The
ignition and cable guide assembly may be loose and missing one of the two bolts
that attaches it to the under side of the triple clamp (upper). Check that your
ignition switch assembly isn't loose. Makes a really annoying rev-dependent
rattle that sounds like something loose in the valve train. Pete.
Solutions
-
Get some Allen
head bolts (SHCS) and screw them in. As I recall they're M8 bolts about 15mm
long. Use LocTite. What WAS in there were special BMW "security bolts" that
have the heads break off when you torque them enough. Mine fell out, too, on
two bikes. Flash
-
Screw for
ignition switch bracket (the bit that is combined with the cable retainer), it
has two screws that are driven up into the top fork bridge, one is normal
socket head screw, BMW Part Number 5125 2 346 147,
The other is a tear-off screw: 5125 2 346 145 Each costs $0.35 or so.
Aleksander in Dubai.
-
One of mine fell out
on my '99 Classic. I think I replaced it with an M8x25. I was shocked it was
an 8, I tried a 6mm first. Didn't fit. Slather with loc-tite before you put it
in there. I hope the other one falls out. I hate them darn tamper-resistant
screws, they hamper my tamperin'. Shank
-
Ignition
Mount/Cable Guide "Just got back from lunch about a
mile away. On the way there I heard a buzzing sound from the front of bike (1997
F). When I stopped to look around I found that the ignition and cable guide
assembly was loose and missing one of the two bolts that attaches it to the
under side of the triple clamp (upper). I tightened the remaining bolt and now
need to get a new bolt. You might want to add this to your list of things to
check occasionally."
-
Ign. switch/head
lock. Mine fell off today. Seems pretty straight fwd to replace the two screws
holding in place, BUT what in the world is the short, stubby bolt that appears
to have fallen out of it? It is threaded like normal, but the head is a round
pointy thing that I have never experienced before. Is that the bolt that fell
out of the underside of the triple clamp? If so, how does it get screwed in? Why
would this fall out?
-
You'll find it's
called a shear bolt. It's a type of special security bolt that is supposed to be
tightened until the hex head breaks off. What you have left is the shaft with a
shoulder where the head was. In ~theory~ it's supposed to be difficult to
remove. :-). Todd #389
Is it Possible to
Disable the Parking Light Function?
Q. Is it possible/advisable to disable the "parking"
"feature" of the ignition switch?
A. If you are asking about the Classic, not easily, unless you are going
to disable the parking lights functioning as running lights. It's not a matter
of switching a harness wire, you'd have to switch a lead in the back of the
ignition switch. That's the easiest way I can see, but maybe someone else
looking at it from another angle can come up with something better. Todd #389
Impossible to lock the Front Forks when removing the Ignition Key?
Q. '97 F-650, 18,000 miles. Recently it has become impossible to lock the
front forks when removing the ignition key (actually all 3 keys fail to work).
Any suggestions short of replacing the ignition locking mechanism?
A. Are the bolts that should be holding the lock getting loose and
backing out, allowing the lock to drop down slightly so that the fork lock pin
no longer hits the hole? If so, tighten the bolts, or replace them with Allen
heads and LocTite (tm).