Cooling Fan FAQ
compiled & edited by Kristian #562
Please read the Disclaimer before attempting any work in this FAQ.
Updated 15 August 2004
Manual Fan
Switch
5/31/99
Unknown
Want to
be able to switch on the cooling fan at will? Just install a
switch!
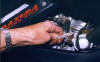
 Remove the stock spade connectors that are seen in
the first photo.
Remove the stock spade connectors that are seen in
the first photo.
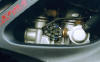
 Use a “Leatherman Tool” file or something
similar to widen the plastic opening (see second photo) enough so
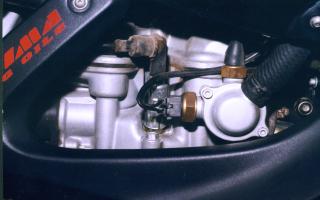
that double spade connectors can be installed (as seen in the
third photo).
Use a “Leatherman Tool” file or something
similar to widen the plastic opening (see second photo) enough so
that double spade connectors can be installed (as seen in the
third photo).
Run additional wire of the correct
gauge to the underside of the dash.
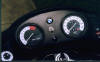 Carefully mark and drill an opening for a
toggle switch (as seen in the fourth photo).
Carefully mark and drill an opening for a
toggle switch (as seen in the fourth photo).
Caution:
only attempt this if you like to tinker.
Q. My fan cables have the
annoying habit of vibrating loose from the switch, causing the
bike to overheat during my summer city rides. I am tempted to
just short the cable and leave the fan on all of the time. Is
there any downside to this (besides a little noise and power
consumption)? Mason #631
A1. Andy Leeds UK #982
- I doubt the fan motor is 100%
duty cycle rated. Getting such motors with automotive EMC
approval (so it doesn't effect your engine management or
ABS) is very hard. I know, we've been trying to make
electric vacuum pumps and compressors for years. This
means the fan can run for X minutes and then must cool
for Y minutes. If you run for X+ minutes, you start using
the motors "extended" life. At the end of this
life it burns out (if the designer got his sums right).
Typical figures are 20% duty over 60 minutes with 60
minutes extended life. In other works you can run 12
minutes on 48 minutes off for years, 17 minutes on 48
minutes off 12 times or 72 minutes on once.
- I had the same trouble but
with the switch (its a gravity design mounted on its side:
shoot that designer). My solution was to run a two
position switch in parallel to the bars. If the temp
gauge says 100 plus and the fans not on in traffic, I hit
the switch and override the circuit.
- Your constantly running fan
would also slow the engines warm up, increasing engine
wear. This may not be significant on a bike (unlike a
truck or car(, but it won't help. Just a few thoughts.
Fan Not Working
Things to look for #1
Andy #982
29/11/01
The Fan Switch is the first culprit.
(The large one with the wires attached). Some owners fans did not
work from new. Only £5 and 20 minutes to replace.
The general procedure is
just remove the wires, unscrew and replace before too much
coolant runs out. Top up the coolant and reconnect.
- The fan switch is the two pin job on
the right hand side of the bike under the fuel tank (Pre-FI
bike) screwed in to the silver dish type expansion bit.
- If you short the two pins the fan will
run (if not it’s the fan itself and you will need a
new fan motor).
- If it runs and the engine is still hot
(idle for 15 minutes), the switch is kaput.
- The problem is the mounting. The
switch has a disk that warps with heat and pushes a
bridge into contact with the pins. The bridge can turn in
its slot and jam. These bikes vibrate remember. If the
switch was placed vertically rather than horizontally it
would probably last forever.
- BMW should only use this type of
switch vertically not horizontally. The solution is to
replace the switch and hope for the best.
- When you take the old switch out, you
will lose a bit of coolant (so be quick). Note you will
need to top up the coolant again.
I now have a rocker
switch in parallel to the temperature switch to act as a test/back-up.
This problem has apparently also surfaced in the GS.Check also
the Thermistor is working. For a Cheap Fan Replacement See
Flash's Fan
Replacement FAQ.
Things to look for
#2
Bill
Problem: '97 F650
Radiator Fan Motor apparently burned out.
- After blowing several 20A Fuses I
appeared to discover the problem. The fan motor/blade
assembly had come loose and was resting against the
radiator fins. After securing new Allen bolts I Loctited
everything back in place. Fuse blowouts continued. I then
disconnected (unplugged) the fan and idled the bike (about
15 minutes) until the overheating red light came on.
Immediately switched the bike off. Since no fuse had
blown I am assuming that the culprit is the fan, given
that it had been trying to run resting against the
radiator for an unknown period of time. Interestingly,
the overheat red light had never come on before today's
experiment. The new fan motor is terribly expensive. If
your bike is of this vintage, you might want to check to
see that the radiator fan has not vibrated loose. Could
save you some big bucks. Bill
Solution:
- After taking the fan off the bike, it
was obvious that 2 of the 3 Allen bolts had disappeared
and the third one was loose. This resulted in the fan
spinning around the one remaining bolt and shorting out.
Ouch! Check those Allen bolts, if loose, only retighten
them after Loctiting.
Also Check:
- The fan heat sensor switch first.
Maybe it is at fault and is shorted and that is why the
fan does not go on. The switch is a probably a lot
cheaper than a new fan. Richard #230
- Pull the plug and short (i.e. connect)
the two sockets on the cable end. If the fan goes on,
then it's the switch. My fan "died" this week,
but all that had REALLY happened was that the plug had
vibrated loose. Definitely check everything before
spending any money. Mason #631
Replacement FAN Links:
Sizes Not yet confirmed
for F650
FANally Fixed – A cheaper solution to buying the
BMW replacement Radiator Cooling FAN.
by Flash #412
Please read the Disclaimer before attempting any work in this FAQ.
- This note is for the '94-'00
F650 (Funduro or ST, including the Aprilia Pegaso). I
suspect that the parts are the same for the GS and the
Dakar. But since I don't KNOW that, I ain't sayin' it is
so.
- If your Official BMW plastic
fan blade breaks or comes loose from the shaft, what do
you do? Do you buy a new fan assembly for $191 from BMW?
(The blade is not a separate part.) Or do you buy the
same thing from Aprilia for a Pegaso for $145 and wait
for them to plant the trees which will eventually be
processed to make the cardboard to be used for the
shipping carton, when they get around to putting it on
the boat? There is no replacement that I found at any
motorcycle or car place for the Mitsuba PM-3 12V DC 5"
fan assembly. (If some Inmate with Japanese fonts and
skills googles for "Mitsuba PM-3" we might be
able to find out something about getting replacement
motors from somewhere in Japan.)
- I figured that replacing the
fan blade would be a LOT cheaper. It was...
- Will 905 suggested looking at
Grainger's where I found the 5C166, at Grainger's, a five inch fan blade designed for a 3/16"
shaft that lists for US$3.19. Visit Grainger's website
and use your zip code to find the store nearest to you.
Grainger's stocks an amazing amount of STUFF in today's
just-in-time economy. And they tend to have VERY good
prices, too.
- OK, but it isn't exactly a
direct replacement part. So, here's a little info that
will help you if you find yourself in the same mess I did.
- Take the tank off the ('94-'00 carbed F650) bike. You can do
it with the tank on but trust me, it'll be LOTS faster to
do it this way. Cut the wire tie that holds several wires
to the fan. Remove the three "big" Allen screws
that hold the black plastic frame to the radiator. Push
the tab on the wire connector and disconnect it. Remove
the fan assembly. Pay attention to how the puke tank hose
clip mounts and the metal shroud, too. Remove the fan
assembly from the bike and take it to a work bench. Don't
lose the metal bushings that go through the rubber
grommets.
- Remove the three little Allen
screws holding the motor to the frame. Take the thing out
of the frame. Set the frame aside. Unscrew the nut
holding the fan blade to the motor. If the shaft spins,
scotch the fan by jacking it up off the motor with a
screwdriver. After you get the nut off, use two
screwdrivers to jack the old (black) fan off.
- The new fan is white plastic
and is meant to spin the other way. You gotta do some
electrical work to make it spin the right way and some
mechanical work to get it on the shaft.
- Look down into the connector
where the spades come out. Take a small jeweller’s
screwdriver and shove it in the side with the tab. Gently
pull on the wire while you do this. The spade WILL just
slip out of the plastic connector dealie. Pay attention
when you do the second one which one came from where
because you want to put them back in the OPPOSITE slot.
You'll need to carefully bend the tab back out slightly
before you slip it in. It'll just click into place. Do
the other one, too.
- Remove the metal clip from
the new fan. Take a file and file down the place where
the clip was until that hub area is "flush"
with the outer hub when viewed from the side. Basically,
you want to remove about as much height of plastic as the
clip is wide. Take about a half inch drill bit IN YOUR
HAND and carefully ream out the hole from the side
opposite the clip. You're looking to relieve it less than
an eighth of an inch. It might help to eyeball the thing
a few times as you go...
- Press the motor into the clip
side of the blade with the blade sitting flat on the
bench. Take a look at the other side and see if you can
screw on the nut at all. If not, more reaming. If so...
use your judgment. When you've got it all so it fits
prepare for final assembly.
- Get some grease and apply it
to the area that the fan hub will contact on the motor
housing. Reinstall the metal clip on the hub nub. Press
the motor back into the blade as before. Recheck that you
can get the nut on. Put a drop of Loctite on the threads
and screw the nut on. Do not over tighten. You want to be
able to turn the fan without a WHOLE lot of resistance.
Some is ok. You can test it by plugging it back in,
shorting the switch wires and turning the ignition on.
The fan blades should spin clockwise as viewed from the
motor side of the blades. It should spin fairly straight.
- Before I did the final
reinstallation, I put some RTV silicon sealant over the
nut to keep it in place in case the whole mess got loose
for some reason. Probably overkill. But hey, I had the
stuff handy, so better safe than sorry.
- Reassemble in reverse order.
Wait for the RTV to vulcanise. Go ride.
What I found was that with my original factory part, when
the fan came on at idle it would cool the motor until the
fan cut back off. With the new, five blade instead of six
blade part, the thing heats up to where the fan comes on
and then... stays there. According to my temperature
gauge, it doesn't get any cooler, but it doesn't get any
hotter either. Frankly for $188 difference, that is
plenty good enough for me. You can buy a whole WEEKEND of
riding, including motels with the $188 you didn't spend
for a new fan. I hope you enjoy thumbing your nose at BMW
(and their usurious parts prices) as much as I do.
Q: To be quite honest, I don't think i've
ever heard my fan come on!,is there a quick way to check? Can it
be tested by leaving the key "on" after a ride and
using just the kill switch to knock out the engine? T-N
A: 1. you can get your fan
to come on if you just leave the engine idling for 5-10 minutes
in a sheltered place so theres no cooling air going going through
the rad, so the fan will eventually come on.
2. Yank the wires off the fan switch,
that's the thing with TWO wires on it at the thermostat housing.
Short the two wires together with the ignition on. You can use a
paper clip for this. The fan should come on. If it doesn't, give
it a little helper spin, to make sure it isn't bound up. (If it
won't spin at all... you're gonna spend too much money for a new
fan.)
Feedback
on Broken Fans
- My fan switch failed in 2000.
No trouble since then. Andy Leeds UK #982
- '99 Classic F650, 18,000
miles, fan still works when it needs to. Bob#550 (Olympia
WA)
- See the FAQ there are a
couple of incidences of fans failing there. As you know,
I've had two fans fail on this bike and I know of two
others who have had problems. I believe that my problem
was due to a faulty temp sensor - which engaged the fan
too early and caused it to run always and to the point of
failure. Chris
- After an all day ride in the
dolomites (cold day, no stopping, keeping a pretty decent
speed) my temp light came on. I was at about 11,500 miles
at the time, and the fan had just stopped. I waited a
week to finally get the part and have it replaced. the
dealership said it is a very uncommon part to have to
fix, so they had to have one flown in. emphatic
- 1997 BMW F650 at 27,000 miles
on original fan, no problems. Phoenix, Arizona, too!
Brian 1025 Phoenix.
- My fan fried on me a few
weeks ago. 2001 Dakar. Cut open the motor and found the
reason. The motor obviously got hot, melted the
insulation in the windings and slung it all over the
shaft and brushes. Once it cooled down the plastic locked
everything up. Once I removed the melted plastic, it
freed up. Skip
- 2001 GS. 27,000 miles. No
problems with fan. Dan#823 in Orange Cty, CA
- 97F, 25K miles. No problems,
fan still works when (rarely) needed. Marty #436-Chicago-97
F650F
- 01 GS. fan motor froze up
while riding in death valley. Great timing! I do a fair
amount of dirt riding, might have an effect. Replaced
under warranty. MikeB#819 in Reno.
- 99 f650 classic, 13000 miles
in Austin, TX: no fan problem. John K - Austin TX
- 2000 F650 GS. 38K Km (23K
miles) No problem so far. During this last hot summer the
fan has been running a lot more often than I had ever
expected. In real hot climate it must be running all the
time. haakon #626(Norway-F650GS).
- Engine too hot - reprise.
Well thank you folks for all your suggestions. A week or
so ago I wrote wondering about my overheating problems.
It turned out to be a blown fan. I found a dealer in Rome
that fixed me up with a new one and the trip continues...
6 weeks down and 7 or so to go. emphatic
- My fan died in exactly the
same way somewhere between 12 and 14,000 miles. Brad, N.
CA., 2001 F650GS - Inmate #1002
- I have 8600 miles on it, and
it's about 10 months old. (When the fan died-sic) Seacuke
#1214, '02 F650GS, California
- My fan seized up at 10,700
miles. SScratch
 Remove the stock spade connectors that are seen in
the first photo.
Remove the stock spade connectors that are seen in
the first photo.  Use a “Leatherman Tool” file or something
similar to widen the plastic opening (see second photo) enough so
that double spade connectors can be installed (as seen in the
third photo).
Use a “Leatherman Tool” file or something
similar to widen the plastic opening (see second photo) enough so
that double spade connectors can be installed (as seen in the
third photo).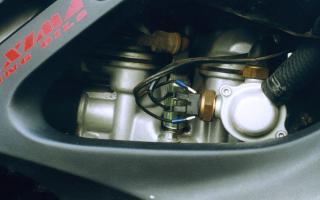
 Carefully mark and drill an opening for a
toggle switch (as seen in the fourth photo).
Carefully mark and drill an opening for a
toggle switch (as seen in the fourth photo). 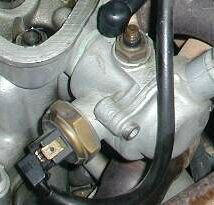