F650 Sprag Clutch FAQ
compiled & edited by Kristian #562
Please read the Disclaimer before
attempting any work in this FAQ.
Last Updated: 11 June 2006, by Winter #1935
For other related FAQs:
Introduction

The sprag clutch acts as a one-way clutch to allow the starter motor to
drive the crankshaft and thus start the engine. Once the engine starts,
the crankshaft is turning faster than the starter motor can, so it
basically "free-wheels" (BMW manuals typically call the sprag clutch the
freewheel). Think of the sprag clutch like the rear hub on a bicycle, the
freewheel (the part that clicks) as you coast down a big hill with your
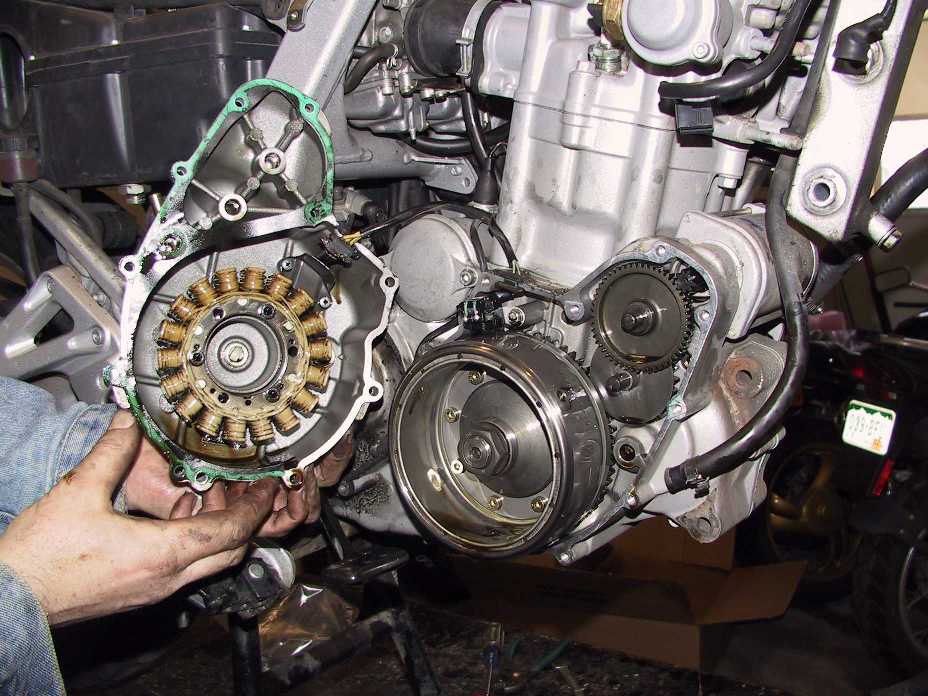
feet (the starter motor) remaining still. On the left is Flash's pic of
the flywheel, the starter Gear and the Gears in between. The sprag clutch
is in the gear behind the rotor/flywheel, for the sake of the starter.
VERY few instances of problems with this item recorded. (thanks to
norbrat and malsin)
The hub, rotor and sprag clutch are secured by about a dozen bolts.
This special hardware has a rated shear strength, so that they will
shear off rather than damage the woodruff key, crankshaft, or possibly
snap the drive chain. These bolts & nuts should be secured with Loctite
threadlocker so they don't work their way loose, catch on the stator and
shear off while you're out on a nice morning breakfast run and can't
figure out why your bike isn't getting any spark. kevmeister
Sprag Clutch Misc
Symptoms
- I bought a 1997 classic last summer. It seems that the sprag
clutch engaging the starter has some serious problem. If for some reason the
engine doesn't fire up on the first or second turn the starter just slips
away. I can hear the electric motor running but the engine stands still.
The other indication of trouble is that when I stop the engine and the
crankshaft turns probably just a couple of degrees backward it sounds
like something just breaking in the engine. I checked the three gears
between the starter and alternator rotor and they are OK. Unfortunately, I
didn't find anything about the sprag clutch in the FAQ. BMW Manhattan gave
me a price for the roller-holder assembly as $121.03 (12-11-2-343-296) and
the gear as $233.04 (12-11-2-343-294) I also was told that they do not
sell tools like the rotor puller (12-5-510). My questions. Did anyone have
similar problems with the sprag clutch? Any comments are welcome.
Jenoe
- I work on the BMW F650 for the Police Department in Barbados. I
had problems with the one-way Starter Clutch (Sprag Clutch) on Three motor
cycles. When I dismantled the Clutch from the Flywheel I saw that the
Spring around the one-way clutch was broken. I replaced the spring with
one from and old oil seal and it worked perfectly for a short time. I
haven't dismantled it as yet to see what is the current problem. I am
currently searching for a one-way clutch from an automatic Transmission
which could replace this. I believe it should be stronger than the
original one-way clutch. Shawn737
- Hi, I received a lot of information from your site which I found
very useful in servicing The Police Fleet of vehicles in Barbados. I
currently have a problem with a bike that occasionally cranks when trying
to start. The starter is fine because I cranked the engine with alternator
cover off and I saw the gear spinning Independent of the Flywheel but
occasionally would crank. I found the problem was the Sprag Clutch.
Shawn. The Royal Barbados Police Force
- If you're bike still starts and runs, it's NOT likely the same
problem. It can't hurt to pull the right side cover and have a look. Look
& feel around in there to see if you find any stray hardware. Check the 8
bolts that secure the freewheel gear to the alternator shaft rotor. Behind
four of those are nuts that secure the cover over the sprag clutch. To
check those, you'll need an alternator puller tool ($25). I have one I can
mail you, if you'll send it back right quick. kevmeister #1715
Advice
- I doubt anything is wrong with the gear. Probably just the
sprag clutch is dorked up. If I were you, I would get the puller and pull
the rotor off, remove the sprag clutch and gear and SEE what is wrong,
then order the parts you NEED. You might find that some foreign object is
in there and simply extracting it will fix your problem.
- Jenoe wrote "It seems that the sprag clutch engaging the
starter has some serious problem. If for some reason the engine doesn't
fire up on the first or second turn the starter just slips away. I can
hear the electric motor running but the engine stands still." It
could be a couple of things (1) Your battery might be a little on the low
side which would then not create sufficient power or inertia to throw the
gear onto the flywheel starter ring after a couple of attempts. (2) The
splined path that the smaller gear on the starter motor travels along may
be dirty or corroded preventing easy or full travel of that gear onto the
flywheel starter ring. I'd look at those before doing any dismantling.
When I stop the engine and the crankshaft turns probably just a couple of
degrees backward it sounds like something just breaking in the
engine" That's normal - It's just the valve de-compression linkage
clattering. You can sometimes hear it at low engine speeds. Trevor 999
UK '01GS
- Trevor, it seems that you have the same assumption that I had
before I removed the right side engine cover. Namely, that starter on an
F650 works somewhat similar then on cars with a small starter gear
sliding into a bigger gear attached to the crankshaft. To my surprise it
is not the case. In the sprag clutch assembly there is a bunch of rollers
(just like in some bearings) running on smooth surface one side and on a
faceted one on the other. Each segment of the polygonal surface slightly
tilted into the direction they want the clutch to be connected. They
create a kind of wedge where the rollers can stuck moving the smooth
surface with them, therefore turning the other ring. I believe that in
our case the smooth ring is inside and the segmented one is the outside.
Jenoe.
- Once you pull the right cover, you should be able to spin the big
gear on the rotor one way but not the other, if the sprag clutch is working
properly. There should be no "graunching" feel or noises, only
smooth operation in one direction and NONE in the other.
Flash 412 (CO)
Sprag Clutch Replacement Instructions
A Few Important points before you read this:
- I recommend you have a Clymer manual on hand before doing this job,
- I wish to inform you that I am 'not' a mechanic and have made the
following observations thru carrying out this work myself.
- As Mal has stated, "this is a precision piece and one which he
recommends you replace with a new part".
- Take Mals advice seriously, it was only after taking the scenic
route (and wasting a lot of time and a starter GBP 93 + postage) in trying
to fix the old one that I then heeded what he said, to anyone else save
yourself time and do the same.
Parts and Tools
There is not a lot of info on doing this job however, you will need the
following items to carry out the task,
- New sprag clutch (freewheel) cost approx. 60
- Replacement Sprag cover cost approx. 5, and while you're there get
replacement nuts for the cover,
- RHS cover Gasket and also some instant gasket may be required
- Top dead centre bolt, not sure of cost as we made our own,
- Pullers, once again not sure of cost as we made our own. Note: YOU
WILL NOT BE ABLE TO DO THIS TASK WITHOUT THE PULLERS
- Loctite or some similar nut locking compound (medium strength)
- A good socket set
- Well lit and clean working area
Procedure
- Remove the sump guard, then remove the sump plug to drain the oil
from the bottom of the engine. You can also drain the oil from the frame,
however if its not due to be changed you can get away without doing
this.
- Next remove the right had side cover, I also disconnected the
three yellow wires going back up to the regulator so I could get the RHS
cover completely out of my way.
- Remove the bung on the left hand side of the engine to insert the
TDC bolt, make sure you have the crank in the correct position and insert
the bolt to lock the engine in place.
- When this is done you can remove the rotor nut and then set up the
pullers to remove the rotor / flywheel. Before doing this you may wish to
take note of the set up of the gears from the starter motor down to the
fly wheel, also note the small washer and spacer, ensure these go back on
as they have come off. Also when removing the rotor the flywheel may come
with it and thus so will the two other gears. If this is the case just
take your time and work everything off together.
- Now with the rotor off, put it up on the bench, the fly wheel will
just pull out of the rotor without much required force, and there it is
your little sprag clutch (freewheel as BMW call it).
- Remove the three nuts and take off the sprag cover, you should
then be able to remove the sprag with your fingers. You may find upon
removing the sprag that the outer spring (similar to an oil seal spring)
has broken and thus the bearings within the sprag have come loose, and
this my friends is that horrid noise that you've been hearing.
- Now just do everything in reverse making sure to give all moving
parts a rub of some fresh oil before and during assembly, this may avoid
damage upon starvation of oil on start up. Insert the new sprag, you will
find that it will go in both ways however, it needs a push to put it in
one way (wrong way) and will just slide in the other way (correct way),
put on the new sprag cover, a drop of loctite on the bolts and on with the
new nuts.
- Next you will need to take your extra couple of arms out of your
pockets and put back on the rotor and gearing from starter to flywheel. It
is here that you will be thankful that you took a note as to what order
everything goes on. ENSURE THAT YOU GET THE WOODRUFF KEY INTO THE SLOT
CORRECTLY. At this point see if you can move the flywheel, it should move
freely in one direction and not move at all in the other. This is easier
to check if the starter has been removed.
- When the rotor is in place, reinsert the rotor washer and nut and
tighten. Flash on the chain gang site has said that you do not need
loctite on a taper, I have duly taken his advice.
- When this is done put on your new gasket, perhaps also a small
amount of instant gasket and reinsert the RHS cover. Instant gasket will
not suffice on its own as the paper gasket is required for the correct gap
between the engine and cover. DON'T FORGET TO RE-CONNECT THE THREE YELLOW
WIRES GOING BACK TO THE REGULATOR.
- Remove the TDC bolt, put back in the bolt, top the bike up with
oil (make sure that bung is in), put back on the sump guard and well thats
just about it.
As I said earlier I am not a mechanic, and thus this job took me a
long time, however I reckon that if you've got all the above ingredients
at the ready and also know the difference between a ring spanner and a
socket set you should be able to complete this job in about 1 - 2 hours
and thats taking your time!! Hope this gives you an idea as to what is
involved in replacing the sprag clutch (freewheel). collo_man
Questions
The Spring from my sprag clutch is broken
When I removed the sprag clutch the spring was broken and I replaced it
with a spring from a crankcase oil seal off a mini. This spring was very
slightly wider than what had been on the sprag but I thought that maybe
I'd get away with it!! Could this cause the non-release of the starter
when the bike fires up? collo_man
- Of course. If you saved the old original spring, you might drop
round to an industrial supply place and see if they have something that
better matches the original. Or... you might spring 150 punts or so for a
new sprague clutch ("freewheel" according to BMW). Flash 412 (CO)
What are the differences between the GS and Classic?
- There is a difference in the Classic & GS/Dakar engines where the
sprag clutch and alternator are concerned. The Classic has a 280 watt
stator and the hub, rotor, and sprag clutch are secure by 8 M6x16 bolts &
4 M6 nuts. The GS/Dakar has a 400 watt stator and a bigger hub, rotor, and
sprag clutch secured with the bigger M8x16 bolts & 4 M8 nuts.
kevmeister
Sprag Clutch Minced
 I decided to pull the right-hand side engine cover to visually inspect the
contacts of the ignition sensor and the stator.
I decided to pull the right-hand side engine cover to visually inspect the
contacts of the ignition sensor and the stator.
|
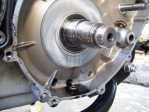
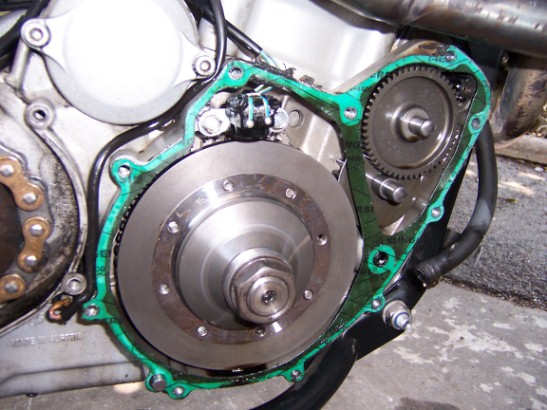
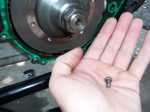 Huh? I watched Flash pull the alternator on the
F650 Issue 2 DVD, and the sprag clutch
housing should not be out yet. Before I even got the cover off, one of the
sheared-off bolts fell on the ground. Uh-oh.
Huh? I watched Flash pull the alternator on the
F650 Issue 2 DVD, and the sprag clutch
housing should not be out yet. Before I even got the cover off, one of the
sheared-off bolts fell on the ground. Uh-oh.
|
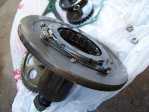
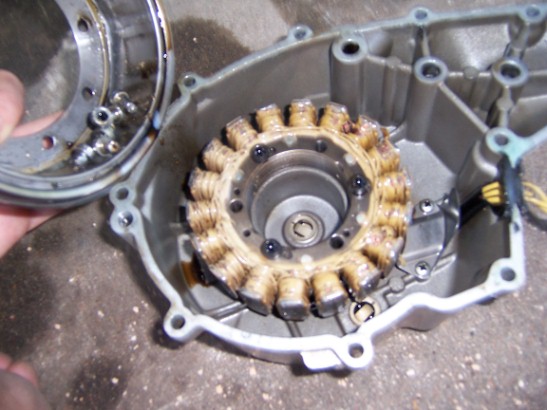
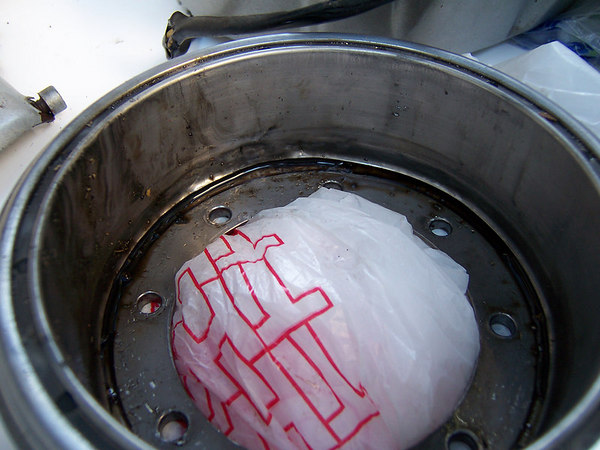
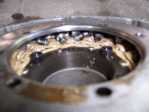 Looking under the sprag clutch housing, I find all the other
sheared-off bolt heads, along with a bunch of chewed-up insulation from
the windings.
Looking under the sprag clutch housing, I find all the other
sheared-off bolt heads, along with a bunch of chewed-up insulation from
the windings.
|
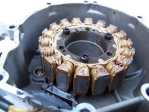
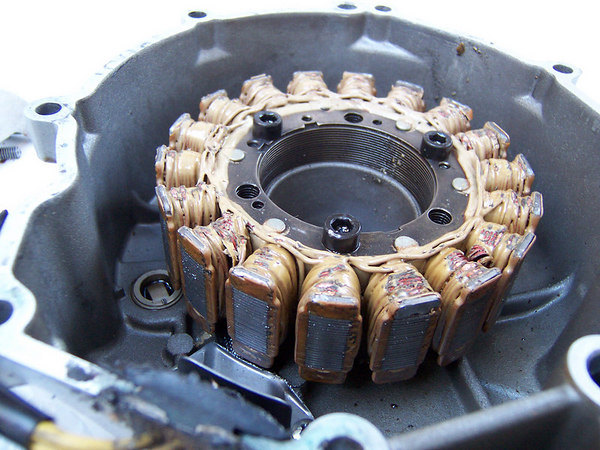
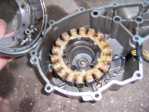 The sprag clutch housing comes off easily enough revealing a pretty chewed
up stator. [Ed note: You can see the three yellow wires for the stator /
generator on the right of this image]
The sprag clutch housing comes off easily enough revealing a pretty chewed
up stator. [Ed note: You can see the three yellow wires for the stator /
generator on the right of this image]
|
 Pulled the nut that secures the sprag clutch assembly to the rotor shaft.
It came off with a good amount of effort. There was plenty of threadlock
residue, a good sign.
Pulled the nut that secures the sprag clutch assembly to the rotor shaft.
It came off with a good amount of effort. There was plenty of threadlock
residue, a good sign.
|
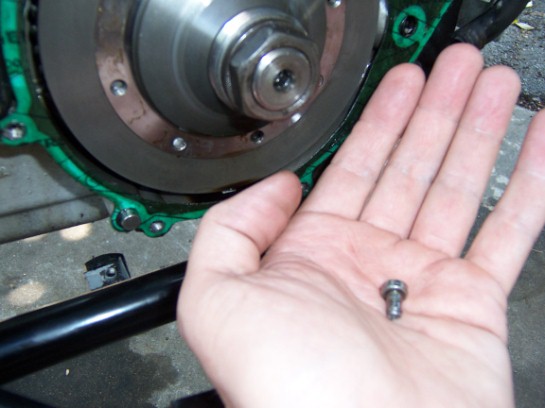
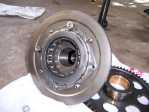 This nut fell once the housing came loose.
|
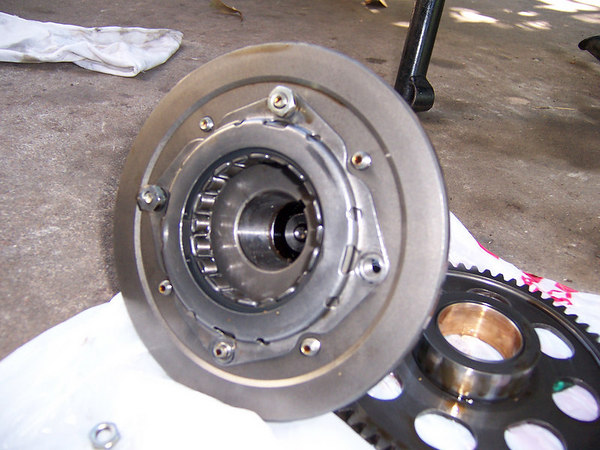
 Here is the back side of the sprag clutch housing. There are only two
LOOSE nuts attached the sprag clutch cover. The other two were completely
off. All those nubs are the sheared-off bolt studs. I don't find any
evidence of threadlocker on any of these bolts.
Here is the back side of the sprag clutch housing. There are only two
LOOSE nuts attached the sprag clutch cover. The other two were completely
off. All those nubs are the sheared-off bolt studs. I don't find any
evidence of threadlocker on any of these bolts.
|
 The Clymer manual has this to say about the sprag clutch bolts in step 2
of the Starter Clutch Disassembly (p. 145): "The freewheel cover nuts
are secured with a high-strength threadlocking compound and may be
difficult to loosen". And again in step 3 (p. 146): The eight Allen
bolts have been secured with a high-strength thread-locking compound and
may be difficult to loosen... These fasteners are NOT difficult to
loosen. The remaing two nuts are completely loose.
The Clymer manual has this to say about the sprag clutch bolts in step 2
of the Starter Clutch Disassembly (p. 145): "The freewheel cover nuts
are secured with a high-strength threadlocking compound and may be
difficult to loosen". And again in step 3 (p. 146): The eight Allen
bolts have been secured with a high-strength thread-locking compound and
may be difficult to loosen... These fasteners are NOT difficult to
loosen. The remaing two nuts are completely loose.
|
 Here's another angle
|
 So, making my list of replacement parts, I have a damaged magneto,
obviously.
So, making my list of replacement parts, I have a damaged magneto,
obviously.
|
 And a dinged up hub
|
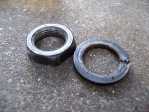
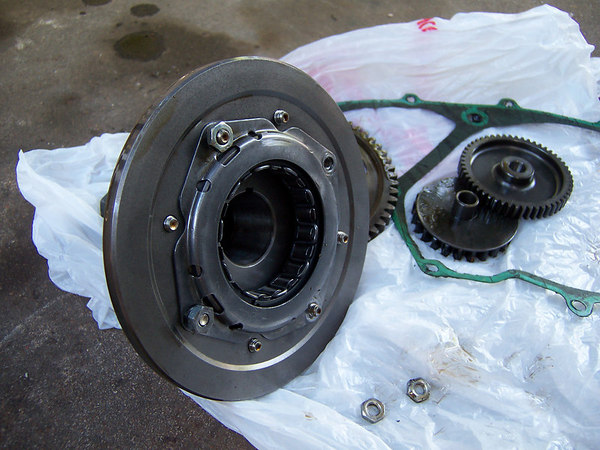
 Here's the lineup of suspects. Which of these is the most serious
offender?
Here's the lineup of suspects. Which of these is the most serious
offender?
|
 I decided to pull the right-hand side engine cover to visually inspect the
contacts of the ignition sensor and the stator.
I decided to pull the right-hand side engine cover to visually inspect the
contacts of the ignition sensor and the stator.
 Huh? I watched Flash pull the alternator on the
F650 Issue 2 DVD, and the sprag clutch
housing should not be out yet. Before I even got the cover off, one of the
sheared-off bolts fell on the ground. Uh-oh.
Huh? I watched Flash pull the alternator on the
F650 Issue 2 DVD, and the sprag clutch
housing should not be out yet. Before I even got the cover off, one of the
sheared-off bolts fell on the ground. Uh-oh.
 Looking under the sprag clutch housing, I find all the other
sheared-off bolt heads, along with a bunch of chewed-up insulation from
the windings.
Looking under the sprag clutch housing, I find all the other
sheared-off bolt heads, along with a bunch of chewed-up insulation from
the windings.
 The sprag clutch housing comes off easily enough revealing a pretty chewed
up stator. [Ed note: You can see the three yellow wires for the stator /
generator on the right of this image]
The sprag clutch housing comes off easily enough revealing a pretty chewed
up stator. [Ed note: You can see the three yellow wires for the stator /
generator on the right of this image]
 Pulled the nut that secures the sprag clutch assembly to the rotor shaft.
It came off with a good amount of effort. There was plenty of threadlock
residue, a good sign.
Pulled the nut that secures the sprag clutch assembly to the rotor shaft.
It came off with a good amount of effort. There was plenty of threadlock
residue, a good sign.
 This nut fell once the housing came loose.
 Here is the back side of the sprag clutch housing. There are only two
LOOSE nuts attached the sprag clutch cover. The other two were completely
off. All those nubs are the sheared-off bolt studs. I don't find any
evidence of threadlocker on any of these bolts.
Here is the back side of the sprag clutch housing. There are only two
LOOSE nuts attached the sprag clutch cover. The other two were completely
off. All those nubs are the sheared-off bolt studs. I don't find any
evidence of threadlocker on any of these bolts.
 The Clymer manual has this to say about the sprag clutch bolts in step 2
of the Starter Clutch Disassembly (p. 145): "The freewheel cover nuts
are secured with a high-strength threadlocking compound and may be
difficult to loosen". And again in step 3 (p. 146): The eight Allen
bolts have been secured with a high-strength thread-locking compound and
may be difficult to loosen... These fasteners are NOT difficult to
loosen. The remaing two nuts are completely loose.
The Clymer manual has this to say about the sprag clutch bolts in step 2
of the Starter Clutch Disassembly (p. 145): "The freewheel cover nuts
are secured with a high-strength threadlocking compound and may be
difficult to loosen". And again in step 3 (p. 146): The eight Allen
bolts have been secured with a high-strength thread-locking compound and
may be difficult to loosen... These fasteners are NOT difficult to
loosen. The remaing two nuts are completely loose.
 Here's another angle
 So, making my list of replacement parts, I have a damaged magneto,
obviously.
So, making my list of replacement parts, I have a damaged magneto,
obviously.
 And a dinged up hub
 Here's the lineup of suspects. Which of these is the most serious
offender?
Here's the lineup of suspects. Which of these is the most serious
offender?