Adjustable Screen
by Nieveld
reproduced with permission from:
Motorbikepages.
The wind screen
As a
newbie I do not comprehend the excitement of race bikers when there doing well
over 200 km/h (120 mph). There is not a windscreen that will protect you at
these speeds, so the best way to drive at these speeds is comfortably in your
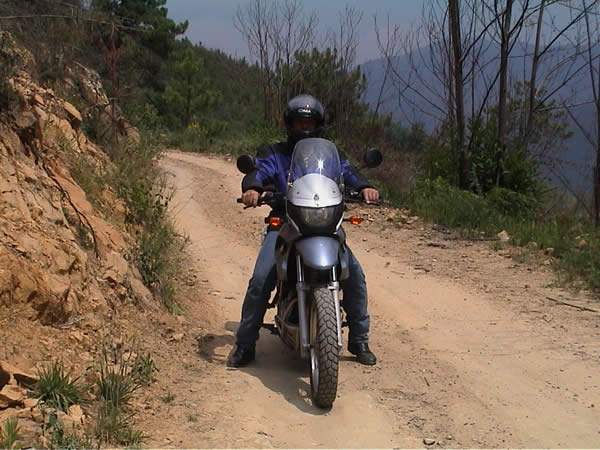
car (excuse me: I mean "cage"). My BMW 650GS came with the tall BMW windscreen.
Above about 80 km/h, no positive effect is to be gained from this screen. I'm
1m80 (6 ft) and when I ride the thumper, the wind hits me just under my chin.
Riding 100 km/h is already uncomfortable and 140 km/h (90 mph) is quite
unpleasant and only useful for some quick passing.
As a newbie I had not
realized this BMW screen was that poorly constructed, so I started browsing the
internet again to figure out a solution. I found that there are three screens
available (in Europe) that fit the (new) F650GS: The tall BMW screen, the BMW
Dakar screen, and an Ermax tall screen. Multiple stories and theories existed on
the web about these screens, with lots of impressions but no hard data. In
addition to the commercially available screens there are also some non-standard
fixes. I'll describe most of them below.
How to improve your screen
and what about "Jet Compression"?
Based on info from the FAQ pages of
the Chain Gang, I modified my
existing tall F650 GS BMW screen by adding 12 mm (1/2") plastic spacers under
the top screws. I had to make the two side holes in the screen a bit oval to
allow for the new position of the screws. Easily done with a low rev drill. The
more upright position helped a bit, but not a significant amount.
Wind impact
point moved from my chin up to my nose (I'm 1m80 - 6 ft). Big deal.
What to do next? Adding one of
those little plastic winglets on top of my screen (made by Saeng) did not make
too much sense to me. I played around with the idea to build the "Jet
Compression" windscreen that was mentioned on the Chain Gang site. This was a
story that seemed to have appeared in a German motorcycle magazine. When and
where is not known and some charts that were supposed to show why the system
worked were no longer present.
The document can be found here. It
basically means that the author built a funnel on top of his screen. The funnel
increased the density of the air and caused it to "blow away" the air that hit
the screen from the front. Sounds logical, but how to build one? I have seen a
somewhat similar gadget on an older BMW, but that strip was only 5 cm (2"). A
funnel should be much longer to have any positive effect.
Out of curiosity I posted the
basics of this story at an aerodynamics engineering site, just to see if one
could design such system based on aerodynamics theory. The feedback from the
experts was that this theory about a "23 degree air compression and expansion
angle" was basically bullocks and that there were too many variables existing
for any decent planning of such screen. Trial and effort seemed the only way
forward, but if you realize that you will have to buy LEXAN (as used by BMW) or
some other poly-type material at $ 150 per square meter, you'll need to make a
mold for the form, and be proficient with a heat gun or use a temperature
controlled oven to bend these 5 mm thick screens, you realize that this is not
going to be an easy task. Expect to mess up at least two screens and a few days
of work before you may have a useable prototype.
Earplug
intermezzo
I admitted defeat and started to wear ear plugs. That did
ten times more for the noise than any screen will ever do. However, I still
would like to be able to ride about 70 mph without them. By the way, I have been
using Wilson pilot earplugs for many years on board the plane (as passenger) to
silence out the engine noise that causes most of the tiredness after
intercontinental flights. They cost virtually nothing. Last batch I bought was
at http://aircraft-spruce.com/main.html. Can't get any better and
they're only about $2.
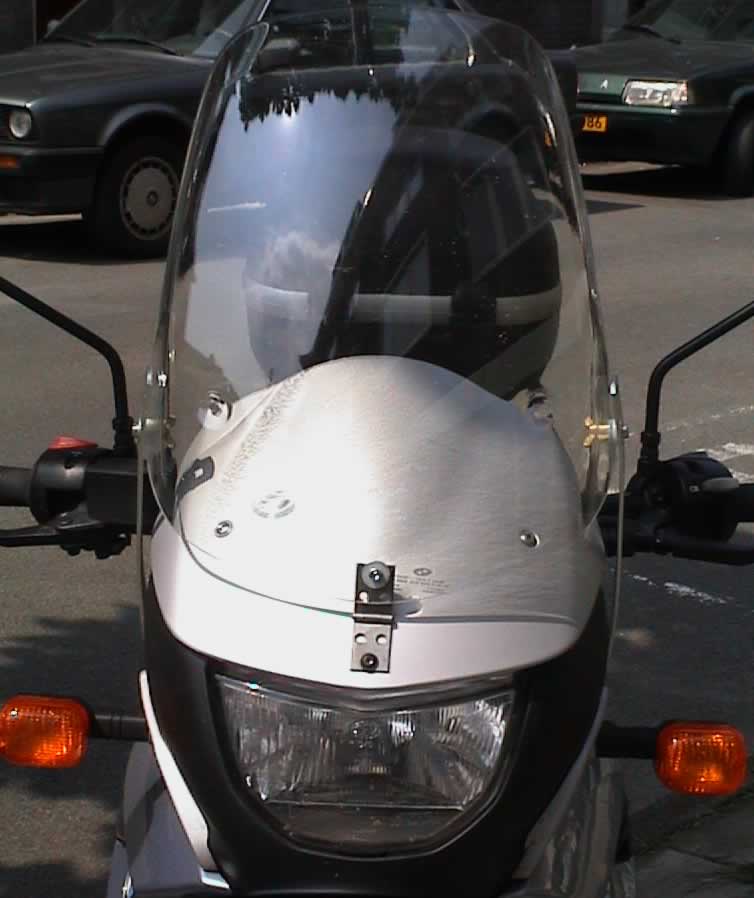
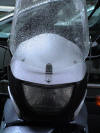
Ermax versus BMW
screens
Anyway, having read multiple articles and comparisons between
the BMW and Ermax screen I decided to give the Ermax a try. I ordered the "tall"
transparent screen ($92 in Holland and had to be shipped from France) and
received it two weeks later. Note: Ermax did not ship the long M5 screws that
you need with the screen so I had to get these from my local hardware
store.
Key difference: The Ermax screen is
far more upright than the BMW screen and is a bit curved away from the screen at
the top, which helps messing up the wind speed. Note that the Dakar screen has a
much more curved screen top. Overall result is that the wind now hits me at the
forehead: Altogether a 15 cm (6") improvement ($16 per inch). Still not enough
to ride with an open helmet, but a little better when you're doing 70
mph. I
did notice that the form of the Ermax causes buffeting. The BMW tall screen does
not have this problem.
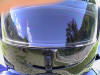
My conclusion is that the Ermax
moves the "quiet" zone a bit up, but not enough if you're 1m80. I guess that
Ermax caters for the French market where people are still a bit less tall than
in Northern Europe. You will still need ear plugs. At speeds above 90 mph there
is quite some buffeting. Everything basically starts to get blurred at that
speed. Side wind from the screen hits the mirrors, which are sometimes blown out
of position. If you're up to about 1m75 (5ft10) I expect the Ermax to be more
effective than the tall BMW screen. If you're taller and already have the tall
BMW screen or the Dakar screen, the Ermax is not worth the money. I noticed that
the BMW tall screen is made from LEXAN (polycarbonate) while the Ermax looks
made of thick Acrylic glass. It took only a day to get some scratches on the
Ermax screen (and therefore couldn't return it to the store).
No screen better than any
screen?
I installed the Ermax over the small stock screen that
originally comes with the F650GS. While trying to get the right type of screws
for the Ermax I drove around for a day with only the small screen, and concluded
that up to speeds of about 50 mph it doesn't matter at all if you have a screen
or not.
Altogether I'm still looking for a more optimal solution. Now that I
have two screens I will use the BMW screen to apply the "Trevor adjustable
screen" solution (see below).
Some screen
theory
To get comparison numbers that can be used for future
reference I measured the height of the screen by taking the distance from the
top of the (fake) tank, a pretty stable element on my bike, to the top of the
screen (vertical measurement only). Results: The tall BMW screen, unaltered,
measures 32 cm (about 13") tank-to-screen top. My altered version (adding some
spacers on top screws) has 38 cm (little over 15") tank-to-top.
The Ermax
buffeting screen measures 45 cm (18") tank-to-top.
Using the shape of the BMW
tall screen I measured the maximum height that Trevor's adjustable screen will
be able to go: 44 cm tank-to-top, so a bit less than Ermax. Trevor's height is
1m76 (5ft10.5), so that's why his screen is perfect for him. Since I'm 1m80 (6
ft) I guess I need about 50 cm (20") to be able to ride with less wind
problems.
My general conclusion from these
measurements is that a very basic principle applies: As long as the top of the
screen is at about eye level you will have significant less wind impact. It
apparently does not matter very much how the screen is shaped and whether it has
the extra top spoiler or not. The easiest way to see if your screen modification
is successful (besides trying out) is to tape some loom to the top of your
screen and see what happens with these tiny strings at different speeds. Raising
the screen above your eye level is also an option, but in that case you need to
raise it substantially higher (at least 10 cm / 4") above eye level to avoid
visibility problems. This last solution will probably look a bit silly on an
all-road bike.
Wind screen
alternatives
Solution 1: The Rando Mega
screen
Rando has made a screen from a barn door Slipstream screen.
This huge screen solves all problems, so check out the message board for Rando's
pictures and story (July 15, 2002). His screen measures just over 50 cm (20")
tank-to-top and should therefore be the right solution for me as well. Problem
is how to get a Slipstreamer screen (the right type of screen) in Europe in one
week (I'll be going away for vacation with the thumper for the As the crow flies trip). So the answer lies in trying Trevor's
adjustable screen.
Solution 2: The Clever Trevor
Screen Solution
I name it after the inventor of this solution. Have a
look at Trevor's site with nice shots of his adjustable
screen.
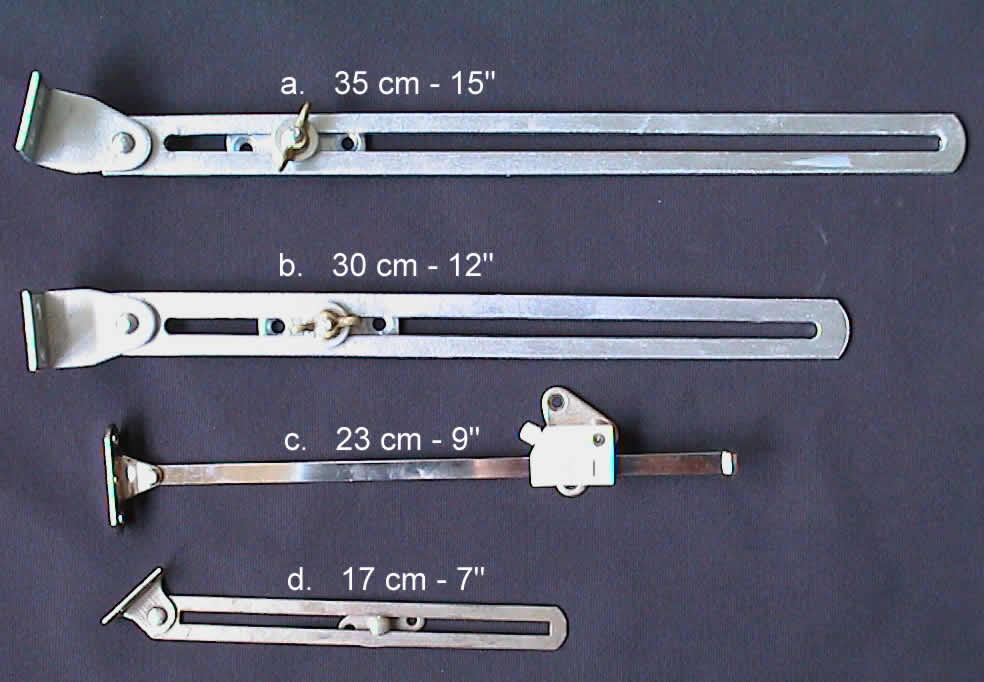
It took me a while to find the
right hardware store for the drawer brackets. Most of them had newer versions
based on a tube system. I started to collect all applicable bracket types until
I found window brackets that would probably fit Trevor's description.
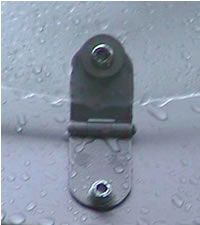
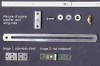
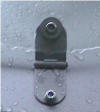
 The top two are window brackets (2 mm thick), the lower two are
brackets for cabinets. Looking at Trevor's site he used a longer version of the
thinner "d" type bracket. My preference was to use the "c" type (also 2mm
thick), because this is a single rod of steel and has a nice clamping system.
The clamp, however, could not be fully fixed in place so I'll defer this system
for a next round. The window brackets "a" and "b" were a bit too large, but had
the advantage of being very strong and reasonably weather proof. A nice extra
was that they already have all the necessary fixing material, including the wing
nut and nylon washers. The price for a pair of nr. "b" was a mere $10. The
lowest bracket is used for cabinets, has thickness of 1.5mm and is less
weather-resistant, so I opted for bracket "b".
The top two are window brackets (2 mm thick), the lower two are
brackets for cabinets. Looking at Trevor's site he used a longer version of the
thinner "d" type bracket. My preference was to use the "c" type (also 2mm
thick), because this is a single rod of steel and has a nice clamping system.
The clamp, however, could not be fully fixed in place so I'll defer this system
for a next round. The window brackets "a" and "b" were a bit too large, but had
the advantage of being very strong and reasonably weather proof. A nice extra
was that they already have all the necessary fixing material, including the wing
nut and nylon washers. The price for a pair of nr. "b" was a mere $10. The
lowest bracket is used for cabinets, has thickness of 1.5mm and is less
weather-resistant, so I opted for bracket "b".
 The work to transform two of these brackets into the components
to mount on the bike was no more than an hour work, and basically consisted of
sawing the M6 screw part from the bracket (see top row) and making the hole on
the left in the bracket (2nd row) a bit wider. Since my screen needed to be
about 5 cm (2") higher than Trevor's screen I added a hinge to the lower part of
the screen. I bought two hinges and preferred the right one, but used the left
one for this first prototype because this one was made of stainless steel. Price
for the hinge: $1.50. An additional advantage of the hinge is that it avoids
pressure on the screen when you adjust the height.
The work to transform two of these brackets into the components
to mount on the bike was no more than an hour work, and basically consisted of
sawing the M6 screw part from the bracket (see top row) and making the hole on
the left in the bracket (2nd row) a bit wider. Since my screen needed to be
about 5 cm (2") higher than Trevor's screen I added a hinge to the lower part of
the screen. I bought two hinges and preferred the right one, but used the left
one for this first prototype because this one was made of stainless steel. Price
for the hinge: $1.50. An additional advantage of the hinge is that it avoids
pressure on the screen when you adjust the height.
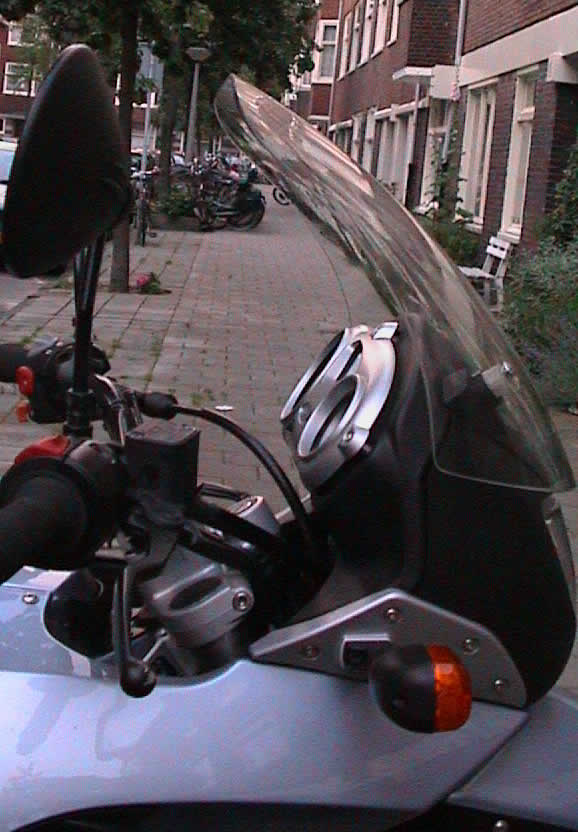
The brackets were a bit on the long
side (30 cm - 12"), which I solved by mounting them on the 4th screw into the
silver plastic moulding of the 650GS. I found this position a bit easier as it
is behind the turn-light and therefore easier to mount. Just like Trevor I used
a 1.5 cm (1/2") spacer o fit the bracket onto the screws and re-used the two
tall screws from the screen to mount these brackets. The hinge I mounted to the
headlight structure using the third screw from the screen. Besides the wing nuts
which came with the brackets, I therefore only needed to add one M5 screw to
connect the hinge onto the screen. This prototype still has a basic screw for
the top mounting of the hinge. I plan to use some nicer looking screws in a next
version.
Note that I mounted the tall screen on top of the stock screen.
First of all because I found this better looking, and secondly because the stock
screen reduces the opening between the tall screen and the lamp house and
therefore reduces false winds. Worst case: If my adjustable screen crashes for
some reason during my long trip I always have the stock screen to
continue.
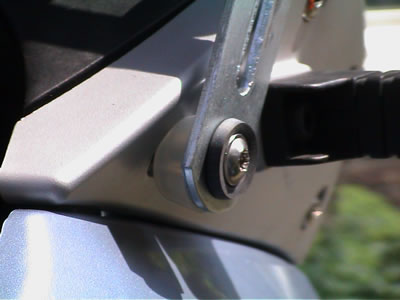
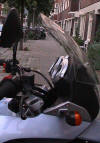
Below you'll see the low mount,
with a cone-shaped plastic washer on the inside (left) that sells as a small
doorstop. The rubber washer on the right side is a washer that is used in
faucets. Low in price and very good quality rubber. The middle picture shows the
stock screen with hinge, and the right picture shows the wingnut of the top
mount on the inside of the screen. See release 2 version below for an
explanation.


A 6mm hole at the corner of the
screen is easily drilled in the LEXAN. The nylon washers that came with the
window brackets fitted perfectly. I positioned the wing nut on the inside of the
screen, mainly for cosmetic purposes. I may eventually replace the wing nuts by
regular screws. The brackets needed a little bending by hand to fit the curve of
the screen. The result is given in the pics below. Total amount of work was
about 3 hours, most of which was spent in explaining to other folks passing by
what I was doing.
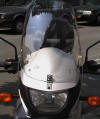


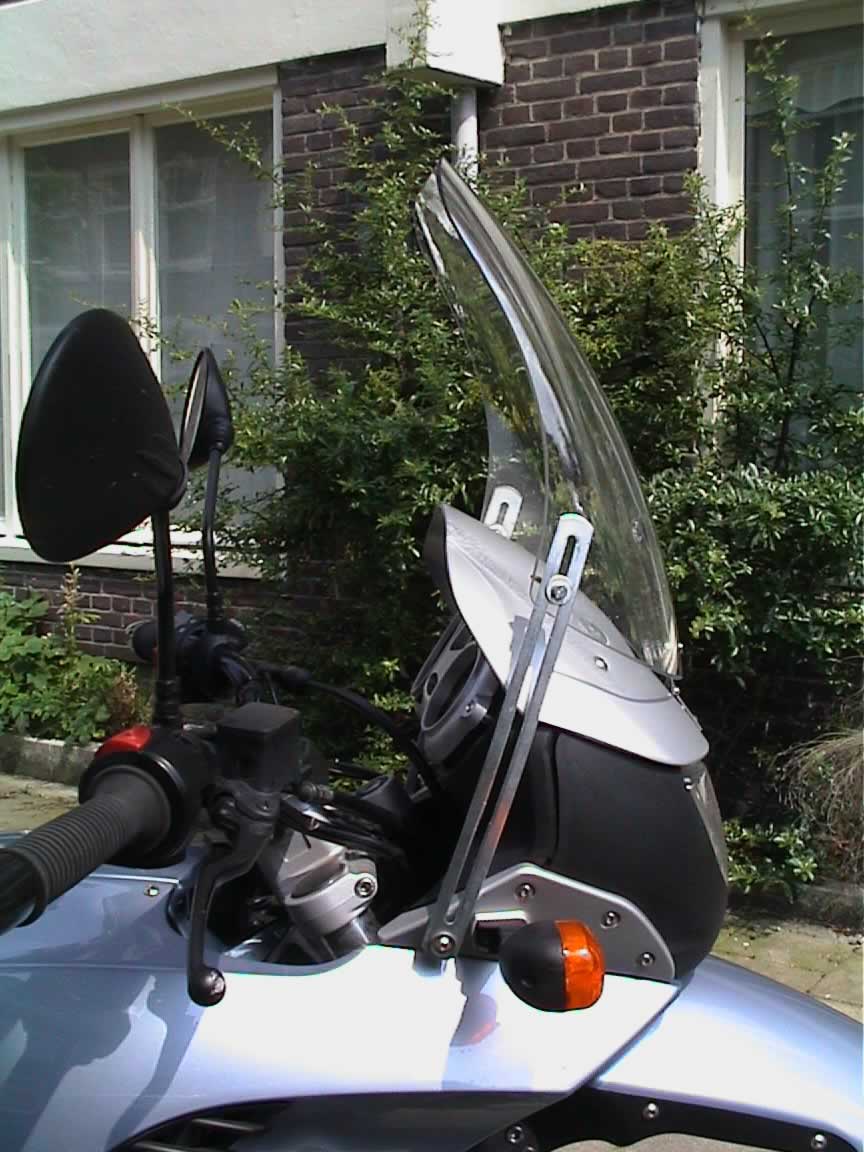
The two pics on the left are the
"Hinged Trevor" screen prototype. The picture next to that is the Ermax screen
and the one on the right is the BMW tall screen (modified with spacers). I
adapted the size of the pictures somewhat so that the "Mickey Mouse Mirror Ears"
have about the same size. This shows the substantial difference between the
adjustable screen and the two other options.
Future versions will have a
prettier hinge, of course. That is a matter of finding a stainless steel hinge
with only a single hole and which then will be shaped to follow the curve of the
screen.
Prototype Driving
Test
A noticeable reduction in wind at helmet level! The tank-to-top
distance of this hinged version of the Trevor screen measures 51 cm (20.5""). I
can drive 100 km/h (60 mph) without earplugs and with the screen of my helmet a
little open. Wind hits me at the helmet just above the forehead and has much
less power. This does not mean that there is no wind at all, but it is
sufficiently less to take short trips (30 minutes) on the highway at this speed
without ear plugs. With earplugs, speeds up to 130 km (80 mph) can be driven
without too much buffeting. Because the upright screen is a bit further away
from you there will be some buffeting, but the quantity is tolerable and much
less than with the Ermax screen. The opening between the stock screen and the
tall screen does not lead to false winds from below. In its highest position,
the screen is just at eye level. I found that having the dark edge of the screen
at eye level disturbs my vision on the highway and have therefore lowered it
about an inch.
Altogether, Trevor's adjustable
screen is a success! The modification is very inexpensive and can be done
with basic tools and without being an experienced handyman. The adjustability of
the screen will allow you to lower it quickly when you're planning to go
off-road and want to get rid of the screen. You should not expect miracles from
this modification, but the improvement is significant enough to give it a try
when you're tall and like to ride over 100 km/60 mph with some more comfort.
Worst that could happen is that you have wasted a few dollars in brackets and
end up with two little extra holes on the side of your screen.
What's
Next?
Improvements:
- Make the hinge better looking. I already closed
the other screw holes with polyester and will paint it light gray/silver and see
if that looks better.
- Replace the screws in the top mount of the brackets
by short slotted screws that fit the opening in the brackets. This means only
the wing nuts need to tightened on the inside of the screen.
- Have both the
brackets and the hinge galvanised for permanent rust protection. This is an
inexpensive job, but usually has a return time of a week, which I do not have
presently.
- Now that this works for the tall BMW screen I can try to do
something similar with the Ermax screen that I now have as spare.
Trevor Screen Release
2
After two of days driving I found the time to make a couple of
improvements.
Top Mount Screws
 These used to be composed of a
screw and the wing nut. I replaced the screw by a bolt that locks into the
bracket. This eliminates the need for a tool when adjusting the screen. The wing
nut can be loosened by hand and adjusting the screen is a matter of seconds (but
don't try this while driving). The special bolts will add the serious amount of
$1 to the costs.
These used to be composed of a
screw and the wing nut. I replaced the screw by a bolt that locks into the
bracket. This eliminates the need for a tool when adjusting the screen. The wing
nut can be loosened by hand and adjusting the screen is a matter of seconds (but
don't try this while driving). The special bolts will add the serious amount of
$1 to the costs.
The Hinge
 Now that the prototype worked out OK, it was time for some
cosmetic changes. The unused holes were filled with polyester compound (left
from an older car restore project) and spray-painted a couple of times with
rust-protecting silver paint. The spray can cost $ 12, but this will be good for
the next 100 hinges, of course. The picture was taken after one of those typical
Dutch rainy summer days (and winter is worse). The paint was only one day old
but held good.
Now that the prototype worked out OK, it was time for some
cosmetic changes. The unused holes were filled with polyester compound (left
from an older car restore project) and spray-painted a couple of times with
rust-protecting silver paint. The spray can cost $ 12, but this will be good for
the next 100 hinges, of course. The picture was taken after one of those typical
Dutch rainy summer days (and winter is worse). The paint was only one day old
but held good.
More test results
In
general, the adjustable screen with the hinge performs well. There was not yet
time for an off-road drive, but it performed well on minor bumps like driving up
the sidewalk. The only time when I could hear some noise from the hinge was when
I drove full speed over some speed bumps.
I noticed that mounting the
brackets on the 4th screw of the mould rather than on the 3rd, and the increased
height of the screen in general because of the hinge, resulted in much more
space on the inside of the screen. This allows me to put the wing nuts on the
inside where they are less obtrusive than on the outside. The extra space also
allows the screen to be adjusted downwards without the wing nuts hitting the top
of the headlamp structure. They actually move over the stock screen.
One
negative point needs to be noted: The higher screen takes a significant part of
the wind away from the helmet. That's good, right? But it also means that
raindrops will stay longer on your visor, since they are no longer immediately
blown away by the wind. Now that the screen takes a larger part of your viewing
area, raindrops on the screen will be more annoying as well. I consider both
effects the consequences of luxury, but they need to be noted.
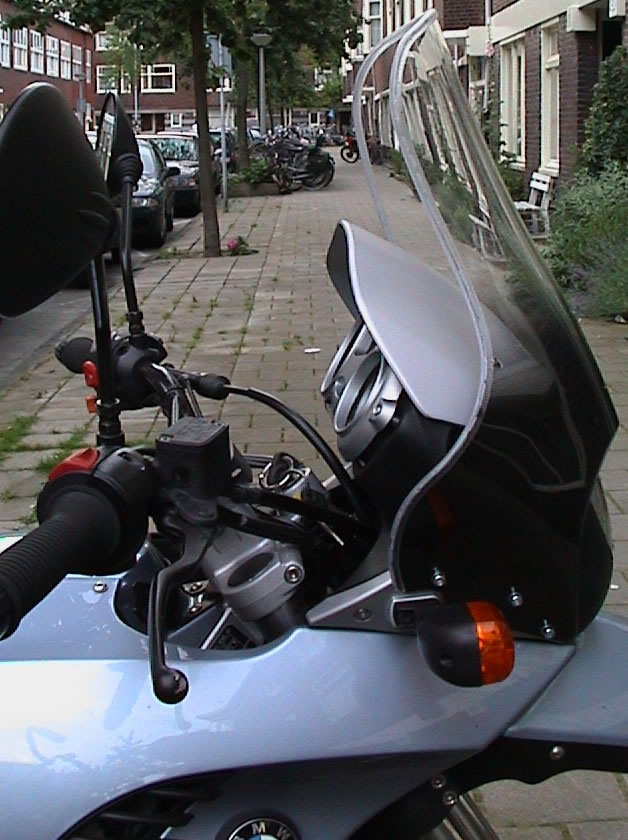
I have added a couple of shots
below. Couldn't find a nice background, so this will have to do until I'm back
from my vacation trip. The painted hinge starts blending in quite well with the
stock screen. The wing nuts on the inside are virtually invisible.

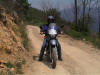
The Road Test
After a one
week 2000 km (1400 mi) bike trip to Italy I gained the following results
(besides a slightly sensitive bottom):
I have used the hinged Trevor
screen for the full part of the trip. It was mostly extended to nearly the
maximum height (50 cm - 20"), which is just below eye level for me. For off-road
trips (about 100 km) I lowered it to around regular BMW tall screen level to
better be able to overlook the road. The modified screen worked excellent: I did
not have to clean my visor even once during the trip. The two friends who
accompanied me for the first half of the trip on their Honda VFR bikes had to
clean their screens daily, even though they claimed to have no problems with
wind up to speeds of 160 km/h (100 mph) on these road bikes.
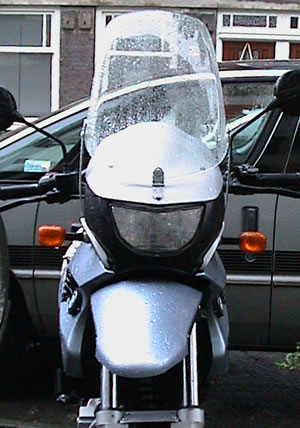
The left picture shows my screen
after about 1600 km (1000 mi), while the right screen shows the helmet visor at
the same point in time: No Bugs!

There is no clearer proof that the
screen modification works very well.
Reliability
No
changes had to be made during the trip which included over 100 km (60 mi) on
unpaved mountain roads. The screws have been perfectly in place all the time.
Only after about 1000 km (600 mi) of mountain curves with multiple bumps and
very frequent acceleration and braking, the hinge pin started to wear a bit,
which resulted in a slight noise when you go over a road bump. This wear is
caused by the relatively small width of the hinge in relation to the overall
weight of the screen. At no point the screen was vibrating or shaking. Over time
I might eventually replace the hinge by a slightly wider one.
Remaining
observations
The only downside of the screen modification that I
could find up to now has been that the bracket screws attached to the plastic
headlamp mould also need to come off when you need to fill up cooling fluid:
About a one minute delay every time you refill coolant.
For me, this overall modification
of around $15 works perfectly well and is easy to install by anyone able to
drill a hole and turn a screw. Without serious off-roading it will likely last
for many thousands of miles.
Anyone interested in buying my now
useless Ermax screen?
Questions or your own experiences?
Send me mail.
 The top two are window brackets (2 mm thick), the lower two are
brackets for cabinets. Looking at Trevor's site he used a longer version of the
thinner "d" type bracket. My preference was to use the "c" type (also 2mm
thick), because this is a single rod of steel and has a nice clamping system.
The clamp, however, could not be fully fixed in place so I'll defer this system
for a next round. The window brackets "a" and "b" were a bit too large, but had
the advantage of being very strong and reasonably weather proof. A nice extra
was that they already have all the necessary fixing material, including the wing
nut and nylon washers. The price for a pair of nr. "b" was a mere $10. The
lowest bracket is used for cabinets, has thickness of 1.5mm and is less
weather-resistant, so I opted for bracket "b".
The top two are window brackets (2 mm thick), the lower two are
brackets for cabinets. Looking at Trevor's site he used a longer version of the
thinner "d" type bracket. My preference was to use the "c" type (also 2mm
thick), because this is a single rod of steel and has a nice clamping system.
The clamp, however, could not be fully fixed in place so I'll defer this system
for a next round. The window brackets "a" and "b" were a bit too large, but had
the advantage of being very strong and reasonably weather proof. A nice extra
was that they already have all the necessary fixing material, including the wing
nut and nylon washers. The price for a pair of nr. "b" was a mere $10. The
lowest bracket is used for cabinets, has thickness of 1.5mm and is less
weather-resistant, so I opted for bracket "b".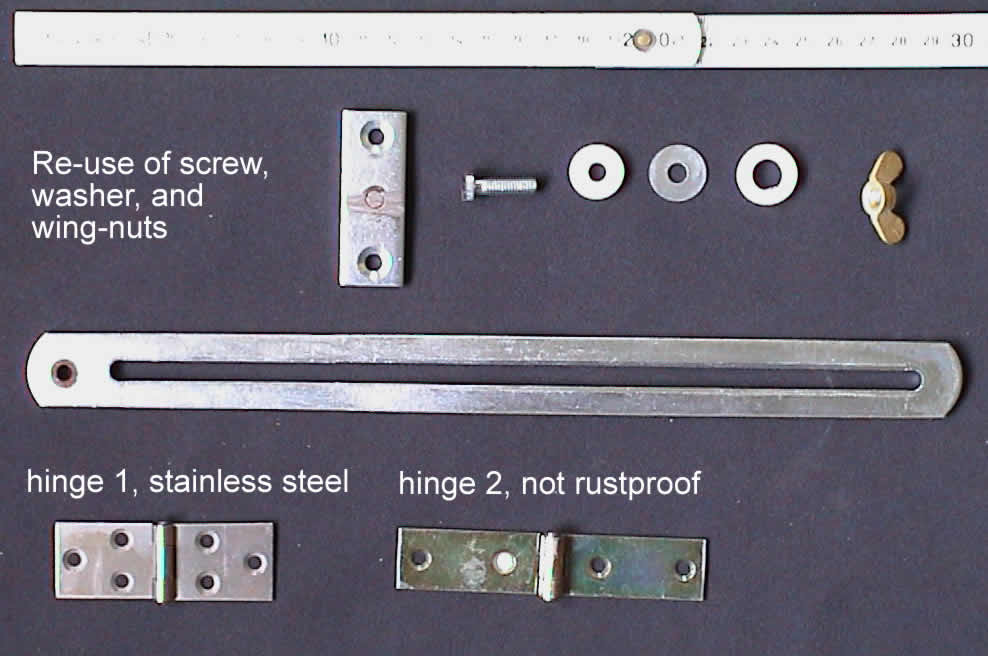 The work to transform two of these brackets into the components
to mount on the bike was no more than an hour work, and basically consisted of
sawing the M6 screw part from the bracket (see top row) and making the hole on
the left in the bracket (2nd row) a bit wider. Since my screen needed to be
about 5 cm (2") higher than Trevor's screen I added a hinge to the lower part of
the screen. I bought two hinges and preferred the right one, but used the left
one for this first prototype because this one was made of stainless steel. Price
for the hinge: $1.50. An additional advantage of the hinge is that it avoids
pressure on the screen when you adjust the height.
The work to transform two of these brackets into the components
to mount on the bike was no more than an hour work, and basically consisted of
sawing the M6 screw part from the bracket (see top row) and making the hole on
the left in the bracket (2nd row) a bit wider. Since my screen needed to be
about 5 cm (2") higher than Trevor's screen I added a hinge to the lower part of
the screen. I bought two hinges and preferred the right one, but used the left
one for this first prototype because this one was made of stainless steel. Price
for the hinge: $1.50. An additional advantage of the hinge is that it avoids
pressure on the screen when you adjust the height.