F650 Keys, Locks and Security FAQ
compiled & edited by Kristian #562
Key FAQ merged by Winter #1935
Please read the Disclaimer before attempting any work in this FAQ.
Last Updated: 21 Feb 2007, by Winter #1935
For other related FAQs:
Introduction
Securing your bike depends on where you are located. In some towns you may
not feel there is a need. In the middle of a major city, you might want some
sort of security devices. There are a lot of devices on the market, and
plenty of reviews of those devices. This FAQ discusses the security of
your F650 bike, including things such as how to re-key the locks for your
panniers and top-box. Note: You are responsible for your bike security.
You may be required in your insurance agreement to ensure you always use
an appropriate locking mechanism.
| At The Very Least... |
|---|
| At the very least go out and purchase a disc-lock. These are small
and relatively indexpensive devices, and will prevent most "honest"
theives. Lock your steering as well. The extra 2 minutes you spend locking
your bike may save you many hours later. Besides... if someone does short
your ignition to get your bike started, if the steering is locked, they
will have trouble going anywhere
|
Bike Security Suggestions
Theft Warning
7/20/99, Denise of Nederland, Colorado:
"Over the Fourth of July weekend (between approx. 5pm - midnight
in a decent neighborhood in Boulder, Colorado), someone attempted to steal
my F650 by jamming a screwdriver in the ignition and attempting to start
it. The fork was locked so the would-be thief couldn't steal my urban
horse, but he/she did cause considerable damage to the ignition and it
couldn't be moved. I'm sharing this information because there may be other
F650 owners who could possibly experience such attempted thefts.
Interestingly enough, when I hauled my motorcycle down to Foothills
Cycle in Lakewood, Colorado for repairs, the rep. told me that someone
else in Denver metro area had the same thing happen to him in broad
daylight out in front of a store."
Keep those forks locked - Webmasters
General Suggestions
Adamx#1001, Nicola, Randy748, Spakur, Andy Leeds UK, December '01
How do you secure your F650 while away? Does a disc lock do the job?
Or do you usually do something more? Most bike thieves are opportunist
scum, these items will just put them off. If it's 'professional' thieves,
they'll get it if they want it, even if you concrete it onto the ground.
Suggestions:
- Datatag and a good solid chain.
- Immobiliser/alarm
- Big D lock through front wheel
- Cover bike in crappy old cover so it looks 'not worth nicking'
- My philosophy is to have more locks than the other bikes, so if
they're thinking of steeling they'll pick another bike.
- Disclock and the heaviest chain+lock available (in the bike store).
- This plus a cover for the bike will hopefully discourage people.
- Don't forget a Heavy Chain weights a LOT so usually you don't
want to drive around with it.
- Datatag puts the professional thief off. A dirty big chain (16mm
links, CISA lock) through the swing arm and rear wheel and concreted in
lock down point deals with the kiddies. Disk locks only work for short
stops, alarms only work if you are in sprinting distance and or a
size/frame of mind to try and kill the thieving what-sits.
- Don't lose the keys for the heavy stuff. A security firm once
asked our local Fire Fighters to cut a chain as a sort of challenge. They
did it, after four hours of freezing with nitrogen and hammering with a
pneumatic chisel
- When I first got my bike I asked around about alarms... almost
everyone I asked that had actually installed an alarm stated they were
more trouble than they were worth. Stories such as yours are typical of
what I was told. However people are not exactly going to complain about
alarms that are working right? I also go with a low-tech option: Large
visible lock on the front. In more dodgy locations I also slip a small
padlock through the rear disc/disk. However my bike looks fairly ratty and
beat up as it is (scratches, cracked fairing that has been reparied, paint
missing)... Winter #1935
- I kind of agree with you about the alarm being more trouble than
help. The one that I put on my bike was a gift so I had to install it as a
show of appreciation. I started having small issues as I mentioned and
therefore decided to add a switch to bypass the circuit so that when the
alarm malfunction or even failed I could do without. Mine though was a
cheap brand so I was asking if there is anyother one that has proven
reliable and maybe worth installing. Maybe if I have an alarm that is
reliable it will be worth having it on the bike as it provides extra
protection. nikosb #1770
- The people i know who have alarms on their bikes seem to have
trouble with them,false alarms and flat batteries being the main culprits.
stevo
Layer The Defence
Andy Leeds UK #982
Britain leads the world in vehicle crime (we had to be good at
something given we get beaten at all the sports we invented)! Basic rule
is to layer the defence:
- Data tag or smart water puts off the professional thief, but if
they want it they'll get it. F650's with Ducati/Fireblade level protection
are not worth the effort.
- A big chain fastened to a hardened tie down point (or round a lamp
post) and through the frame of the bike stops the joy rider. Fill any lock
with bike. Don't leave it dangling on the road where they can put plumbers
nitrogen on it or get the angle grinder in. Remember wheels can be
removed. Locking two bikes together is a second rate defence but you can't
carry two bikes into a van. I use a chain with 16mm link thickness through
a concreted in tungsten loop. Cable locks are a very poor substitute for
chain, as bolt croppers are quiet compared to an angle grinder or sledge
hammer.
- Alarms are only any use if you are within sprinting distance and
are prepared to thump the scum bag with the screwdriver in your ignition.
(At least you Yanks get to shoot them). Put your helmet on when attending
an alarm incident. A fellow biker will understand and apologise if they
just nudged your bike in the parking area. Any one else deserves to get
the living whatsit scared out of them.
- A tatty cover camouflages a good bike. If in doubt put a GBP3.99 car
cover and half a roll of duck tape over your GBP40.00 anti-condensation
impregnated, super shield bike protector.
- Even if you only stop for a coffee, lock the bike. Disk locks are Ok
for this. Never leave a helmet with the bike. In dodgy areas don't lock
the ignition if you use the chain. Idiots have been known to force the
ignition lock before starting on the chain. The ignition lock takes less
than 2 seconds to break with a 50p screwdriver, so save yourself the cost
of buying a new lock. If your alarm works through the ignition lock ignore
the above.
- Bike thieves should be hanged from lamp posts as slowly as possible.
If they carry a petrol powered angle grinder, jam its throttle open and
jam it in any suitable orifice. Carry a tow rope for this purpose, but
remember to keep your gloves and helmet on.
Immobilisers and Alarms
There are several devices on the market that can be used, however many
people experience problems with some alarm systems causing battery drain,
bad connections and short circuits etc. Note: Some Insurance Agents will
require an alarm to be professionally installed.
- This
article seems like something you might be interested in; more
specifically, within the article is a link that takes you
here.
billmallin #1629
OEM / BMW Alarm Systems
I do not know of anyone that has one of these installed, however the plugs
for these devices should in theory already be on your bike. So they should
simply plug-in to your bike. For example on the GS you get an additional
wiring harness that appears to connect "between" your normal wiring
harness and certain sensors / switches etc. [Ed note: If anyone has the
BMW alarm installed, can you please let us know how it connects into the
bikes electrical system...]
- I believe that's what they call a 'dealer added value'. Its not a
standard upgrade from BMW for the 650. RevJVegas #1906
- AFAIK (at least here in Europe) there is no factory alarm. My
alarm was fitted by the BMW dealer as a dealer-fiited option. Is there a
brand name on the key fob? Or can you see what brand it is from the 'alarm
body' - mine was installed under the seat where the toolkit normally goes.
If you find a name - perhaps someone's got the same, or you can find
instructions on the 'net. NikosF
- An anti-theft alarm system is listed under available equipment for
the F650GS on the BMW North America web site. The key fob has two buttons
and a BMW logo on the front and says Gemel - TXSHS ON THE BACK.
MOSLEYDS
- With two buttons one would have to guess one to arm and the other
to disarm. Curious, is it just a motion tripped type of alarm or does it
also kill the ignition? RevJVegas #1906
- Gemel appears to have the following website:
http://www.gemel.it/ Winter
#1935
- All I know is it won't start unless you push the right side button
on the demote (key fob) MOSLEYDS
Aritronix Systems
Website: http://www.aritronix.com/
- I'm installing the Scorpio i500SE alarm. It's one of the best
money can buy. It retails for 389, but I managed to get it on Ebay for
269. Just bid on one that has a starting bid of 269 - even if you are
oubid and loose, you will receive an email from the seller asking if you
want to buy it for 269. I mainly bought it for the perimeter sensor and
pager. Now I can catch anyone who tries to frigg with it (recently had
$500 worth of damage to it). I am going to try to do this myself as soon
as time allows and will post some pics of how it worked out. I still need
to find the ignition control wire though. Mr Pink BBG#77
Scorpio customer support:
I initially planned on having my dealer install this alarm. However, my
dealer was very reluctant to do so and advised against it due to potential
battery problems (excessive battery drainage). My dealer claimed that if I
installed this alarm, I could expect a 3 volt drop in three days if I did
not start the bike. I contacted Scorpio and was able to speak to a
technician who told me that it was physically impossible and was able to
give me various worst case voltage drop scenarios in several alarm
settings. I was pleased with this information and decided to install it
myself. Having bought this alarm on ebay, the seller neglected to include
documentation for the perimeter sensor. I contacted Scorpio once again,
who sent me the information I requested in a reasonable amount of time. I
contacted Scorpio for a third time when the plastic antenna cap fell off
my handset; they were quick to send me another. Overall, Ive had a good
experience with customer support.
Range:
Scorpio claims that you can get up to half a mile range. If you look at
other reviews online, most people report a fraction of that, depending on
the geographical surroundings (buildings, concrete, etc). I tend to get
about half a km range (about 1/4 mile), which I think is sufficient and
likely due to the placement of the antenna and lack of metal around it. I
am able to park my bike in an underground parking lot, walk 500m to
another building, and receive a decent signal from the 3rd floor.
Overall performance:
There are a few sensors that can be set to trigger this alarm: 1) Shock
sensor; 2) Tilt-sensor; 3) Perimeter sensor. You can arm these sensors
independently or combined. In the daytime I will usually set the first
two, adding the perimeter sensor at night. You can even set the bike to
silent alarm where it will page you, but the alarm will not sound on the
bike. I found this to be useful when you want to catch kids snooping
around your bike but you dont necessarily want to scare them off before
you do.
I bought this alarm primarily for the perimeter sensor feature and as a
reaction to recent act of vandalism which was not prevented by a Xena
alarm that failed to go off. I was curious to see how this feature would
work. The perimeter sensor can thankfully be adjusted to encompass a range
around the bike from about one to four feet. The adjustment is very
sensitive so you need to tinker with it until you get it right. I am
pretty happy with how it works. You can also adjust the sensitivity of the
shock sensor. The sheer volume of this alarm is startling (your ears will
be ringing if you stand too close for more than a few seconds) and is
likely to get the attention of people in a hurry. The best feature of
course is that the bike will page you if the alarm goes off. Similar to a
cell phone, you can set the handset to vibrate or ring.
Battery drain:
One of the big concerns for me was battery drainage. Due to this concern
(and the extra effort that would have been involved), I neglected to
install the hijack disable kit, preferring to use my Xena disk lock as an
additional deterrent. Another good feature on the handset is that it will
let you know when the bike battery drops below 11.5 volts. So far it has
not dropped below this, but then again, I ride my bike nearly every day.
The longest I had my bike parked with my alarm armed is 3 days and it
started up fine. Even if the battery craps out, or the power is cut, the
unit has a built in backup battery to keep it operational.
Final thoughts:
I have used this alarm now for a month and a half and am very pleased with
the performance. The only thing that I dislike is that you cant set a
silent perimeter alert (alerting you when people are getting too close but
not triggering the alarm) while still having the tilt/sensor alarm active
(the alarm sounds when the bike is being touched or moved). Overall
though, I would give this alarm a 9 out of ten and would recommend it to
others. If you live in the inner city and youd like to have that extra
piece of mind, then this alarm is the ticket. The reality is that if
someone has the cohunes and manpower to pick up your bike with an alarm
going off in their ears and throw it into the back of a truck faster than
you can answer your handset page well then I guess they deserve a hero
cookie and perhaps your bike too.
Other Alarm Manufacturers
If you have comments on any particular alarm system, please let us
know. This is just a list of other manufacturers.
Cyclone Alarm
I am replacing my old and broken alarm on my 1999 F650 classic. You can
find the schematic of the alarm
here. What I
think I figured out is the following:
- The red wire from the alarm goes to the positive battery terminal.
(does not need to go through the ignition)
- The yellow wires connect to the wires coming from the battery that
connect to the left and right flash light respectively.
Alarm Installation
Check out the Classic
Documentation and the GS
Documentation for schematics of the electrical systems of these
bikes.
How to find the ignition/engine control wire?
I'm doing an alarm install that is pretty straightforward but it comes
with an ignition disable feature that requires that I find and cut into
the "ignition/engine control wire." I'm having a hard time identifying
this wire using the repair manual. I think it is one of the wires coming
out of the starter relay, but I would like to make sure I'm splicing into
the right one. Has anyone done this before or does anyone have any
suggestions? Mr Pink BBG#77
- Use the wire off the handlebar kill switch. It disables the
computer and fuel pump. Adam #1958
- For best results try to incorporate all the wiring into the loom
by using heatshrink tubing and solder. Dont use those ugly crimp terminals
to splice the cables. The battery part is easy just look for a red cable.
The ground is also easy just look for a brown cable. I cant remember the
other two colours but the FAQS have the wiring diagram for ya.
Komatias
Regarding the alarm issue I have installed a different alarm
(King's Gun) on my 1999 F650. There are a couple of advices I'd give you
based on my problems so far. You probably have to do some wire cutting and
connecting. If you use crimp connectors make sure they are really holding
well although my experience tells me they can get loose with time. Mine
did after a couple of monts and had surging problems at random times.
Finally I soldered all the connections and it works fine. I put the alarm
under and behind the seat, there was enough room for the kit and the siren
under the rear rack. I don't know if there is the same space on a GS but I
would recommend putting it somewhere interior, not exterior.
There is usually a grey wire used as the antenna. Make sure
that is not tangled or hidden by antyhing. The reception on my alarm is
not that impressive (50m). I would also leave the alarm to sound in case
your bike and pager be out of range. I am replacing my siren with a 120db
one. I was in store and I listened to one and it really hurts the ears.
As for the wiring, it might be different on the classic but the FAQ or a
motorcycle manual with the wiring diagram is the place to start. nikosb
#1770
Where is the best place to put the alarm unit?
- On a GS there is a small flat space further toward the rear under
the seat - I use this space for my "extended toolkit", so depending how
"thick" the alarm unit is you may be able to fit it there. Winter
#1935
Scorpio SRi-500 SE with perimeter sensor
The following was installed on a F650CS. Special thanks to Mr
Pink for the details and pictures.
Cost: $269 (frequently sold for this price on ebay).
Note: I am not affiliated in any way with Scorpio alarms and have tried
to be as objective as possible in this review and installation guide. I am
not a licensed technician. This is the first real "hands on" thing that I
have done to my bike, so please follow this guide at your own risk.
| Scorpio Alarm on a F650CS |
|---|

 Instructions and general setup: This alarm consists of a main control unit
with two wiring harnesses (main and accessory)... ... and the FM handset.
Instructions and general setup: This alarm consists of a main control unit
with two wiring harnesses (main and accessory)... ... and the FM handset.
|
 First have a look under the seat and find a place to put the MCM unit.
There is not much room under there, but I found a place that will work in
the left rear fairing. A word of caution: be careful that your placement
of the MCM unit and wires does not cause them to be 'crushed' by the seat
when you get it back on there.
First have a look under the seat and find a place to put the MCM unit.
There is not much room under there, but I found a place that will work in
the left rear fairing. A word of caution: be careful that your placement
of the MCM unit and wires does not cause them to be 'crushed' by the seat
when you get it back on there.
|
 The wires that you need are in the tail section of the bike. You need to
find the wires for the left and right rear turn signals, the license plate
light, and a ground wire (all conveniently wired into a nice little
connector just waiting to be tapped into).
The wires that you need are in the tail section of the bike. You need to
find the wires for the left and right rear turn signals, the license plate
light, and a ground wire (all conveniently wired into a nice little
connector just waiting to be tapped into).
|
 These are the wires that you will tap into from the HAR-1. Before you
start, remember to disconnect the negative battery terminal. I chose to
tie into these wires "post-connector" just in case I screwed something up
(in which case I would only have to purchase the tail end wiring harness).
There is not a whole lot of wire to work with, but it is certainly
managable and made easy with the provided t-tap connectors. Each of the
four wires from the MCM unit gets its own t-tap connector. You stick one
wire in the female end of each connector and then clamp it onto the
appropriate wire.
These are the wires that you will tap into from the HAR-1. Before you
start, remember to disconnect the negative battery terminal. I chose to
tie into these wires "post-connector" just in case I screwed something up
(in which case I would only have to purchase the tail end wiring harness).
There is not a whole lot of wire to work with, but it is certainly
managable and made easy with the provided t-tap connectors. Each of the
four wires from the MCM unit gets its own t-tap connector. You stick one
wire in the female end of each connector and then clamp it onto the
appropriate wire.
|
 After I tapped into the correct wires (see diagram), I bundled them with
electrical tape and tucked them out of the way.
After I tapped into the correct wires (see diagram), I bundled them with
electrical tape and tucked them out of the way.
|
 Here you can see the general setup, and pretty much the only place on this
bike to stick the MCM unit.
Here you can see the general setup, and pretty much the only place on this
bike to stick the MCM unit.
|
 It was important for me run the antenna wire where there was little metal
in order to get the best possible signal. Once the seat is on the bike,
you can see where the antenna sticks out from the MCM unit to the back of
the bike. Pretty inconspicuous, and it provides a decent signal.
It was important for me run the antenna wire where there was little metal
in order to get the best possible signal. Once the seat is on the bike,
you can see where the antenna sticks out from the MCM unit to the back of
the bike. Pretty inconspicuous, and it provides a decent signal.
|
 Once the main unit is installed, you can install the perimeter sensor,
which is only a small plastic-cased device that can be stuck pretty much
anywhere with the double-sided velcro that was provided. Once all of this
is completed, you can connect the positive lead from the MCM unit to the
battery. The alarm with make a couple "chirps" to let you know that the
unit is functioning. Now just connect the negative terminal, and you're
all set to try it out.
Once the main unit is installed, you can install the perimeter sensor,
which is only a small plastic-cased device that can be stuck pretty much
anywhere with the double-sided velcro that was provided. Once all of this
is completed, you can connect the positive lead from the MCM unit to the
battery. The alarm with make a couple "chirps" to let you know that the
unit is functioning. Now just connect the negative terminal, and you're
all set to try it out.
|
Alarm Failures
- I have been using a motorcycle alarm system (King's Gun) on my
1999 F650 for the past year. I have had a few minor issues with it
(probably read earlier postings related to it) but yesterday the alarm
finally failed. I unarmed the alarm and started the motorcycle. After two
minutes riding I noticed a strange sound. For some reason the alarm was
firing the ignition as if it was trying to start it. I pressed the kill
switch but the motorcycle kept running. I had to turn off the ingition to
stop the motorcycle. First thing I suspected was the alarm was
malfuncitoning. I took it out and noticed that parts were broken and the
whole alarm kit was falling apart. Since I never fully trusted the
reliability of this particular alarm I had installed a switch to bypass
the alarm system, so I disconnected the alarm and was able to ride home.
nikosb #1770
Locking Devices
Kryptonite Disc Lock
- Of course these are super easy to break - there is aerosol
refrigerant now available in building supply places. The thief simply
sprays the lock with this spray which freezes it and then gives it a whack
with a small hammer whereupon it shatters like glass. Tim C.
- The "freeze and shatter" attack is an urban myth; I would love to
someone actually DO this successfully. First, aerosol refrigerant (Freon)
isn't cold enough to have any effect. The suggested approach is to use
liquid nitrogen, which is readily available, but not something that people
can easily carry on their person safely. Finally, even when dunked in
liquid nitrogen, Kryptonite and Abus locks (and probably most other good
ones) remain malleable enough that they will not shatter or crack when
struck. The Kryptonite EV disk lock is very difficult to defeat without a
grinder (which can defeat any lock). If you're really paranoid though, buy
an Abus lock. Back to the topic, I always use a Kryptonite EV disk lock
and NY Chain to attach my bike TO something, and it fits just fine.
Mason #631 - 97ST in PA
- I tried the freeze and shatter method when trying to rescue an old
abandoned classic SOHC Honda four tagged by sanitation and most certainly
bound for the dump. I used a lot of liquid nitrogen to no avail.
Sanitation took it the next day. But a friend once had a bicycle stolen in
this matter, came out to find his U-lock in three broken pieces and no
bike. So maybe it's not such an urban myth. I use an orange kryptonite
stapler lock on my bike, fits on the disc. The real problem is how to
carry it while underway. Something NEVER addressed by ANY of the moto
press. A lock, any lock, only keeps the honest honest. A determined thief
always takes the bike. Ya have to be vigilant. Woke up this morning to
someone trying to break into my apt. by the window on the fire escape that
the fire dept. destroyed breaking into my apt. during the great floods
last weekend. I knew I shoulda waited until he was inside, woulda had
fresh liver for breakfast. Shank NYC USA
Misc. Padlocks
- One small and very subtle method of adding a lock to your bike is
to get a small padlock, and hook it through the holes in the brake disc -
the rear disc is a good idea, as it is less obvious. Normal disc locks are
usually brightly coloured to help you remember they are installed. The
padlock is more likely to be missed - but don't forget you installed it!
Winter #1935
Locking Your Helmet
I have been looking for a helmet lock for my Dakar. I have limited
space left on the bars and would rather it lock somewhere else (maybe
attached under the seat or something). Are there any decent options? I
have looked around town at the motorcycle shops here but all I've found
are the chromed ones that mount to your handlebars. nabenson
- Now you can't use it while you are riding but, there is a license
plate frame helmet lock by Ztechnic available at A&S Cycles here:
http://ascycles.com/detail.aspx?ID=1622
milhaus
- If you don't like the price, or if you don't like hanging your
clean helmet next to a dirty tire, your basic $6 gun cable lock at Walmart
works great for locking the helmet to the crossbar, luggage rack, etc.
famelec #2007
- I have an industrial-strength cable-type bicycle lock. I bought it
at Home Depot (cheaper) and it's only a couple of feet long. It's a thick
cable coated with clear plastic, I wrap it around my rear rack and feed it
through the helmet and sometimes the jacket. It basically lives on the
back of the bike along with the ubiquitous cargo net. Twempie #1687
- I have one of those handle bar mounted helmet locks mounted on
part of the frame above the rear passenger foot peg. Works great and the
lock is out of the way. motoleo #1934
- WHOA! While I was looking for a picture of the kind of cable and
lock I now use I found this - its is called a
KryptoGrip lock. I am
thinking this will be even better than what I now use. Seems its designed
to lock stuff, adjustable to reach around and through the helmet/jacket
sleeve and compact to maybe fit in my pocket or little trunk area. Might
even investigate mounting it to the back rack. Need to find a local store
that carries it? KryptoGrip
review Not planning to use it to lock the beast just some stuff.
Sounds awe-right! Gangplank
BMW Keys and Locks
General Questions
Has anybody had his or her BMW top case re keyed by the dealer to
match their ignition key?
I called the parts dept at BMW of SLC about having that done for a new
top case and they said it couldnt be done for an F650GS. I find that hard
to believe. Is this correct? The installation manual for the top case
talks about a lock barrel conversion kit for same key locking, but gives
no part #. Am I better off just to go with a locksmith?
- Check below on this page for instructions on re-keying your lock
yourself. Winter #1935
- VERY nice page with pictures:
http://www.pbase.com/rodneff/keying_bmw_locks
- If you want the really dirty way to do this just take ALL of the
tumblers and springs out and reinstall the cylinder. Now the lock can be
opened with a screw driver or paper clip or any BMW key. As long as the
thief watching you use your key believes the box is locked, it is locked.
I had one of the bags on my K75 rigged like this and it was broken open
with a crow bar when he could have opened it with his thumb nail.
Claude #312
Do I have to pay the BMW price for a new key blank?
- BMW gets about $6 for a blank from which you can have a copy of
your (Classic) key made. Then you have to find someone who will cut a
double-sided steel key, pay him and hope he does it right. Or... you can
go to any locksmith or key shop and get an ILCO blank for a Volvo. It has
the numbers X140 and VL8 on it. I had three keys made for under $10. These
blanks do not have the big rubber thing on them. I believe you can get
them like that if you want them like that. These keys DO have a big head,
but at least they're flat. When the locksmith cut the first key, it was
difficult to get into the ignition lock and impossible to get into the
seat lock. I took it back to him. He did a bit of grinding and buffing and
it works in all the locks just fine. Then I had him make the other two
copies. Those worked like a charm. The locksmith told me that he had seen
a blank like the BMW blank come in from the nearby Aprilia shop from time
to time. Flash #412.
- My brother had a non-standard key made for his car and it trashed
his ignition lock. Ditto my daughter. echo
- Dunno about the car lock problems, but I used a Volvo key blank to
good advantage on my Classic. No problems, and I cut the head on one down
so I could get to the seat lock without removing the hard luggage. Harl
#380
Alternative source of BMW Keys?
- Action Safe got back to me...The cheap blanks they carry are made by Ilco. It is key blank number BMW3 or x144. "There are other manufacturers but Ilco is probably the biggest." charleshmosesii
- For the CLASSIC, in addition to the Ilco X140 and VL8 key presently mentioned in the FAQ, a Curtis VL10 key can be cut to fit. Flash 412 (CO)
What about Replacements Locks?
- If you have a real locksmith nearby, one who does European cars
and locks, they may have suitable key blanks. It's a ZADI lock, pretty
common in Europe, less common in the US. If they don't know the ZADI name
or have an index for ZADI blanks, they're not really full service
locksmiths. Todd #389
- You CAN order a new lock to your key code. It will come with a key. (It will probably take a while to get.) Flash 412 (CO)
- When my lock was busted 2 months ago, the chap at Chicago BMW said BMW was terrible at doing this right the first time around. In fact he said they rarely ever get it right. Replacing the lockset is the only sure solution, and it isn't much more money. Total time inc. shipping from order to install was 4 weeks. Tempo #1908
Key not turning in the Ignition?
- You think someone shoved something in there and broke it off?
Where were you parked? Soyanarchisto #1944
- A few weeks ago I over graphited my ignition lock and was unable
to turn the key in it. Since I don't own a compressor I ran to the store
and bought a can of dust-off and blew the excess graphite out. Big 'ol
black cloud of graphite came out. After that the key worked fine.
patobravo #1754
- One day I found my forks wouldn't lock. I looked and it was
because one of the two screws mentioned in the faq was missing and the
other was loose. (See the Ignition
Switch FAQ) patobravo #1754
Removing the GS/Dakar ignition lock?
- Remove the bars and upper fork clamp / triple tree. You will need to disconnect the lower part of the lock using the two screws.
- Mount the upper fork clamp in a vice. You should see two "non removable" screws securing the ignition lock to the upper clamp.
- Using a drill and a 5mm drill bit, drill at least 6mm into the center of the non-removable screws.
- Now using a 8mm drill bit, drill at least 5mm into the center of the non-removable screws.
- Finally, you may need to use a little force to break the lock out of the upper fork clamp.
Re-keying a BMW luggage
| Removing a Type 1 Lock |
|---|
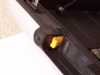 This is the type 1 lock in a pannier. You will find these locks in the BMW
panniers and BMW top box.
This is the type 1 lock in a pannier. You will find these locks in the BMW
panniers and BMW top box.
|
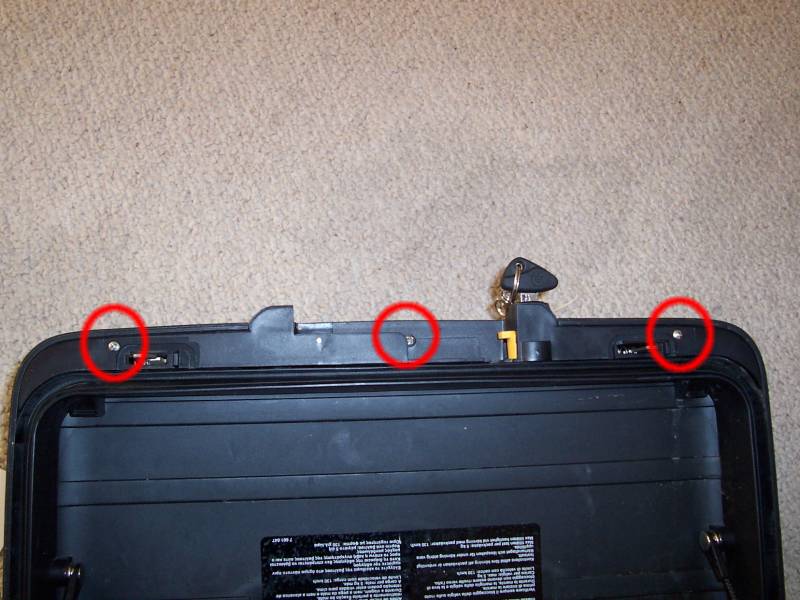
 Start by unscrewing the pannier as shown in the red circles in the image.
Once you have removed all three screws, simply pull out the "locking"
component of the pannier. Insert the key into the lock.
Start by unscrewing the pannier as shown in the red circles in the image.
Once you have removed all three screws, simply pull out the "locking"
component of the pannier. Insert the key into the lock.
|
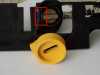 Remove the plastic latch part of the lock. You can see the small metallic
wafer. Using a small screwdriver, push this wafer in, and simply push the
lock out.
Remove the plastic latch part of the lock. You can see the small metallic
wafer. Using a small screwdriver, push this wafer in, and simply push the
lock out.
|
| Removing a Type 2 Lock |
|---|
 Using a small hammer and punch or small screwdriver, drive out the
small pin holding the black plastic catch to the lock. Before progressing
to the next step, Insert the key into the lock.
Using a small hammer and punch or small screwdriver, drive out the
small pin holding the black plastic catch to the lock. Before progressing
to the next step, Insert the key into the lock.
|
 Using a small screwdriver or something similar, push back the small
metallic wafer - this is what prevents the lock from coming out. With the
wafer out of the way, simply push the lock out!
Using a small screwdriver or something similar, push back the small
metallic wafer - this is what prevents the lock from coming out. With the
wafer out of the way, simply push the lock out!
|
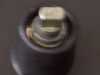
| Removing the Topcase lock |
|---|
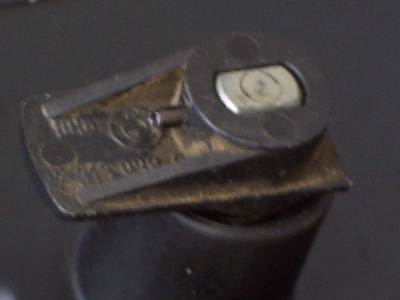
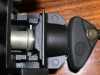 The key is in the lock position in this view and the cylinder is on the
left. On the top of the cylinder, there is a spring-loaded tumbler, or
'keeper' that prevents the cylinder from being removed. If you could
remove the cylinder with the key in the lock position, it would be easy.
But you can't. The key must be in the unlock position. Fauster
#1833
The key is in the lock position in this view and the cylinder is on the
left. On the top of the cylinder, there is a spring-loaded tumbler, or
'keeper' that prevents the cylinder from being removed. If you could
remove the cylinder with the key in the lock position, it would be easy.
But you can't. The key must be in the unlock position. Fauster
#1833
|
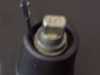
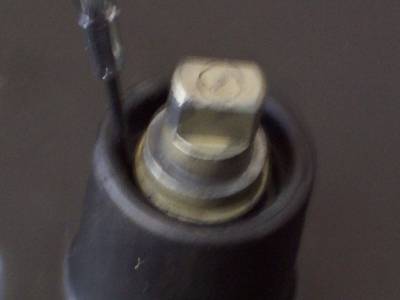
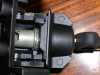 Guess where the keeper went.... facing down, or away from your view.
However, there is a slot on the cylinder that shows the back of the
keeper. You need to find a way to depress the keeper from the other side
so that it sticks out of the slot as shown. I used a dental pick and it
worked like a charm. What I did was depress the keeper while the key was
in the lock position and then slowly turned the key while keeping the
dental pick on the keeper. After a few tries, I was able to depress the
keeper while the key was in the unlock position and the lock cylinder slid
out without significant effort. Fauster #1833
Guess where the keeper went.... facing down, or away from your view.
However, there is a slot on the cylinder that shows the back of the
keeper. You need to find a way to depress the keeper from the other side
so that it sticks out of the slot as shown. I used a dental pick and it
worked like a charm. What I did was depress the keeper while the key was
in the lock position and then slowly turned the key while keeping the
dental pick on the keeper. After a few tries, I was able to depress the
keeper while the key was in the unlock position and the lock cylinder slid
out without significant effort. Fauster #1833
|
| Rekeying the locks |
|---|
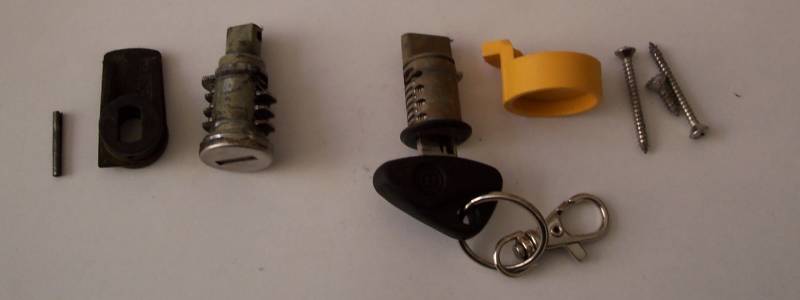
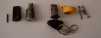 On the left is the type 2 lock, and on the right the type 1 lock. The type
2 lock has a smaller "nib" with a hole in it to insert the pin to hold the
plastic latch on.
On the left is the type 2 lock, and on the right the type 1 lock. The type
2 lock has a smaller "nib" with a hole in it to insert the pin to hold the
plastic latch on.
|
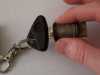 When removing the key from the lock, place your fingers over the wafers as
shown. Gently remove the key. If you do not do this, wafers and
really tiny springs will shoot all over the place.
When removing the key from the lock, place your fingers over the wafers as
shown. Gently remove the key. If you do not do this, wafers and
really tiny springs will shoot all over the place.
|
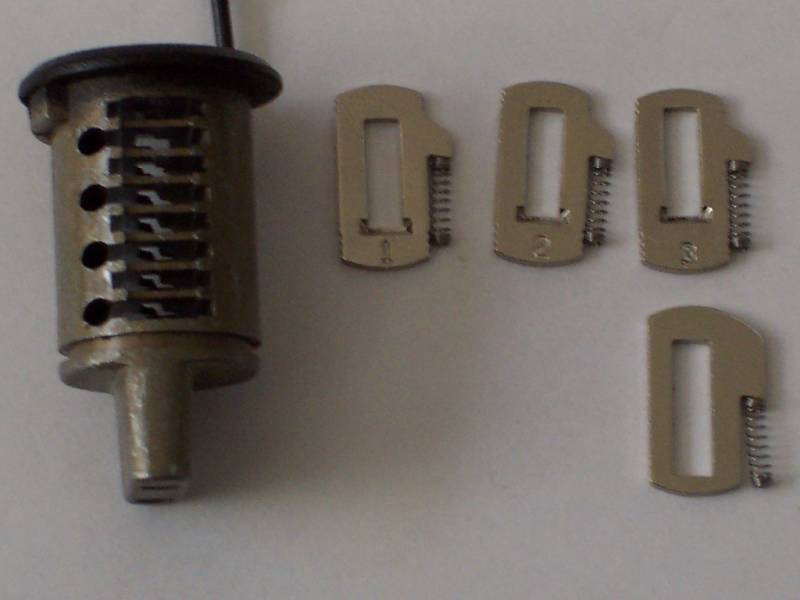
 This is an empty lock and all the wafers. There are three kinds of wafers,
and one final "catch" wafer. What you need to do is move the wafers around
until your key works effectively. You can see the small springs - a spring
needs to be inserted into the little holes before sliding in a wafer.
Finally, insert the "catch" wafer into the final slot.
This is an empty lock and all the wafers. There are three kinds of wafers,
and one final "catch" wafer. What you need to do is move the wafers around
until your key works effectively. You can see the small springs - a spring
needs to be inserted into the little holes before sliding in a wafer.
Finally, insert the "catch" wafer into the final slot.
|
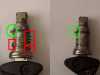 Here are two locks. On the left is a lock with a key that does not fit,
and on the right is a lock correct for the key. In the red squares are the
wafers that are incorrect, and in the gree circle you can see the "catch"
wafer. This always sticks out.
Here are two locks. On the left is a lock with a key that does not fit,
and on the right is a lock correct for the key. In the red squares are the
wafers that are incorrect, and in the gree circle you can see the "catch"
wafer. This always sticks out.
|
| Additional Notes |
|---|
- Take your time - once you have done one lock it is quite easy.
- Even if you do not have enough of the correct wafers, 4 or more of
the correct wafers should be enough - and still makes picking the lock
tricky.
- Leave the key in the lock where possible. This keeps the wafers
from springing out. Trust me - looking for five small springs on your
carpet is really hard.
- You may need to push the "catch" wafer in when sliding the lock
back into position. Again, put the key in the lock to make it easier.
- Once the lock is back in position, check it rotates correctly
before putting everything back together.
|
Don't forget to tell your insurance people if you are
using a different lock or more locking devices.
You never know, they might just ask for less $$$!

 Instructions and general setup: This alarm consists of a main control unit
with two wiring harnesses (main and accessory)... ... and the FM handset.
Instructions and general setup: This alarm consists of a main control unit
with two wiring harnesses (main and accessory)... ... and the FM handset.
 First have a look under the seat and find a place to put the MCM unit.
There is not much room under there, but I found a place that will work in
the left rear fairing. A word of caution: be careful that your placement
of the MCM unit and wires does not cause them to be 'crushed' by the seat
when you get it back on there.
First have a look under the seat and find a place to put the MCM unit.
There is not much room under there, but I found a place that will work in
the left rear fairing. A word of caution: be careful that your placement
of the MCM unit and wires does not cause them to be 'crushed' by the seat
when you get it back on there.
 The wires that you need are in the tail section of the bike. You need to
find the wires for the left and right rear turn signals, the license plate
light, and a ground wire (all conveniently wired into a nice little
connector just waiting to be tapped into).
The wires that you need are in the tail section of the bike. You need to
find the wires for the left and right rear turn signals, the license plate
light, and a ground wire (all conveniently wired into a nice little
connector just waiting to be tapped into).
 These are the wires that you will tap into from the HAR-1. Before you
start, remember to disconnect the negative battery terminal. I chose to
tie into these wires "post-connector" just in case I screwed something up
(in which case I would only have to purchase the tail end wiring harness).
There is not a whole lot of wire to work with, but it is certainly
managable and made easy with the provided t-tap connectors. Each of the
four wires from the MCM unit gets its own t-tap connector. You stick one
wire in the female end of each connector and then clamp it onto the
appropriate wire.
These are the wires that you will tap into from the HAR-1. Before you
start, remember to disconnect the negative battery terminal. I chose to
tie into these wires "post-connector" just in case I screwed something up
(in which case I would only have to purchase the tail end wiring harness).
There is not a whole lot of wire to work with, but it is certainly
managable and made easy with the provided t-tap connectors. Each of the
four wires from the MCM unit gets its own t-tap connector. You stick one
wire in the female end of each connector and then clamp it onto the
appropriate wire.
 After I tapped into the correct wires (see diagram), I bundled them with
electrical tape and tucked them out of the way.
After I tapped into the correct wires (see diagram), I bundled them with
electrical tape and tucked them out of the way.
 Here you can see the general setup, and pretty much the only place on this
bike to stick the MCM unit.
Here you can see the general setup, and pretty much the only place on this
bike to stick the MCM unit.
 It was important for me run the antenna wire where there was little metal
in order to get the best possible signal. Once the seat is on the bike,
you can see where the antenna sticks out from the MCM unit to the back of
the bike. Pretty inconspicuous, and it provides a decent signal.
It was important for me run the antenna wire where there was little metal
in order to get the best possible signal. Once the seat is on the bike,
you can see where the antenna sticks out from the MCM unit to the back of
the bike. Pretty inconspicuous, and it provides a decent signal.
 Once the main unit is installed, you can install the perimeter sensor,
which is only a small plastic-cased device that can be stuck pretty much
anywhere with the double-sided velcro that was provided. Once all of this
is completed, you can connect the positive lead from the MCM unit to the
battery. The alarm with make a couple "chirps" to let you know that the
unit is functioning. Now just connect the negative terminal, and you're
all set to try it out.
Once the main unit is installed, you can install the perimeter sensor,
which is only a small plastic-cased device that can be stuck pretty much
anywhere with the double-sided velcro that was provided. Once all of this
is completed, you can connect the positive lead from the MCM unit to the
battery. The alarm with make a couple "chirps" to let you know that the
unit is functioning. Now just connect the negative terminal, and you're
all set to try it out.


