F650 Workshop - valve clearance
Every 10 000 km the valve clearance should be checked. After the
first 10 or 20kkm however adjustment is hardly necessary. Adjusting
the valve clearance yourself is a more complicated job and you need
to have the right thickness of shims. Checking if everything is
still alright is easy to do. Checking the valve clearance must be
done with a cold engine. Clearance on the intake and outlet side
should be 0.10 to 0.15mm.Tools: feeler gauges 0.10 and 0.15mm, sparkplug spanner,
spanner or drive socket # 10, hexagonal socket 6, large
screwdriver
Extra parts: none
- Remove the grey side panels and fuel tank.
- Blow and brush away particles around the sparkplugs and loosen one plug. The plugs can also be exchanged - when putting back the new plugs first screw them in by hand carefully to 'feel' the thread, then fasten them at 20Nm.
- Remove the valve cover - the hose on top of it can be kept in its place.
- Remove the plastic plug on the right side of the crank case. Because the generator is on this side no oil comes out.
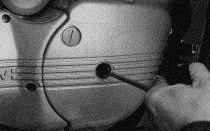
- Turn the crankshaft with a # 6 hexagonal socket (clockwise) until the markings on the camshaft sprockets are in one horizontal line.
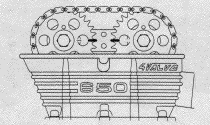
- Measure valve clearings between shim and cam with a feeler gauge. All valves (intake and outlet) should have between 0.10 and 0.15mm clearance. The valve that is on the left rear side can be gauged through a slide in the camshaft bearing block.

- Remember the number that indicates the valve that needs adjustment.
With the valve cover removed pouring in new oil is very easy. Just pour the lubricant alongside the camshaft chain without having to wait for the oil to trickle down.
- Reassemble the engine - mind the rubber gasket fitting properly. All bolts of the cover are tightened at 10Nm. Don't forget to screw in the plastic plug on the generator side.
Eventually take your bike to a garage for adjustment of the valves.