Changing your F650 Chain and Sprockets
compiled & edited by Kristian #562
Please read the Disclaimer before
attempting any work in this FAQ.
Last Updated: 14 June 2007, by Winter #1935
- Introduction
- Changing your Chain and Sprockets
- Misc Questions
- General Questions
- Is this normal to have a new chain and need tightening shortly after install (seems like it would but not sure)?
- After tightening the chain to the appropriate 1.4 to 1.8 in. and retightening the axel nut, the chain tensioning screw and the bracket that holds it on seems lose. Is this play normal?
- Do I have to put the chain back in the same direction as it was?
- My C/S has at least 1/4" play in it. Is that normal? The play is in the transmission. Rotational about the shaft.
- What happens if I put the Front Sprocket on the Wrong Way Around.
- So What else can cause a Chain Breakage/Derailment?
- Is it normal to replace the chain every 12,000 miles?
- Free-play in drive shaft / Drive shaft teeth worn
- Chain "jumping" around while on center stand?
- Nyloc nuts on the rear sprocket?
- Questions on the Internally Toothed Lock-Washer
- The Tab comes pre-folded? How do you install it if it pre-folded?
- Can't I just any washer that will fit and I can bend over? Does it have to have Teeth?
- Can I get them anywhere or only from BMW?
- Any chance you have that part number somewhere?
- Mine arrived with NO Tab. What's with THAT?
- The Chain Roller FAQ
- F650 Classic Rollers
- F650 GS Roller
- F650 Dakar Rollers
- Chain Roller Feedback
For other FAQs related to this topic:
Introduction
Maintaining your final drive (your chain and sprockets) is important
four your safety and a well operating machine. However sooner or later
your final drive will become worn in several ways. The sprockets will wear
which makes it harder for the chain to "grip", and the chain will over
time degrade making it loose. This FAQ tells you how to change your chain
and sprockets. If you are after other chain / sprocket related FAQs, you
should check the General Chain FAQ and
the Sprockets - Other Sizes
FAQ.
| Warning: Make Sure You Get it Right |
|---|
| You do not want your chain or sprockets to come loose while
riding your bike. This could result in all sorts of nastie things
happening such as your rear wheel locking up. This could result in serious
injury to yourself and potentially others. When testing your newly
installed chain and sprockets, wear all the gear - in fact wear all the
gear all the time. And not only could the chain coming loose cause you
serious injury, but could result in damage to the engine. This could
become costly when repairing the bike. |
Changing your Chain and Sprockets
by David #476, Andy #618 & Kristian #562
Additional Pre '97 Comments by Spakur
Tools & Parts Required
- '97 Classics and above, GS/Dakar. 30mm Socket & Wrench
(for stubborn counter-shaft nuts you may need an extra long handled
wrench to remove the nut)
- '96 Classics and older, pair of EXTERNAL Circlip Pliers.
- Torque Wrench. Might need two Ranges, e.g. 8-60 & 40-100, for
different nuts.
- 243 Loctite or Equivalent
- 6 Nyloc Nuts for Rear Sprocket (Only if you also change your
Sprockets.). M8x30 (standard 8mm thread pitch). Available from any Good
Hardware Store.
- '97 Classics and above, GS/Dakar. 1 Lock-Washer ; (The
Nuts & Washer are available from your dealer for approx $3.50 - you
may be able to reuse the old ones if still in good condition. For the
price though, I went with new). See also the
Questions on
the Internally Toothed Lock-Washer.
- '96 Classics and older, a new Circlip, but get the RIGHT
one. Refer Internal/External
Snap Rings FAQ before proceeding!
- '96 Classics and older, a new
O-Ring for Behind the Sprocket. It does not seem to be shown on the
Parts List.
- New Chain - See General Chain
FAQ for Chain Information & Suppliers
- New Sprockets if needed. See the
15Tooth Sprocket FAQ if you want more low rpm/around town
driveability. That FAQ also has some opinions on Larger Sprockets.
- NOTE: If you bought a non-OEM Front Sprocket, it won't have the
Noise-Damping Rubbers Glued on the sides of the Sprocket.
- BMW #10 or High Temp Grease
- Chain Tool to Press Plates or Rivet Links on. If you are just
installing a Master Link you do not need one. See the
General Chain FAQ for a list of Tools.
Time Required
- 2-3 hours for both Chain & Sprockets if it's your first time.
Procedure
While the procedure is outlined below, before you remove the Rear
Wheel, refer the Rear Wheel Removal FAQ
for more detailed information on Rear Wheel Removal.
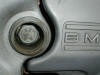
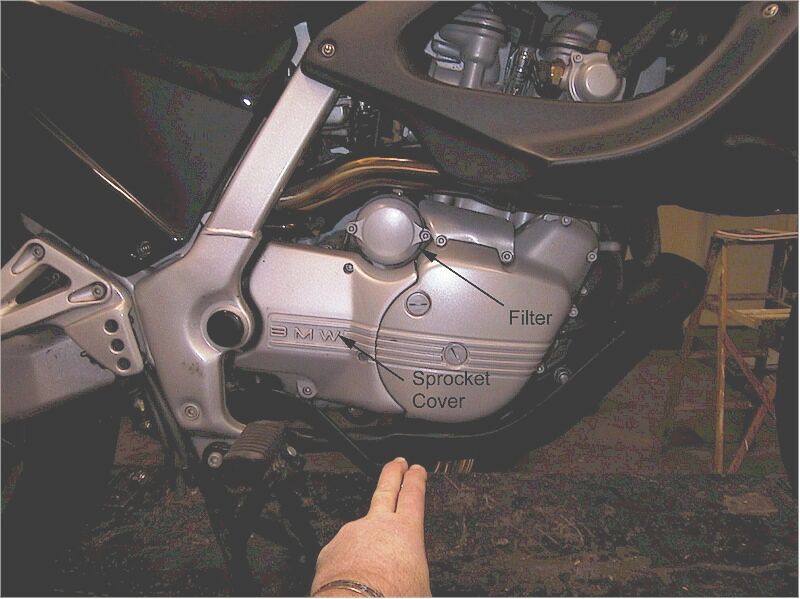
- Place the bike in neutral and put it on the center stand. Take the
counter/shaft sprocket
cover off (The one Stamped "BMW"). There are 3 Allen Bolts.
Set it aside.
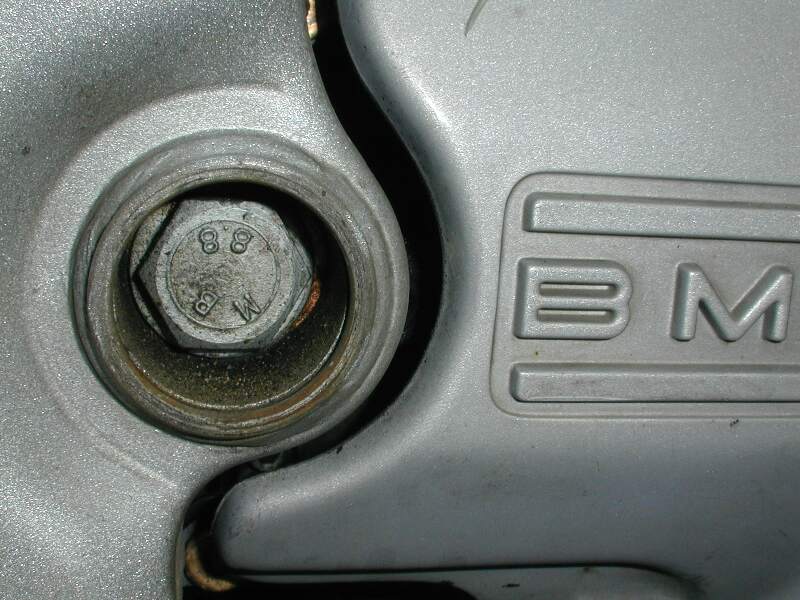
- '97 Classics and above, GS/Dakar. Bend the lock washer down
using a cold chisel or an old screwdriver.
- Remove the
CS Sprocket Nut
using a 30mm socket. This may require a long handled wrench to provide the
necessary leverage for stubborn bolts. The nut unscrews
counter-clockwise.
| Note: Ideas for removing the c/s sprocket |
|---|
The whole c/s Sprocket will try and turn if is not held by
something, so to stop it turning you can either: See the General Chain
FAQ, Removing
the Countershaft Nut for further ideas.
- Put the bike IN 1st GEAR. This will hold it via the Engine
Resistance. This is easiest and should work most of the time.
- Place one foot on the Rear Brake to hold the Rear Wheel in place.
(You can also put it in (1st) gear AND stand on the Rear Brake!)
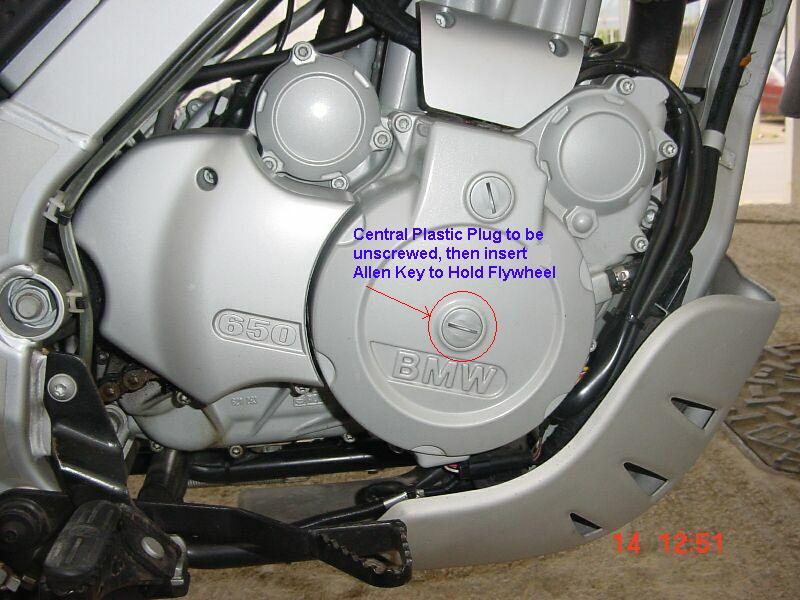
- Follow the Manual and unscrew the
Plastic
Centre Plug in the RHS Engine (Alternator) Housing, insert a
Hex Allen-Key
Socket in there and Hold the Flywheel while you undo the nut.
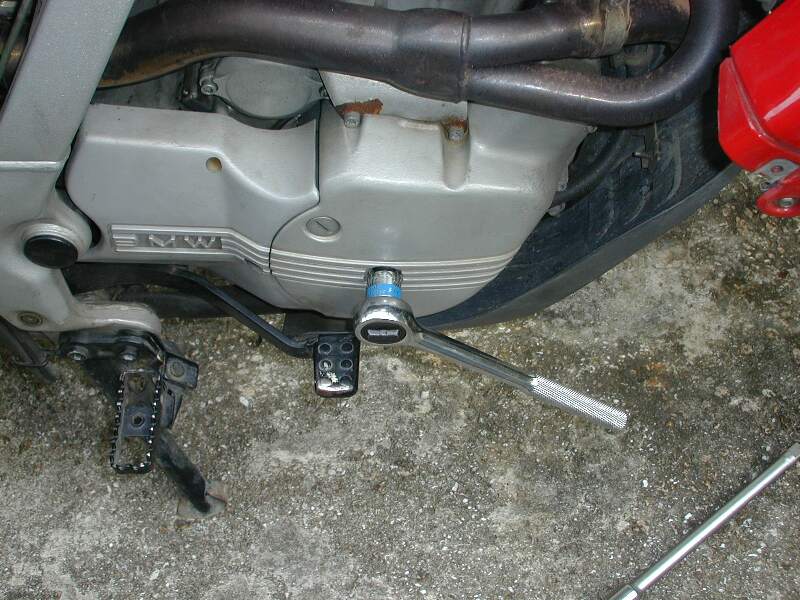
[Addendum from Colorado Bob #1297: The size needed for the Hex Allen-Key
Socket is 6 mm. My Hex Socket's diameter is larger than the alternator
hole, so I used a 7 piece Allen Wrench set that is one piece (the pieces
fold into the handle) into the hole and braced it against the brake pedal
(that's AGAINST, not pushing down on it). The handle pushes against the
brake pedal as you turn the nut loose. It makes the job a piece of cake.
You don't have to contort your body with one foot one the brake, etc. When
you go to tighten the nut, the engine (or the "flywheel" if you
want to get picky) turns, the wrench will also turn until it contacts the
brake pedal from the other direction. The pedal stops the hex wrench and
flywheel from moving while you tighten the nut. No other gyrations
involved. For pictures see the General Chain FAQ,
Removing the
Countershaft Nut]
- You could also use the (TDC) crank-stop bolt if it is in
gear and not muck with the brake at all, if you happen to have a crank
stop bolt handy, but it's a small bolt...
|
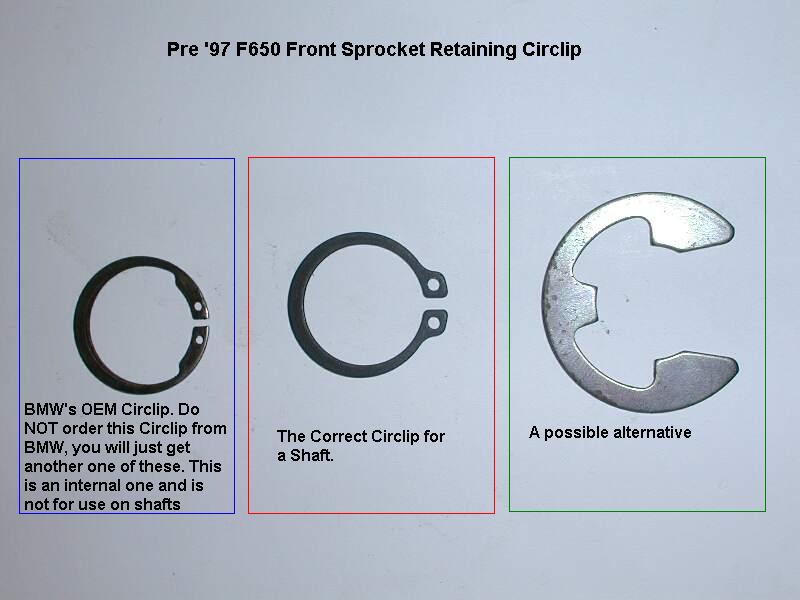
- If you have a Pre '97 Classic, you will have to remove the
Circlip, NOT a
Nut and a Washer. (Note this picture does NOT show the OEM Circlip. The
OEM Circlip SHOULD BE the Middle of
these three. Please
read the Internal/External Snap
Rings FAQ before proceeding. (That's a 15T NON-OEM Sprocket by the
way)
- Loosen the rear axle bolt and screw the
chain adjusters
on the left and right side of the swingarm towards the front of the bike
an equal number of turns. This will slacken the chain. After moving the
wheel as far forward as possible I still could not get the chain over the
C/S sprocket. I had to remove the chain from the rear sprocket to gain the
slack I needed. This is easy to do.
- Lift the chain off the front sprocket and remove the sprocket. I
did not need a gear puller (good thing too, I don't have one). The
Sprocket Specialists one I bought has three threaded holes in it which
would be useful for removal if ever required.
- If your sprocket is secured by a circlip (1995-1996):
Examine the O-ring behind the sprocket; if it's not PERFECT,
replace it. You can get one at a BMW dealer for $1.50 or any hardware
store for .39c. Now clean the area around the seal and the splines of the
shaft. An old toothbrush or a detail brush and WD-40 work well for this.
If your sprocket is secured by a nut (1997 and onwards), you will not
have an O-Ring.
| O-Ring Notes |
|---|
While reviewing the Aprilia Pegaso online parts, Flash found a
warning that solved the mystery of the O-ring behind the countershaft
sprocket (see this
image). Theories include:
- The O-ring was to help stop the wobble a bit when a Circlip was used and also to possibly help Jam the Circlip against the Sprocket so it didn't rotate.
- In the old setup, the O ring probably provided pressure against the sprocket/circlip to prevent it from wobbling. In the new set up, the nut is torqued down and locked in place with a washer. If the O ring were left in there, and it provided some pressure to the sprocket, once the O ring started to degrade (or completely fall apart) the sprocket could start wobbling, perhaps even enough to release enough space that the nut could spin relative to the locking washer.
|
- Wipe all the WD-40 off and apply a liberal amount of BMW #10
grease to the shaft and inside splines of the new sprocket.
- '96 Classics and above, GS/Dakar:
- Put
the new C/S sprocket on, then the lock washer (either new or old). Note:
When placing the new c/s sprocket on, you should have a 1/16" gap
remaining for the lock-washer.
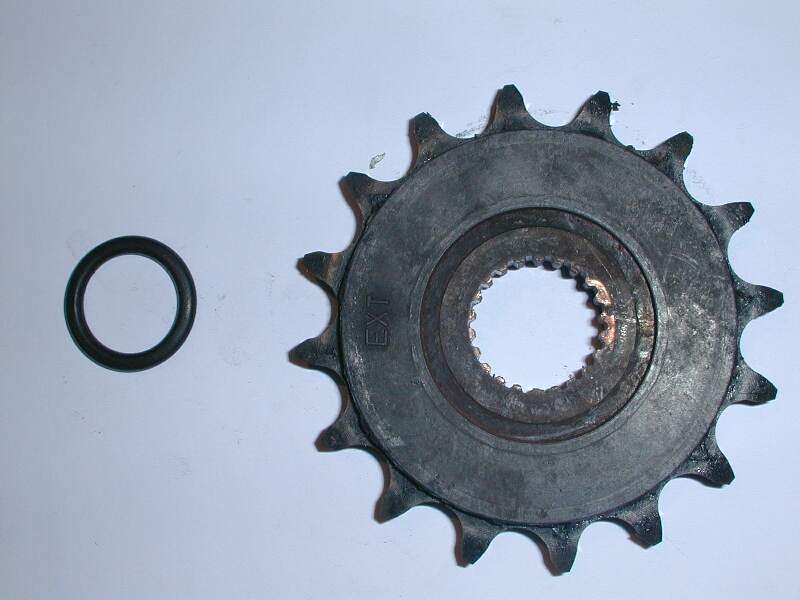
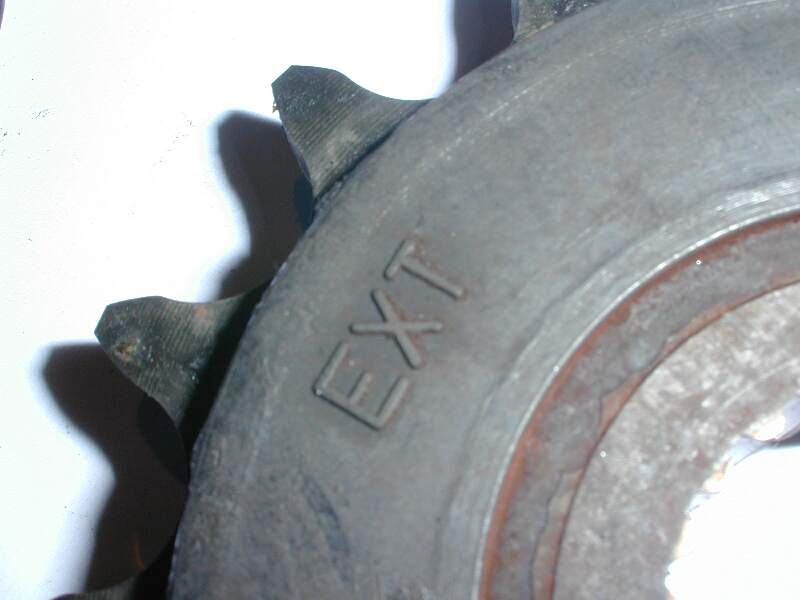
| Note about the Sprocket Direction |
|---|
If you didn't check when you took it off the
face marked
EXT (or the face with slightly
raised Boss
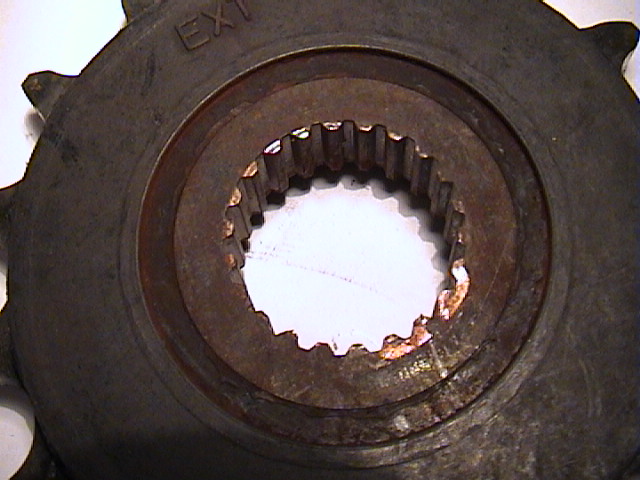
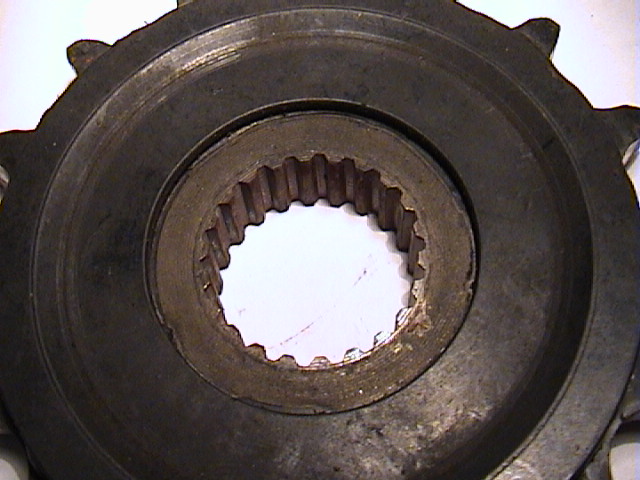
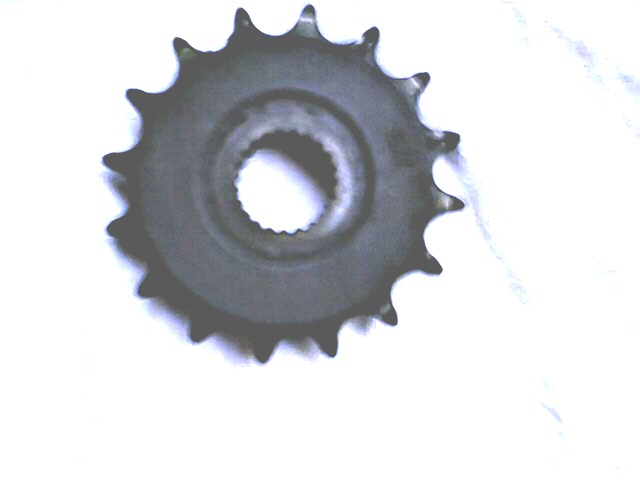
goes outwards). Here is a picture of the
INNER FACE.
Without the rubber Dampeners (only on the OEM 16T Sprocket), the Inner
face is flat and the outer has a small raised Boss/Collar as you can see
in this shot of a
15T
non-OEM. see "What
happens if you put it on the wrong way", below.
(Addendum from Colorado Bob #1297: If you are installing an AFAM brand
sprocket and get confused as to which way the sprocket goes on, the side
with the Part Numbers faces towards you.)
|
- Now take your rag, spray some WD-40 on it and clean the threads of
the C/S sprocket very well. Wipe excess WD-40 from threads thoroughly.
- Now put two or three drops of MEDIUM Loctite (the blue kind in a
red tube. Shake it first) on the C/S threads.
- Put the nut back on (after you have cleaned all the old Loctite
out of the threads with a small screwdriver or a dental pick) Tighten it
as tight can with a ratchet and check to make sure the lock-washer will
line up with one of the flats of the nut when it's torqued.
- Put the old chain back over the sprocket.
- Now applying the brake as you did before, or with the bike in 1st
Gear, Torque the nut to 80 then to 100 Nm's. Don't Bend the Lock Washer
over just YET.
- '96 Classics and Older:
- Replace the O-ring, put the new C/S
sprocket on, then the Circlip. It is recommended you RTV Silicone this
Circlip in place. Make sure the surfaces are clean and free from Oil or
Grease first. Replace the Old Chain over the front Sprocket. See the
IMPORTANT note about the Sprocket Direction above.
- Remove the Rear Mud Scraper & Chain Guard. This can be done
without removing the Chain Guard, but having it off makes it easier to
remove the chain from the old sprocket.
- Lift the chain off the rear sprocket and set it over on the right
side of the swingarm out of the way.
- Remove the rear tire by pulling the long bolt out towards the
left side of the bike. Be careful not to lose the spacer on the left side
of the wheel.
- Change the rear sprocket and use new Nyloc Nuts. Apply a good
amount of #10 to the inner side of the wheel bearings. (Don't forget the
middle one under the sprocket carrier).
- With the wheel off, now would be a good time to inspect the Chain
Rollers for Wear and Clean them. Refer The
Chain Roller FAQ below for details.
- Replace the wheel. This is a bit tricky the first time because
everything wants to keep falling out. What I do is this. Take the axle
bolt and put it through the left side adjuster, put the spacer over the
bolt. Holding the tire with both hands and resting it on my foot, I push
the tire up into place taking care to get the brake disc between the pads.
(or you could remove and replace the pads) Now push the axle the rest of
the way through the right side adjuster and put the washer and nut on it.
Don't tighten it down yet. Now cut the old chain on the bottom side
of the swingarm. (I use a Dremel tool. some grind a rivet head off, others
buy a chain cutter/press, others use a hacksaw) Don't pull the chain out!
Refer the General Chain FAQ (under
Chain Tools) for more information on methods of removing the Old OEM Chain.
- Take out your New Chain, set it on a clean cloth. Take the package
with the master link and clip and grease in it open it up and set all the
pieces on the clean cloth. Hook one of the links of the old chain to one
on the new chain and pull the new chain through and around the front
sprocket and over the rear one. Make sure you leave the gap on the bottom
or the chain will fall out.
- Now. Measure your chain. Ensure your rear axle is still in the
middle of the adjustment range on both sides of the swingarm (Range is
from 1-7). Then pull the chain taut with your hands and align the link to
be cut with the master link. Mark this link with a marker. With the OEM
16T (or 15T) Front and 47T Rear, the Classic F Chain has 110 Links. The
Dakar has 112. Refer the General Chain
FAQ for more information on replacement Chains.
| Warning: Chain positioning and Chain Rollers |
|---|
| IMPORTANT! "When I changed the chain on my '99 F, I
passed the chain *below* the
lower roller. When the
bike was taken for a test ride the body weight of the rider caused the
chain to cut into the roller and shred it. No serious damage because it
was noticed immediately. A new roller fixed things. Clearly an act of
stupidity on my part but another newbie might make the same mistake so I
thought I'd share the experience. I only cut four links off the 120 link
chain and I kept wondering why. Unfortunately, I didn't give it enough
thought." George
|
- Take another break and contemplate how pissed off you will be if
you cut the chain one link too short and render it useless!
- Now go back and look at your mark. When you're certain you've
marked a FULL link and not a half, and there is plenty of slack to get the
proper adjustment, cut the excess off.
- Now with the Master Link in hand, Grease two of the O or X-rings
(BOTH SIDES) and put them on the link (in the proper orientation according
to the picture), Lightly grease the Pins and put it the Link on the
chain. Grease two more O or X-rings (BOTH SIDES) and put them over the
exposed pins followed by the loose side plate. At this point it will look
like the clip will never go on. Have faith. Flash to the rescue. Take one
of the side plates off either your old chain or the discarded bit and put
it next to the master link, over the NEW Side Plate. See
Fitting a Chain for more detail on this
procedure.
- With a pair of channel locks (This is a brand name of pliers with
jaws which expand so that no matter what size you are squeezing the jaws
remain parallel. Important for the two jobs you will use them for) squeeze
the side plates over the pins. Once the plate has JUST cleared the recess
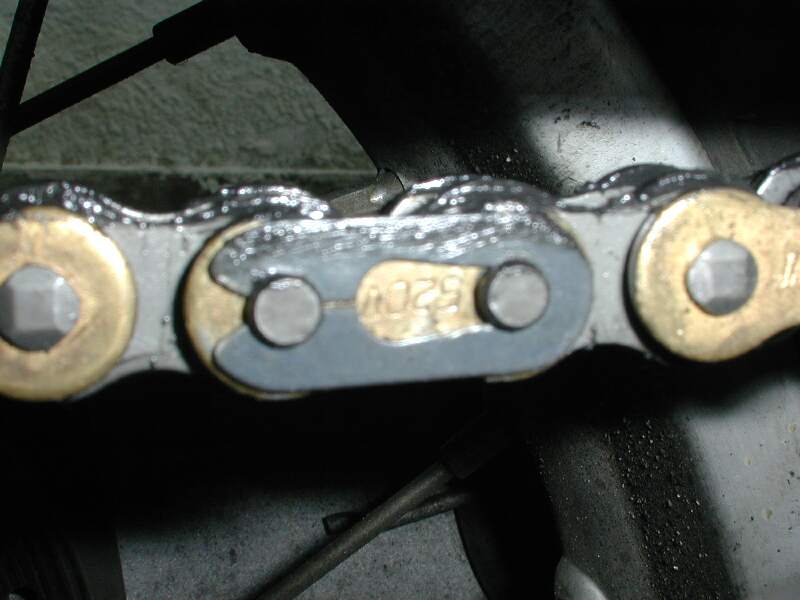
in the pins you're ready to put the clip on. WITH the master link on the
bottom of the swingarm, the open bit of the clip should go towards the
front of the bike. IMPORTANT: Check the picture on the chain
package, The closed end goes in the direction of chain travel.
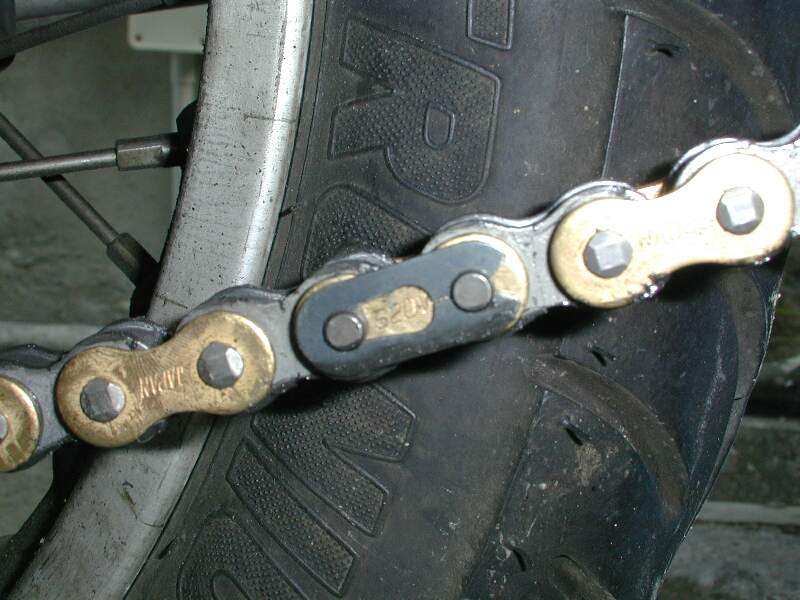
Slide the clip on from the side and make sure it is all the way
on and in the recesses of BOTH pins. Here's the
Link on the UPPER
Leg of the Chain. Here it is on the
LOWER Leg of the
Chain.
- Consider putting either a Tie-Wire or some
RTV Silicone over the
Master-Clip, for safety as these clips have been known to come
off. You will need to CLEAN the Master-Clip and Side-Plate before
applying the Silicone. NOTE: As it says on the side of the Chain
Packet a Master-Clip is NOT as strong as a Riveted Link. If you
wish you can order a Rivet Type Link which is Hollow and use the DID
or some other tool to rivet the ends for an endless chain. The Rivet
Links are not the default, so order them specifically if you want them.
btw RTV stands for Room Temperature Vulcanizing. That means that the
silicone compound cures at room temperature.
- Deep Breath, you're almost there. Take the channel locks and open
them all the way, grip one side of the Counter Shaft nut and the other
side of the lock washer and squeeze the washer up against one of the
flats.
- Place a mark, using a permanent marker or other method, across
the c/s nut & head of spline. Periodically pull your cover off and
check to ensure the marks are still aligned to determine if you're c/s nut
is working itself loose.
- Adjust the chain per the picture on the swingarm, or owner's
manual. Do it slowly, 1/4 turn of each side at a time so they stay even.
For Details of Chain Adjustment see the
Rear Wheel
Removal FAQ.
- With the chain adjusted properly, tighten down the rear axle bolt
to the proper torque (100Nm). Don't forget to Nip the Adjustor Bolts
Tight too.
- Reinstall the rear mud scraper & chain guard.
- Now for the very most important part: Recheck EVERYTHING. Counter
Shaft sprocket O-ring in place (on 1996 and earlier models),
lock tab bent over nut, Torqued to 100Nm.
Chain master link on properly and clip in proper direction. Rear sprocket
torqued (Nylocs are 25Nm if I recall correctly, check this) Rear Wheel
greased, adjusted and tightened properly, brakes not binding. Counter
Shaft cover back in place. OK.
- Go for a ride slowly at first and stop and check everything
especially the master link. And congratulate yourself on a job well done.
The money you saved will pay for all the tools you had to buy to do the
job and the next time you'll already have them and it will take about 1/4
the time it took today. Lube the Chain when warm.
More Photos:
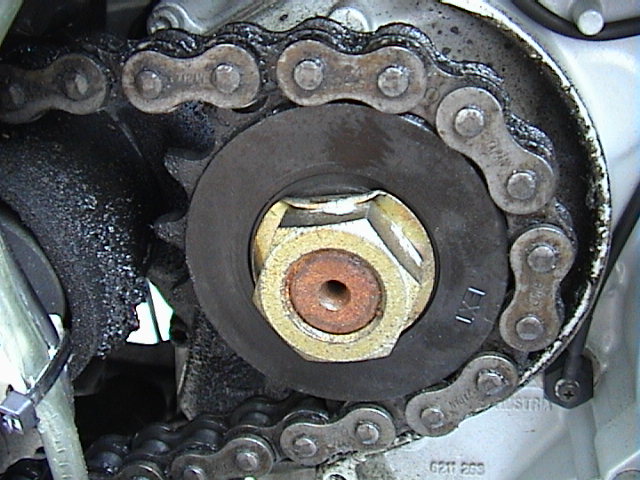
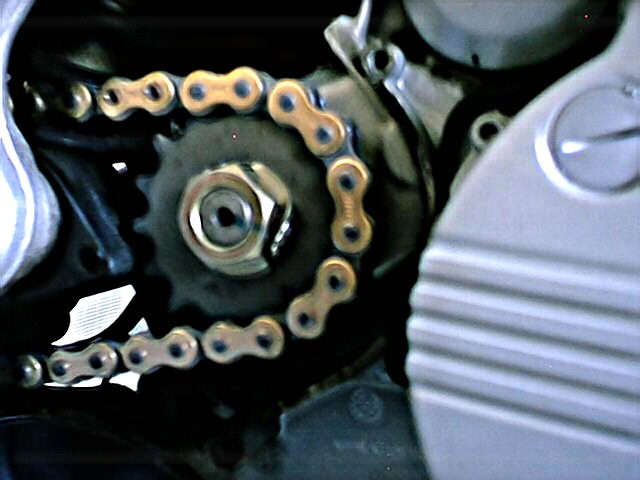
Figure 01
- New Front Sprocket & Chain - Note Rivet Link at 11 O'clock - See
also CS Sprocket Nut
Figure 02
- The Old Sprocket about to come off
Figure
03 - Old Front Sprocket & O-Ring Behind Sprocket (note: O-Ring
is only used on 1996 and older models using the Circlip rather than the
Nut to secure the countershaft sprocket)
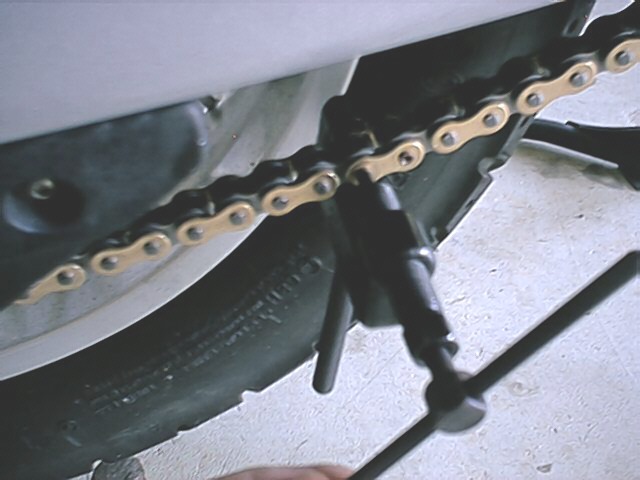
Figure 04 - Motion
Pro Chain Riveter at work. Normally requires two hands, unless you are
taking a photo!
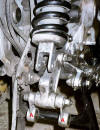
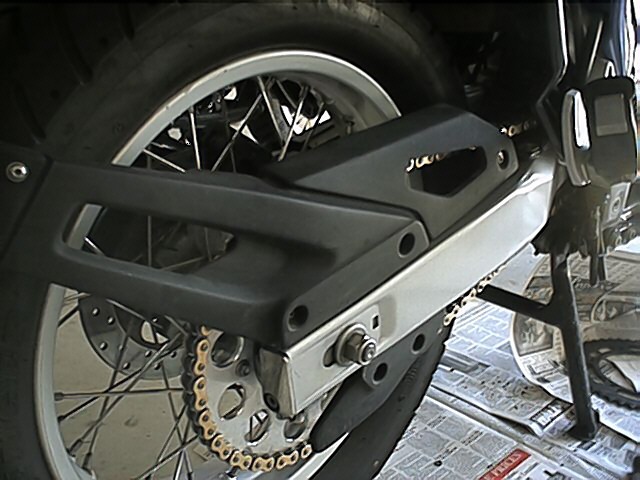
Figure 05 - Rear
Half-Axle & Alignment Gauge. New Chain & Sprocket installed.
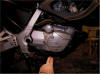
Figure 06 - Job
Complete, New Chain & Sprockets!
Figure 07 - Pre '97
Snap Ring - Left Supplied by BMW (incorrect), Middle Snap-Ring (correct),
Right (Kristian's E-Clip Solution)
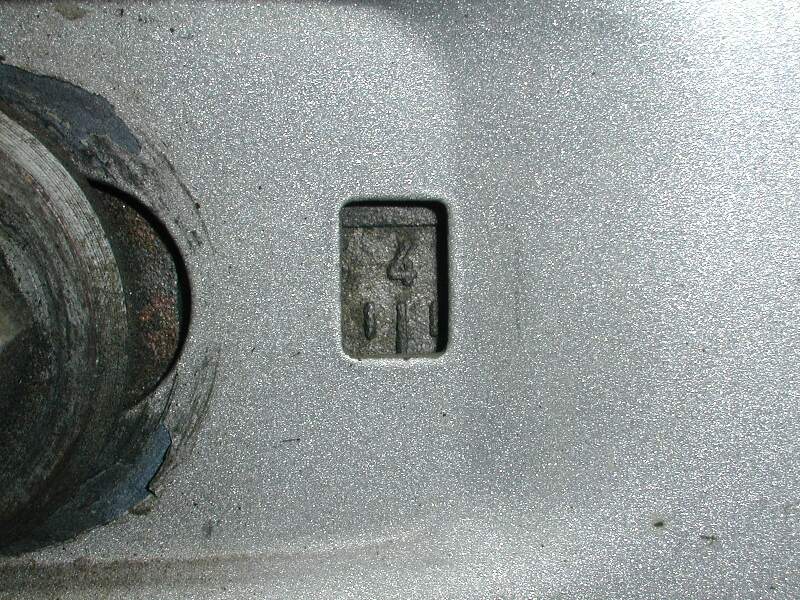
Figure 08 -
EXT means External i.e. Install Sprocket with this face outward.
Figure 09 -
Adjustment Marks
Figure 10 -
Tension Adjustment Bolts
Figure 11 -
RTV Silicone on E-Clip (Pre '97 Bikes ONLY)
Figure 12 - Lower
Roller - Dirty Chain
Figure 13 - Upper
Roller
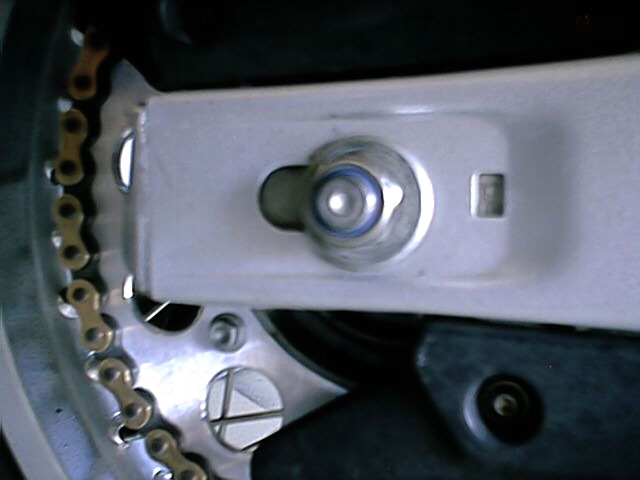
Figure 14 - Rear Axle
Nut
Figure 15
- RTV Silicone on Chain Master-Clip
Refer also to the:
Quick-Fitting a Chain
by Flash #412 # Kristian #562, May '02
This FAQ is for changing CHAINS only, without the Sprockets.
- Refer the General Chain FAQ for
a list of Chain Suppliers. When you buy a Chain, decide if you want a
Rivet Link or a Master Clip. You must order it at that time.
- Only if you are going to install a Rivet Link will you need a
Special Chain Tool. See the General Chain
FAQ for details.
- Assuming you have 16T (OEM) (or 15T Front) and 47T (OEM) Rear, a
110 or 112 Link DID 520VM is readily available, however, so if you are
happy with that, buy it. Note that you CAN get just get the
standard DID 520VM 120 link X-ring chain and cut it, as it doesn't
cost any more for 120 links instead of the required 110 (Classic) or 112
links (GS/Dakar) so IF you changed your sprocket size and are not sure
which Chain length is correct, this is the best way to do it.
Procedure:
- Put the Bike on the Centrestand.
- Loosen the Main Axle Bolt.
- Set the wheel toward the front of the adjustment range (a couple
notches back from full forward) with the
Chain Tension
Adjustment Bolts. i.e. Loosen the bolts and PUSH the wheel forward as
far it will go.
- Cut your old Chain or separate it by removing a link, but do NOT
remove it from the bike yet. Special Chain Tools and a variety of methods
to do this are outlined in the Chain Tools Section of the
General Chain FAQ. I prefer grinding the
head off two pins. Of course if you have a Master Clip already, you can
simply remove that and lever out the Master Link, to separate the
chain.
- To install the new chain, make sure the bike is in Neutral so the
sprockets can freewheel, and using the master Link (with the pins in it),
piece the end of the OLD and NEW chain together, and pull the old chain
out past the rear sprocket until the new chain comes around far enough to
see both ends of the new Chain. Disengage the old chain from the new one.
- (If you bought a 120 link chain, and are going to cut it, MAKE
SURE YOU ARE NOT OFF A HALF LINK before marking to cut it. Don't forget to
leave some slack. Press a pin out and unless you screwed up, it will be
right. Some old dirt biker friends of mine told me ALWAYS fit the chain
to the sprockets ON the bike. NEVER just count links and cut the chain on
a bench. I decided to learn from their hard-earned mistakes)
- Insert master link from Rear WITH the provided X-Rings for that
(far) side, Place the provided X-Rings for the Near Side over
the exposed Pins, Place face plate on front of link, and compress with
Vise Grips. You can also place a # 6 or 8 socket wrench over pin with the
C clamp behind the master link and behind socket wrench. Tighten C clamp
until seated (pins from rear sticking through face plate in front). Make
SURE you grease the X-rings (BOTH sides) and the Pins with the little pack
of white grease provided, BEFORE insertion of the Master Link. Don't get
any dirt impregnated in the Grease.
- TIP: When you go to install a clip-type master link, you
may find it difficult to press the side plate on far enough to mount the
clip with the X-rings in place. There's a trick you can use:
Take an open half link from either your old chain or the end you just cut
off your new one. Place the link on top of the new side plate with
the opening that the pin went through over the pin hole in the side
plate. Use your pliers or Vise grips or C-Clamp to squeeze the pin through
the side plate. You should alternate pins a couple of times, proceeding
slowly.
- In three steps or so, you'll have the pins through the side plate
ready to receive the Master Clip. Do NOT over-tighten the face plate onto
the X-rings, or you will just create a Stiff Link. The master Clip
Should slide into place over the grooves in the pins without there being a
GAP between the Clip and the face plate or without it being difficult to
get the Clip on. The grooves in the pins should just be visible past the
Faceplate.
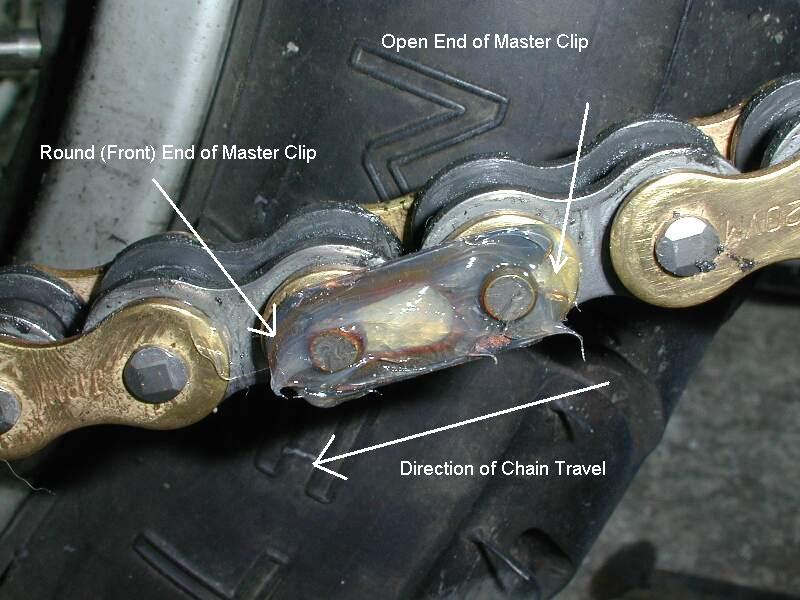
- Install the Master Clip with the ROUND END facing in the direction
of Travel. See Master
Clip in Place. Place the clip over both pins and slide back using a
pair of pliers or a Screwdriver, until it sits firmly in the grooves on
the pins and the open end is CLOSED.
- It is Highly Recommended you RTV Silicone the Master Clip
in Place!
- Refer the Rear Wheel Removal
FAQ for details on realigning the Wheel, setting the Chain Tension and
Tightening the Axle.
Swingarm Removal is Easy
Adrian#668, 24-Sep-01
Introduction
Some people prefer to take off the Rear Wheel and the Swingarm when
they change the Chain. While not at all necessary, it has its advantages.
Refer the Rear Wheel Removal FAQ for
details of Wheel Removal.
The procedure as described in the Shop Manual has ok pictures and
description.
- It allows you to remove the OEM Endless Chain without cutting or
grinding it. It allows you to install a new OEM Endless Chain without a
Master or Rivet Link. Note that the OEM Chain is NOT as strong as e.g. an
Aftermarket DID 520VM, as per the General
Chain FAQ.
- It allows you to press the Master link on a non-OEM Chain in your
bench Vise or C-clamp prior to installation.
- Don't let people talk you out of doing this yourself it really is
not that difficult. Once your bike is lifted and stable the procedure is
simple. Two bolts to remove, the one through the swinging fork is fairly
long (similar to your rear axle) the other that connects the shock to the
Swingarm fork is shorter. The torque values for these two bolts holding
the Swingarm are:
100Nm for the long Swingarm Pivot Bolt (holding the Swingarm to the frame)
at the front. You will need TWO 22mm Sockets. Only Sockets Work!
80Nm for the Bolt through the tension strut to the deflection levers.
- Make sure that the side stand can pivot out of the way to allow
clearance for removing the second bolt. You will also need to unclip the
(plastic clip on the Swingarm) from the brake line hose to allow the fork
to drop out the way. Rear Wheel must also be removed prior to removing
the swinging fork. Refer the Rear Wheel
Removal FAQ for details.
- My first problem was that I have no center stand for my Dakar. A
cinder block and few pieces of wood made a temporary stand. My plan is to
purchase a proper motorcycle lift for future tire/chain maintenance. The
second problem was that I purchased a 110 link continuous chain. The Dakar
is 112 links.
- Removing the swing arm allows you to easily clean areas that where
previously inaccessible & purchasing specialized tools unnecessary.
You do not need to break the stock chain and fitting the master link can
be pressed together in your bench Vise or c-clamp prior to
installation.
- Spakur Notes: "Your dealer could cut the chain and
mount the master link for you (or buy the OEM chain - which is an endless
chain). My dealer did this for no extra cost. This means that you get
higher safety (using master link instead of split link) and you don't
have to buy any special tools. The old chain can then be used as a reserve
chain when touring."
Procedure
OEM CHAIN & SPROCKET CHANGE (CLASSIC F) BY REMOVING THE
SWINGARM, by Pat Duffy # 1210 (AKA TAKING CARE OF YOUR REAR END)
It appears that when most people come round to
changing the chain and sprockets on their F650 they usually go for an
aftermarket chain such as I did. They are probably a stronger chain but the
genuine replacement from BMW is also worthy of consideration. For a start it is
endless (no master clips or rivets) this results in having to remove the
swing-arm to fit it, but since we all should be looking at our swing-arm and
idler arm bearings for wear it is a good opportunity to have a real good look
down there as well. It is also no harm to give the usually inaccessible places a
good clean out, especially since this is the one place that endures the worst
than or highways and byways can throw at it. It is also relatively reasonably
priced.
Parts
This started off as just a simple chain/sprocket replacement so we will
stick to that. The genuine BMW "REPAIRSET CHAINWHEEL" (their term) is part
No. 27 712 345 694. This contains the following:
- 2343192 Locking Ring 1 No. (circlip)
- 2343475 Hexhead Nut 1 No.
- 2345586 Chain 1 No. (endless and coated in a nice layer of chain wax)
- 2343260 O Ring 1 No. (For the gearbox shaft)
- 2343481 Chain Wheel 1 No. (front) (c/s Sprocket)
- 2345664 Pulley 2 No. ( When I saw these I couldn't figure out what
they were for. It then dawned on me that they were replacements for the
two spongy rollers that the chain runs on. (See the
Chain Roller FAQ below). They are made
from a hard plastic so they are probably a lot more durable than the
sponge but when pushing the bike they make a very loud noise as the chain
rubs off the lower one.
- I figure that if since only the bottom one was worn if I swapped
the two existing rollers then it would be a far better alternative, maybe
someone has some comments about this)
- 2343472 Locking plate 1 No.
- 2345334 Chainwheel 1 No. (Back) (Rear Sprocket)
On my particular model (pre '97 Classic) the front chain-wheel is held
on the gearbox shaft using only the
circlip so I had no use
for the Hexnut and
locking plate. I did notice however that when the new one was fitted
it did wave a little as I rotated the shaft. The shaft appeared to be true
so I think that it is due to being held only with the circlip. I see from
the Pegaso repair manual that it's front sprocket is held in the same
manner.
Tools
The bikes tool kit contains all the Allen keys that you need but you
will also require the following:
- 24 mm socket, spanner or an adjustable spanner for loosening the
axle (19mm ring spanner on other end).
- 2 No. 22mm sockets to open the swing arm bolt.
- 10mm, & 13mm spanners for various idler arm nuts etc.
- Circlip pliers.
- Torque wrench.
- I thought beforehand that I would need a puller to remove the
front sprocket but it came off very easily. i.e. NO Puller required.
Method
- Remove the Rear Wheel (see Rear
Wheel Removal FAQ).
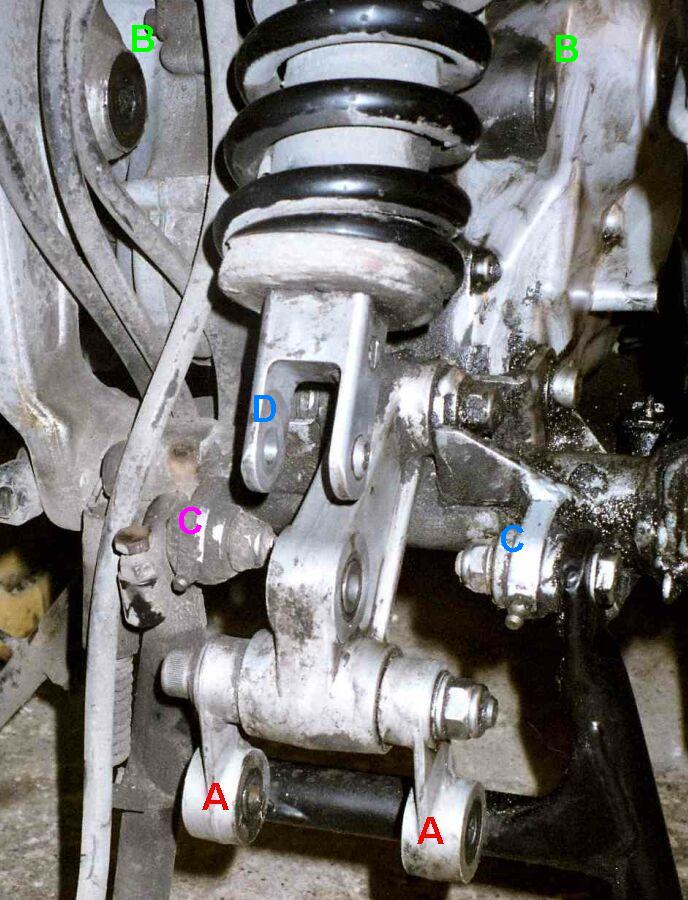
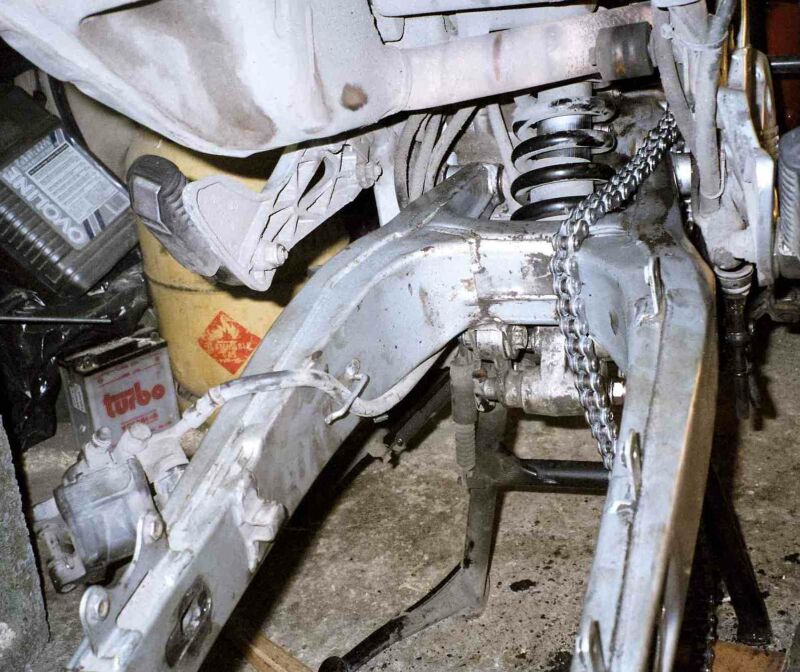
- Open the two bolts connecting the swing arm to the tension strut.
(Marked A in the pic.)The right hand one of these has to be removed first
as it screwed into threaded lug on the swing-arm. The left hand one is a
nyloc nut and bolt.
- Hang the rear caliper out of the way (do not remove or open any
bolts on this) and unhook the brake line from the swing-arm.
- Open the swing-arm pivot bolt and tap it through with a suitable
drift. You can then pull the swing-arm back out the way. Watch out for the
two nylon washers between the swing-arm pivots and the frame. They sit
against the faces Marked "B" in the Photo above.
-
- Remove the three bolts holding the front sprocket cover. Unhook
the old chain from the sprocket. Remove the circlip (or Bolt/Washer if
your bike is '97 or newer) from the shaft and simply pull the sprocket
off. Remove the O ring inside and discard.
- You can now give the area a good cleaning. I sprayed WD40 on the
surfaces (take care with the bearings) to soften the dirt and simply wiped
it clean. The stuff is everywhere keep at it and at least you will have
the satisfaction of a clean rear for a few days. You can take the chain
guide off the swing arm and clean under it.
- When the area is clean gently push the steel bushes from the idler
arm bearings.
- This will expose the needle bearings. They should have loads of
grease around them but put some into the bore and gently rub it all around
taking care not to dislodge the needles each time. You can also do the
swing-arm bearings in the same way. Take care here not to lose the spongy
washers on either side of both pivots. Check for broken needles.
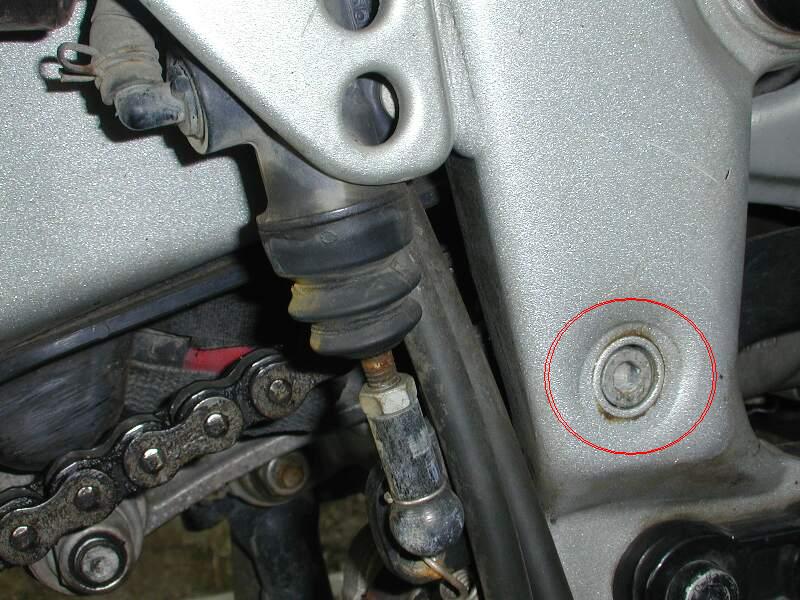
- You might also want to grease the Centrestand nipples as they are
easy to access (marked "C" in the above Photo). No the colours
don't mean a thing)
- Unbolt the brake pedal and chain roller (pulley) at this stage I
swapped it with the top one but if your roller is fine then just clean
both it and the sleeve on which it is mounted. Grease the inside of the
roller and put it back. You should put a dab of grease on the brake
plunger prior to re-assembly. Remember that your caliper is off the disk
so be gentle with the brake.

- Put the new O ring on the gearbox shaft. Oil it a little first and
just push it on. Fit the Sprocket on the shaft. The sprocket has ext
stamped on it to avoid having it mounted the wrong way (external I
presume). Put on the new circlip. See
Internal/External Snap Rings
FAQ before proceeding if your bike is '96 or older.
- Push the new chain through and mount it on the sprocket.
- Reassemble the idler arm and refit the swing-arm taking care to
replace the two nylon washers. I dabbed them with grease and stuck them
onto the swing-arm pivot prior to assembly. Enough grease and they will
still like s**t to a blanket.
- Bolt the tension strut to the swing-arm this time fitting the left
bolt first.
- Remove the old sprocket from the sprocket carrier on the back
wheel (now is a good time to clean the hub and
check the
bearings. Clean all the gunk from the nylon nuts (it is probably a
good idea to replace these nyloc nuts. Refer to the
torque table for all torques.
- Replace the rear wheel and
caliper. Replace the brake line in its restraints. You will notice how
much more forward your back wheel is now and probably realise that
you should have done this a long time ago (or is it just me).
- Replace all the plastic and grin broadly with satisfaction at
another job well done. I should note that I am disappointed at how much
debris had adhered to the swing-arm, idler-arm and the underside of the
bike but I blame it to a certain extent on my gravity chain oiler. It does
drip a little and the oil is flung off the chain when riding.
Misc Questions
General Questions
Is this normal to have a new chain and need tightening shortly after
install (seems like it would but not sure)?
- There is a little take-up slack on a new chain, but not that much.
After that it shouldn't need tightening for a LONG time. When it does it
normally needs it often and is sign it needs replacing.
After tightening the chain to the appropriate 1.4 to 1.8 in. and
retightening the axel nut, the chain tensioning screw and the bracket that
holds it on seems lose. Is this play normal?
- It is normal and It's not really play. You can take out MOST of it
by pushing the wheel forward as FAR as possible on BOTH Sides before
tightening the axle nut, but you'll never get it that tight. So accept
that it's normal and just tighten those screws up (Do Not over torque
them) AFTER you've done up the Axle nut, so they don't either (a) fall out
completely or (b) swing around into the path of the chain.
Do I have to put the chain back in the same direction as it was?
Spakur #1117
- It won't make any difference which way it goes on, as the rollers
roll and so will wear evenly, unless the chain is so badly lubricated that
the rollers have seized. If it's a chain with a split link it's important
that the spring clip is fitted so that it swims with the chain direction
of travel. i.e. closed end in direction of chain travel.
Click below for info ...
Chains don't stretch
http://www.chainoiler.co.uk/tech.php
Regina Chains website
http://www.regina.it/oldregin/products/choose.htm Trevor #999
I installed the AFAM 15 tooth sprocket today. With the bike in first
gear, I manually checked the shaft for movement. It has at least 1/4"
play in it. Is that normal? The play is in the transmission. Rotational
about the shaft. Not in the C/S sprocket; it is definitely tight on the
shaft. Colorado Bob #1297
- Normal on both my bikes, Classic & GS. Kristian#562
- It is normal. It isn't "a quarter inch of play in the
transmission." It is "a few degrees of rotational play at the
countershaft." Play in the transmission in ANY direction other than
rotational is a BAD THING. But some rotational play is normal. Flash
#412
What happens if I put the Front Sprocket on the Wrong Way Around?
"Help! I am probing the Collective Consciousness of the Chain Gang
to see if there has been anyone with the problem I am having. Bronhilda
the '94 F650 has thrown her chain three times. I have visually lined up
the sprockets last time I renewed them and the chain 4000km ago and they
looked OK. The chain tension was at spec or just a little tighter the last
time it happened, breaking the chain. Yes it did throw off the chain (off)
every time. The first time it came off, it was with less free-play than
spec, but the other two times I progressively reduced the slack to about
20mm. It only broke the last time because I was travelling at about
80km/hr when it came off and wrapped around the side on the rear
sprocket. I used the best grade of Regina Gold Link O-ring available. I
had not checked the guides and rollers so I guess that it the first place
to start." ..... and a little later ..... "Found the problem.
Some idiot put the front sprocket on the other way around! The offset was
wrong." Nigel in NZ
- Putting the Sprocket on wrong can cause this, due to the Chain not
lining up properly with the Sprockets, causing premature wear or a
propensity to derail.
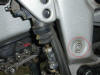
- If you look closely at the c/s Sprocket there is a
raised Boss on
the Outer Face. It Looks Flush in the OEM, because of the Rubber. The
Inner (Steel)
Face is Flush.
- You do NOT want to have a Chain Break/Come off/Jump the Sprockets
at any speed.
- Why? Because it can Jam and lock up your Rear Wheel, which is like
slamming on the brakes at 80 km/hr. Imagine if it is wet. Nigel was
lucky.
So What else can cause a Chain Breakage/Derailment?
- Incorrect Chain Tension - Too tight can cause premature stretching
and possible breakage on full Suspension Travel. Too loose can cause a
derailment.
- Poorly fixed Master Link. Check your Master Clip/Master Link
regularly, even if you did Rivet it. Make sure you put it on properly.
- An object lodging in the Chain and travelling up to the Sprockets
and Jamming. e.g. driving over a piece of wire or metal which gets thrown
onto your Chain.
- Poorly fitted or poorly fitting front Sprockets. If the spline is
worn and you have just a little Circlip (no NUT, like Post '97 bikes) that
little front Sprocket can wear.
- Loose Rear Sprocket retaining nuts. Check them regularly.
- Worn Sprockets.
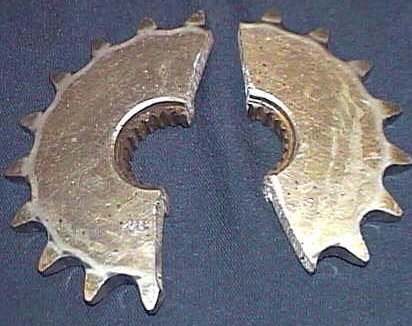
- Part of your own bike coming loose and lodging in the Chain.
See what
happened when Mal #1011's
Chain Slide Rail broke off (on the Track)
on his BB1 (Same Rotax
Engine as BMW F650) and went into his front Sprocket.
Broke it right in
two. So make sure your Slide Rail
screws are fixed properly.
Is it normal to replace the chain every 12,000 miles?
- My dealer told me to expect to replace 'em at around 12,000 miles.
The question is...does it need it? Or do they just want to replace it
because it's time? Careful chain maintainence can prolong the life
expectancy greatly. Logans Ride
- Depends on the environment and lubrication. 12k is fairly normal
for a chain that's lubed manually. Get an automatic chain oiler, it does a
much better job of lubing the chain, 24,000+ miles is easy with one. Mr
Precision
- As mentioned above chains have a varied lifespan ranging from your
12,000 miles to many more. If it's not properly maintained and used in a
nasty environment it could ware out easily in 12,000 miles. Will in
CA
Free-play in drive shaft / Drive shaft teeth worn
The multi-tooth of the drive shaft where the sprocket is mounted has
become a lot of play. The circlip is a week construction and the sprocket
went off on the Karakorum Highway in Pakistan. We could repair the drive
shaft, but the teeth are worn now. How can we rework the drive shaft, how
difficult is it to get the drive shaft out, how can we harden the drive
shaft. What parts should we exchange? bikesonworldtour
- Drop the motor.
- Split the cases.
- Replace the shaft with one from >='97. Get the nut and
lock washer that go with it.
- Reassemble in reverse order.
Depending on how hamfisted you are, you might get away with
replacing ONLY the shaft. If you remove the cylinder as a whole, you won't
need the expensive head gasket. If you leave the piston in the jug by
removing one circlip and pushing the pin out, you won't disturb the rings.
(Replace the any circlips you remove.) If you're careful, you can reuse
all the gaskets. If you don't disturb the oil system, you shouldn't need
to prime it. But it might be a good idea to do anyway. It isn't hard to
do. Flash 412 (CO)
- Is there any form of permanent fix that WONT involve splitting the
cases? gsatlanta
- Just install the new sprocket on the shaft, install the nut
however you best can, and then weld the nut to the end of the
countershaft. [When you come to replace the sprocket] grind the weld down,
replace the sprocket, reinstall the nut and weld it back on again.
Flash 412 (CO)
- When welding, make sure you attach the Earth clamp to the
sprocket. If you attach it to the engine etc, you will toast the
transmission bearings, as the current could cause arcing within the
bearing cages/cones/balls etc. jack #1977
Chain "jumping" around while on center stand?
I recently changed my chain and front sprocket (15t from 16t). I have
the standard rear sprocket which appears to be in good condition with 12k
mls on it. If I put the bike on the centre stand and put it in gear the
chain jumps. It does'nt hop off either sprocket or anything like that but
the uneven running worries me. I am wondering is this normal. The effect
increases in the higher gears. The engine is running very smoothly so I'm
not putting it down to any engine problems. HarryE #1647
- If you're running a seven year old sprocket with 12,000 miles on
it and it is "jumping"... odds are that your sprocket has at least one
tight link and needs replacement. This is especially true somewhere wet
like Ireland. Flash 412 (CO)
- It may "look" to be in good condition, but it has worn over the
last 12k miles along with the old chain. Get a new rear sprocket on quick,
before it trashes your new chain and new front sprocket. I don't think
you'll have much luck mixing new with old sprockets and/or chains.
dmemt #1464
- Did you put the sprockets on the right way? I think that the
front/countersprocket has an offset to it. motoplaner #1671
- Harry - Any chain, even if correctly installed will jump about
while on the centre-stand as there is no resitance to stop it flailing,
especially with a single cylinder engine whose speed of rotation is never
constant. It's always pulsing from the power stroke then slowing till the
next one. Impercetible to the eye, or your rev-counter, but nonetheless it
is, hence the surging of the chain. If you do the same with a litlle
application of the rear brake, you'll find the whole thing will smooth out
as some resistance is applied to the chain. If it still does it with a
fair bit of rear braking then you might consider other things to look at.
Trevor, CG #999
Nyloc nuts on the rear sprocket?
I am just replacing the rear sprocket on my '04 GS. According to the
parts fiches the nuts should be "self locking nuts" and the FAQs / DVD
state the use of Nyloc nuts (I assume self locking nuts is German
translation of nyloc nuts). Strange thing is my GS did not have nyloc nuts
on there. Has anyone else found this? I am guessing I put the nyloc nuts
on rather than the nuts that came on my bike. Winter #1935
- My OEM sprocket nuts were self-locking but not nylock - they were
the slightly crushed nuts, I can't remember the name, but there's a name
for slghtly crushed nuts. Prevailing torque or something like that?
dinskeep
- Same here on my '02 - can't remember the name either. Officially
you're supposed to replace the nuts every time you remove them.
dbtcycle #1620
- FWIW, If you DO use nylocs, make sure you get REAL ny-locs (the
brand not the type) because a lot of HomeDepot/Lowes "ny-locs" are really
plastic-locs, and plastic will melt when heated. And fwiw, re-using
ny-locs, as previously stated, is dubious. Re-using "metal-locking" nuts
is definitely verboten. dlearl #476
- As a "re-user" of self locking nuts, I'd like to take this chance
to debunk the myth. Reusing metal locknuts is permissable if the self
locking mechanism is still functional. How do I know it's functional? If
you can by hand screw this nut down on the bolt past the threads protuding
out the other side, the nut is no longer serviceable. jetdocs550
#1546
- True, but the rest of us don't have the finely calibrated fingers
you have. Don't get me wrong, I've re-used PLENTY of ny-locs and
self-locking nuts. Before I became a Wurth dealer and found out how easy
and cheap it was to simply buy boxes of the right sizes, BUT.......
Self-lockers stay in place because of a certain amount of torque required
to un-do them. Say a NEW nut requires 50 ft/lbs to undo. How much torque
is required the second time, or the third, even though you can't "finger
tight" them past the lock? Do you feel safe with that on your sprocket?
(Hey, I do too. I just like the shiney new ones better!) More importantly,
do you feel safe advocating the same on a public forum where guys and gals
without your experience will, more than likely take your advice? At LEAST
you should add YMMV! dlearl #476
Questions on the Internally Toothed Lock-Washer
by Marty #436
The Tab comes pre-folded? How do you install it if it pre-folded?
- It is not completely bent, just started, a slight bend so it's
easy to get a grip with the Channel Locks (water pump pliers). Those
washers are usually a little thick - hard to bend easy. My first washer
was oversize all around and had one big pre-folded tab. My second was the
same. The two spares I have right now have 2 small pre-folded tabs. All
have the teeth on the ID. I doubt BMW is too extremely picky on those
specs.
Can't I just any washer that will fit and I can bend over? Does
it have to have Teeth?
- The only way to keep it from loosening is that the washer is
secured by the teeth (on the ID) that catch in the splines on the shaft.
Those ID teeth are very important!
Can I get them anywhere or only from BMW?
- There's probably lots of sources for those washers, they're just
generic parts. The dealers probably switch other substitutes to make more
$. BMW Orlando used to send me 1 BMW oil filter and 2 Champions
(Bombardier) when I'd order 3 filters.
Any chance you have that part number somewhere?
- Off the GS Fiche (Classic has
SAME Sprocket/Nut Arrangement) Called a Securing Plate, is in the Gearbox
Section (Where else.. ;-) )
- SECURING PLATE 23 00 2 343 472 Part #24
- HEX NUT 23 00 2 343 475 Part #25 M20X1.5
- SPROCKET 23 00 2 343 481 Part#26 16 Z
Mine arrived with NO Tab. What's with THAT?
- It's not unusual. Got the front sprocket locking washer in a parts
order today. No tab, just like the old one (thin washer with splined
center hole).
The Chain Roller FAQ
by Kristian #562 & Haakon #626. Additional comments by Supertech
& David H Park #711.
Different models have different chain rollers:
Checking The Roller is Part of the 12K service.
F650 Classic Rollers
The Lower Roller gets most of the abuse, the Upper doesn't really get
hammered much unless you are whooping it through the Bumps, your
Suspension is sagging because you have a heavy load on or your Rear Shock
is threatening to fail.
What to Check:
- That they still roll reasonably well. The Rollers are not
on Ball or Needle Bearings, they just roll on a Tube that has bolt
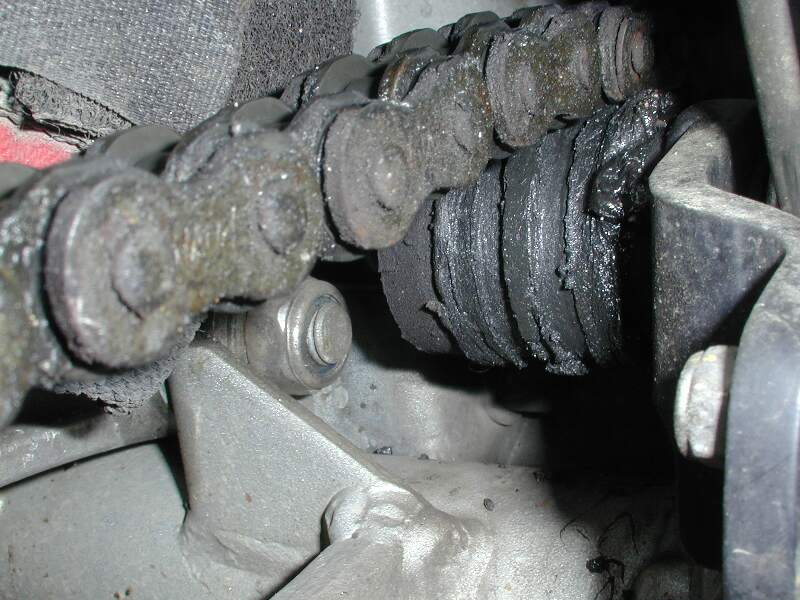
threaded through it. It is recommended you take both rollers off, strip
them down and check them, re-grease the inside of the Steel Tube and
reinstall them.
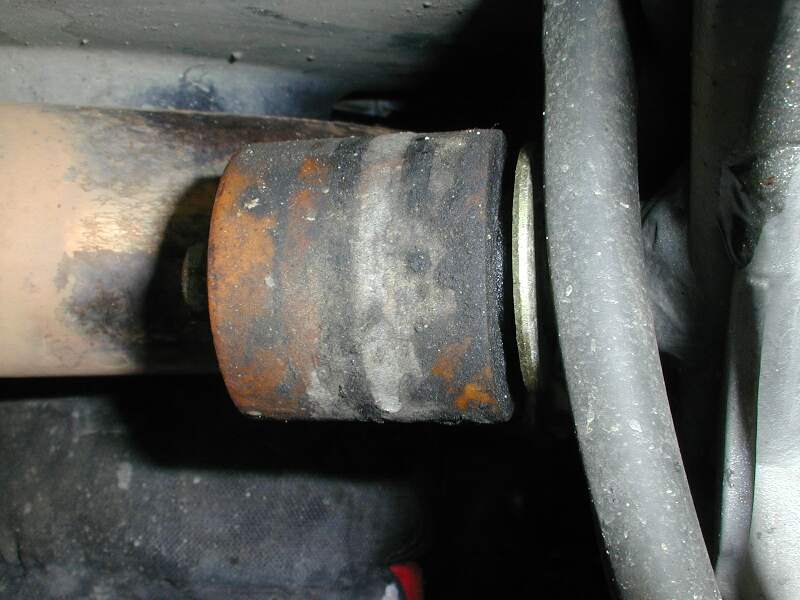
- That the Outer Skin, which is rubber and fits over the Inner Skin,
is not worn. The Lower
Roller in this picture LOOKS worn. But cleaned up, it wasn't, the chain
just deposits a lot of Grease/Wax/Oil build-up, leaving "Grease
Tracks" which make it LOOK worn.
Replacing the Upper Roller:
- This one's easy. It can be done with the Wheel on, but it is
easier to Access with the Wheel off.
- Using an open ended or Ring spanner, Simply undo the M8 bolt, and
remove the roller assembly. You should be able so slide the roller off the
Bolt, the Outer Skin off the Inner Skin and the Inner Skin off the Steel
tube.
- Don't lose the Washer.
- Grease and reinstall. The Bolt Torque is nominally 25Nm, but
"enough" is good enough.
The bit you normally have to replace is the Roll Pin. But as noted
above, the Upper Roller doesn't wear much.
| Classic Upper Roller Assembly Parts |
|---|
| HEX BOLT |
26 11 2 345 365 |
M8X50 |
| FLAT WASHER |
16 11 2 345 084 |
8.5X24X2 |
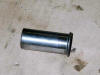
| SPACER SLEEVE |
26 11 2 345 364 |
14.3X19.5X33 |
| ROLL PIN |
27 72 2 345 664 |
|
| SPACER SLEEVE |
27 72 2 345 358 |
8.3X14X34 |
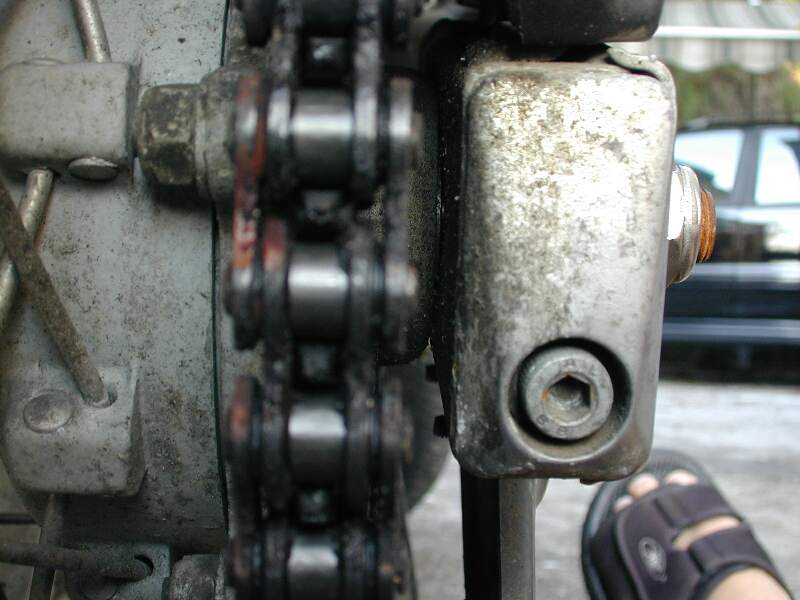
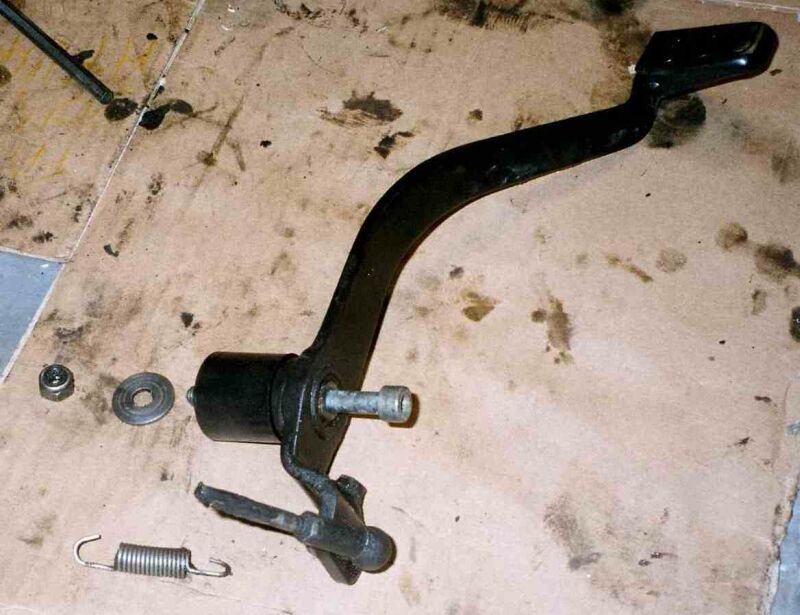
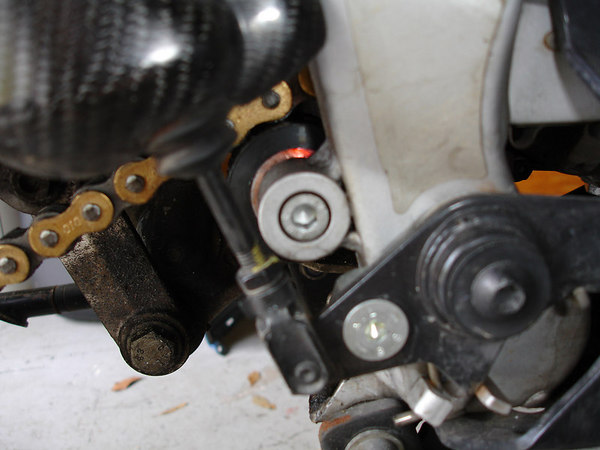
Replacing the Lower Roller:
- This one's more involved, because the
Bolt that holds on
the Roller is also attached to Brake Foot Lever assembly.
- It can be done with the Wheel on, but it is easier to Access with
the Wheel off.
- Using an Allen Key on the Outside and a Spanner on the Nut on the
inside, Undo the M8 bolt, and remove the roller assembly. Allow the foot
brake pedal mechanism to simply drop "a bit". You should be able
so slide the roller off the Bolt, the Outer Skin off the Inner Skin and
the Inner Skin off the Steel tube.
- Don't lose the Washer.
- Check and Clean the Roller and Grease. Grease the Brake Pedal
Mechanism too.!! Reinstall. The Bolt Torque is nominally 25Nm, but
"enough" is good enough.
The bit you normally have to replace is the Roll Pin. NOTE, You can
always swap the (Less worn) upper one down to the lower one to get you
going Temporarily.
| Classic Lower Roller Parts |
|---|
| FLAT WASHER |
16 11 2 345 084 |
8.5X24X2 |
| ROLL PIN |
27 72 2 345 664 |
|
| SCREW FILLISTER HEAD |
07 11 9 901 036 |
M8X80 |
| SPACER SLEEVE |
27 72 2 345 362 |
SW |
| SPACER SLEEVE |
27 72 2 345 363 |
|
| HEX NUT |
36 31 2 345 495 |
M8 |
| O-RING |
27 72 2 345 480 |
13.95X2.62 |
F650 GS Roller
As noted above the GS (and the Dakar) has only ONE Roller, an Upper
one. The GS Roller has a similar (but not exactly the same) assembly to
the Classic.
- The checking and installation procedure for the GS Roller are the
same as for the Classic Upper Roller. The Torque Value is 21Nm.
- The GS Roller uses a M6 X 100mm - Z1 Bolt
| GS & Dakar Upper Roller Parts # |
|---|
| NUT |
51 16 2 328 287 |
Inbusmutter M8 |
| FLAT WASHER |
07 11 9 931 019 |
A8.4 |
| BUSH |
27 72 7 650 285 |
|
| FLAT WASHER |
07 11 9 936 441 |
8.4 |
| SPACER BUSHING |
27 72 2 345 833 |
14x19.5x33 |
| SPACER BUSHING |
27 72 2 345 832 |
8.5x14x34 |
| ROLL PIN |
27 72 2 345 831 |
|
| HEX BOLT WITH WASHER |
07 11 9 900 547 |
M6 x 100 -Z1 |
F650 Dakar Rollers
As noted above the Dakar has TWO Rollers, an Upper one the same as the
GS and a big Lower Roller.
Image 1
Image 2
Image 3.
- The checking and installation procedure for the Upper Roller are
the same as for the Classic Upper Roller. The Torque Value is 21Nm.
- The Dakar Upper Roller uses a M6 X 100mm - Z1 Bolt
- The Dakar Lower Roller uses an M8 X 60mm Bolt.
| Dakar Only Roller Parts |
|---|
| CHAIN TENSIONING PULLEY |
27 72 7 657 449 |
Complete |
| SCREW FILLISTER HEAD |
07 11 9 920 152 |
M8X60 |
The parts numbers for the Upper Roller are as for the GS. It would
appear the Upper Roller, like the Classic, doesn't need replacing very
often.
If you're looking at the Diagram at your Dealers and he looks confused,
On the BMW Parts CD:
- The GS uses part no's (1-17) and 20
- The Dakar fiche shows it uses parts no (1-9) and (18-20) but this
is WRONG. If you look at your Dakar it HAS two rollers. So it should be
Parts 1-20.
- It would appear the BMW Database for the DAKAR is incorrect as it
shows only the Lower Roller on the Fiche.
- We can't put the gif here, as it's copyrighted.
The Expensive Dakar Lower
Roller
The Dakar Lower Roller, unlike the GS one has Bearings. So far it looks
like the Dakar Roller is one complete US$70-$75 Unit. In Norway/Sweden
they are as high as US$105. Astounded.? So was Robin #790, who found
this:
- Well, my $70 (retail, my dealer charged me $54, what a freakin'
bargain) chain roller came in today. On close examination it looks like
... a chain roller. Moose sells these for less than $15. The outside
diameter is 40mm. Caveat: I haven't actually seen the Moose part, so I'm
not 100% sure it's a match. On the other hand, what do we have to lose?
It's $15.
- Update: Doing my 24K service, bit by bit. I ordered the Moose
chain roller to avoid paying BMW their ridiculous prices. The part number
is 23-9975, and the cost is around $12-15. The part is the correct
diameter, but is maybe 1/4 to 3/8 of an inch thinner across the axle than
the BMW part. The Moose roller comes with washers that almost take up the
slack, but not quite. When installed with both washers (one on either side
of the roller), there's still a bit of side-to-side play. I'm going to get
some washers from a hardware store and take up the extra slack. I figure
that for the fifty bucks I saved, I can make an extra trip or two to the
hardware store.
- The Darn thing looks like a Skateboard Wheel. If anyone can find a
Skateboard wheel (Other than off BMW's Skateboard) that fits, please let
us know. The Roller I/D would need to fit an M8 Bolt. Please could someone
measure the Length of the Roller too.
- I can, without a doubt, state that the Dakar has a roller below
the chain. This was the (by now infamous) $70 roller, though it ended up
being $54 from the dealer. To be honest, I haven't looked at the upper
roller since I got the bike, 13 months and 16k miles ago. I really hope
that those of us who own Dakars are the only ones afflicted with this
malady, and the regular GS folks might have a source for a cheaper OEM
roller. Kinda doubt it, though.
- I stopped by my the local skateboard shop and picked up a used
wheel, bored it on the drill press 1" to fit my oem bearing, pressed
in the bearing, sanded off the width to size and....... voila.... one
better-than-new chain roller: cost $00.00 USD; time 20 minutes including
10 min round trip to the shop. These kids go through skate board wheels
like I go through mirror posts so the supply is endless as long as my oem
bearing holds up. This fix is golden. Gravel Adventurer
Chain Roller Feedback
- The lower Chain Roller collects lots of grime which sometimes
looks like if the rollers are worn. Clean the Chain Roller and check. If
the Chain Roller is 1/4 to 1/2 worn down it is probably time to buy a new
one or to change it with the upper Chain Roller, which usually don't wear.
Spakur#1117
- The old roller has a couple of grooves worn into it that
correspond with the side plates of the chain. The grooves are maybe 1/4
inch deep.
- Mine looked like that too, then I discovered the
"grooves" where in fact a 3/16" thick layer of oil/road
grime built up on the roller with the grooves being paths worn thru the
oil by the side plates. cleaned up smooth and fresh lookin'. NormJ #473
- My bottom roller was looking natty as hell until I sprayed some
mineral spirits on it and wiped it up real well ... at 26,587 miles it
looks just fine, no wear NormJ#473
- I'm doing my own chain and sprocket replacement soon. Do I need
the rubber dampers that my dealer is trying to sell me (3 parts X $20 per
part), or is this just a bunch of hooey? As I understand it, the rubber
dampers go between the sprocket and sprocket carrier. Robin #790
- My 97 has 20K miles and the rubber dampers are fine. I took the
wheels off myself (19,200) to have tires mounted. I did clean the dampers
and the spaces where they fit, but there was not much dirt in there.
Unless they change structurally but not visually then I don't see why they
would need to be changed unless they were damaged or broken. When you grab
the rear sprocket and wiggle does it move excessively? Mine moves back and
forth a MM at most and rotates versus the hub maybe half that. Just a bit.
Chris in Santa Cruz, CA #782
- Provided you've never allowed the carrier to waltz on over
towards the swingarm, by e.g. leaving out the spacer, then those wedges
should be O.K. for many 10's of thousands of miles.
- The top and the bottom one are the same (or should be), if you
don't want to buy a new one just exchange them. The top one is rarely
"scratched". I guess they should be changed when they have been
worn down ~50% or so. If you take them off and clean them with some
anti-grease stuff you'll hopefully see that they are the same. When you
take them apart make sure that they can roll, and are not (for some
reason) stuck, since that would speed up the wear rate significantly.
They are not very expensive ~US$6-7 a piece I think. (Spakur #1117)
- Sometimes the roller APPEARS grooved. But that is actually
build-up of Chain Wax (tm) or equiv, and can be carved off. (Flash 412)
- I just cleaned my bottom roller last week. It is hard plastic and
was completely encased in thick, sticky chain lube. It too looked grooved,
but when I scraped all of the gorp off, it became round again and showed
no wear. (Richard #230)
Modified and edited by Kristian #562. Many, Many thanks to Dave
& Andy for taking the time and to Spakur for the Extra Comments on the
Pre '97 F650.
